Jeff Berk
 Subscriber
-
Posts
605 -
Joined
-
Last visited
-
Days Won
1
Content Type
Profiles
Knowledge Base
Zcar Wiki
Forums
Gallery
Events
Downloads
Store
Blogs
Collections
Classifieds
Everything posted by Jeff Berk
-
I'll let you know if it works. I hope you are in no rush.
-
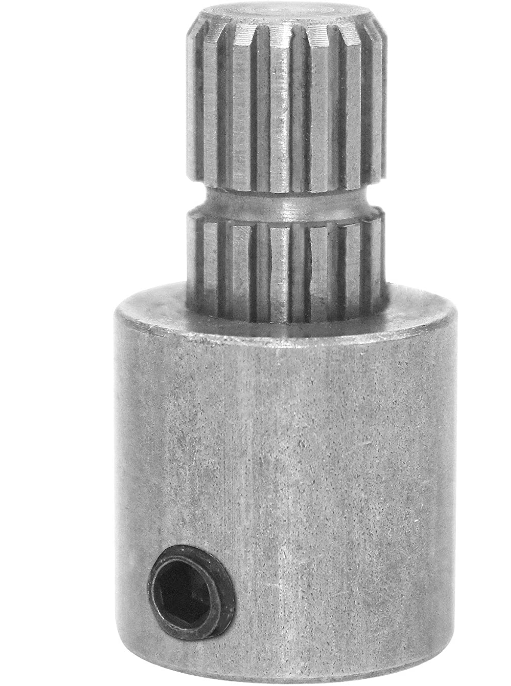
I decided to try and make a pair of them. I just received the mill bits yesterday from China and will try to mill the extensions next week. I figured if I tried to turn down the 11.18mm to 10.7mm, the splines would not be deep enough. CrankExtension.pdf
-
I think what I'll do at this point is try the car out with some recording temperature sensor I have when I next do Autocross. The suggestions I received are a good starting point. I also found this on the internet which might be of some help: https://www.zhome.com/Care/z_cooling.htm I'm tempted to try that oil cooler as I found a used one for $50. I'll have to read up on them more. I only recently learned that my G35 daily driver had one after it started leaking. I also might consider creating a shroud out of fiberglass based on a method posted by several hotrodders but that will have to wait until next winter when my Z hibernates: https://www.motortrend.com/how-to/1006sr-fan-shroud-fabrication
-
Dual electric fans connected to a thermostat, no clutch fan. There is no fan cowling. The fans are attached to an aluminum frame that is mounted to the radiator.
-
Thank you for your help Racer X. The radiator was replaced with an aftermarket aluminum unit in early 2017 just before I purchased the car. I flushed the cooling system last week after noticing the temperature issue appeared to still be with the car. When I refilled the radiator I noted that the coolant in the radiator would begin to circulate after the engine began to get hot. This suggests that the thermostat is opening when the engine heats up. Maybe the car is fine now. I'm thinking I should try an autocross in July and see if I can complete it without having to pull off to the side to cool off so I can limp home.
-
Mine's a '74 260z with a modified 280 engine, round tops, MSD ignition. I did have vapor lock problems early on. A PO had removed the fuel rail and ran the fuel to a low-pressure regulator=> fuel log => separate hoses to the SU round tops. No return flow. I changed that to a simple fuel rail made from an extruded off the shelf part and ran hoses to the two SUs and a regulator. The regulator sent excess fuel to the tank so as to keep a steady flow of fresh (cool) fuel to the SUs. I installed cork gaskets to reduce conductive heat transfer to the rail from its attachment points on the engine. I am assuming that I solved the vapor lock issue now but I'm concerned that my temperature gage is climbing while stopped in traffic.
-
I'm having overheating problems if my car sits in a traffic jamb or between heats when I previously did autocross. I've reestablished a fuel return line to replace the deadhead system installed by a PO and did some other minor changes. I don't want to add hood vents. I hesitant to wrap the header and exhaust due to possible overheating the exhaust and trapping moisture but I found a product by Termo Tec. It wraps loosely around the header so it likely will not trap moisture and heat as much as a tight wrap tape. Does anyone have an opinion on this product? https://www.summitracing.com/parts/the-14004#overview
-

Is it worth considering a used set of Panasport Formula wheels
Jeff Berk replied to Jeff Berk's topic in Wheels & Brakes
What would be a better option for auto-x? I read on https://tireer.com/best-autocross-tires/ that a good tire is the FALKENAZENIS RT660P 195 /60 R14 86H SL BSW -
Is it worth considering a used set of Panasport Formula wheels
Jeff Berk replied to Jeff Berk's topic in Wheels & Brakes
I put the purchase on hold while I follow Jeff G's advise and looked into what tires are available that would work for Autocross. From searching ClassicZcars' postings it found the following: https://www.discounttire.com/buy-tires/falken-azenis-rt615k%2b/p/34264 https://www.discounttire.com/buy-tires/falken-azenis-rt660/p/88519 Racer X identified a Hoosier tire that may work and several other tires showed up on discounttire's web site. I might go ahead with the purchase if I can scrape the $$$ together. Thanks everyone for the help. -
Is it worth considering a used set of Panasport Formula wheels
Jeff Berk replied to Jeff Berk's topic in Wheels & Brakes
If I do go with these wheels, are there grippy tires that will fit these rims suitable for Autocross? Nothing seems to come up on Tirerack in this size other than standard all season tires. Racer X mentioned in a recent thread "Hoosier still makes tires, the Street TD, a DOT legal bias ply with tread that works very well in 225/50-14" but I'm having trouble locating these. Currently the wheels have old 195 70R14 tires. The wheels are 14x6 and about 4" of backspacing. Should I try mounting a wheel on the front and/or rear to check the clearance before I buy to make sure there are no clearance issues? Jeff -
Is it worth considering a used set of Panasport Formula wheels
Jeff Berk replied to Jeff Berk's topic in Wheels & Brakes
The seller agreed to lower his price to $400 for the set of 4 and meet me around 30 miles from my home so I decided to go ahead and purchase them. I figure they will be a good winter project. -
Is it worth considering a used set of Panasport Formula wheels
Jeff Berk replied to Jeff Berk's topic in Wheels & Brakes
It looks like $300 each https://www.sportsandclassics.com/parts/non-british/datsun-non-british/datsun-240z-260z-280z-panasport-z-light-wheels/ It's been listed for 2 months so he might consider offers. -
Hi, I really like the looks of Panasport wheels and I found a set on Craigs list but I'm not sure if its wise to purchase used aluminum wheels. Does anyone have any input? I would need to purchase new tires since my existing wheels are 15 inch. They will also need some cleaning up and new clear coat. https://limaohio.craigslist.org/wto/d/findlay-panasport-formula/7615888664.html Jeff
-
My understanding is the spline part and set-screw tube are welded together. As long as the two parts are precisely aligned, I might be able to turn it down on a lathe from 11.18 mm to 10.7 mm.
-
I need to extend the crank shaft maybe 1/2 inch to keep it from rubbing against the door card covering. I had covered the door in leather and added 1/4-inch or more of foam and quilted the leather. I've found some extensions for Ford, Chevy (picture attached) and a few other cars but I was told by the vendor that it will not fit the Datsun Z. Before I try and machine a couple, does anyone know a source for this item. If not, anyone have a detailed, scale drawing of the shaft I can use as a starting point if I have to create one?
-
FS5W71 TRANSMISSION NUT FOR MAIN SHAFT LEFT-HAND THREAD AVAILABLE!
Jeff Berk replied to zKars's topic in Engine & Drivetrain
I thought it was the right-hand nut that was difficult to find. -
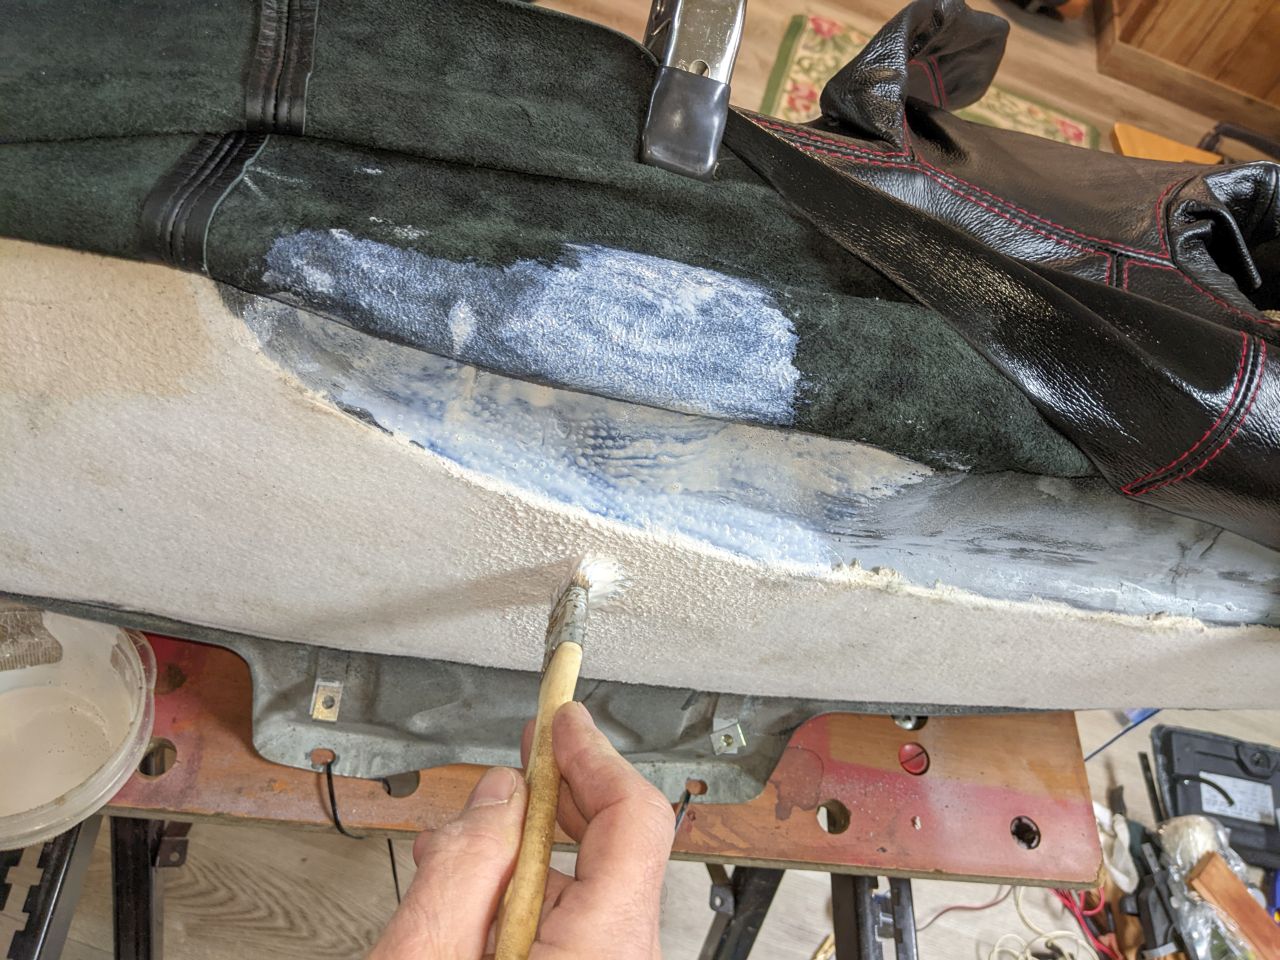
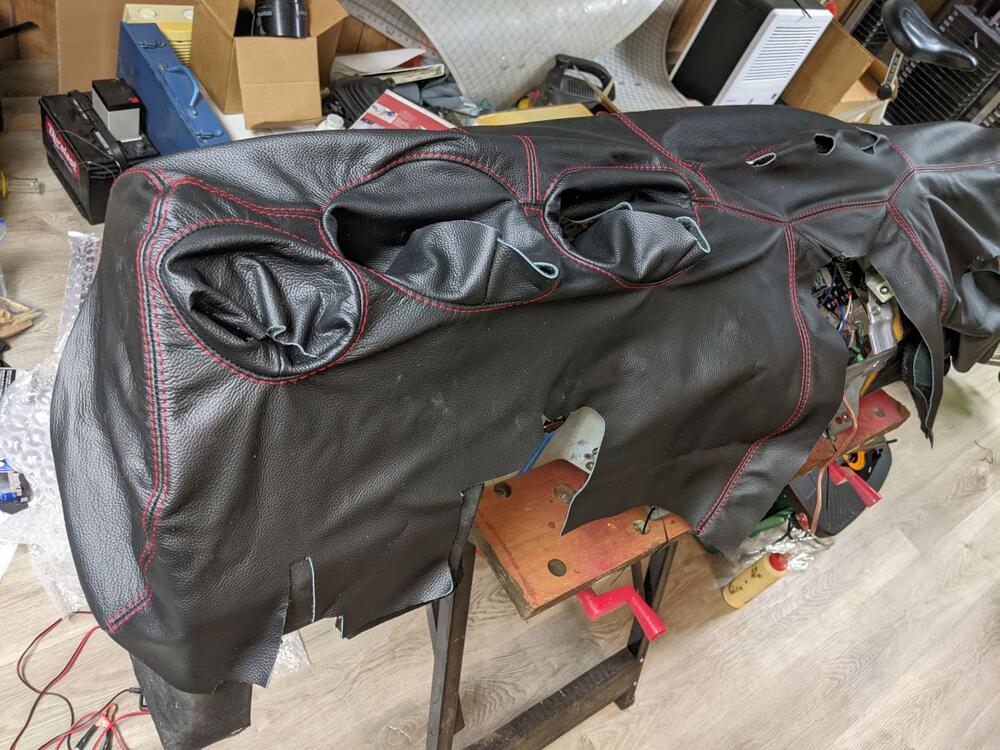
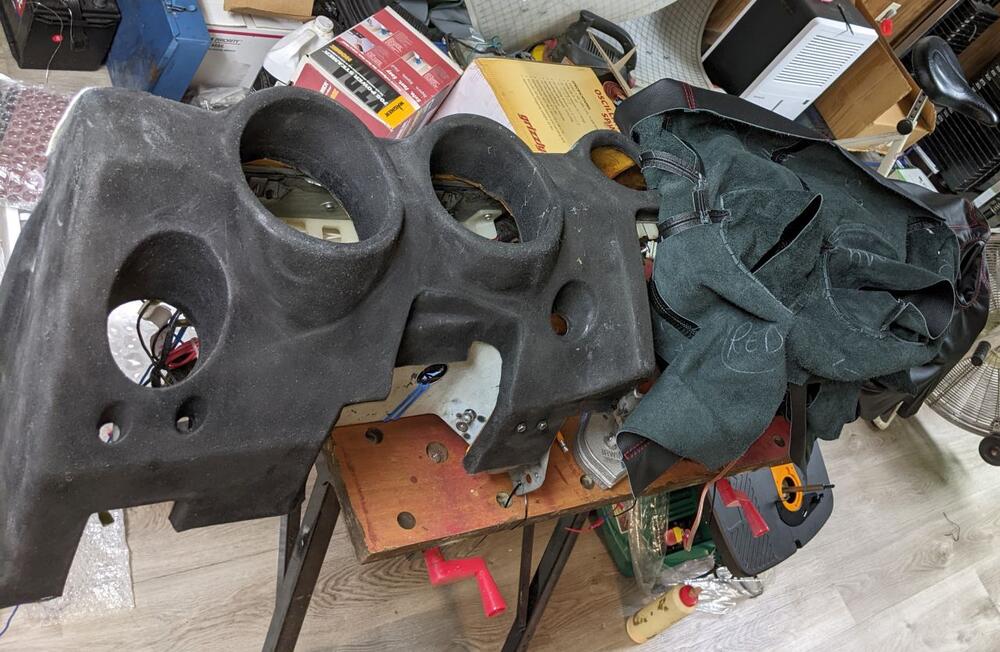
No instructions are provided and the supplier warns you that this is the case. Going with what I saw on line and from documentation of an install of the same supplier on a 240z dash, I started in the middle with the 3 gages and worked outward. That's when I realized the problem with the vent holes. I don't think they are unsurmountable; but, I'm not not very good at sewing leather yet. Its going to be a learning process as is most tasks on my 260z. I just installed my first attempt at a new driver's side lower panel. I need to still flatten out the seams and add the saddle stitching in red. After test driving a few cars that had contrasting stitching, I think it's growing on me.
-
Well this as well as can be expected... https://streamable.com/ts3evp I might be tabling this for a few months while I learn how to do leather work with my dash back in my car.
-
I had the vendor delete the cut out for the cigarette lighter but instead send a little extra leather so I could make a cone after cutting out a hole for it. Now I'm considering deleting the cigarette lighter and possibly the dimmer and trip odometer controls. This is going to be a very frustrating project. I have the leather partially installed now and the holes for the speedometer and tachometer are going to be a problem as will the hole for the driver-side vent. I've tried using water with a little neat's foot oil mixed in for the initial soaking and rubbing alcohol and water for subsequent soakings so the leather will stretch. Then water and a hair dryer to shrink the leather in other areas. The 3M brand Fastbond 30-NF contact cement is fantastic. It is a water based, low odor, water cleanup contact cement with great hold properties. I was able to find a gallon on facebook/marketplace not too far from me at a reasonable price. I had asked the vendor to use black thread on the remake but he did it in red like the first one. I might keep it red as it is not bad looking after all.

-
I returned the old dash cover to them and have been communicating with them off and on for a few weeks. They finally shipped the replacement and it arrived in Chicago yesterday. I hope it will be just a few more days and I'll have it. I'll post some details on the installation as it progresses. There was a 2015 post with details on the installation on a 240z you might want to look at: https://www.classiczcars.com/forums/topic/50755-leather-dash-cover-installation/
-
Have you checked with Datsun Spirit for suggestions? I've never shipped an engine but it seams that you would want the engine supported by the points its supported in the car: engine mounts and transmission bellhousing. Warning: Once again... I don't know what I'm talking about.
-
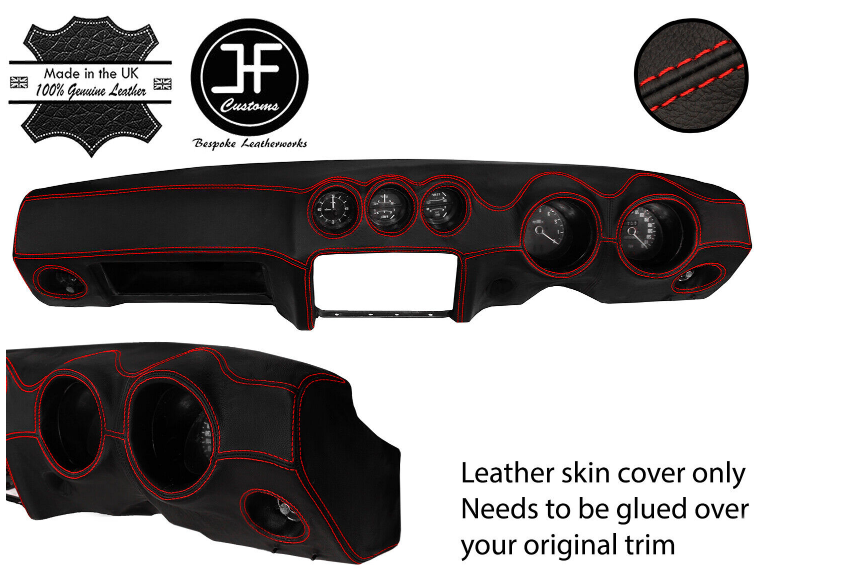
I'll update you on the results after I receive and install the dash. It is going to take a few weeks but based on the one I returned, the contouring is done with curved seams. From what I understand from another classiczcars contributor, I'll need to wet the leather and stretch it over the dashboard to dry using lots of clamps in order to form it. Some sites suggest wetting leather with a mixture of water, alcohol, and baby shampoo. Here's the one they should be sending. Note that I told them I would need to have a left-hand drive version. I am thinking the red stitching is a bit too much so I'll likely dye them black. It also lacks the cigarette lighter hold so i requested they send me the leather for one and I'd install it where needed.
-
The dash cover supplier agreed to take care of the issue and I just mailed the 240z leather cover back to them in the UK. Hopefully, they will send the right one now. The door card covers and center console covers from them worked out well. Captain Obvious: Yes, you are correct, it is just you. SteveJ: Your second picture looks like my dash, except I ran the wires behind the dash ; )
-
I'm really upset with J-F Customs for abandoning me after this purchase.
-
My error, the hole in question is the cigarette lighter, not the ignition. I think what worries me now is the differences in the dash contours. This could cause some problems getting the leather to fit properly. The 260Z dash does not go down as far as the 240Z dash. That could be helpful since I can make the dash cover smaller, not larger. The 240Z dash has cutouts for the cigarette lighter and hazard switch. For the 260Z, the switch moved down to the center console. Note the hazard switch hole for the 240Z has variations, too. The lighter hole is a problem since there is nothing I can do to move the hole on the leather and would have to replace this section of leather. The shape of the ventilation controls area is different. I might be able to stretch the leather to get it to fit. The gauge lights dimmer and trip reset are on the front of the dash on a 260Z. Cutting new holes is not a problem. There is a cutout for the glove box lock on the 240Z. The lock is integrated into the door on the 260Z. No hole was cut out in the leather for the glovebox lock so I'm good there. There are some contour differences, too. The change in contours could be a killer. It might be worth giving it a try before I spend money on replacing the section of leather under the steering wheel.