Jeff Berk
Free Member
-
Joined
-
Last visited
Everything posted by Jeff Berk
-
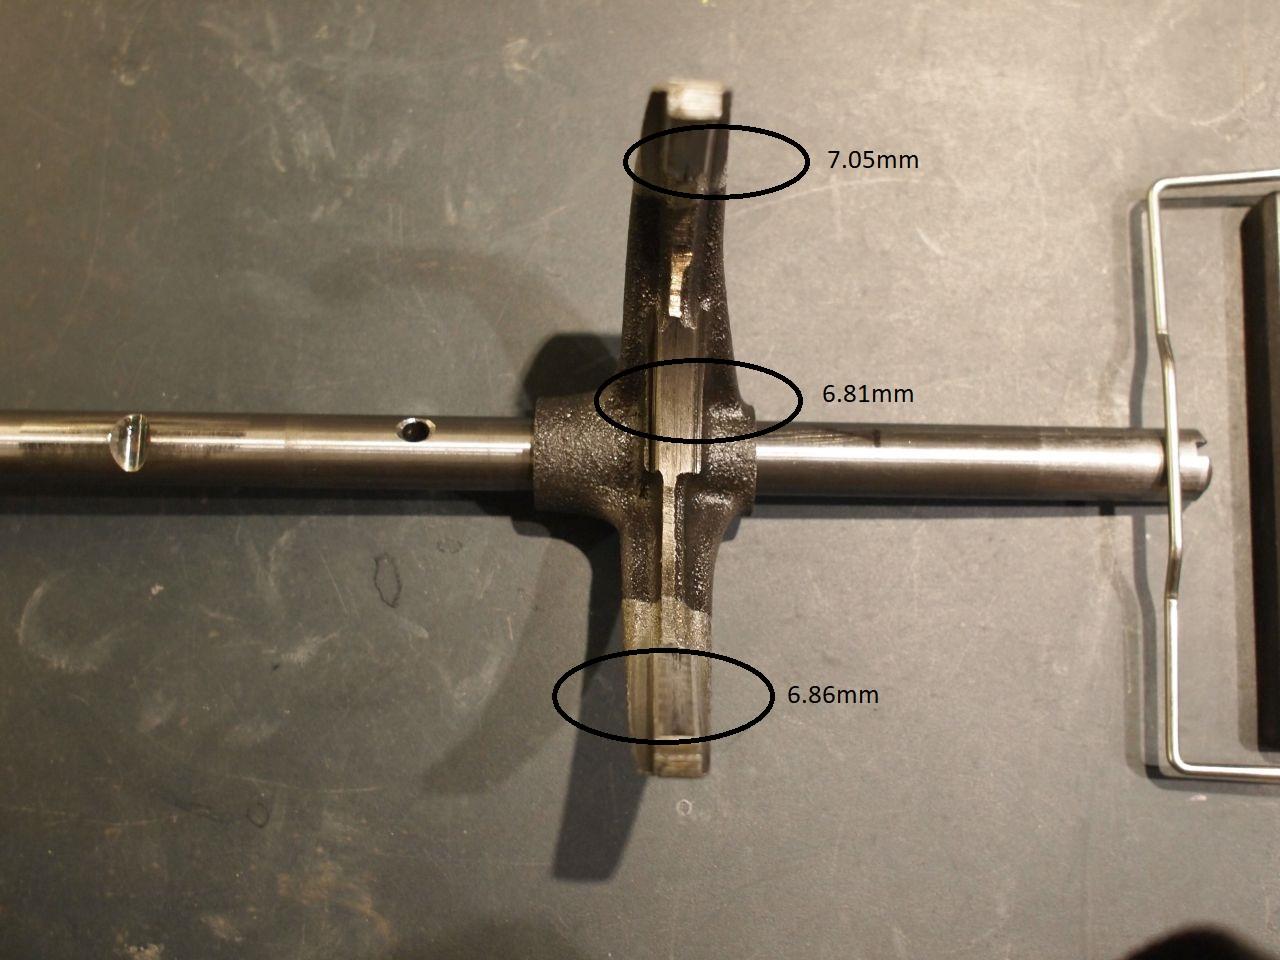
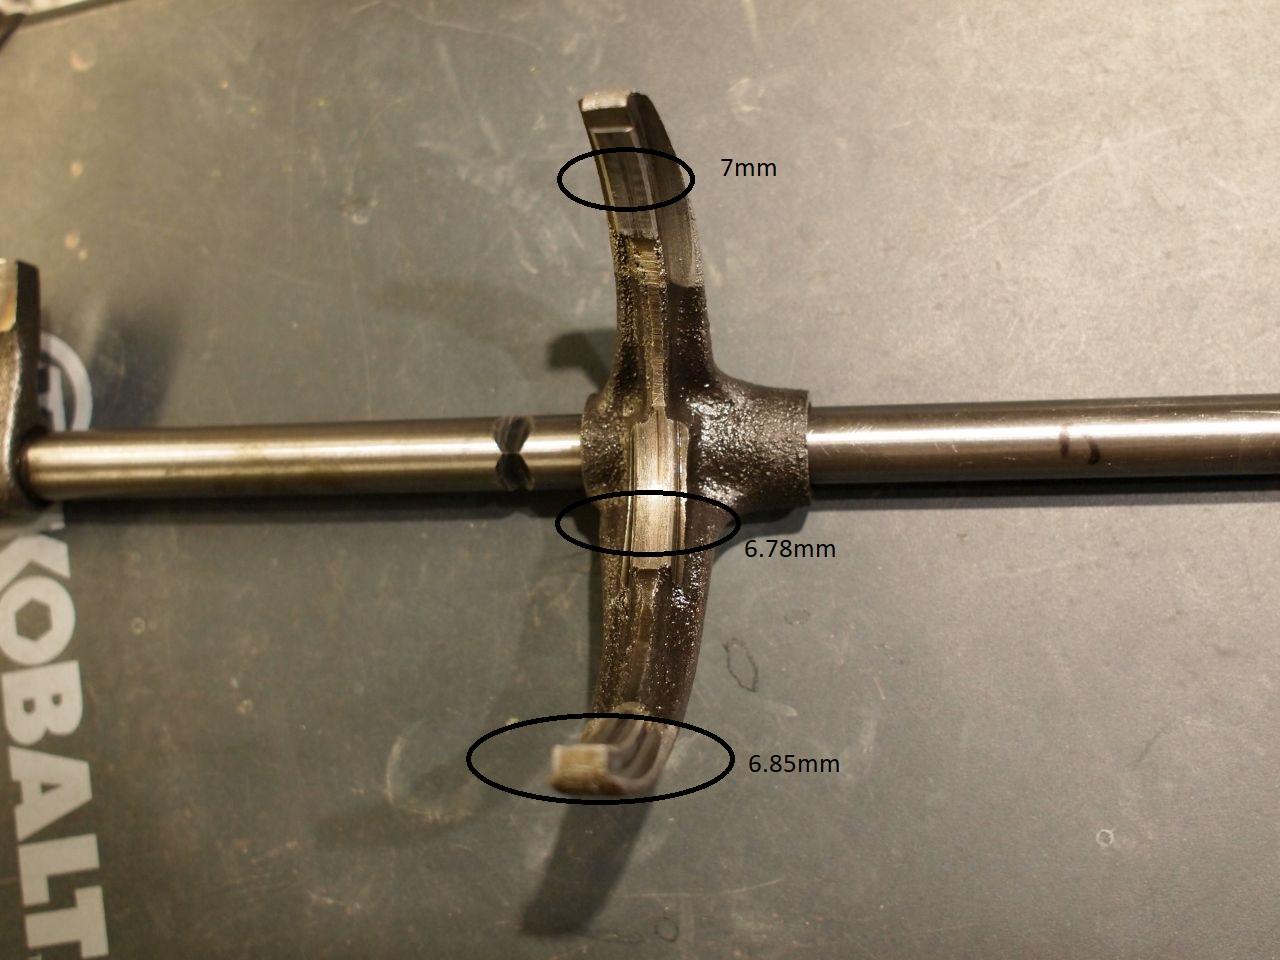
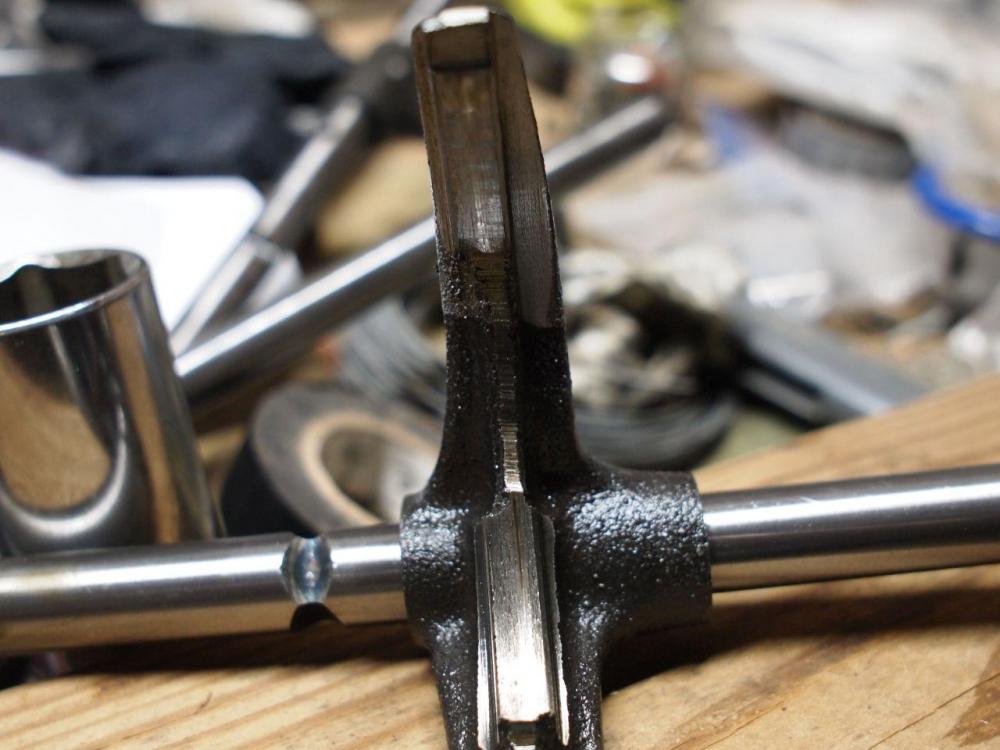
 The fork was tight on the shaft (roll pin intact). I've attached closeups of the 1/2 fork (marked "T") and 3/4 fork (marked "C") with measurements. I'm not sure if there is any path forward if the 3/4 fork needs to be replaced because it appears to be NLA. The measurements are widths. I'll send the thickness shortly. An additional question... The rebuilding kit only came with one set of needle bearings but the transmission has several of them. Should I purchase additional needle bearings and replace them all?

-
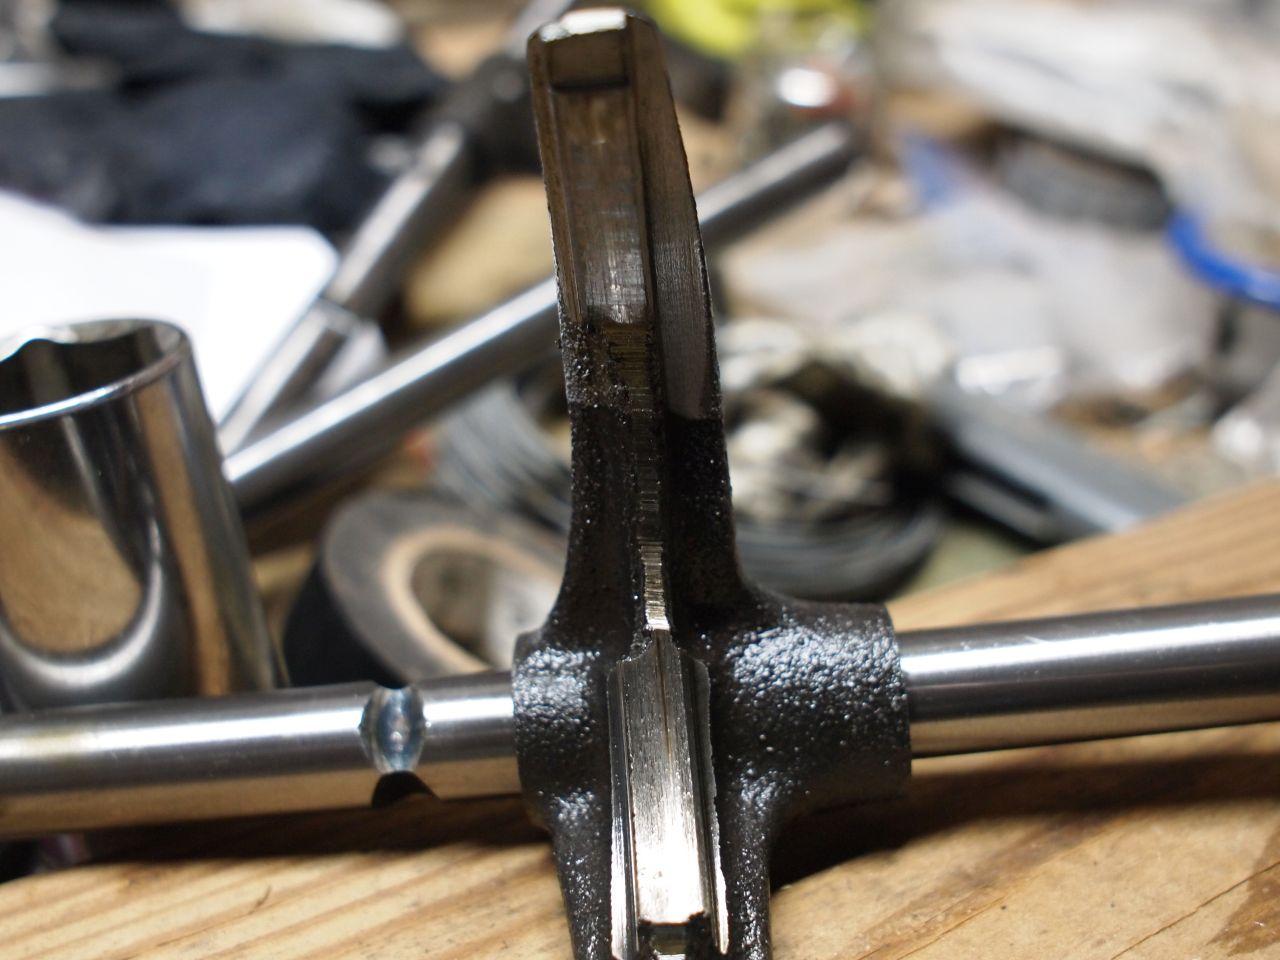
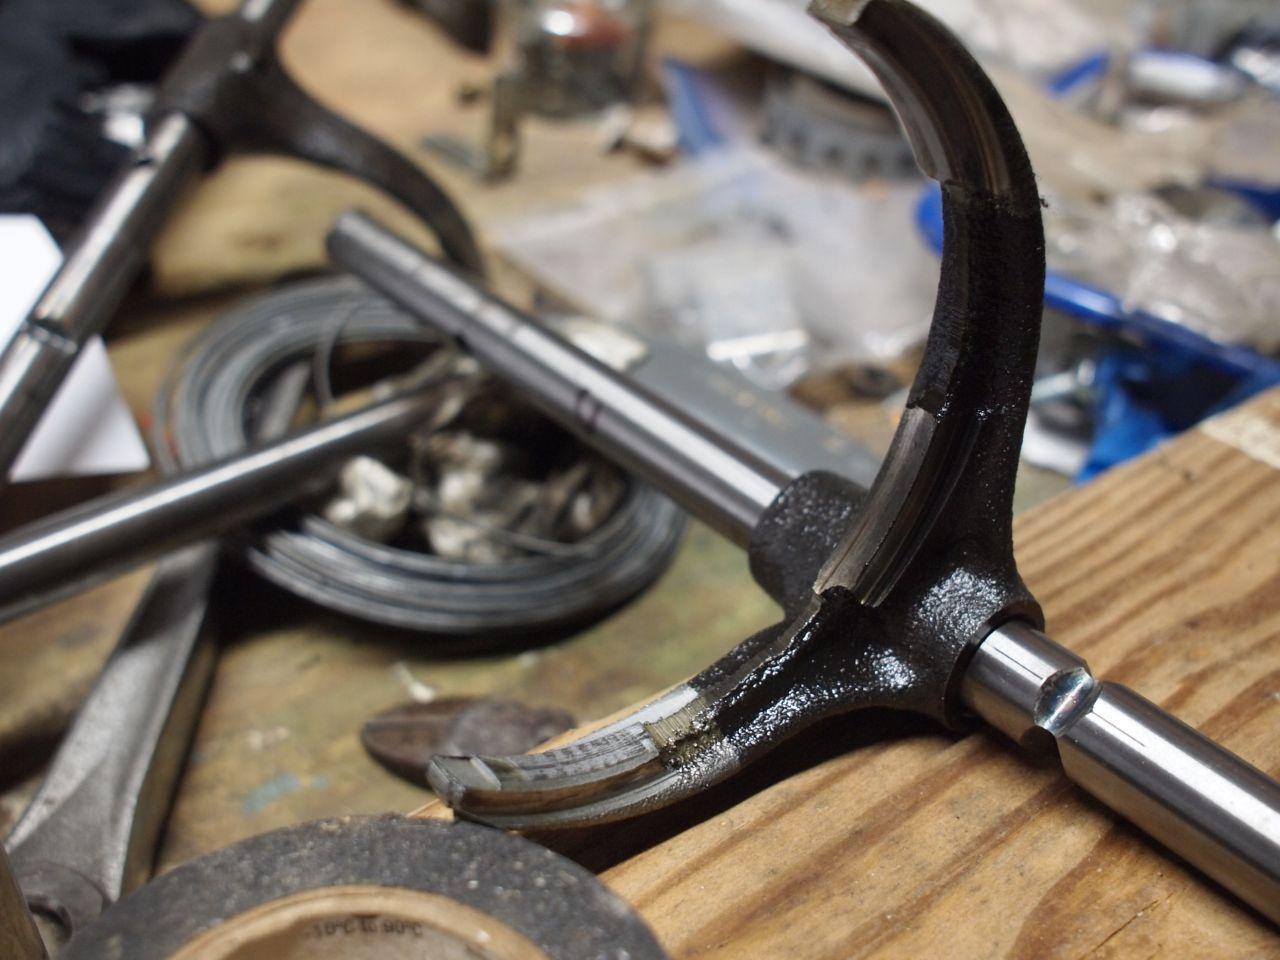
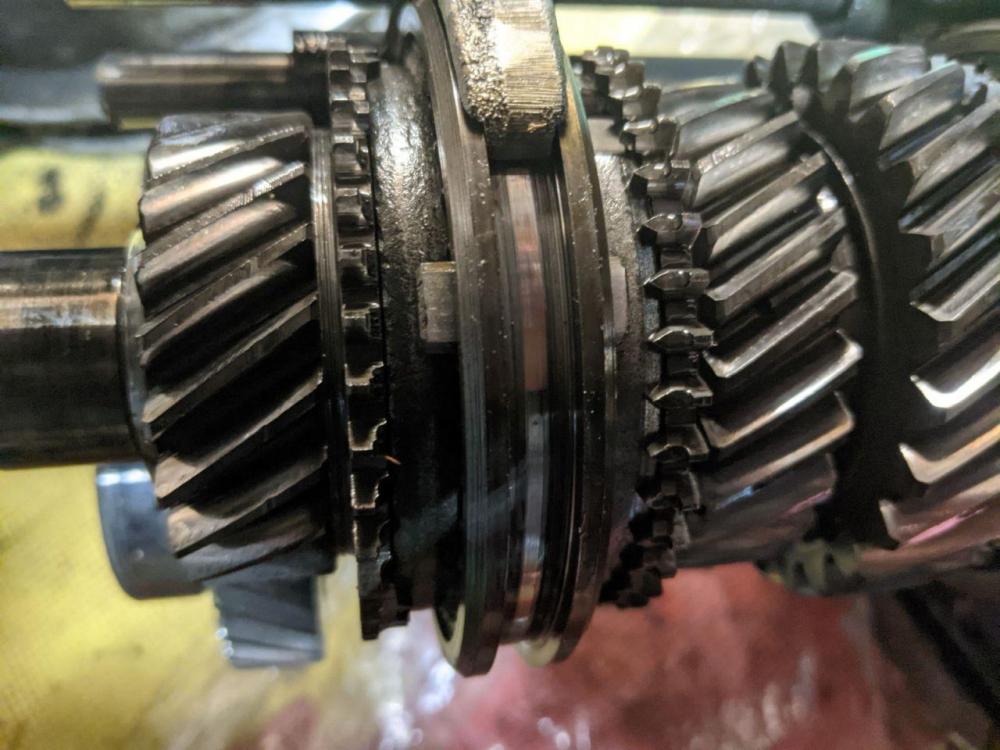
OK, I'm good with the nut issue and I just about have the whole thing taken apart. I could use an opinion on the condition of the 3rd/4th fork condition.

-
I might just do that. $60 for a nut seems a bit steep. If I still had access to the maker space machine shop I'd try and make some but they're closed until further notice due to C-19. I actually found some M27X1.5 staking nuts but nothing M27X1.0.
-
Can anyone suggest a source for main and counter shaft staked nuts, with RIGHT HAND threading? I must have one of the earlier FS5W71B's. If they are NLA, can I substitute something else?
-
https://www.yeggi.com/q/240z/ Good source for printer files. I've printed the plastic clip for retaining the chrome bezel on the door pull of Datsun 260Z and 280Z, 1974-78 and part of a cold air intake.
-
I've got several parts on my '74 thanks to my son's printer.
-
Thank you Mayolives! There are many tips in there that will help. I'm on hold waiting for a bearing puller/splitter to arrive. I'm also mounting three dowel rods on my work bench to sting components on in order so that I can put everything back in the proper sequence and direction. It was suggested that I engrave an F on components on the side facing the front. I might do that as well. I'm assuming roll pins should be replaced with new ones but snap rings are fine to reuse. Correct?
-
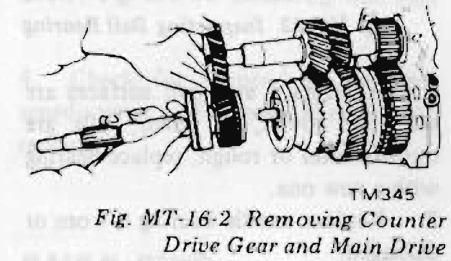
If you look at MT-16-2 below, there is a little play in the main shaft at the point where it's shown as being separated from the rest of the shaft. I'm assuming that's normal. I can see the bearings in the adaptor plate and it appears to be in good condition with no play in the shaft as I try and wiggle the shaft. Could the worn synchros be causing the slipping out of gear? I thought it would just be a problem getting into gear. It looks like I might be able to do the rebuild myself as long as I don't need a press. If it gets too rough, I have a local mechanic that has worked on these transmissions I can fall back on.
-
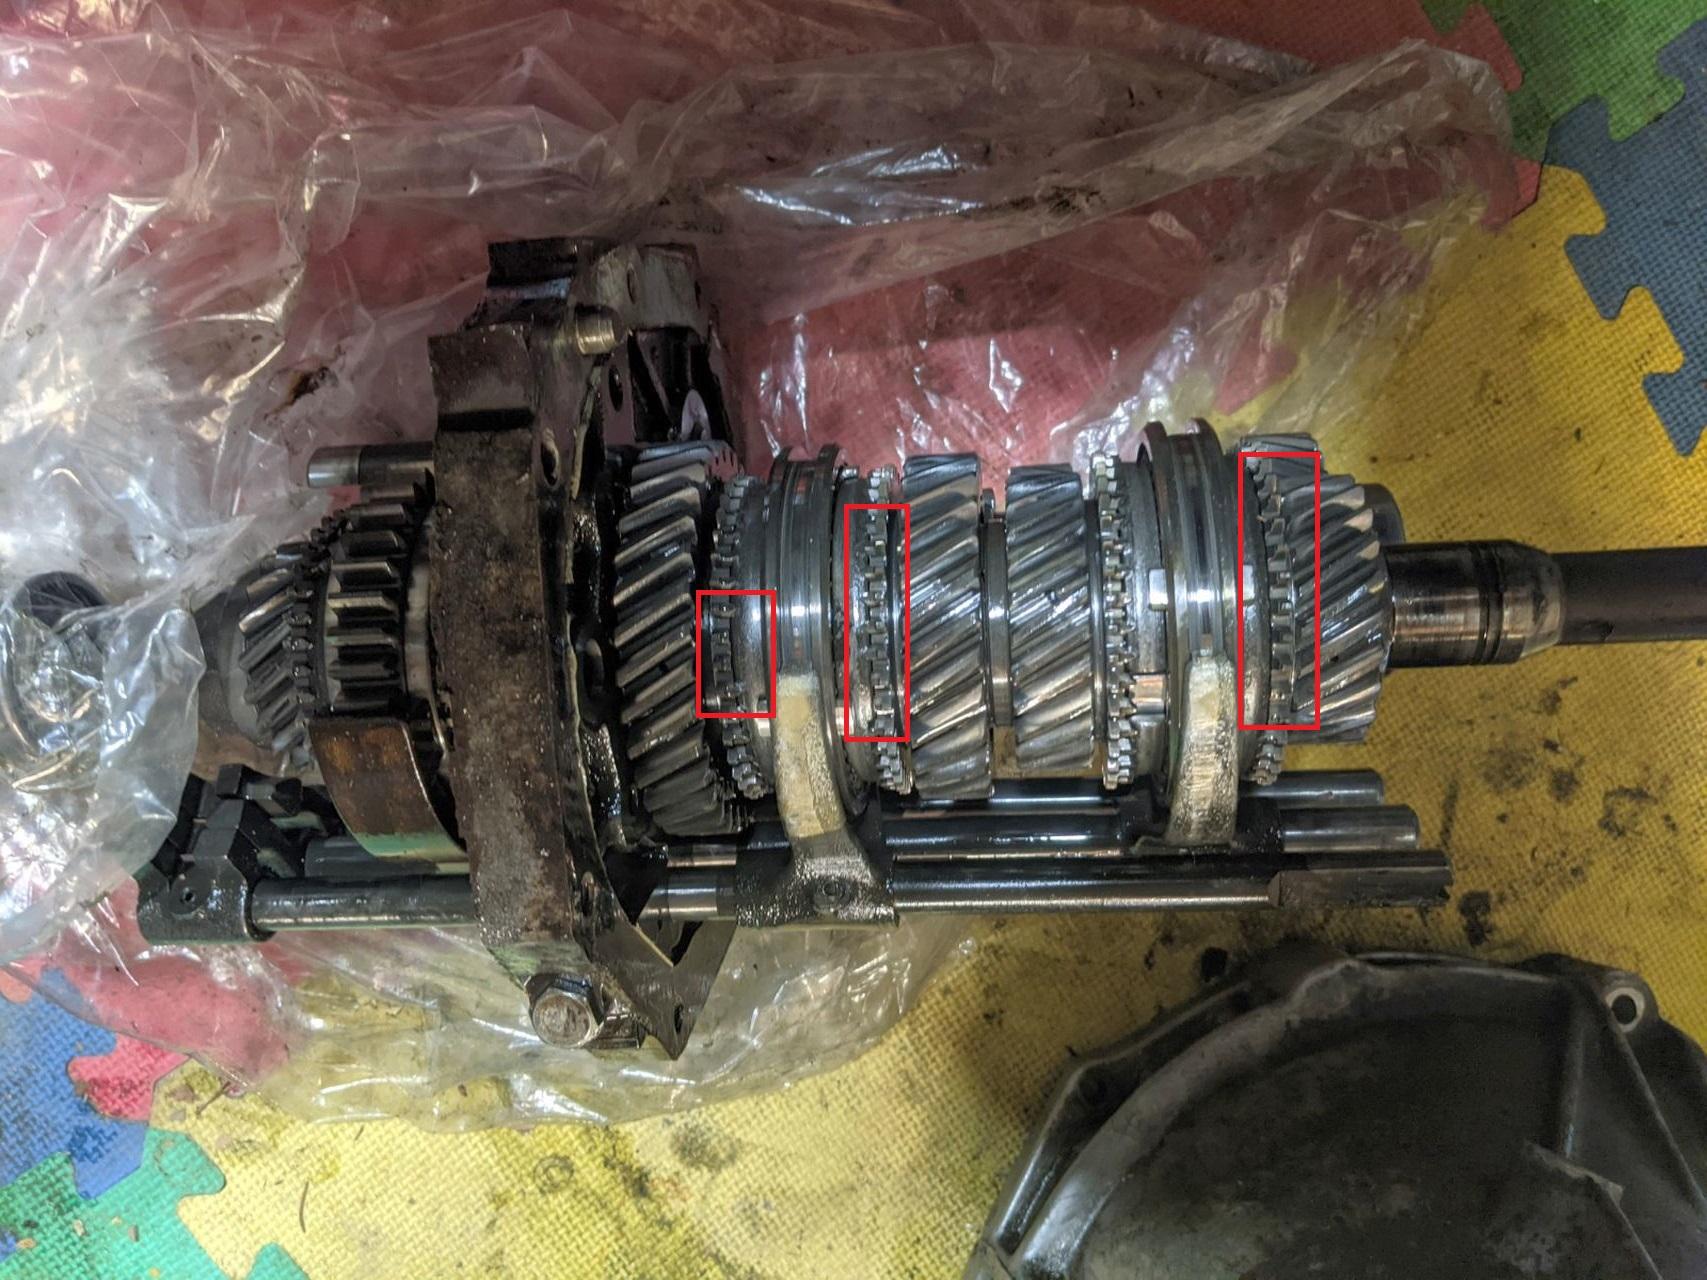
OK, I pulled off the front transmission case. Keep in mind that that I have not done this before so I'm not 100% sure what I'm looking for. What seems to jump right out is that the baulking rings seem to have some teeth chipped off. My problem, however, was that I'm slipping out of 3rd and 4th gear.

-
Thanks all, got it off. I'll take a stab at the front half of the transmission case tomorrow.
-
Zed... The dust shield has a small gap between it and the body of the transmission tail piece. I've tried prying with a screw driver and twisting with a pipe wrench. Before I get too aggressive, I just wanted to make sure I wasn't missing anything. I'll try and wiggle it with a dead blow hammer and prying. I'm assuming that the dust sleeve and seal need to be removed to pull off the tail end of the transmission. I'm sure it's a wide ratio based on it having two bolt tabs at its tail end and I don't see what looks like a reverse lockout mechanism. Jeff
-
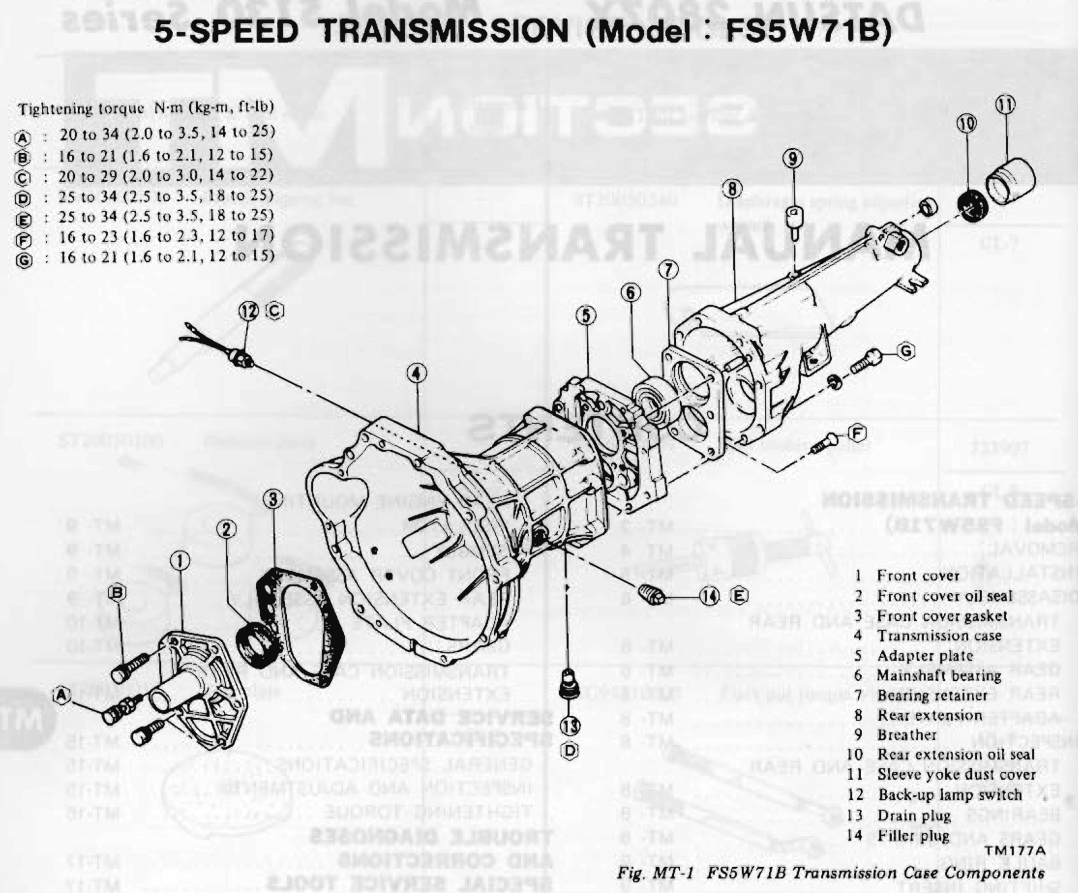
I'm getting around to disassembling by 5-speed to search for the cause of the slipping out of 3rd and 4th and I'm already stuck. I removed the stopper guide pin, return spring plunger, return spring plug, and plunger. I need to remove the tail end of the transmission and removed the six bolts that pass through the adapter plate and now I'm stuck. Do I need to remove the dust cover sleeve (No. 11) and seal (No. 10) to pull the tail section off? If so, is the dust cover sleeve screwed on? After their removal, just hammer and twist left to pull the tail end, right?

-
I purchased a garage door high lift kit from DDM Garage Doors. https://ddmgaragedoors.com/diy-instructions/garage-door-high-lift-conversion.php The installation wasn't too rough although if you've never had to install or adjust torsion springs before, it could get a little unnerving. You also will have to buy a jack shaft, wall mount opener or just learn to raise and lower the door by hand which is what I do. I had also looked into two post lifts but they have some issues like being a permanent installation by having to be bolted to the floor, requiring a thicker concrete floor than normally found in residential garages, and I feel safer with the car supported for long term storage by four posts, each with it's own lock. BTW: All the photographs appear to show clean garages and at least two really cool cars. I'm jealous.
-
https://www.bendpak.com/Rolling-Bridge-Jacks-Manual-5900004-BendPak.pdf When you use a 4-post lift, all tires rest on the two runways. To do such work as replacing the brakes, you need to remove the wheel. But the car is resting on the wheel. The bridge jack fits between the two runways and can be used to lift the front or back, or if you have two bridge jacks, the entire car just above the runways. Right now, for instance, I had to pull my transmission. I'm using a home-made bridge jack to support the rear of the engine.
-
When I first purchased the lift, I searched for instructions on line and found a video where someone actually assembled one without assistance.
-
FYI, I have a Bendpak. Great lift but just to correct an above comment, they come with steel ramps. The aluminum ramps are an option that have a longer approach making it ideal for cars with low air dams. If you are planning on doing work on your car, consider getting the bridge jack if it's within your budget. I ended up building a stationary bridge and use bottle jacks to get the same effect. I have the wheel kit to move the lift but other than making it easy to move the lift to its final position after assembly, I've not had to use them. The plastic trays are a must to protect the car underneath. I have two of them and then cut a piece of plywood to get a third when I discovered a slow leak from the differential. I also had to turn my garage door to a high lift which means that a "normal" garage-door opener won't work. One more comment, if you are planning on installing it yourself, get help. The components are heavy.
-
I've used Molotow and it works OK for narrow lines but it might not be the best option for a part that requires a wide area since you'll end up with "brush strokes". I also used Rustoleum Bright Coat Chrome and got acceptable results. It required several coats and cannot be clear coated to increase the luster. It is possible to chrome plastic with real chrome by first coating it with a metallic material or to coat it with aluminum that will shine almost like chrome. Here's a discussion that might explain it. I decided to go with paint. https://www.startribune.com/q-how-do-you-chrome-plastic/41432532/
-
Captain Looks like the O2 sensor is more complicated than I thought. Sorry to send you on a goose chase (turkey chase?) Jeff
-
I've attached a writeup on how to make a front differential mount, unfortunately, I didn't make note of what web site it came from. I'm assuming either HybridZ or this site. I had mine cut on a CNC type machine I had access to up until C-19 hit. The SVG file may or may not be correct. It's used as the source file for creating the part on the CNC. Differential Front Mount.docx differentialFrontMount.svg
-
After putting in a new clutch, I sold my transmission jack figuring I'd never do that again. Wrong as usual. I did a quick check and found a rebuilt 5 speed close ratio nearby but at >$1,000 I'll see what I can do with my transmission. Anyways, I don't want a spare transmission since I'm limited on space and with winter knocking at our door, I need to get all three cars in my 2-car garage. At least this will give me a winter project. I'll jump back on this thread once I get around to pulling the transmission. Thanks! Jeff
-
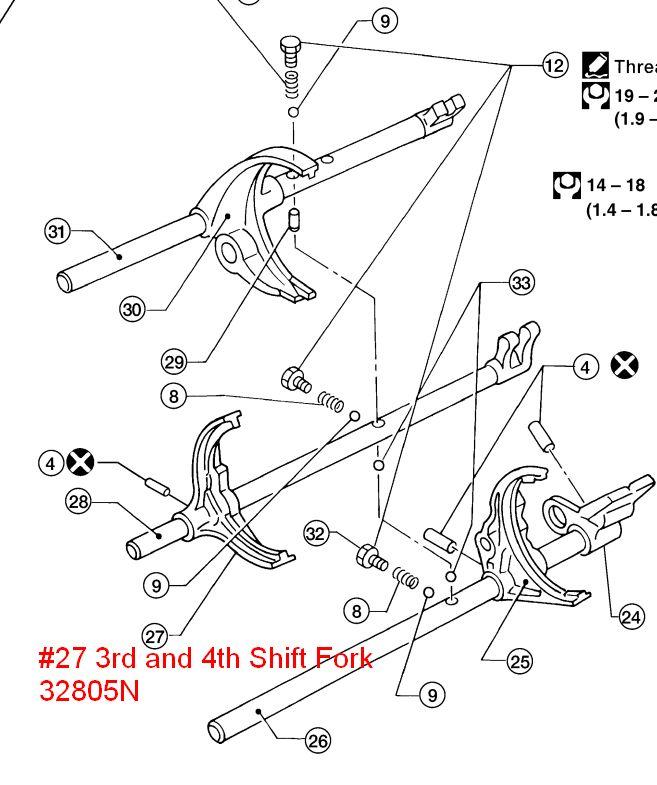
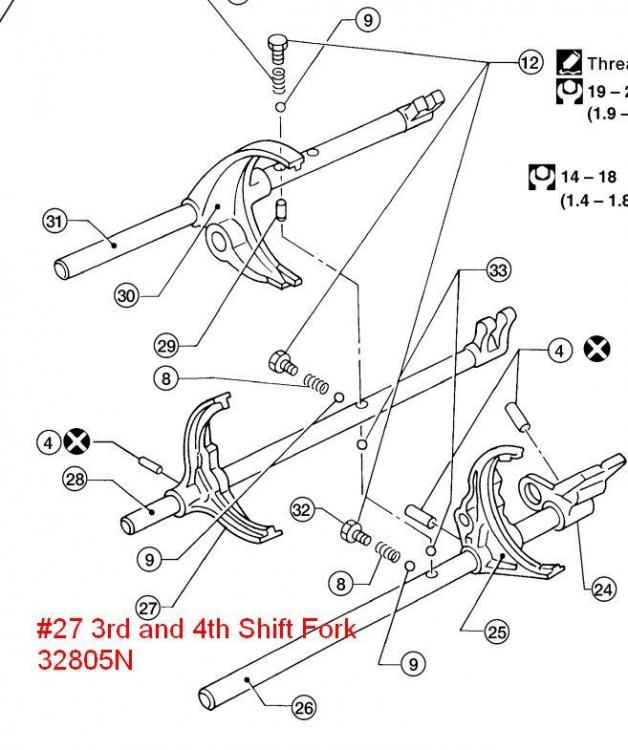
I don't think its the Shift Lever hitting anything. I checked from under the car while my son shifted back and forth between 3rd and 4th and it looks like nothing was binding or hitting. Moving to the shift fork as the next potential cause, it looks like the part potentially causing the problem would be #27 (31805) or #28 (32809N). Unfortunately, those parts are NLA. If worn out at contact points, can these parts be repaired, redressed, or built up with welding? Or are they available as replacements through other channels? I'm just wondering if rebuilding is even an option.
-
I started this question in another thread but instead of taking over that thread, I thought it best to start a separate one. I have a '74 260z with an engine and drivetrain from a 280z or 280zx. The transmission is a wide ratio FS5W71B. The transmission would slip out of 3rd and sometimes 4th gear when I let up on the gas. I replaced the transmission fluid with Red-Line MT-90 and replaced the 3 ball bearings and springs (detent springs 32831N). There does not seem to be anything interfering with the shifter and the transmission seems to go fully into gear. I test drove the car today and the problem seems to persist. According to the service manual, after eliminating the springs as the problem, the next thing to look at are the Shift Fork and the Gears. My question is, whether I could tackle this level of rebuild or is this something best left to a professional? I'm also not sure how available the gears and shift fork are for this old unit. Note that the ball bearings for the springs came in packs of 10 so I have 7 extra if someone needs any along with an extra spring since I ordered an extra expecting to loose one. Thanks Jeff
-
If you are talking about the heating element on O2 sensors, that's there just to get them up to operating temperature (~600F http://www.autotap.com/techlibrary/understanding_oxygen_sensors.asp). After a few minutes, I don't think you don't need it. A good discussion of O2 placement can be found here. My original idea for including a Rraspberry Pi was to add a G-meter. Not because it adds any diagnostics, but it's cool. My son's 2020 Type N has a factory one in his dash.
-
I started looking into this because I'm also a data junky. I was looking into a "no-weld" bung to fit the O2 sensor to. I figured on using the O2 sensor's voltage output monitored and logged by a Raspberry Pi. Not sure what I'd do with all the data.
-
Ditto on the heat shrink. Those ball sockets worked great. I had used a stainless steel rod and cut threading on the ends but blacking out the rod looks great.