Jeff Berk
 Subscriber
-
Posts
605 -
Joined
-
Last visited
-
Days Won
1
Content Type
Profiles
Knowledge Base
Zcar Wiki
Forums
Gallery
Events
Downloads
Store
Blogs
Collections
Classifieds
Everything posted by Jeff Berk
-
If someone needs a crank shaft lengthened, I don't mind doing it for them. However, it would require them to dissasemble the window regulator, pay for round trip shipping, and most importantly, not raise a fuss if I screw up the job. I didn't show my second modified spline shaft but the small rod extending out of one end of the part snapped off while in the lathe, but I was able to use the threaded rod to replace it.
-
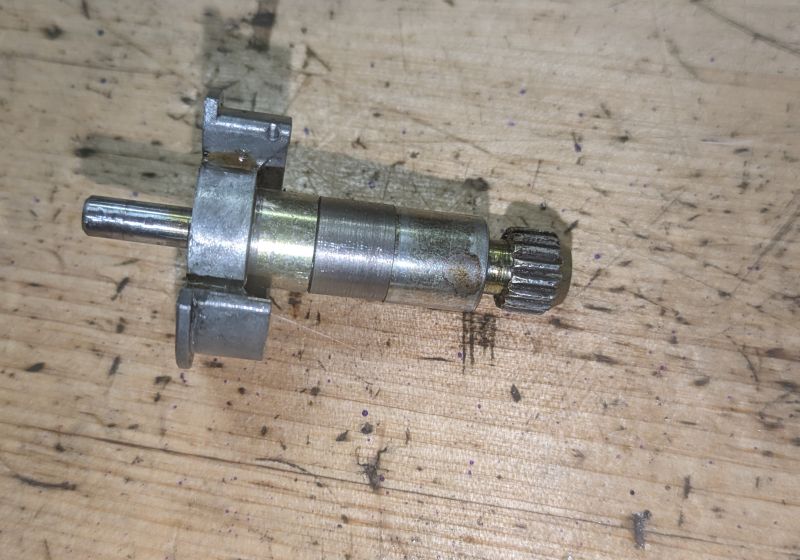
Finished product. Now to move onto the next detail. So many little issues to chose from.
-
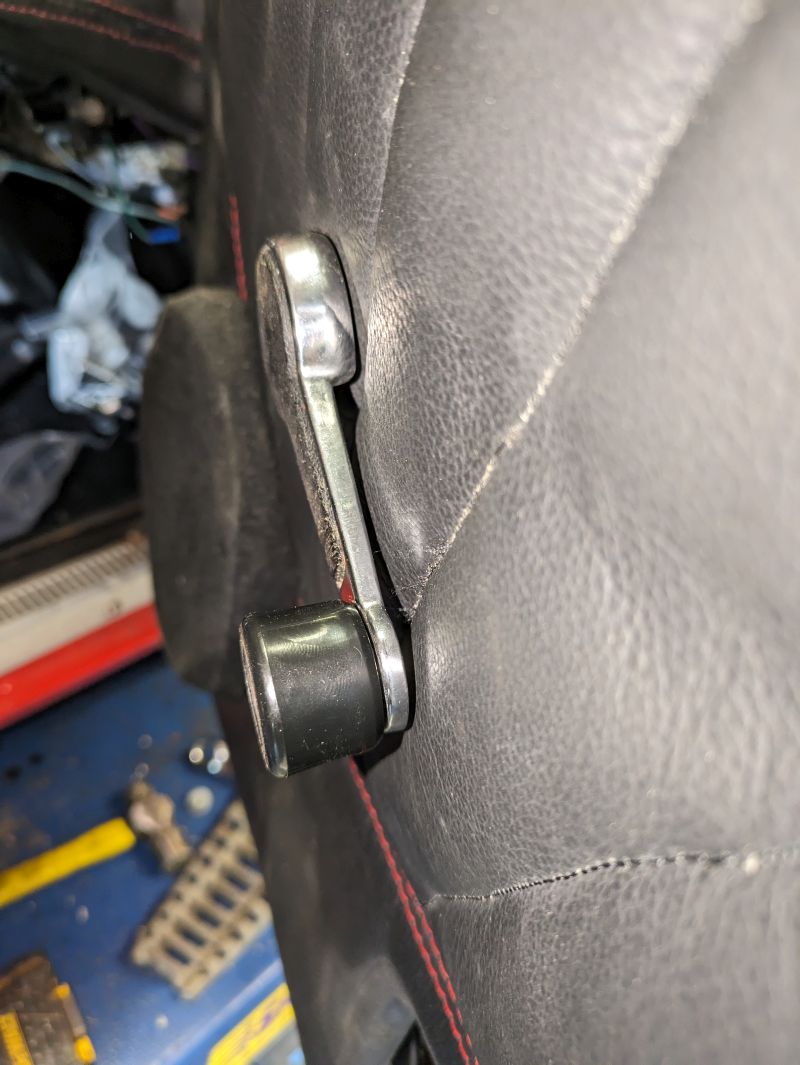
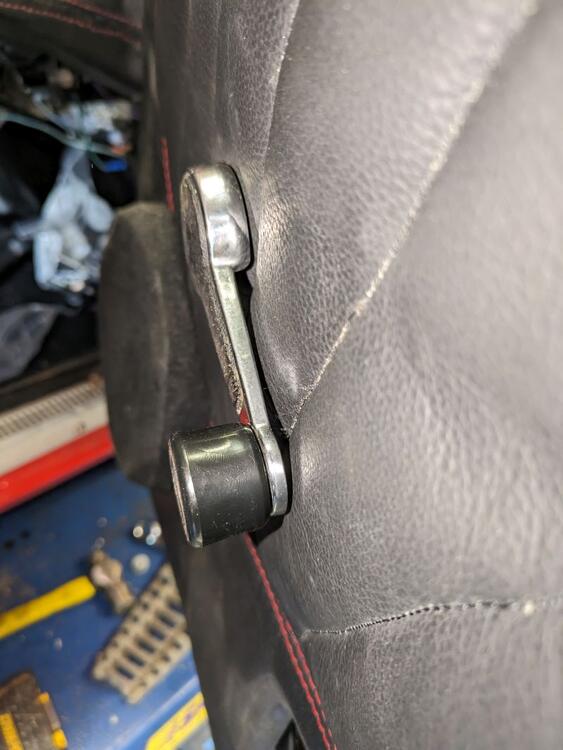
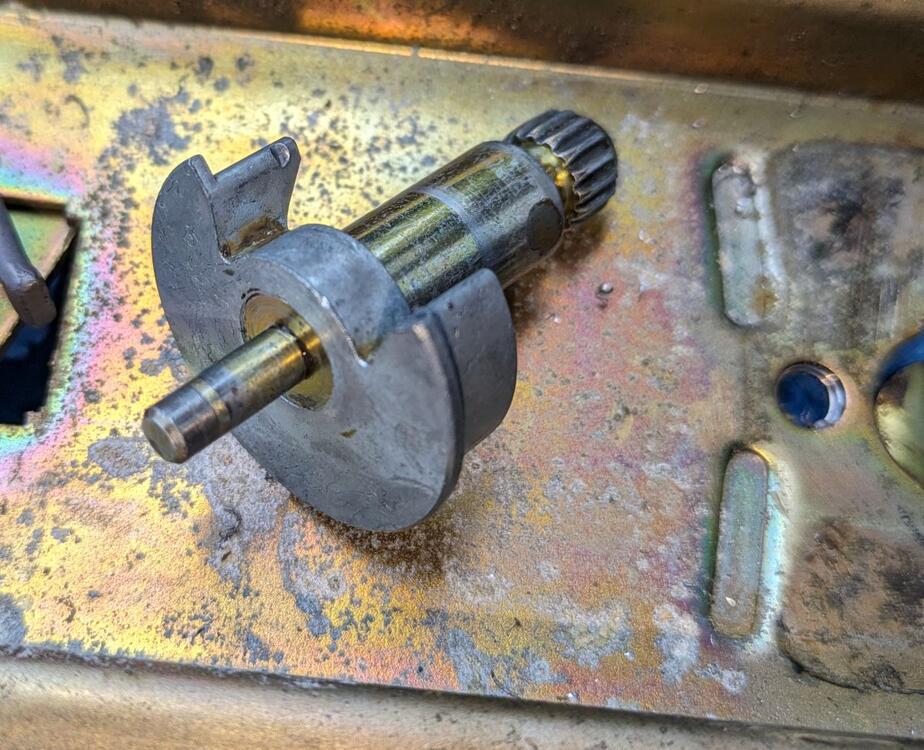
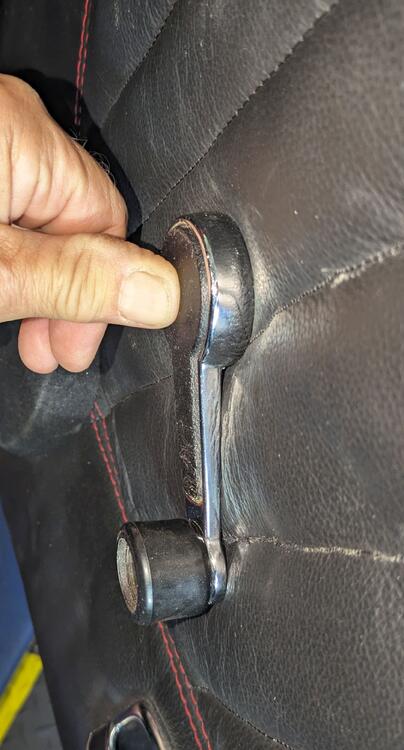
I welded it up and made a mess out of it but it cleaned up ok on the lathe. I'm just trying to get the window back in the track now and then I'll post a picture of the finished project. I found a rubber bumper in the bottom of the door. Any idea where it goes? I couldn't ID it in the FSM

-
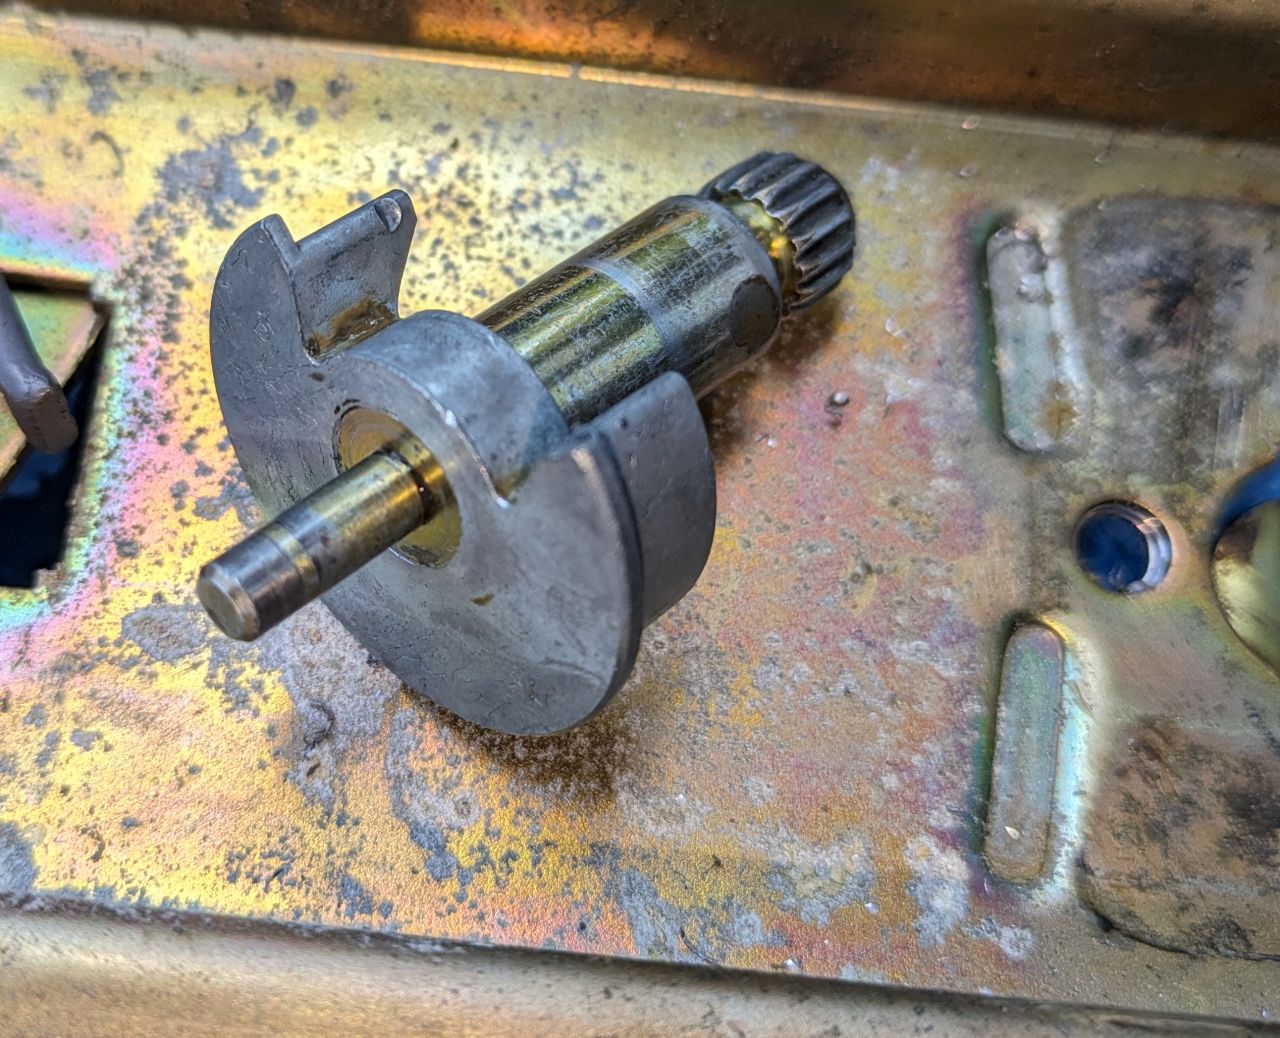
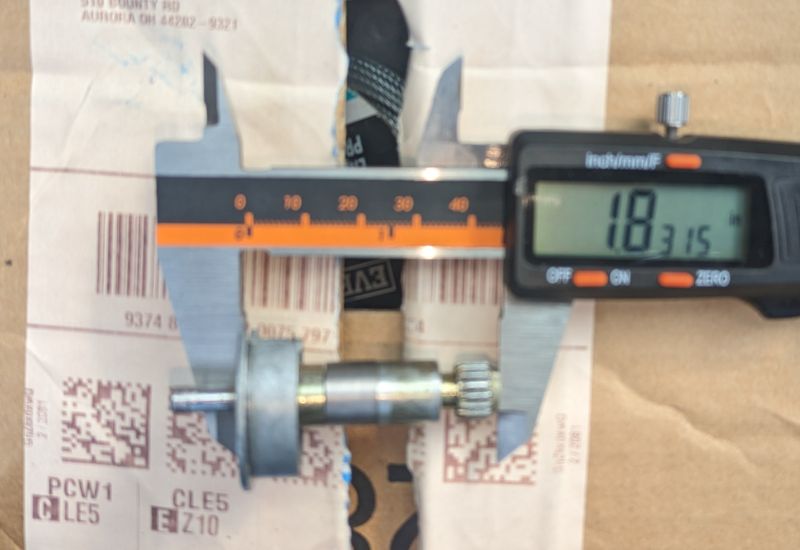
Well here's where I'm at. I cut the shaft; drilled, tapped, faced off the ends; made a spacer from some scrap; and used a short section of all thread to piece it all together. This increased the length by 0.29 inches. I'll need to weld the stack in a couple spots to withstand the torque. I'll then weld the regulator back together. If all works well, I have a second one to do. Thank you all for the input.
-
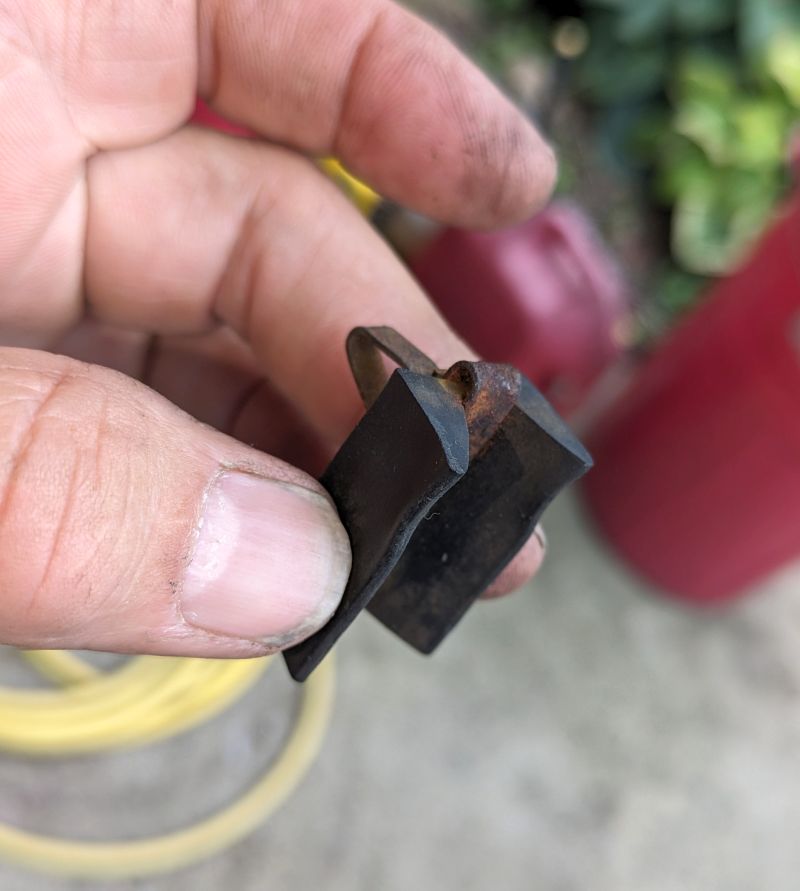
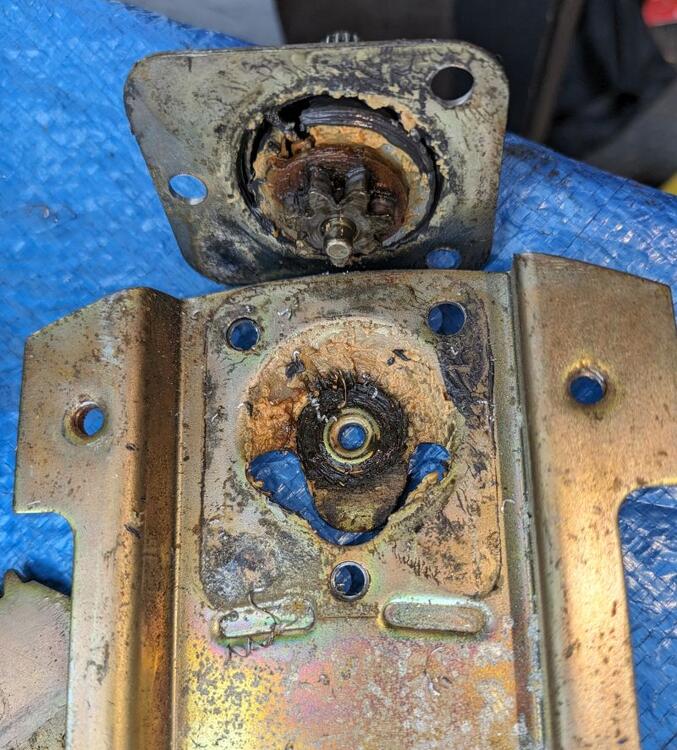
Well, I had nothing better to do so I took it apart to see what's inside. I used to do that a lot when I was a kid. I figure I can reassemble it with some nuts and bolts or a spot welder I hope I still have access to. It looks like the spline shaft is press-fit to an aluminum collar that mates to a spring. My options now look like the following (assuming I can put this back together): 1) Cut the shaft and extend it by adding a little steel by welding the two parts 2) Attach a short hollow tube between the two parts that can be welded or fixed with set screws. The added diameter would not be a problem. 3) Extract the shaft from the aluminum collar and turn a new shaft. The easiest might be #2 and the most elegant would be #3. Separating the shaft from the collar would be my primary concern. Feel free to offer input. I'll try and get this to the makerspace in the next couple of days to see what's suggested.
-
I might just bite the bullet and pull a door panel off to take a look before winter.
-
My Captain, I saw a posting on cutting and rewelding the shaft to replace a damaged spline and I considered that and might end up going that route. I figure that a complete replacement should also be doable. I'll evaluate my options when I dig into the regulator in a few months. Thank you for the input.
-
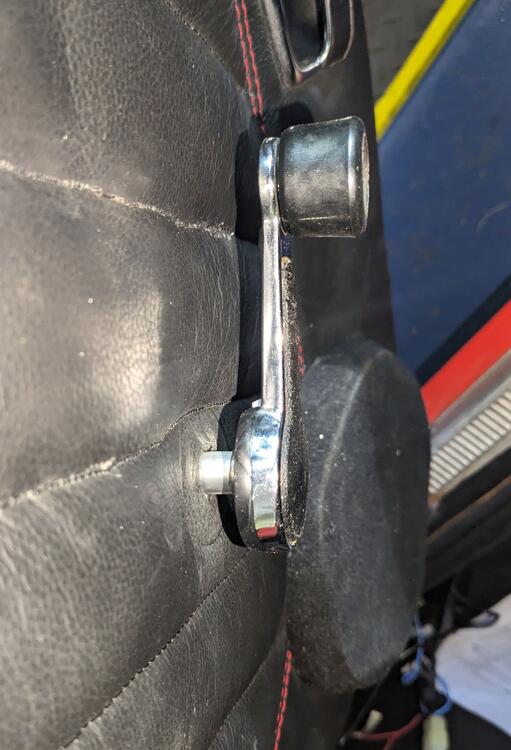
My Captain, I didn't purchase the aftermarket adapters because they were not the correct diameter and I wanted to try and make them myself. The aftermarket adapters were a two piece design with the sleeve and spline sections welded together. There was at least one complaint that the weld failed so I wanted to make it out of a single piece of metal. Billet seems to be a popular buzz word so why not. It was easy but a little time consuming and most importantly, fun to make them so that's what I did. I noticed a comment from the aftermarket part manufacture that they could not make them any shorter and I understand the reason for that statement after I figured out how to make them. I only needed to extend the shaft a short distance to clear the padded leather covered door panel. Even after I modified the aftermarket design to shorten the length, the crank handle extended too far from the panel. Creating an entirely new window regulator spline shaft should be as simple to make as these extensions however I don't have a picture and measurements of the other end of the shaft to design one and will have to wait for winter hibernation to make a few. I'll also likely have to switch to steel from aluminum.
-
Well after several tries, I came to conclusion that this may not be the best approach. The shaft extender extends the shaft too far for my application. Plan B is to replace the shaft entirely with one that is just slightly longer. That will have to wait until late fall when I put my Z in hibernation so I can pull the window regulator out for modification. I'll get back with the results of my experiment then.
-
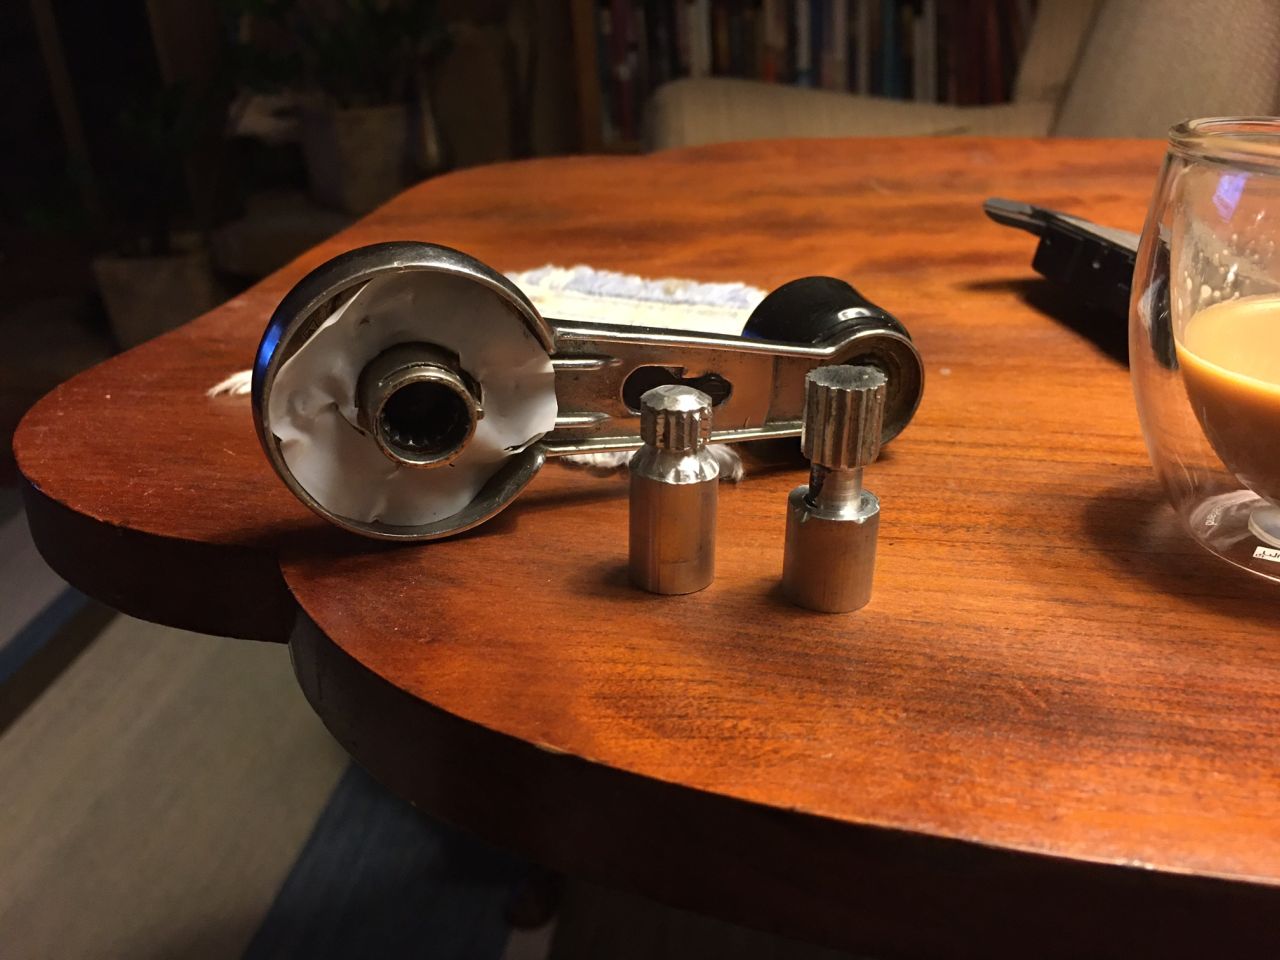
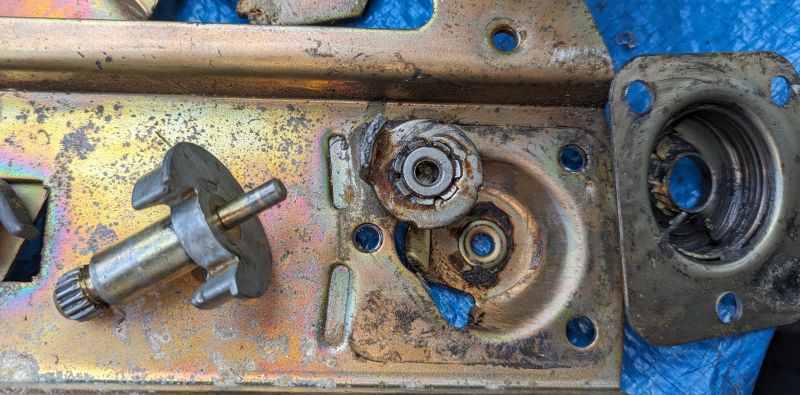
Here's some photographs of the two sets. Note that one is missing the plastic handle that fits over the adjustment lever. It still works. The plastic cover cracked and fell off. I might still have it but it would have to be glued on. They work fine but need some cleaning up and lubrication. I suspect shipping would be expensive to Finland.


-
Thanks Steve. I think I have it now.
-
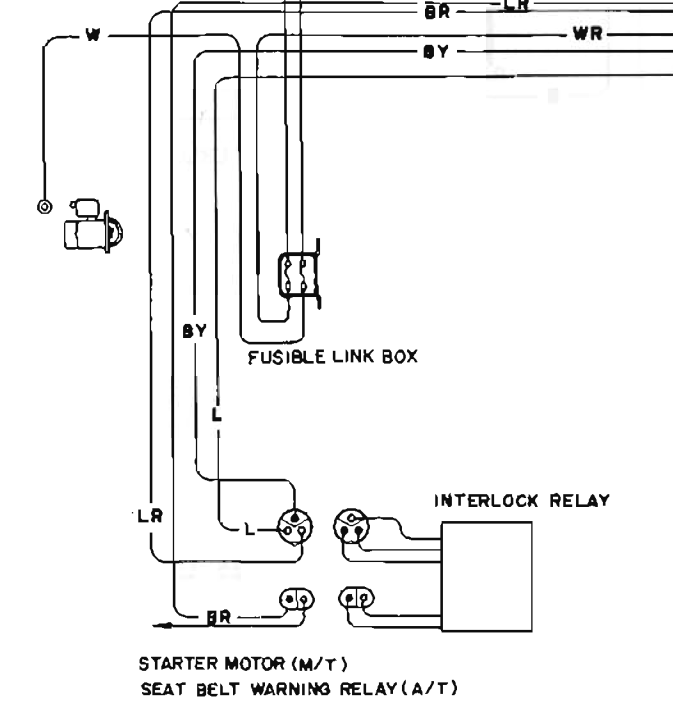
I'm trying to clean out my engine compartment of unused connectors and components. The emergency override button had already been removed so I thought I could just eliminate the seatbelt interlock relay and associated plugs. No luck. The starter solenoid wouldn't activate without the relay. Is there a means of removing the relay by jumping selected wires? It really serves no purpose at this point.
-

Windshield washer not spraying due to electrical problem
Jeff Berk replied to Jeff Berk's topic in Electrical
Yes, I agree. Only a real ding bat would install that nylon washer wrong. -
Windshield washer not spraying due to electrical problem
Jeff Berk replied to Jeff Berk's topic in Electrical
Dave! That was it!!! I too, maybe 5 years ago, repaired my combination switch to fix the headlight switch. I put the nylon washer in the same way as the guy in the video. I rearranged the washer and I can now wash my window, at least the passenger side until I find the clog. Thank you ALL for the help. -
Windshield washer not spraying due to electrical problem
Jeff Berk replied to Jeff Berk's topic in Electrical
I found a spare intermittent wiper relay in my parts bin but substituting it didn't correct the issue. I noticed that if I press and hold the washer button, the wiper will wipe a couple of times so it looks like the washer is charging the capacitors in the wiper relay. Also, if I hold it too long, I blow the 20 amp fuse. I unplugged and cleaned the contacts for the wiper motor and all of the D-shaped color-coded connectors under the glove compartment. I used contact cleaner spray and a small-diameter nylon brush to clean the female and a small nylon brush wheel on a Dremel to clean the male contacts. I've seemed to have picked up about a volt so that I'm getting 4.0 volts at the washer motor contact when the button is pressed. I'm wondering if I should check resistance between wire segments or turn the power on and check voltage at various points? -
Windshield washer not spraying due to electrical problem
Jeff Berk replied to Jeff Berk's topic in Electrical
With the combo switch plugged in and the LW at the washer unplugged, I get 0.7 ohms when the switch is pressed. With the two connectors on the amplifier unplugged, I get 0.9 ohms between the two washer pump wires when the switch is pressed. -
Windshield washer not spraying due to electrical problem
Jeff Berk replied to Jeff Berk's topic in Electrical
Looking at BE-64 of the FSM and how the switch's stationary contacts are mounted, one of the circuits is a ground. I might have to connect the battery and turn the ignition on and probe around with a multimeter to figure out what's going on. I'm still confused as to why there is 12v going to both contacts on the sprayer when the sprayer button is not pressed. It seems like one contact should be a ground and the other only showing 12v when pressed.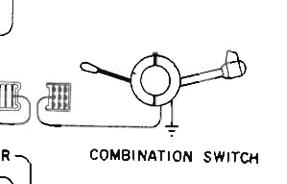
-
Windshield washer not spraying due to electrical problem
Jeff Berk replied to Jeff Berk's topic in Electrical
I took the switch off and cleaned up the contacts with vf sand paper and contact cleaner spray. I'm still getting the voltage readings: ~12 volts on both connections when the button is NOT pressed, and ~3 volt difference between the two connections with the button pressed. If instead, one of the two contacts dropped to zero and the other stayed at 12 volts, it would work. One more question, should the wipers start wiping when I press the sprayer button because they don't. This is not a major issue since I don't intend to drive my car in the winter but its just one of those things that's on my list of things to fix. -
Windshield washer not spraying due to electrical problem
Jeff Berk replied to Jeff Berk's topic in Electrical
I didn't realize there was a switch to view signatures let alone a way of generating one. I've written a short sig for now. -
Windshield washer not spraying due to electrical problem
Jeff Berk replied to Jeff Berk's topic in Electrical
I'll need to figure out how to get to the button on the end of the wiper stalk to clean up its contacts. I might need to table this issue until fall when I attack other issues with the dashboard. As for the sprayer motor, it is new and will spray when I power it directly from the battery. -
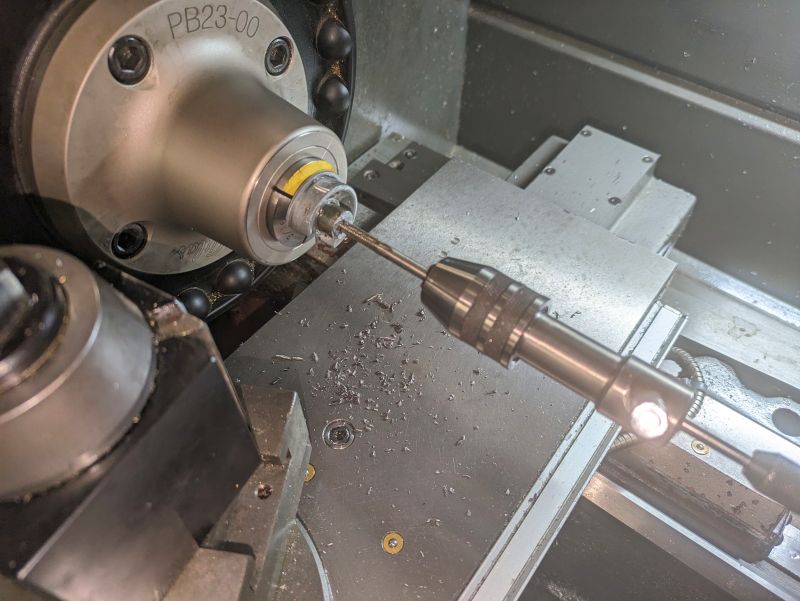
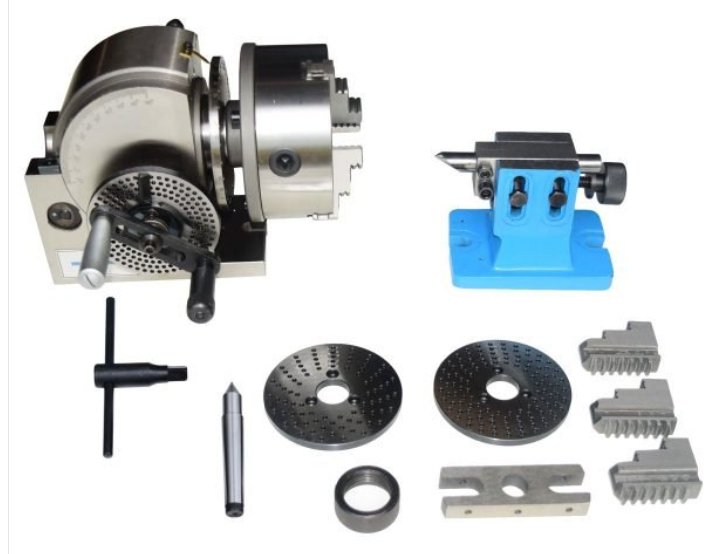
The splines are cut with an indexed fixture on a milling machine. You select the correct index disk, mount the part in the chuck, cut the spline with an endmill. Then turn the hand crank and engage the pin selector to advance in this case 22.5 degrees to the next spline slot. Repeat until you have 16 cuts, then change the depth of cut and repeat. Yes, its an absurdly, error-prone process. That's why I'm making a limited run and do not plan on selling them.
-
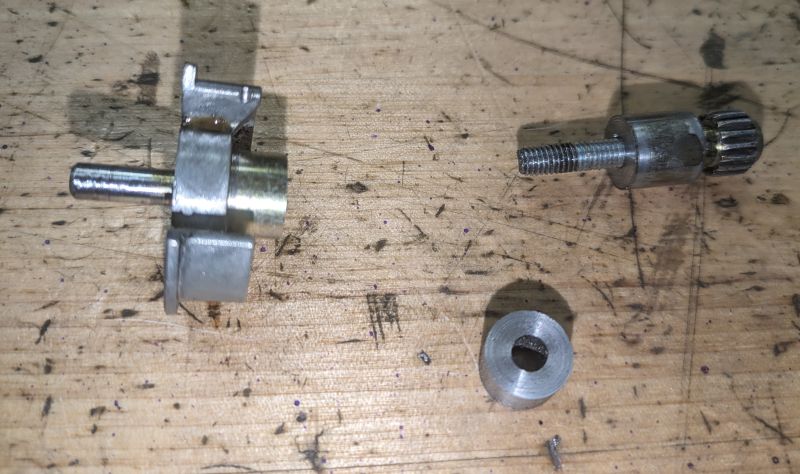
The following information us based on the orientation in the photograph: The one on the right is an early version. I realized the spline could be shorter and the hollow part on the bottom needed to be longer to accommodate two horizontal cuts (not performed yet) to fit a wire crank clip that attaches the adapter to the spline shaft on the door. A second crank clip attaches the window crank to the adapter. I decided that the long neck on the one on the right was not needed and extended the crank handle shaft too far. You are correct my Captain, a non-profitable job but an opportunity to get more proficient at using the lathe and mill along with learning how to use the indexed clamp to cut 16 splines, 22.5 degrees between each.

-
Windshield washer not spraying due to electrical problem
Jeff Berk replied to Jeff Berk's topic in Electrical
I have a new sprayer motor installed so no. Also, all the voltages I provided were read from the two wires that power the motor with the motor disconnected from them. -
I made a set but they extended the crank out too far so I'm trying again. I think I can get it down to just over a 1/2 inch extension. These are hand milled so they take maybe an hour to create. I will likely become more efficient by the time I make 3 pair but please, no more requests.
-
I’m troubleshooting my windshield washer circuit and I’m stuck: 1) The wipers work but the washer motor has not run since I got the car ~5 years ago. 2) Voltage measured between the two wires when unplugged from the washer motor reads 3.8V when the washer button is pressed. 3) At individual wires I’m getting around 12V to relative to ground (11.97V and 12.31V) when the washer button is NOT pressed. 4) On one washer motor wire I’m getting around -0.56V to ground and +3.2V to ground on the other wire when the washer button IS pressed. I’m assuming that there should be +12V going to each contact when the sprayer is not used and then drops to 0 volts on ONE contact when the sprayer is used. However, when I press the switch, voltage difference between the two wires is only 3.65V which is not enough to operate the pump. I’m finding the wiring diagram a little confusing so can anyone offer me a starting point on my trouble shooting. BTW: I was at the Pittsburgh Vintage Grand Prix last weekend which had 4 Z's in their > 2 L sports car class. It was a lot of fun to watch and to check out the Zs and other cars in the car show lot.