Av8ferg
Free Member
-
Joined
-
Last visited
Everything posted by Av8ferg
-
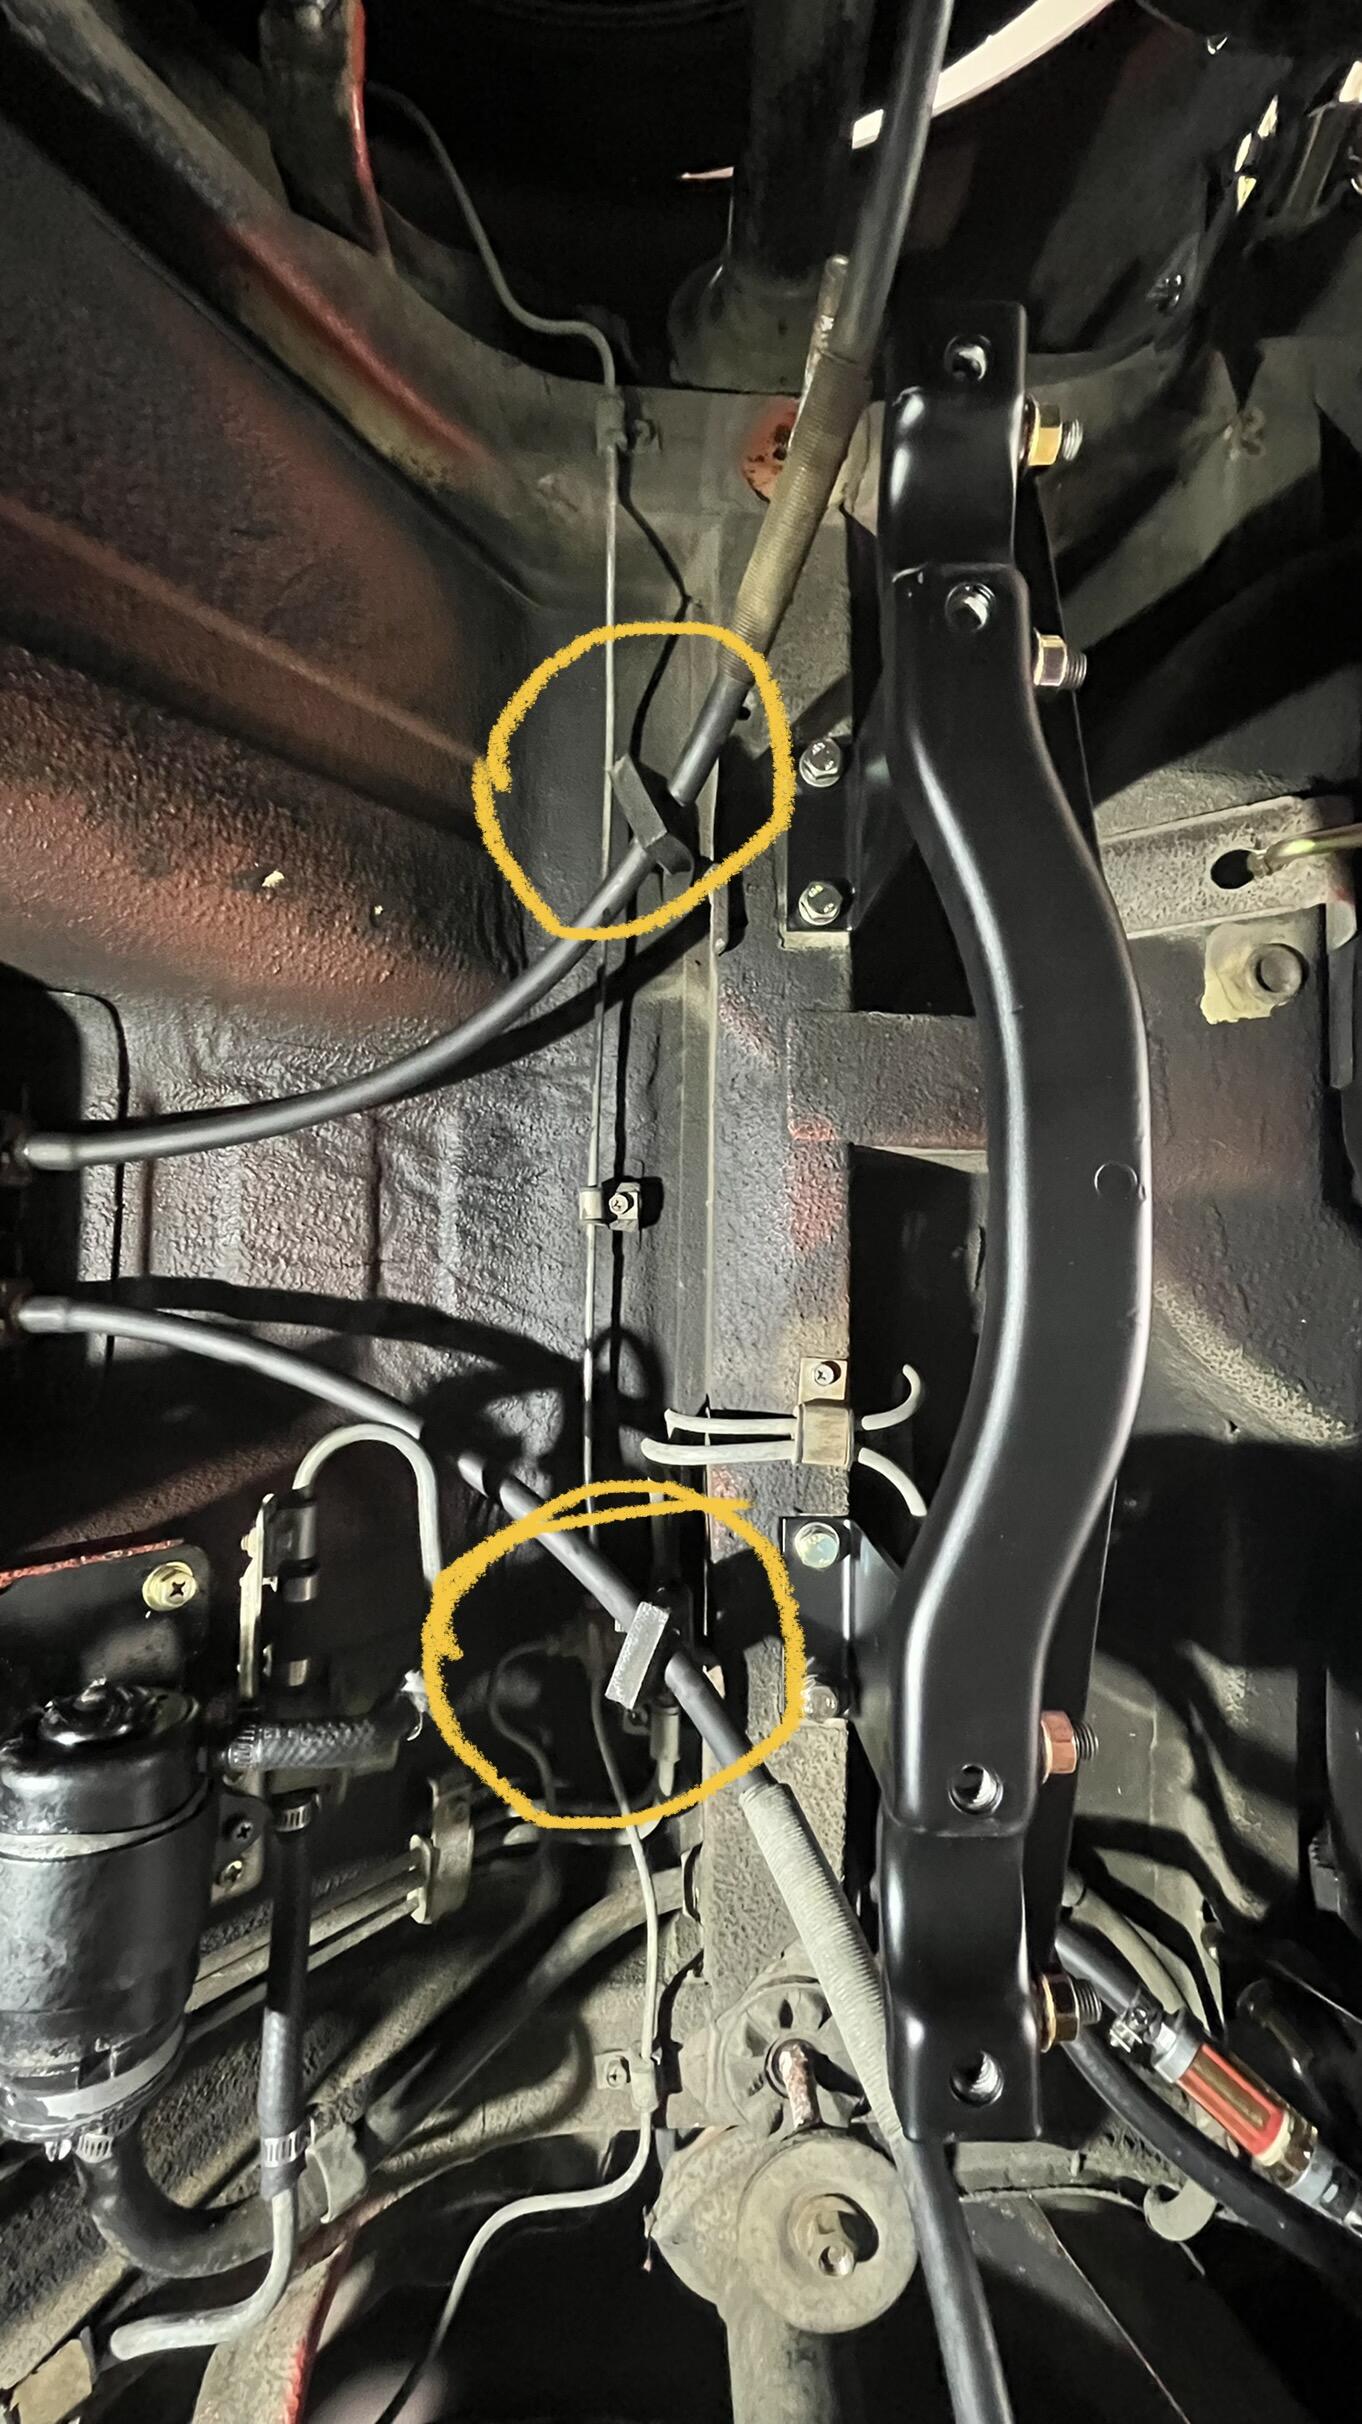
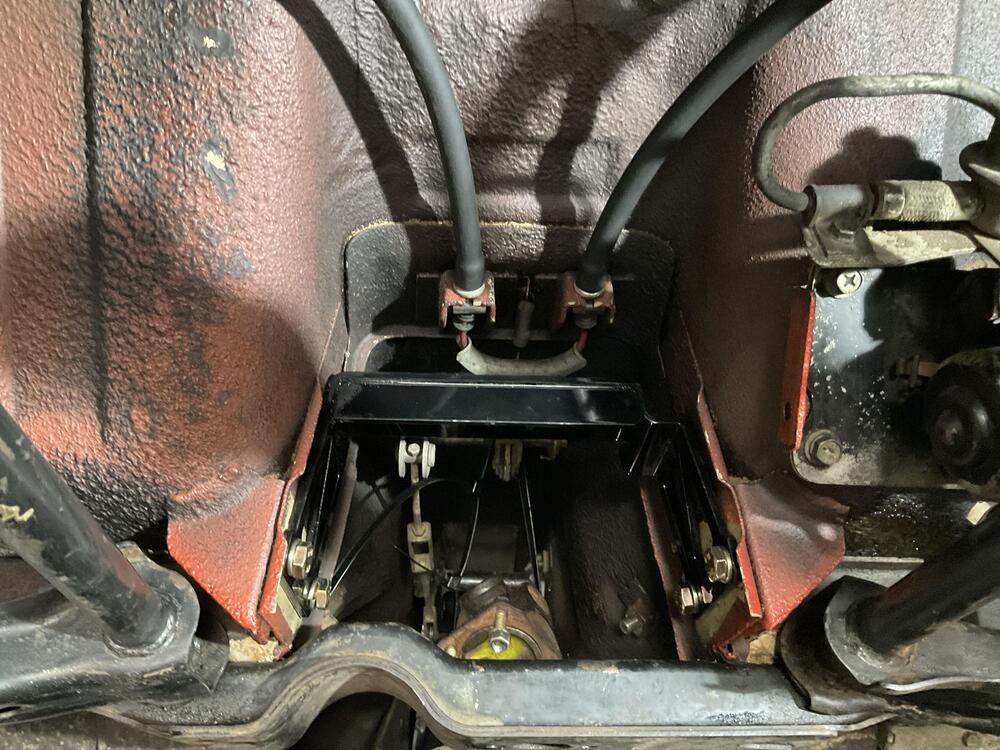
 Dan, you’ve made some good progress. I’m about to start reinstall. I took this pic for you showing the e-brake cable routing through those hangars. I think you could use Muffler Hangers from AutoZone. I know they have them.
-
Ken, thanks. Great idea. Wasn’t sure I was going to get in there once the differential was in. Glad to know it’s possible. Thank you! Sent from my iPhone using Tapatalk
-
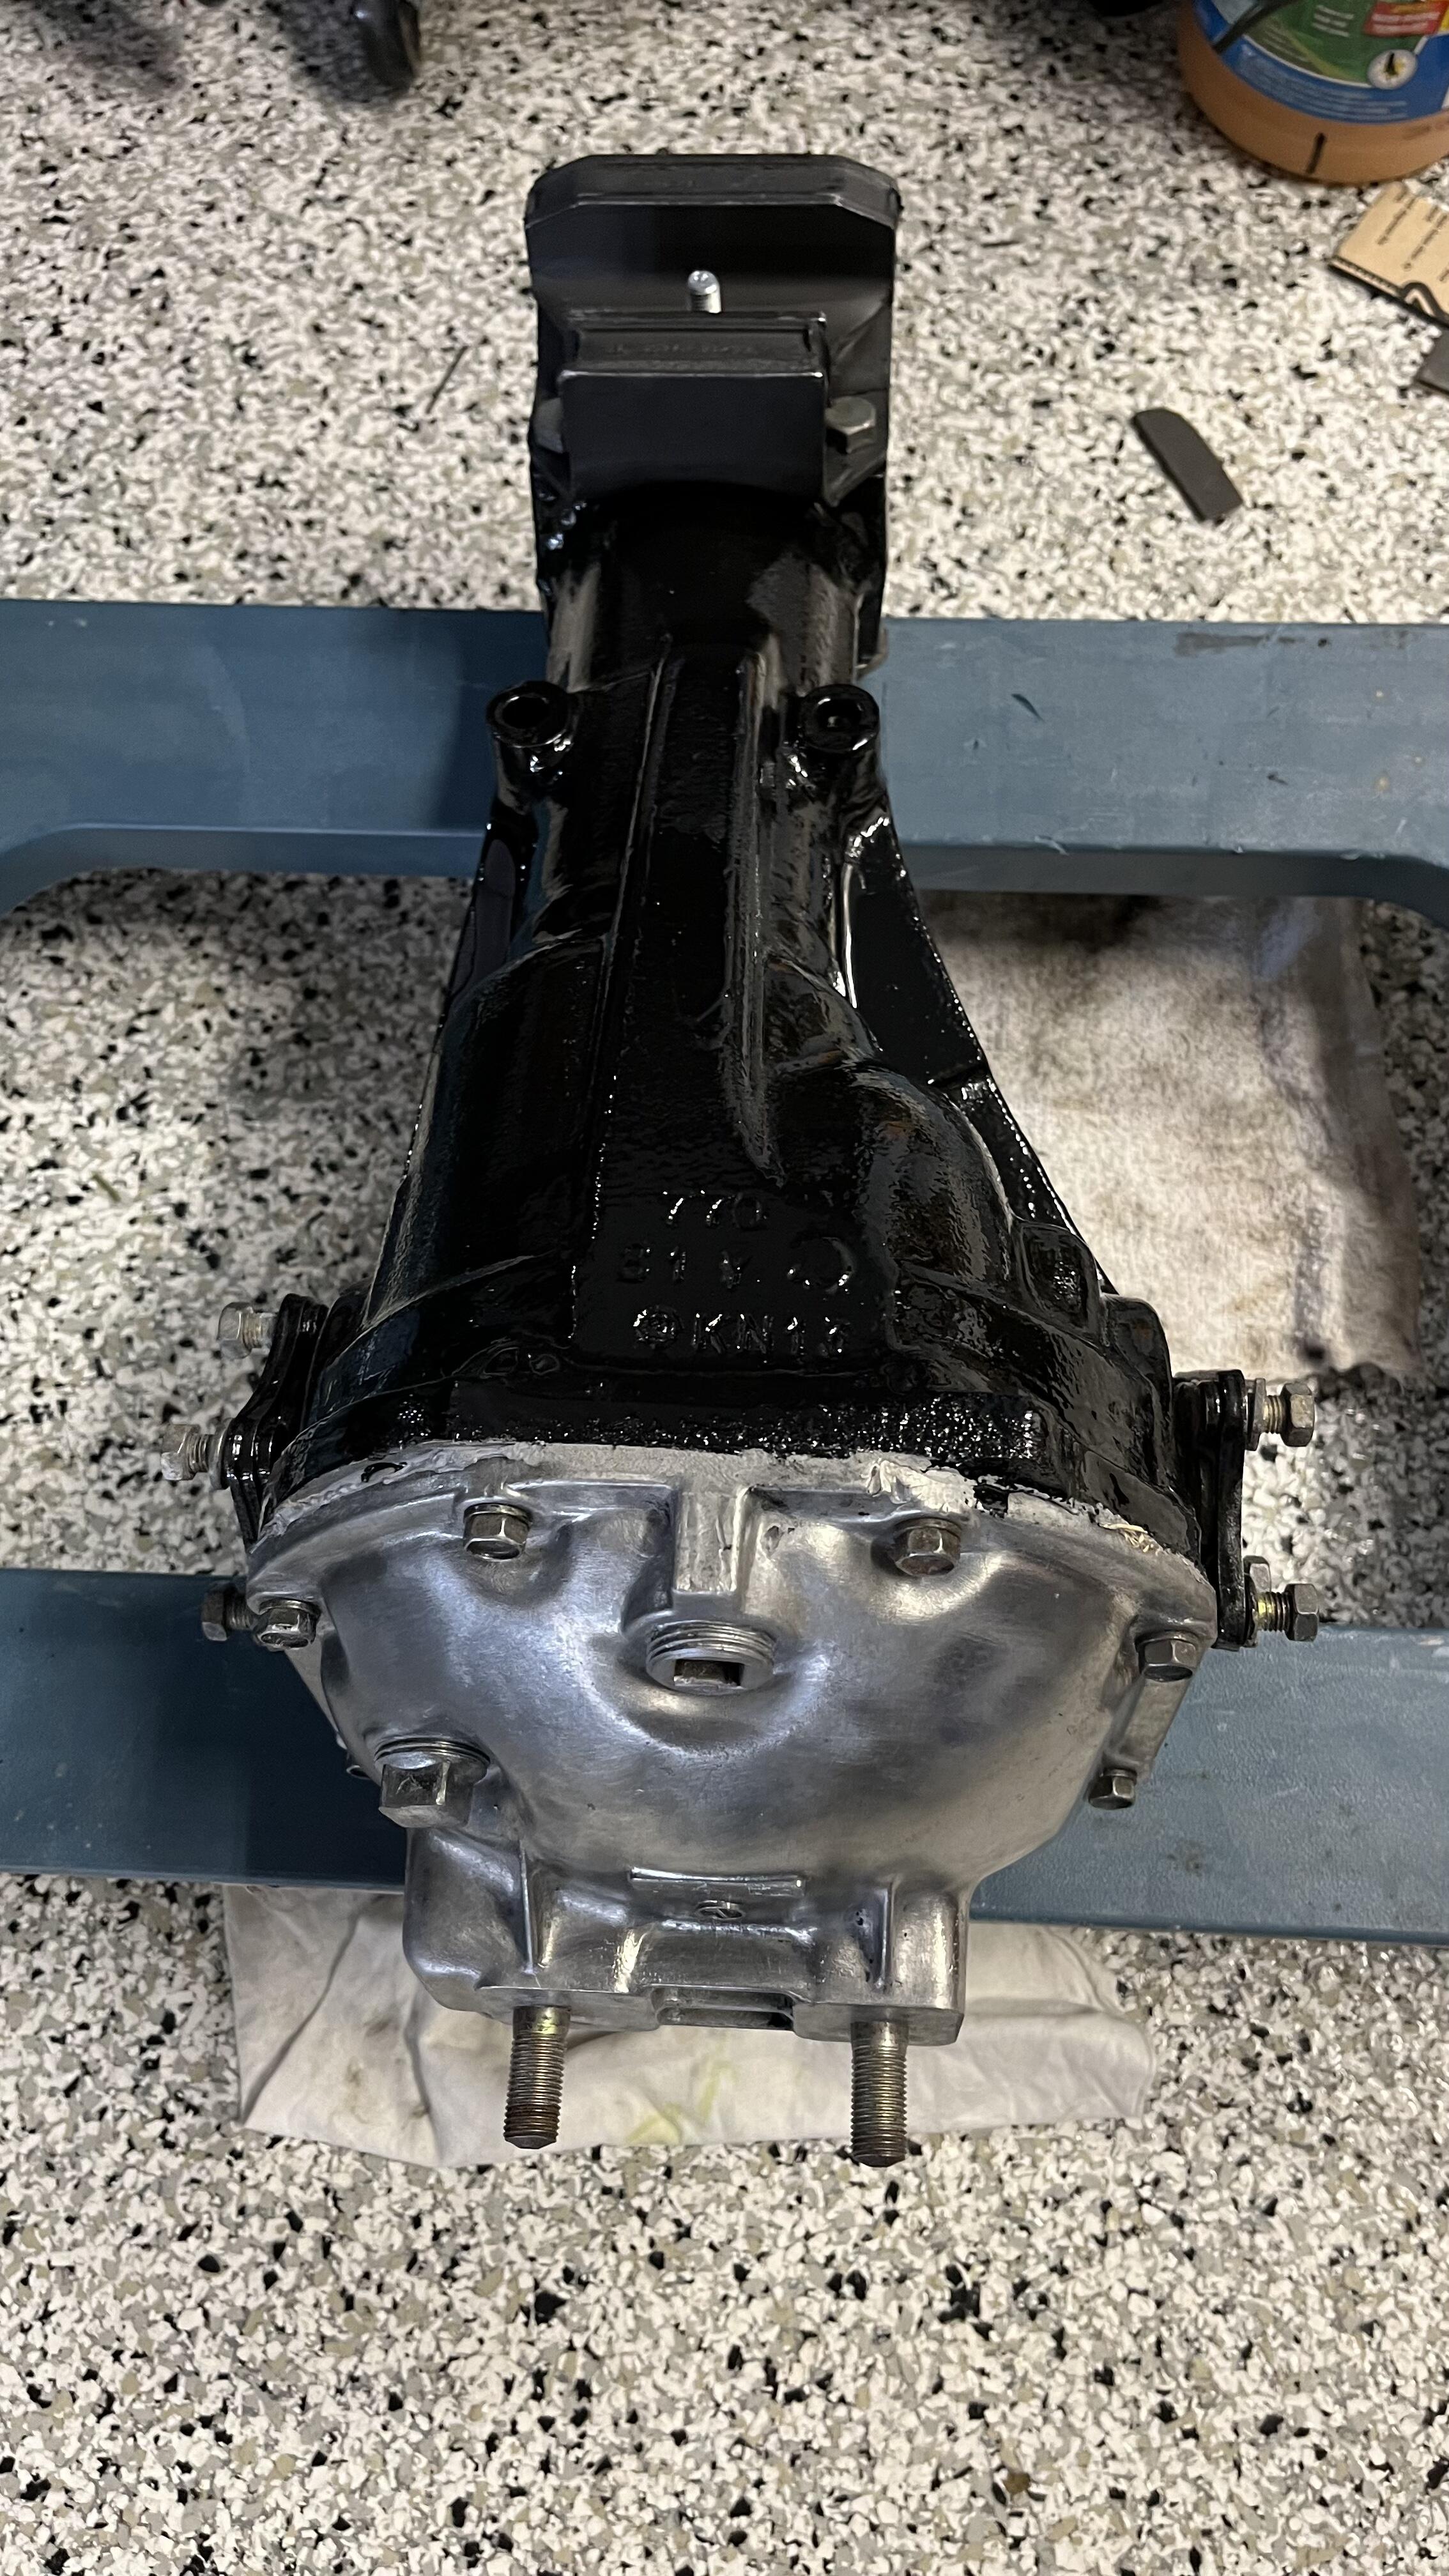
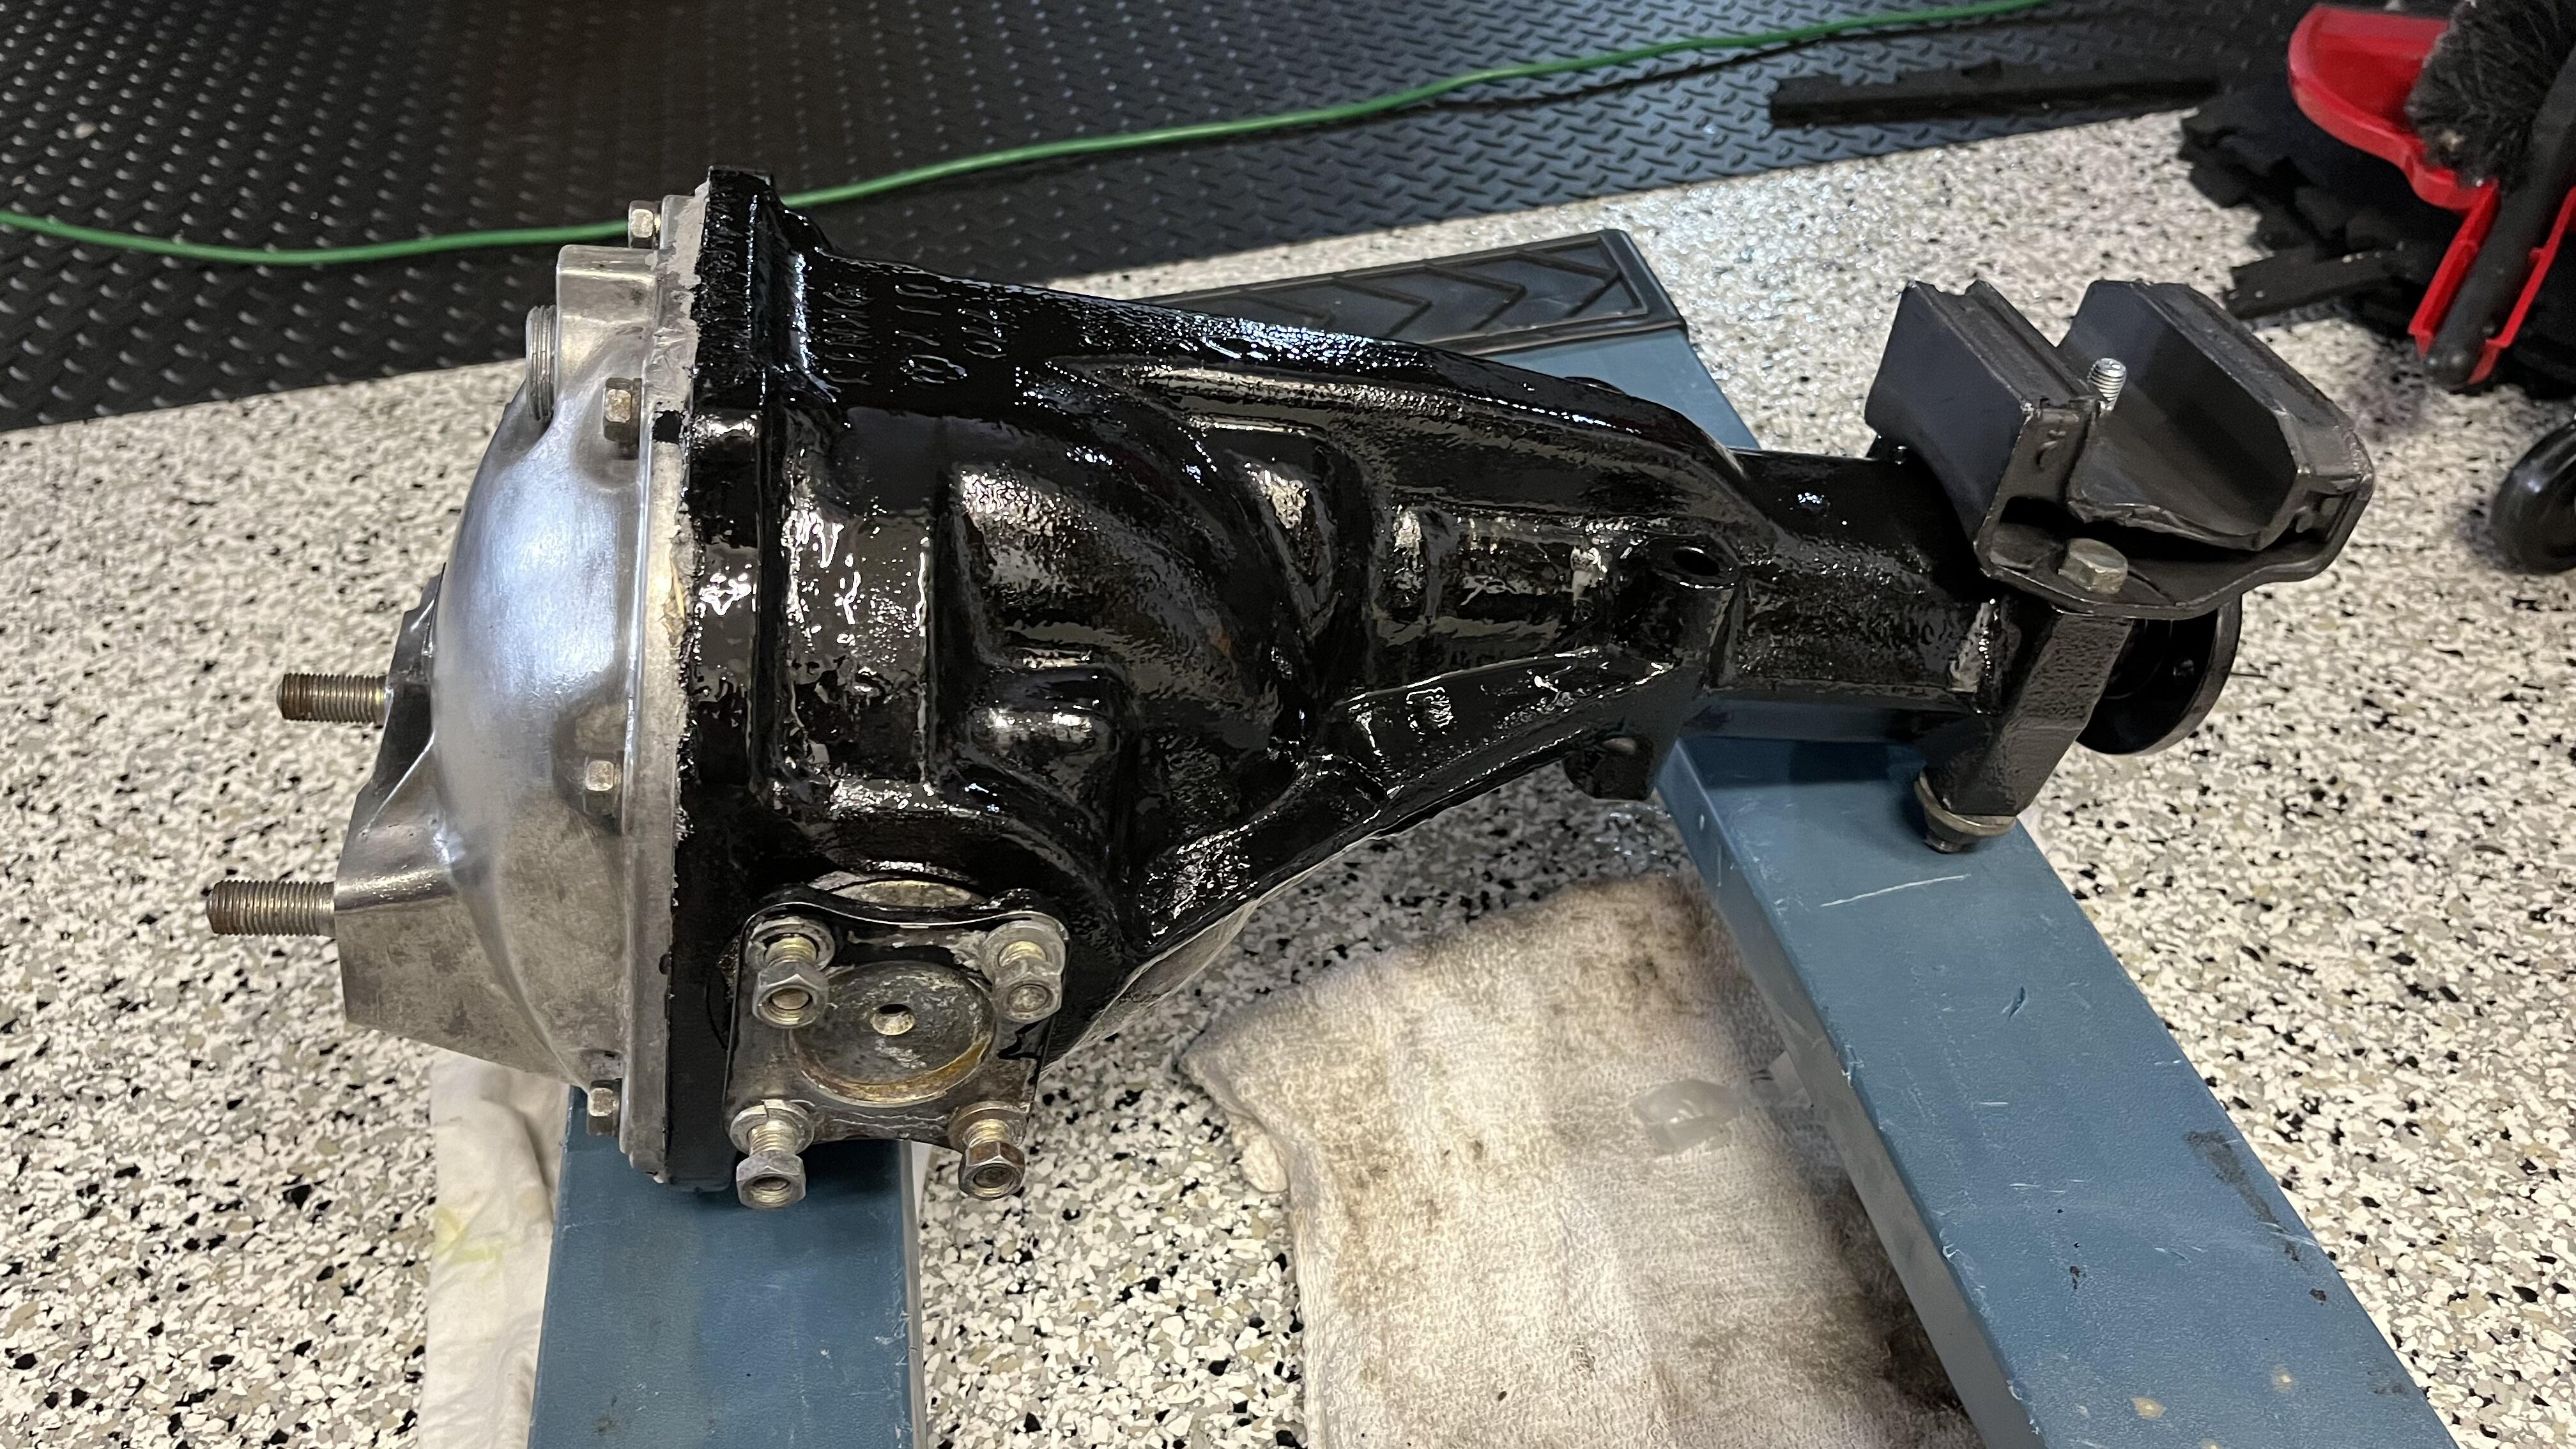
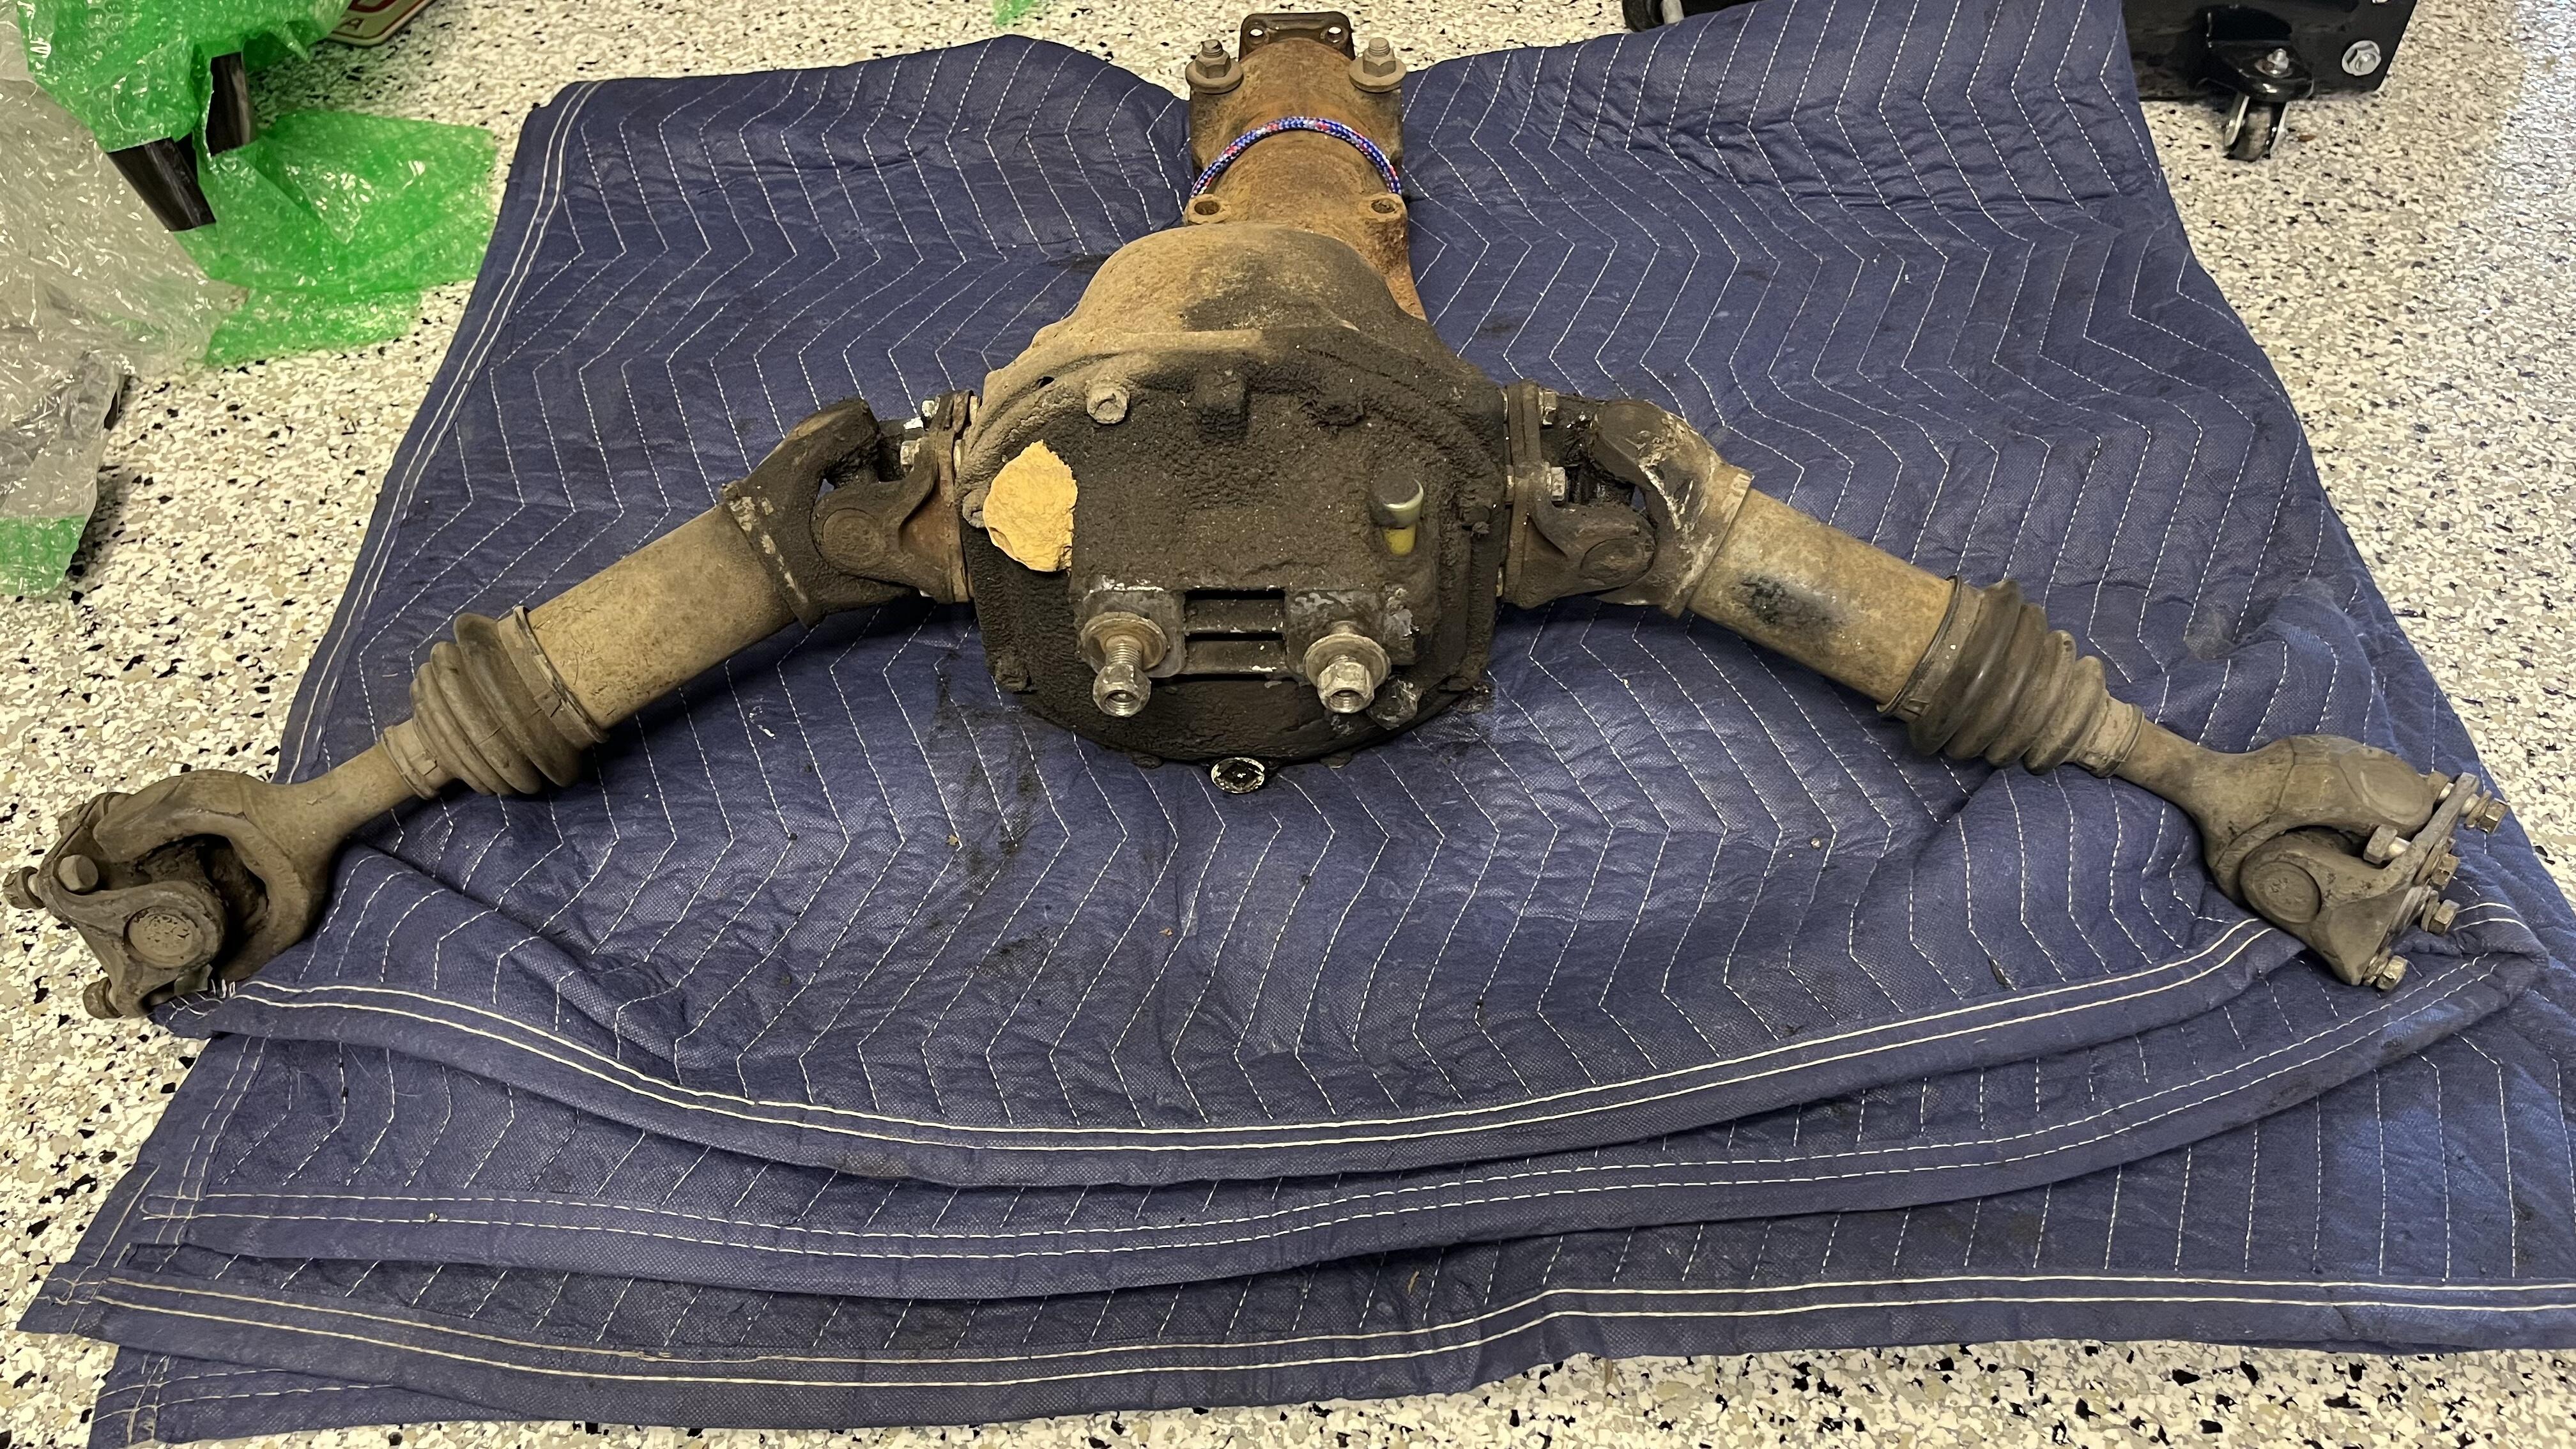
The ZX 39:10 differential I have is finally refreshed. I cleaned the inside with brake cleaner and wiped clean all the gears. The outside is painted with POR-15 and I kept the cover with the exposed aluminum. I put the old plug from my 3.54 differential into this one, because it uses a type for an box wrench vs the 1/2” drive type. I would not be able to service it with the ZX fill plug because there isn’t enough space between the back of the diff and the rear mount to inset a 1/2” drove socket. I put new synthetic 75W-90 gear oil in. Took more than what I expected. Read 1.3 quarts but it took about 1.7 before it began to run out the plug whole. Refreshing the 1/2 shafts now. Not fun cleaning all this gunk, and time consuming. Still waiting on my powder coated parts to be done. Sent from my iPhone using Tapatalk


-
Thanks Dan. I tried to find that posting. The search function on the forum isn’t great. You asked about the differential removal. So if I had to remove my differential again since your might be doing this soon here is how I’d do it now . 1. Remove the sway bar. It blocks easy access to the propeller shaft bolts. Not required but will make it easier. 2. Unbolt Half Shafts and propeller shaft from Differential. If the car is on jacks make sure wheels are off ground so you can rotate them to get different angle access to the bolts. 3. Tie the nose of the differential to the strap above diff. I used a slip knot so I could easily lower when ready. 4. Drain the differential-easier while mounted on car than sitting on the floor. 5. Remove skid plate under cross member. (2 bolts) 6. Unbolt differential from the crossmember mount (single bolt on cross member) 7. Remove differential crossmember (4x14 mm bolts) This is where you need to be careful. Lower the car and put a jack under the back of the differential with a little support. 8. Unbolt differential from mustache bar. 2x20mm 9. With the weight of the differential supported by the jack and the wheels of the jack orientated forward and aft. Slowly push the differential studs out of the mustache bar . Once they’re clear. Slowly lower the jack to to floor. Lift the back of diff off the jack and then untie the slip knot and lower the differential nose. You’re done. Now I’d your have a transmission jack this would be much easier. That would be the preferred method. Sent from my iPhone using Tapatalk
-
Dan, I’ve completed the front Koni’s with Ebauch lowering springs. I’m very happy with the height and ride. I kept the stock insulators in the front. Next week will be the backs. I bought 240z insulators and will run Koni’s and Ebauch there also. I’ve finished my Differential refresh and just waiting for my Mustache Bar bushings and parts to get back from powder coating. I think the backs will be easier that the front because you can rock the whole assembly out from the car with taking the control arms off. Good luck! Sent from my iPhone using Tapatalk
-
Today I’m installing the technoversion differential stop. I have the bracket in but was wondering how much material to remove from the snubber. The instructions says most applications should remove the bottom two steps but then it says but measure first. It’s a bit hard to measure holding an 80lb differential up there. What’s is the general consensus. Do you want the snubber touching the differential or do you want a small gap? I know a few folks installed these recently on a 280Z. Thanks

-
Thanks ZedHead, that make the decision pretty easy. Good information there. Seems like the ZX one is a bit more robust just liking at the ring gear size. Sent from my iPhone using Tapatalk
-
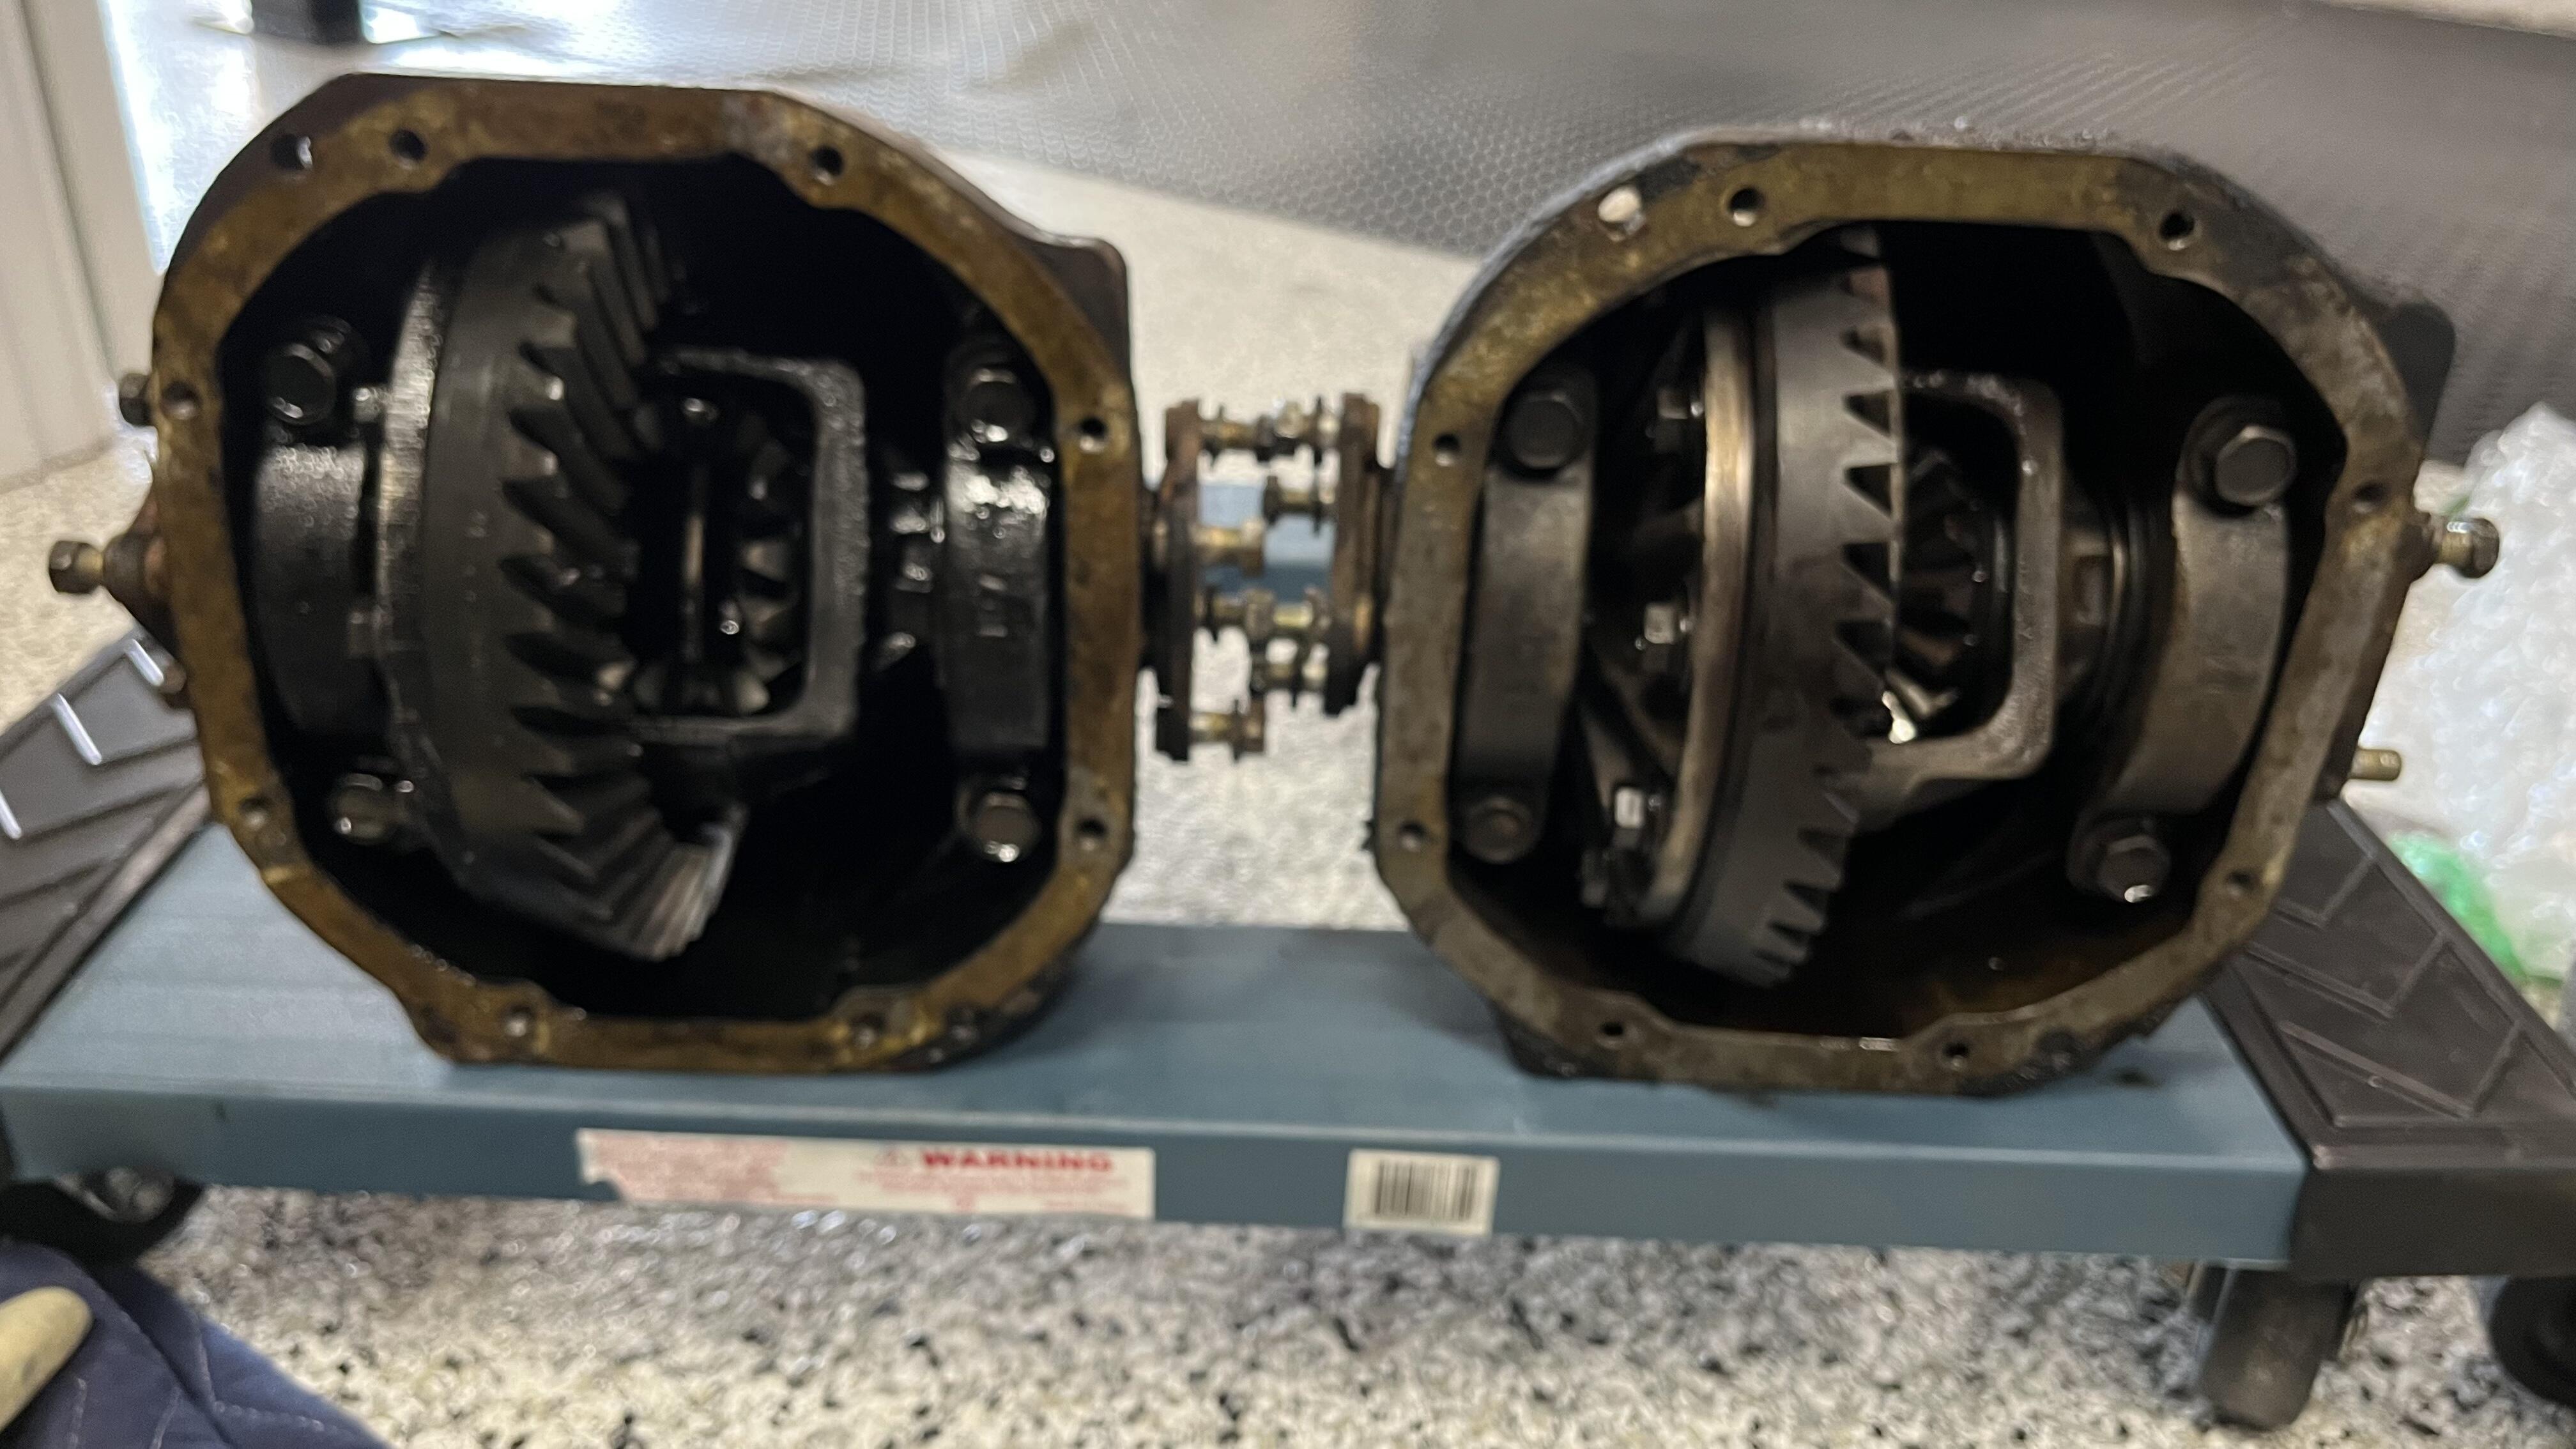
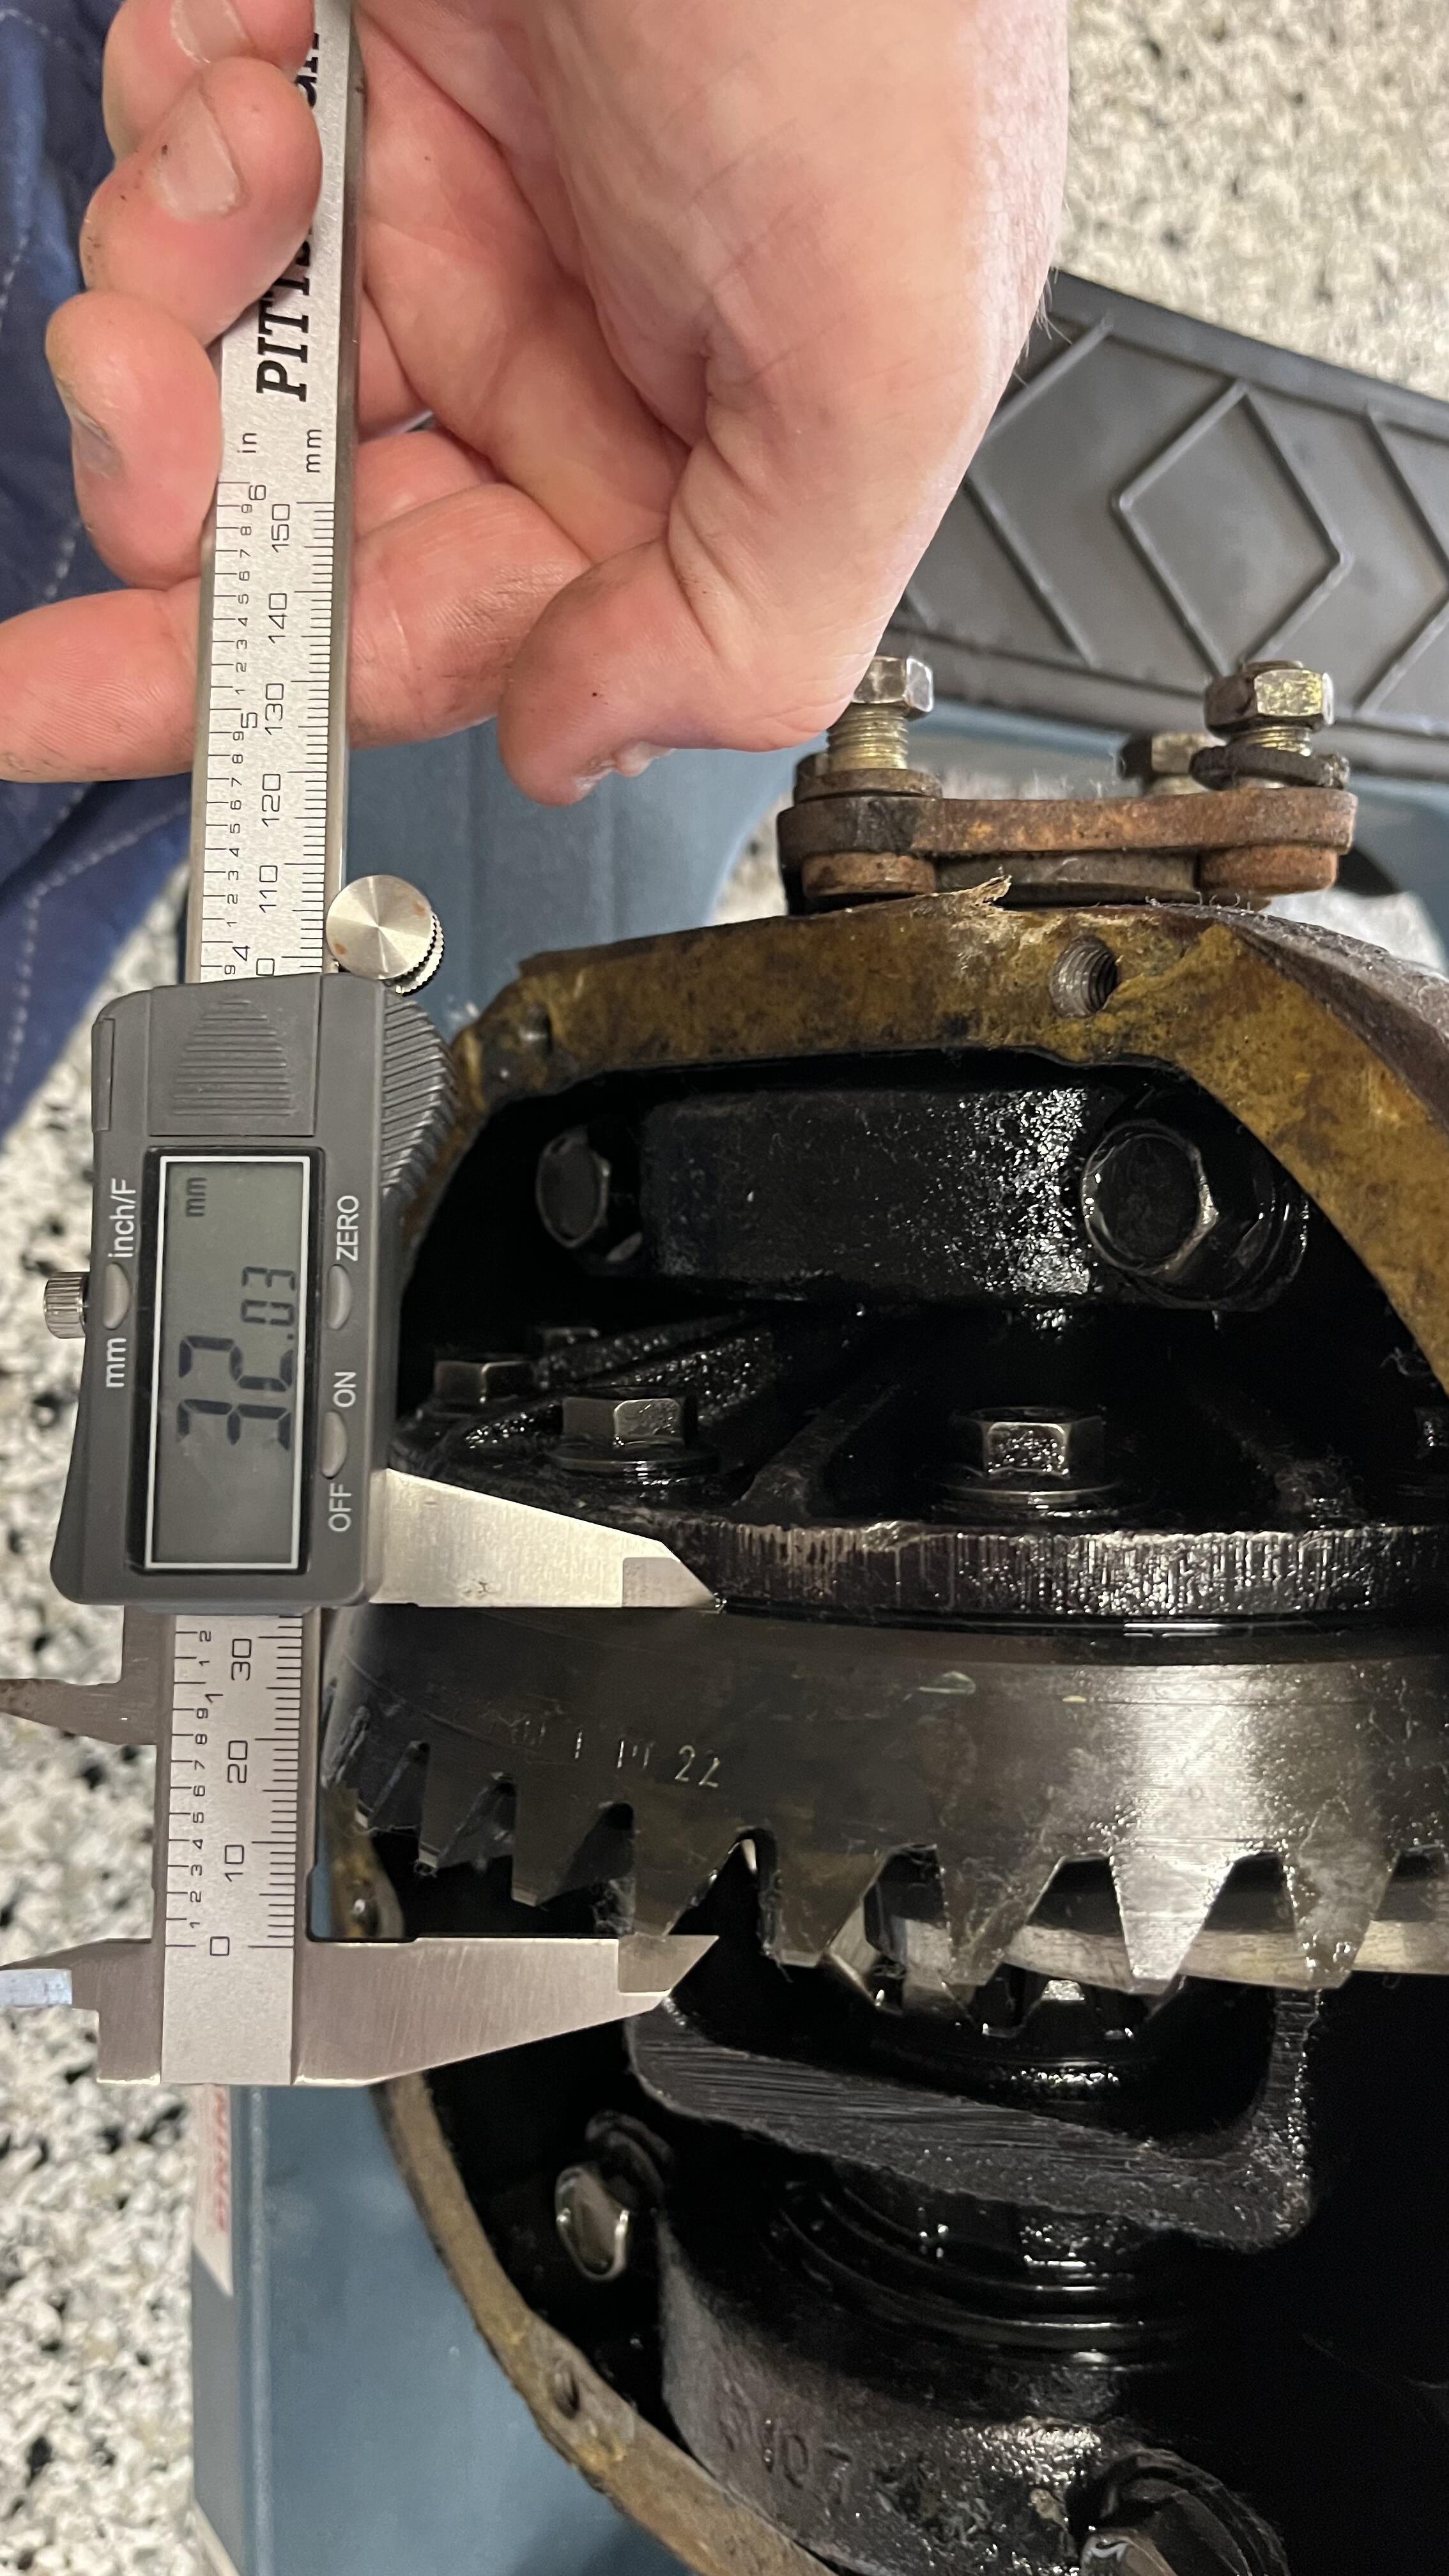
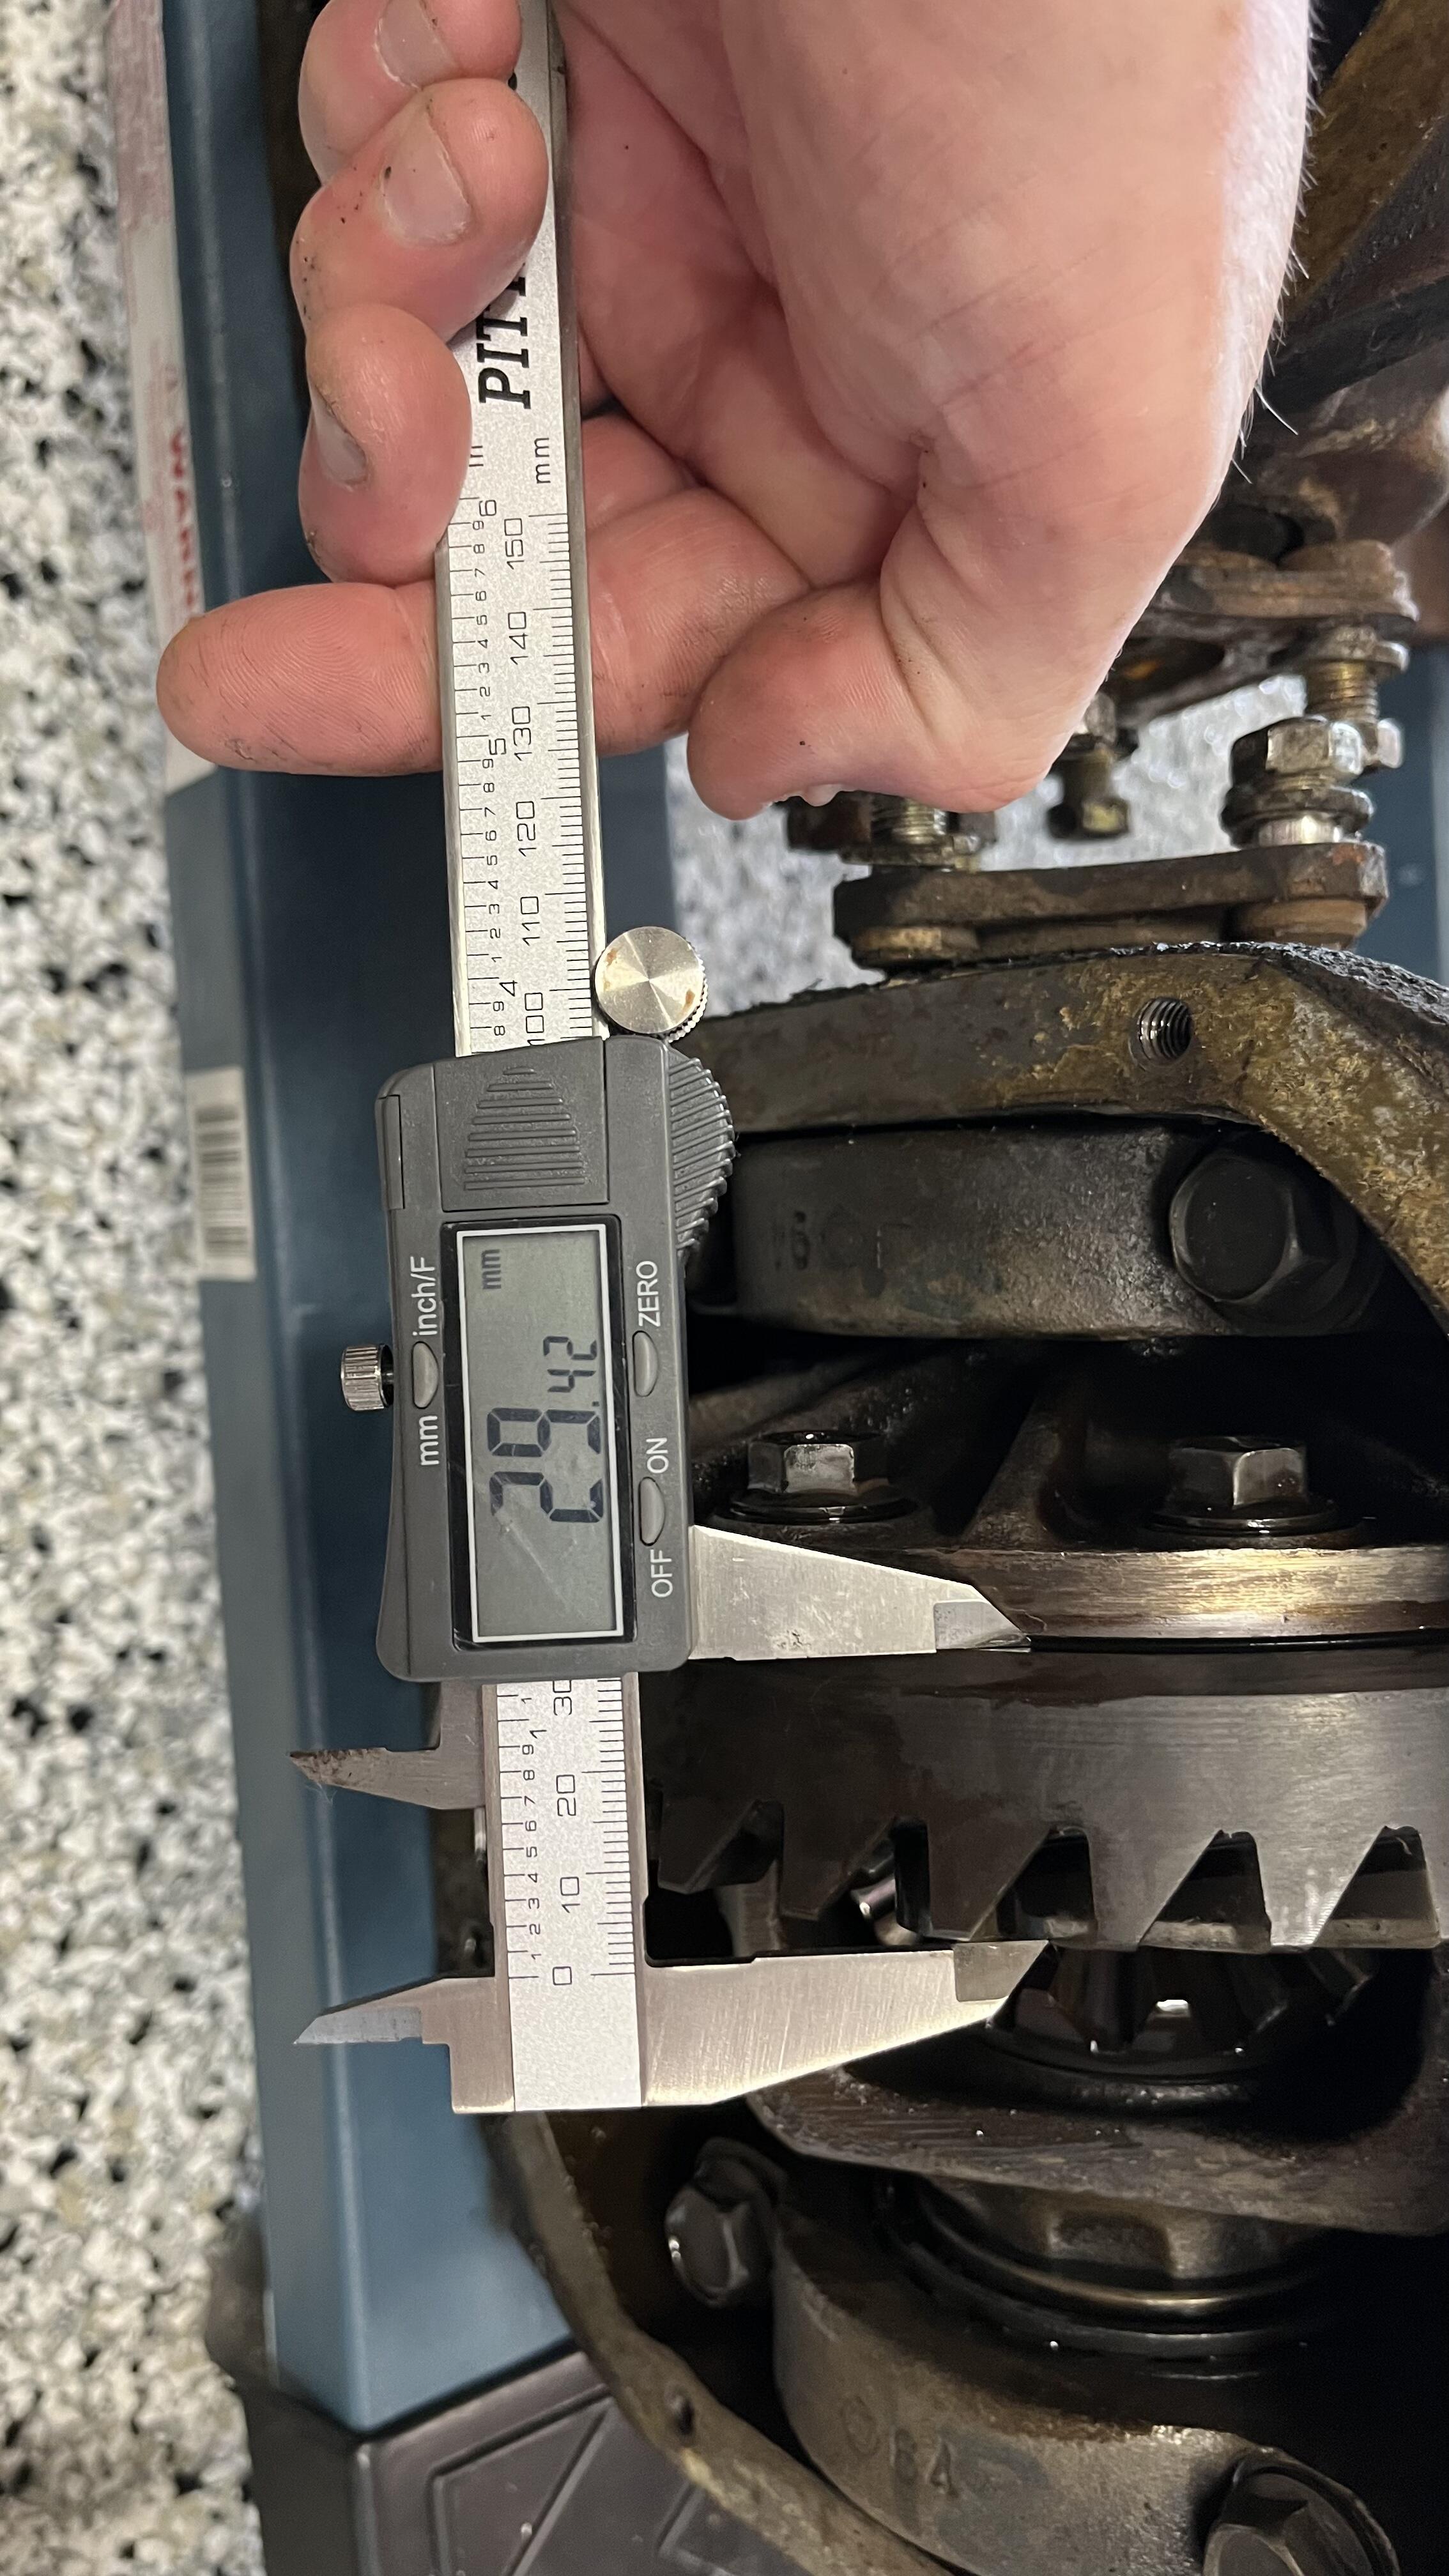
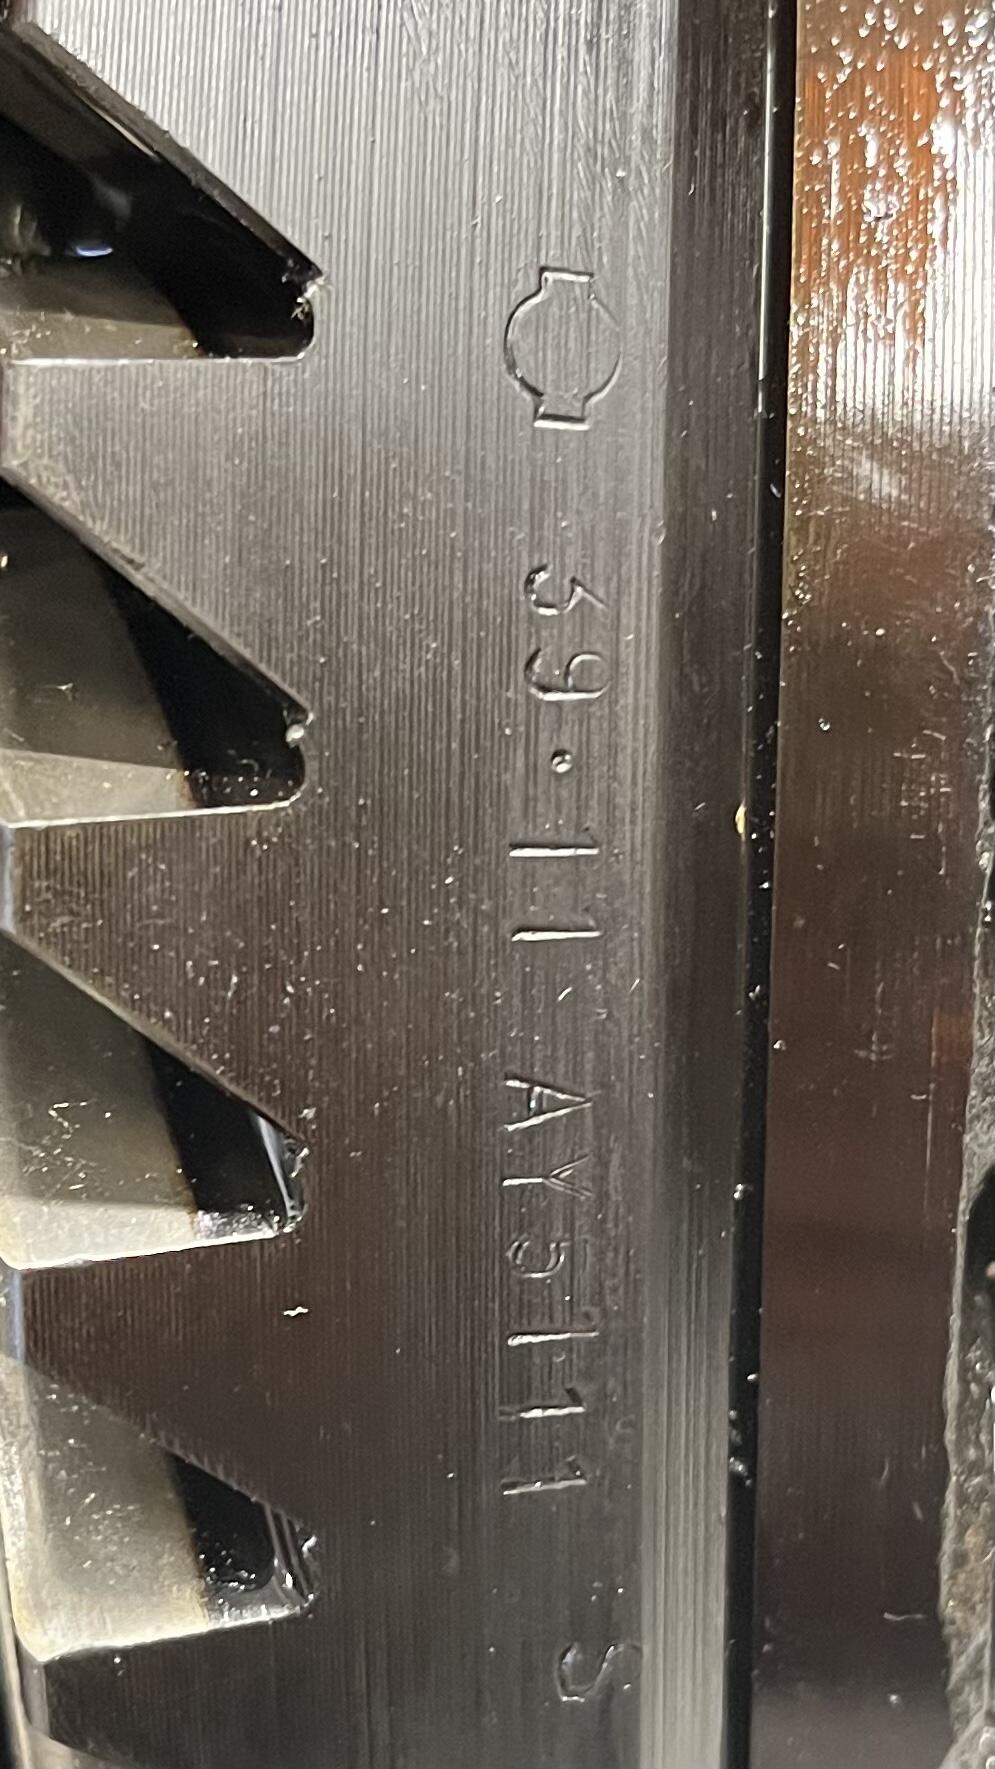
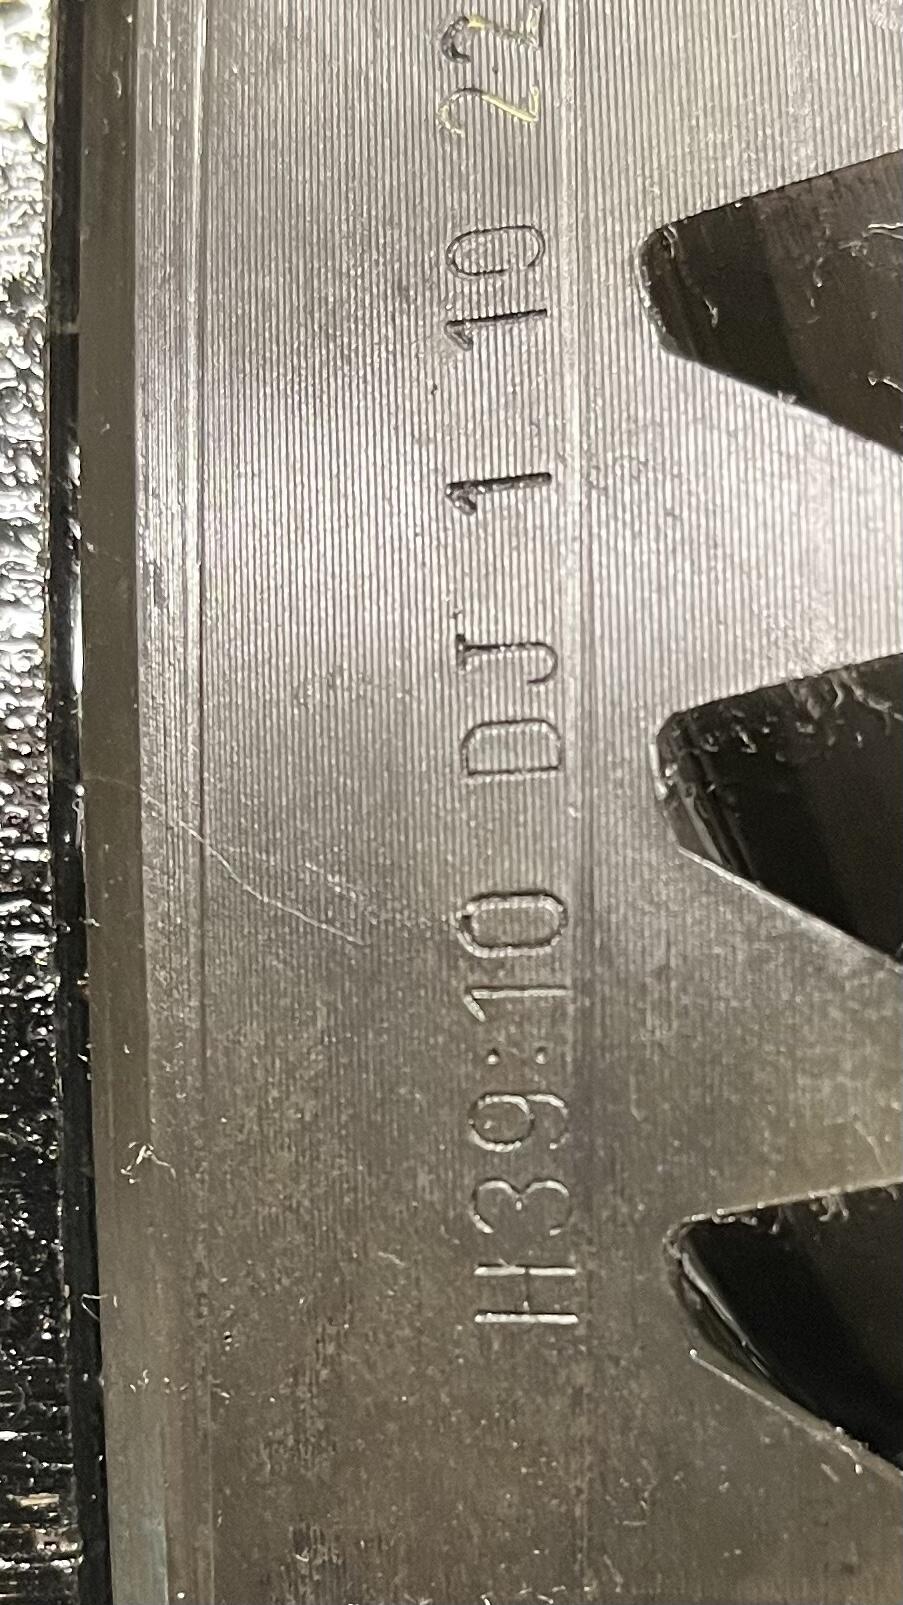
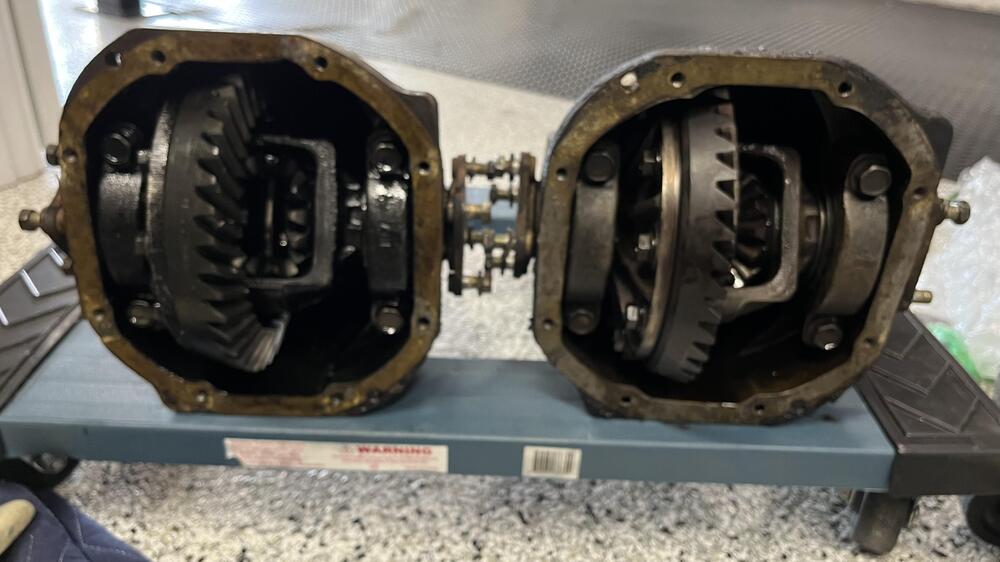
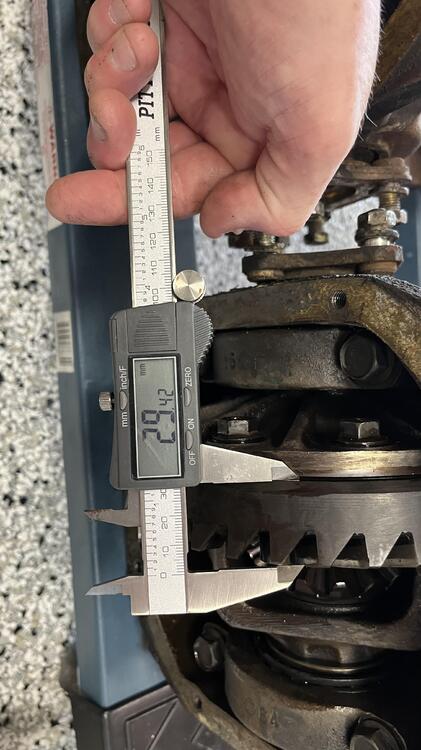
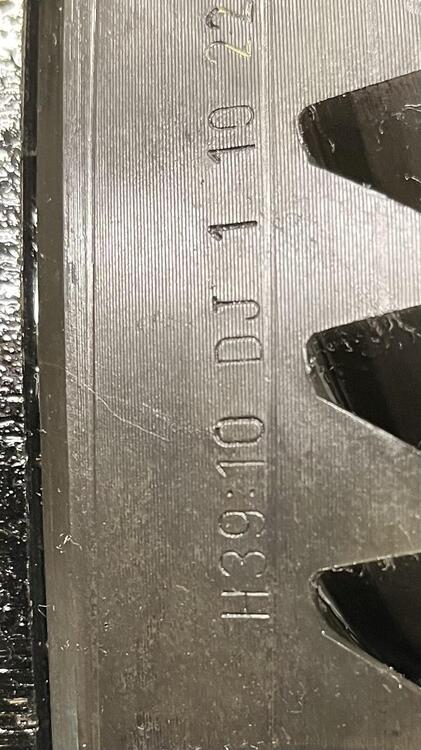
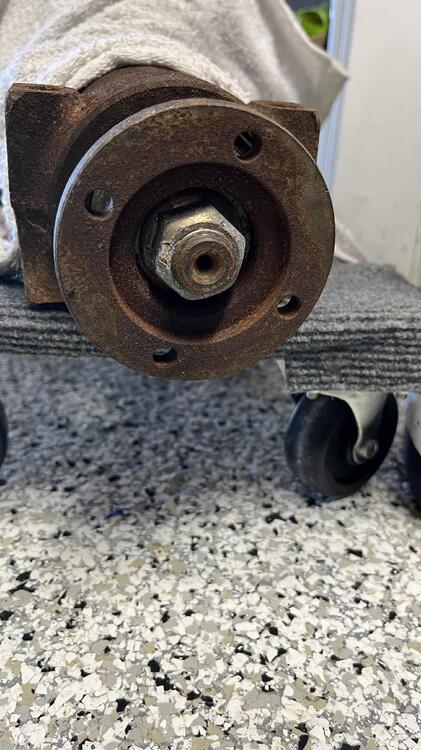
Dan, you don’t want to do it like it did. It’s hazardous for sure. I’ll post some lessons learned later. So after cracking open my old differential i discovered it is also a 3.9. It seems to be in good condition like the ZX one I have. These differentials are not 100% identical. The one I removed from the car is has 39.11 stamped in the Ring Gear. The replacement differential I got from a 1982 ZX has 39.10 stamped on the ring gear . The ring gear of the old Differential is thinner that the one from the 82” ZX. 29 vs 32 mils. I haven’t decided which one I’ll use. Seems like the one from the 82 ZX has more lash where the half shafts mount the my old one. . Here is some pics of the differences. The 82 ZX Differential is in the left in the pic.


-
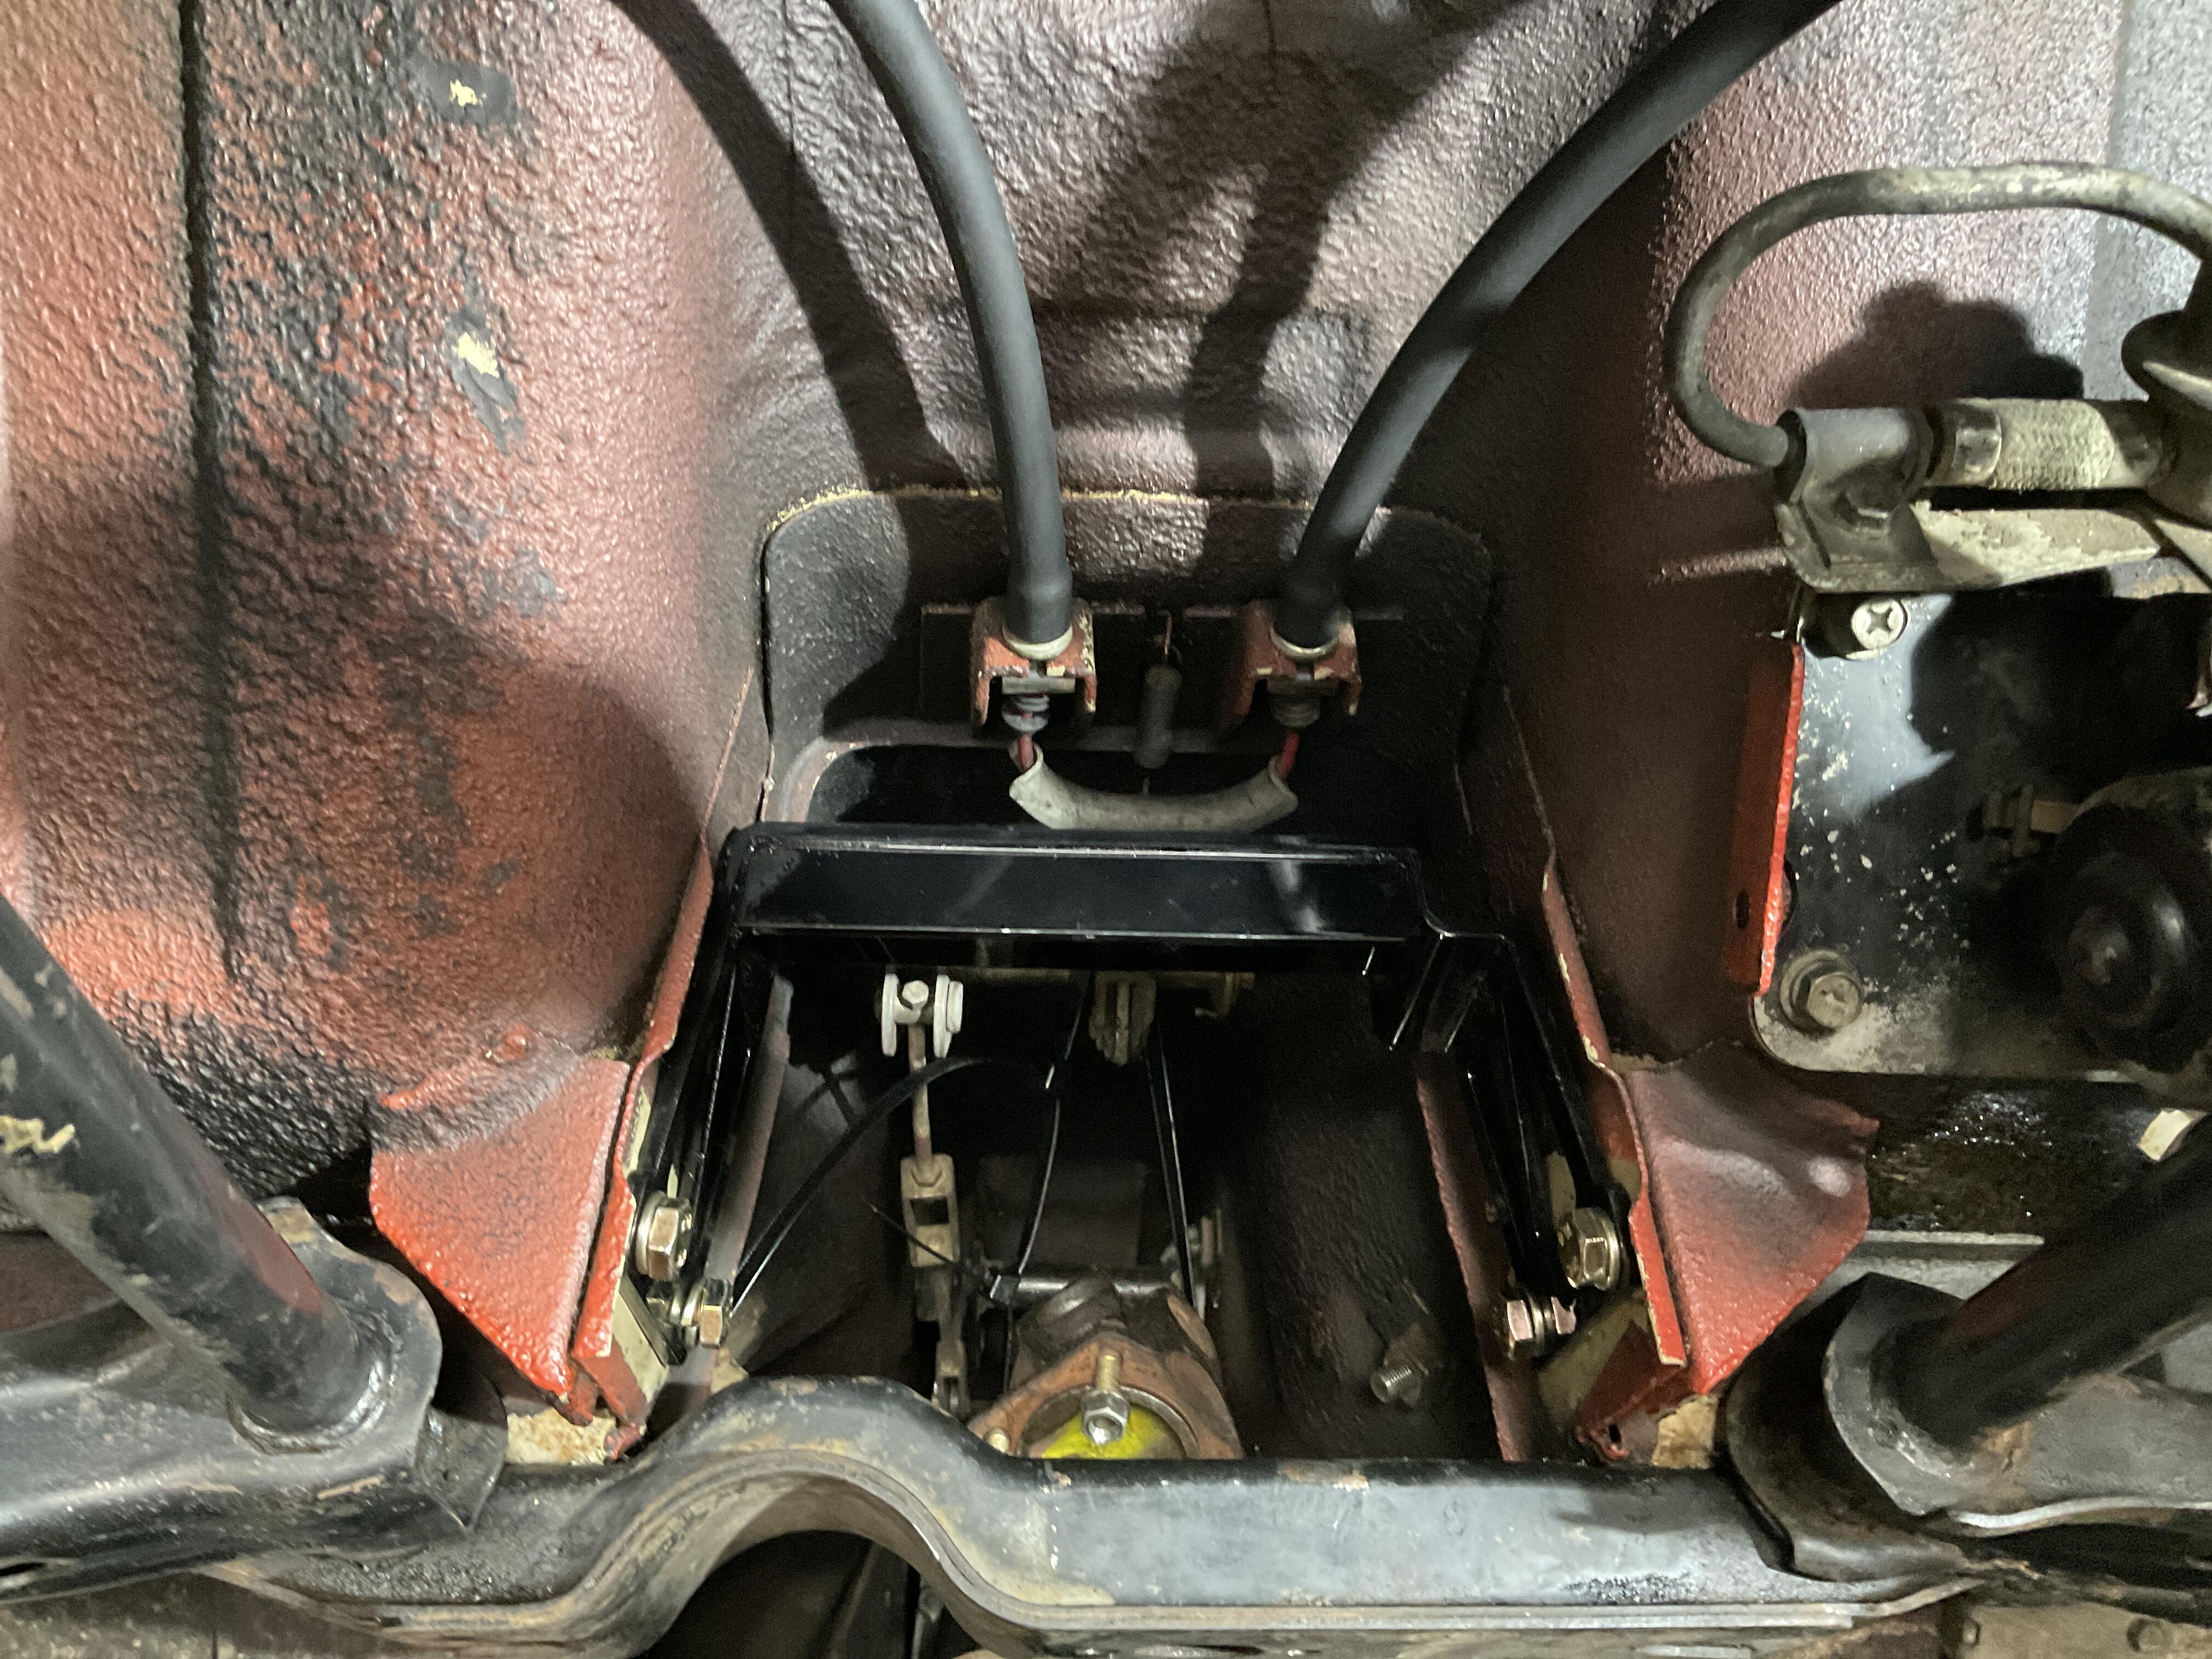
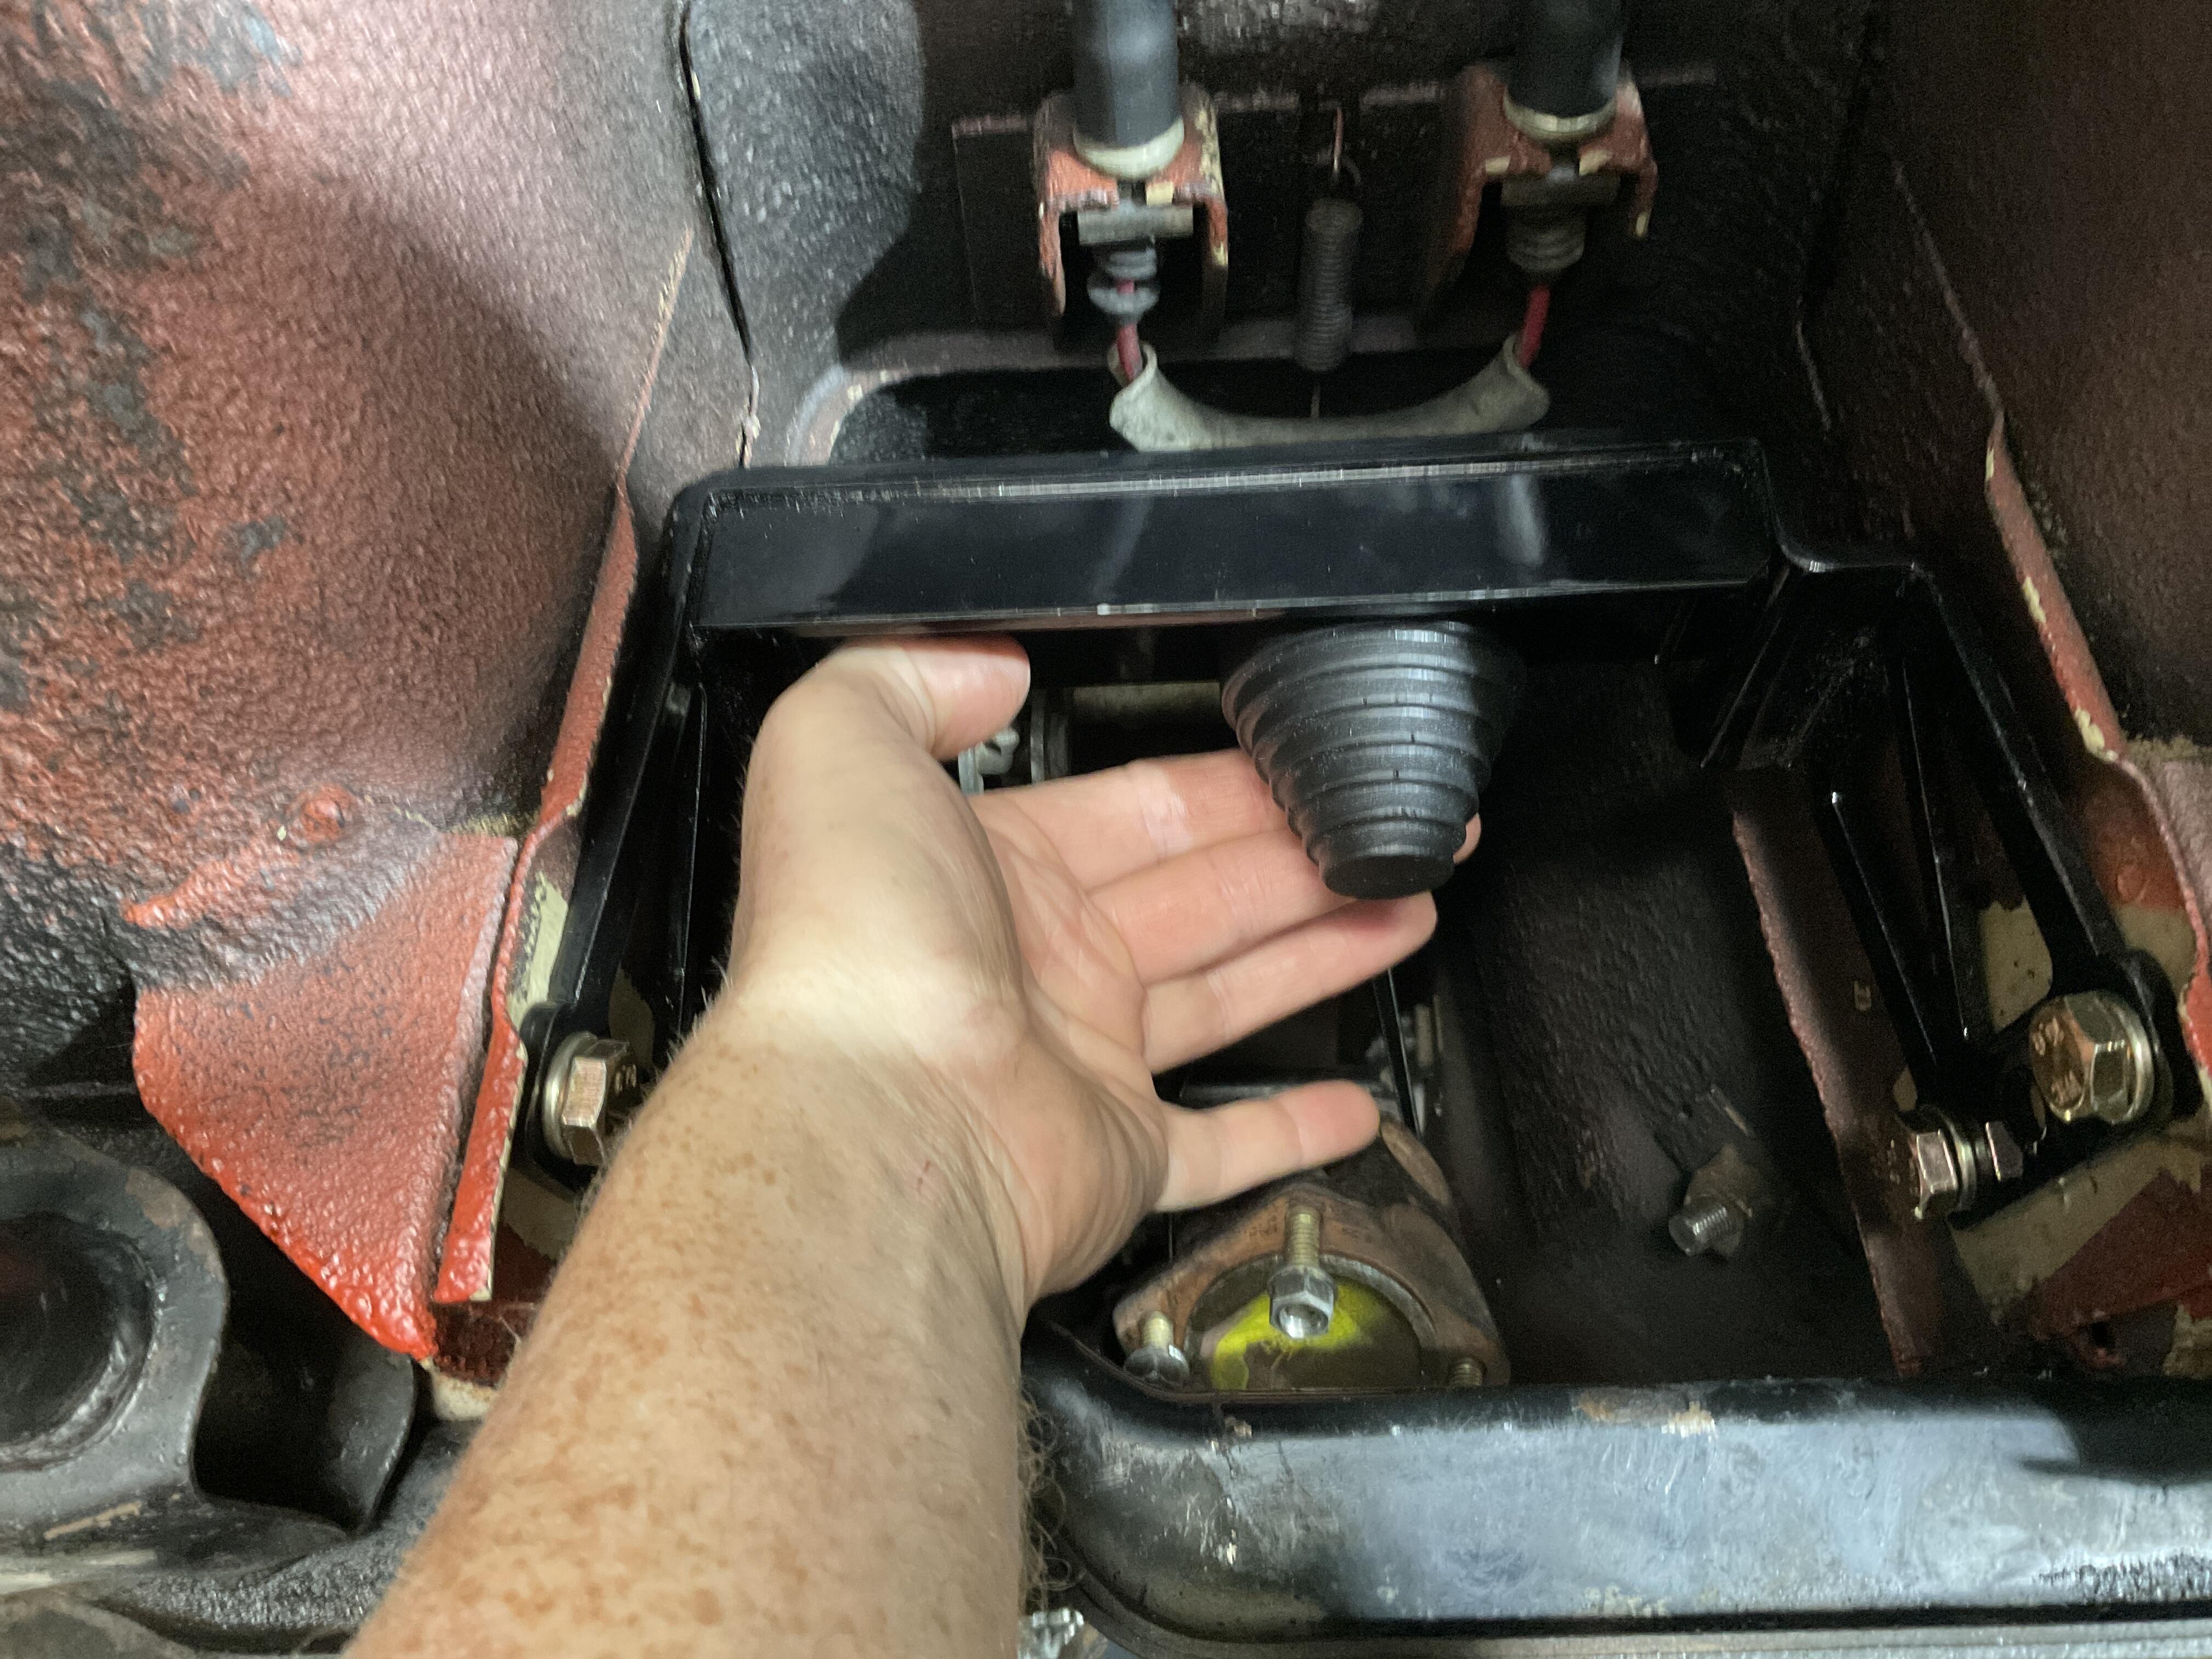
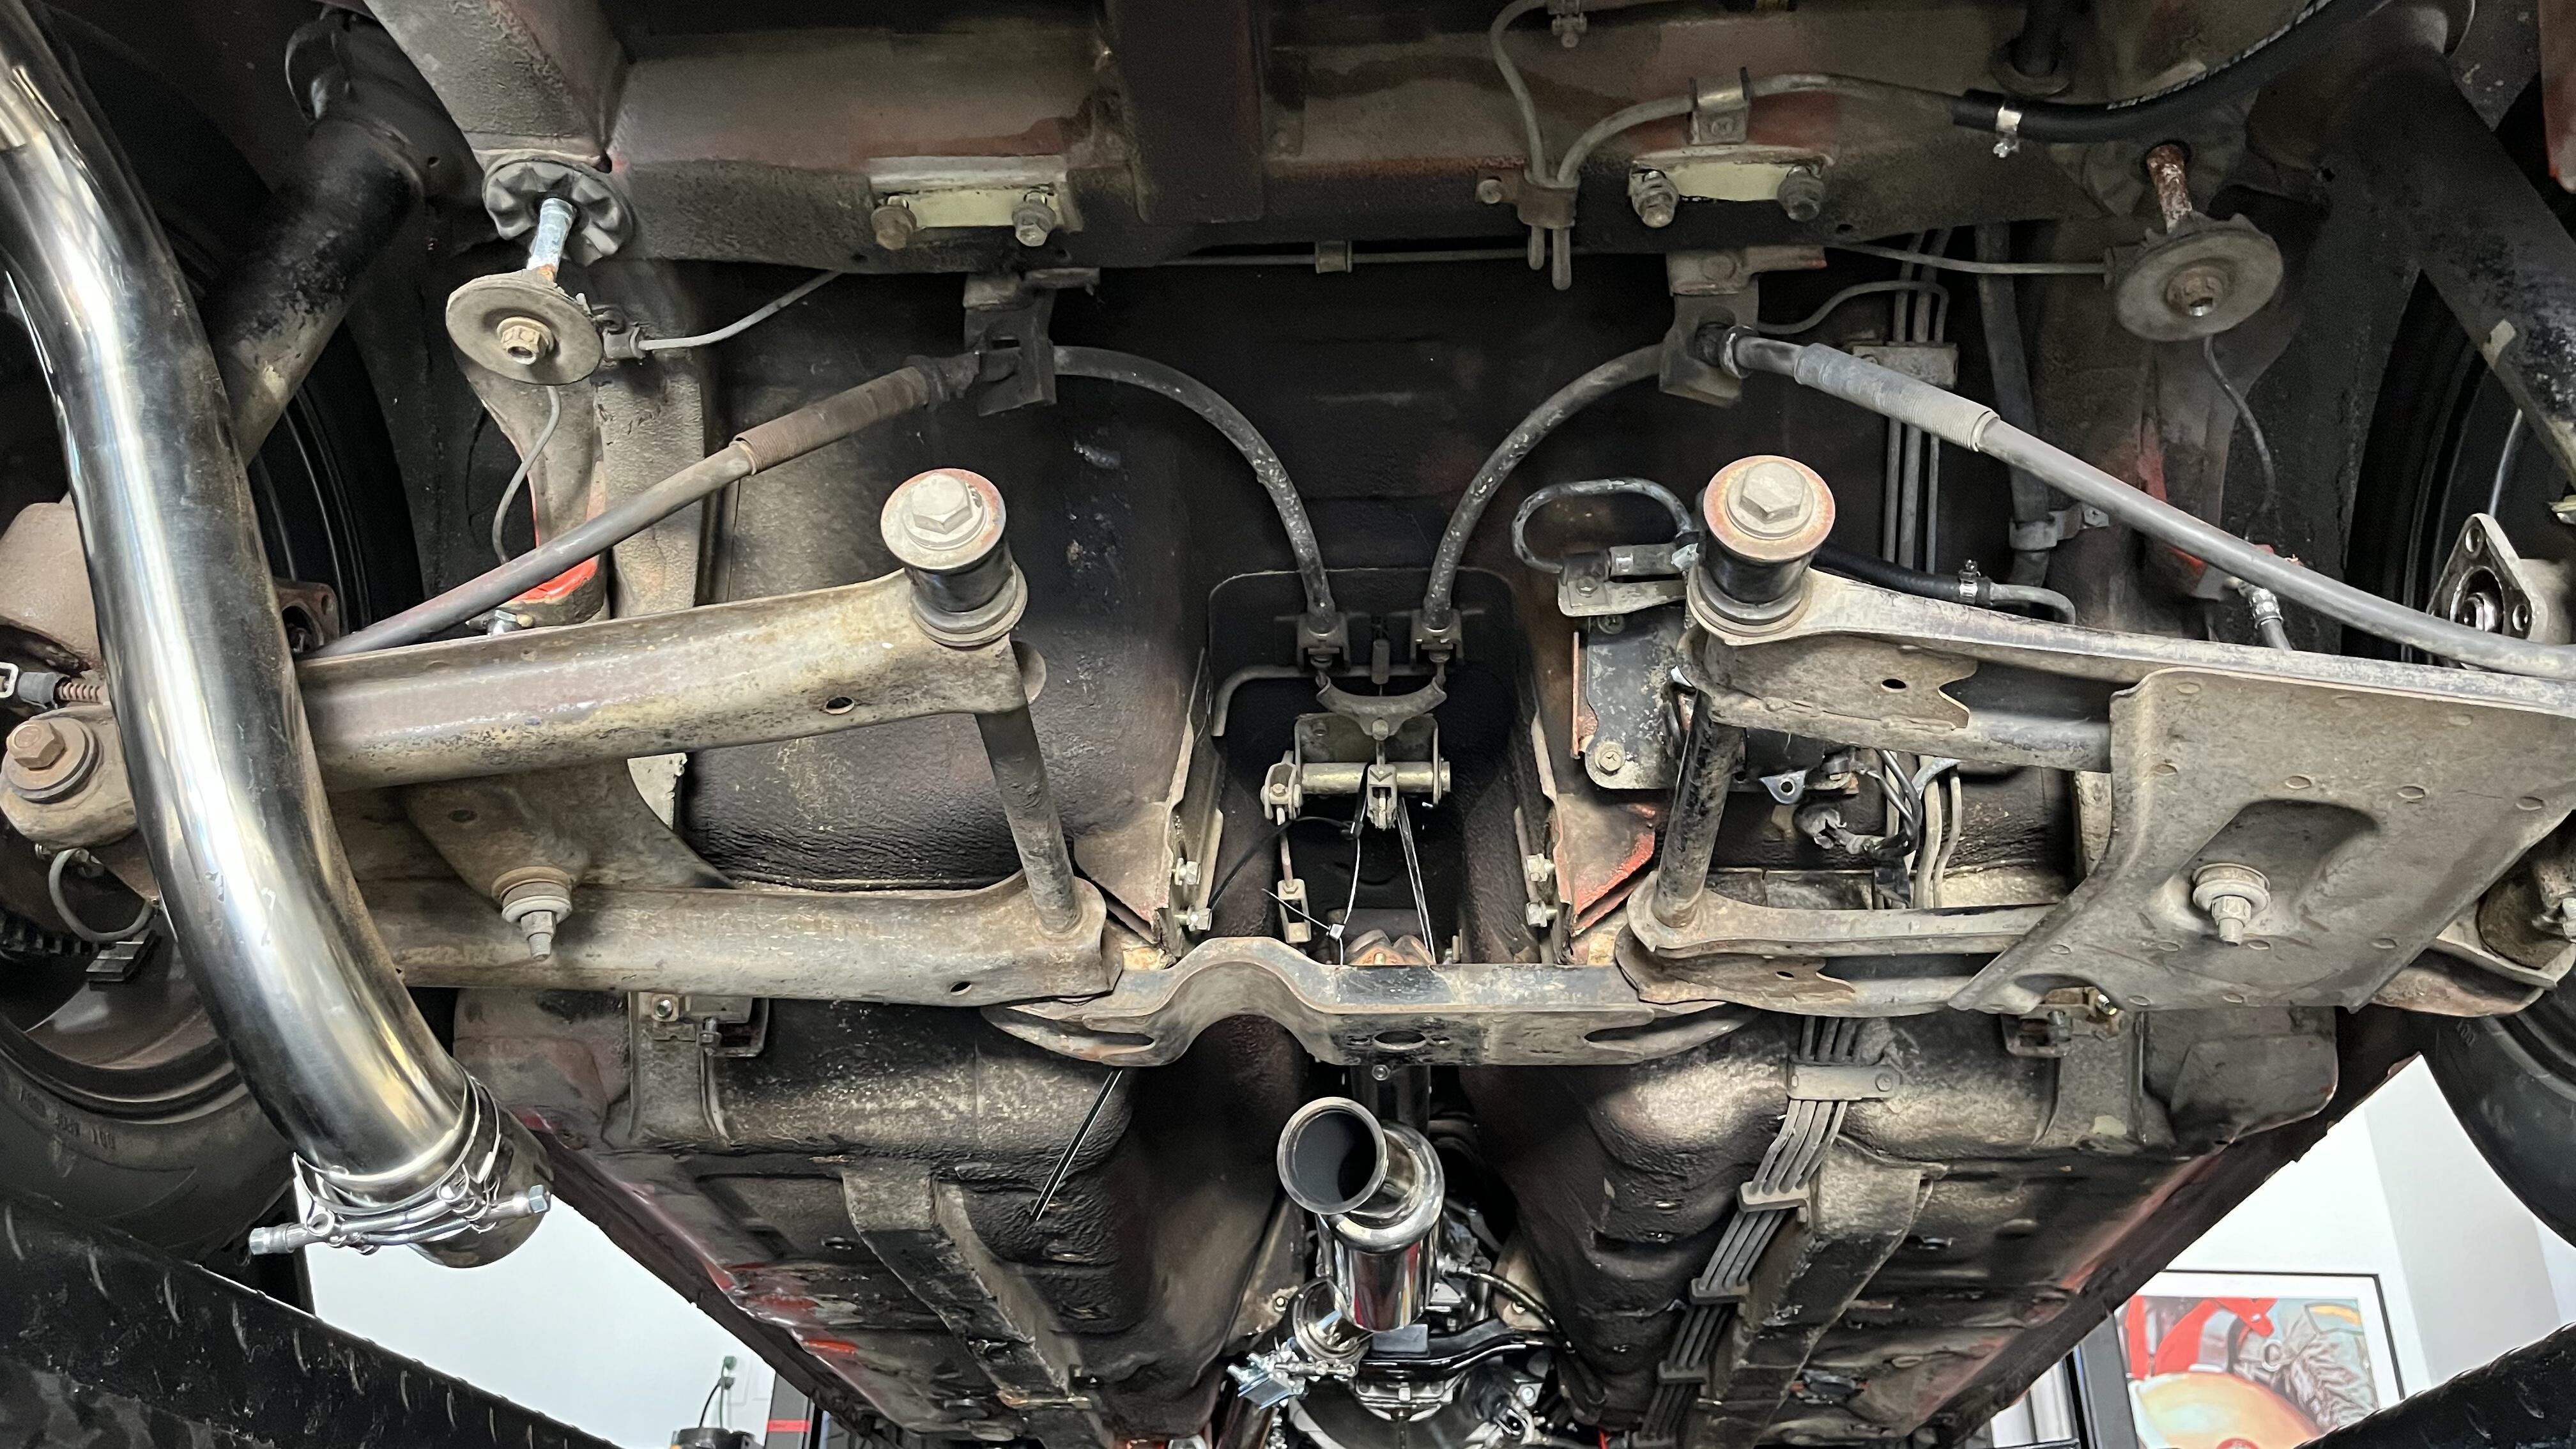
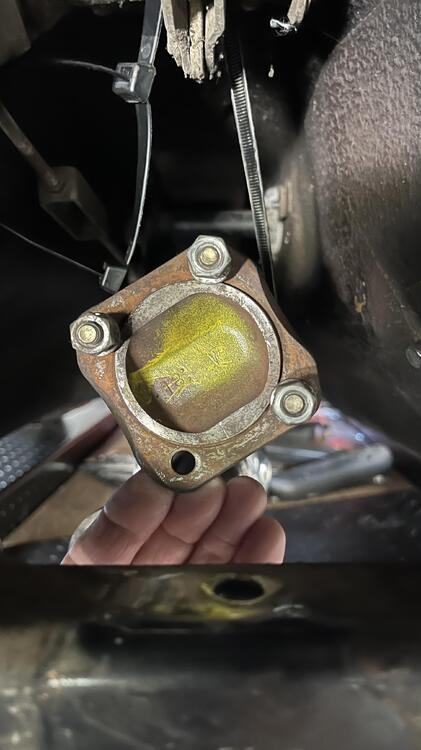
I decided to start investigating my rear differential and the noise back there. While loosening the diff drain plug it became obvious the the bolts holding the diff to the mustache bar were loose. Loosen enough to allow movement of the differential. I decided I’d make a run at getting the differential out, so I could install the new mount and TechnoVersion stop. It wasn’t an easy task, potentially hazardous as the differential is very heave and awkward. I had to remove mine with the half shafts installed because of one stripped bolt on half shaft. Took me all morning to get all this out. Heres are some pics. Of note the part of the differential that connects to the propeller shaft has a different mounting plate on my differential and the ZX one. Should fit fine because I measured the inner flange diameter and they’re the same. Bolts are 8mm diameter on both. Mustache Bar bushings ate shot….got new ones on order. Can’t wait to remove the old ones🥲 made a video showing how loose the differential. See link


-
Got the car registered today, big milestone….last time it was registered was 24 years ago. Sent from my iPhone using Tapatalk
-
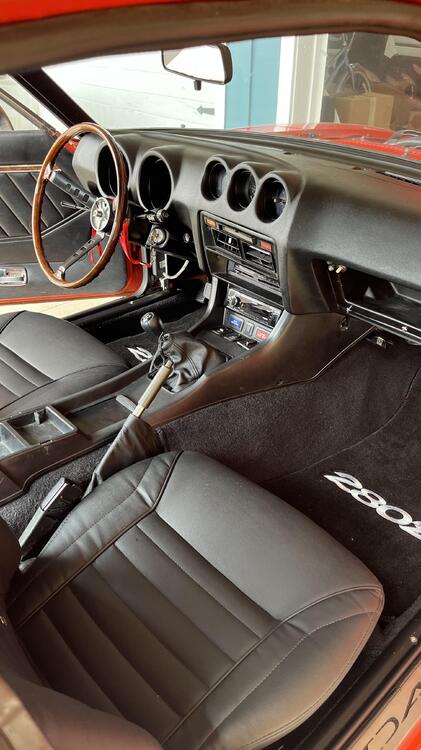
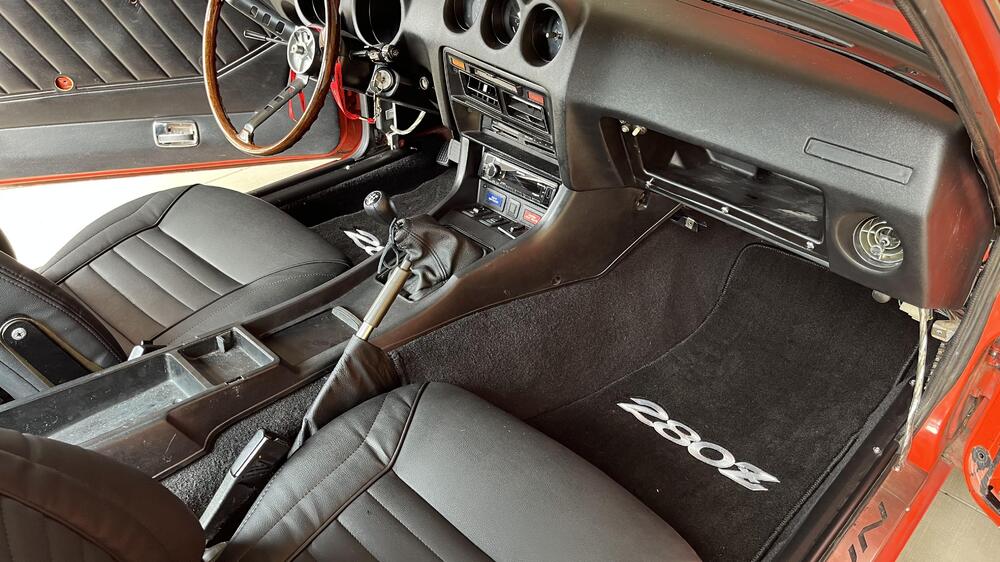
Making progress on the interior. I decided to go a different direction due to the challenges of a custom interior. I don’t have the proper tools, experience and skill to do it right. I decided to buy an ACC molded carpet kit from Rock Auto. I’m pretty impressed with the quality. Way better than the MSA kit I was going to work with . It took time to get this new kit in but I’m very happy with the quality and fit. It’s cut pile, with a molded rubber backing and the a layer of jute matting. It comes rolled up so I set it out in the sun for a few hours to work out the kinks. The install was time consuming…three days to get it all in. The reason is you have to make all the cuts for the transmission, ash try, seat belts etc. Getting all the bolts for the seats, seat belts, rocker trim and so forth takes time. You also have to cut out the larger section where the HVAC section is. You have to trim slowly a bit at a time….fit, trim,fit, retrim for every section. You finish each day with sore hands and maybe a few finger cuts. It’s a bit messy too . The jute matting it very stout and hard to cut. The key is take it slow to get everything fit. It’s sitting pretty good, right now but a few days in the heat will help out. Take a look.!
-
Shhhh…keep talkin like that they won’t stop coming down here. Housing prices are crazy already and rude drivers aren’t welcome. Sent from my iPhone using Tapatalk
-
Looks like Siteunseen put his car for sale. 😂 https://bringatrailer.com/listing/1972-datsun-240z-206/ I looks like your car Cliff.
-
Just did my seats… there is a good video based on a forum member post.
-
This is a real problem and it’s everywhere. Here are some other ways to avoid scammers. 1. Have the person post a picture with a price of paper with specific information on the paper, with the item. I just sold a car using Cargurus and they required that I take a photo of the car with the door open, and a piece of paper on the windshield with a code they emailed me written by hand on it. This keeps people from using photos they pulled of the internet. 2. Not to offend anyone but a foreign accent or poor grammar is a dead giveaway. 3. People need to earn my trust. I call people before buying most of the time. People are are too anxious and willing to please are more likely to be scammers. 4. I also like to lead people with a false statement that is obviously not true but only to someone who’s informed would know. Like “Does this fender fit on the 1972 with the special edition headlight buckets”? Or something like…”I need a fender that fits the 1975 to 1981 Z not the earlier ones. If the guy says…”yes, it sure does”….then you probably got him. My mother in law got scammed last year with an Amazon email fake charge. She called the number was on the phone for 2 hrs the guy talked her into letting him have access to her computer where he stole all her passwords and credits card numbers. Took her to the cleaners..she was 79 Sent from my iPhone using Tapatalk
-
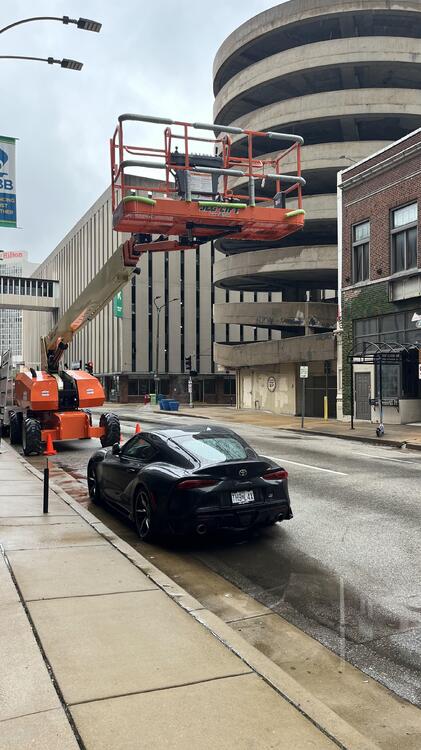
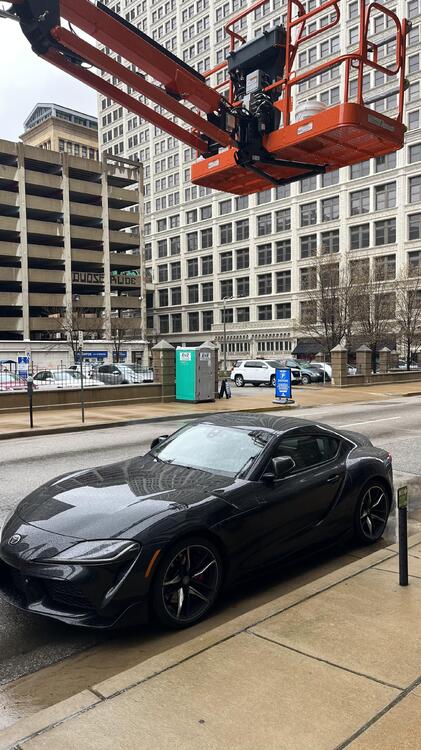
Off topic here…squirrel! I was in St. Louis for work this week and went for a couple walks downtown while I was there and saw this and took a pic. I can’t believe this person parked their car here or the lift driver parked the lift here. This is a 55k or more Supra.
-
I have an extra 280z carbon canister clamp. I also have a newly plated throttle linkage rod. Not sure if you got what you needed already.
-
Thanks for posting this, my driver’s side door makes a very noticeable “click” when I pull my lever to open the door. Its coming from this exact location you’re referring too. As the hook pulls on the eye loop the spring rod moves latterly causing this click sound and a also a binding feel. I put grease on mine but it didn’t help at all. I’m going to try a rubber grommet.
-
I don’t know about that but anything is possible I guess. I didn’t think undercarriage aesthetics was really all that important in the 70’s. And why does it have rivets on the corners where there seems to have a plastic cover on the plate. It’s weird! My plastic is mostly gone. And to answer your previous questions lit the top diff mount. You are correct. I was mistaking the solid all metal part mount they sell at at MSA and zcardepot. The MSA says you will get noise from is. I mixed my facts. Sent from my iPhone using Tapatalk
-
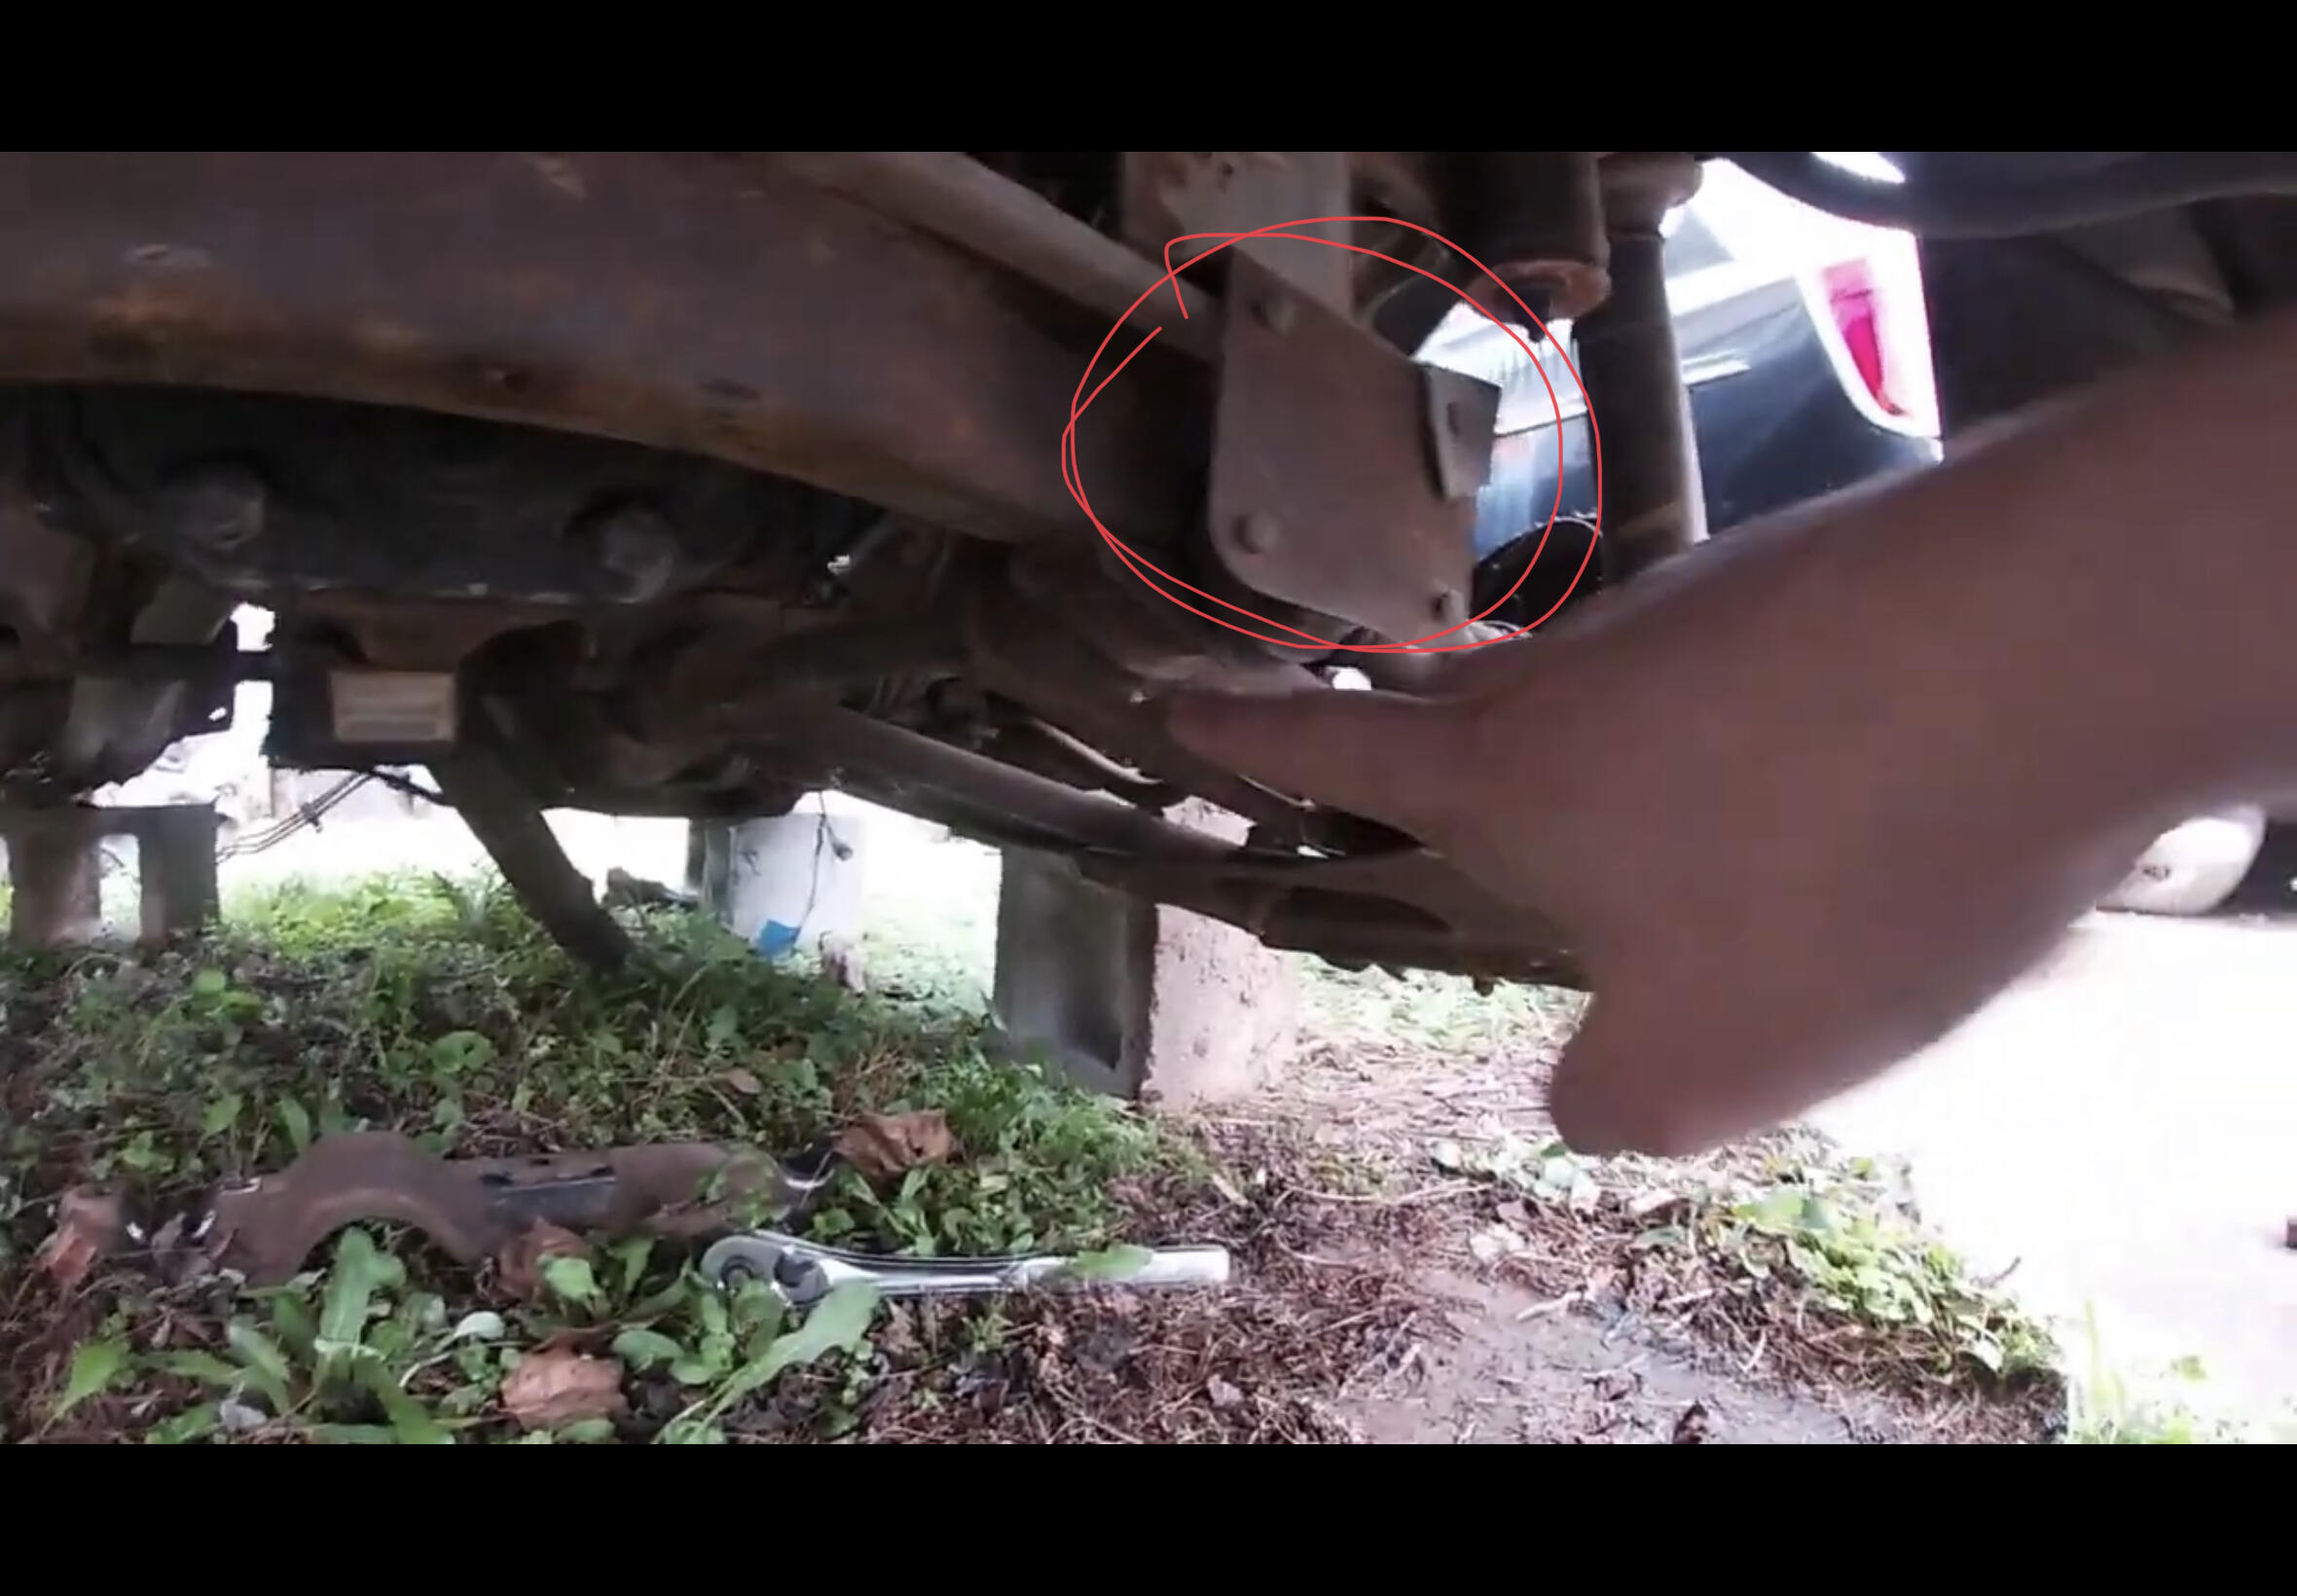
So I found one of these plates in my parts bin. I bought several boxes of Z parts for $300 from a guy in Memphis that sold his 78’. One of those boxes had one those plates was in there. Had no idea where it went. Then I discovered where it whet when I removed mine from my car. It must have a purpose and it was only on the passenger side. Don’t think it’s related to the fuel pump because like Capt said it on the other side on the axels. The exhaust is on the other side of the car so it’s not exhaust related. Someone on this forum knows. Of note it’s very flimsy metal, not like a heat shield thickness.
-
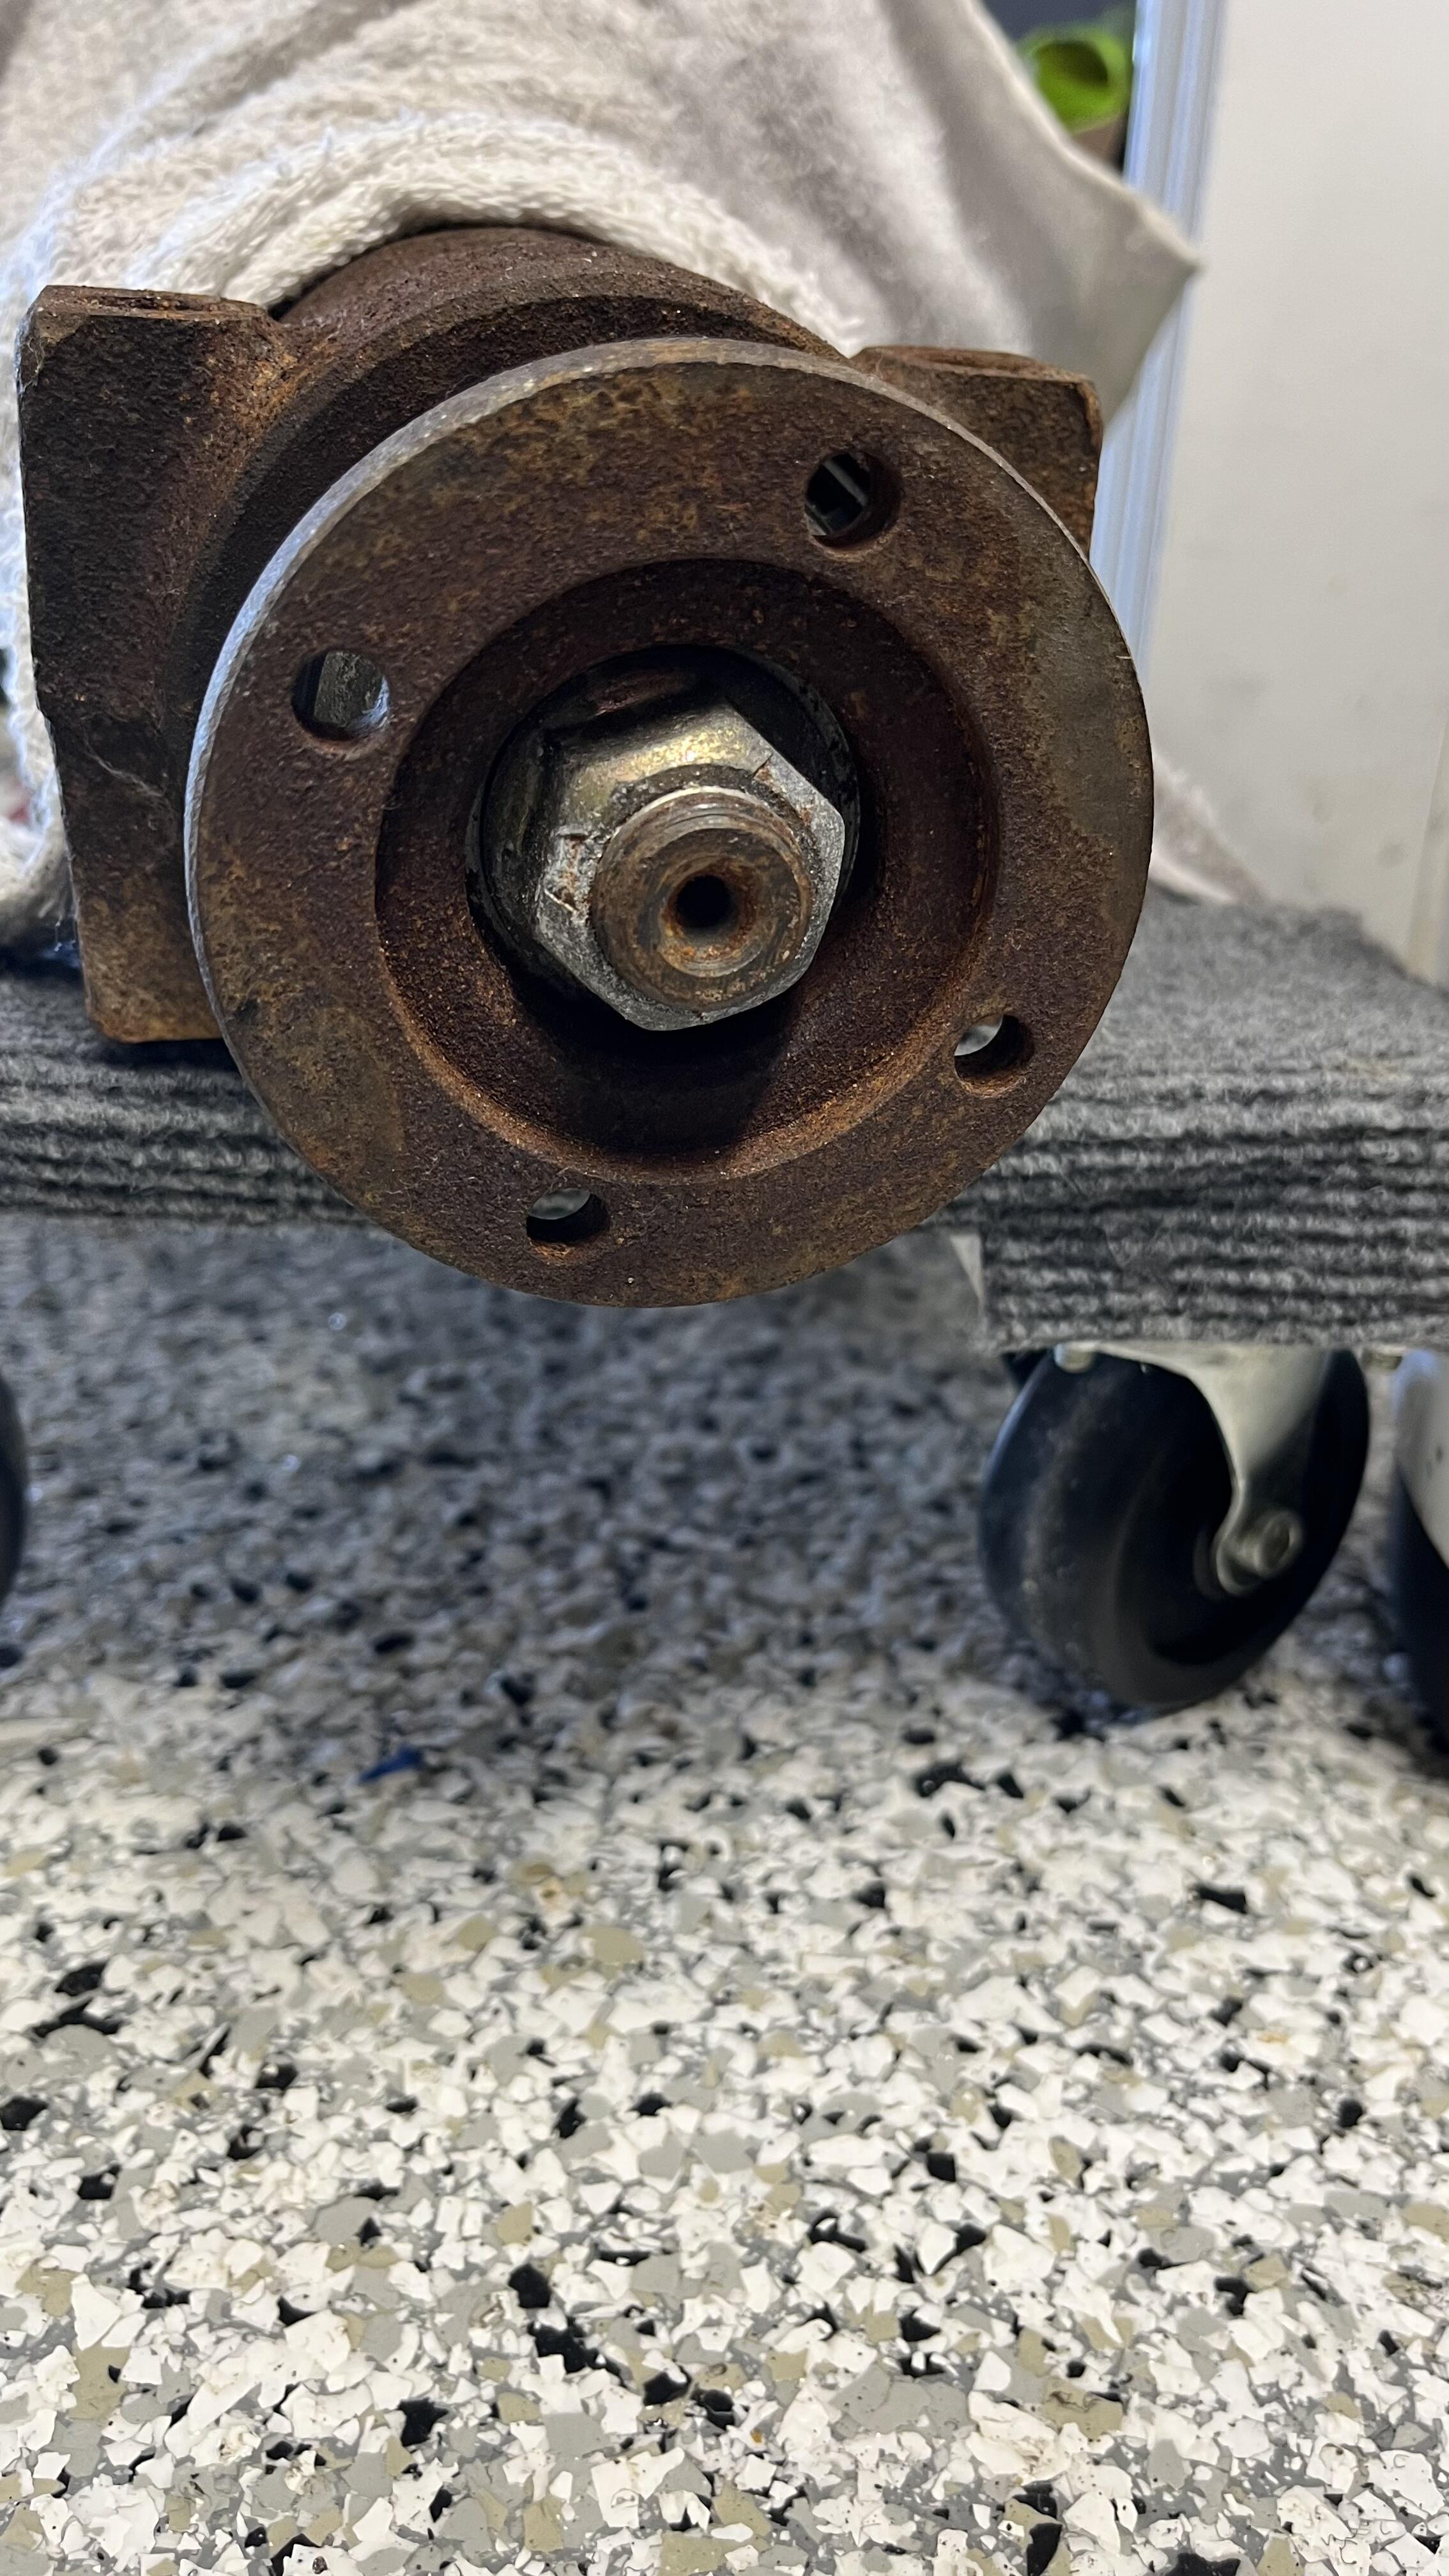
Okay…quiz time. I was watching videos of people taking apart the rear suspension. Who know what this metal plate/shield Is attached on the passenger side on the suspension. Took a screen shot during a video and it’s circled in red. I removed mine when I put my fuel tank back in. What is it for? 🤔

-
You have got to be kidding me!! That’s hilarious
-
Your timing is perfect! I was going to order a replacement OEM insulator tonight. On a work trip right now and wanted all my parts ordered so I can get this started next week. PM me and I’ll be happy to buy it from you. After much thought and advice from a reputable member of the forum. I’m going to go with a partial restoration of the back suspension, not a full tear down. I don’t want to open too many can of worms that I will have difficulty pulling myself out of. I’m a one man band, average to below average mechanics and don’t have Gucci tools like Captain Obvious. Mustache bar bushings and control arm bushings might be beyond my tool inventory and skill level. I don’t want to have another 6 week setback. Plan is it clean things up, replace anything that looks bad and get the 3.9 diff in as well my Ebauch spring an shocks. I’m too close to being on the road to get a big setback. OBTW, found a new windshield and ordered it. Got a great deal and it doesn’t have the blue band on the top!! The much sought after Fuyao brand That was a tough find. If anyone needs help I can steer you in the right direction as there are a few out there still. Sent from my iPhone using Tapatalk
-
Dennis, Ivan from Vintage Dashed responded to my message. He said he’s going to email you. Let me know if he doesn’t for some reason. Want to make sure I gave the correct email address. He said you can call him directly at: 510-779-8153

-
I have a kit designed specifically for dashboards. I ended up buying a new dash so have no need for it now. Sent from my iPhone using Tapatalk