Av8ferg
-
Posts
1,538 -
Joined
-
Last visited
-
Days Won
45
Content Type
Profiles
Knowledge Base
Zcar Wiki
Forums
Gallery
Events
Downloads
Store
Blogs
Collections
Classifieds
Everything posted by Av8ferg
-

280z Bumper Conversion: Who Kept 280z Lower Valence?
Av8ferg replied to Muzez's topic in Body & Paint
Same one. MSAa and everyone on planet earth is out of them. Waited 3 months for this piece of trash. Sent from my iPhone using Tapatalk -
280z Bumper Conversion: Who Kept 280z Lower Valence?
Av8ferg replied to Muzez's topic in Body & Paint
Cliff, you mean the Xenon? Wait until you see mine. It’s worse than terrible. New out of the box from the factory. I’m pissed Sent from my iPhone using Tapatalk -
280z Bumper Conversion: Who Kept 280z Lower Valence?
Av8ferg replied to Muzez's topic in Body & Paint
More pics. Sent from my iPhone using Tapatalk -
280z Bumper Conversion: Who Kept 280z Lower Valence?
Av8ferg replied to Muzez's topic in Body & Paint
Good discussion and timely for me. I recently bought the xenon front air dam. Bought it direct from Xenon and I’m so disappointed I don’t have words . It’s not even usable. It so warped that it’s unusable. It has flaws all over it. I’d avoid this product like Covid-19. I’ll post pics of this garbage later. My stock lower valance is banged up so I started looking for alternatives. I think I may have found it and might be something you like. I think it’s was used on the European 260’s. Take a look at these pics. Wish I had better one but this is probably what I’m getting. Sent from my iPhone using Tapatalk -
Yes, I live in NC and shipped a box them. When I was in San Diego for work I located them and went by to check them out. Zero prep required but they won’t remove paint. Contact is at the bottom of my last post . Here’s a link. http://www.anocotemetalfinishing.com/home.html Sent from my iPhone using Tapatalk
-
I’ve used a place in San Diego that I’m pretty happy with. Turnaround was about a week. Prices are good. They charge by the hour and I’ve done two batches. Fist was about 13lbs and that cost me ~$210 with tax. I did a joint venture with Captain Obvious. I think the results were good, not perfect but very good. They didn’t lose any parts either. I actually walked into the place and watched thee process. They specialize in doing classic cars so they’re familiar with what people in the car hobby want. Here is the before and after of a few items. I had the do ALOT of bolts and nuts, they came out awesome. A note, I always take account of how a place looks to make a judgement of the type of management/leadership at a business. If it’s a mess and filthy with a bunch of dudes wearing nasty work clothes it can be an indicator. I use the same theory of restaurants. If the bathroom is a mess, imagine what the kitchen looks like . This place in San Diego was spotless, people were wearing matching overalls and the place was super nice for a plating business which you expect to be something from a Chinese slave labor camp. Place is called Anocote Metal Finishing. 858-566-1015 Ask for Debbie and tell her you want Yellow Zinc plate . Sent from my iPhone using Tapatalk
-
Cliff, you have the right perspective. I’m the same age as you are and I wish I had the wisdom I have now when I was a teen or in my 20’s. It doesn’t matter how you figure it out as long as you do. So many spend their lives chasing things that add no lasting value to their lives. They don’t know the difference between the priceless and the expensive. Your time and happiness is priceless. Give it away with extreme caution. Last night I flew into Liege, Belgium (Nightly milk runs from the UK), met 3 other company pilots there in the lounge. We had 2 hrs to burn and there were 5 of us total shooting the bull at 2am in the morning drinking coffee and cracking jokes. We flew back in there tonight (same guys except one was missing). His name was Peter Souza. Come to find out he died last night after he landed. No idea what happened. Makes you take account for your own life, what’s important. He didn’t think he was going to die within 24 hrs after we met. Married, 2 kids and only 47 yrs old. You have to live a little for today, and more so the older you get. Be kind to others, be a generous and be that someone you want to be remembered for. All we really leave behind are what we do for others, everything else fades away. You’ve figured it out…..that’s winning in the game of life not how many zeros on the check on pay day. Glad to have gotten to know you on the forum. You’ve added value to more people’s lives than you think.
-
Zedhead, I agree. Not sure if it’s as effective at this length. I just want a clean, reliable install that I can fix and forget. Sent from my iPhone using Tapatalk
-
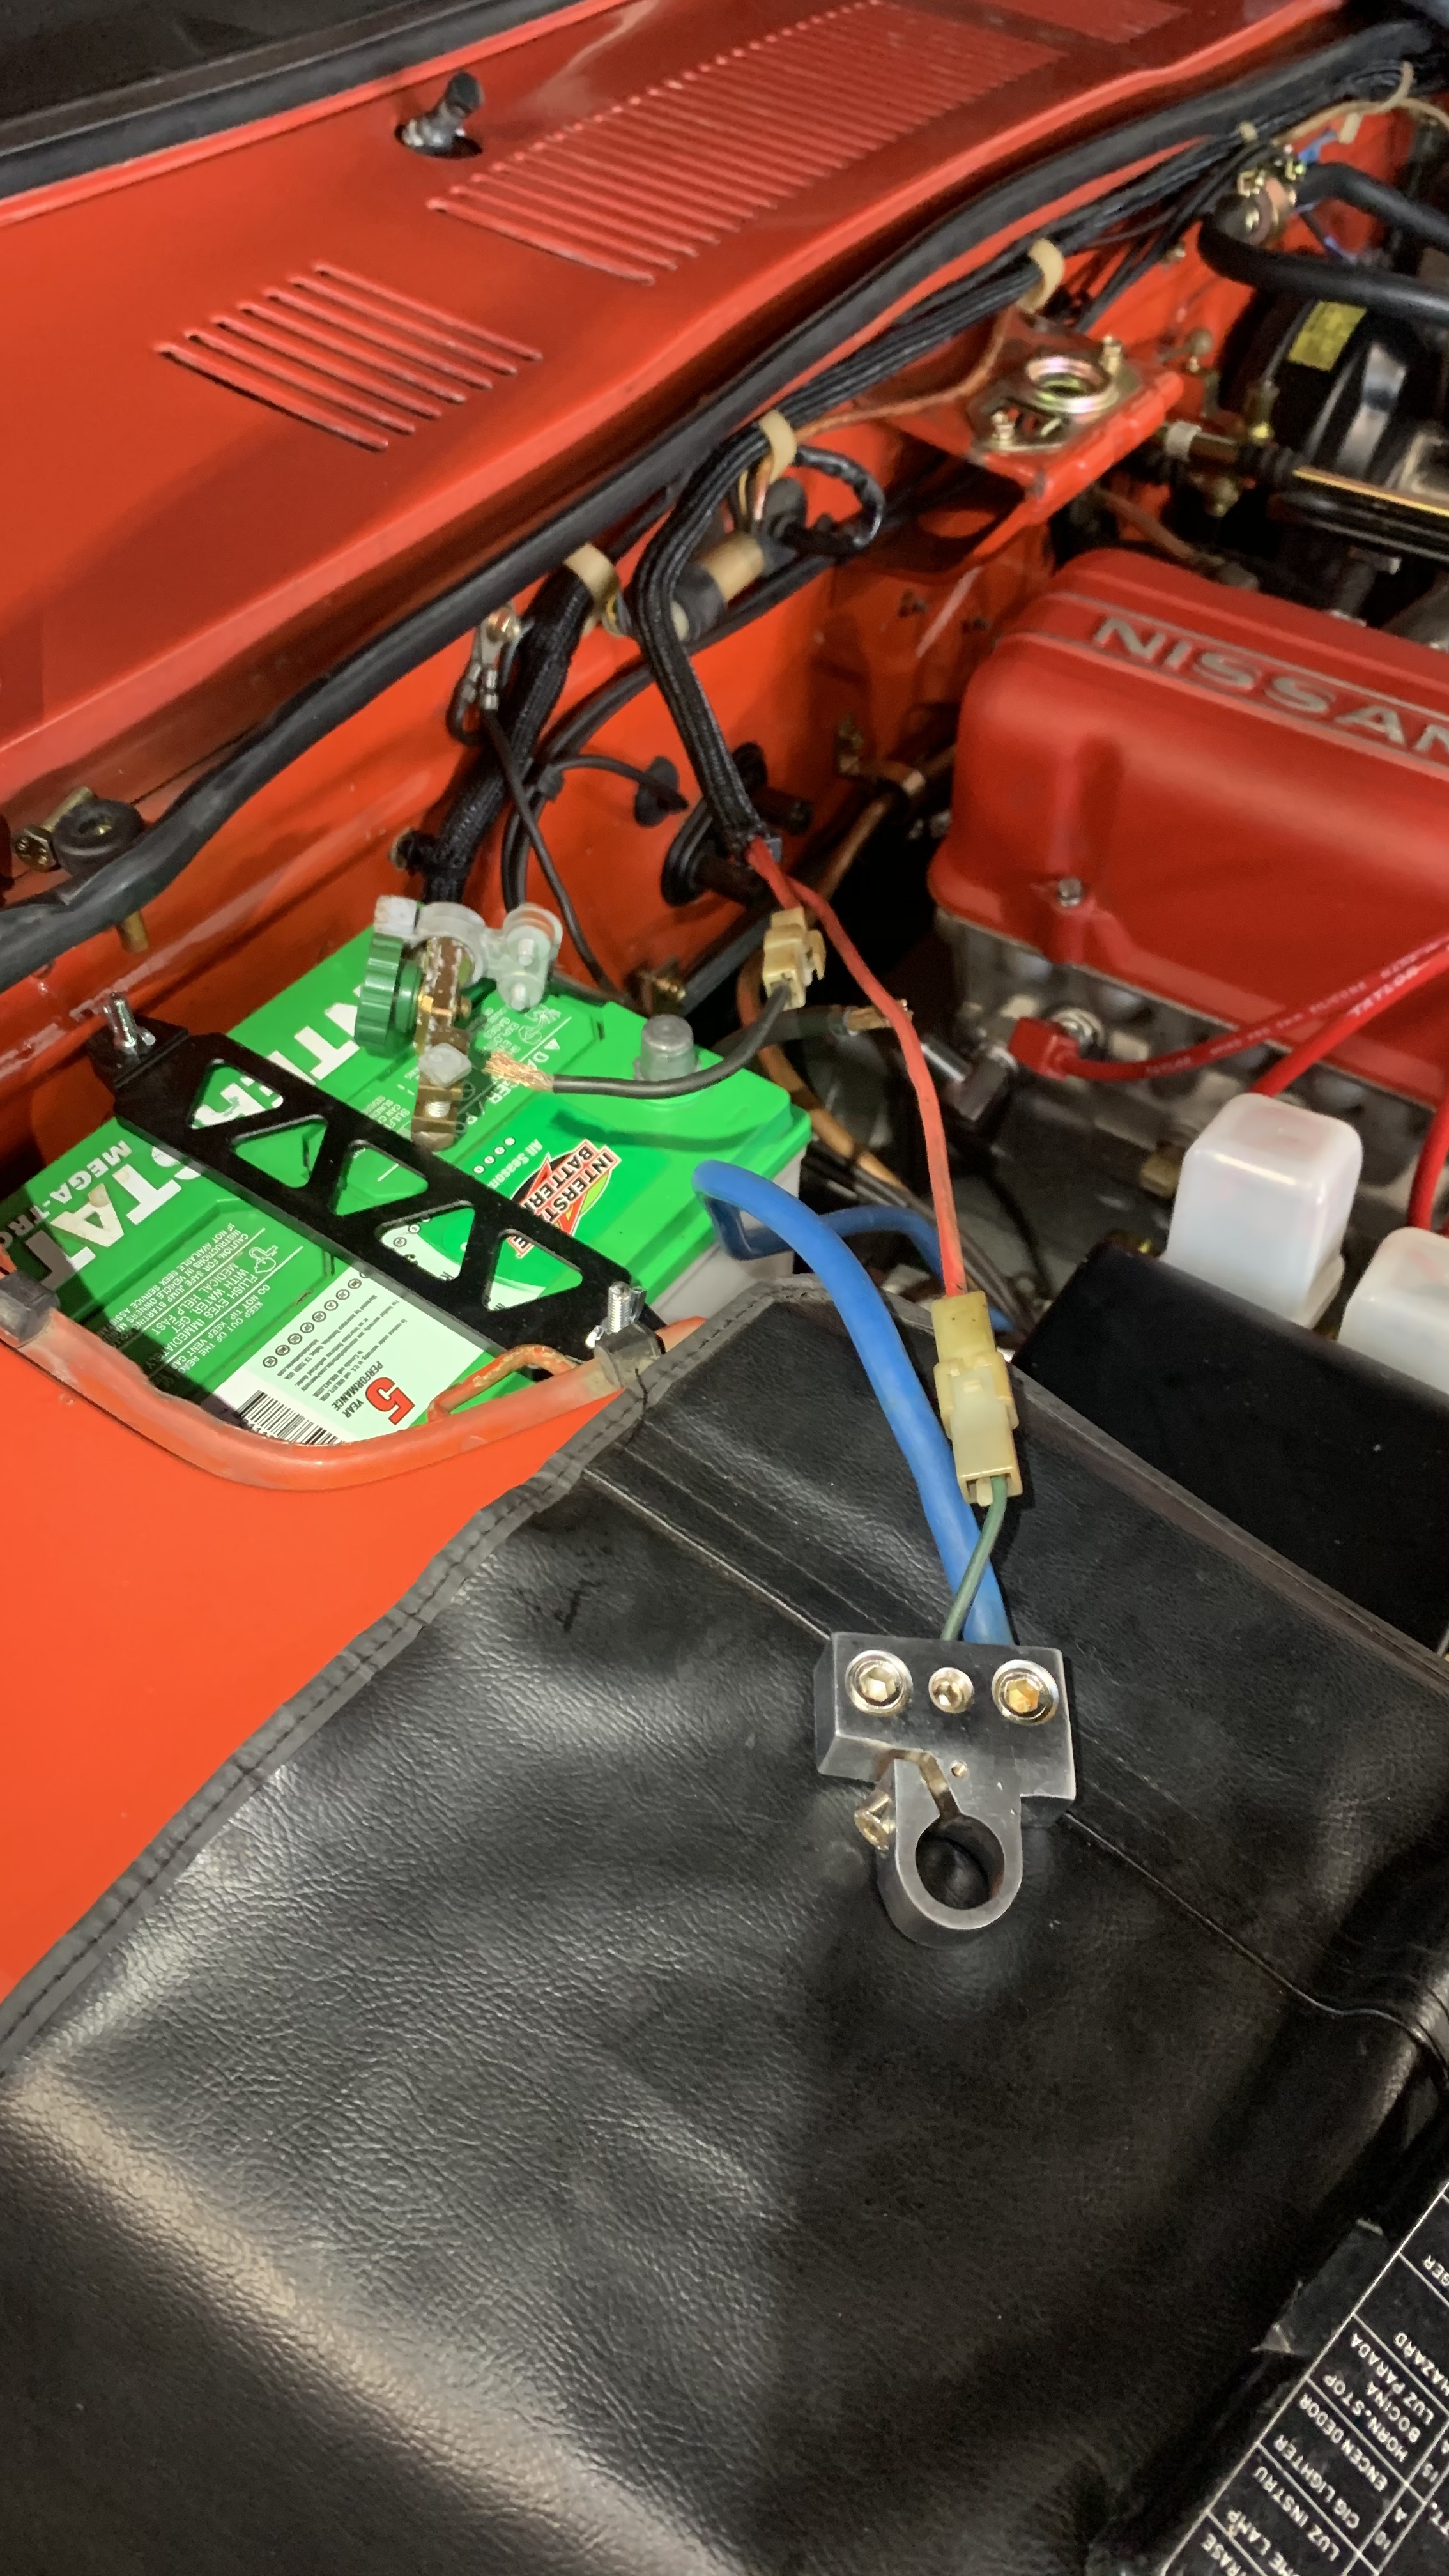
Sitting in a hotel in the UK about to fly back to Belgium tonight and doing online research about my Z wiring so I can be ready to get to work on her when I get home. I know the injectors get their power directly from the positive side of the battery through a fusible link. I have a green link there which is pretty short and I’d like to replace it with an inline fuse instead. My research leads my to believe that the green link is equal to 40 amps, but I’m not sure. The 77 wiring diagram that Wal280z made shows that link as being white, not green. Not sure what color it’s supposed to be, so not sure what amp inline fuse to put here. I assumed the green was 40 amps because the green link on the fuse link block is 40 amps on a 75’ and 76’. My hope is that Nissan kept the color methodology the same for all links, red = 50amps, black= 80amps and green =40 amps. I also have a black fusible link on the neg post of my battery so I guess an 80amp inline fuse would be good here. I am planning to replace the other 4 fuse links near the regulator too at some point. For reliability, easy of replacement and lastly because on one of my blocks the base is cracked where it bolts to the metal holder. Only a matter of time before it breaks off. Not to mention it seems easy for water contamination to get under the plastic covers. Not really a great design in my option. So, had anyone else replaced those fusible links on the battery with inline fuses. The OEM links are like $40 each as well which is silly, and I only found them at one place online. Comes to like $90 with shipping for two links. 😵💫. I’d rather just do away with them and go with a modern solution. Can anyone confirm the amp fuses I’m looking for there off the battery. You can see my link off battery in the attached picture. Thanks. Lastly I found this link to a write up about the Datsun fusible links, in here the writer says.” WARNING: Do not replace fusible link with a solid wire, or a regular fuse -- you risk burning up the entire wiring system when a short occurs. The Fusible Link protects against short circuits“. I don’t understand this, what’s the rational in this statement? Here the link: http://datsun1200.com/modules/mediawiki/index.php?title=Fusible_Link

-
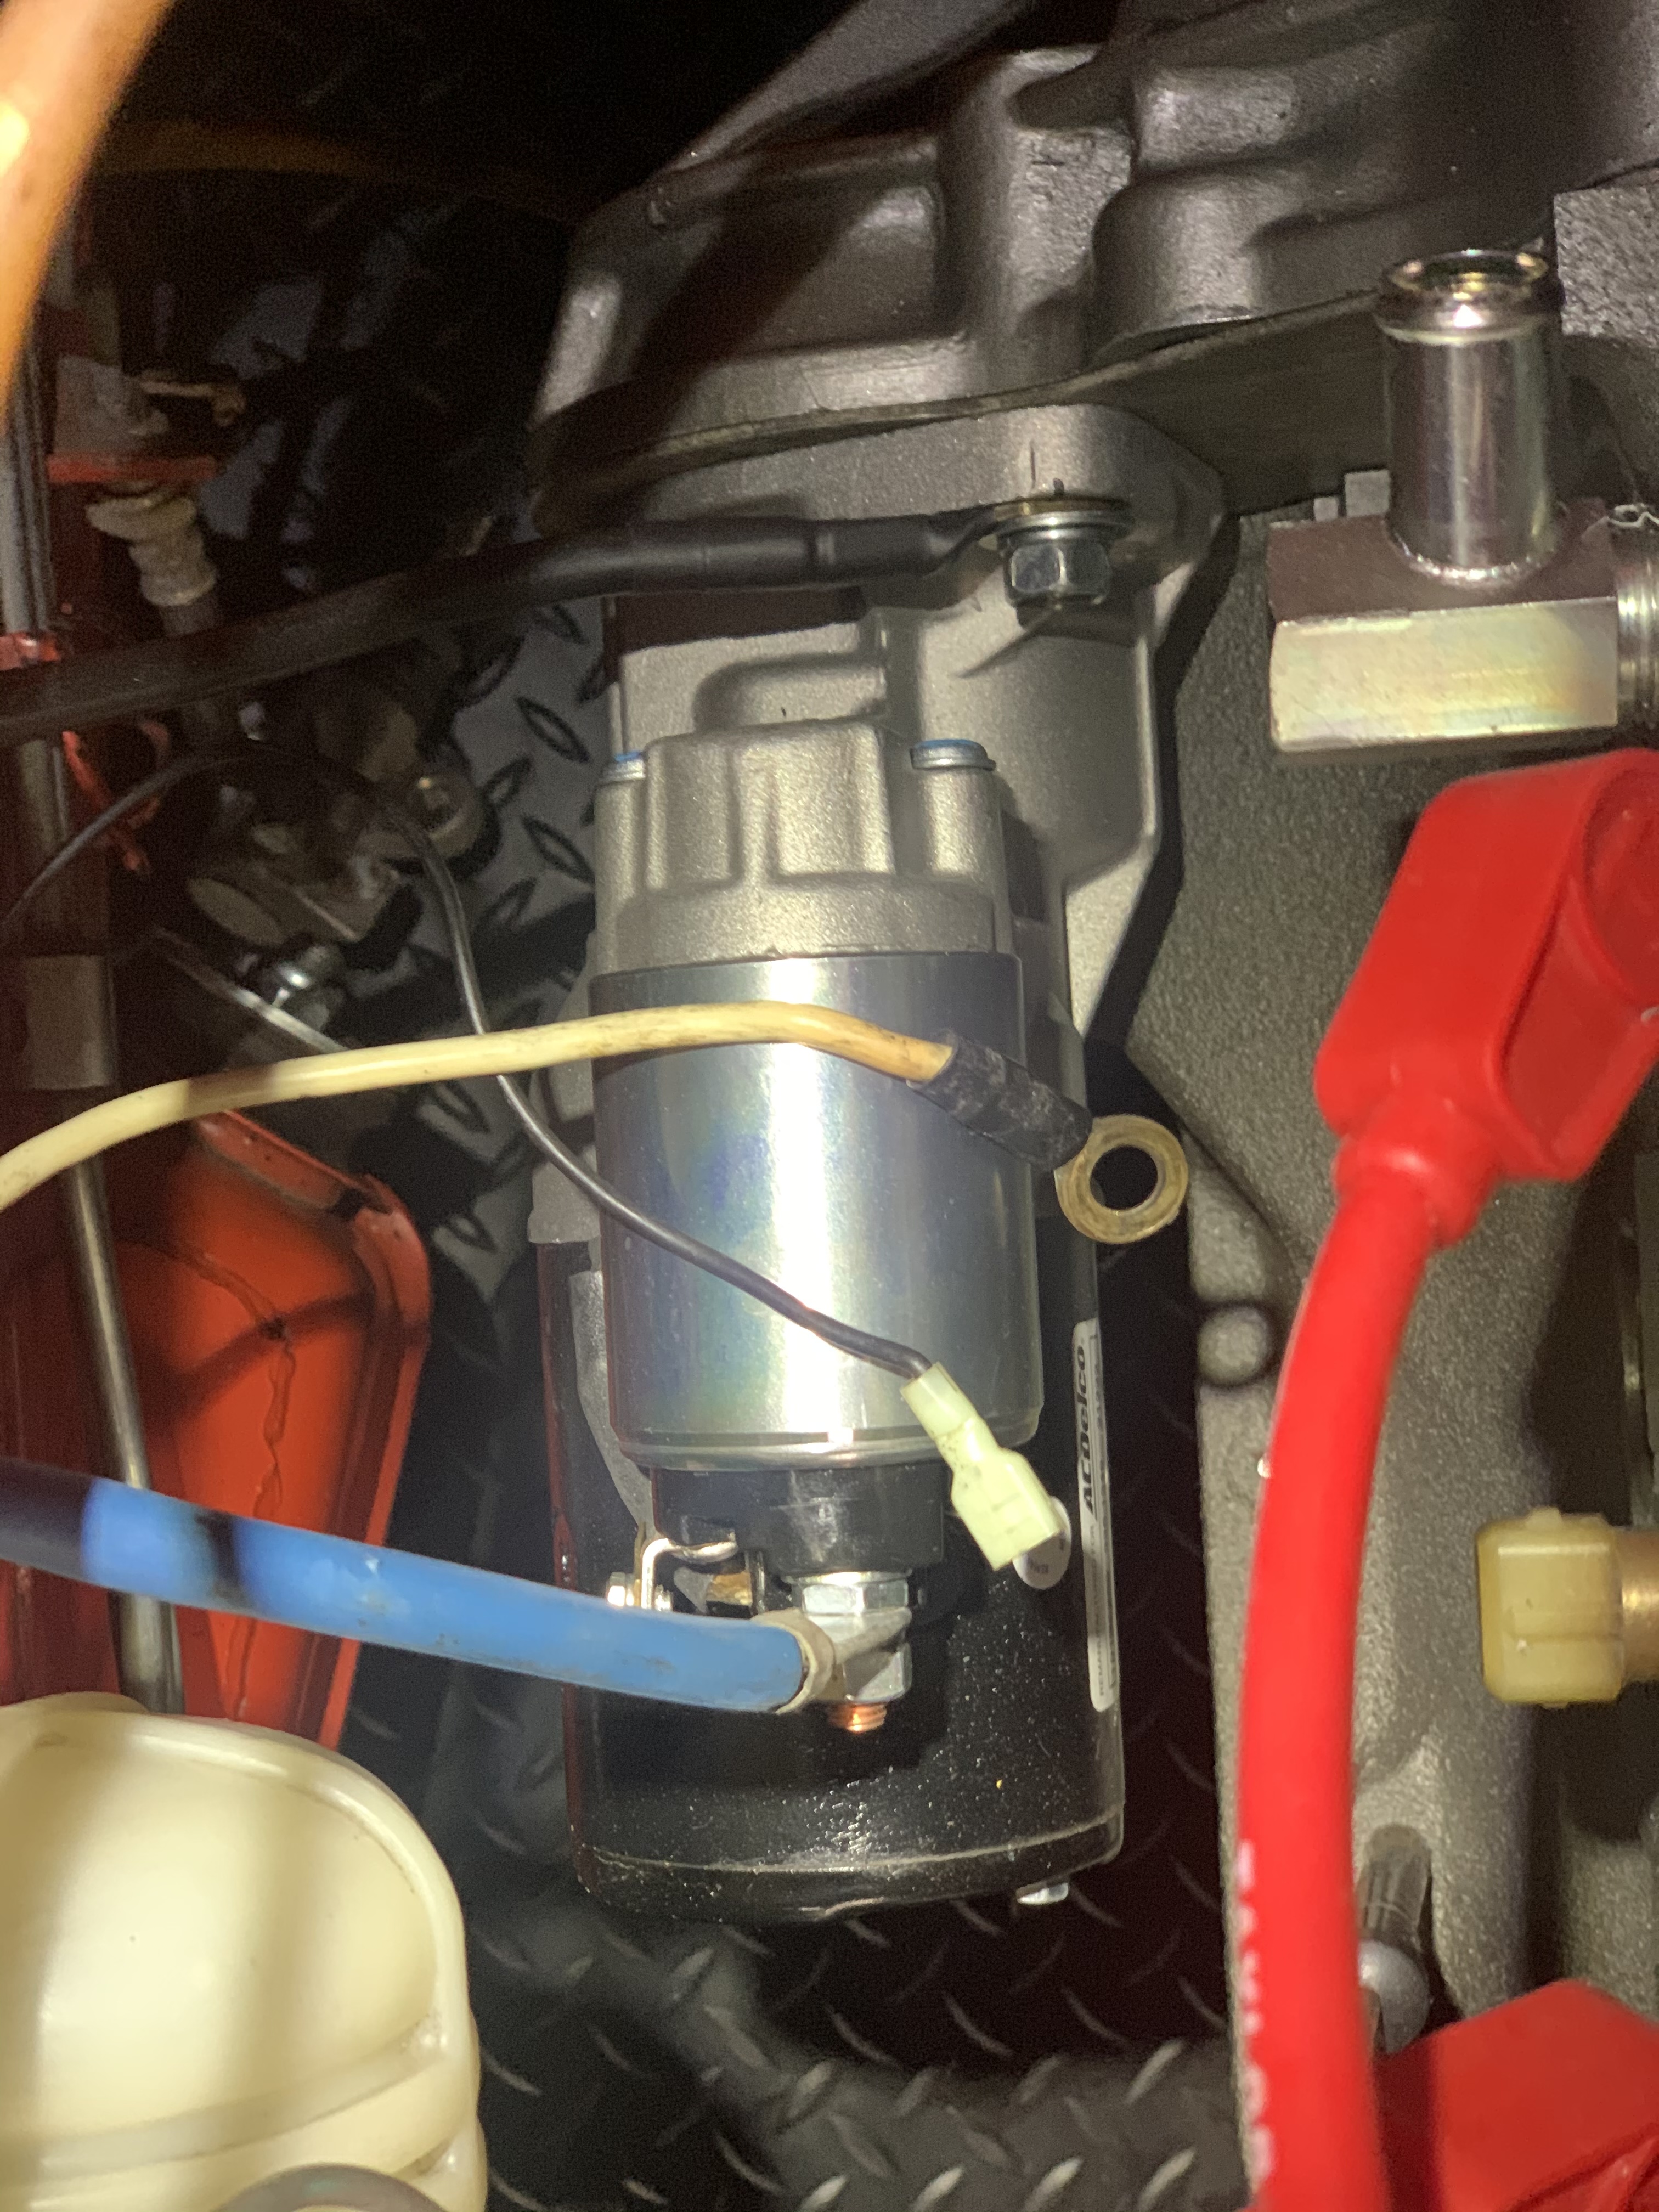
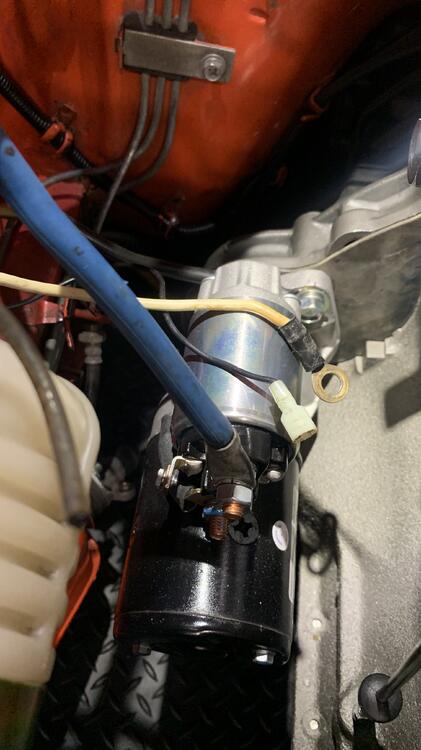
Great words of advice Bruce. So, I just took some pics of my setup before I left for work. I have two red wires coming out of the firewall bundle both have quick disconnects (one green and one black). My assumption is the black goes the neg terminal post and the green to the positive side. Also I have 2 extra wires by the starter…one white with a spade connection and a black one with a loop connect. Not sure where they go on this starter? I connected the black ground wire from the battery to the bolt that mounts the starter to the transmission. I don’t see a spade connection on my starter. It’s a starter for an 82’. See below pics


-
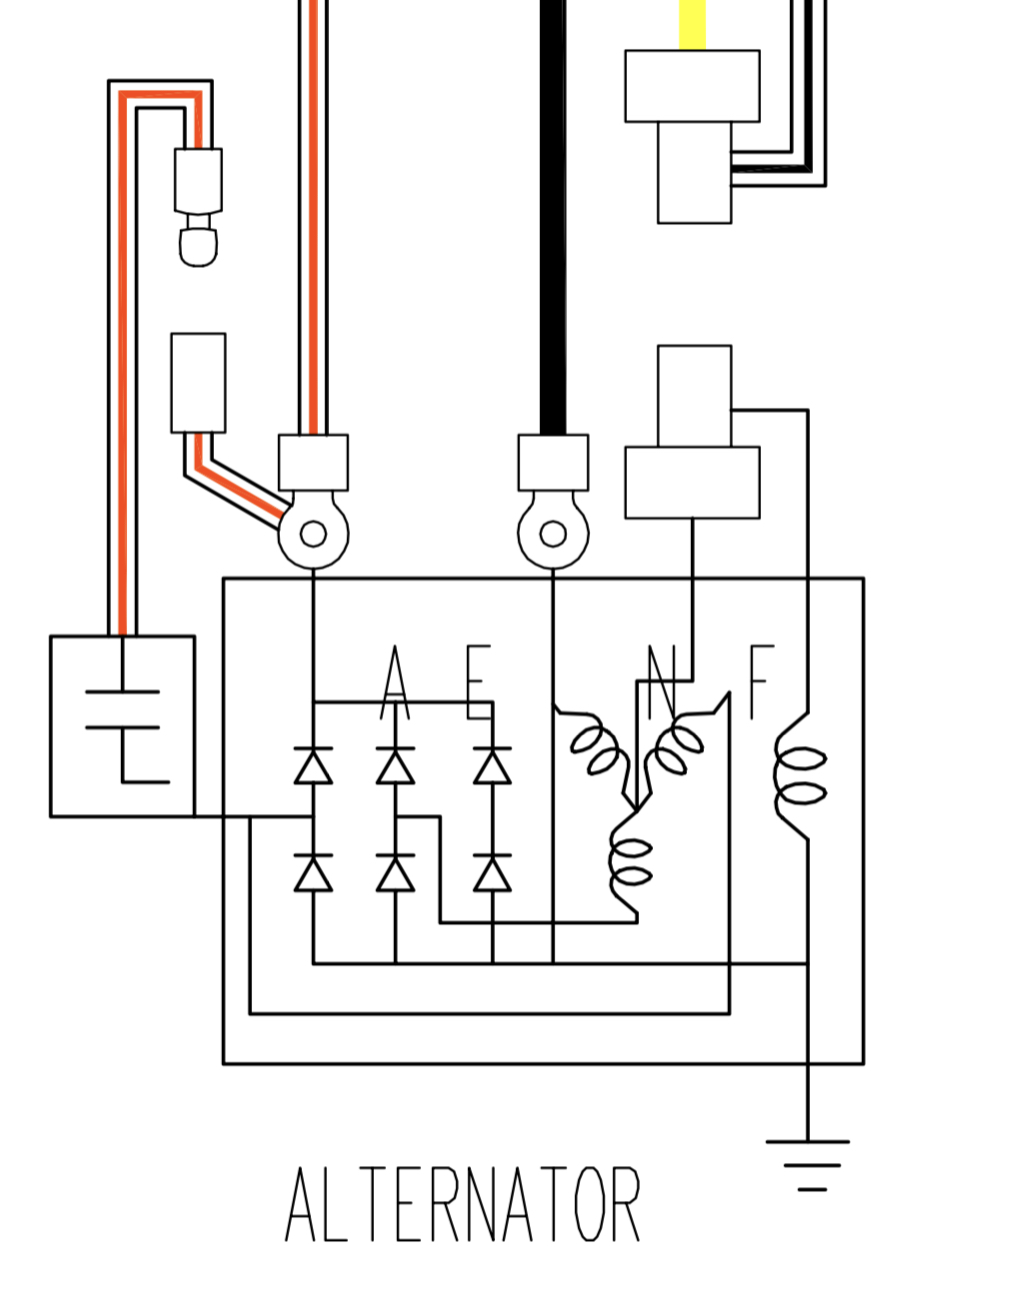
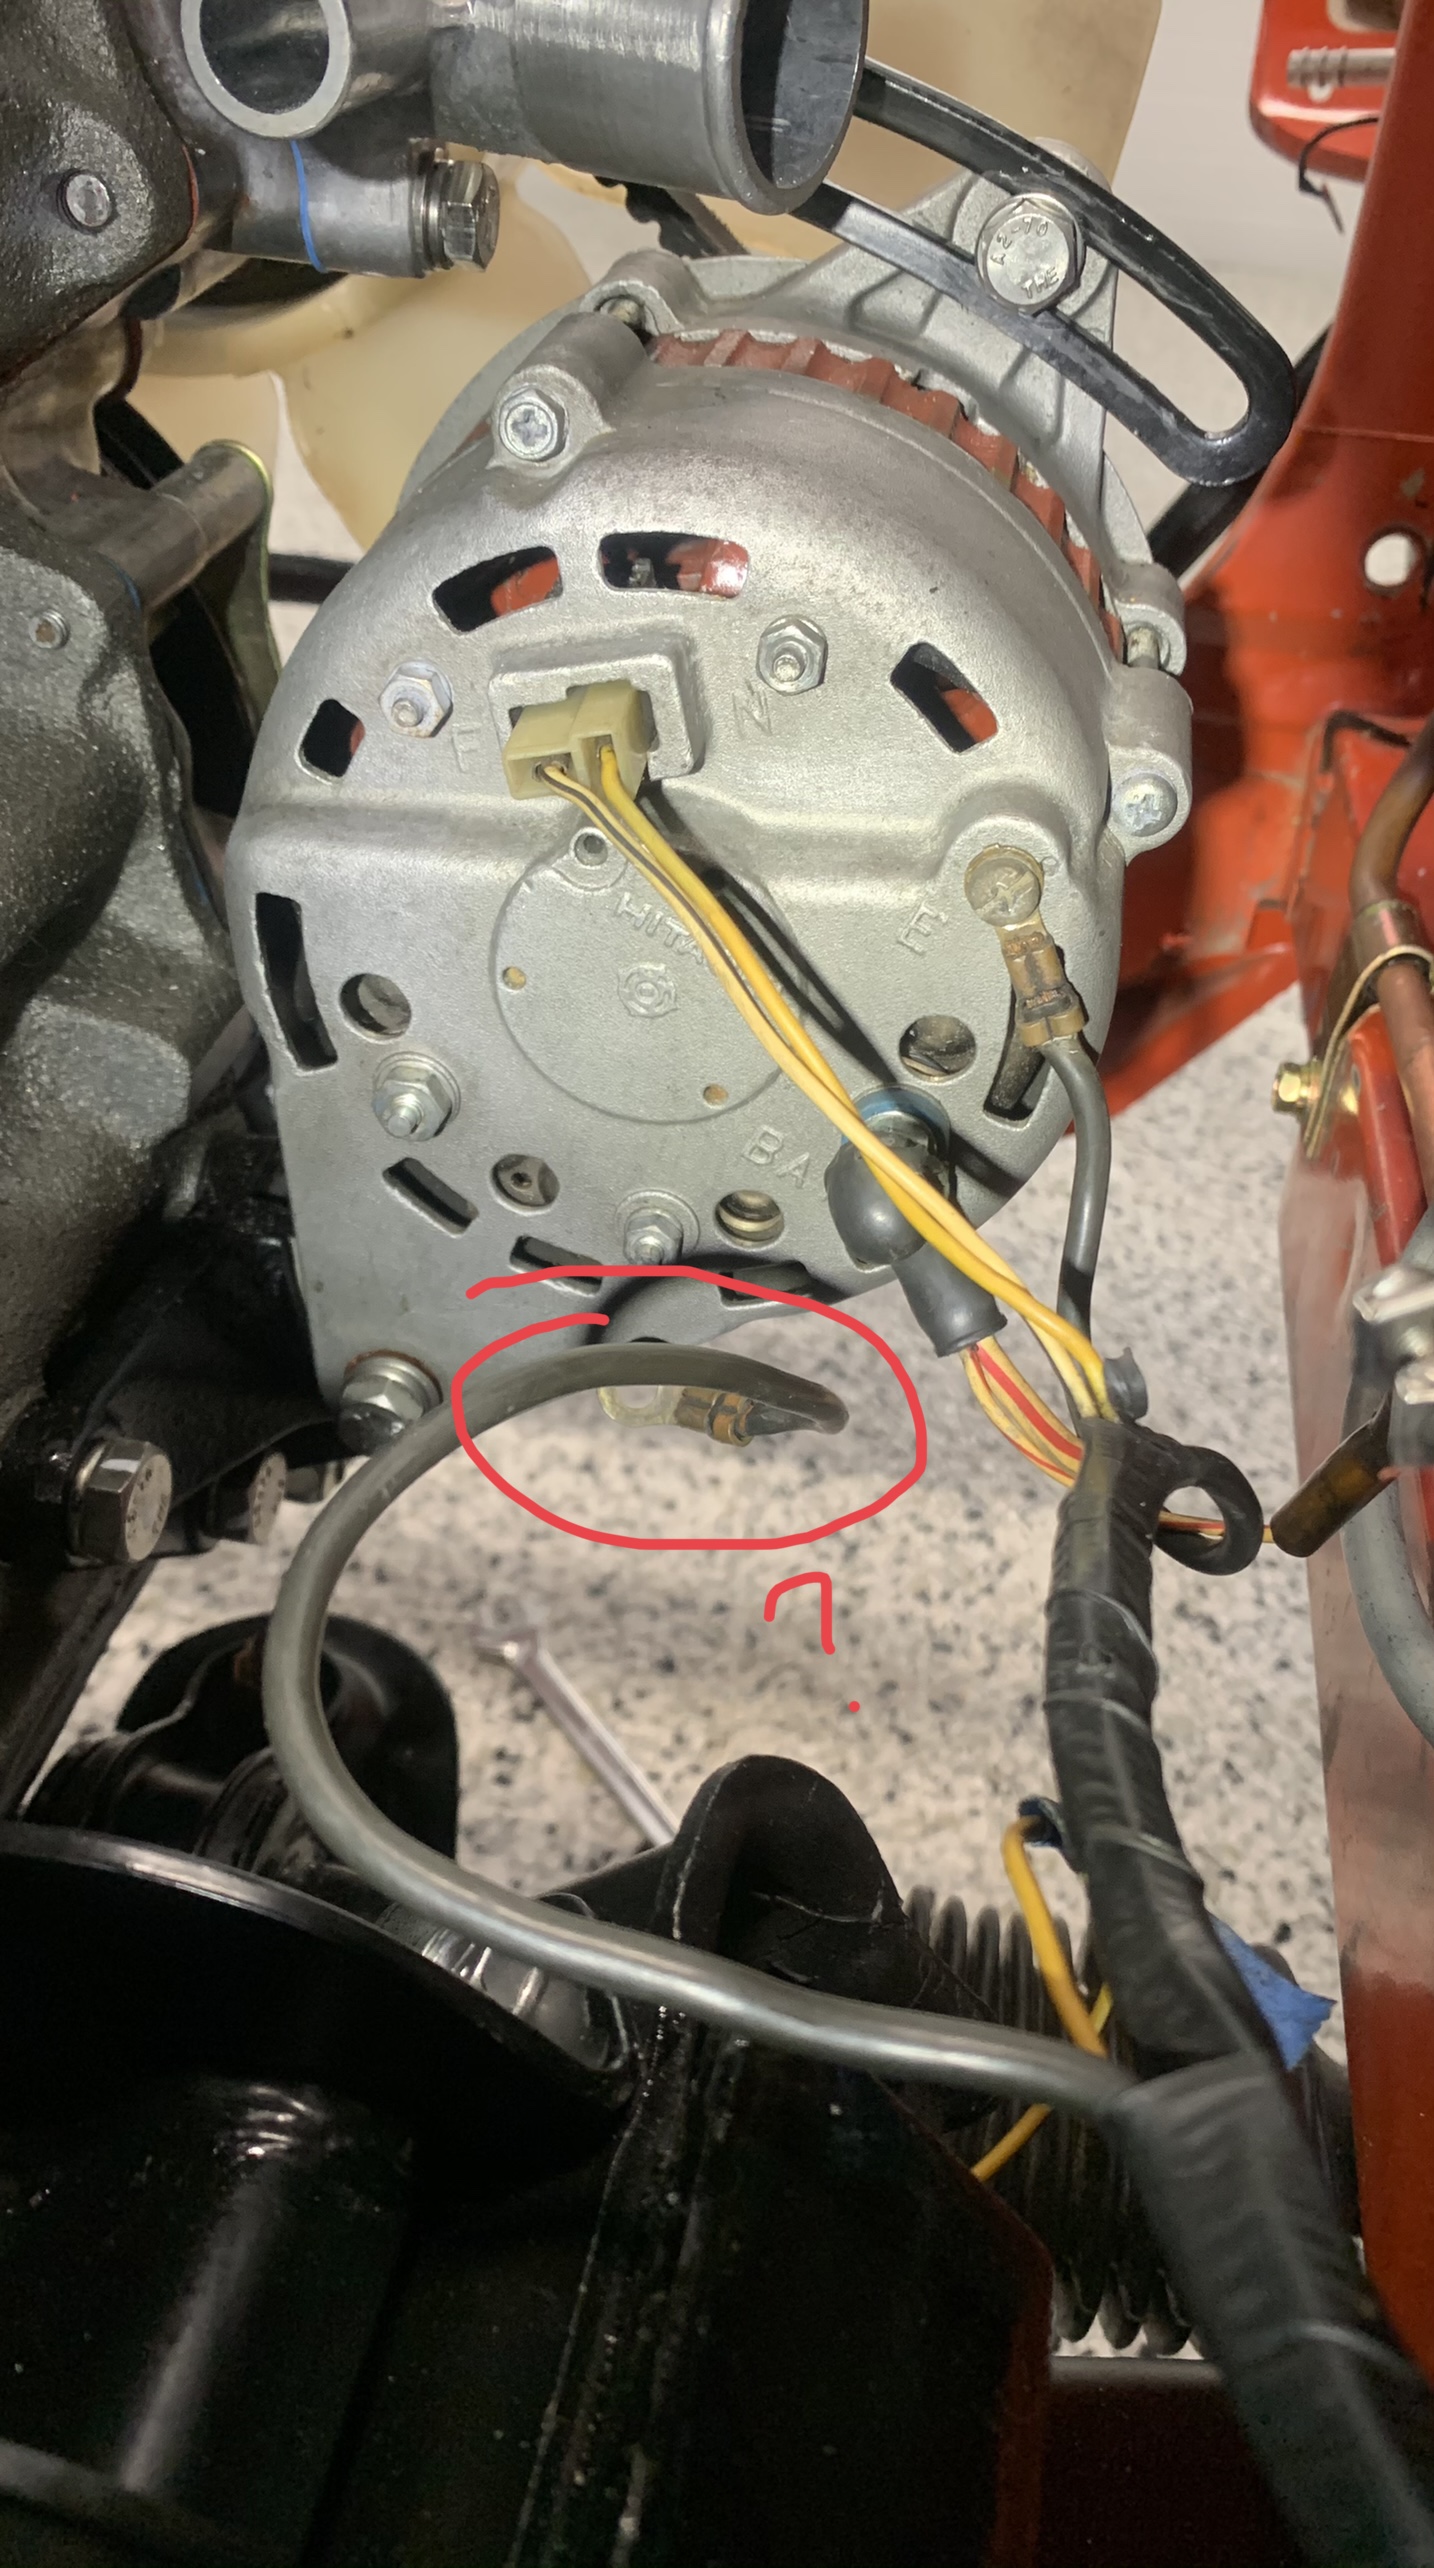
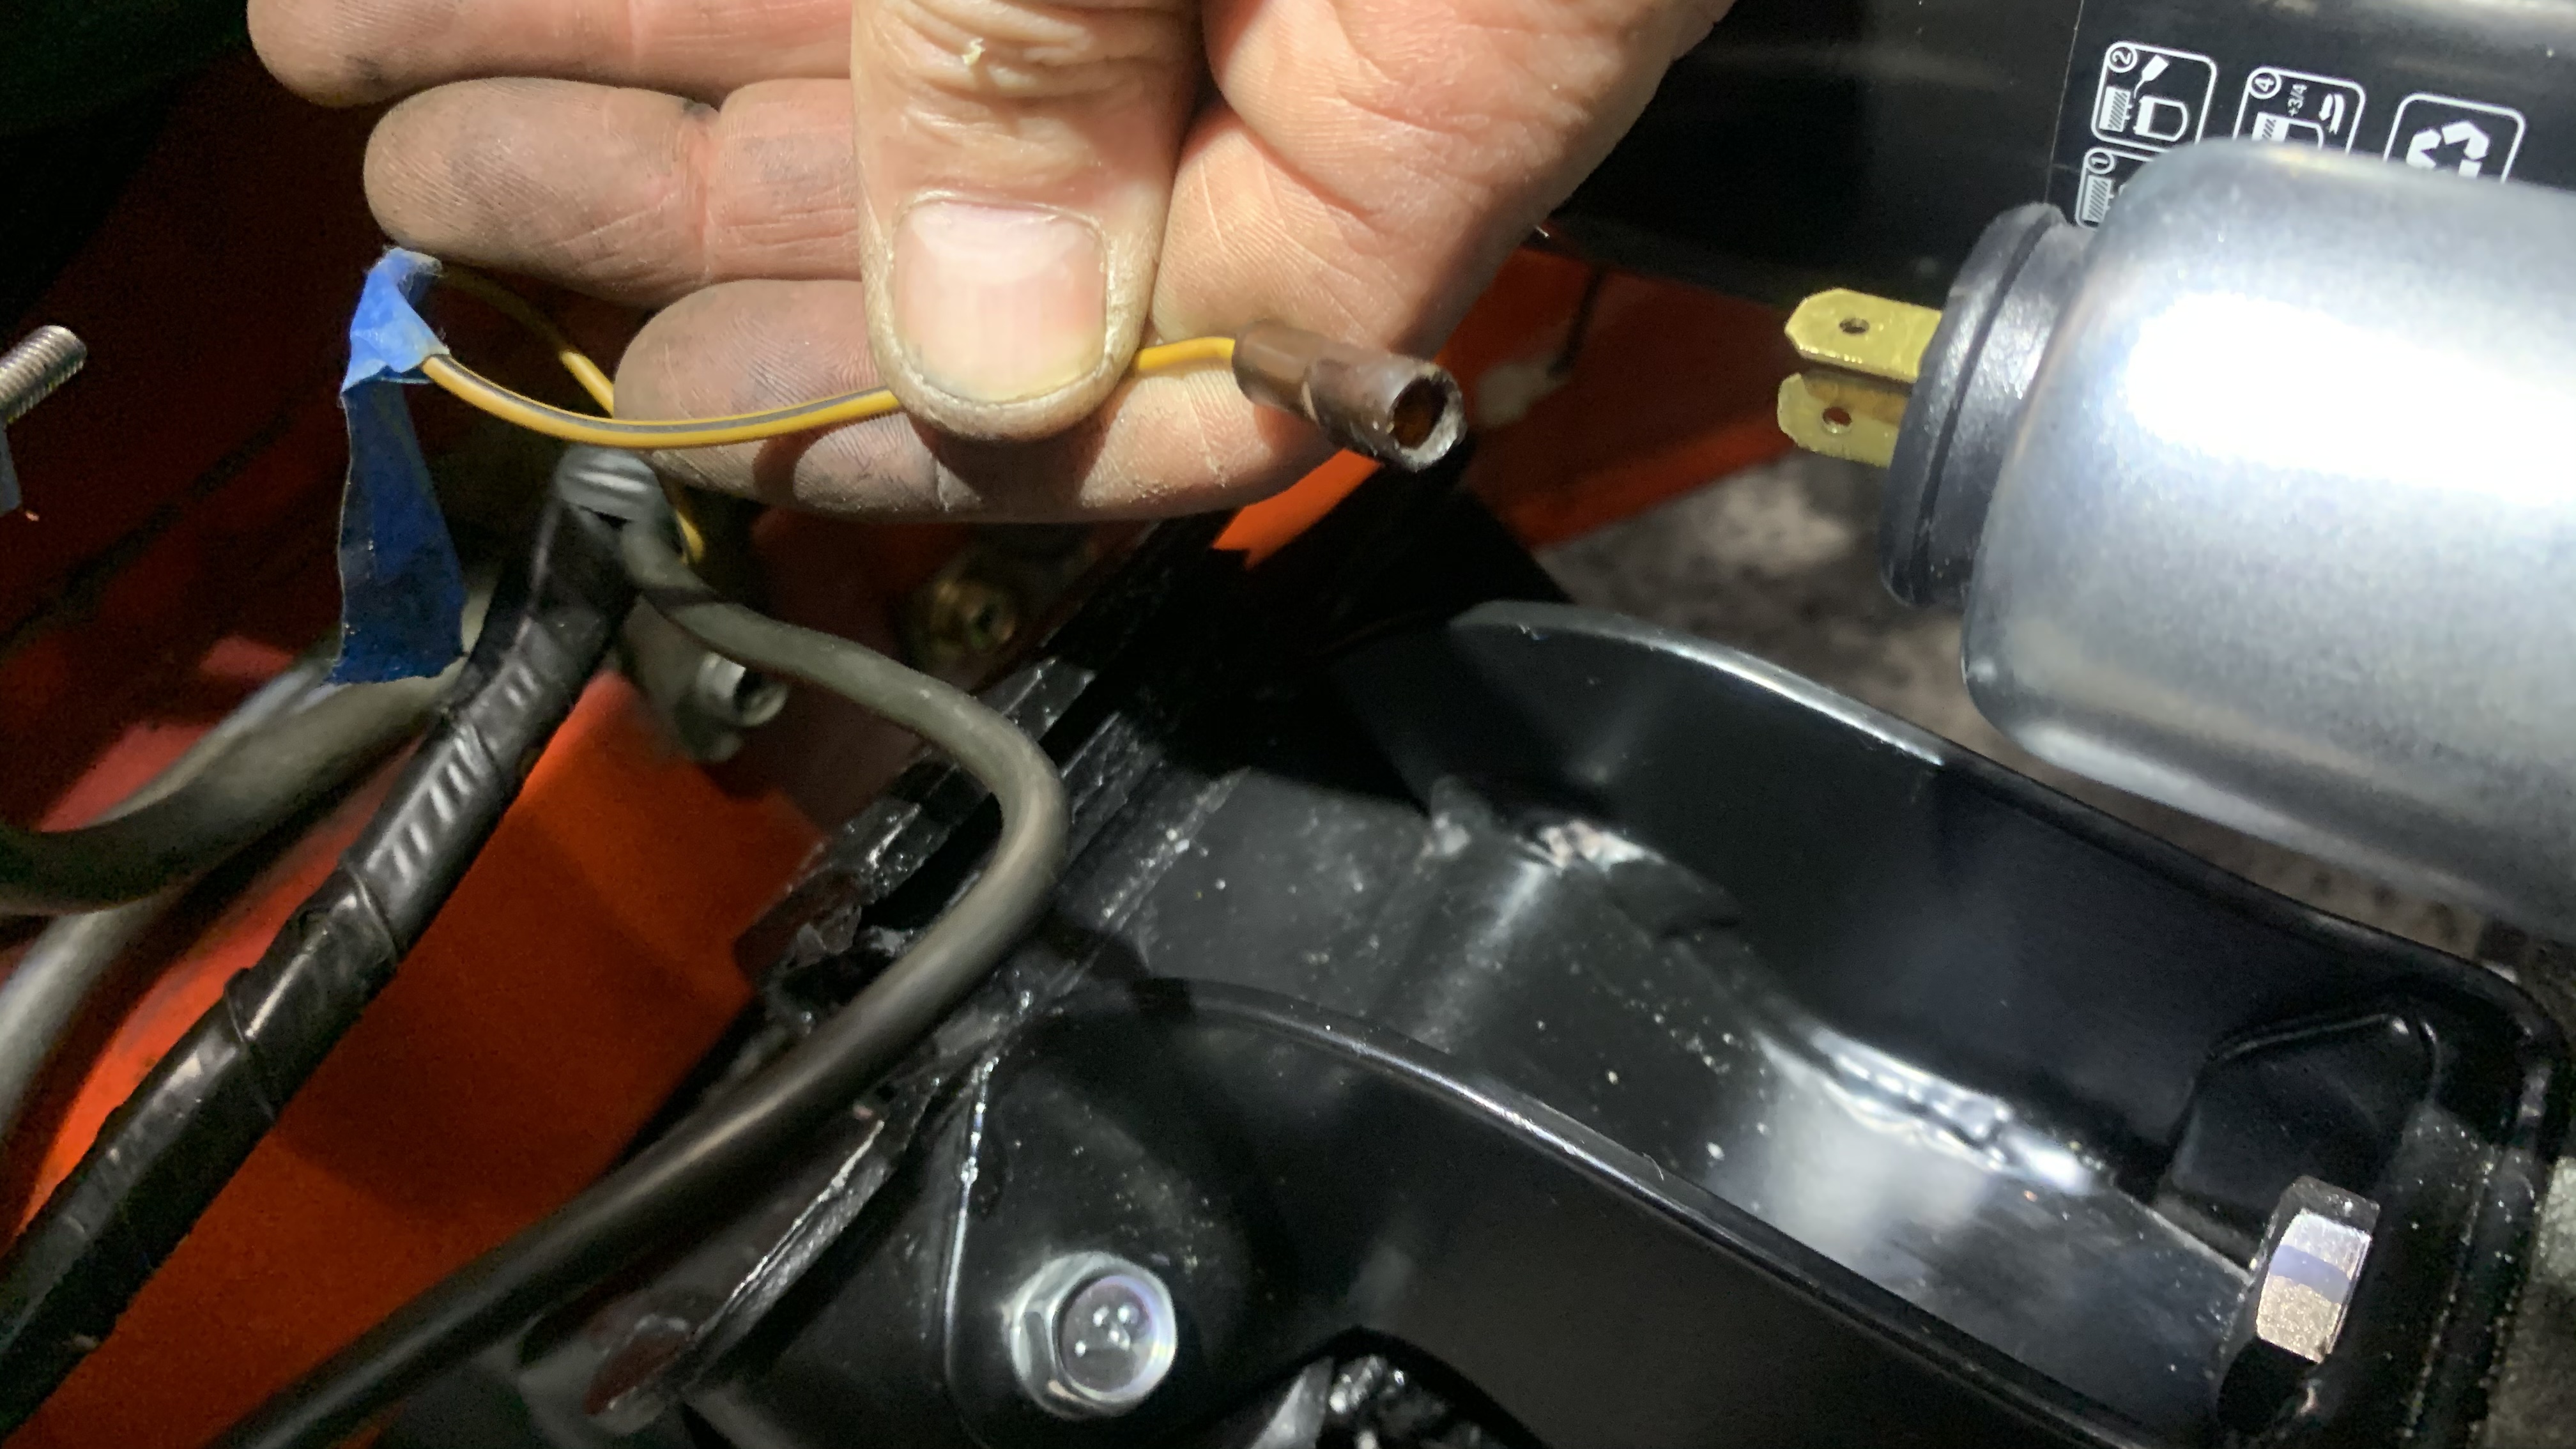
Making progress today hooking everything up, Had two questions. 1. The alternator hook up. There are three connections to be made. One is easy because it had a connector that only goes one way, in one place. The other wires, I’m not 100% sure. I have a black wire and a red /white wire that also has a bullet connector as part of it. I see these wires on the wiring diagram, but I don’t have all the labels on my Hitachi alternator. “N - F” go to the obvious connector. The FSM says there is an “A” and and “E” I don’t see an “A” labeled on my alternator. All I see is “N -F” and “Bat” and “E”. The “E” I assume is we’re one the black wires I have go. Then the Red/White wire to “ Bat”. Where does the other black wire go? See pics? Also my wire for the oil pressure is a bullet connector but the oil pressure sensor has a two prong connection. Is this the wrong connector or the wrong sensor?


-
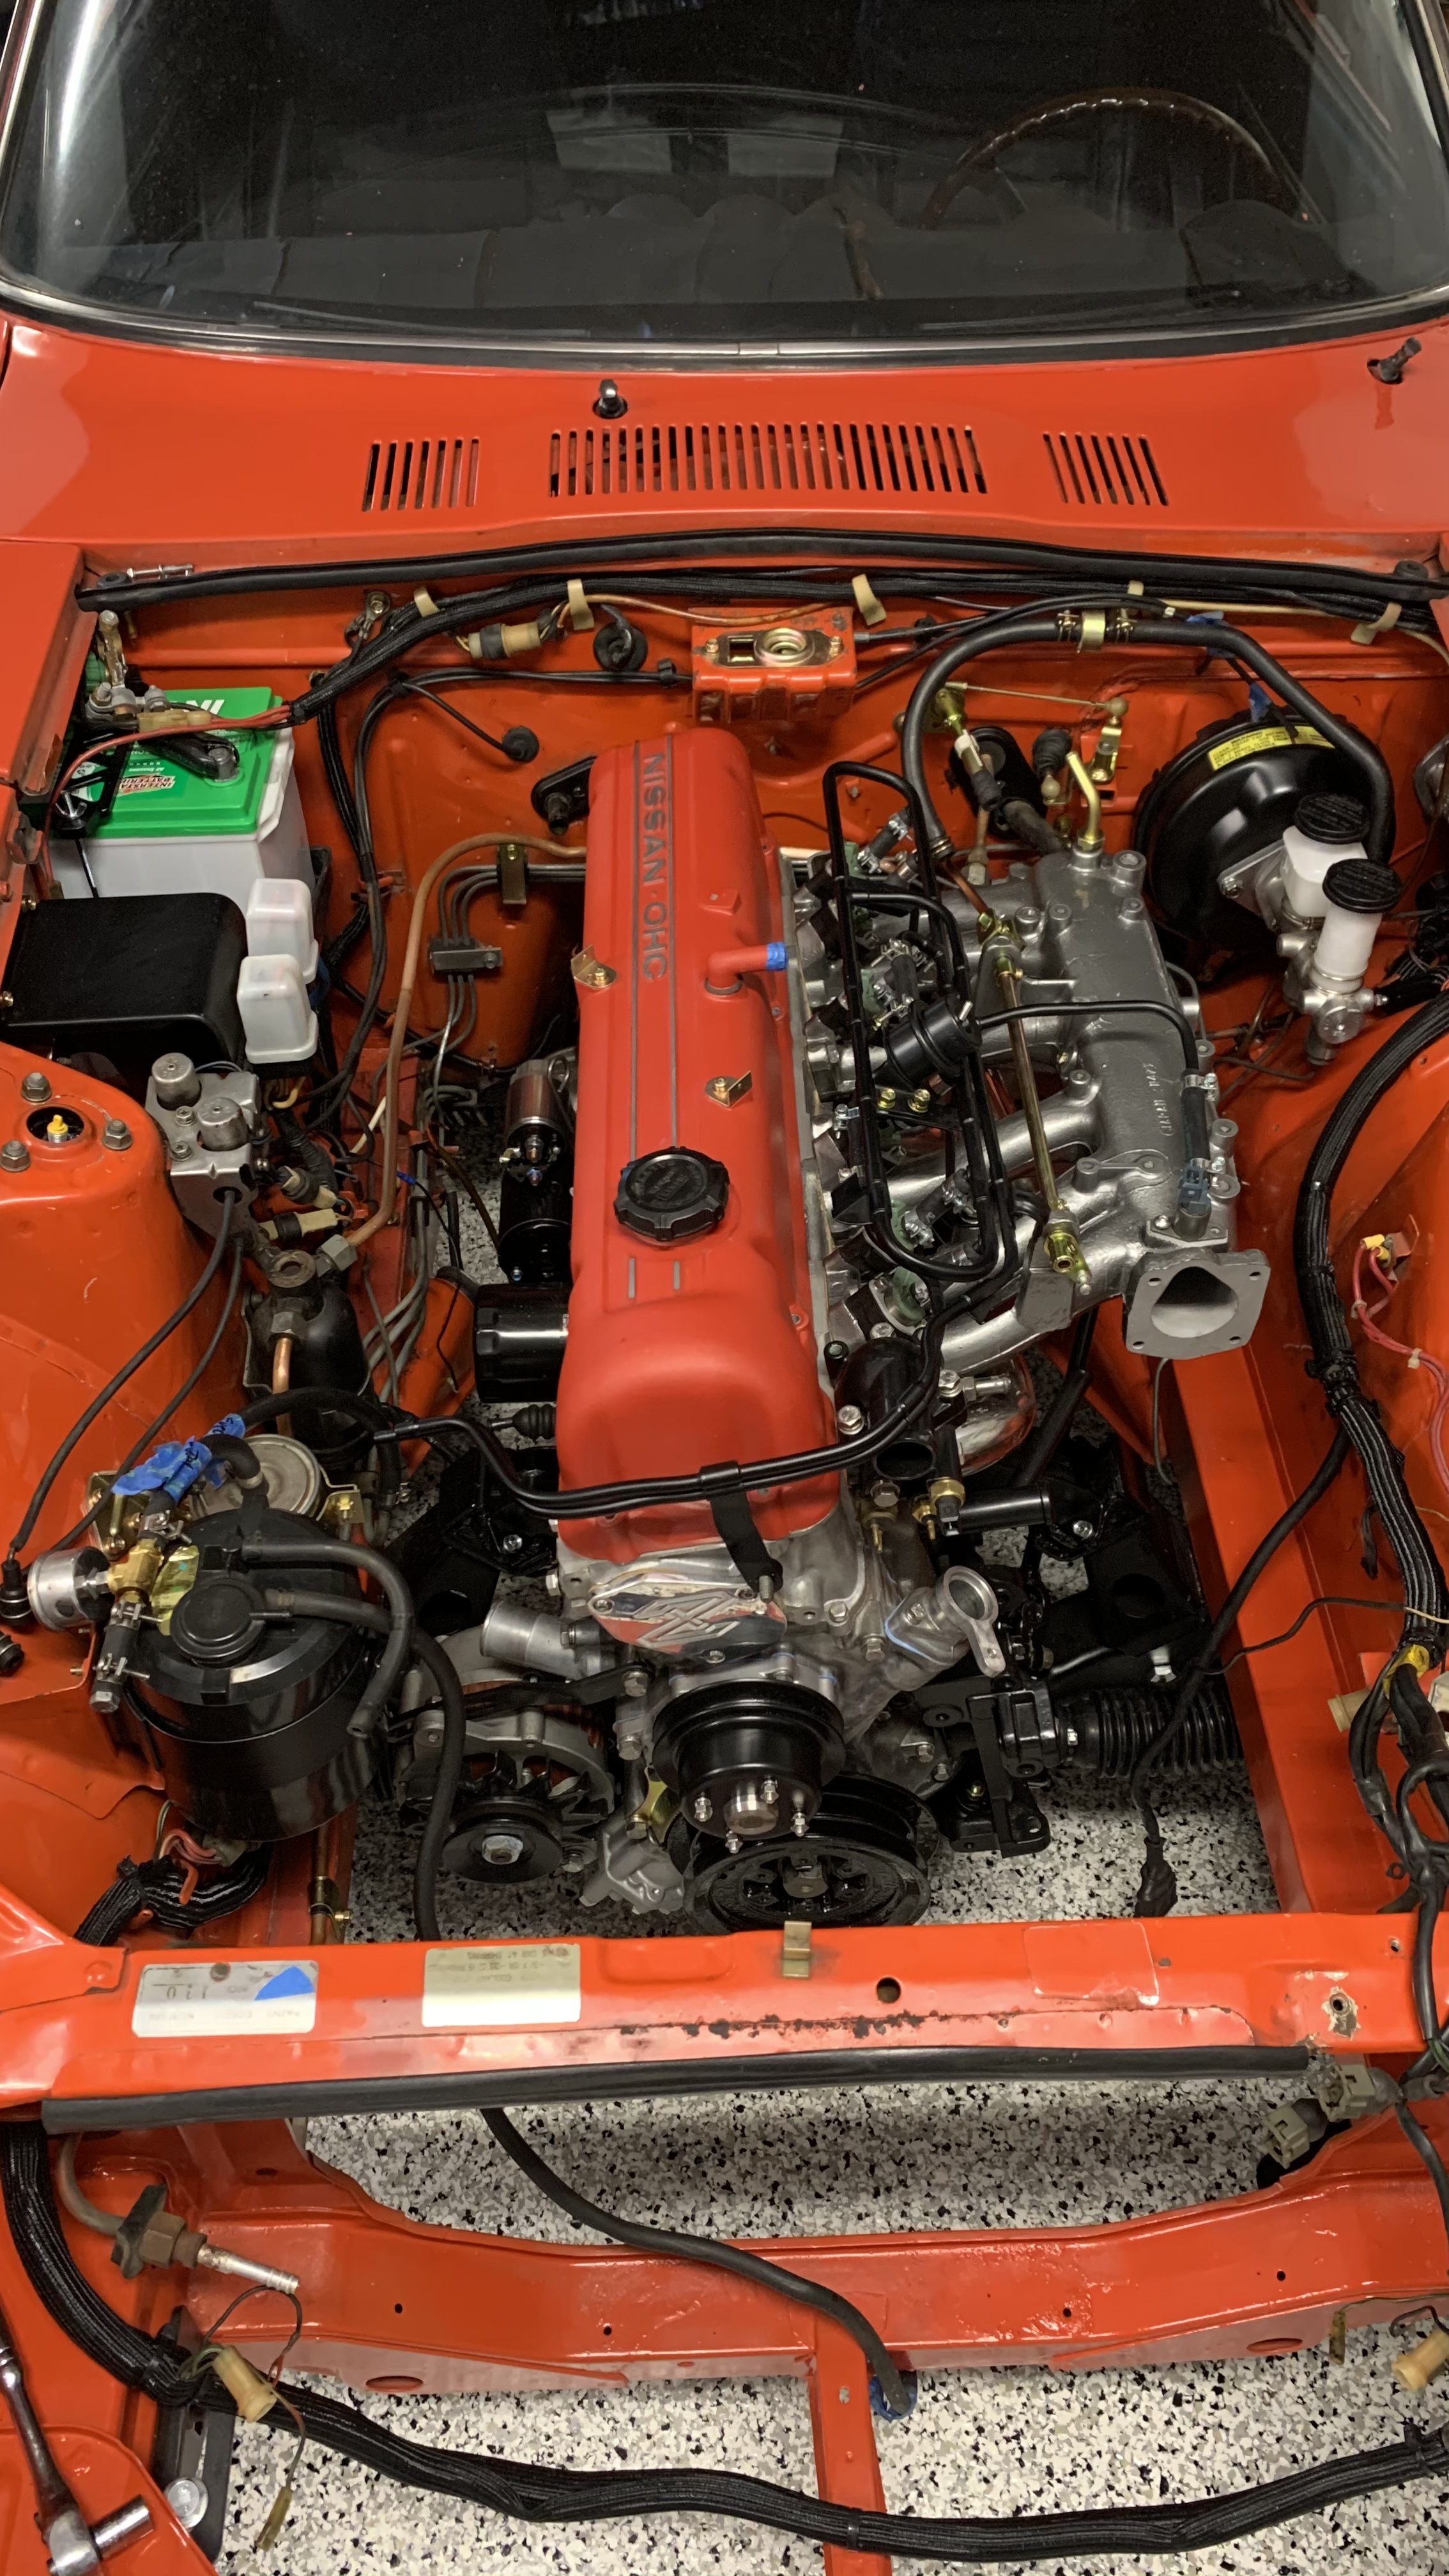
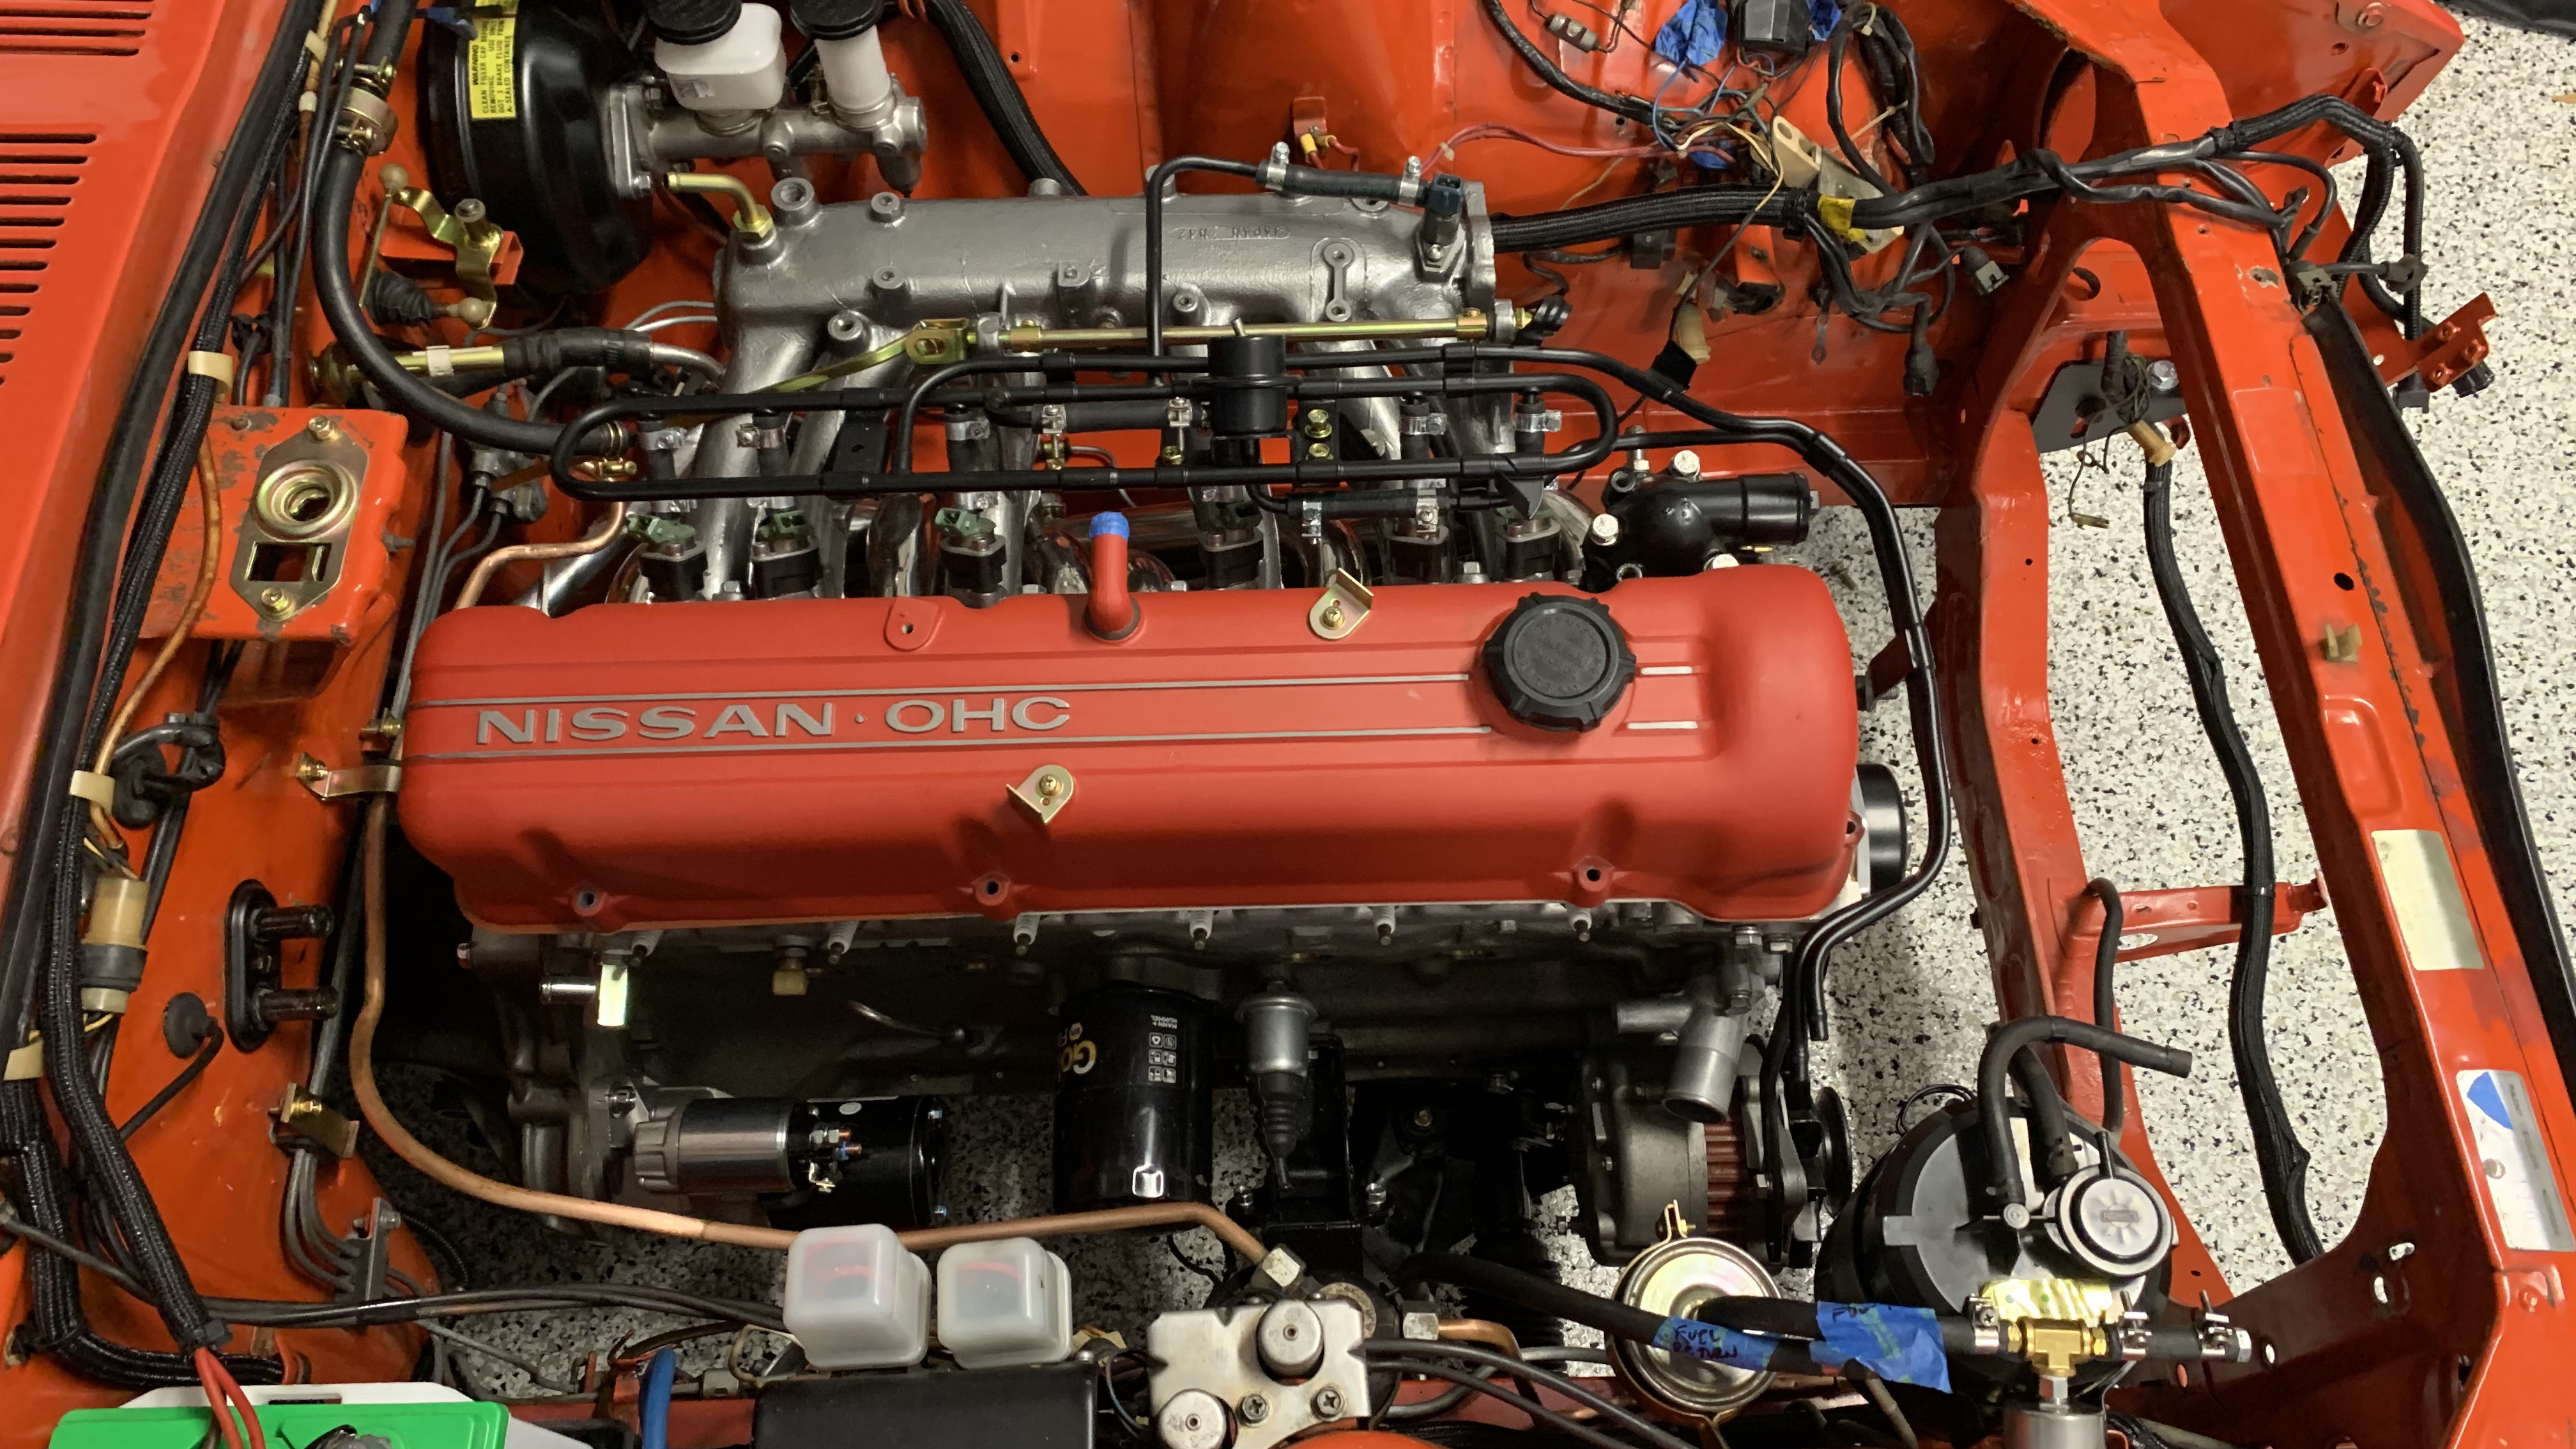
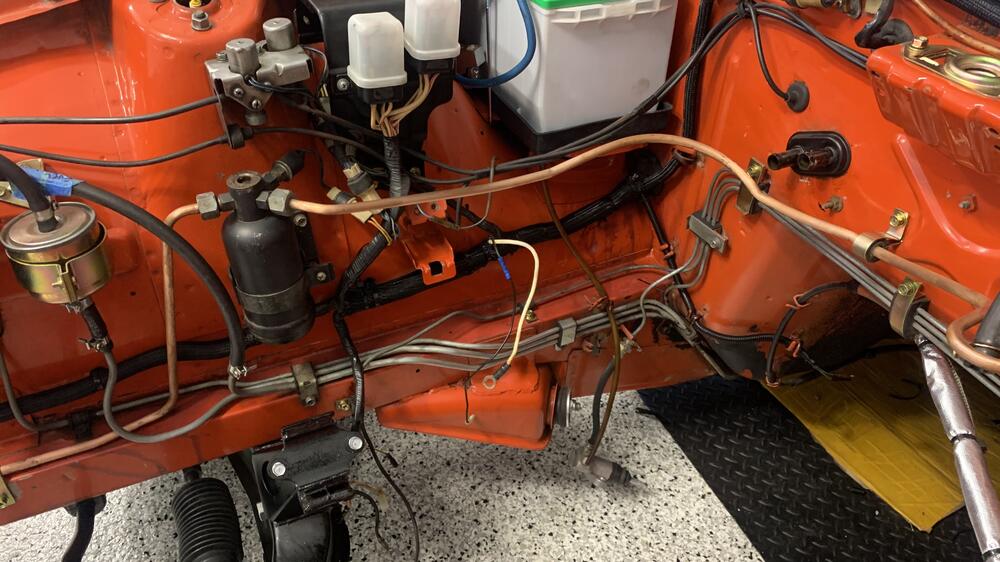
Inside the blue circle is the fuel filter. (You already knew that I’m sure but wanted to make sure what your were asking about). BTW if anyone knows where to get the rubber insulator that is glued to the inside of the fuel filter bracket please let me know. Can’t find one. I think your asking about what is is Inside the orange circle? That is the AIr Conditioner refrigerant bottle. I will be installing a catch can too. The deposits I had to remove from the pistons and valves were bad, thinking a catch can might ease that build up over time. Sent from my iPhone using Tapatalk
-
Wasn’t that bad. Took all of 45 mins. I gave my son a short safety brief and it started something like this. “This is a job you can lose a finger, so we’ll go slow and not force anything, make no assumptions and ask questions if confused….you need to pay attention”. His eyes got big. 😳 I felt the install was easier than the extraction probably because of the lessons learned pulling it. Like getting the load leveler set up right as well as the chain lengths correct. The chains on the front attach point need to be about 1/4 the length of rear chain . This is because the load level can’t angle the engine sufficiently at full throw with equal chain lengths. You can’t get the transmission snout low enough (into the tunnel) before you start running the oil pan into the engine front cross bar. So getting the chain lengths right was critical. Run the load leveler 70% toward the back of the engine so it can be lifted mostly level with unequal chains Once over the bay now you can run the leveler forward and drop the snout. I also couldn’t get the driveshaft installed at the same time. I tried, but just couldn’t get the internal splines to line up. I did try to rotate the engine with the crank bolt to move the splines but no dice, just couldn’t get it to go in more than 3/4”. So I’ll have to pull the shaft out later from the back. Getting the engine mount bolts aligned took a bit of finagling back and forth / up and down. The transmission mount isn’t fully in. After cleaning and painting the crossmember yesterday I discovered the bushing rubber was cracked on one side, I wont replace it right now, easy to pull later. The trans is still on a jack right now, I know these bushing are no longer available and read that poly ones really transmit the vibrations to the cabin, Will drive and see how it feels and cross that bridge later.
-
She’s in!!! My 14 year old son helped me. Just the two of us.


-
Here are higher resolution pics

-
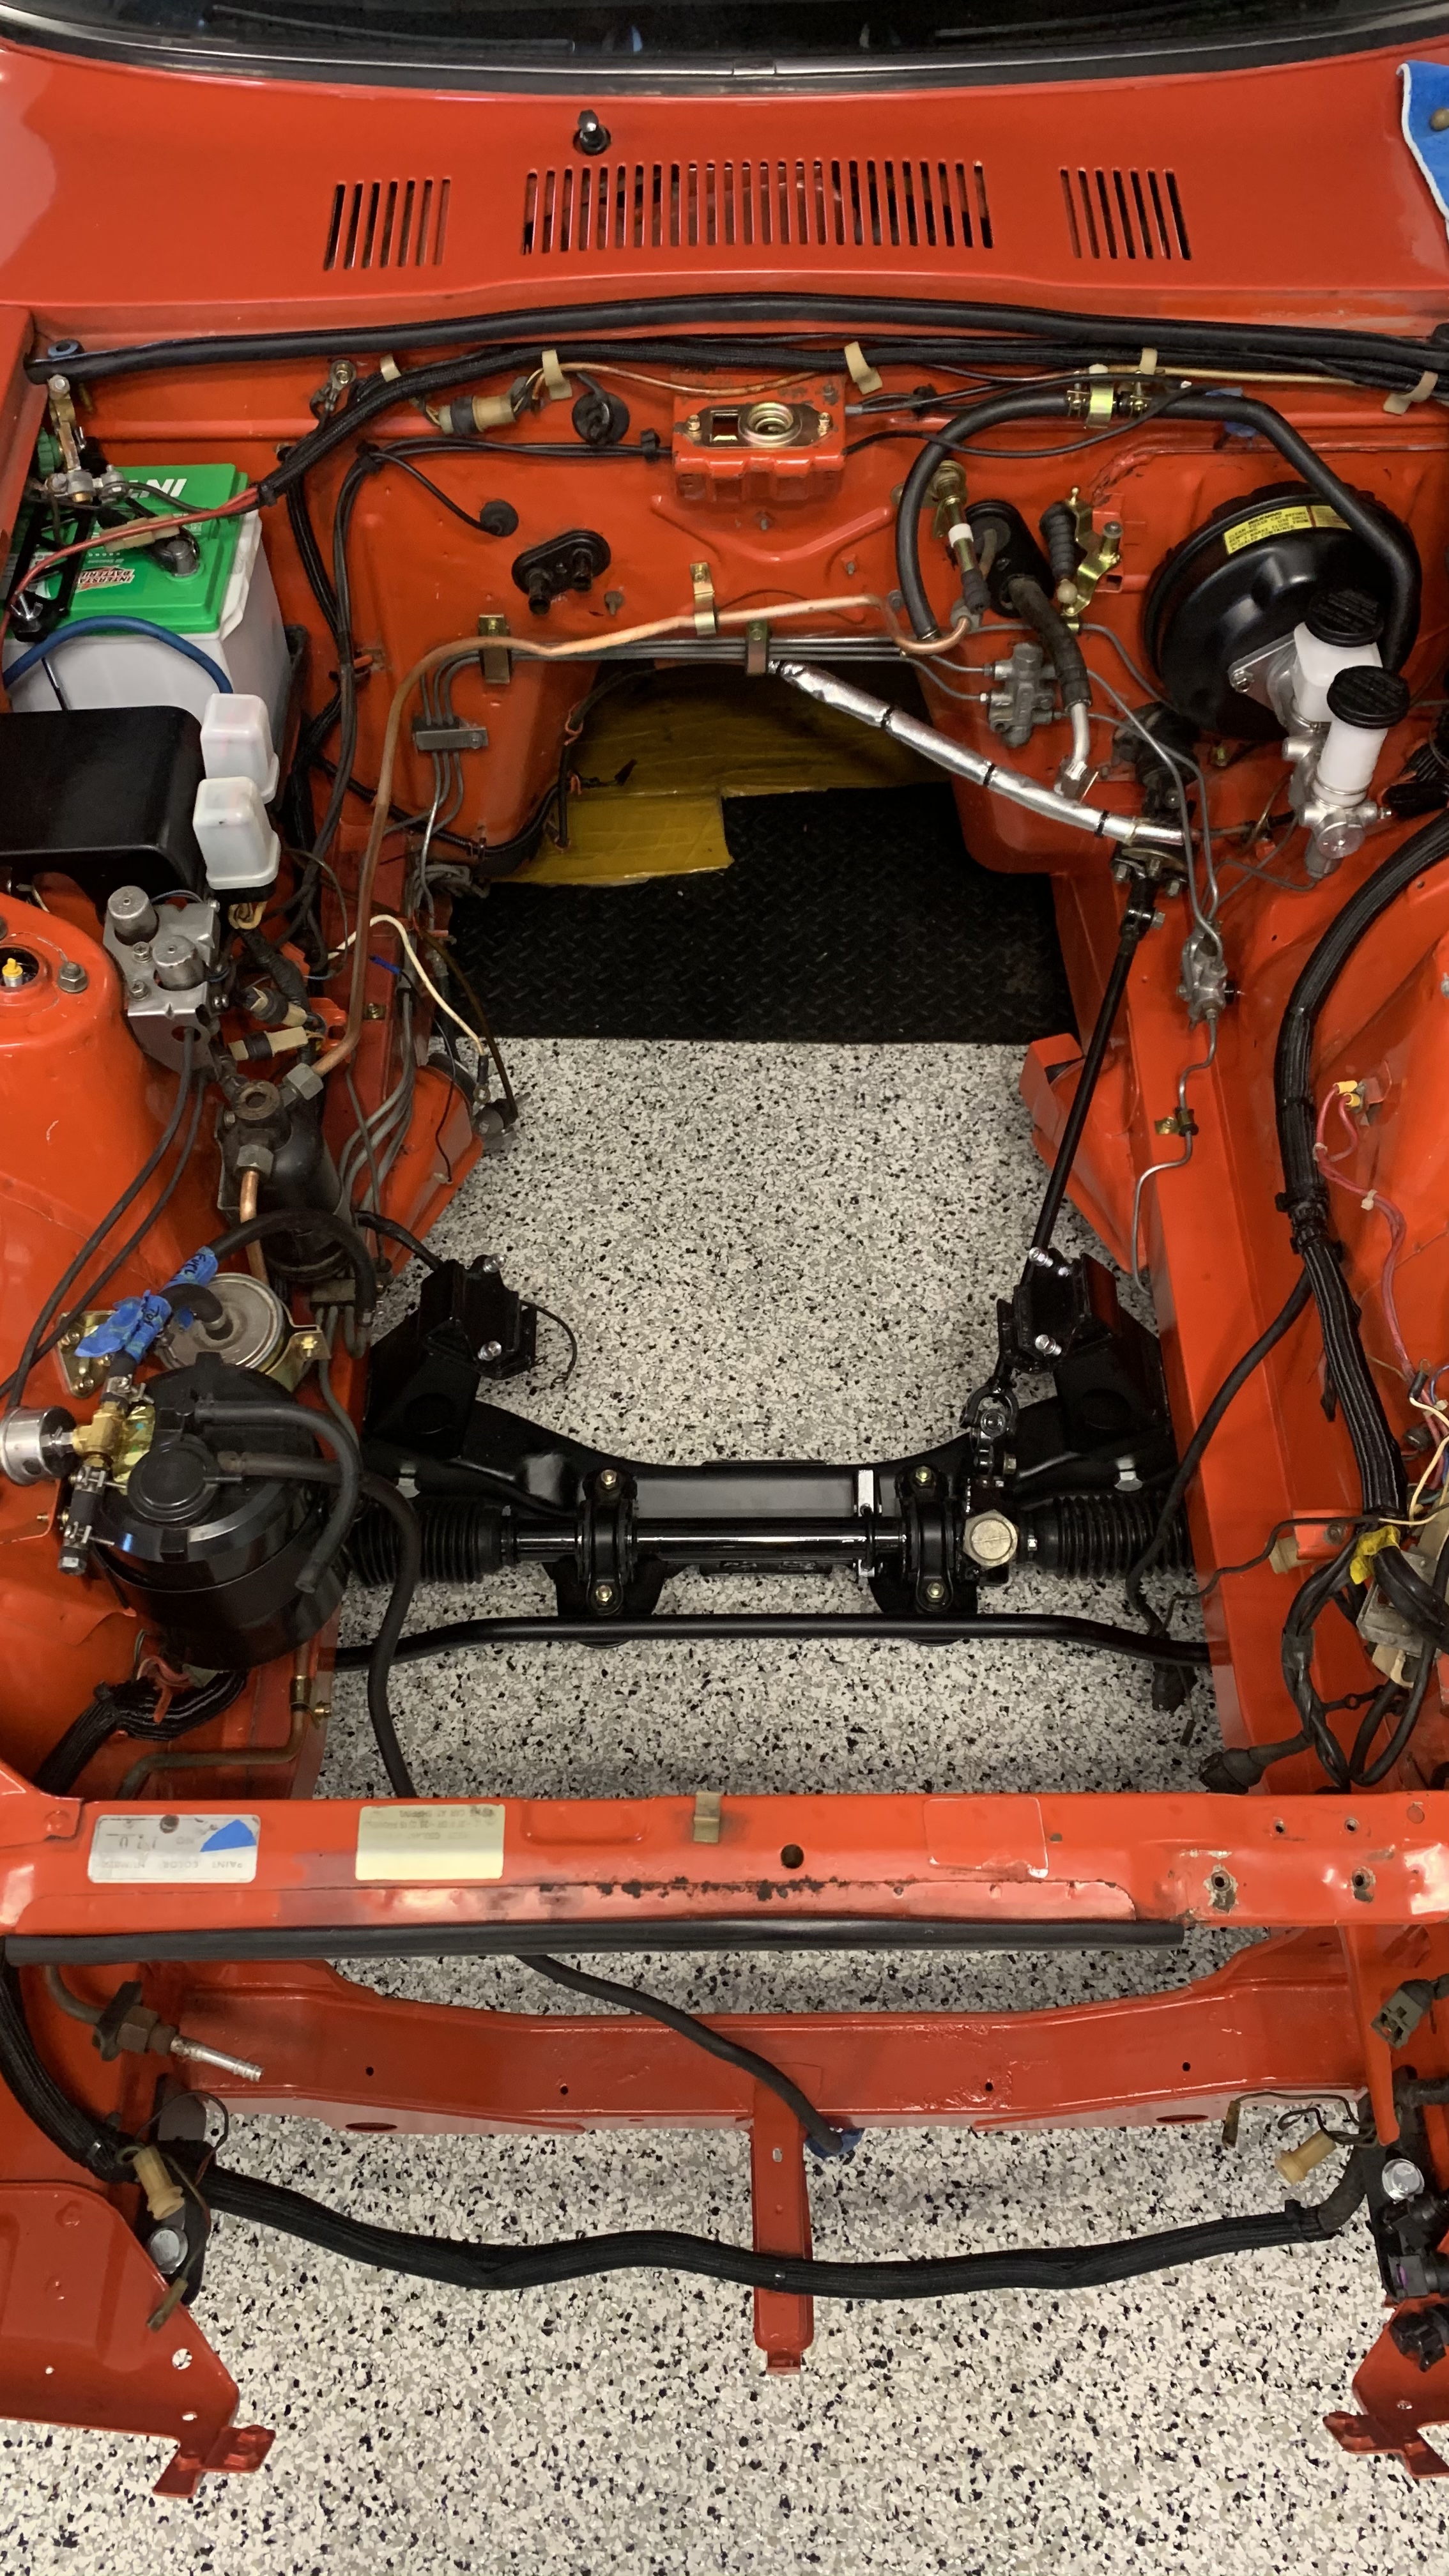
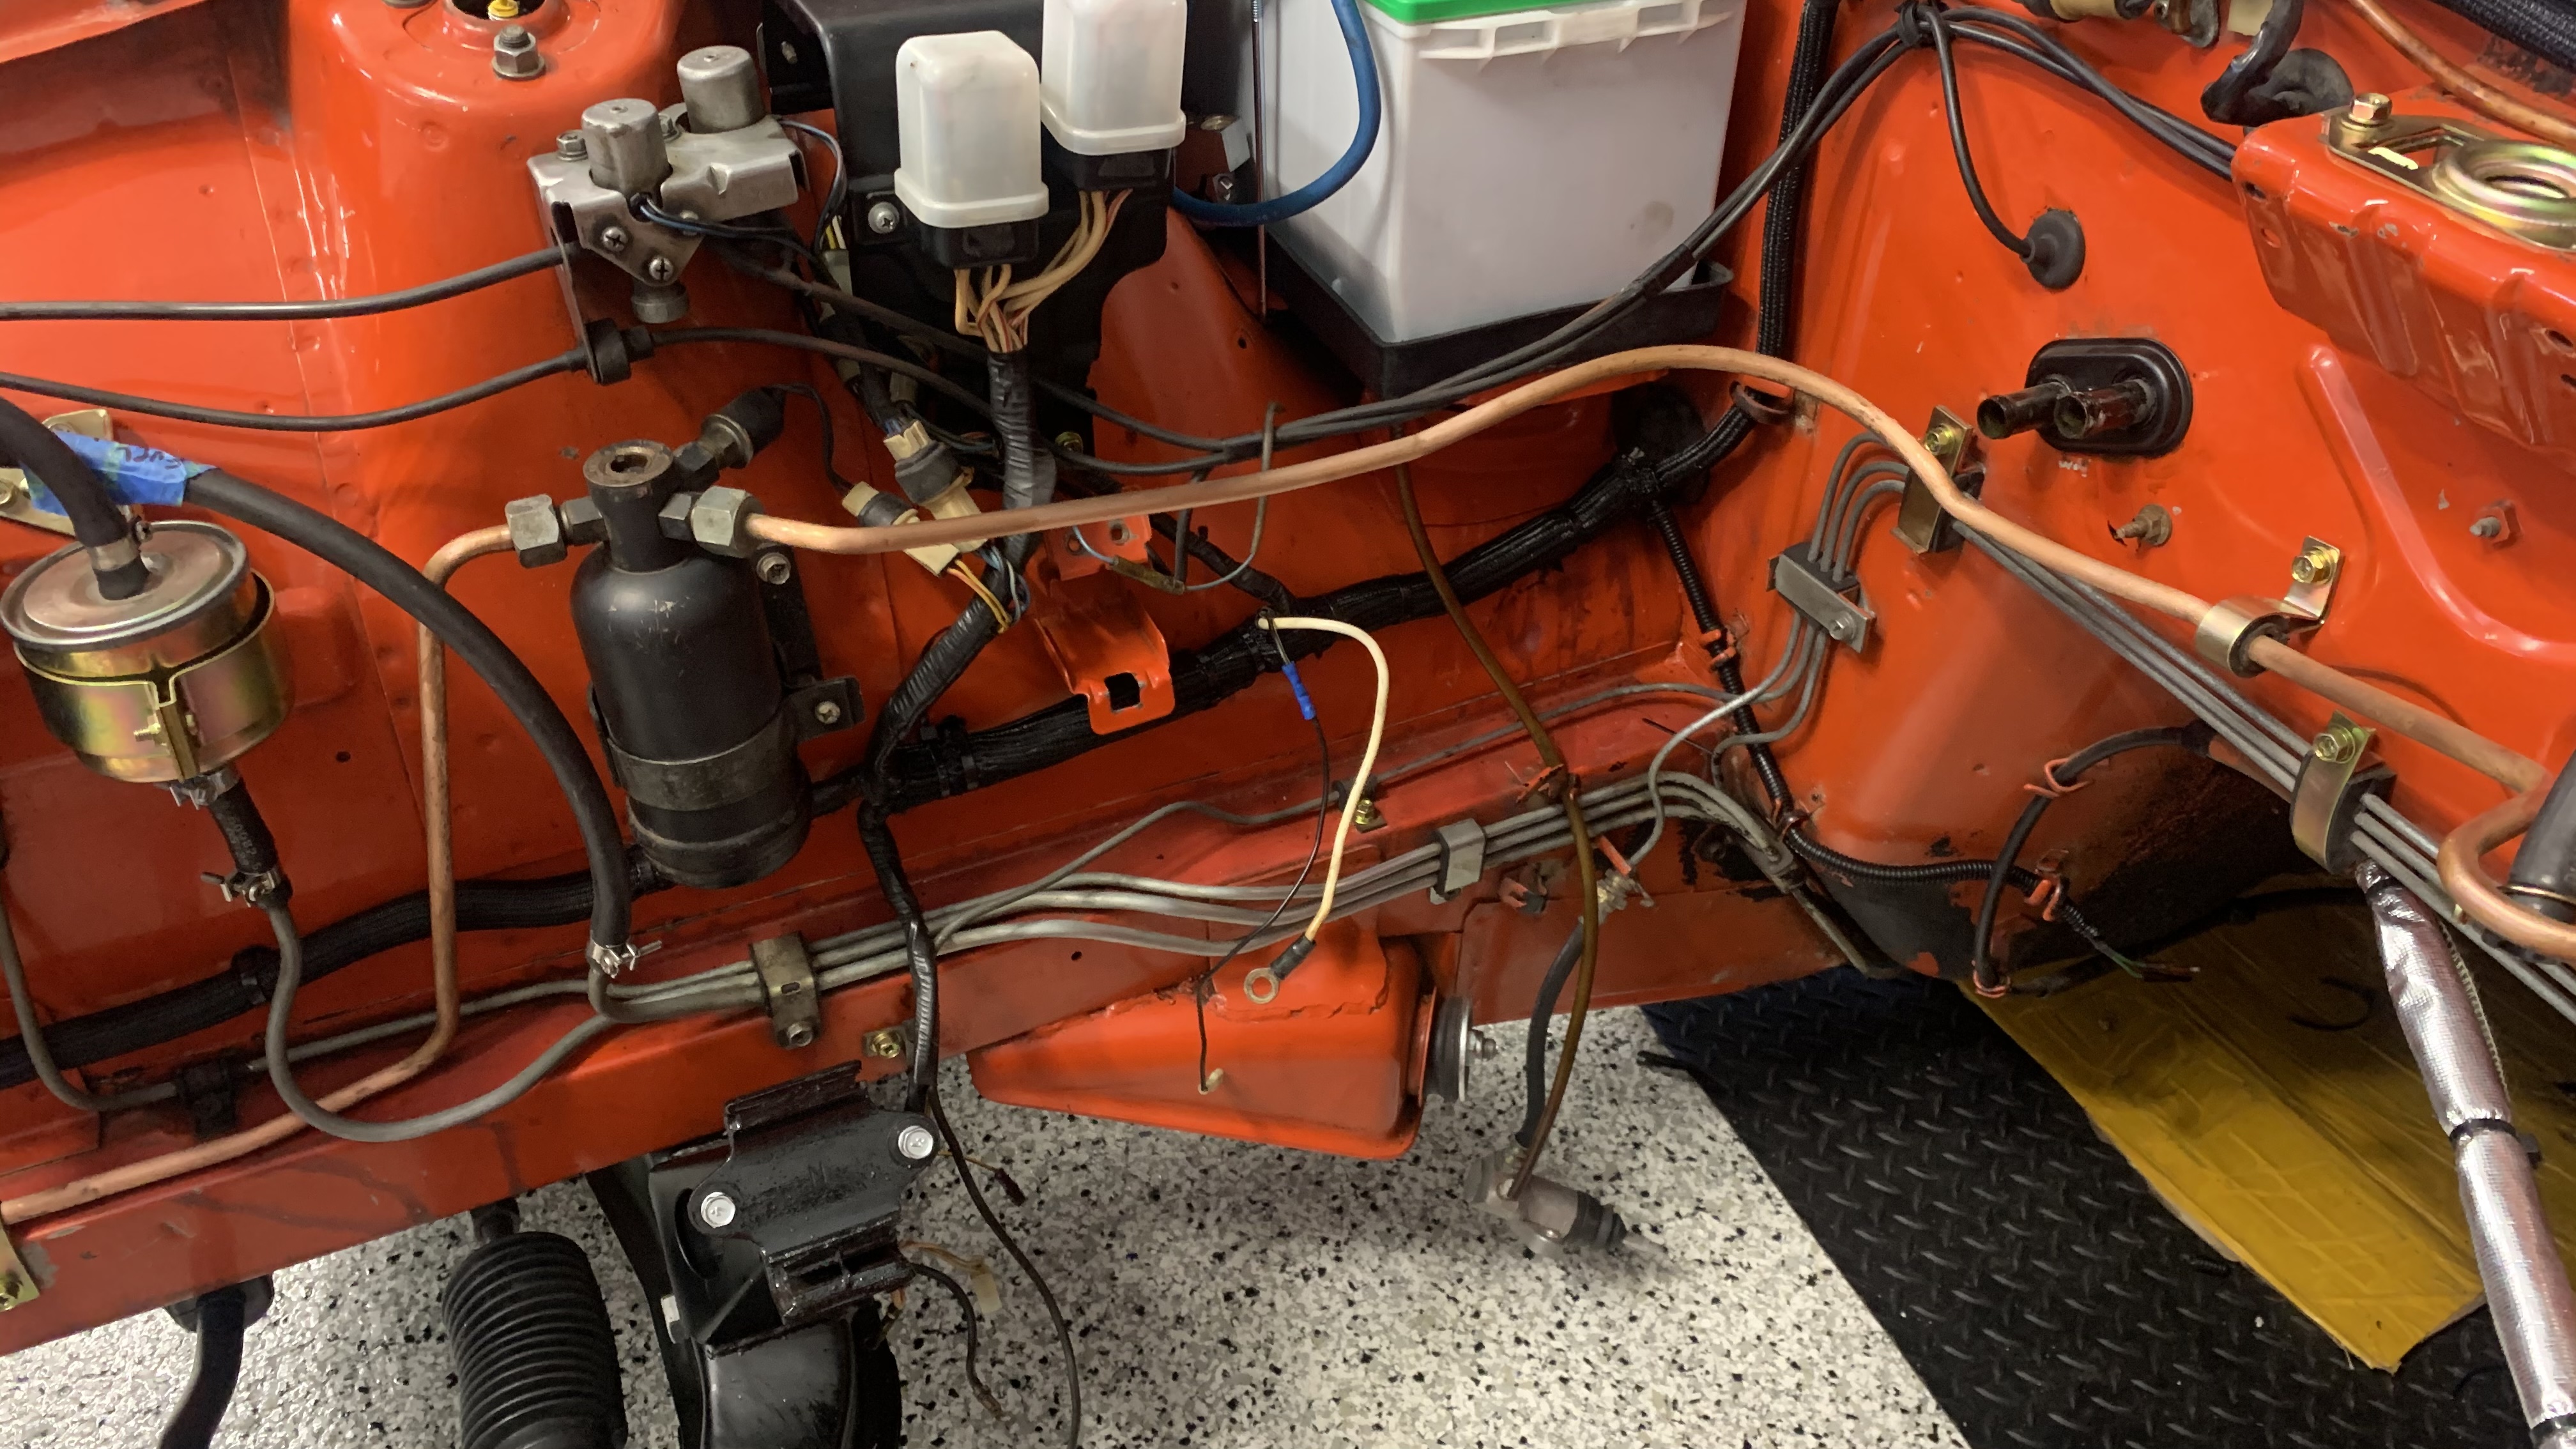
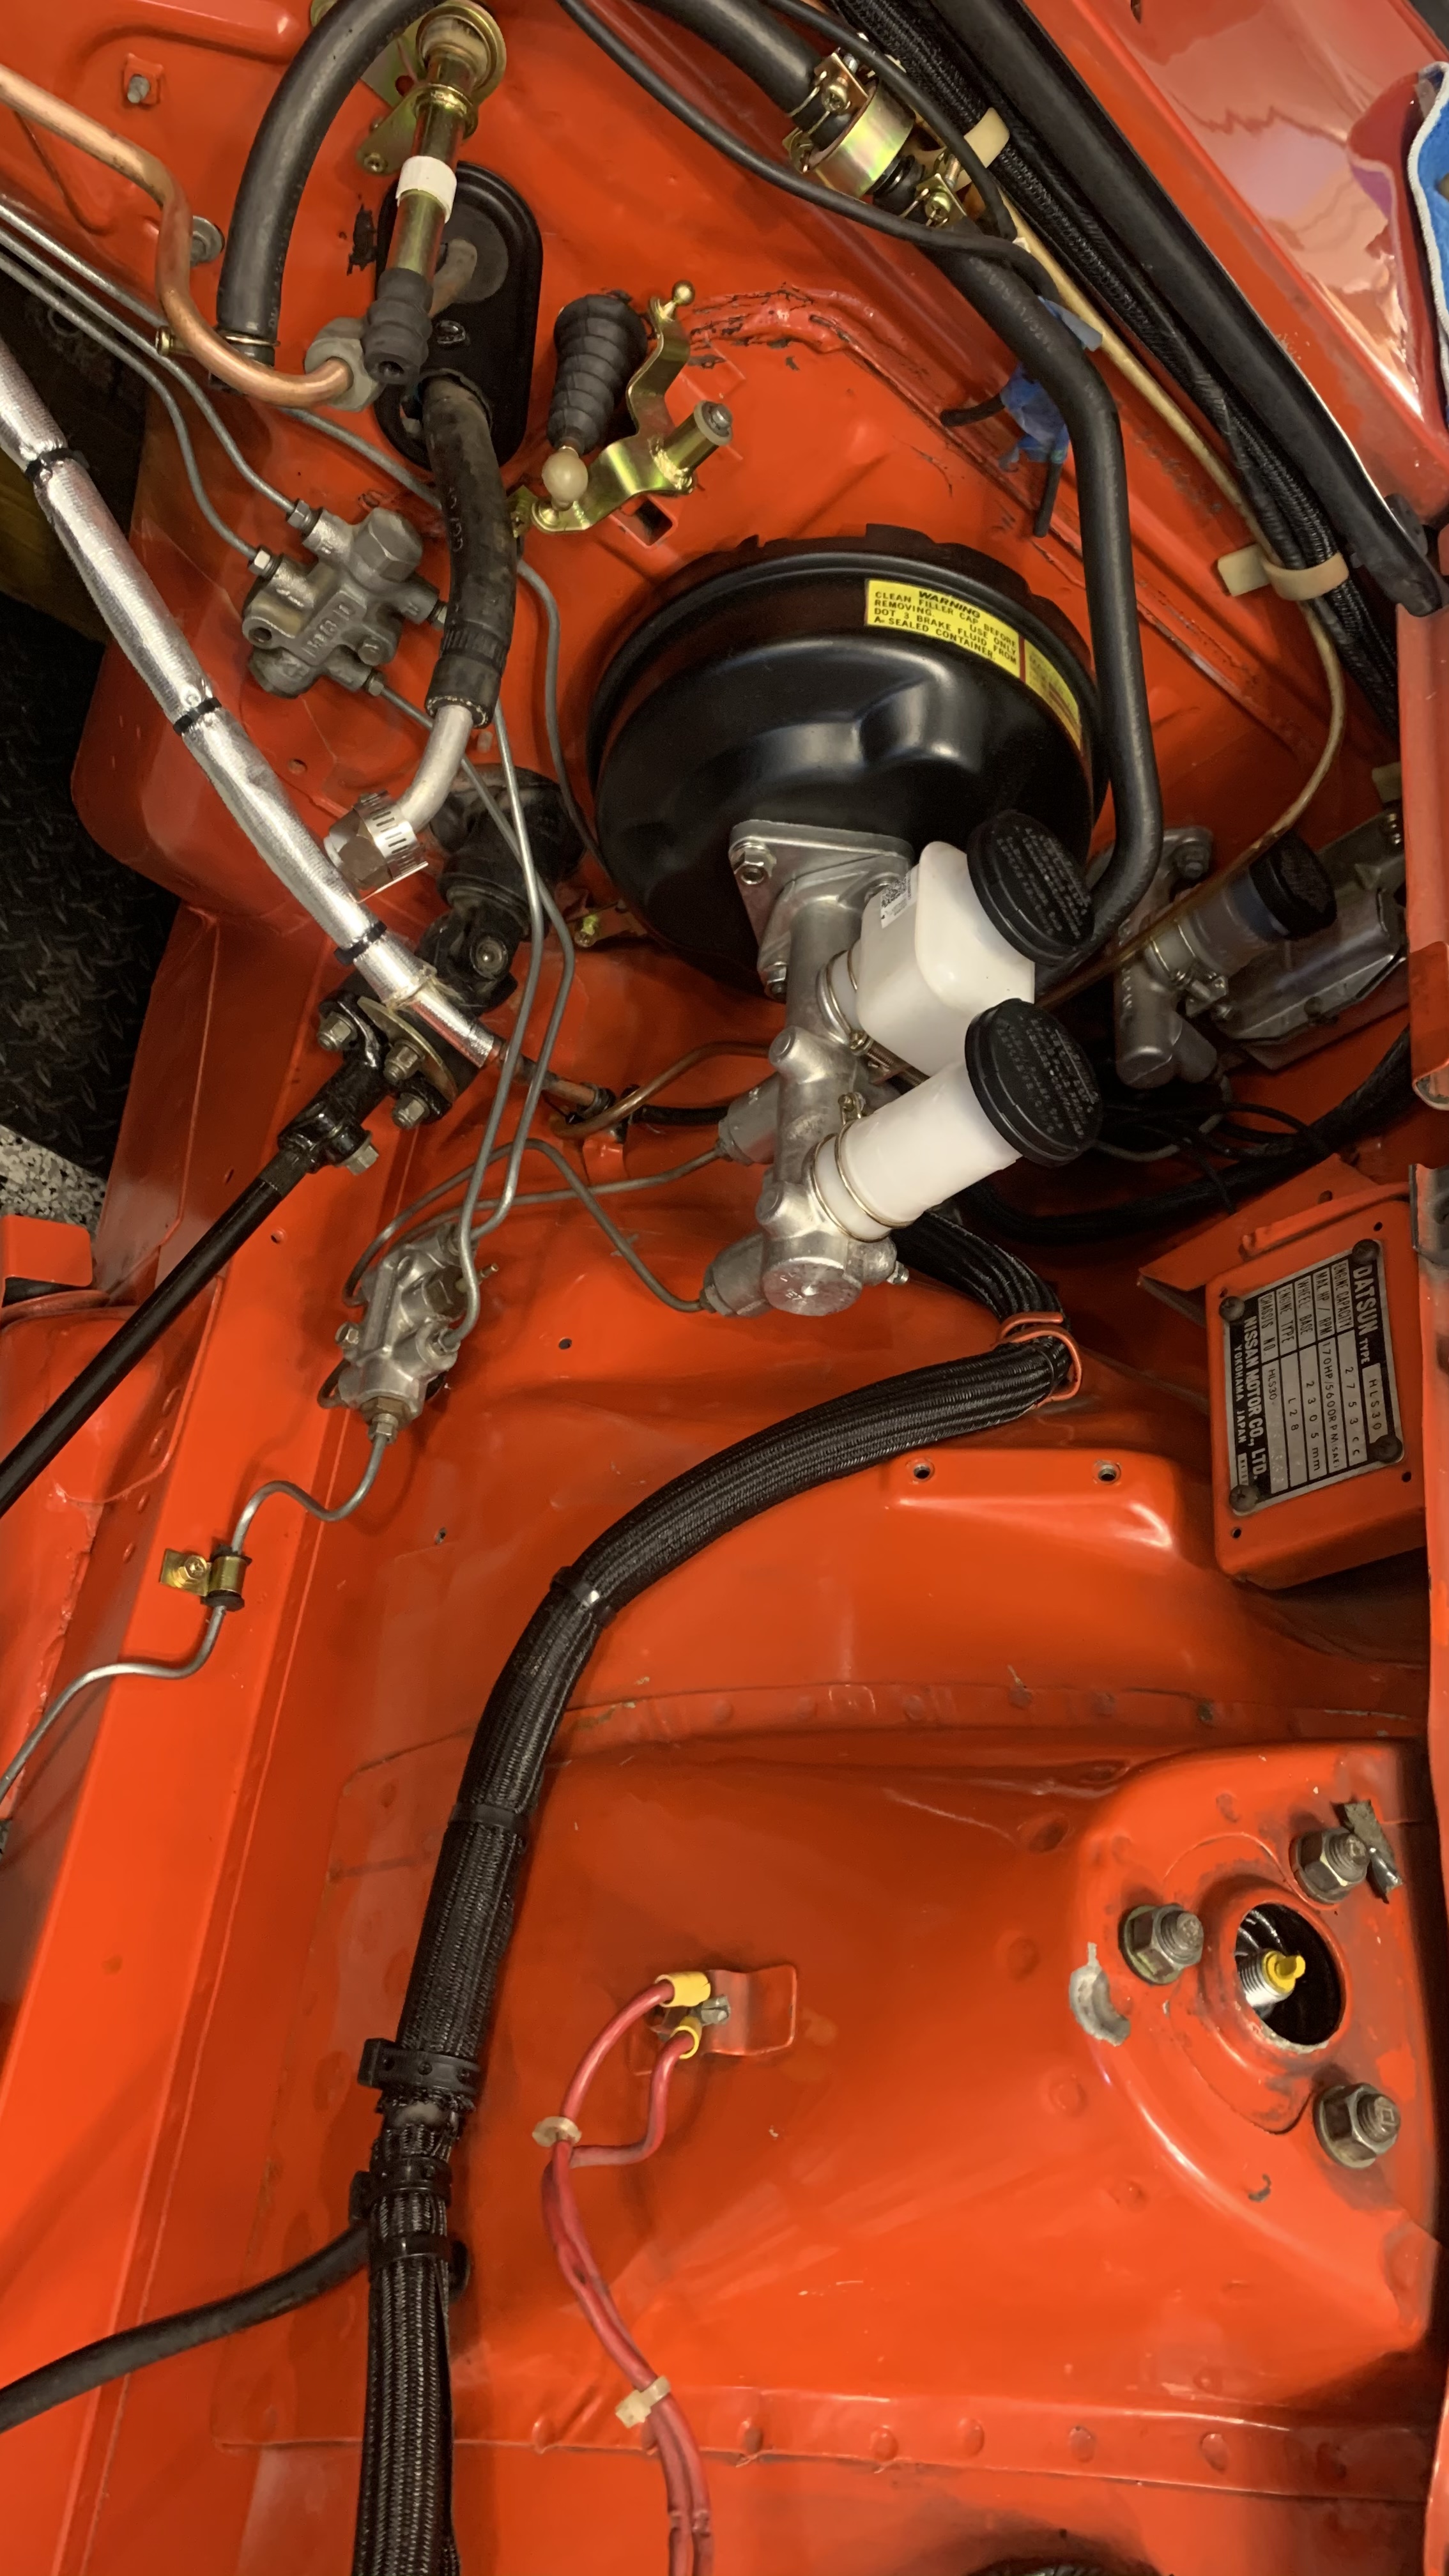
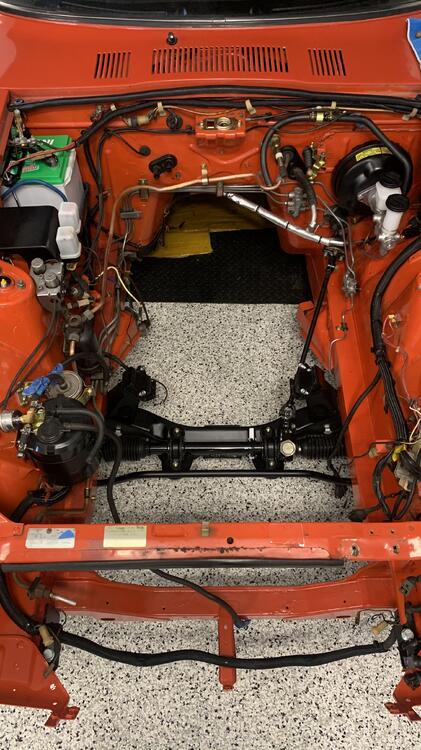
Okay, I think I’ve completed all the engine bay clean up and prep I need to do before the engine goes in. There is more work to do especially near the coil area but I think everything else can be completed after the engine goes in. See the below pics and let me know if anyone sees anything out of place or a missed. This has been a lot more more than I expected, definitely underestimated it. Sent from my iPhone using Tapatalk
-
Pretty shady, to go through all that effort and no be hiding something. Has anyone called him out on BaT? If not someone should. I might chime in a see what he says. Great observation Dutchzcarguy! Sent from my iPhone using Tapatalk
-
The exhaust....that’s what I found. Pic one you cannot see the exhaust pipe but later pics you can and instead of going straight back it takes a 90 deg turn towards drivers side. Looks odd for sure, the pics were taken at different times and why would you bend the pipe like that unless you are trying to stop exhaust from getting in the cabin. Sent from my iPhone using Tapatalk
-
You say they are theoretical but let’s be honest stealing a Z is no different than stealing any 70’s vehicle. There isn’t anything particularly unique about the design that makes it stand out from a ease of theft. So I’m not sure where you are going on this? It’s not like you’re trying to steal a Tesla or something with a advanced stock anti theft device. In the 70’s you pretty much had kill switches for the ignition and crude alarms. It you want to be creative put a cut off valve on a inconspicuous portion on a fuel hose. Nobody will be looking for that. Open the hood, turn the valve 90 degrees and walk away. There are several areas to hide a valve like the in the engine bay.
-
I know my Z was repossessed by a California based bank on 1989. I have the bank repo sheet. So I think it’s experienced the means of theft. Defeating theft is pretty easy, you need to focus on the 95% of would be thieves. Covering the last 5% is difficult and expensive. Most thieves don’t want to spend 20 mins trying to steal a car. Anything more than 5 mins becomes risky unless they have a place the car is hidden like a barn or garage that they can work while the owner is away. But for a casual evening out for dinner with the wife you don’t need anything too elaborate. Something as simple as puling out the coil spark plug wire or a discrete coil disconnect switch would stop 98% of the walker-by thieves. My recently restored 1966 VW was stolen while I was deployed to Afghanistan in 2002. Stolen from a repair shop, was what I was told. Could have been the shop owner..who knows. I never saw the car again, never really got compensated because it was an old car and the insurance company said it was only worth $600. It was worth about $6,000 in reality and would be three times that today. Sent from my iPhone using Tapatalk
-
Thanks Jim, I’ll do that. Got to install the steering rod and a few other minor tasks. Should I re-install that metal Heat Shield that goes in the transmission tunnel before putting the engine/trans in? I’m pretty sure I pulled it out prior to removing the engine and transmission so so be able to go back In reverse order? Sent from my iPhone using Tapatalk
-
Final items to finish up this weekend before the e gone install on Monday. I had a question for the group. When I pulled my engine there was a heat wrap around the speedometer cable. It was pretty beat up. Not sure if that was stock. My speedometer cable also has a orange rubber sleeved around it under the wrap. Looked for replacements and found one on zcardepot but it’s diameter was too big. So I bought some heat shield tape and wrapped the cable. Any thoughts on this. Is it required, is the tape sufficient and where else could/should I use the 12” wrap I bought at zcardepot. Pic 1 is old wrap. Pic 2 is my tape job and Pic 3 is the new wrap I have left. Sent from my iPhone using Tapatalk
-
I had to trim one hook down. They we more like 10” and the back one needed to be longer but about 1” so I took an inch on the front hook to even them up. Sent from my iPhone using Tapatalk
-
Sorry, bad link. Try this but the other sent comes with the Hooks bonus. https://www.amazon.com/gp/aw/d/B07GSGQSRD?psc=1&ref=ppx_pop_mob_b_asin_title Sent from my iPhone using Tapatalk
-
After my engine bay clean up and battery tray painting jobs I wanted to solve my battery hold down problem. I know the car was meant to have a MT24 battery but I’ve had originally bought a MT34 which is almost identical just about 1 in shorter. I didn’t have a stock hold down and knew it wouldn’t accommodate an MT34 anyway because of where it bolts to the firewall. I had been using a ghetto nylon strap but finally decided to fix this. I purchased a couple adjustable hold downs at my local parts store but they all didn’t work. I then looked on Amazon and found one that works perfectly. Check it out, it was only about $14. It doesn’t come with the fly nuts and hooked rods. Here’s the link: https://www.amazon.com/your-orders/pop/ref=ppx_yo_mob_b_pop?_encoding=UTF8&gen=canonical&lineItemId=mnohtrortrswqny&orderId=111-3970410-8507432&packageId=1&returnSummaryId=&returnUnitIndices=&returnUnitMappingId=&shipmentId=UHxzlCLhr Sent from my iPhone using Tapatalk