


Elliott000
Free Member
-
Joined
-
Last visited
Everything posted by Elliott000
-
 Thanks guys I appreciate all the help. I'd hate to get this thing together in a year or two and the friggin hood won't go on! Sent from my SM-N950W using Tapatalk
 -
I have the measurements listed in the FSM. yesterday when I started on the engine bay frame rails I took it off the rotisserie. It now sits supported at the rear bumper and right where the subframe ties to the floor so that I could cut out the front rails unimpeded. Essentially the engine bay section at tis time is free hanging. Sent from my SM-N950W using Tapatalk
-
That might help make sense of a measurement between strut towers. On the manual it says I can't remember now but my width is 1/4" smaller than factory spec where as the dimensions down at the bottom where the crossmember bolts up are bang on. Should I attempt to spread this to stock figures while I'm at it? Not sure how I would balance out the spread. Car is currently level, i could plumb bob down once I finish the lower frame and make it right I suppose. Similar to when I had to fabricate the axle swap in my truck.... Patience and lots of measurements Sent from my SM-N950W using Tapatalk
-
I agree, that's why I wanted to discuss it here. I was thinking if I flattened it and added some form of angularity maybe it would or could be better. I already cut some templates to trace and cut the upper steel. Since im no pro level tin basher, I was thinking I might not be able repeat the same round contour but I do have the ability to box it. Sent from my SM-N950W using Tapatalk
-
Hey guys, so I posted originally about these in my rusthole thread. Ive found these pictures today and want some z enthusiast responses before I decide my route. I was going to do my best to re create the air horns that go over the wheels but it WILL suck. This guys has cut them off and sheeted it in which add rigidity in the vertical load plane but will it cause weakness that one should consider in the lateral plane? This would be the easy way out, And yes I understand these are the fresh ait vents on this year of car but Im not picky about it either way. windows down will be drafty enough. Thoughts


-
Any advice on installing the weld nuts in the tubing Sent from my SM-N950W using Tapatalk
-
Well after plenty of research and such I've bought some steel. For the lower main frame rails in engine bay I've gone for 2.5 x 2.5 tube, ill notch a relief in the side and integrate the crossmember brace/bolt holes, got some flat stock to weld nuts on for the rest of the holes. Easier, stronger and cleaner i figure. Im gunna rebuild the rad support aswell with same material and dress up the upper part of it as necessary. For the part that ties into the floor behind the suspension mounts Il dress that up with sheet metal. And braces from 1.5 x 2.5 tube I already have. She should be stout and not too much heavier, ill be sure to set a benchmark to measure from on the body to locate all the mounting holes and to ensure everything is square and straight. One side at a time I figure Sent from my SM-N950W using Tapatalk
-
Delete it! Just found my answer, reviews on these cosmos are low and sound as though they are too stiff, the struts that buddy bought are kyb so the cheapest of the options. Probably worthless to sell it off at this point so should the time come that I need the chassis to be a roller ill probably install it just for experience. I'll google around in a quality street machine coil over setup for my 71. Sent from my SM-N950W using Tapatalk
-
Hey guys, the 240 I got comes with a brand new set of Cosmo adjustable coilovers, racing g spec. Front 6 rear 8 kg rate. Question I have is what will I need to track down to run these. Do I want to run these springs, it won't be a track car but I will drive it with purpose haha. Never done little car suspension. Im used to lifted trucks. Thanks for any direction Also with a coil over strut setup I'm looking at, does this go so low as new spindles and caliper mounts it or is it just a thread sleeve deal. Sent from my SM-N950W using Tapatalk
-
-
Looks good thanks for the pictures Sent from my SM-N950W using Tapatalk
-
My inner rails are healthy but the outer are trash . Custom job commin up... Im going to tackle the frame rails and strut tower first so I can basically consider the floor and its structure complete. Then these bad boys Sent from my SM-N950W using Tapatalk
-
Hey I'm not sure what this indentation is called on the car. Outside of frame rail above two bolt holes. What ties into it, i need to replace this one obviously. I cant really bend something up to match this but I can cut some 1/8" triangles and make the same shaped pocket. Is the recession a necessity or was it there to add strength. Can I make this area flat and get away with it or will that screw up parts fitment down the road. Thanks.... Joys of not having disassembled the car myself haha. Pockets at the bottom of pic in frame. Not the strut tower, that ill just cut out and form a peice in there Sent from my SM-N950W using Tapatalk
-
Good to know. I had similar ideas to just priming and welding then priming over the seam. Just had concerns about moisture from the back over the yrs in the spot where I'd have ground off to weld. Sent from my SM-N950W using Tapatalk
-
Hey guys I'm getting ready to start in on patching up my 240, im new to the tunes bashing scene and don't know alot about weld through primers. Is this something I basically want to use on any and all sheet metal in which I won't be able to treat later on or for any welds wherr it's a spot weld style repair or fixing small pours holes with a patch piece? What are some good brands and are there any tricks aside from the usual prep pre painting. Thanks in advance. Also, what is a general good primer or sealer to use when i open a channel up like the rockers or the upper air horn frame part and need to cost the inside before sealing it up. Sent from my SM-N950W using Tapatalk
-
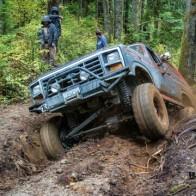
Thanks for all the replies guys, this car same as my off road right is a build for myself with no desire to sell. Just drive, labour aside from filler and paint will just be my time with my kid over the years to come. Lookin forward to getting at it. I'll definitely be checking frame measurements. Here's my other build as she's sits today. All home brew fabrication on 38s Sent from my SM-N950W using Tapatalk
-
That's a pair of engine stands I modified so they were vertical and sturdy! With a spreader bar in the middle at the bottom. Works great Sent from my SM-N950W using Tapatalk
-
Man those look amazing, exactly what I will try to do. Just need to figure out how to shape em! My only concern is structure... Im used a body on a frame, if i cut that thing up just as pictured will there be movement that could screw things up when finished? Would I be best to pull it off the rotisserie for a repair like that or should it be ok because there's still substantial steel helping fight any sag. Sent from my SM-N950W using Tapatalk
-
Thanks for those numbers! The rest of the car isn't bad. The floors are pretty much finished, there's some rust on the rear quarters but available patch panels for them and the rockers will take care of that. Other wise good to go. It's kinda wierd that they are that trashed. Way she goes I guess. I think ill look around for the panels, if not my buddy was just here and we had a look at hand building them with multiple pieces asking a bead roller. Will take fab time but will work. I just want her to be structurally sound. Being as its under the fender I don't even mind if it's boxed and not round. Fenders..... Thats another issue, the ones I've got are fiberglass but they are $^!# because they got cracked on the journey home. 8 gotta locate new ones, id prefer steel but fiberglass seems more readily available. Sent from my SM-N950W using Tapatalk
-
Got this car off my buddys cousin for the cost of fuel to grab it. It's got lots of goodies for it and a rebuilt 3.0 stroker but it's also got a lot of rust in all the wrong places. My experience with vehicles is generally wheeling and building trucks. I've done some sheet metal work and have all the tools necessary bit i have no idea where to start or if I should bother.... See attached pics of the worst and hardest repair. The rest is basic metal cut n fit. What are these top frames called. Can they be fixed? I've seen a couple cars with these cut off and tubed.... Help! Sent from my SM-N950W using Tapatalk
-
I've got nothing 510,i might sell my mini van and search for a 8/10000 buck one, we've got a ram for running around and ill drive my bronco to work . No more soccer van for dad! Just gotta talk the wife into it hehe Sent from my SM-N950W using Tapatalk
-
No i havent but that's a good thought. I'll continue the hunt! Sent from my SM-N950W using Tapatalk
-
Something inside changed i backed out on my offer after digging around for parts. Simple but never really thinking about it parts like the moutlnt plate for the wiper motor and all those guts, an entire suspension etc. Cant justify it. Id sooner buy a complete car and do a bunch of the body work myself Sent from my SM-N950W using Tapatalk
-
Thanks eh, I've hit him up for a lot of pictures I probably have 40 pictures of the car from every different angle the floors are certainly shot and he's already started cutting those out for the trunk fenders whatnot or looking actually pretty decent even from underneath and behind Sent from my SM-N950W using Tapatalk
-
1800 bucks is where were at on it. Sunroof im ok with but ya. I dont know.... Around here (Vancouver canada) u can buy a complete car for 5k but the rust is way worse than this one Sent from my SM-N950W using Tapatalk
