z3beemer
-
Posts
168 -
Joined
-
Last visited
-
Days Won
3
Content Type
Profiles
Knowledge Base
Zcar Wiki
Forums
Gallery
Events
Downloads
Store
Blogs
Collections
Classifieds
Everything posted by z3beemer
-
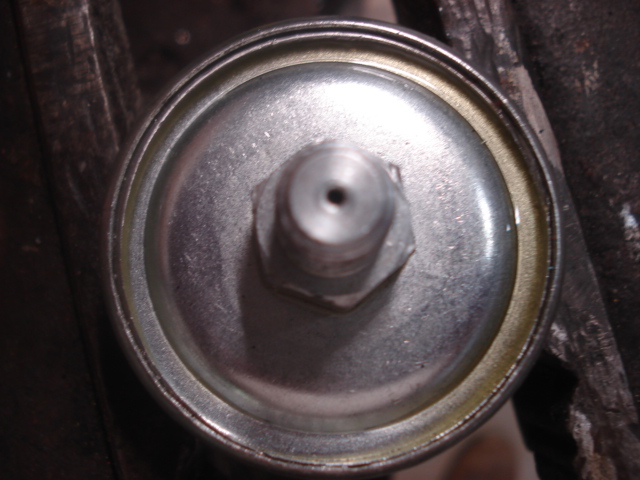
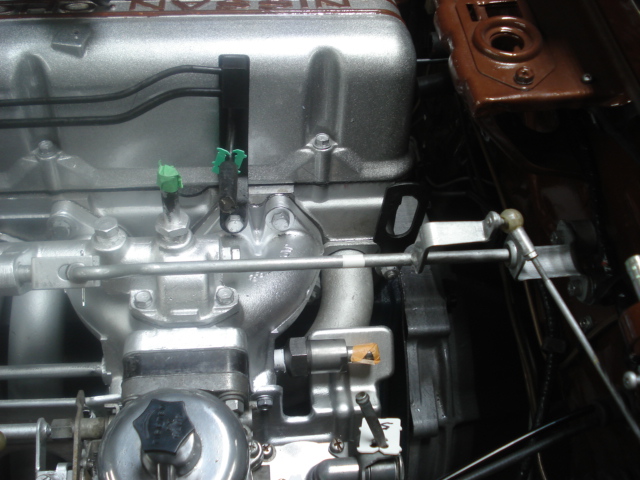
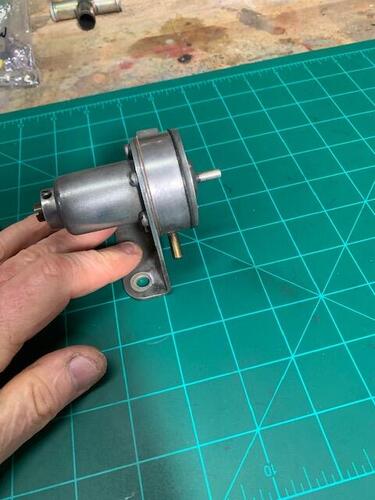
On one the first starts on my 73 restoration project, I notice I didn't have any oil pressure showing on the gauge. I was pretty sure I had oil pressure because the engine wasn't making a lot of noise but shut it down just to be on the safe side. Using the forum, I was able to find out how to check to determine whether it was the gauge or the sending unit. Turns out it was the sending unit. I ordered a new one from Zcar Depot. I installed it and that took care of the issue. I started noticing a small oil leak under the car. I had a hard time locating the source but finally discovered it was coming from the oil pressure sending unit. It appeared dry around threads, but i removed it and sealed around the threads with permatex and reinstalled, still leaked, still dry around the threads, tried again using teflon tape, seemed to get worse but still dry around the threads. So i removed it again and figured it may be leaking around the back seam where the front and back portions of the unit come together. I did notice some oil there. On the bench, I injected some air into the unit and quite a bit of oil came out around the seam. I notified the guys at Zcar Depot and they were very accommodating (as usual) and sent me out a replacement. The first one they sent me was silver and screwed into the block very easily. I was able to get 3 or 4 turns on it before having to use a wrench. The second one was a Beck/Arnley brand and gold in color. I had a hard time getting it started in to the block and when I did I could only get about 1/2 turn on it and it was very tight. Here's what I did. The threads appeared to be 1/8"-27 NPT thread. I ran a tap in the hole in the block. It threaded in smoothly without the use of any tools. Then I ran a die of the same size on the threaded side of the sending unit. It took a little more effort but nothing excessive. I then buffed the threads on a wire wheel to remove any of the gold plated coating. I was now able to start it into the block hole about one turn or so. Using a wrench I would turn it one turn at a time then back it out, it was still pretty snug but seemed to be going in smooth and straight. I did this 4 or 5 times, turning it in a little deeper each time until it felt like it bottomed out (or was in as far as it would go). That took care of the problem andi the leak. I thought this info may be helpful in case others run into the same issues. The attached pic shows where the oil was leaking out once I applied air pressure to it.

- 17 replies
-
- 2
-

-
- fitment issues
- oil pressure sending unit
- (and 1 more)
-
So, I search the forum for an answer, got some info, but not exactly what I need, so here it goes: I'm doing a 73z completer restoration that was originally an automatic and I've converted it to manual using 72z doner parts. I initially left the car with points while starting it and checking it out. It runs with points. Now I want to make the Pertronix conversion (with the flame thrower coil). Since the car was originally an auto it had dual point distributor with one wire to each set of points. I replaced the 73 distributor with a single point distributor from a 72 Z. Since I'm using the original wire harness from the 73, it had two wires the connected to the points. Since I wasn't exactly sure which wire to use, I ran the two wires together then connected a single wire to the points. All ran well. The kickdown switch has also been removed. (I understand that is what sends power to the second set of points). So here are my intentions and questions. I plan to disconnect the ballast resistor and connect the 2 wires together. I plan to use the existing 73 wire harness. First question: There are two condensers in the circuit; one on the side of the distributor that connects to the points, the other is mounted near the coil and connects to the + terminal on the coil. Can both of these be removed when using the Pertronix system? Second question; the two wires on the Pertronix module are red and black. Should I connect the red wire to the wires that previously connected directly to the points (these would be the two wires on the harness that I tied together to make a signal connection) and the black wire from the module to the -(neg)on the coil or is there some other way I should connect them? Thanks in advance for your help. Paul (z3beemer)
-
THIS ADVERT HAS EXPIRED!
- FOR SALE
- NEW
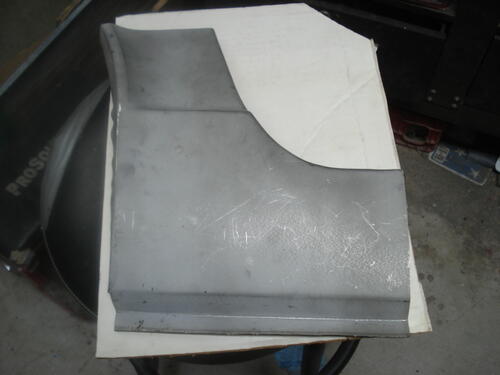
New right side rocker repair panel. This panel goes in front of the right rear tire and extends to the opening of the door. I initially bought it to repair this panel but ended up replacing the entire right wheel arch which included this panel. Photos show front and back of the panel. The tag is on the back of the panel. $35 + shipping.$35
valparaiso, Indiana - US
-
Yea your probably right. Not sure I'll find a metal one anyway. If not, I'll get the fiberglass one from Motorsport. Talked with them today and they are currently out of stock but are expecting them back in first week of June. Maybe something will show up between now and then.
-
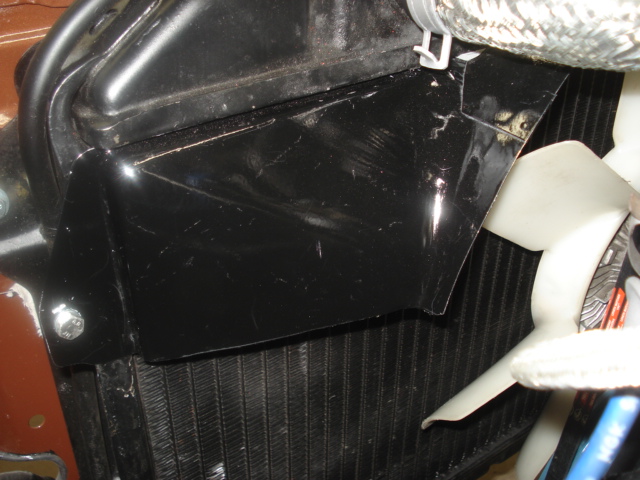
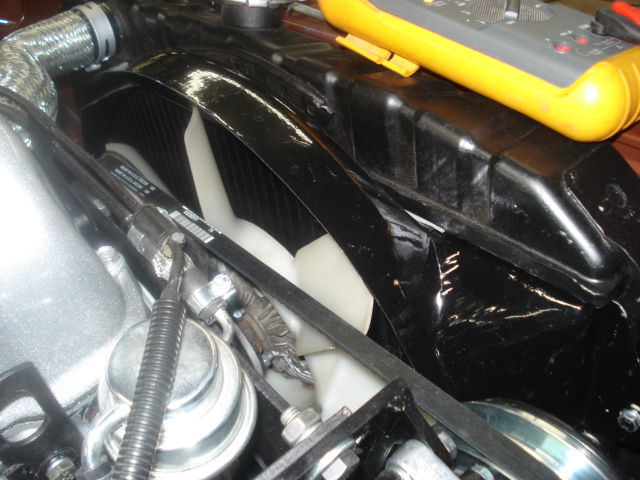
Well, based on the input of the knowledgeable members of this form, it seems the original shroud on the 73 Z was a one piece metal shroud. The one on my car appears that it was one piece at sometime and someone cut it to ease installation and removal. Unfortunately, when I got the car only the top portion was attached. So I guess I'm looking for a complete metal fan shroud for a 73 Z and I'll cut it accordingly. Otherwise, I guess I can get the fiberglass one from Motorsport and cut it in half to ease installation. So, if anyone has a metal one for a 73 let me know.
-
Here are a few pics
-
Trying to post a few pics but for some reason I keep getting an unknown server error. Don't know why. I'll try again later.
-
When I got the car it had only the top half of the metal shroud and it fits the radiator fine. 73 240Z. I recently purchased a two piece plastic one from a 260 but it doesn't even come close to fitting.
-
Looking for the lower half of the stock metal fan shroud used on 73 240z. I really only need the lower portion but if someone has the whole shroud to sell I'd be willing to buy the complete shroud (depending on price)
-

THIS ADVERT HAS EXPIRED!
- WANTED
- USED
Looking for the lower portion of the stock fan shroud for a 73 240Z Pic in the add is actual a plastic one from a 260/280. I'm looking for the metal one. I really only need the lower half but would consider buying the complete shroud depending on price. I already have the upper portion.Ask for price
Valparaiso, Indiana - US
-
View Advert Lower Fan Shroud for 73 240z Looking for the lower portion of the stock fan shroud for a 73 240Z Pic in the add is actual a plastic one from a 260/280. I'm looking for the metal one. I really only need the lower half but would consider buying the complete shroud depending on price. I already have the upper portion. Advertiser z3beemer Date 04/22/2023 Price Category Parts Wanted Year 1973 Model 240Z
-
View Advert 240Z Right Side Rocker repair panel New right side rocker repair panel. This panel goes in front of the right rear tire and extends to the opening of the door. I initially bought it to repair this panel but ended up replacing the entire right wheel arch which included this panel. Photos show front and back of the panel. The tag is on the back of the panel. $35 + shipping. Advertiser z3beemer Date 04/22/2023 Price $35 Category Parts for Sale
-
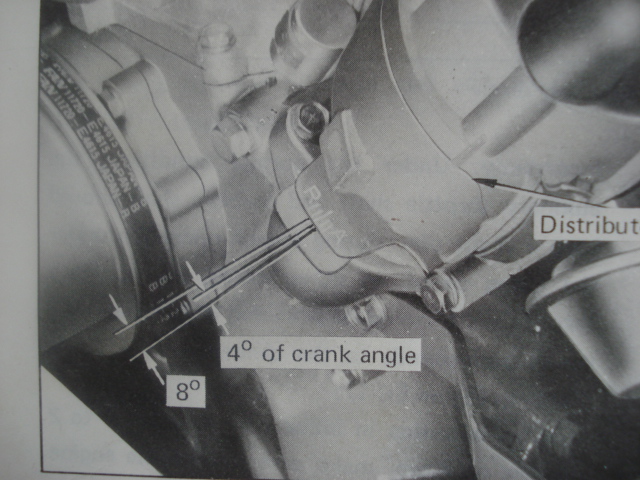
I'm nearing an attempted start up on my 73 complete restoration. The 73 was originally a auto with dual points, I've converted to a manual with roundtop carbs, intake and distributor with single points from a 72. I trying to interpret the timing plate in the distributor. Attached are two pics, one from the 73FSM the other an actual pic of the indicator on the distributor. There is not a similar pic in the 72 FSM. The pic from the 73 shows 3 lines pointing to the indicator. Unfortunately, there are two arrows pointing to the bottom line labeled 4 degrees and 8 degrees. The center line and the top line have arrows but no labels. I'm assuming a misprint. The second picture is the actual indicator on the distributor. Here are my assumptions, let me know it this sound right: The R on the left stands for retard, the A on the right stands for Advance. The center line on the indicator (the longer line) is TDC. Moving towards the A increases advance until maximum advance is achieved when you reach the A. Likewise, moving towards the left increases retard until maximum retard is reached when you reach the R. I have no idea how many degrees of advance or retard is represented by each increment ( 2 degrees or 5 degrees). Sooo, are my assumptions correct? If so, how many degrees are represented by each increment? If I'm incorrect, can someone enlighten me? On a related note, what should the timing be? I've seen 6 degrees and 17 degrees. One said it was 6 degrees for USA cars. I assume that was due to emissions requirements. Since I do not have to have emission testing and I've removed most all the emission equipment when I converted to roundtops (72 standards), what would be a good timing setting? As usual, thanks in advance for your assistance.

-
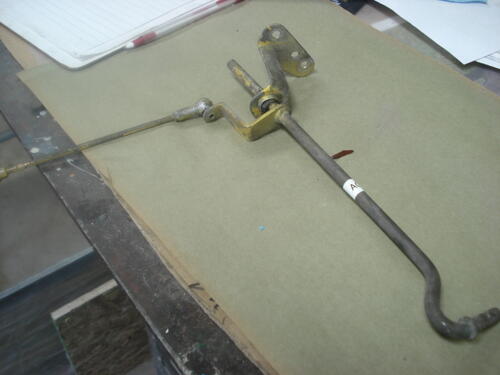
After taking a few redneck measurements It looks like the linkage arm I need is about 12.25" overall length. I'm not too worried about current condition, I can sandblast it an paint it. Let me know if you have something that might work and how much you want for it. Thanks
-
The one from the 73 is 10.75"
-
Thanks but I don't do facebook or anyother social media. Appreciate your reply.
-
Well, I decided I'm going to try to weld an extension in the one I have. Can anyone who has a 72 Z with round top carbs provide me a few dimensions? I would need an overall dimension from the top of the shepherd hook to the end of the rod, and a dimension from the top of the shepherd hook to the end of the hook (the part that connects to the carb linkage). Thanks in advance. Paul
-
View Advert Throttle Linkage Arm for 72 240Z Wanted to buy throttle / carb linkage arm from 71 or 72 240Z with round top carburetors. This is the arm that runs from the firewall bracket and has a shepherd hook on the carb end. See pictures. It must be from a round top carburetor car. Advertiser z3beemer Date 03/15/2023 Price Category Parts Wanted Year 19720 Model 240 Z
-
This advert is COMPLETED!
- WANTED
- USED
Wanted to buy throttle / carb linkage arm from 71 or 72 240Z with round top carburetors. This is the arm that runs from the firewall bracket and has a shepherd hook on the carb end. See pictures. It must be from a round top carburetor car.Ask for price
Valparaiso, Indiana - US
-
Thanks for the input. I guess I'll post in the want ads and see if anyone has a linkage arm from a 72. If not I may be able to cut the one I have, and weld a section in to make it longer. I can also weld a short stub on the shepherd hook. If I can't find one, I may need to call on the group to get a few dimensions. In the meantime, if anyone has a linkage arm from a 72 (round top carb), let me know. Thanks Paul
-
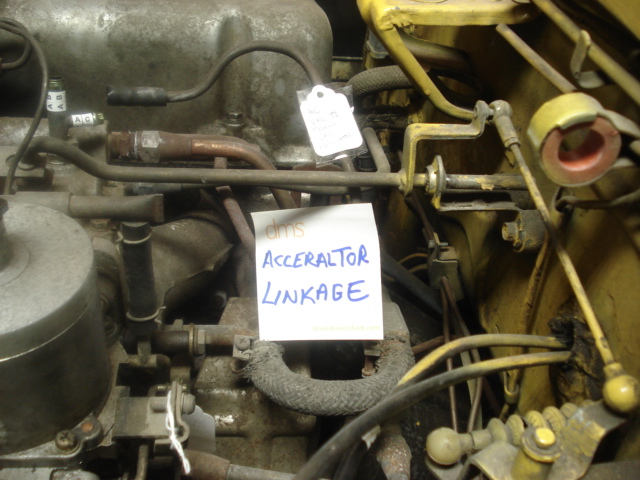
I have a question and a problem. I'm doing a 73 restoration that was an auto. I'm changing it over to manual with 72 round top carbs and intake manifold. It appears the carb linkage arm that runs from the firewall bracket to the intake manifold are different lengths. I looked on the micro fisch and it does not indicate that they are different. The mfg date on my 73 is 3/73 not sure the mfg date on the 72 (I only have the engine & trans). Attached are two pics. The yellow one is the original one on the 73 connected to the flat tops the silver one it the same linkage arm attached to the 72 round tops. Note the spacing between the firewall bracket and the upright angle bracket on the linkage arm. Comments, suggestions, resolutions greatly appreciaated. Thanks Paul (z3beemer)
-
 I hope you didn't pay his asking price. I was going to sell the one I have for 1/2 what he was asking.
 -
I just love this site. There is so much knowledge here, and everyone is so helpful. Thanks again to all of you! z3beemer (Paul)
-
So I've spent the last hour or so searching the forum trying to confirm which trans I have. Every time I think I've got if figured out I find another post that seems to contradicts what I thought I confirmed. I'm doing a conversion, auto to manual, on a 73. When I bought the car the 73 was complete and I got an engine and manual trans with it from a 72 Z. I have no idea of the vin # from the 72 so I have no idea of the mfg date. Looking on the manual trans I can't find any legible numbers on the casings other than casting numbers. Is there an easy way to tell from looking if it is a F4W71 A or B? The shifter lever looks like the pic below. Not sure if that helps but one of the post I read said you could tell from that.

-
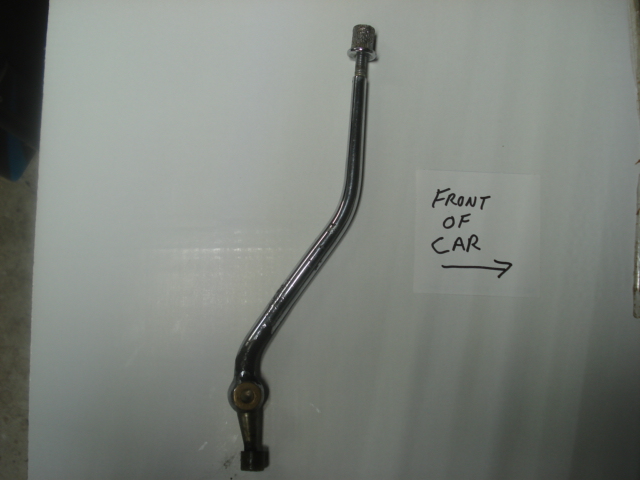
Can anyone tell me the proper orientation of the shifter for a manual transmission. I'm working on a 73Z, converting to a manual from an automatic. The manual trans is from a 72Z. Since I never saw the shift lever installed I need to be sure I'm installing it properly. All the fisch and fsm pics show a straight lever. Attached is a photo of how I think it should be installed. Can anyone verify ? Thanks