


z3beemer
Free Member
-
Joined
-
Last visited
Everything posted by z3beemer
-
I'm working on a restoration project for a 73 Z. I'm trying to figure out what the proper mating should be between the back of the front fender and the front of the rocker panel. Currently it appears there is no visible seam where they come together. You would think there would be a visible seam where they butt together. I think the previous owner may have just bondo 'd the seam then sanded it smooth. The z service manual doesn't really show a clear illustration on how they come together. I dug out a few pics I had of the 71 I owned years ago but I cant tell from that either and no visible seam is appears. Can anyone shed some light on this? Thanks in advance for your help.
-
-
I haven't checked yet to too see if Zcar Depot will be restocking but I'm fairly sure they will be. Also I think Motorsport handles the same ones. It looks like some of the vendors mentions so far only handle repair panels. I'm looking for complete fenders. Thank you.
-
I'm working on a 73 240Z and in the need for some decent fenders. I was considering buying them from Zcar Depot but notice that the ones they sell have a warning that they may not be exact replacement and may need some modifications. I was wondering if anyone has purchased these and how much "modification" was needed to get them to fit properly. I'd hate to pay the price and all the high shipping cost and find out they look like hell wen I get done. On a related note, if anyone has a decent set (or just the L or R) of used ones they'd like to sell, I'd be interested. Thanks Paul
-
View Advert Heater Control Knob I need a heater control knob for a 73 240Z. This is the knob that goes one the slide lever on the heater control unit. I only need one. I believe they are the same on 70-73 models. If you have one let me know how much you want for it. Advertiser z3beemer Date 12/24/2019 Price Category Parts Wanted Year 19730 Model 240Z
-
Hi all. I'm approaching the dreaded floor pan replacement on my 73 Z. The good new is the trans tunnel and the rockers appear to be pretty solid so I should have something to weld to. I may need to add some metal at the transition point up front near the firewall. I have a few questions for those of you who have done this: Is it better to have the car sitting on the wheels or propped up on jack stands? If on jack stands, it there a particular spot to place the jack stands or just anywhere solid ( eg: suspension, differential, etc). Which way is easier to install them: down from the top or up from the bottom? If coming up from the bottom, is it possible to leave the front seat mount in place at the trans tunnel and rocker. I figure if this is possible it would act as bracing and eliminate cutting it out and re welding it back in. For some reason my car does not have the frame rails that run under the floor pans from front to back. My guess is that maybe someone removed them and tried to patch the holes (big holes) in the floor pans. My floor pan kit includes the rails and I intend to install them. I know where they start at the front because a portion of the rail is still there. What I don't know is where are they suppose to terminate at the back. I'm thinking at the cross rail right behind the rear seat mounts???? (yes/no?) Any help or comments would be greatly appreciated. Z3beemer (Paul)
-
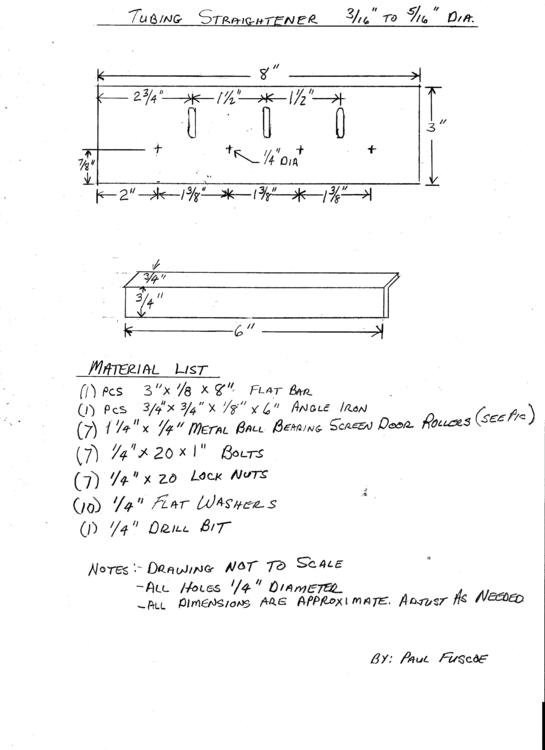
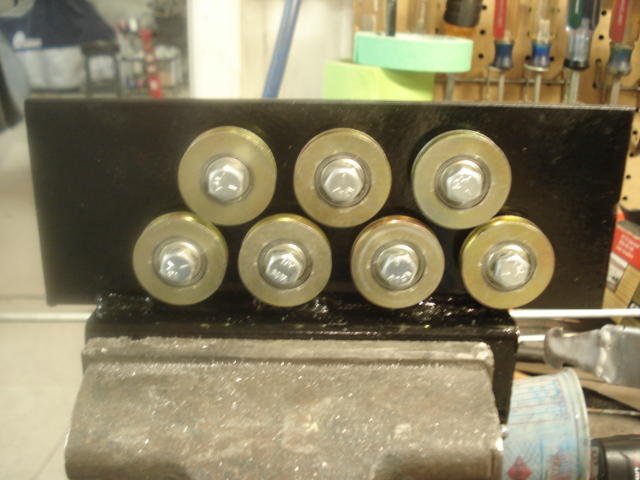
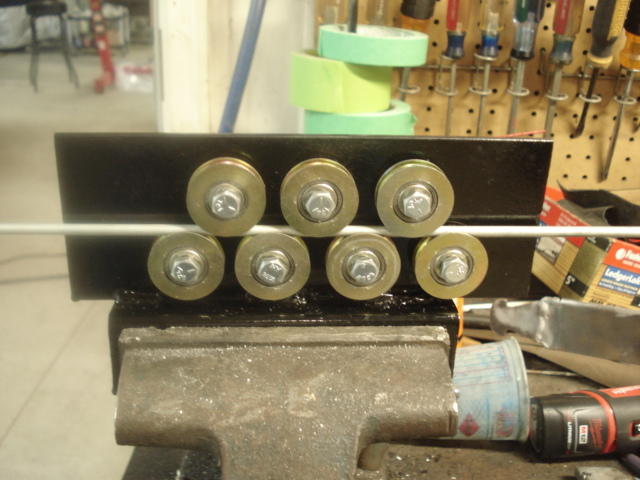
OK Here are more detailed instructions on how to build one of these. Two files attached. One is the drawing with dimensions and a material list. The other is detailed assembly instructions with pictures. If you decide to build one, I suggest reading all the way through the instructions before starting. If anything is unclear, shoot me a message and I'll try to clear things up. Paul (z3meemer) Tube Straightener Fabrication Instructions.docx
-
-
I'm in the process of tearing down my 73Z project car, and decided to make all new brake and fuel lines now. To save some money and not have to piece several pieces together, I decided to buy 25" rolls of tubing. I wanted to start with straight tube so I looked in to buying a line straightening tool. Well they wanted $100 for one and that was more than I was willing to pay, so I made one. This will work on 3/16, 1/4 or 5/16. It cost me $15 to make. Attached is a picture of it. If there are others interested in making one of these, let me know. If there's enough interest, I'll write up detailed instructions on how to build one. Paul (zbeemer)
-
-
I don't think you're being overly cautious. Too many unscrupulous overseas businesses. Once you do a wire transfer, your money is gone, even if you never get your order. Just offer to pay the PayPal fees. That way you at least have some recourse if they rip you off. If your PayPal account is tied to your credit card, you have an additional layer of protection. If the vendor is unwilling to accept PayPal, I'd tell them "no thanks " and look elsewhere Just my $.02
-
Just an update on my bumper saga. I contacted Ogden chrome and got quite a run around. After about 2 weeks I finally got to speak with Jose. He quoted me $3200 + shipping to do front and rear bumpers without over bars. I had previously spoke several times with The Chrome Shop in Rock Island, Illinois. Very nice to talk to and very quick to respond to phone calls and emails. Quote: $1200. So far , they are who I'll be using. I'll keep you posted.
-
Thanks for the update and info. I got a call into Ogden Chrome. I'll see what they have to say. FYI..another place I found is The Chrome Shop in Rock Island, IL Spoke with them several times and they seem like a possibility. Got a quote from them $1200 for front, rear and bumper guards. Extra for over bars but mine are in pretty good shape and I'm not sure if I'll re install them or not, Right now I'm thinking may just use the rear one and leave the front one off. Early stages of restoration so I have lots of time to decide.
-
Does anyone know if this Denver Bumper is still in business? I tried the number I found Googling it but says its been disconnected. Don't know if I had the right place or not.
-
Trying to do some research during my tear down. Have gotten a lot of info here, but have a few questions; I have a 73 Z with auto trans but will be changing to manual on the rebuild. I have a spare engine and trans from a 72 Z. I'll be using that trans. I need to clarify some of the wiring. On the auto there are two wires on the left side of the trans (black wires). From what I can tell these are for the kick down solenoid and will not be needed on the manual trans. On the right side of the auto are the four wires , 2 for the inhibitor switch and 2 for the back up lights. I know the inhibitor wires need to be connected together so the car will start with the manual trans. The other two wires are for the back up lights. On the manual trans I only see one switch on the left side of the trans with 2 black wires. What is the switch for? As I see it, I need a neutral safety switch and switch to connect the back up lights. Am I missing something or do I have to add another switch? Thanks in advance for your help.
-
So if you install bracing, doing one side at a time, do you brace the side you're working on, or the side opposite the one you're working on? Seems if you brace the side your working on it would be difficult to maneuver the pan around the bracing.
-
I've had several people tell me, and have seen it mentions in several other Floor Pan post, that it is recommend to installing support bracing before starting the floor pan replacement, in order to keep everything in place and square during the process. What I haven't been able to ascertain is where the bracing should go, and how to you install it so it doesn't interfere with the installation. I plan to do one side at a time. Help and recommendations are greatly appreciated (73 240Z).
-
Plan B. Does anyone know a good source for fiberglass fenders? I found this place out of NJ named Datsun Z Fiberglass with good prices, but after several no return calls, I did a little further research on this vendor. There are way too many complaints and unfulfilled orders. I'm looking for stock style fenders, not custom. Thanks Paul
-
I'm trying to find a decent set of replacement fenders for my 73 240Z project. I spoke with the guys at Z Car Depot , they have them for $305 each. But the web site states there may be fitment problems. I spoke with them directly (really nice people to deal with) and it seems the fitment problems may be more than just shimming and elongating / adding holes. They said the curvatures may be somewhat off ,but they sold about 10 sets and no one has returned them or complained. I was wondering it anyone has purchased a set from Z Car Depot and if the problems were insurmountable. The shipping will be about another $250-300 ea, but I can probably drive over to their store and pick them up and still save a few $100. Any input would be greatly appreciated. Thanks, Paul
-
Not to get politica,l but you can thank the US Government and the EPA for the cost of re chroming. They put so many regulation on the shops that small companies couldn't afford it and went out of business, leaving only large shops in the market. With little competition and massive regulations, we get stuck with astronomical cost.
-
First let me thank you all for your replies to my dilemma. I'm new here and I really appreciate everyone's input and eagerness to help out. I think I found a home for my Z project. I'm still now exactly sure what works and what doesn't on my 73 Z. So let me pose a few questions. Diseazd informed us that the vin # on the parts Wal280Z and I were discussing were from a 72 Z and not a 73. I don't know much about how Datsun did their vin numbers but mine is 152810 and was manufactured Mar 1973. Wayne's vin # is 163037. I would think with it being 10,000 digits higher it would be a 73 as well (yes/no?). Second, the "L" bracket... in looking in the Datsun factory manual, it does not show the bracket. It just shows the clevis on the master cylinder attaching directly to the pedal. Maybe it is just showing a "typical" illustration and not an actual one. If all it takes is adding the L bracket to the pedal I can easily weld one onto the clutch pedal. Third: I was wondering if anyone who has a 73 would be able to provide a picture of the actual 73 clutch pedal and a picture of the brake and clutch master cylinders as viewed from the engine compartment. Thanks again for all your help, hopefully I'll be able to return the favor. Paul (z3beemer)
-
Ok I ran a search here for clutch pedal swap and spent the last hour reviewing the posts on the issue and I'm probably more confused than ever. I recently purchased a 73 240Z Automatic that came with a spare engine/ manual trans from a 72 240z (or so I'm told). So I'll be swapping the trans to stick. I know the existing pedal work will work for the change out by changing the brake pedal and adding the clutch pedal. In reading all the post there seems to be quite a bit of disagreement on what will work and what won't. Does anyone know for CERTAIN if 72 pedals will work in the 73 or do the pedals have to out of a 73? Thanks in advance
-
Doing a auto to manual conversion on a 73 240z. Need a clutch pedal. As I understand it need to be from a 73 in order to align with the opening in the firewall. I'm told there are differences among the various years. Call or text Paul at 219-916-2321

