


z3beemer
Free Member
-
Joined
-
Last visited
Everything posted by z3beemer
-
I bought this kit and so far, I'm very happy with it, although I cannot confirm or deny the efficiency, as of yet, because it's not fully installed (complete restoration). I bought the kit specifically for a 240z with integral controls (this allows you to use the existing dash controls). My car originally had a dealer installed ARA system. I had originally planned on converting it from R12 system to R134a but when i looked into it, it was going to be more money and work than just buying a different system. Plus, I think my heater core was shot since the previously had the heater hoses bypassed. I spent a lot of time both before and after purchasing this system discussing the particulars with the owner. JW is the owner and has been in business 40+ years. I like the fact that you can call them and a real person answers the phone and is willing to spend time with you to answer any concerns and questions. You won't find better customer service anywhere. JW is very patient and friendly. I've talked to him so many times I told him he was probably sorry he sold me the system. He's a great guy. Just a few things to consider: This is going to take you more than a few hours! Don't even start it without removing the seats, dash and steering wheel. The instruction are not great but JW has always been available to clarify things. I varied from the instructions quit a bit so don't feel that the instructions are cast in stone. If your considering this system I'd be happy to talk to you and pass on my expierences and suggestions. But let's do it by phone, I talk much better than I type. I'll keep you all posted as I proceed with the installation. As I said this is a complete restoration so I can only do so much until the engine, radiator, condensor, etc. are back in. Here's the company info: Auto AC Solutions. www.autoacsolutions.com (out of Texas) 1-877-542-8192 Owner: JW Regards, Paul (z3beemer)
-
Ok I know this should be in the classifieds, but I tried it there and the I only got responses from every foreign and domestic scammer. Some who have been members for only 2 or 4 hours. Anyway...I've been looking for a left front fender for a 73 240Z for about the last year and a half. I wasn't really too worried about it because I had plenty of other things to do on the car and was sure something would turn up by the time I needed it. It hasn't. I'm approaching the point where it's going to bring my entire restoration project to a halt. If anyone has a usable left front fender they can part with please contact me. I'm not looking for one in pristine condition, just something I can work with. I do need the front portion that connects to the headlight and fender extension to be in good condition. Even if I can find one that is good from the front of the fender to about 18" back towards the door I could probably section my existing fender and weld them together. Fender with dings, dents and light to moderate rust OK, Thanks Paul (z3beemer)
-
SteveJ, I read your write up on replacing the internals in your clock and had a few questions. Did you use the original glass from the old clock or the glass from the new on? Likewise, did you use the reset knob from the old clock or the new one? I think I'm going to attempt to do this and I'm trying to get as much info as possible before tackling it.
-
I started a discussion earlier regarding the felt washers needed when rebuilding the wiper assemble. One of you suggested McMaster Carr industrial felt. That's what I ended up doing. They came out good. Not sure how long they will hold up but they're a lot better than the worn ones that were in there. Unfortunately, I had to buy a 10' strip of it. I ended up using about 6". It's 1-1/2" wide and 1/16" thick. If anyone needs a piece, let me know and I'll mail it to you (no charge as long as it can fit in a business size 9" envelope. Oh, BTW I soaked mine in oil before installing them.
-
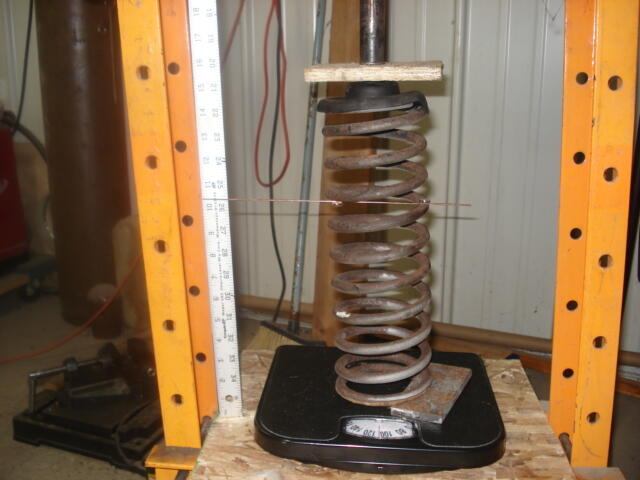
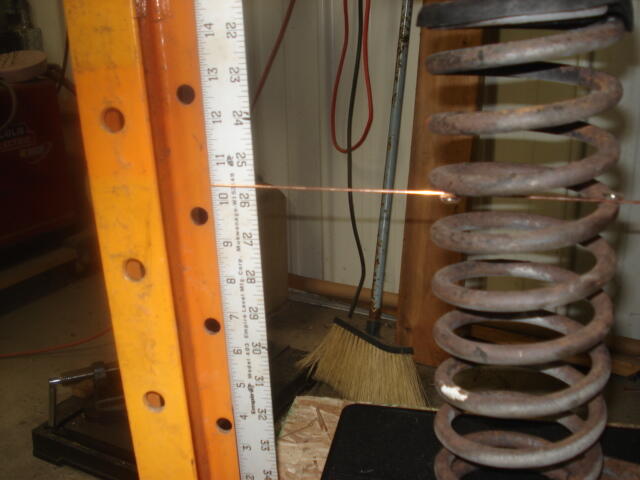
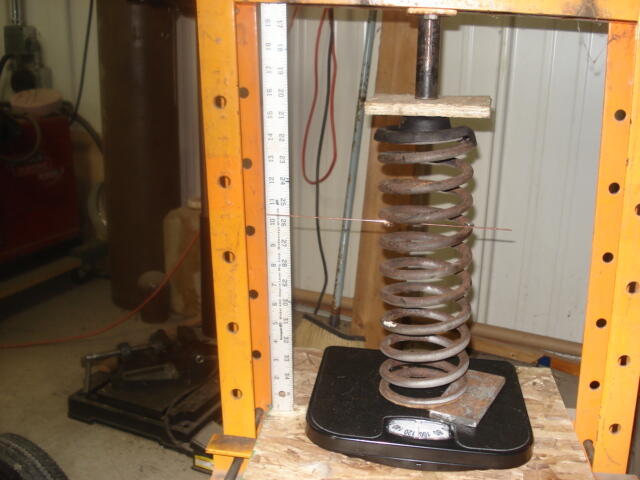
I wrote the above procedure for testing spring tensions a few months ago. I finally got around to taking a few pics of the set up in case the written procedure wasn't clear.
-
Steve J Thanks for the input. Looks like a good alternative. Haven't taken mine apart yet. After I do, I'll try oiling it as suggested in other post. If that doesn't work. I'll go with your method. The clock you suggested sell new on ebay for $65. I'll let you all know what I find and how it goes. Thanks again.
-
Had planned to use Zclocks to repair my 73 240z clock based on comments here. Thought the $149 would be a fair price. Just checked his site. The price is now $320. A bit pricey. Any other suggestions "reasonably" priced?
-
Nothing brings out the scammers like posting an ad in in the "parts wanted" section of the forum. I posted an ad a few days ago looking for a left front fender for my 73 Z project. Within hours I started getting bombarded with replies stating they had one in excellent condition. Just a few clues to be aware of so you don't get burned. See how long they've been a member. One reply I got the person had been a member for 4 hours, another one was a member for 6 days....red flag! Another clue is the stated condition is always excellent...we all know that if you can find one of these it's not going to be in perfect condition. Look at where the message is sent from...it's usually from some oddball source like tap a talk . Some offer to send pictures, but the pictures are usually ones copied from some other source. I had one that sent me pictures from a legitimate ad where I had spoke to the seller who informed me the part had been sold. If you call the number and connect with a real live person who speaks broken English it's more than likely a scam. I replied to one that left an email address. I replied a few days after I got his message...guess what? It came back as an invalid email address. Another red flag is the price is usually very reasonable and includes shipping. The last fender I bought, the shipping was more than the cost of the part. One way to help determine if its a scam (but not perfect) is to ask for specific pictures of the part. I usually ask for a close ups of the front and back of the area where the headlight bucket attaches. It's a shame we have to deal with these low life's. Too bad there's not a way we could screen them out. Maybe we can help each other out by posting detailed info any time we encounter a scammer. Remember the old saying, "if it sounds too good to be true, it probably is". Paul
-
Had planned to use Zclocks to repair my 73 240z clock based on comments here. Thought the $149 would be a fair price. Just checked his site. The price is now $320. A bit pricey. Any other suggestions "reasonably" priced?
-
View Advert Left Front Fender to fit 73 240Z Wanted to buy Left front fender to fit 73 240Z. Fender does not need to be in pristine condition but needs to be usable. Shipping will be to Indiana at 46385. Minor rust, dings, dents acceptable. This is the last piece I need for my restoration. Advertiser z3beemer Date 03/22/2022 Price Category Parts Wanted Year 1973 Model 240 Z
-
Thanks for the help guys. You confirmed my suspicions / logic. Guess you can't believe everything you read.
-
Working on a 73 240Z Restoration. I just ordered an O ring and locking collar for the fuel tank sending unit. The FSM shows the sending unit going into the tank, then the o ring on top of that, then the locking collar. Is this correct? This would result to a metal to metal fit between the tank and the sending unit and offer little sealing from leakage. The one I took out had the o ring between the bottom of the sending unit and the fuel tank, then the locking collar, (which seems to make more sense). Trying to decide which is correct. Did the previous owned just install the previous one incorrectly or is the FSM correct?
-
View Advert 240Z Rear Lower Control Arm Need a Right Rear Lower control arm to fit a 73 240Z. Mine got damaged trying to press out the old bushings. See Pics attached. Contact me here or at z3beemer@mail.com Thank you. Advertiser z3beemer Date 12/30/2021 Price Category Parts Wanted Year 1973 Model 240 Z
-
-
Thanks for all the tips guys. I found some industrial felt at McMaster Car
-
I have removed the windshield wiper assembly from my 73 Z project. I noticed there are felt washers between the linkage arms. Anyone have any idea where you can buy something to use to replace these? I thought about using neoprene washers but thought they may not allow the arms to move smoothly enough. Any thought or ideas would be greatly appreciated.
-
-
Testing your springs. Per my previous post, I'm in the process of a resto on a 73 Z. Currently working on the front suspension, replacing / rebuilding everything that I can. I wanted to change the springs but found limited options. Chevelle springs seemed the most viable option but entailed a lot of "trial and error" work. And, as you know, each time you put them on and take them off it's a real PIA. Especially since the car is on a rotisserie and completely disassembled. I wouldn't be able to get any real information until the engine, doors, hood, hatch ,etc were back on and the full weight of the car was on the springs. So, I decided to test the existing springs to see if they even needed replaced. Years ago,when I worked as an auto mechanic, rarely did we need to replace springs unless they were cracked or broken. So here is what I did: Needed : A hydraulic press, a bathroom scale (an old analog spring style, not an electronic digital), a yard stick, a piece of stiff wire (welding rod or coat hanger), some short pieces of flat bar for steel shims, couple pieces of wood" and a ratchet strap (optional, for safety). Set Up: Cut a piece of 3/4" plywood a little bigger than your scale and set it on your press. Set your scale on the plywood Set your spring on the scale. Because of the way the spring is cut, it will not set level on the scale. Place the metal shims between the spring and the scale until it sets level. Use the top spring cover from your strut and place it on the top of the spring. Fasten the yardstick to the press vertically alongside the spring Use the stiff wire to create a pointer and attach it to the spring (I used magnets to hold it in place, but duct tape will work too). Be sure to make the pointer long enough to reach the yardstick Place a small block of wood on the top spring cover and lower the press ram just enough to hold everything in place. If you prefer, wrap a rachet strap around the press to catch the spring should it decided to kick out (optional) The Test: Before proceeding record the reading on the scale (or adjust it to zero if possible). Also record where the spring pointer is pointing on the yardstick Check the spring specification in the service manual. I was working on the front springs and the rating was 83 pounds / inch Wear safety glasses (just in case) Slowly operate the press watching the spring pointer against the yardstick. Continue to operate until the pointer has moved one inch from the starting point. Then stop. Record the reading on the scale. Subtract your starting scale reading from your finish reading. This will be your rating per inch. In my case the reading was 92 pounds. Since spec is 83. I figured I'm good. A little red spray paint, and the look great. Saved a lot of time and money. Hopefully the rears will be good too. BTW: Be sure to mark left and right springs when you take them off, they are different lengths. The ratings are the same on both sides.
-
I'm doing a complete restoration on 73 240Z. Like most I'm having spring issues. I'm trying to keep it pretty much stock regarding ride height and performance. I found a place that can make springs that duplicate OEM but the cost is $600 for a set of four. More than I'm willing to pay for springs. Found another place that claims exact stock replacement but 30% stiffer. I have nothing to compare that to and I do not want a stiff ride. So I'm wondering.... How do I know the original ones need replaced. I was planning on replacing them just as a good practice on a restoration. Seeing how I can't find what I want (or am willing to pay) How bad off would I be if I just reused the original springs. There are no visible signs of damage. Other alternatives??? I got to believe some other car somewhere has springs pretty close to the OEM Z ones.
-
-
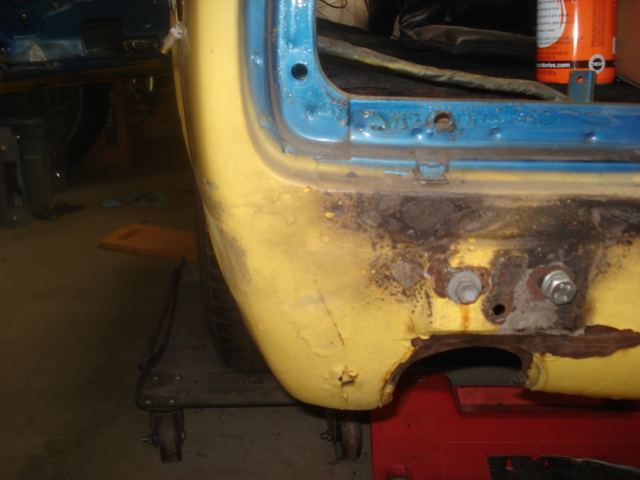
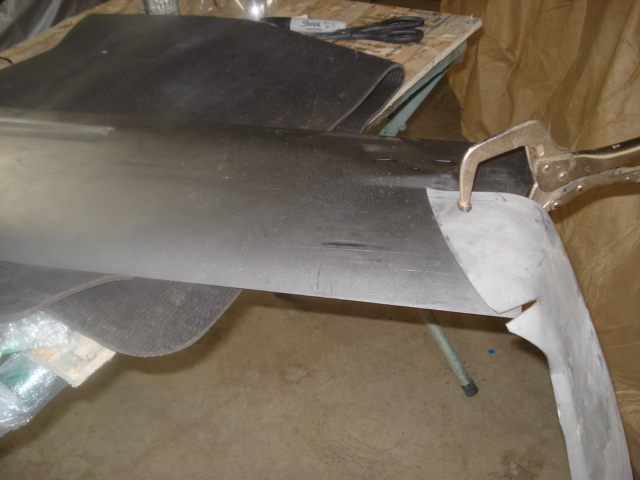
I working on a restoration of 73 240z. Although I'm not trying for a concourse restoration I'm trying to keep it as much as possible original looking. It appears one of the previous owners did most the body work with an axe and a truckload of bondo. As I work my way around the vehicle repairing and replacing body panels, I do not know how the original panels were assembled. Currently I'm working on replacing the rear panel below the tail light panel and the rear corner panels that connect quarter panel to the rear panel. My questions are: does the corner panel mount on top of the rear panel or behind the panel ( see pics). Second, once the panels are installed is the seam left visible or is filled with body filler and sanded smooth so it appears seamless?

-
I used a place in Ft. Wayne Indiana called Reckon Plating. I liked the fact they were local and within driving distance to me (I live in Valparaiso). They did a great job and they answer the phone when you call with a real live person. I'm working on a 73 240Z, I had them do the front and rear bumpers, the rear over bar and the bolts. It cost me about $1200. They'll do and estimate if you send them pictures and descriptions (length, width, height, etc.). Just be aware the the actual cost once they actually see the parts will likely be more than the estimate. A lady that worked there, Shane is very friendly and helpful. Don't know if she still works there or not. Here's the info: Reckon Plating 5300 Hanna St Ft Wayne, IN 46806 800-5924766 or 260-744-4339
-
View Advert 240Z Right Rear Repair Panel New right rear quarter panel repair part. This part goes between the front of the rear tire and the door opening. It is new. I bought it to use on my restoration on a 73 240Z but ended up purchasing the entire wheel arch. $50 + $15 shipping. Email if you have questions or would like me to call you. Advertiser z3beemer Date 05/18/2021 Price $50.00 Category Parts for Sale
-

