chaseincats
Free Member
-
Joined
Everything posted by chaseincats
-
Thank you so much for these great ideas, I'll tackle them one by one: Fuel: I tried the pump priming method but that didn't change things. Timing: I recently changed distributors to a rebuilt one (the old one's center bushing was dying) and with both OEM distributors I get the same result. The car is also timed at 10 degrees at idle and runs smooth as glass. Compression: Not sure about the compression (kind of afraid to look haha) but the car runs really well and has great highway pull as-is. Spark: I changed the plugs last year to the iridium plugs with new ngk leads and all the recommended tune-up brands/gear to no change. The car also has some sort of ignition box made by "Jacobs electric." The one spark related issue I can think of is the center terminal on my distributor cap is semi melted - I put some ox-guard on the side of the terminal walls and plug and I believe that helped though.
-
I've tried that and get the same result (I should have mentioned I tried that)
-
Is it possible to improve cold start cranking time? The car has new plugs, wires, cap, rotor etc and runs great once its started. It's also worth noting that after the car has started once, it will start considerably quicker the next key turn (demonstrated on the video). Video: https://www.youtube.com/watch?v=yiT8P_TLuLM My old mechanic said it simply does this because the engine "just takes longer to build pressure than other cars." There are no vacuum leaks (checked with a cigar) but there is oil blowby via either worn piston rings or valve seals (I know that due to there being a small amount of oil on the plugs) but I'm not sure if that could be the reason. Note: this video was created when it was about 80 degrees out so the cold start injector was not firing. Any ideas? -chase
-
Thanks
-
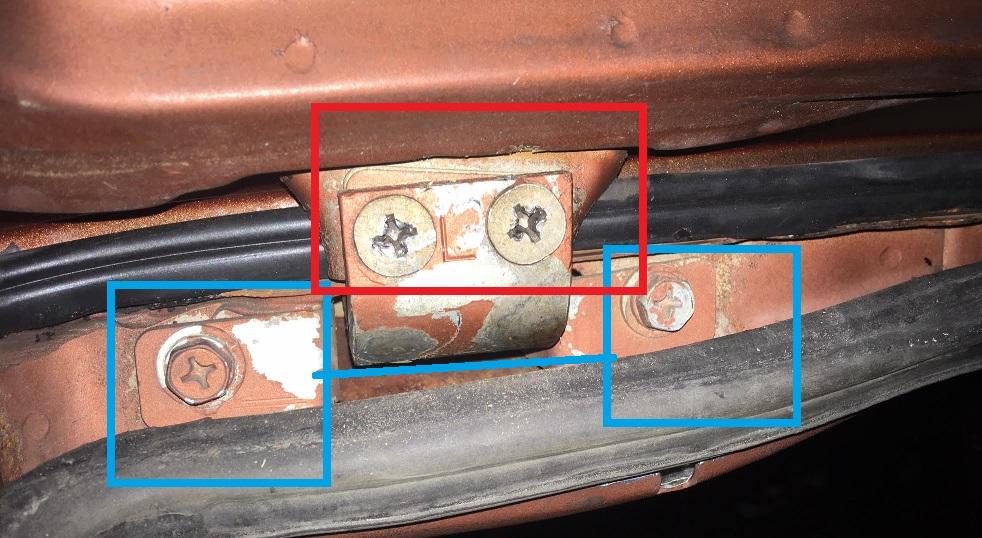
Quick question for you guys, I need to remove the hatch to glue some outer weatherstripping. I remember reading that if you take the wrong screws/bolts off the hatch, it's a pain to get the hatch to close again properly. Which should I take off in the below picture to not disturb the closing alignment of the hatch, the screws boxed in red or the bolts boxed in blue? Any ideas? -chase
-
Right, they told me the same thing before they sent a replacement. 😕
-
Gotcha - it's just strange that we have to do that on a brand new part
-
Update: I received a replacement fuel sending unit after my first one from zcardept started to engage the fuel warning light when the tank wasn't low on fuel. After a few weeks of driving with the new sending unit, this new one started lighting the warning light even on a full tank. I'm not sure what the issue is with the thermister on these, but it just seems to be a design flaw.
-
Coincidentally I cleaned the bullet connectors & afm connector a week before the car died and it ran better than it ever had. I also smoked the engine last week and no leaks could be found. Just checked the fpr and no leak. tach needle is perfect too. This is so strange... EDIT: the coolant temperature sensor connector bullet connector popped out. Thanks for the tip.
-
Alright so I increased the idle, timed it to 10 degrees, then brought the idle back down to 800. It’s running so rich now that it burns your eyes when you stand behind it. this makes no sense at this point. any ideas?
-
While it isn't 100% in the same area, it is very close (I'll be using a timing light today to get it back to 10 degrees). That said, regardless of how far forwards or backwards I turn the distributor, I cannot get it back up to the rpm it was before changing distributors. Would air gap affect this? EDIT: I just checked and the air-gap was definitely larger than it should be - so I adjusted it and will start the car after everyone is awake to test. But thinking back to yesterday I did notice yesterday that when it was running rich - after installing the new distributor - when I press on the throttle body accelerator connector, there was a noticeable lag between when you hear the engine suck air in from the filter and when the rpms rose. I'm not sure if this helps diagnose this at all but I figured disclosing that couldn't hurt.
-
Update: I got a non-wobbly distributor with a pick-up coil that reads 720ish ohms, Popped it in and the car started right up but seems to be running a bit rich and is idling about 300-400 rpm lower than it had been. Could that happen if the pick-up coil's air gap is too large? Any ideas as to what could be going on?
-
Fair enough, thanks!
-
Gotcha. I wasn't sure how 'approximately 720 ohm' Datsun was felt comfy with ,haha. Regarding the new pick-up coil's air gap: The FSM says anywhere between 0.2 and 0.4mm works. Does it matter where in that area the pick-up coil sits? Basically im curious if there is a benefit to getting it closer to the reluctor (0.2mm) compared to 0.4. Any ideas?
-
Update: My friend has a distributor I can have but said when he measured the pickup coil with a multimeter it ready around 760 ohms instead of 720. Would that still work?
-
Yep, just got off the phone with them and they have it via special order. Rockauto has them too for half the price, so I'll probably go with them. In the meantime, a friend may have a distributor I can use. I'll grab a new pickup coil and swap it in there and report back in a week or so.
-
I was wrong, it seems that it's the magnet peeking through and not the coil being ground down:

-
Just headed down to the garage to try that and unfortunately no luck on with the multimeter on any of the resistance settings
-
It seems the re-manufactured ones are NLA. Is there a different distributor that is currently made that is swappable that you know of?
-
Ah, do you mean if I move the coil, continuity should appear if it is the proper distance from the center shaft?
-
Definitely agree but I just don't get how my pickup coil can be dead from that (isn't that block just a huge magnet)? I checked all of the wiring and there aren't any visible breaks, even under the cap.
-
Update: I removed the distributor cap and the front of the pickup coil seems to be scratched, (almost like its been rubbing on the rotating portion of the distributor) there are also very small metal shavings magnetized to the back of the pickup coil. I tried to shake the main shaft around and it can be moved somewhat but is still very much connected to the engine (not sure if any of this information helps). Video I just filmed: https://youtu.be/N8R1Ps-r3Pk Would the pickup coil's outer casing being rubbed against ruin the internals? Also, if that is indeed what happened, it would probably be a good idea to purchase a new distributor, correct? -chase
-
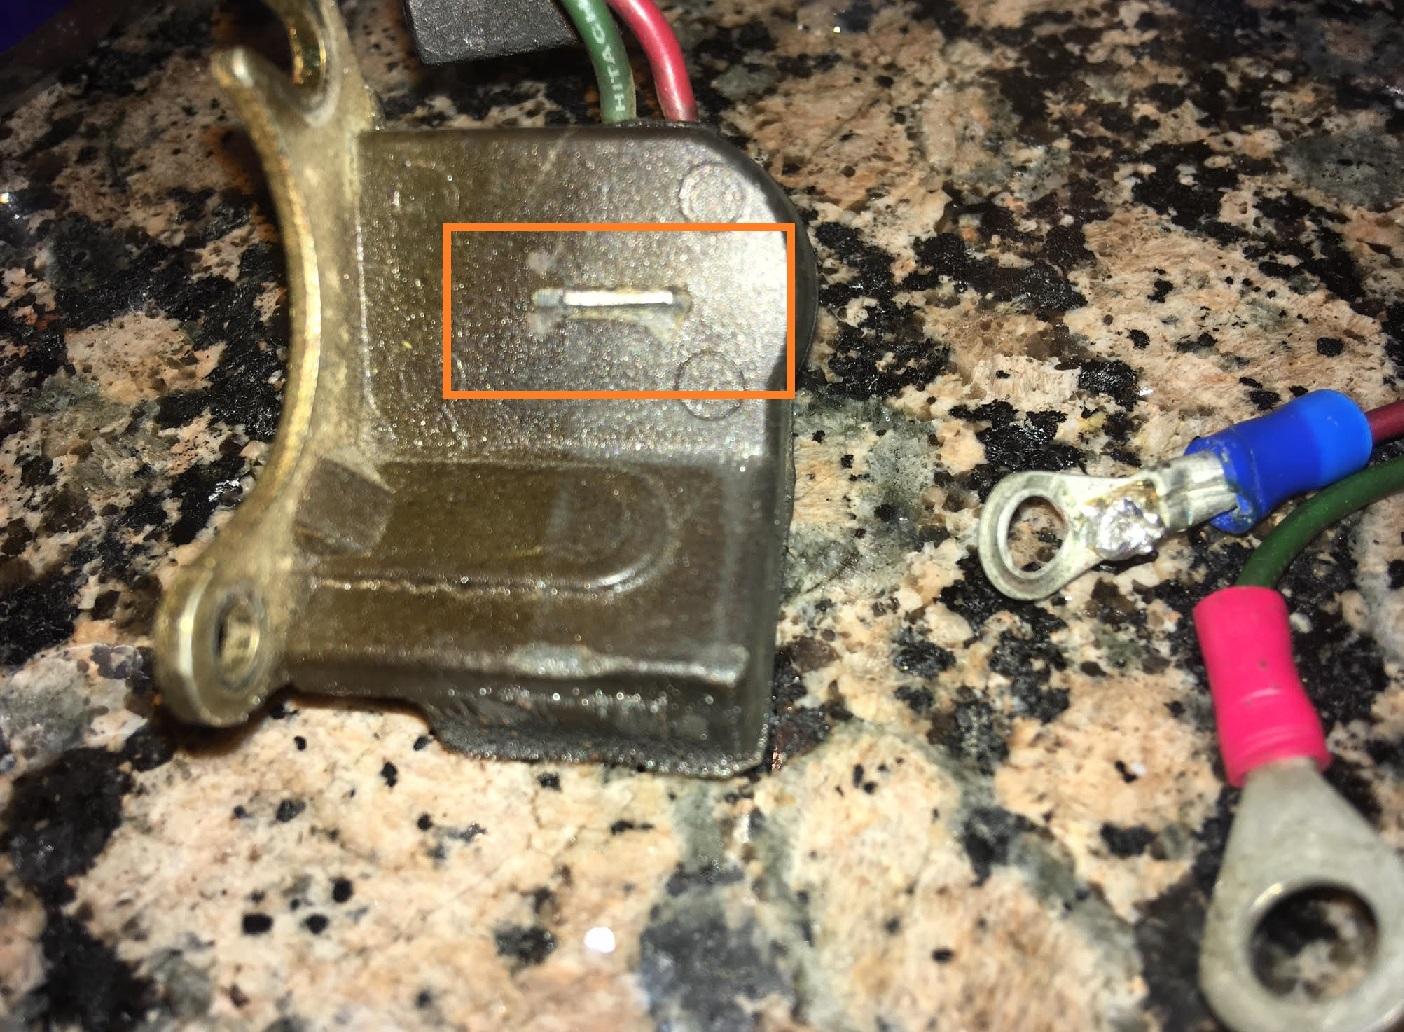
Hi guys, While taking the car out today, everything was running great until I went to wide-open throttle. After about 20 feet, the car flat out died and refused to start. The car was low on gas, so after pushing it to a gas station and refilling it, it started right up 3x in a row and was able to drive it home. I just went down to try and start it and it is now dead. I pulled the coil wire off of the distributor cap and grounded it against the body - and it seems I am not getting any spark now. I used a multimeter to poke the 2 coil poles and got less than 1.8ohms so according to the FSM it means the coil isn't bad. Any ideas as to where I should start to look? It seems like this is the result of an electrical part that was on its last legs or something... EDIT: I just checked for continuity at the end of the two pick-up coil wires (in the black box where they are bolted to the harness) and did not get continuity. Could that be the issue? Box on the right is what I'm referring to: https://www.classiczcars.com/uploads/monthly_2017_02/Screenshot_2017-02-21-14-44-04.png.07517510cbd3dcbe526420d18fa8092e.png -chase
-
My rheostat works but I've always wanted to bypass it to see if the lights get any brighter because who knows how much/if its corroded on the inside.
-
I have a 280z. If that's the case, then maybe somebody put a 240 tach in it? Either way, on mine, the indicator lights only had one BW wire each and once I cleaned the mounting bracket and bolted the housing down, they worked.