


KONI Lee
 Vendor
-
Joined
-
Last visited
-
Pardon my effort at a little humor or levity at the end along the lines of the old joke about "the nut behind the wheel". Clearly it landed wrongly for you. I have shared the info that comes across this forum with engineers here and in Europe for input for improvements if needed and explanations if there are specific decisions behind it that are not clear. Forums are always a double edged sword with pros and cons for manufacturers because there can be positive feedback, problem solving, and refinement as well as misunderstandings or misinterpretations, armchair engineering without understanding, heading off on tangents, etc.. There are positive updates coming based on feedback from here but also misunderstandings and tangents. Being helpful has been the goal and not simply being defensive or pushing a sales message. I can step away if the involvement is seen as unhelpful. Feel free to reach out the KONI Tech staff and Joseph is certainly available to assist as well.
-
Please be assured that KONI has been watching this thread and seeing the feedback. With feedback from both this forum and the input of Motorsports Ind., we have worked together on some minor tweaks and changes over time. As I have said several times previously, we started this project using all the specs, dimensions, hardware, etc. that KONI have been using successfully for decades making the red 86 series internally adjustable (compress-to-adjust) Z-car inserts. KONI has used this nyloc nut on the Z-car 86s since at least 1993 when computerized build sheet records began and any changes and updates would be noted and dated. There have been no hardware changes on those parts and nylocs have been used on them for at least 28 years and also not a single prior comment to KONI America about stripping thread issues, etc.. I've been the lead Automotive Technical person for KONI America since Spring 1996 and I can say hand on heart that there have been essentially no cross threading or galling comments reported to us for any car applications if they a) used the right thread pitch hardware, b) didn't overtighten it, and most importantly c) didn't use an impact tool. The very vast majority of installation issues are related to impact tools and not looking at the instructions. I will admit that even though I most certainly knew better, I have in the past used an impact tool when in a rush or when more convenient and caused issues (not galling or stripping but jamming rebound adjusters). The last time I stuck someone else's shock adjuster is the last time I used an impact tool on a top nut. If you want to change the hardware to use different nuts than the nyloc nuts supplied, then go for it if it pleases you. Just don't over tighten and DO NOT use an impact tool just as the instructions say. The top mount uses Metric 12 x 1.25 pitch and you can used a deep regular nut and a lock washer if you prefer. Because of the recessed depth of the stock type Z-car upper mounts, using jam nuts (two stacked regular nuts biting into each other) will be hard getting a tool to hold the bottom nut while tightening the top nut. For top hardware that is exposed and not recessed where a second wrench is accessible, KONI uses a lot of jam nut systems but the Z-car mount is recessed The nyloc has the advantage that the nylon ring resists all self movement and rotation as long as any threads are present whereas a lock washer only locks in that very last 1 millimeter or so of tightness when the split ring is crushed flat and trying to spring back. If it were to loosen one rotation (remember 1.25 pitch) or some debris were temporarily stuck under the hardware during the moment of installation, then the nut will be free to move if the piston rod were allowed to shuttle vertically within the mount while it operates on the road. So a nyloc is particularly advantageous when the D-shape top mount means there is less threading surface area for a regular nut to load against to resist turning. The D-shaped portion is less than 25% of the circumference and not 50% so nyloc nut is not getting angled and causing cross threading and galling when going on but that reduced threading will restrict how much heavy tightening it can take before deforming the threads. Datsun chose the D-shape 50 years ago so that is what we and you must deal with when installing parts. There are plenty of threads to keep the nut aligned to thread properly and be properly tightened as designed but that proper amount of tightening is not a high number. Just remember that most installation issues on long term proven products are usually caused not by the nut under the wrench but by the nut turning the wrench.
-
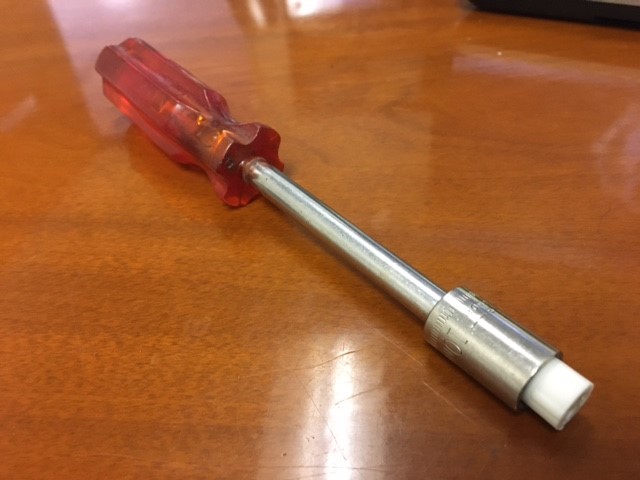
Very nice home made adjuster, lapriser. This actually reminds me that last year I told Joseph that I would post the easy & cheap long neck adjuster tool that folks have made over the years. If you look at the bottom of the KONI supplied adjuster knob, you will see that the tip with the elongated adjuster slot is actually an insert into the end of the adjuster knob. There are actually two different KONI adjuster tab sizes so we have two different inserts depending upon what tab size is used for your application. Although a somewhat tight slip fit, you can remove your insert easily by taking something like a largish wood screw that will bite into the plastic enough to pull the insert out. Be carefully not to deform the intentionally soft plastic of the slot too much. Now you can glue or epoxy (anything hardening really that will fill the voids) that insert into the end of either a screwdriver-like nut driver tool or into a small 1/4" drive socket that you can turn with a 1/4" drive screwdriver-like handle. I bet you probably have an old one at the back of your toolbox that you never use. I don't recall the exact size nut driver or socket needed to fit it into but it is somewhere less than 1/2" or 12 mm size (maybe 10-11 mm or 3/8"-7/16'" range?). If you don't have these tools at home, they can be had for cheap at Harbor Freight, some brand X tool kit, etc. No need to spend Snap-On or Mac Tool levels of money on something that could be had cheaply or you likely already have and don't use. There is a good chance you can make this tool with a screw, a hand tool and glue that is already in your garage and not have to spend any money or more than 10 minutes time. Although you could make your adjustments turn the socket with 1/4" drive ratchet and small short extension, I really suggest using the screwdriver type handle and not a ratchet to reduce the leverage and remove the tendency to over torque/over tighten the KONI adjuster tab and snap it off. The small diameter of the screwdriver handle makes is easy to toss in the glovebox or toolbox for quick adjustments with the twist of a wrist without overtightening. Easy-peasy.
-
Very nice work, lapriser! As mentioned above, the only thing that I saw was that the upper image didn't have the white plastic "bump plate" but I see it on the angleD view. As Joseph mentioned, it is a surface for the bump rubber to impact into and allow any road grit or puffs of air from the fast moving bump stop to be blown out to the side and not into and possibly passed the piston rod seal. It is simply an extra layer of protection for the rod seal to have a nice long life in the sometimes harsh and dirty environment of a roadgoing fender well. Also if your car is lowered and has oversized wheels and tires such that the tire may hit a fender lip occasionally during deep suspension compression, you can stack a few extra bump plates on each other (called "packers" by the racing community) as a fine tuning to make the bump rubber impact happen a little sooner and keep the fender off your tires. Just for fine tuning though, if you need a lot of added strut length to keep the fender off the tire, you really should consider a higher spring rate, a higher ride height, or less wheel or tire width to keep the fender away.
-
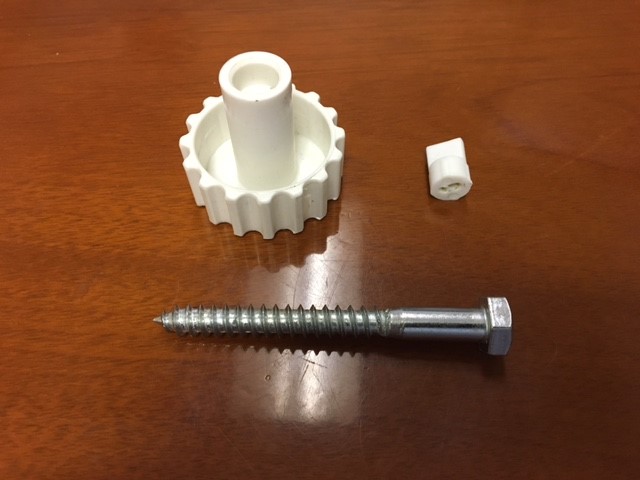
Actually Joseph and I have been talking on the phone about this during recent posts. Lapriser had as also reached out to our KONI tech staff at info@koni-na.com, which is what we would prefer that you do if you have a technical issue such as this. I also saw the post notification when it popped up on the forum. First off, clearly I am sorry to see of the issue that had occurred with the stripping of the threads during installation. We (KONI and Motorsport Ind.) have already made a plan to get a new replacement unit sent out to lapriser at no charge listed officially as a "customer courtesy" replacement due to an installation error that hopefully we can all use a teaching/ learning example and not actually as a warranty situation caused by a product manufacturing issue. Looking at the photo, it is pretty clear that the nut was not cross threaded from the beginning as the threads are only truly destroyed down in the area where the nut sits in the tightened position. The instructions state that the nut should only be tightened to 37 ft./lbs. which is where we feel that things went wrong here. Normally we only see issues of mounting threads being stripped in place (it is quite uncommon though) when someone uses an air or electric impact tool and bangs away to a much higher torque and also gets the very common side effect that the damping adjuster tab and mechanism also gets jammed from the hammering effect of the impact tool. Although the adjuster did get stuck in this case, lapriser did state that he had only used hand tools so must have been solely from manually tightening to much greater number than recommended. Of particular note, the top mounting threads used by the Z cars are use D -shape on the quite small in diameter (12mm vs most strut mount threads at 14mm) with a pretty fine thread 1.25 pitch. The flat area of the D means that about 25% of the circumference has no threading which will also mean that there a not a lot of threads available to hold excess torque without damaging the threads. The D -shape is required by Datsun's upper mount shape which was not uncommon in the 1960s and 1970s but went away for the vast majority of cars after that and now 360 degree threads are the norm for several decades. Extra care should be used if you are installing the D - shaped mounting pins in a spherical bearing camber plate as well that doesn't have the D -shaped mounting hole. Laprise did make the comment that the insert appears to no longer be damping now which is probably evidence that difficult and escalating process of getting the thread damaged nut and mount separated had also cause the strut's piston to become untorqued and open up or bypass the valving flow paths. Normally we only see this when someone uses and impact tool and it aggressively spins the piston rod inside the body or it the car has experienced very high side loading force or top mount bearing failure under use. So we will make sure that we get a fresh units to laprise for his car but would very much like to caution people during installation to be careful and be aware of the following: Use only hand tools and not impact tools as you can overtighten and cause internal issues that you may not notice at that time Use only 37 ft/lbs when tightening the top nuts . If you don't have a torque wrench available, better to be ion the conservative side than the too aggressive side The Z car's 50 year old top mounts require a small diameter, fine thread and a D shape top mounting area with about 25% of the circumference having no threads so again, please do not overtorque it or you can damage the threads and have a tough time getting it back apart. The provided nyloc nut is there to hold the mount properly tighten and not loosen so there is no need to tighten beyond the recommended amount. Earlier in this thread someone projected that the KONI nyloc nuts were made of stainless steel and the cause for galling but that is incorrect. The KONI nuts are actually chrome plated mild steel and not stainless (much more expensive and not used in damper hardware) so dissimilar metals of different hardness is not an issue here. Sorry for this being long but I am trying to be thorough with the explanation.
-
The KONI distributor in the UK is RFT in Mytchett, Surrey. Ask for Trevor and tell him that Lee with KONI North America sent you. Although he cannot get the Datsun Z specific inserts, he can probably get the M48 x 1.5 using the part number 73.25.01.003.1 from Holland. Performance Parts RFT Email: tleigh@rftgroup.co.uk Tel: 01252 494016 Unit One Mytchett Business Centre 57E Mytchett Road Mytchett, Surrey, GU16 6EG
-
According to the drawings I am looking at that has most but not all of the measurements, the 8641 1033 Sport does step down from 43.5 mm OD to 42 mm OD a short distance from the bottom so there is an insternal restiction near the bottom. The 8641 1033 Sport is a straight 42 mm OD all the way down. The 1033 may have hung up on that diameter restriction before it reached all the way to the bottom and thus the length difference is not apparent when inside. All the more reason for you to get the 1031s that are needed for the smaller diameter early struts. It would be interesting to see if you car has the smaller diameter rear struts as well if you think they are original to the car.
-
Hello Jonbill. Sorry that you have had an issue but I was able to dig into some specs to sort it out. If your car needs the M48 x 1.5 gland nut, then you have early ('70-'74.5) strut housings and thus need the 8641 1031Sport with the proper gland nut and a 42 mm OD insert diameter and 394 mm insert length. Based on the late 1974 build date, you bought the 8641 1033Sport which use a M52 x 1.5 gland nut, have a 43.5 mm (1.5 mm larger) OD insert diameter and a 384 mm (note that it is 10 mm shorter) insert length. Whether the cars is the UK were made with a later changeover date or maybe sometime in its life someone put earlier strut housings on your car, you have early struts and thus need the early strut inserts. Remember that you said it was a tight fit but the insert went into the housing, the later car's slightly larger OD insert body fit but barely? If you'd had the M48 gland nut, upon installing it you would have found that the later, shorter insert was too short to engage properly. Although you could stack some washers on the bottom of the tube to spacer it up to engage, there is also a difference in the reound damping force (a bit more on the later car) and compression damping forces (a bit less on the later car) that would also made a functional difference as well. The top mounting pin dimensions are the same between the two models but the later car's inserts actually extend about 5 mm longer and compresses 10 mm shorter than the earlier cars too. The rear struts are quite a bit different in length between the early cars and later cars but they have the same M48 and M52 differnces that you should check on your car as well.
-
Digressive valving is not exactly "new thing" for companies who have been making performance dampers for a long time (KONI has been doing it for at least 50-60+ years) but it might be newer to companies whose products were more replacement grade and not really within the performance realm. It could be that their piston and valving component design might not have allowed the ability to really contour the damping curves very much but have moved in that direction. Many shock companies may not have been around that long or possibly just their marketing companies have simply latched onto "digressive" as a buzzword that they are using heavily now. Some consumer marketing messages may make a big deal about mono-tube or twin-tube design suggesting that one is always better than the other but it is simply not true. There are good and bad examples of both and different cars can have very different needs so it is more important that the damper function is tailored to the vehicle and it usage. Digressive and linear are general terms used to describe shapes of plotted dyno curves (however shocks on cars on roads never operate like dyno graphs look) but there are so many variables in car and damper design that you really can't just hang onto or use it as a "this is good" or "this is not good" gateway. Don't make your purchase on the use or lack of the word "digressive". You did not mention any specific shock brands but it is probably better that way anyway. As to your coil-over questions, it really depends on your usage and expectations of the car. To be a coil-over, it really only means that the spring is mounted on the strut of shock and all 3 of the early Z-cars do that already. Modern usage suggests that you are also wanting to make the lower spring perch height adjustable so you can customize your ride heights, corner weight the car if you want to, and have the flexibility to interchange spring rates is pretty easily. Beyond that, it is pretty wide open as to what your desired outcome will be and thus the path you should follow. With a coil-over, you can select a relatively soft spring rate for a compliant suspension and smooth ride, bump them up quite a bit for firmer ride and sporty control or run really big spring rates for a handling performance only/ don't care about ride quality set-up for mostly track use. It really boils down to what your uses and expectations for the car are. I would let that be the deciding point of whether you choose these Z-car specific Sport dampers or the much more aggressive RACE dampers that are clearly intended for Racing performance track duty with no comfort, no warranty, etc. in mind. Before these new Sports were introduced, there were few options for the car but now they offer more opportunities. Having looked at the damping specs of them all, the RACE units are much, much more aggressive on rebound and compression damping and not specifically fitted as a drop-in for the Z-car strut housings so some level of machining and fabrication may be needed depending upon your intended outcome. The Sport units are made to be a nice performance upgrade for the Z-car but still have a quite reasonable ride quality (so long as you don't overspring the car which will make it harsh), a standard lifetime KONI warranty against defects, be a drop-in solution to fit your housings, etc.. It all depends upon what you want, e.g. "Whats for dinner?" What do you want? Home cooked or eat out? Steak or chicken, Mexican or Italian, etc. Pick what you want to satisfy your interests as there is no specific one right answer for everyone.
-
As with pretty much all KONI dampers, these are digressive valvings on the Z cars. This means that as they initially begin to move, they build damping forces at a pretty steep rate to give very low piston speed, subtle body motion control but the rate of climb continues at a decreasing or digressing rate at target piston speeds across their working piston speed range so that they do not get too firm and causing handling, tire grip, and ride comfort issues once the suspension and body get into significant motion. A progressive damping curve would normally be a bad thing as it would have very little damping force and control in subtle suspension motions but it would rapidly increase the rate of climb becoming overdamped and harsh over big motions and bumps. A progressive damping curve on a car would be an extreme rarity and I can't say that I have ever seen such in my nearly 25 years in the business. Some cars and specific suspension designs (typically not struts) prefer a more linear damping curve meaning that that the rate of climb is relatively even across the piston speed range and typically have pretty limited initial low speed damping forces. Some relatively linear damping examples are a number of BMW rear shocks that are mounted well behind the axle and trailing arm with an overdriving or more than 1:1 motion ratio. Progressive rates can very often be a very good thing for performance car springs but would be a bad thing for performance car damping. Progressive springs and digressive damper valvings can be very well matched, especially when adjustable.
-
Those white plastic rings are called "bump plates" and they are intended as an extra layer of protection for the piston rod seals for when the car compresses fast enough for the bump rubber to make contact with the end of the damper body. The bump plates have two different designs, one a closed ring with a somewhat waffle shape and the other are flat and C shaped with a gap in one side. Because bump rubbers are round, fast moving, and soft to compress, it is defintiely possible for a bump rubber impact to the top of the strut to drive a puff of compressed air and possibly some road grit into and past the seal lip and into the damper. The waffle or C shape gives a path for this to just blow out to the side and help protect the seal that much more. Because KONI dampers are expected to last a very long time, some extra seal protection can be helpful for longevity. After tightening the gland nut, the first step of reassembly is to just drop the bump plate ove rthe piston rod then reinstall your bump rubber, dust cover, etc. The Miata forum thread calls the bump plates "packers" which is a relatively common name from the Oval Track Racing world where you might stack several of them to make bump rubber contact happen sooner for a number of possible reasons but you also risk handling and tire grip issues as well. The comment about them being related to an old, multi-piece style of piston rod seal is something that the poster has made up themselves. Yes, in the early to mid '80s there was a change in the seal design (I talked about ti earlier in this thread) but bump plates having some involvement with that is just someone interjecting their own assumptions. I have explained the bump plate installation and usage many times over 23 years but never heard that one before.
-
Hello All, sorry for the late response. I was away from the internet and emails for most of three day Easter holiday with family so I am just getting caught up to a flurry of activity here. Issues of the last few days: Oil in the strut housing around the insert is always a good idea but it does not really matter what type oil it is. The benefits are twofold, although one is real world and the other a bit more theoretical. As mentioned in posts above, some type of oil between the raw steel inside of the strut tube and the outside of the insert can reduce or eliminate the chance of rust forming between the two and making it very difficult to remove the strut insert from the housing many years down the road if any service or replacement is ever needed. Any kind of spare oil will do just fine so leftover used engine oil, any gear or motor oil left at the bottom of an open bottle, etc. will do just fine. Anything to fill the void so that water or moist air cannot accumulate and start to rust the internal surfaces. I do not recommend anti-freeze as it is water based and will very likely start to rust and make insert removal much more difficult. The more theoretical benefit is potentially improved from inside to outside heat transfer but honestly unless you are trying to race off-road with extreme sustained piston speeds and heat generation, there is no need for cooling the insert for its own function. When we had the KONI Challenge road racing series, we found that there was more wheel well heat generated from the brakes and hubs that might spread into the strut than there was heat inside the strut that needed to dissipate out. Regarding the fitment concern on Nils’ front struts, I think there may be an internal lip or edge that it is catching on and not letting it drop all the way to the bottom. These inserts are exact dimensional matches to the earliest KONI 86 series red strut inserts that were offered from the beginning. I checked old ‘70s KONI catalogs that simply state “1970-1974”so there was no exclusion for super early production strut housings or a later start-up date. I think Nils’ situation is an anomaly and exception and not the rule so they can get a deeper look on a case by case basis. If someone does have an issue, please let Joseph or KONI know.
-
It is a good example of how these cars are regulary upgraded with more modern wheels, tires, springs, bushings, etc. that many people use today. Each of those steps takes some compliance out of the suspension's motion and sharpens the feedback up to the driver and passenger. These cars will normally use a slightly higher initial rebound damping adjustment setting than will a truly stock car with softer springs, taller sidewall tires, etc. might. The stock cars will normally be adjusted to at or near the full soft adjustment setting and the modified car will likely have a higher initial setting however it will rarely be even halfway into the full available adjustment range. This helps show that the new KONI Sport option meets its goal to cover a broad range of enthusiast Z-cars, whether fully stock, upgraded with modern parts but still needing a very streetable characteristic, or for even more aggressive cars for autocross. track days, etc.. If we had fixed damper valving with no damping adjustment to help work with a range of stock or upgraded performance parts, then there would be greater concern about needing multiple strut part numbers to cover the range of cars. Being adjustable lets the car owner match to his own upgrades, handling and ride preferences, local road conditions, weekend competition goals if any, and also compensate for long term wear.
-
I don't have a Z-car damper readily at hand to check one but most KONIs have a roughly 2.0 to 2.25 turn adjustment range from the stop at full soft to the stop at full firm. Depending on any minor stack height difference of the internal valving components used in that application, there is some possible variation but rarely does it go less than 1.75 turns or more than 2.50 turns. Because all KONIs have greater than 1 full turn of adjustment, having external numbered markings like the Tokico would not work.
-
Thanks for the review and feedback, Ian. For clarification on knowing where your KONI adjustment settings are, just use the physical hard stop at the full soft setting (clockwise until it stops) and then the number of full or partial turns counter clockwise up from that point. Example: Full soft, 1/4 turn from soft, 1 1/8 turn from soft, etc.. This is always repeatable and easily matched side to side, front to rear if desired. In general most people probably use 1/4 turn adjustment increments but you can do larger or smaller increments if you want. We have a highly respected and picky BMW tuner whose recommendations go to the 1/16th of a turn. If you can discern judge that small an incremental change in your car, more power to you but most people are probably more in the ¼ turn range. Unlike the Tokicos that had only 5 defined adjustment settings, the KONIs can be adjusted to many more settings across a larger overall adjustment range min. to max. with broader affect across the working piston speed range.

