.jpeg.7e61781a506c5c75a3fd273235c27757.jpeg)
HappyZ
Free Member
-
Joined
-
Last visited
Everything posted by HappyZ
-
 When I tried to install the longer one, I actually had already rebuilt the front one with the shorter on (I hadn't noticed the difference yet). When I installed the long one in the back carb, I didn't want to adjust the float tab so far to accommodate the length. Tomorrow I'll pull the carbs and put the short one in the rear carb (by firewall) and the long one in the front carb. Looking at the pic attached, I now remember that the set came with two sets of needle valves. I installed the same size that was already in there. Is there a way to know which one to use? Thanks for the information. I bought the carb set from zcardepot, but on Ebay.
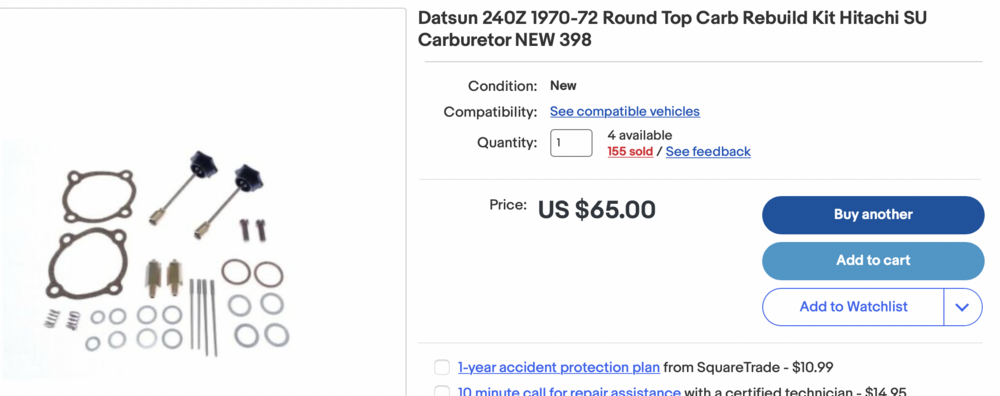
-
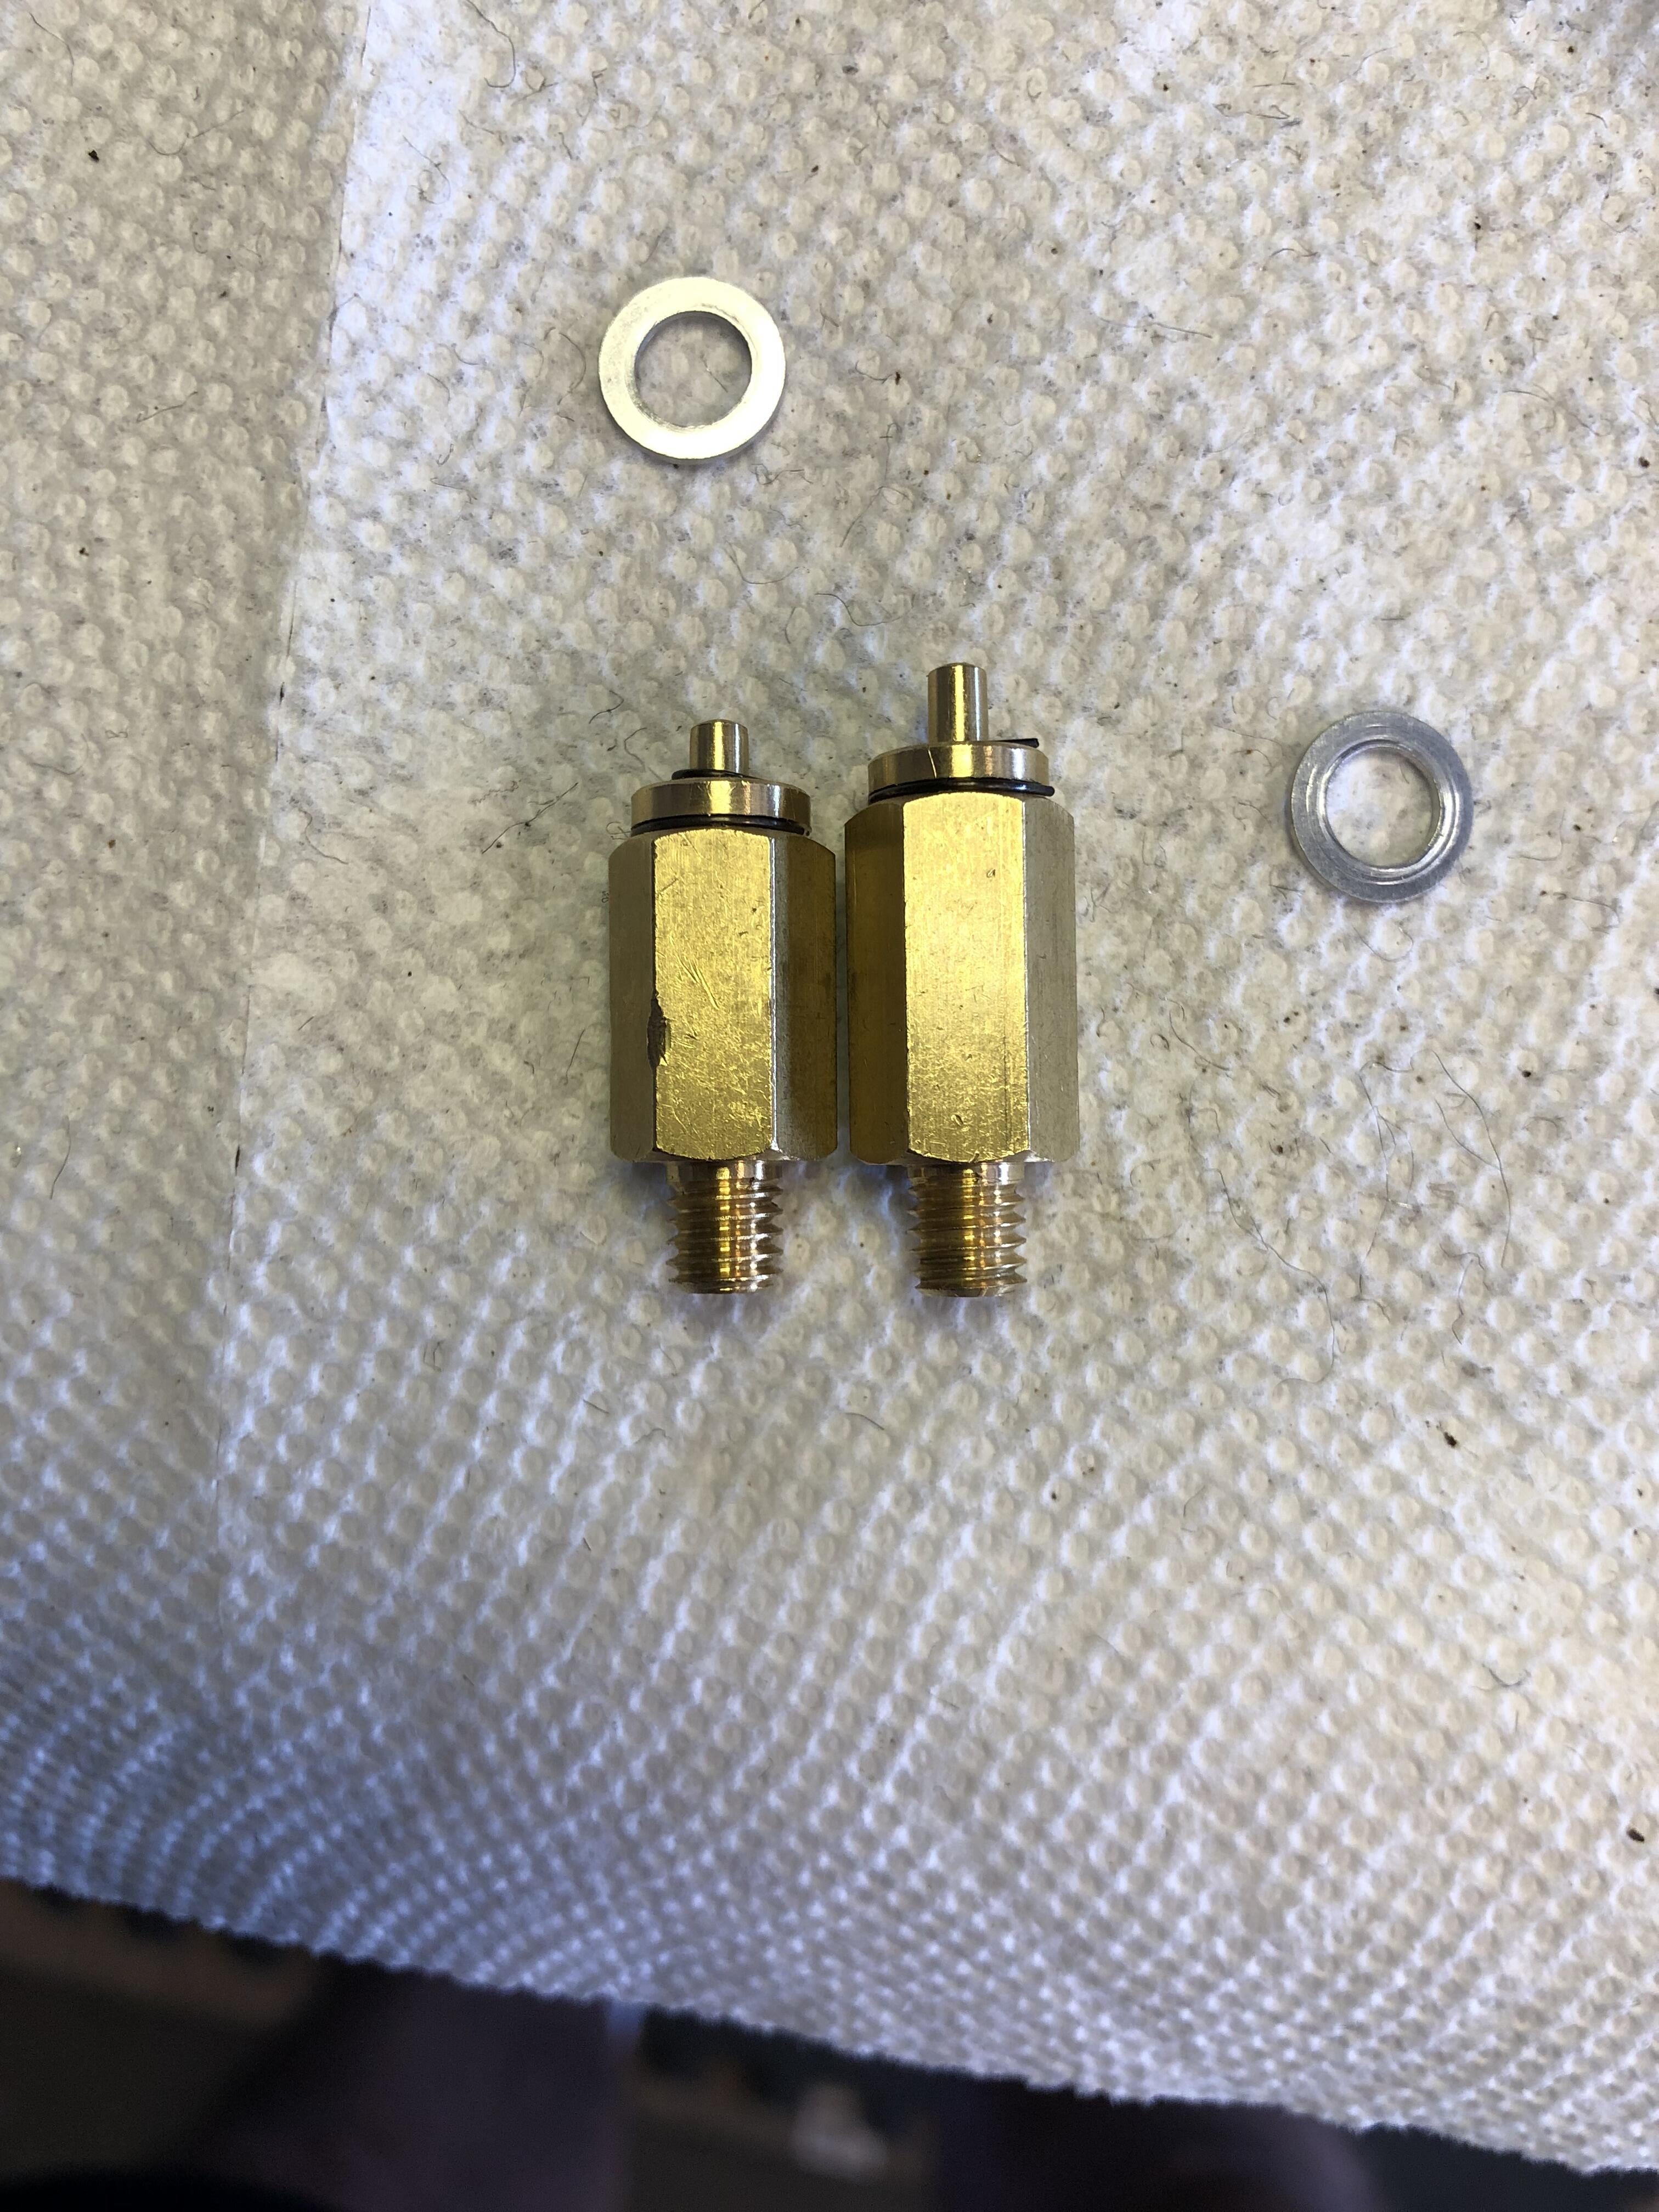
I just received a rebuild kit from one of the Z parts sites and it had two different needle valves in it. One is taller than the other. Could there be a reason for two different sizes? I didn't notice until I installed it and tried to adjust the float.

-
I put together a little spreadsheet that I think captures much have what's been provided here. Although I like the cardboard, I think this may work as well. Let me know if I should had any other notes/comments. It prints on two sheets, so you'll have to tape them together. 280Z Valve Adjustment Chart v2.pdf
-
Thanks for the information. I'm really close to everything coming together, so should be able to report back by this weekend.
-
Thanks, I'll give them a ride. You have been very helpful.
-
In your opinion, should I buy plugs for a '78 280Z or a '71 240Z? And then gap I'll gap them at 1.0mm -1.1 mm
-
I have a 240Z with L28. It has a 240Z distributor with electronic points and SU Carbs, Do I install and gap plugs based on the 240Z ignition/fuel OR 280Z combustion? I got the information below from zcarguide.com ModelSpark Plug Gap (Range) 240Z 0.8mm-0.9mm, 0.031-0.035in 260Z 0.8mm-0.9mm, 0.031-0.035in 280Z 1.0mm-1.1mm, 0.039-0.043in
-
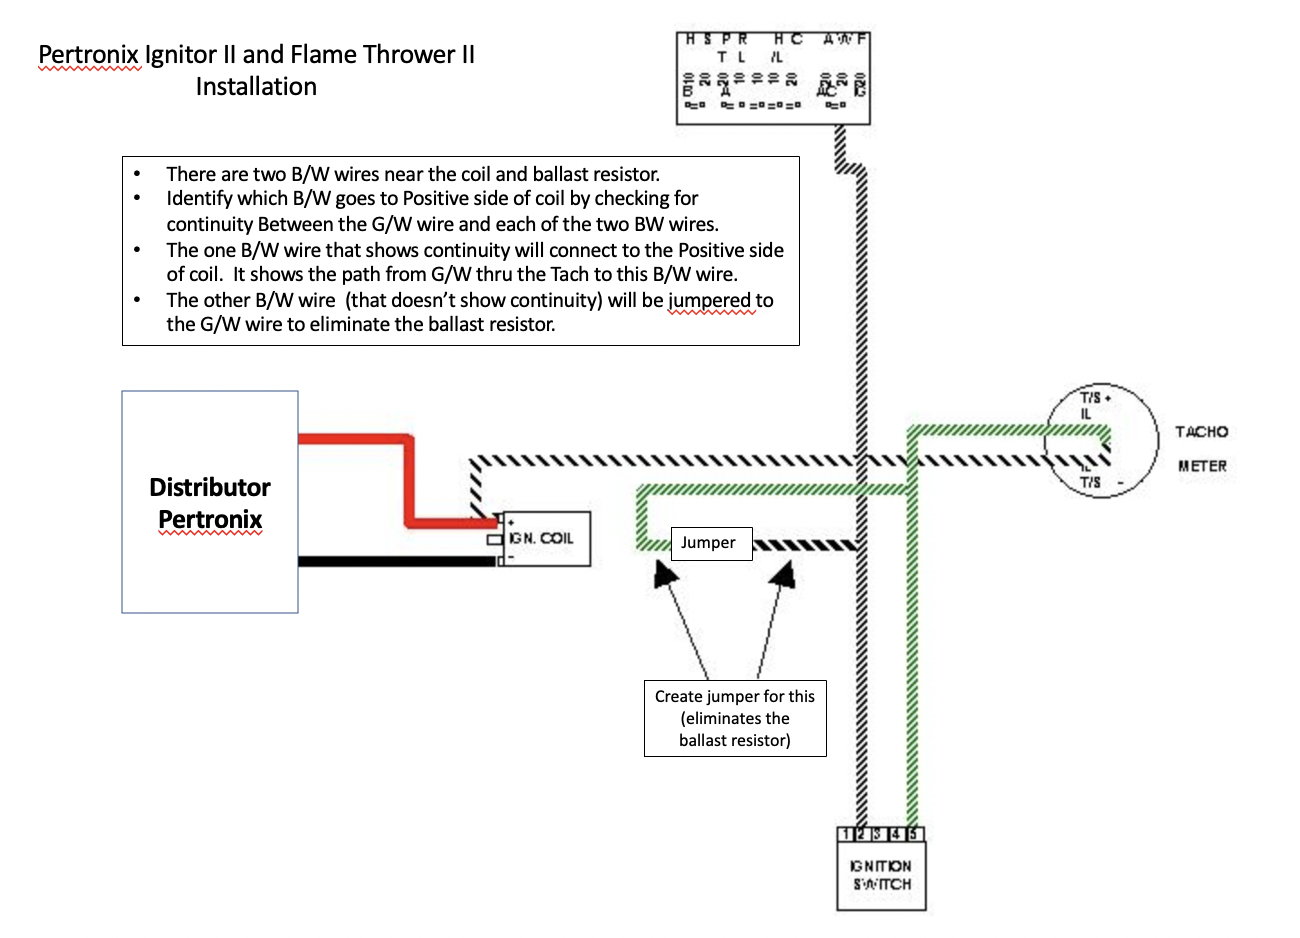
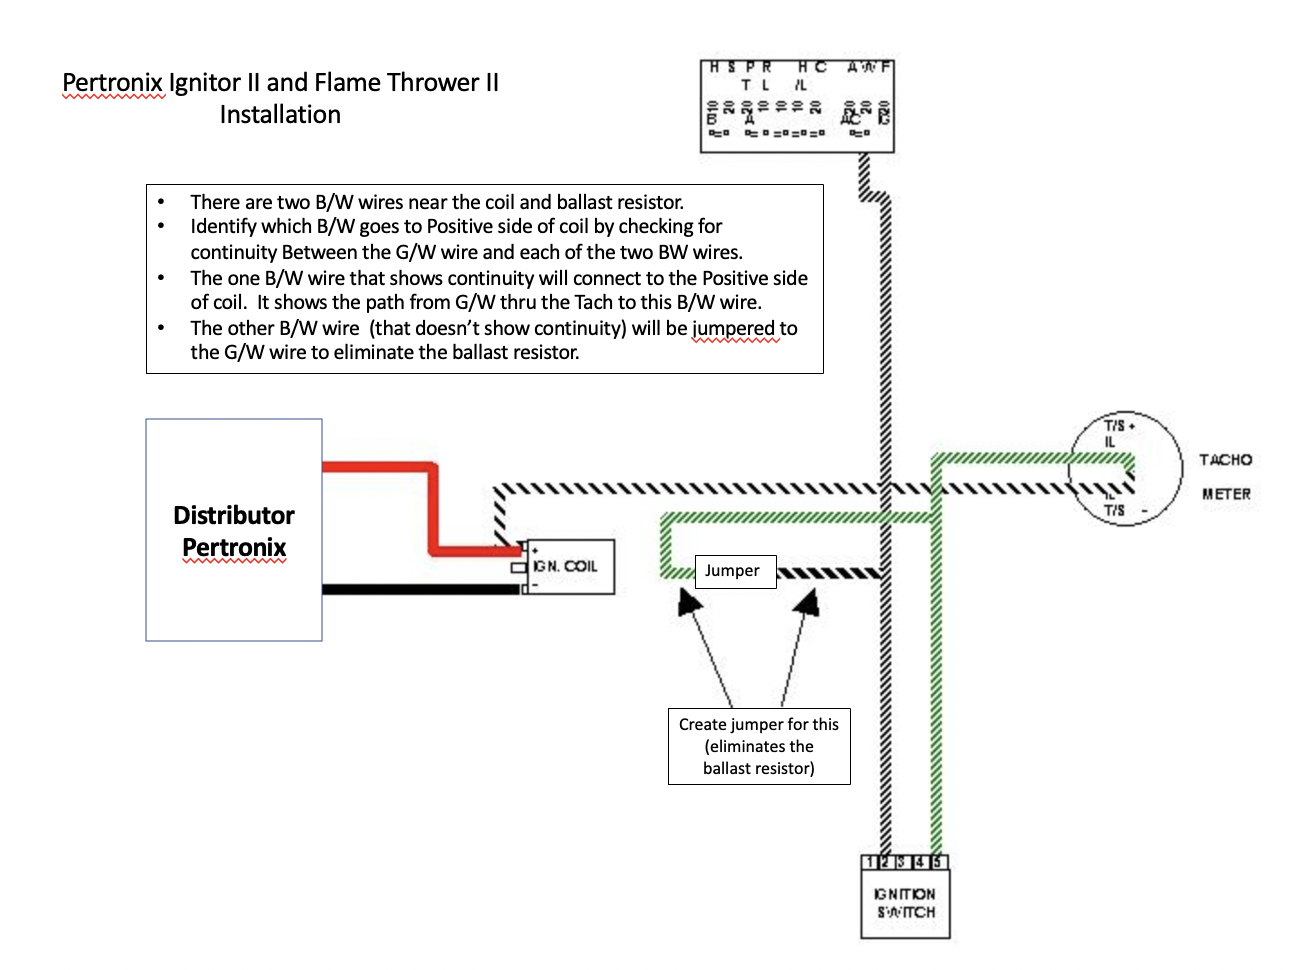
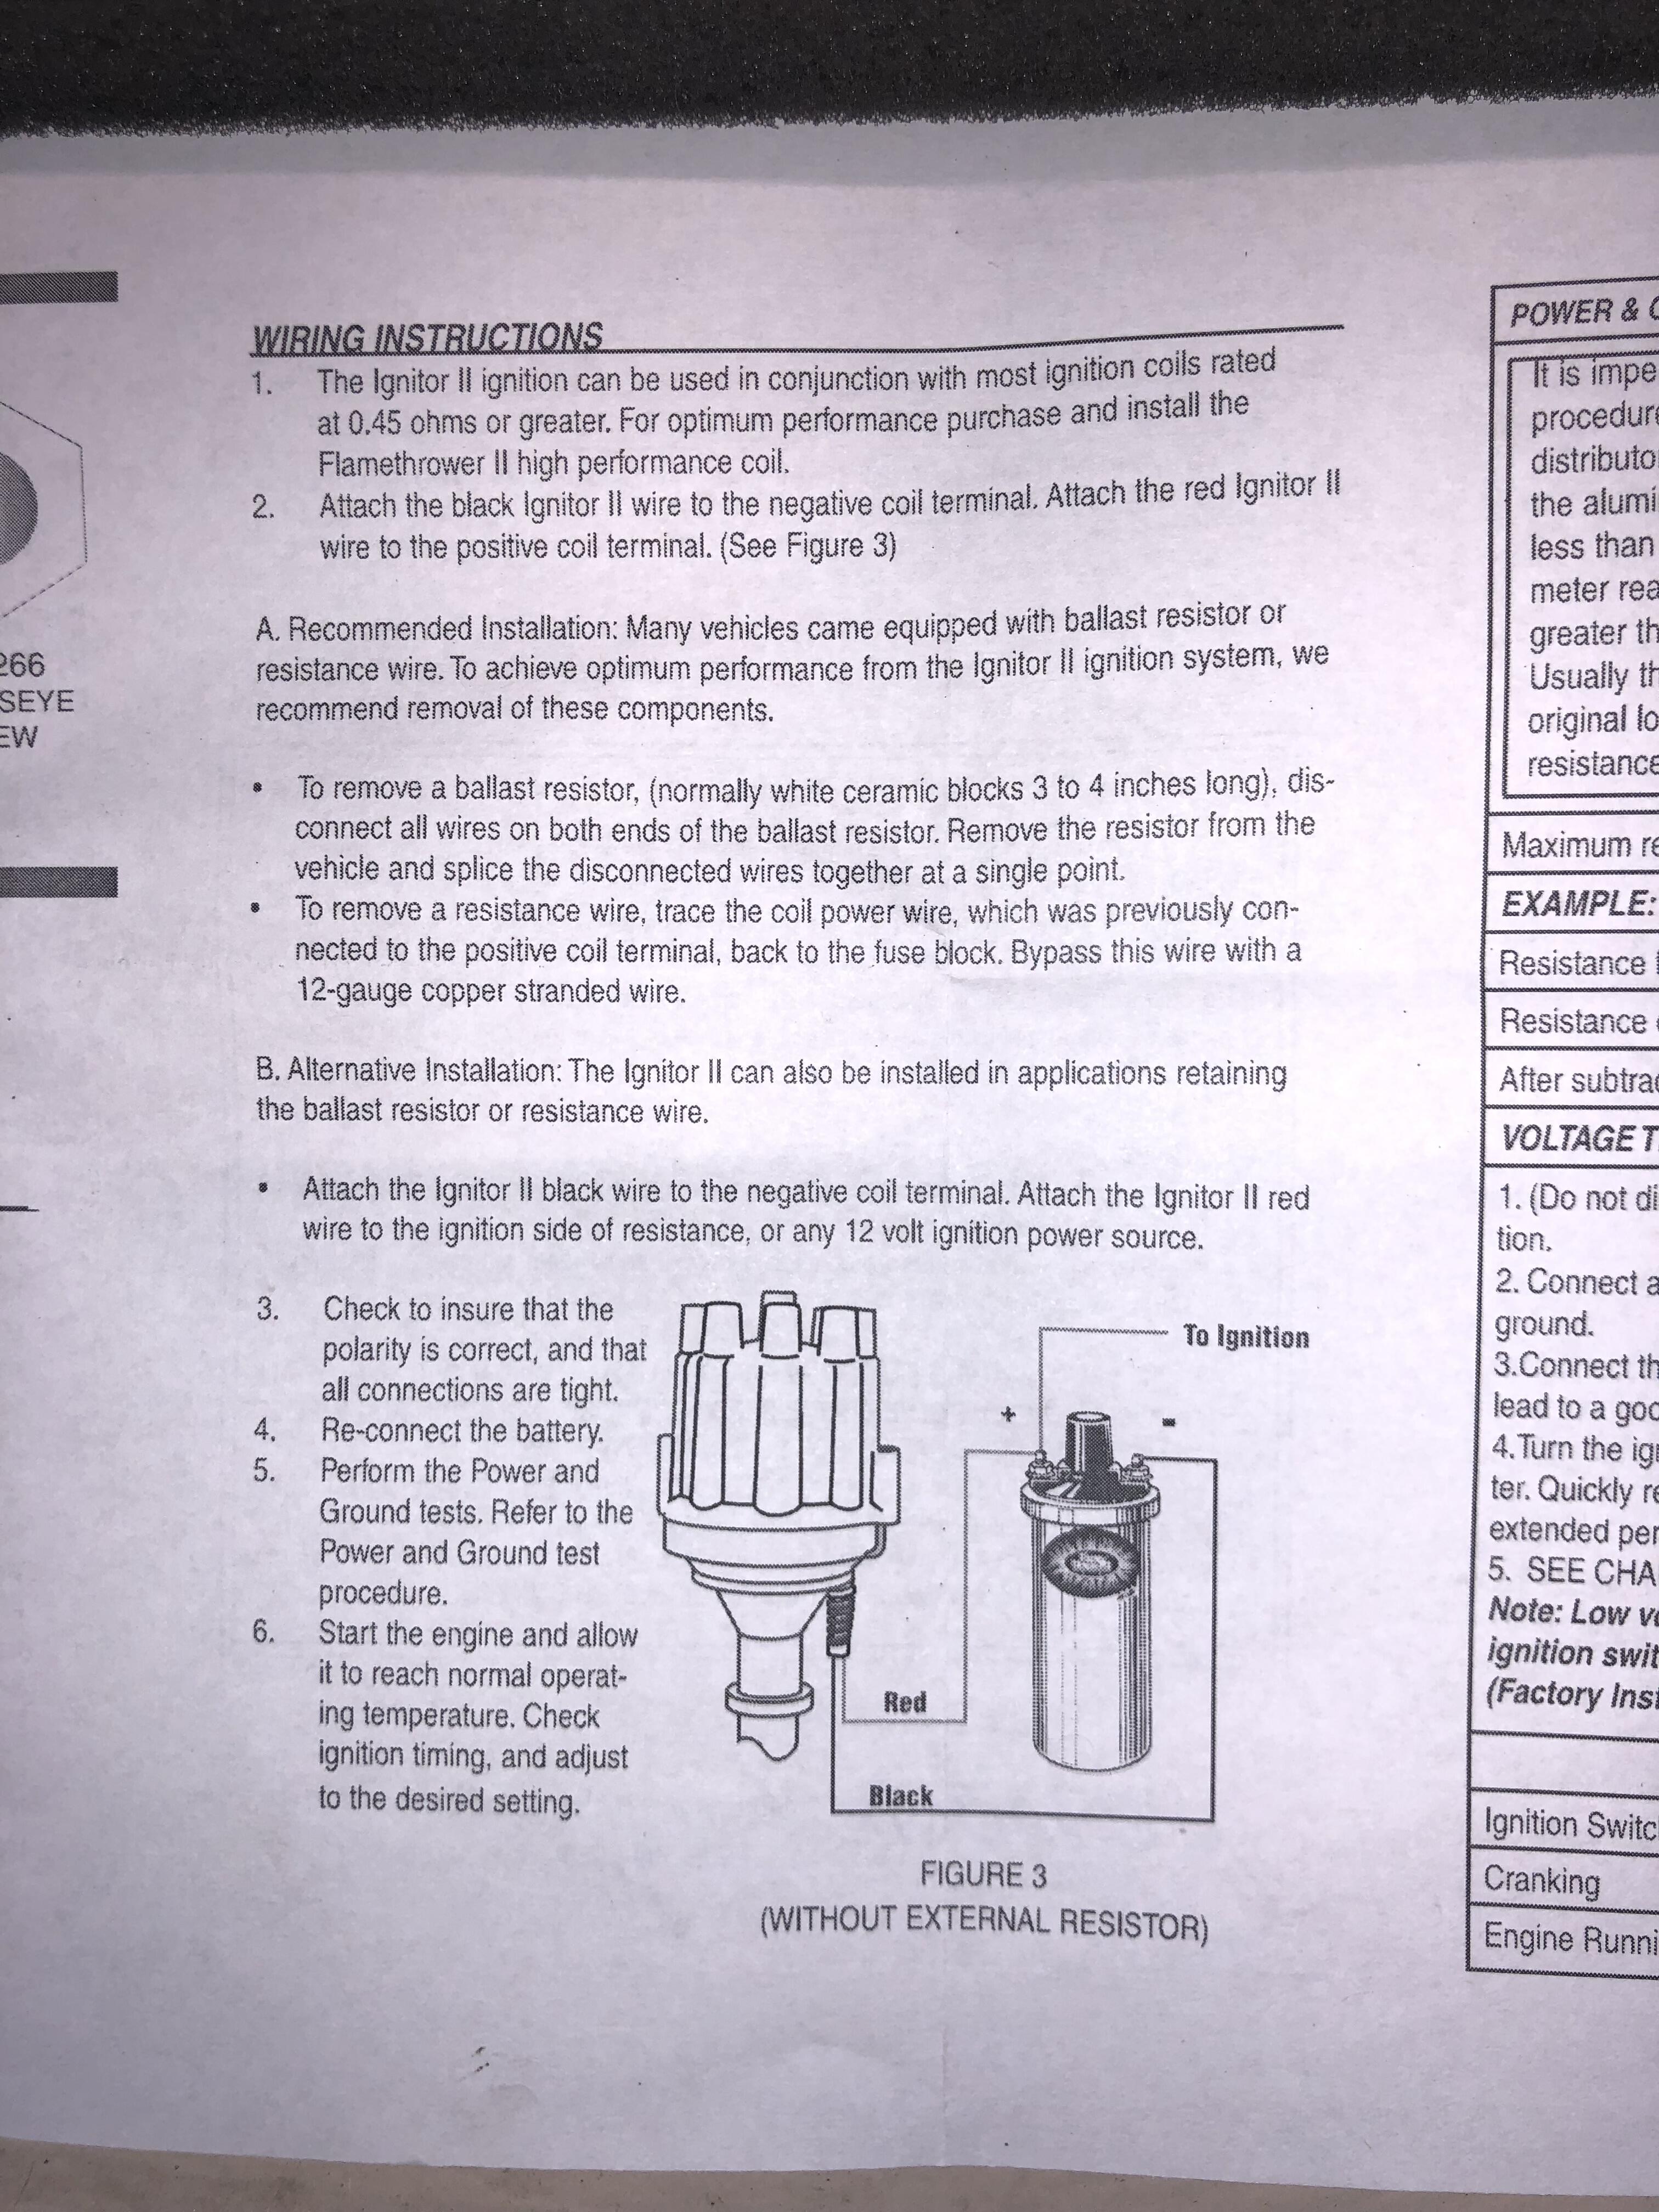
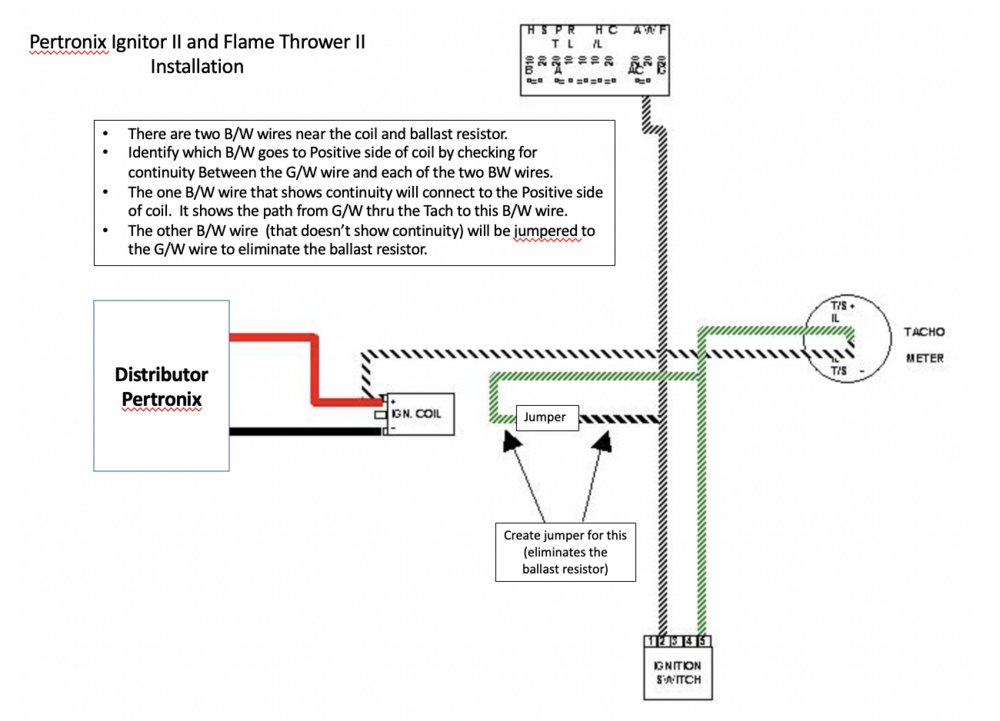
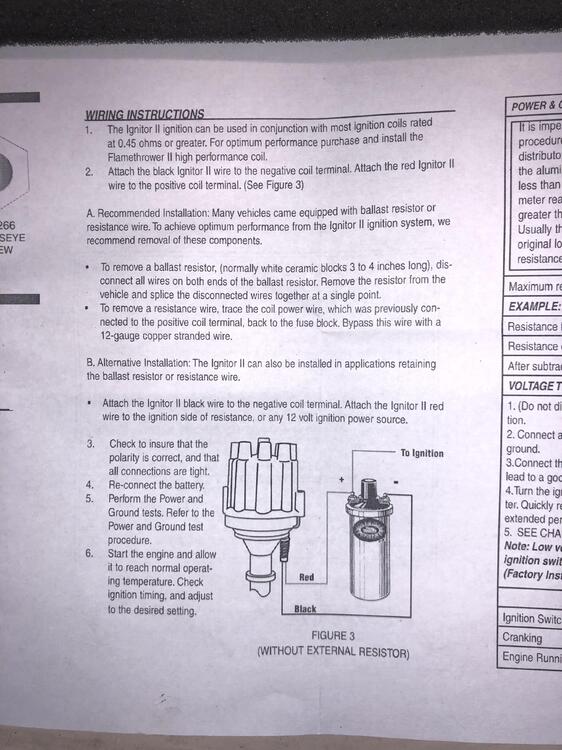
I just installed my Pertronix Ignitor II and Flame Thrower II. I'm not sure of the differences, but this is how I wired it. It eliminated the ballast resistor. I got the information from the video @SteveJ posted above and then updated a diagram previously posted on this site. I hope it helps. My tach does work.
-
So, I cleaned up my points distributor and installed the Pertronix Ignitor II and the Flame Thrower II. I read a number articles, comments, and watch videos. I updated a diagram posted on this site (sorry I can't remember the source) and wired it as shown. My tach works and have good spark. I haven't done any real testing yet. Note to self...don't forget to install the rotor...your car won't start without it. I hope the diagram helps. d

-
Thanks @Zed Head! I have a second distributor, coincidentally it's the same model. I'll taking it completely apart and cleaning/greasing it up. I took a lot of pics, so hopefully I can put it back together correctly. I put the Pertronix in my current one, but may transfer to the cleaned up one when it's done. Is there a trick to removing the shaft part of the distributor; I'd like to clean it up too?
-
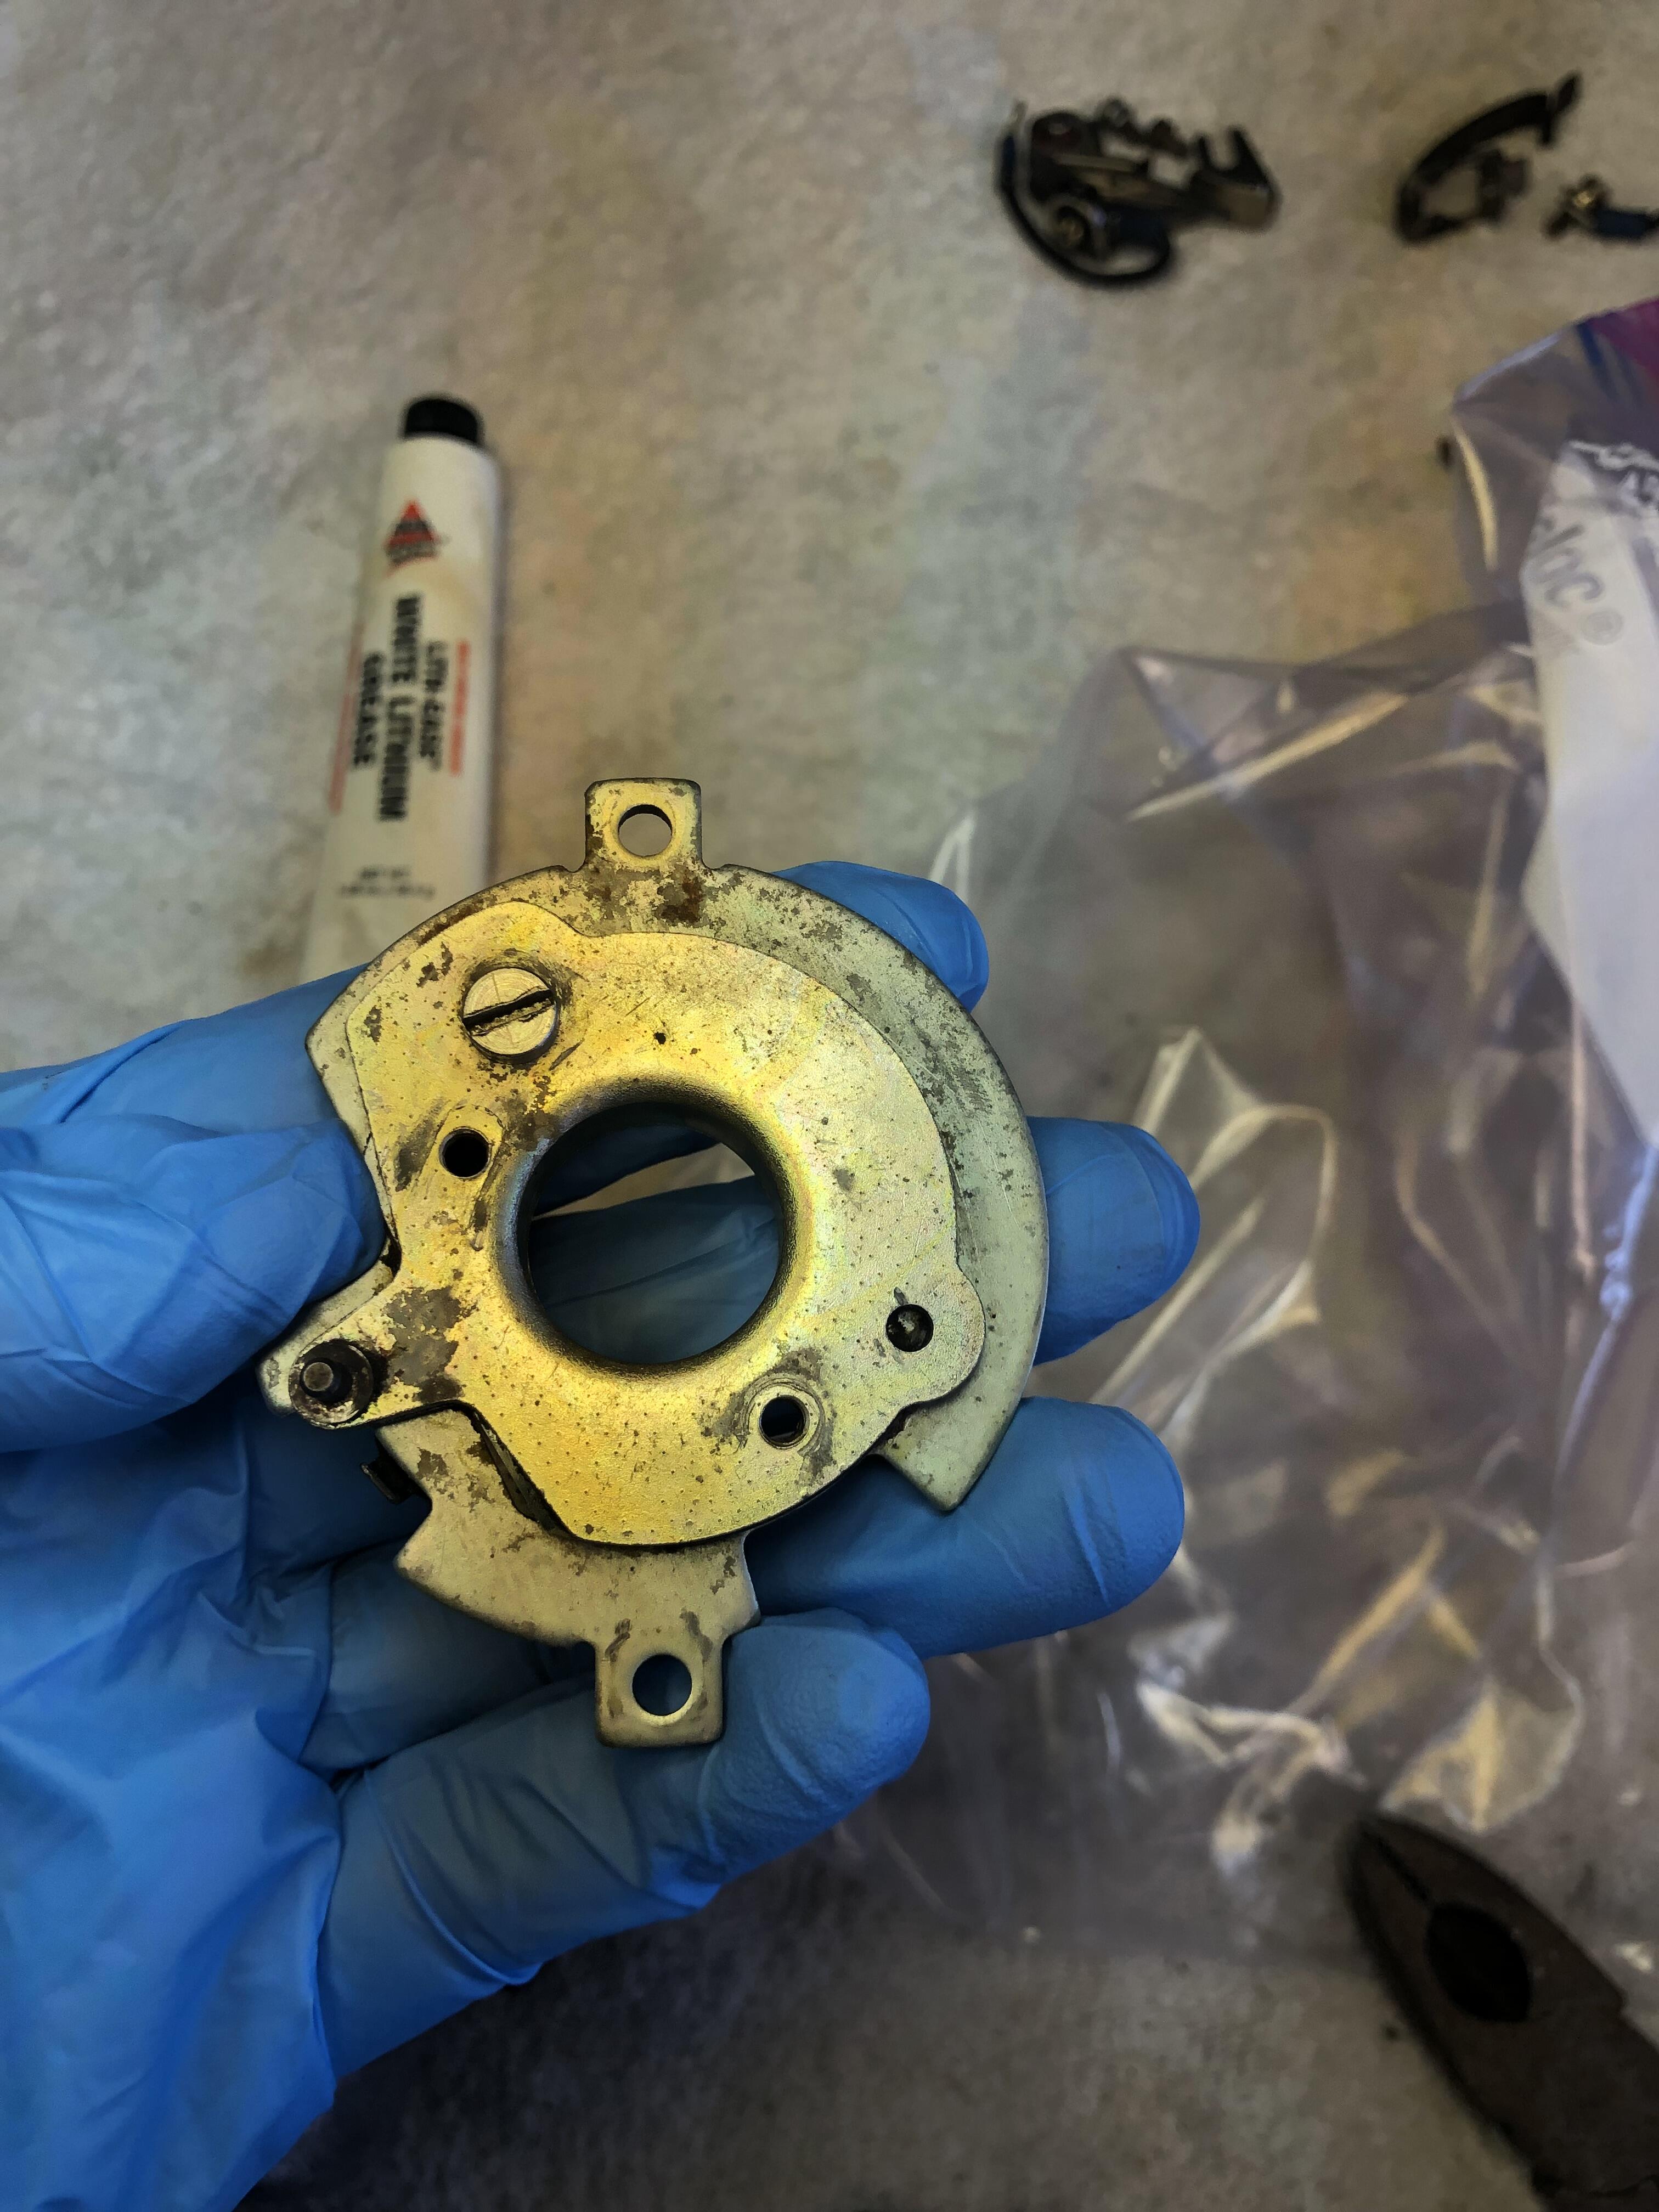
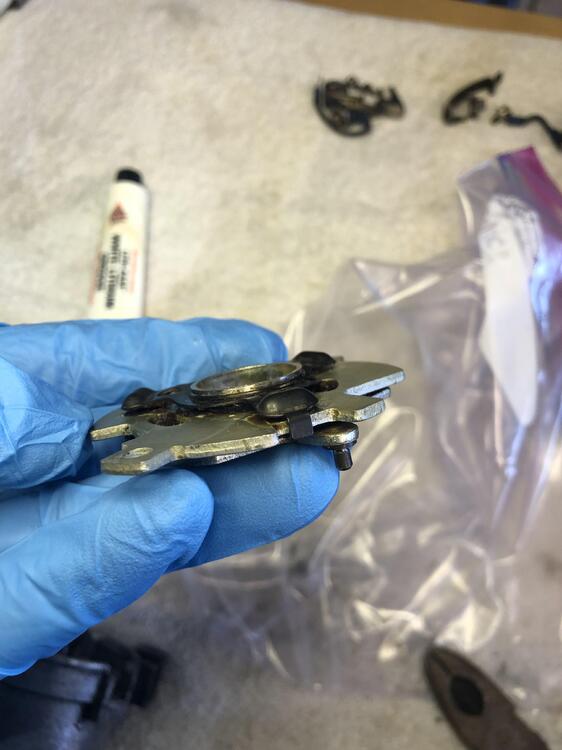
I took the top half apart again and cleaned thoroughly. I greased the areas you indicated and the guide (except the lower half). I must say that no matter what I did, the plates on the disc in the photo never really moved smoothly. I'll put it in and see how the advance works. Here's a pic of the distributor.

-
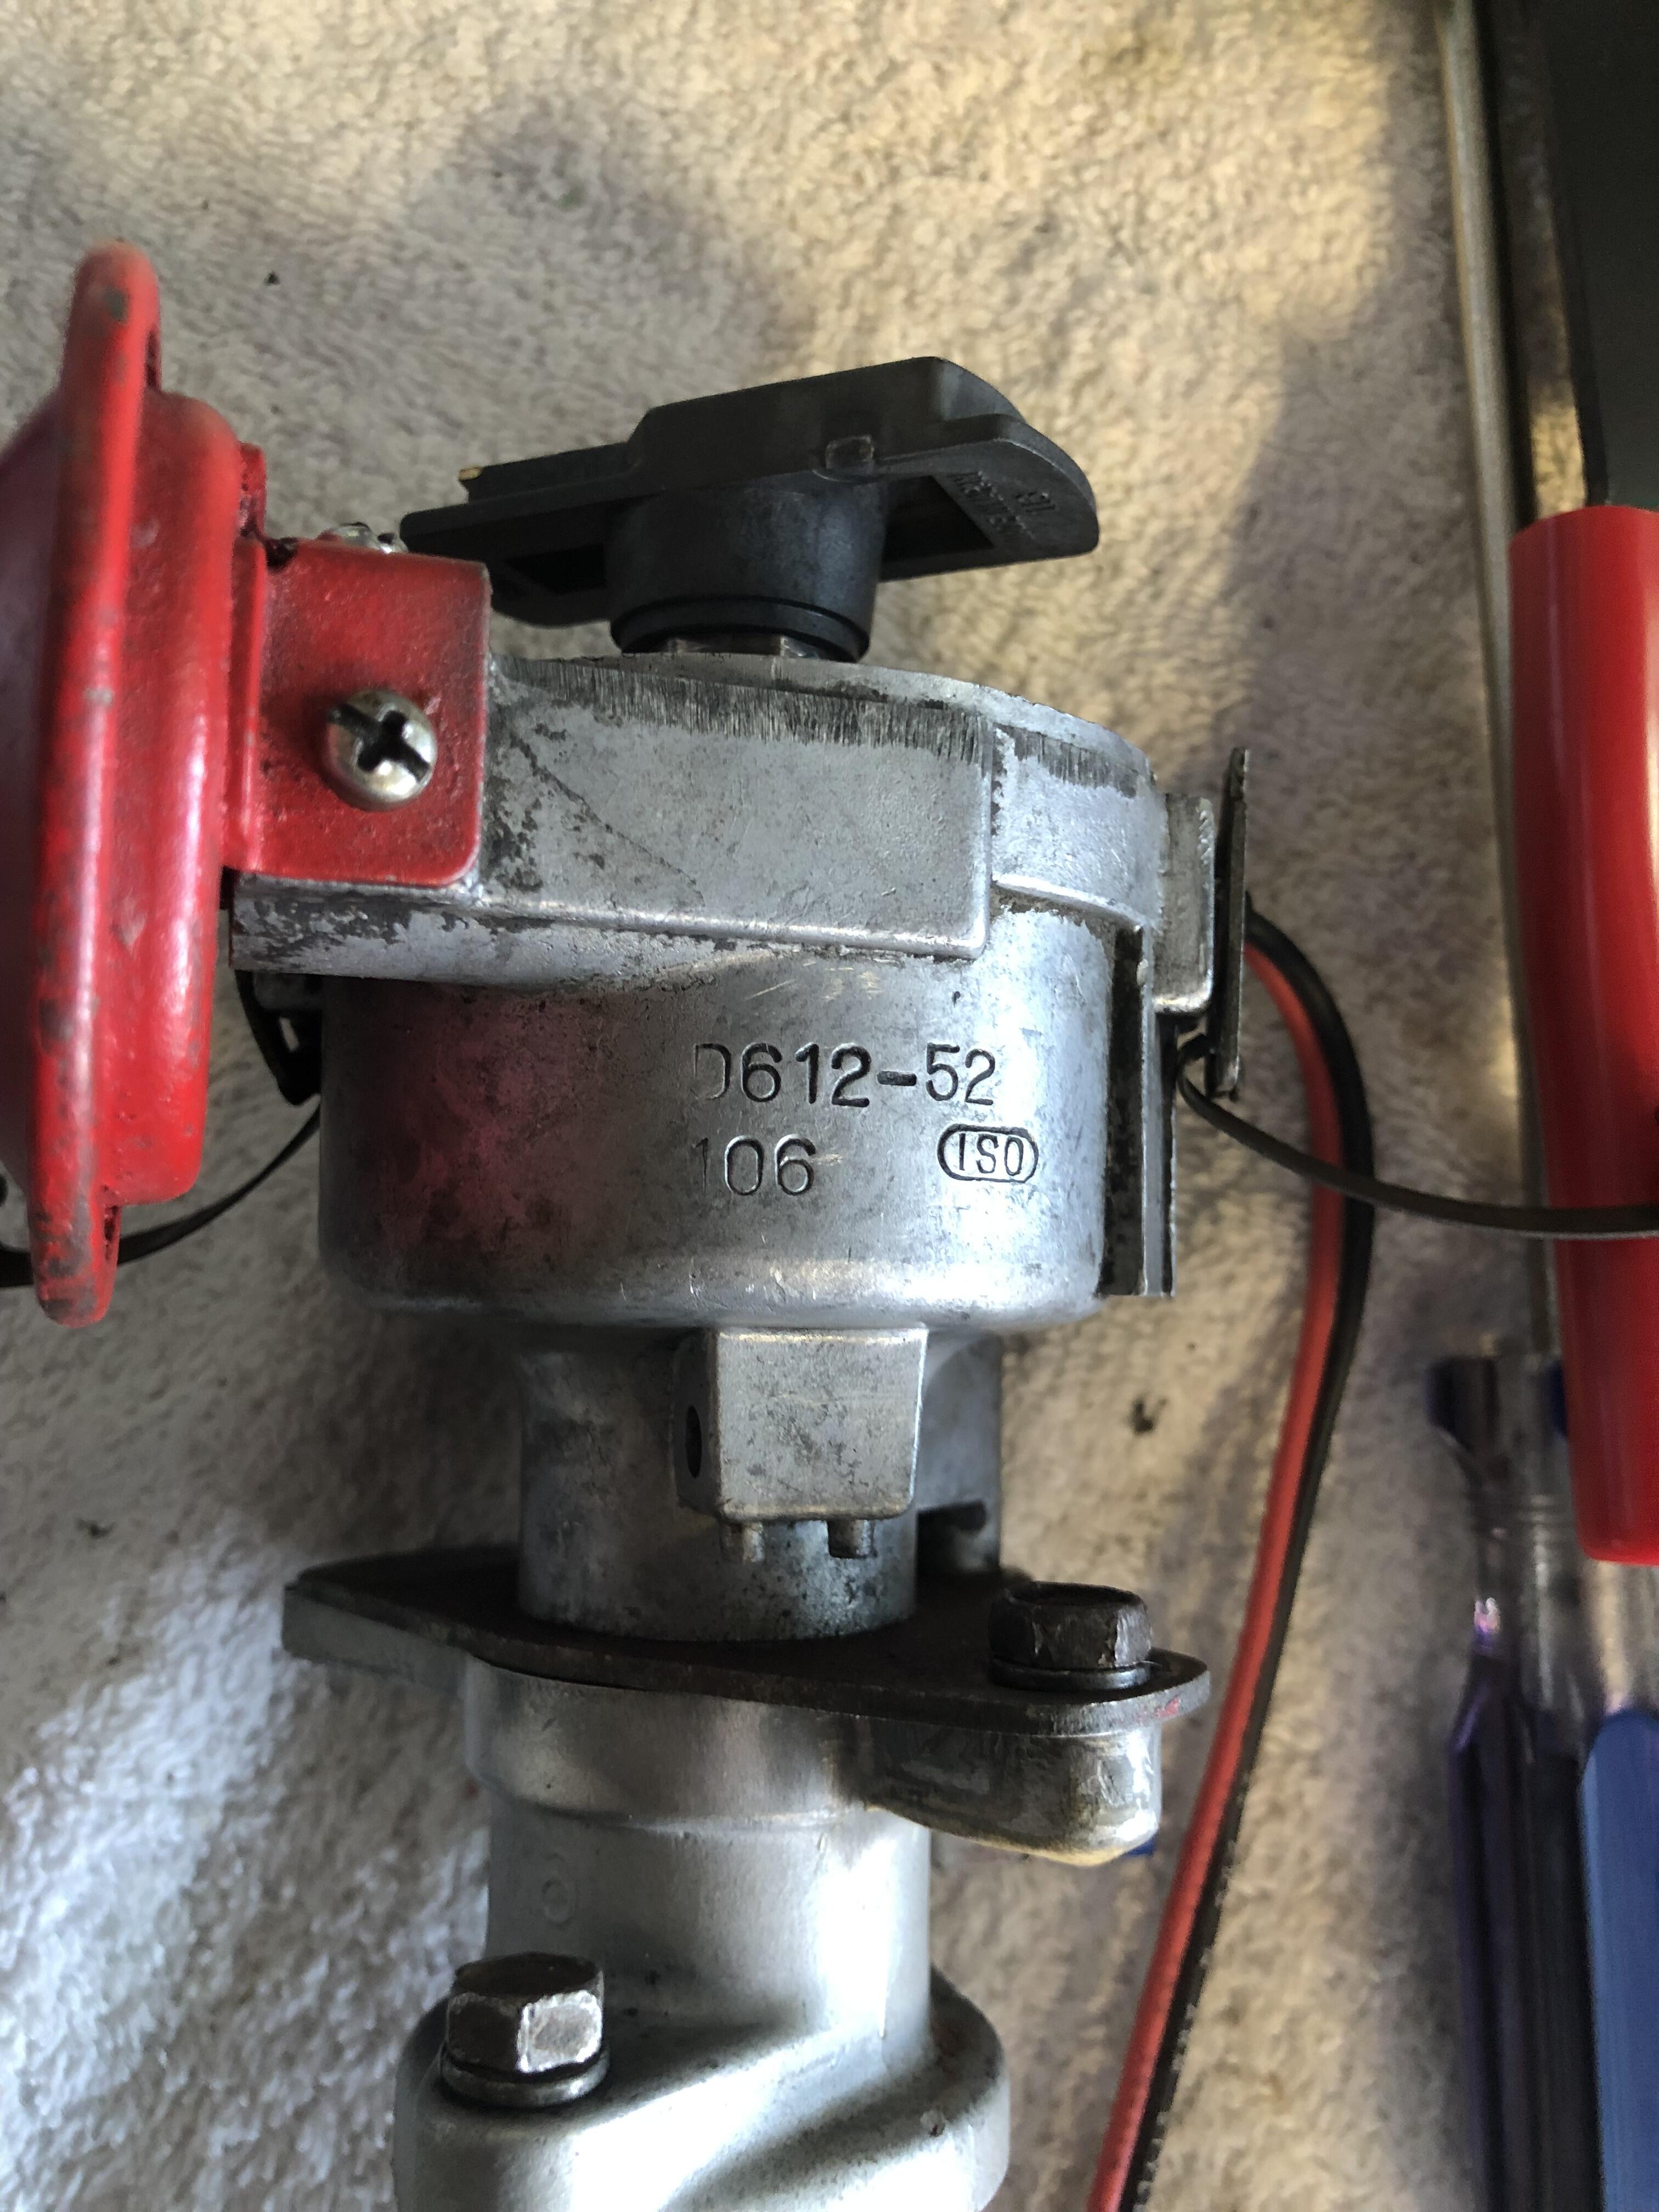
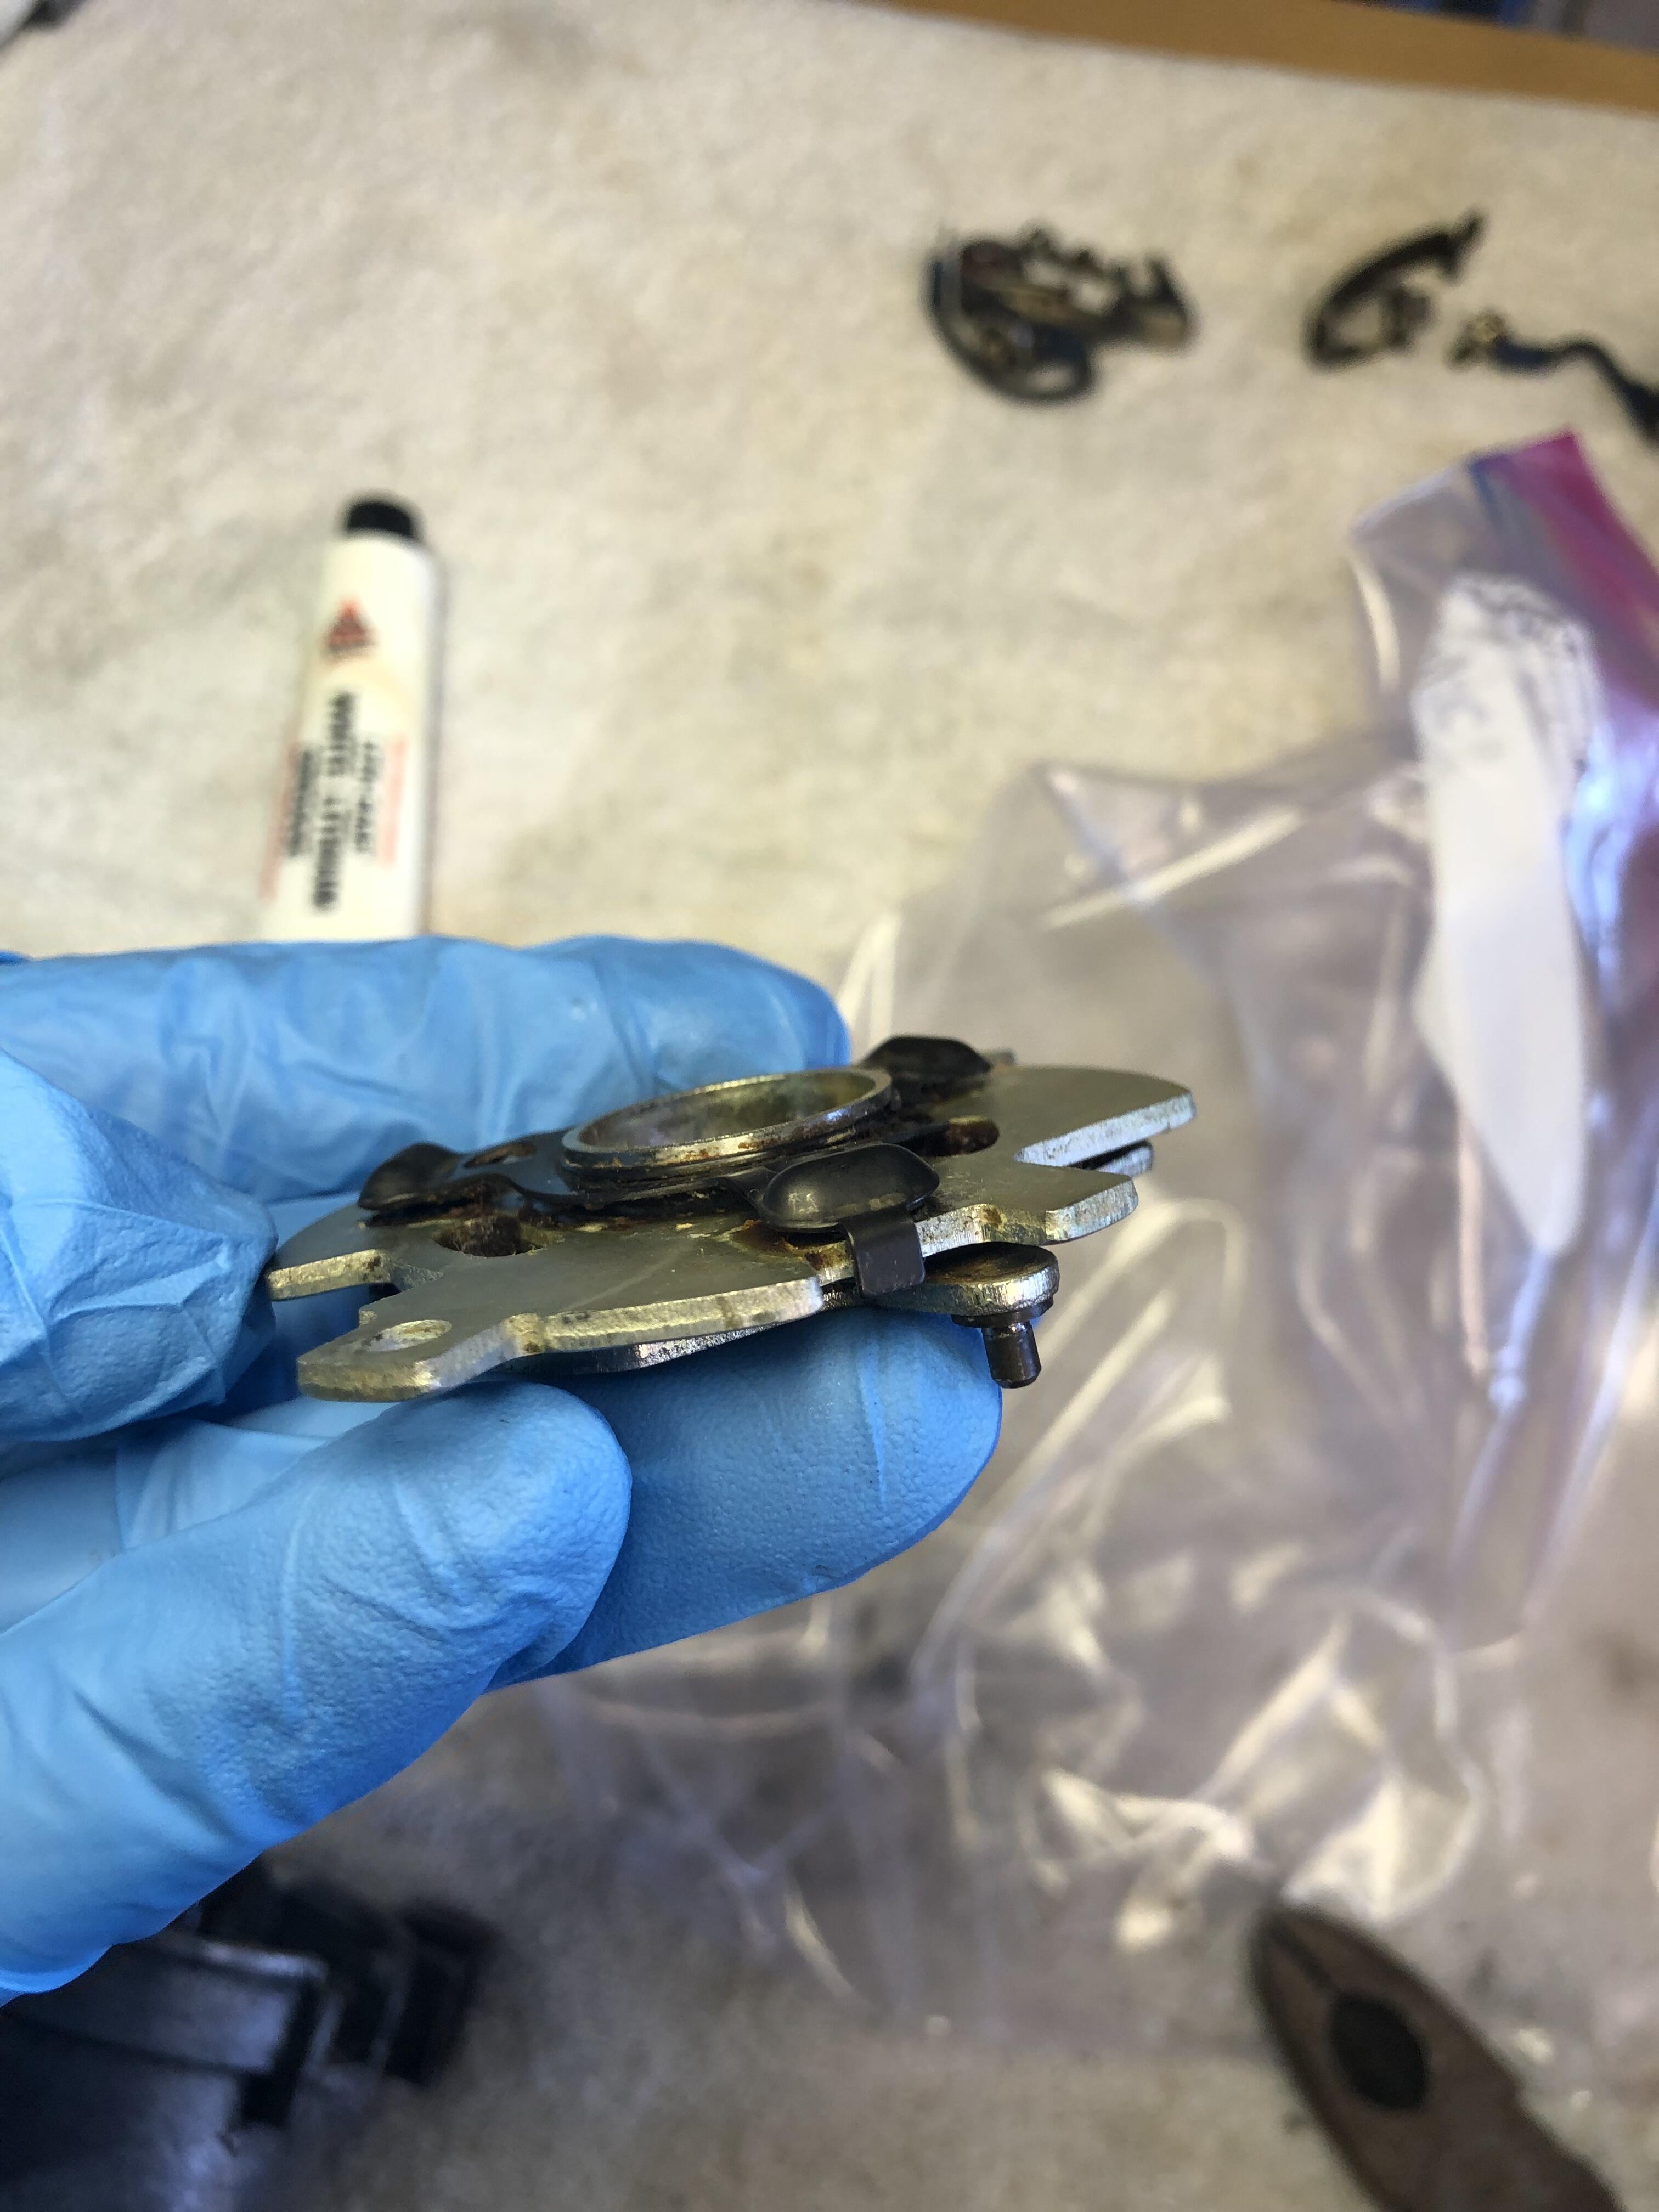
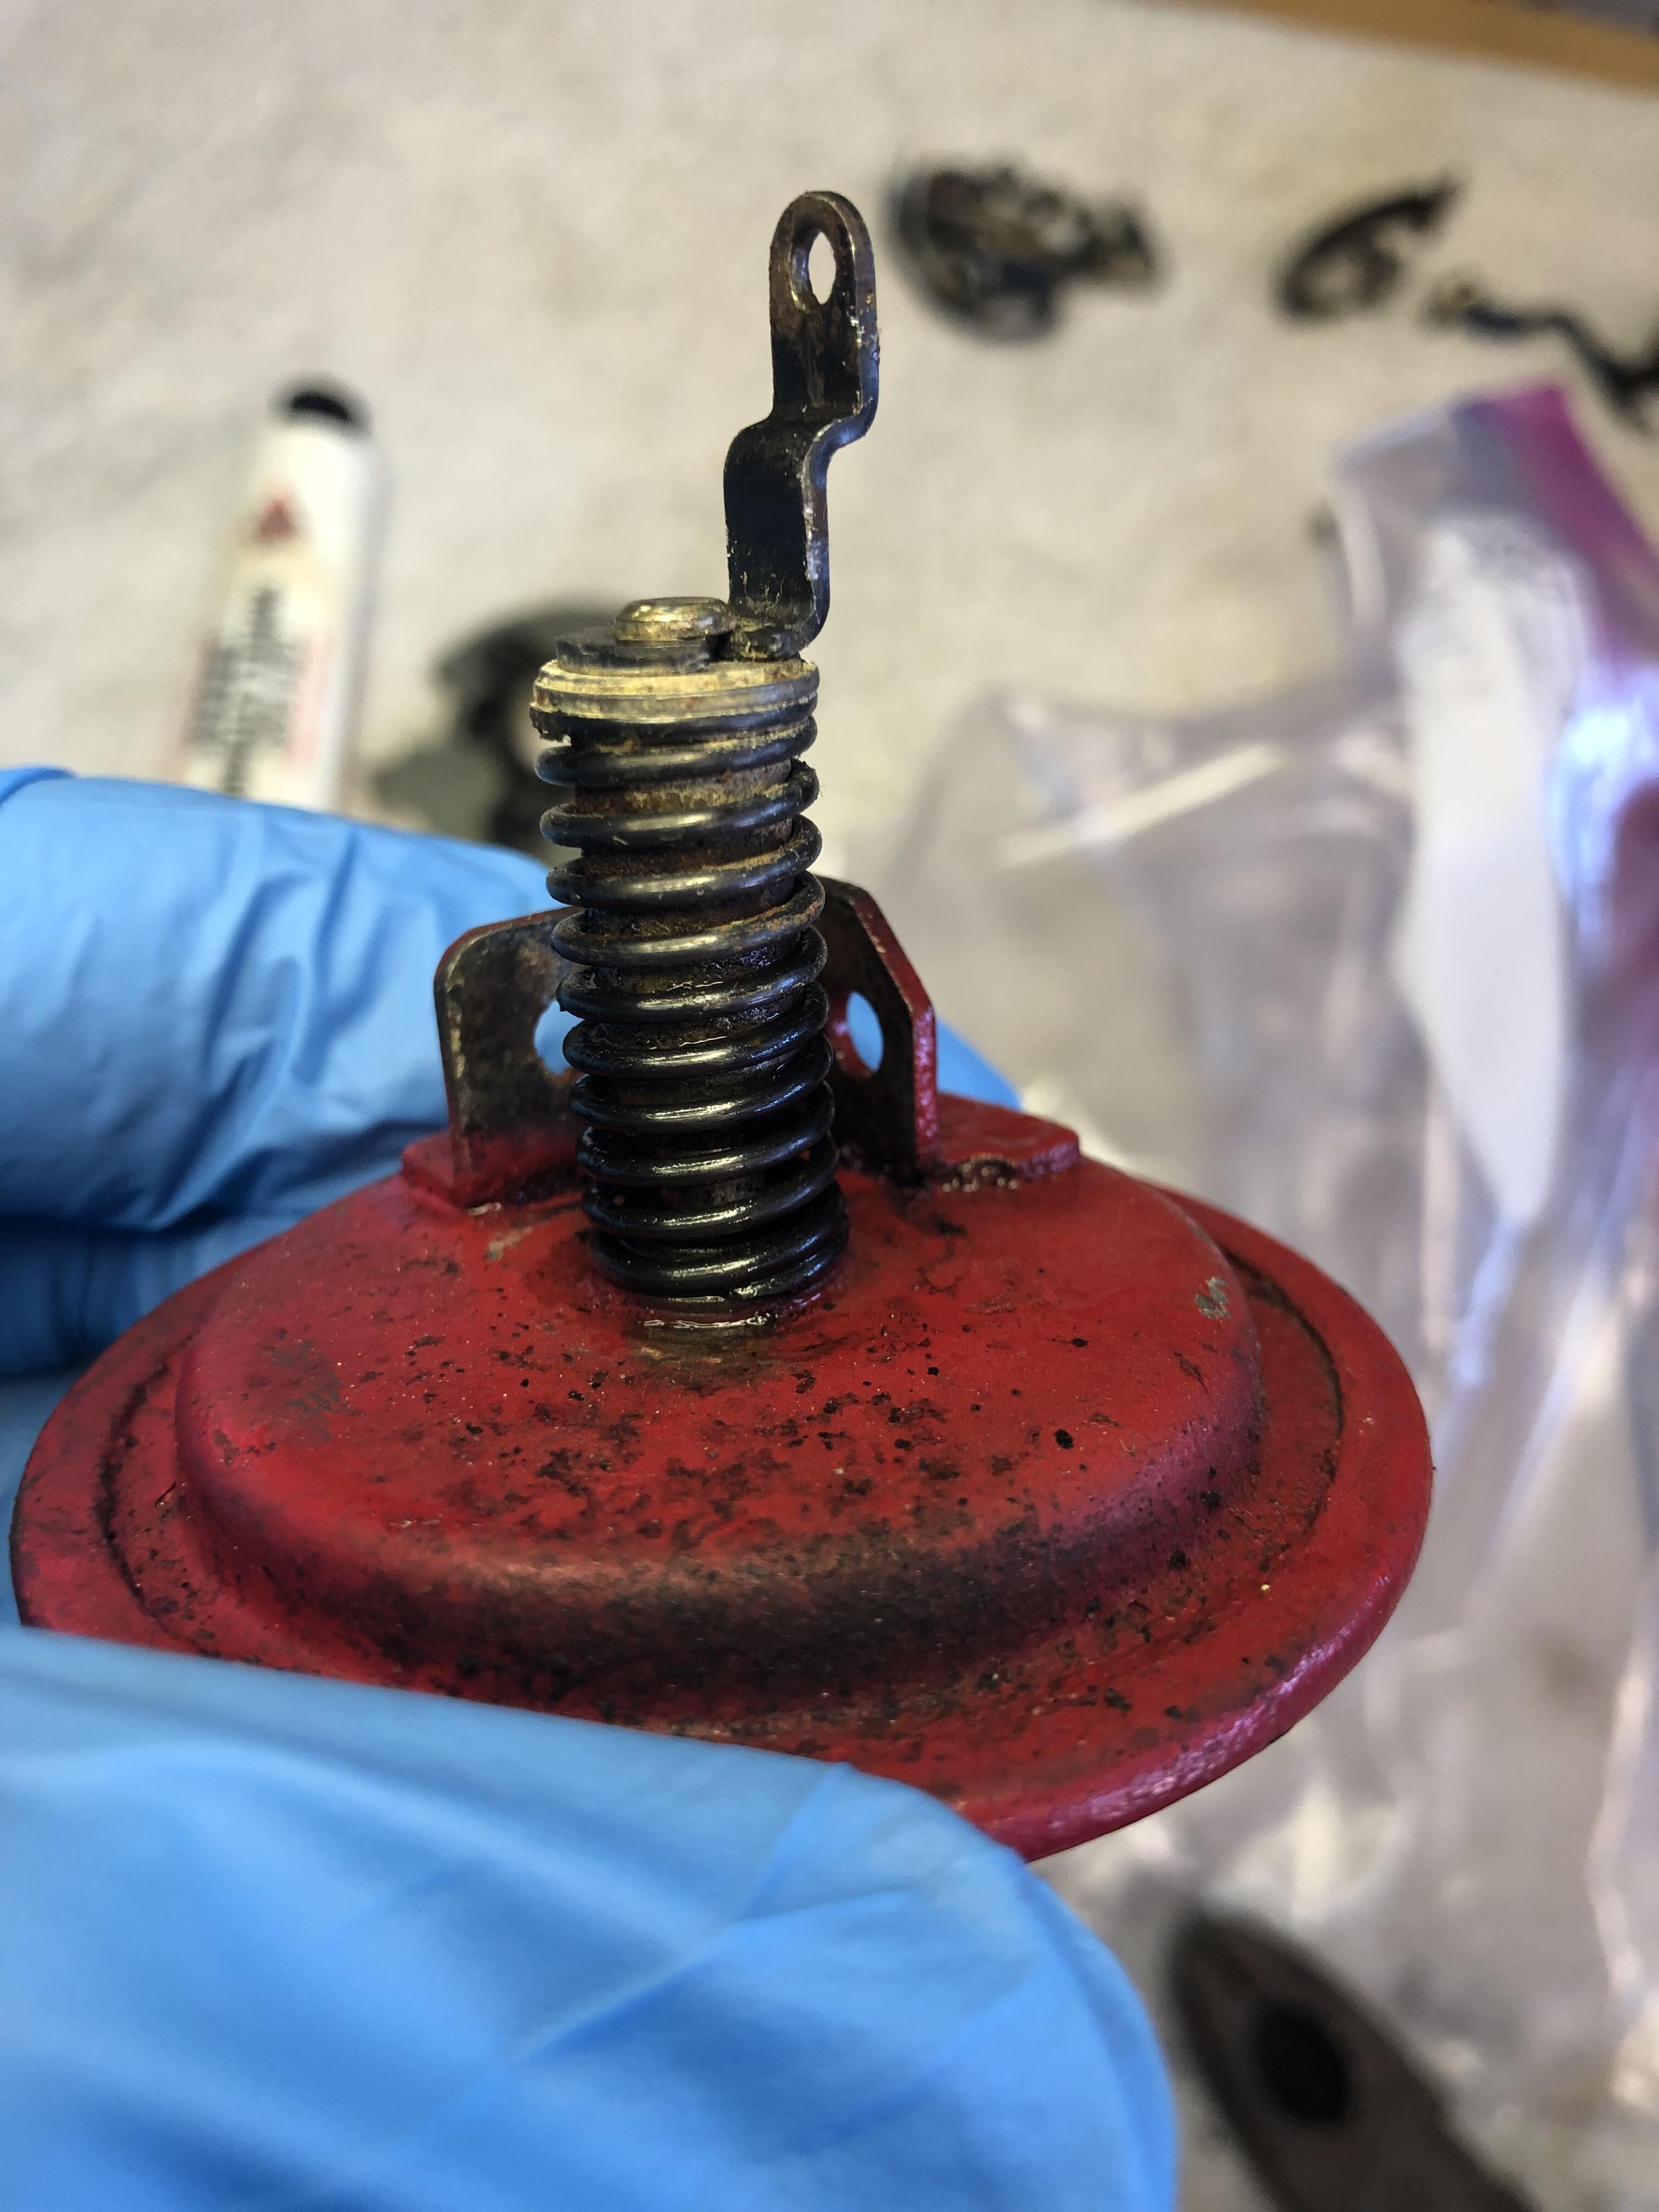
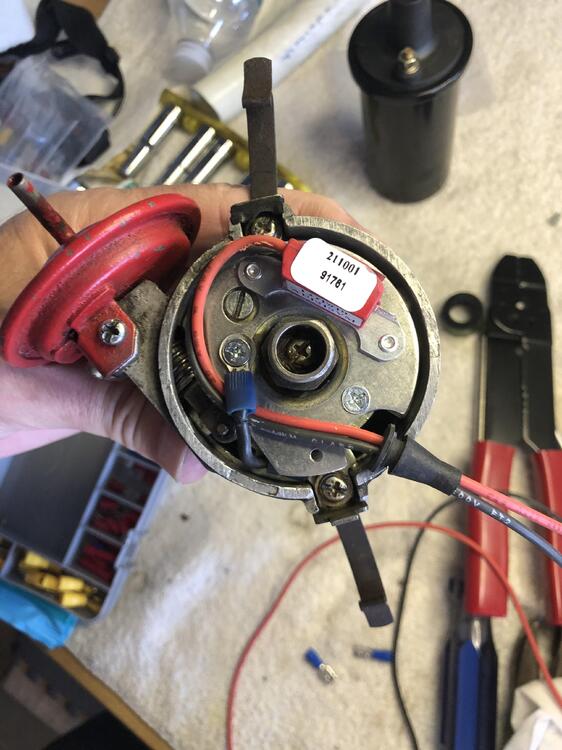
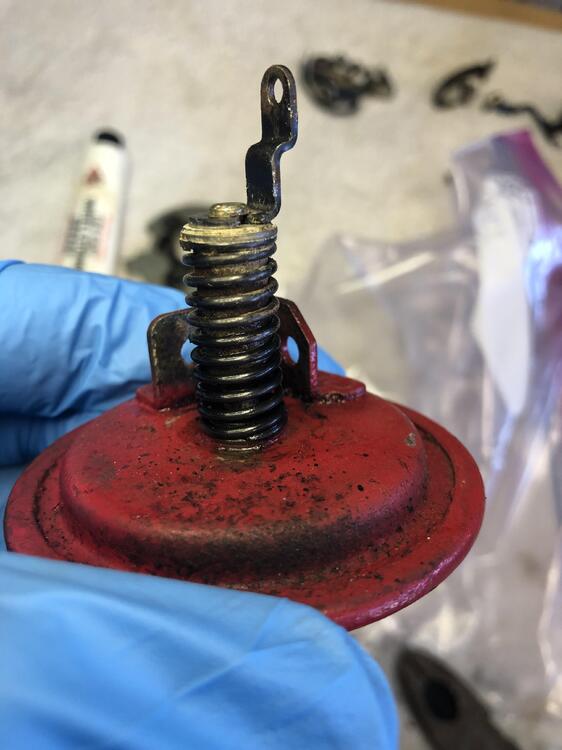
In the process of installing my Pertronix Ignitor II electronic points, I decided to take a look inside. I have some pics attached and have a few questions: The plate below has thee black tabs on the top. I read somewhere that there should be ball bearings inside each tab. I cleaned it a bit before reinstalling but didn't see any bearings inside (they may be there but didn't see them). If they are there, should I clean under the tabs better and put some grease in there? If they're missing, what should I do? What does the screw on the top of the plate do? It seems to pivot on a cam? As I turn it, it doesn't come out, but seems to pivot in a circle. What is the stuff inside the spring of the vacuum advance? Also, It's very hard to push in and out...is that normal? Also, if the diaphragm is bad, is there a way to repair or replace it?

-
I wish I could remember where I bought mine, but the kit in the pic looks like what I bought. They really worked good and definitely no more door sag.
-
That’s very encouraging … thanks. I think I’ll try to fabricate my own first.
-
@Jeff G 78thanks for the help. I may start another thread, but I'll ask here first. Do you know if I can run a 240Z distributor in an L28?
-
Thanks guys. It's definitely not a race car. The header is new and correct to the L28, so it's already round port. I'm reading more bad things than good when it comes to wrapping the header, so I think I'll put that option on hold. Between the other two options, I may investigate which gasket to use and try the 240Z exhaust manifold on the L28. @Jeff G 78Do you still run the fuel rail on a non-race car? Or, do you run hoses?
-
Yes, I'm running SU carbs.
-
I read a couple of threads, but didn't find my situation. I have an L28 (N47 head) in my 240Z. Can I put a square hole exhaust manifold from a 240Z on the round hole N47 head? If so, will it bolt right on. ADVICE REQUESTED: I have a header on the L28 right now, but the heat is extreme. Here IMO are my three options: Wrap the header (about $80) Have it ceramic coated (about $300) Remove header and install the 240Z manifold (if it will work) ($0) What are your thoughts? Cost is not really the issue, but thought I'd share costs.
-
@Captain Obvious I set timing 10 at 800 rpm with vacuum connected. I then disconnected and plugged the vacuum hose. There was no change in timing. I then reconnected the vacuum and rev’d the engine…the timing advanced. It appears it’s working as advertised. I did notice that whenever I rev’d the engine, it would die when I released the throttle. It was sort of a smooth die where the rpms drop smoothly and then it just stops…No sputtering or attempts to keep running. It idles good when I restart. Perhaps my floats aren’t set correctly?
-
@Zed Head I truly appreciate your observation, and I do try to follow the recommendations. I'm waiting on the carb rebuild kit, so can't do that yet. I added my rationale (in bold) to each of my points below: Install electric points and new coil - I received this the other day, so thought I'd install it. Rebuild carbs. I don't know the current status of the carbs, so rebuild is in order. - I really do think the carbs are part of the problem, so thought it would be good to know it's done right. I'm not sure when the kit will arrive. Wrap my headers to reduce temps - I don't have space for a heat shield between the header and the intake manifold, so I'm concerned that the heat from the header could be an issue. I don't have any real knowledge in this area it's just a hunch. Based on what you guys have recommended, I believe the next three steps are in the correct order... Adjust the valves Set the timing Adjust the carbs - to include balance (with airflow meter) and Colortune. The pic is a little device I rigged during my MGB days. The end that contacts the carbs bends to accommodate tight spaces. Take her for a spin and adjust as needed.
-
I'll do the pull the hose routine and report back tomorrow. thanks to all
-
Thanks to all. Based on all of the advice here's my plan: Install electric points and new coil Rebuild carbs. I don't know the current status of the carbs, so rebuild is in order. Wrap my headers to reduce temps - I don't have space for a heat shield between the header and the intake manifold. Adjust the valves Set the timing Adjust the carbs - to include balance and Colortune Take her for a spin I will definitely read the '72 FSM and use as my guide.
-
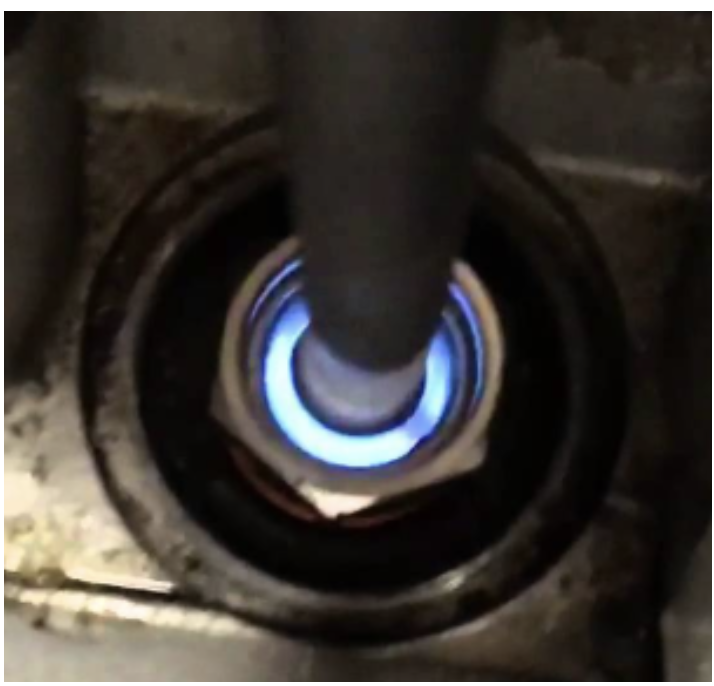
For the Colortune I can only get to Yellow no matter how far I turn the knob: Yellow Indicates a fuel / air mixture which have excessive petrol content (rich). Like a candle flame - producing more light but less heat. Bunsen Blue Indicates a mixture which is correctly proportioned. Whitish Blue Indicates a mixture which has less petrol content (lean) The Pic below is what it should look like (bunsen blue).
-
Thanks for the tips. I’ll go straight to electric points so i don’t have to buy another meter as well haha.
-
Carbs with points … switching to electric points soon.