26th-Z
Free Member
-
Joined
-
Last visited
Everything posted by 26th-Z
-
 Mark, I think the 240Z kats bought last night was a hatch emblem. The picture looked like it needed to be re-chromed. The quarter emblems have the round disc field behind the 240Z. If you think about it, a new plastic hatch 240 is $53, the price kats paid was reasonable. But back to the issue....I bid against you guys all the time as well as buy from you. I keep my eBay identity low profile just so I don't get hate e-mails
 -
Outrageous! How do you download / save the video and how do you order / buy the DVD? The whole thing is in Japanese!
-
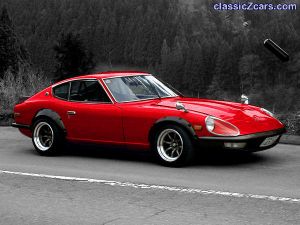 Gav, Wheels are to die for. I always liked red myself. stunning.
 -
You got them all. There are no serial numbers on the transmission or diff. The number on the head is a casting number as are various other casting numbers which don't relate to a specific car. The stock steel wheels are date stamped as are the Federal ID labels on the seat belts, but the dates do not neceessarily coincide with the date of manufacture. For instance my wheels are date stamped 10/69 and my seat belts 9/69. My car was manufactured 11/69. On US cars, the VIN number on the driver's door, dash, firewall, and right front shock tower should match. The date of manufacture is on the door tag and the engine number - stamped on the top of the block between 5 and 6 - is on the shock tower tag. Other than that, you gotta be really knowledgeable and picky about what parts are correctest for a specific car. And even then it is tricky. I know of three different E41 castings for the intake manifold (non emissions).
-
I would like a restored T-shirt in a size medium, please.
-
There are some serious collectors in the Tampa area. The car has been discussed. Harry Frigg mentioned it in his thread a few days ago. I do know it is being sold through a dealer, but not much more. I have been watching with interest, although the "damn shame" thread was great. Who bought that car? I think that car could easily bring $30,000 restored. (And it will probably take 30 to restore it) Beck has been discussing a couple of choice cars on his IZCC site. I understand a guy in New York is selling an extremely nice silver '71 - asking $30,000 - and I have seen a couple of very nice early cars sell within the last few months in the high teens. Although the eBay car is no bargain, it looks like it could be a decent car. It all depends on how true it is to the unique claims about it. I have heard both yes and no to the question about the odometers being reset to zero. I would certainly expect an accounting of the milage. Has anyone actually seen this car?

-
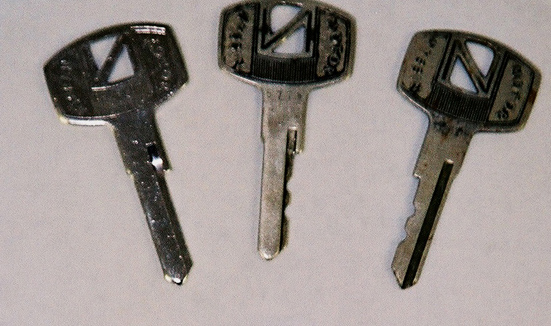
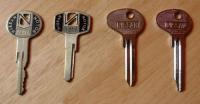
Now check out how the groove on this eBay key is cut down the center of the stem.

-
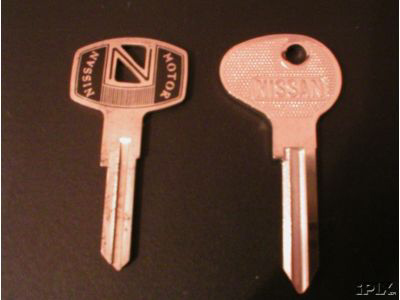
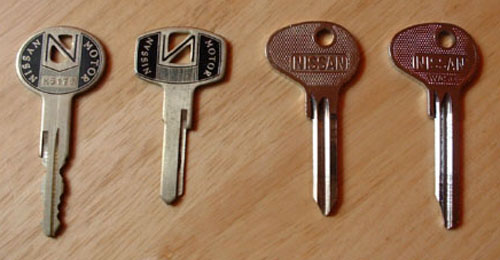
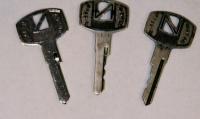
Both single sided ignition key types are chromed steel with the offset lobe head and say NISSAN on one side. The long key has the manufacturer named stamped below the NISSAN. The short key is blank. Both have the dot pattern stampings on both sides. The two different types of door / hatch keys are bronze and identified by a model number stamp at a space along the bottom of the head. Both are enameled gloss black. The difference is in the cut of the grove on one side. Take a look at how close the groove on my keys is cut to the edge of the stem.
-
There are two different length keys for the early ignitions as they were made by different manufacturers. This is kats' picture showing the two lengths (right), the typical door / hatch key (of which there are two different types) and the later double sided ignition key (left). The double sided ignition shown here is the early type. Later double sided keys have a more rectangular head. My experience is that the single sided long key came along the same time as the suppliment instructions - early 1970 - and I see short keys on all the early cars.
-
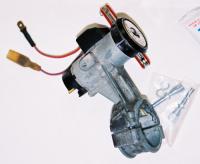
The ignition locks of the series one cars were manufactured by two different suppliers and indeed have the single cut keys. The lock itself has the electrical auxillary from a plastic lobe on the side of the lock body.
-
For starters, you could thank me for some of the pictures. You might better be careful lest you wizz someone off by using their pictures. Great idea. Great amount of work. Great copywrite liability issue.
-
Hey Alan, I'm not doubting the authenticity of 4150 at Zama. Heavens no! Your explanation was exactly the answer I was looking for. Some of the other pictures shown in this thread show differences also. I would love to discuss them, but not at the expense of questioned authenticity. I concur that museum cars do go through a life of their own, require constant maintenance, and "change" over a period of time for one reason or another. A Porsche 917 with LeMans heritage in the Collier Museum comes to mind. The car was not even washed from LeMans before it was placed in the museum. A real time piece, but unfortunately engine-less! The engine is on a stand next to the car. All cleaned up and polished, but I would have thought it more appropriate to leave it in the car. We have bantered around the idea of chassis replacement and I have this opinion to express. A car's chassis is the soul of the car. Part number one. Chassis numbers (in our case) are clearly identifiable and can be tracked. It has never been a difficult science and I'll point to Ron Spain's book on Ford GT40s as a perfect example. To claim authenticity of a particular car with an allowance for chassis replacement is inexcusable and demonstrates a lack of regard to those who own valid chassis. This is where we get in to the idea of replication. Happy St. Patrick's Day from the guy with the green car.
-
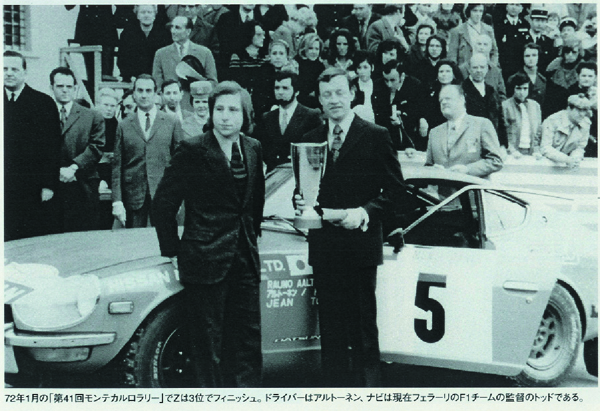
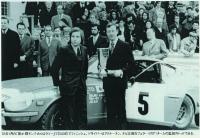
Alan, The car in the B/W pictures shows no rubber molding on the front bumpers and the uprights are not dented. The color photographs of the car at Zama show the moldings and dents. Any explanation? Was the car retired after Monte Carlo or does it's history go on?
-
What happened to the 70 in Michigan, ALT?
-
Oh yea Vicky. I would want a bunch more for my slots. That's a deal.
-
Isn't he cute! Thanks Mike. That same photo is in the article - in color.
-
Oh! Sorry. Lets try that picture again. Credit to Nostalgic Hero Magazine - vol. 96 EDIT: It isn't working for some reason I can't explain. Sorry

-
Thank you, Alan. I can think of little better than your resources and knowledge to set this issue straight. Your photographs in this thread - as well as many others - have been a great pleasure and education. You look pretty snappy in that racecar! Seems to fit you well. :classic: What I meant by "local Z crowd" was an understanding of how our interests contribute in part - just in part - to the big picture. The magazine circulates to the Porsche crowd, the Ferrari crowd, the formula car crowd, you get my point. We are simply a "piece" of the action. I agree we want our piece of the action to be depicted accurately, and I was encouraging our responses to be as "professional" as possible so that we are not depicted in a derogatory manner. I look forward to your e-mail, Alan. I do have a pretty good imagination, but I must see for myself the proportion of this gaffe. They really did stick their foot in their mouth, didn't they? :stupid:
-
Gentlemen, I replied to Casey Annis yesterday afternoon with a polite offer to assist in any manner with research or documentation about the correct identity of the car in question leaving the door open to further dialog as well as allowing me time to prepare mature, factual information. I figured I better read the article first and soldiered off to my best magazine source to obtain a copy. Well, I can't seem to find the magazine in good 'ole po-dunk Sarasota. You want to talk about opera, we got it. You want to talk about various shades of silver hair coloring, we got it. But historic racecars? No got. I took a long look at the Vintage Racing Journal website to get a feel for their clientele and what type of publication this might be. I was impressed with their depth of writing staff and I assure you all, their client market is aimed at big buck, investment grade collectors. People who would demand accurate reporting and coverage - similar to the crowd subscribing to Vintage Motorsport, a publication I am most familiar with. These poor guys have a serious problem on their hands. They have been advised by corporate executives - people who should know - that the car is authentic. The editors are motivated by sales and they are quite eager to publish a story on a car with an agreeably interesting history. The car is also associated with a famous figure in current motor racing history - Jean Todt. (Here is a shot I scanned without permission from Nostalgic Hero Magazine, vol. 96) Try to understand the motivation behind the owners of the car. This concerns me the most. I certainly enjoyed publication of my car in SportZ magazine. My father was really impressed, as was my daughter. But, my point is that the editors of Vintage Racing Journal have very little latitude in this situation. They can't retract the story without incurring the wrath of ranking officials and the wrath of the local Z crowd is miniscule compared to their magazine circulation. I am in no position to write or forward information about the authentic racecars produced and campaigned by Nissan / Datsun in the early '70s. I can't use Alan's photographs or scans of magazine photographs. I have never seen the actual cars, and no slight to you Alan, have any proof that the real ones are sitting in a storage warehouse in Zama. I have seen enough material in this single thread to write an interesting article about the authentic racers. I seem to have an open dialog at least giving me the opportunity to submit such an article (Chris: Casey Annis forwarded your reply to his. Thanks for offering to provide information. I hope we will have an opportunity to do justice to this important part of rallying history sometime. best wishes Ed McDonough European Editor), but without further assistance, can do little more than "bitch" about an injustice. I encourage all of us to approach this situation with mature dignity with an opportunity to do some serious good for our beloved S30s. With permission and collaboration, I will be very pleased to author such an issue.
-
Well, not only did I write the editor, but I wrote the European editor, Mr. McDonough, and this is his reply: I believe the Editor of VRJ has responded to you, but I thought I would answer as well, as you have taken the trouble to write. At times like this, I am glad that I often say "to the best of my knowledge", or wince when someone says "this is the car". I am not an expert on 240Zs and took considerable advice, and thought the car we were depicting was at least a reproduction of the car that did the events I mentioned. I had some 'expert' advice to say that it was. Nissan could not produce a clear history themselves, and working on the recommendation of the Italian Director of Nissan, we went ahead, to have doubts put forward after it went to press. Fortunately, this is not a car for sale..it lives in the Nissan Italia Museum and has all the 'provenance' that provides...and thus it is not going to be put forward for sale as something that it is not. The good thing, as I see it, is that the car drives, handles and runs very much like the original works car. I investigated several 240Zs on the recent Monte Carlo Historic Rally, and the people involved with them could not tell which were 'original' and which had been built to exact rally specs. Tony Fall was in one of these cars on the event and the drivers described what they were like to drive. So, thank you for your message, and apologies for getting it not entirely accurate. We appreciate getting information that keeps us on our toes. Ed McDonough European Editor
-
So, I'm in a vigilante mood this morning, and I read Alan's post, and I look at the website, and agree with Alan. So I write to Casey Annis, editor. I just got this reply: Dear Christopher: We had some question ourselves, but when we directly asked the director of Nissan Italy, he insisted that this was the car. Obviously it leaves us in a strange position when one of the directors of the company tells us that this is the car he claims it to be. Is there any chance, in your mind, that this actually was the car? Thanks for the input, Casey
-
Alan, I too, feel the need to write, phone, fax, and e-mail the publication to point out their error. However I wish to clear up some confusion stemming from your post and defend an excellent publication - VINTAGE MOTORSPORT. Vintage Motorsport, published in Lakeland, Florida, is a superb journal dealing with the subject of motorsport history. Their current issue chronicles the history of IMSA as part three of an on-going story. I highly recommend the magazine and it's coverage of historic racing events throughout the country. VINTAGE RACECAR JOURNAL, on the other hand, apparently needs to be corrected. A quick visit to the website link will demonstrate your concern.
-
-
-