26th-Z
-
Posts
5,238 -
Joined
-
Last visited
-
Days Won
28
Content Type
Profiles
Knowledge Base
Zcar Wiki
Forums
Gallery
Events
Downloads
Store
Blogs
Collections
Classifieds
Everything posted by 26th-Z
-
Looks like I may be a clown on the vapor recirculating tank issue, Mark. May have been one of those plastic tank explanations. My research isn't looking good. I use PB Blaster, but any penetrating oil will work better than WD-40. I want to try the Sili-Kroil. Soaking has always brought me luck on the tough ones. Soak it for days - keep it wet! Gas tank straps and J-bolts are hard to come buy because they all rusted. I finally got my Parker 821 braided hose and it looks great.
-
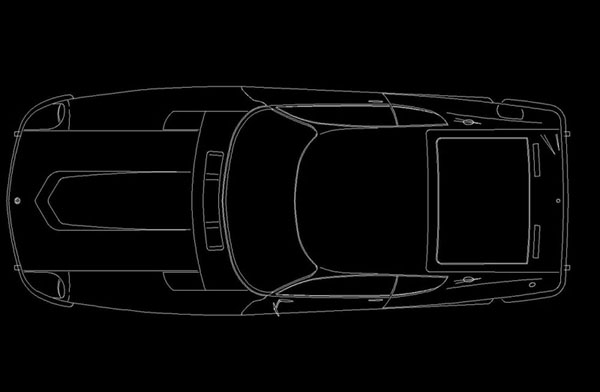
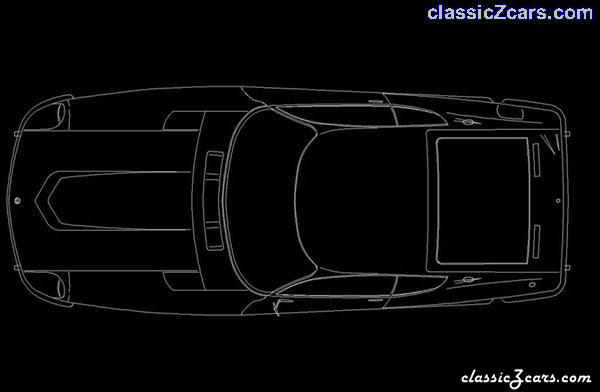 picture of CAD file
 -
I made a CAD drawing of a Z (2d plan view) for you CAD drafters out there. It was drawn in a late version of the popular Auto Cad - .dwg format and I'll e-mail it to you. I know I can save it back to v14 and I might be able to save it back to v12. Let me know what you require. I design custom homes and I frequently design custom garages. I like to fill the garages with cars on my presentation drawings. This drawing is to scale, ready to drop in your plans. I was going to post it on E-bay as one-of-a-kind, RARE, hand constructed import from Electronapan with a low starting reserve of $240 but I didn't think anyone would get the sarcasm. The attached is a jpg export. Try it and let me know what you think!
-
My parts fiche shows the fuel recovery system and is no help at all. If memory serves me, the gas tank vent hoses come up through the floor and then turn toward the filler inside the car. Your picture shows the T valve (Nissan part 17227-E4100) and the hoses, but not where they pass through the floor. There is a rubber grommet for the opening and the boot fits over the opening, sealing the hose on the inside of the car. I'm going to have to look at mine and take a picture. The hose just doesn't simply pass inside the car through a grommet. It is sealed with the boot.
-
Mark, I found gas tank vent hose boots - both large and small - at Banzai Motorworks in MD. It would be good to replace yours with their Part #'s GF-17 and 18 for about $15. I can't emphasize the need to seal the vent system. Check the T fitting and I would use a hose prep / sealer when I put it back together. I did this procedure in 92 and will do it again with the current project. Installation is a real pain. If you get gasoline fumes in the car after filling the tank, you have a vent leak. Banzai is at www.zzxdatsun.com 301-420-4200 I have a big list for them. You demonstrate to me the need to get a digital camera. I'm photographing the old way. I have the parts to send my carbs off to Z Therapy in July. Radiator is restored. Collected most of the parts for the engine bay and I'm focusing on collecting brake parts at the moment. I found a better shop to work on the car and made a major score on industrial shelving - a bunch of it. Work proceeds slowly. I pulled the drive and half shafts Saturday.
-
No Mark, You have just discovered one of the fine intricacies of the early series one model. No venting system! The tube just comes down the wheel well as you describe. Do make sure all your hoses and fittings are secure and sealed when you reassemble or you will get gas fumes in the back of the car. Good luck. I found this job a real pain in the arse.
-
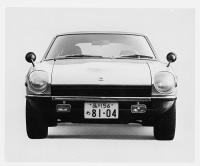
I think the plate looks real good between those snazzy driving lights! Would like to talk to you about your literature collection.
-
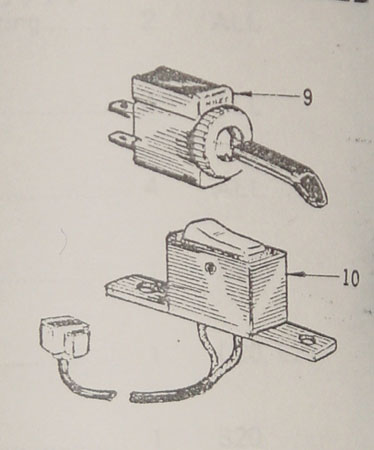
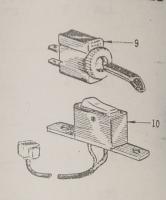
Oops, got it backwards. Switches - #9 is early 70 and #10 probably 71 on. I'm going to write a book about the parts differences.
-
I copied off these two shots from the archived forums. One is about the interior switches, and the second is a front shot of a license plate I would like to have.
-
As long as you are on-line, let me ask how you came up with the numbers so fast. Do they appear in a fiche you have and if so, what section?
-
Many, many thanks. Its people like you who make this club rock. I begin my quest in the morning.
-
Mike, I did something this afternoon I rarely do and beg your forgiveness - I checked the wiring diagram! The 1971 Nissan Chassis Workshop Manual shows the fog light wires. Sure enough, the wiring diagram from the site's downloads shows the red wire. I was confused some time ago when I bought a used console on E-bay and got two switches with it - rear hatch defroster and "parking lights". My 70 console just has blanks in the spot. I think the 71 diagram shows the connection there. Going back through your forum achives revealed just what I was looking for, confirming the switch type I have in my dash 25370-E4100 and the later switch on the console 25370-E8700 I bought. Great photo of the lamps in "Switch Coversation". Can anyone tell me the part number of the lamps? You should find some extra red wires in the harness up near the horns.
-
That's what I thought. I pm'd you about the engine bay light.
-
Mike, I have the same situation including a switch that looks like the hazard switch in the second indent. It is connected to the spares?-perhaps. I remember my car with driving lights years before I bought it, but they are gone now. I was asking in the dash restoration forum, but the subject was getting away from the forum. Lights were an option from the options catalog not published in the US at the time my car was purchased (I believe). I am interested in putting the lights on my car, and I have been asking around for them. I would also be interesting in an options catalog from 1970. What I want to know is how the lights mounted.
-
I liked the rear bumper on the white Fairlady. No uprights - just the corner rubber. Can something like that be done to the front "Euro" bumper?
-
$300 for a 10' X 15' concrete slab is about the going rate installed ($1.50 / sq. ft.). Pavers cost about $1.20 / sq. ft. for material only. For working on a car, the slab should be at least level, smooth. An epoxy based sealer finish is really great for keeping it clean. Try one of those floor products advertised on the motorhead channel. 4" of concrete will hold the load pressures from jack stands easily. Pavers will not give you this performance and in the worst case, could be dangerous if one crushes under the pressure of a jack stand. Consider how long you will be renting and amortize the $300 over that period to get a monthly cost. Consider a mortgage on a 2500 sq. ft. home - 3000 sq. ft. including a two car garage. A monthly mortgage payment of $750 equates to $125 a month for the garage. There are some numbers to chew on.
-
As a buyer, I have had some fun on E-bay with experience mostly good, but I'm moving on to dealing with the network of people I met and places I found. I generally see the "new" stuff bid way out of sight and with a little detective work, I have found places to buy the same stuff at or below the opening price. I have never been ripped off or had a deal go south. I think E-bayers keep it pretty honest. E-bay has its place. In a few months, it got me well connected and my restoration project off the ground. I continue to browse and bottom fish, but I go to other places for specific stuff.
-
I typed the e-mail address for MidwestZ incorrectly. It is zcarparts@cox.net - oops!
-
Great photos I like the second one - did you say haircell? - as my pic to the closest original look. The first one looks like my dash cover. I would love to do the interior in leather. Leather dash would be rich.
-
Forgot to mention the clock! Z clocks are notoriously broken. I am going to try http://members.aol.com/zclock4u/cof.html but Motorsport Auto sells rebuilds. Their catalog shows $80 to rebuild your clock.
-
I have had pretty good luck on E-bay but agree its a mixed bag. I have met some really nice parts sellers on E-bay and they usually have their own websites. Engine lamps are real common and I have a couple. One is brand new for a 72 and later, e-mail me. Luggage straps can be expensive and they are always used meaning re-plate the hardware and sew new strap material. Try zparts@cox.net (MidwestZ) and Banzai Motorworks. My list of part sources includes fourteen different businesses so far.
-
 Owner's Manual 12/69 back
 -
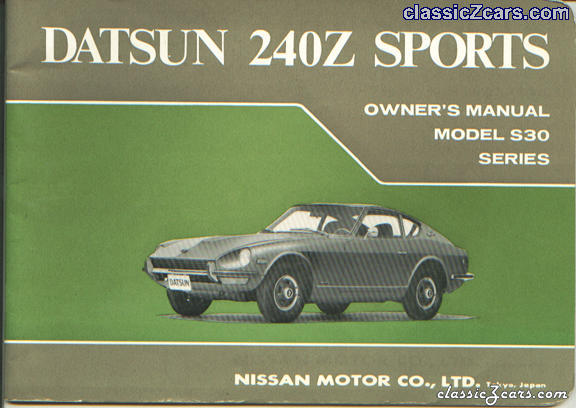 Owner's manual cover 12/69
 -
Oh my, what did I start? H20-Z tells it all - the Aussie texture IS inverted and appears to have more of a "leather" grain than the original stipple. I'm going for it, though. I hope all you "original" buffs will forgive me. Incidently, I notice the defroster vents seem to be unique to the series one dash. So... should I leave the "mystery indent" alone, or should I install a driving lamp switch in that location? I have a toggle identical to the hazard toggle for the application. The console has a driving lamp switch location next to the hatch glass defroster switch. Would love to hear comments - as I have thoroughly enjoyed all the rest of the remarks on this site!
-