26th-Z
Free Member
-
Joined
-
Last visited
Everything posted by 26th-Z
-
 What is a used tray cut out of a junk yard car worth? They are around. I saw one this weekend. What's the going junk yard rate to cut one out?
 -
Kieth, You will find this picture on IZCC's www.zhome.com site at the bottom of the menu - reference pictures - 1970 brochure. The fender bolts are painted. My Z has painted hood hinges, but that area has been painted numerous times over the life of the car and I am not 100% certain. However, I will be painting mine unless someone can convince me otherwise. It makes sense to me that the hinges would have been painted.
-
Hey Marty Rogan! LeBaron Bonney has all kinds of restoration stuff http://www.lebaronbonney.com/catalog.htm
-
And I thought I had a nice collection of models! Wow. Do you build the models, or have them in boxes as I do? Post a photo of the models. There are some good ones there! I'm saving the models for when I am old and in the nursing home. When I am too old to drive slow in the left lane.
-
 Way cool picture. The license plate should read MNY-PIT
 -
There is a group of car collectors that defines the term "Classic" very well and may I introduce you to the Classic Car Club of America. Most any car collector will direct you to this definition and regardless of what we say about our Zeds, this is the recognized definition. "...fine or unusual motor cars which were built between and including the years 1925 to 1948. All of these are very special cars which are distinguished by their respective fine design, high engineering standards and superior workmanship." They were usually quite expensive when new with relatively low production figures. There is no question in my mind that the Datsun 240Z is a significant automotive milestone, including fine design and high engineering standards, but using the word classic is like playing the 240Z on the "elevator music radio station" when we all know it belongs on "rock and roll". I would hate to see one of you stick your foot in your mouth and use the term incorrectly as I have. Check out the CCCA glossary of terms http://www.classiccarclub.org/Glossary.htm
-
I didn't want to get into bashing the ebay deal because I think it's beyond our business, this isn't a courtroom, but I really took exception to some of the terminology used to describe what should have been and what wasn't represented and who said what etc. Essentially, a car was sold on eBay advertised as "all original" and the buyer was wondering how a "professional restorer" could advertise that way. I felt it necessary to rant and rave about what constitutes professional restoration services and the controversy went on from there. AACA discusses acceptable alterations between pages 76 and 83. Similar issues are discussed in the Z.C.C.A. manual. Do you guys think this is all pretty cut and dried clear? Or, do you have comments about some of the things that may be unavoidable due to NLA parts and new techniques. Any experienced judges wish to comment on what they see at shows?
-
I got into it on another site about terminology concerning the description of cars and thought of a thread in which we discussed judging rules and classification of cars at shows. I can't find the thread, but we mentioned the "Official Z.C.C.A. Z-Car Judging Manual" and the "240Z Restoration Program Quality Control Checklist". The judging rules of the Antique Automobile Club of America would apply http://www.aaca.org/ The 86 page document is available in PDF format for printing or you can buy it for $3 I have seen the term "all original" used quite liberally and misleadingly. What I got off on was the notion of "professional restoration"; another misunderstood concept I see thrown around at will. I encourage everyone to take a look at AACA with respect to what they say about restoration techniques, materials, and part replacements. AACA has over 60,000 members and is pretty much the accepted standard in the car collecting community. Have a look and tell me what you think!
-
That is a lockset for later models and although it will certainly fit the early series cars, it is not original replacement for them. The series one cars had a separate ignition key and the aux. electrical connection for the ignition is on the side of the switch unit. Just a clarification. All the parts do fit, in my experience.

-
Let us know how that turns out, Mike. It looks way cool.
-
-
-
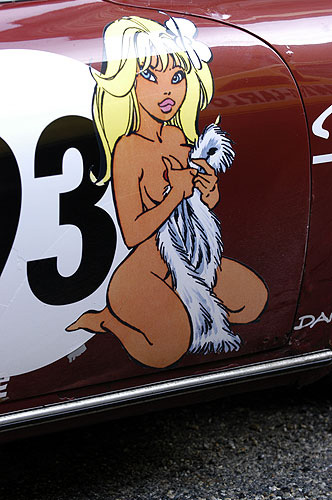
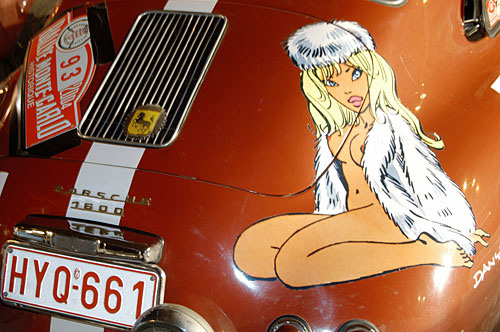
So, what is the story behind this woman and why is she painted on so many different cars?

-
I don't understand a word of it. But this Ok! The pictures of the cars are great! It looks like everyone is having too much fun.

-
Thanks for the links, Guus. I surfed all around, found two videos and many pictures. It was great. #266 did pretty well. I think 11th and third in class IV 4.
-
All except for the verification part. We are showing a few mistakes. HL cars came with an L24 and an L28 engine. The difference is L24 engined cars (1970-1973) show five serial numbers (HLS30-00026) and L28 engined cars (1975-1978) had six serial numbers. RL cars had an L26 engine (1974-1975). L26 engines also appear in world export cars from 1974-1978. The Japanese market L20 engines (1970-1975) are single overhead cam and the S20 engine for the PS30S and PS30SB chassis had dual overhead cams, two liter. The engine description for home market Fairlady Z's is probably the one common mistake I see most often. Typical Fairladys came with 2 liter, single overhead cam, engines L20 and L20E (fuel injection). The 432 / 432R variant came with the S20 engine. And no, it was not made by an aftermarket company "like Scarab".
-
Great explanation, Gavin! Begining with the 260Z, and 'R' designation letter for the L26 engine, Datsun added another digit to the serial code sequence apparently because they were selling far more cars than they originally envisioned
-
hls30.com, you got some of the serial number stuff right, but not enough of it. How about this? When did Datsun convert from 5 digit serial numbers to six digit serial numbers and explain the coding letters involved. With all due credit to Alan, the sleuth that he is, I'll post an interesting photograph to the winner.
-
Gav, were you thinking of Datsun Freeway? http://www.datsun-freeway.com/index.html They have them. Bring your wallet. Try Chloe. She had them. Bring your wallet. I love that expression; bring your wallet.
-
I get these e-mails all the time, from supposedly Paypal, eBay, and my internet provider. They all have an investigation site and you can fight back by FORWARDING the suspicious e-mail to them. Paypal's is spoof@paypal.com Since we are on the topic, I have noticed a lot of virus containing e-mails, lately. Some of them are "about your order", "order confirmation", "your parts order", and "information about your parts request". At first, I thought about identitiy theft as I didn't order anything or didn't request anything and it looked suspicious. The virus software usually picks it up, but I am discussing this with words of caution. Keep track of what you order and what you request. Take a look at your accounts every now and then or get them to send you a monthly statement. Virus software can not be over-emphasized. It's a stormy climate out there - slap a raincoat on that computer!
-
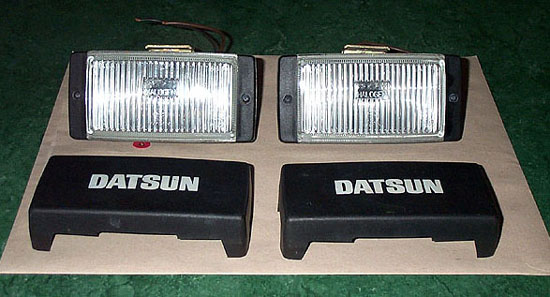
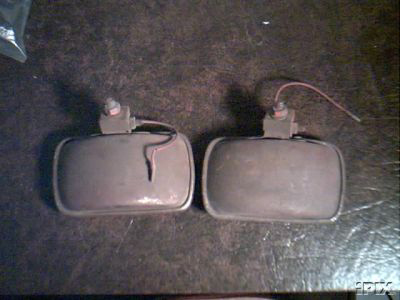
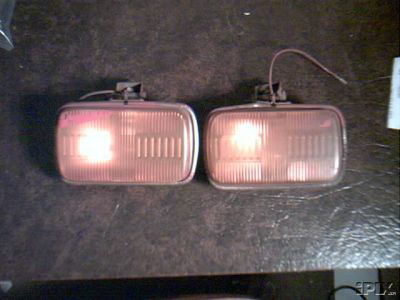
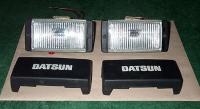
Thanks, Alan. I must be loosing some of my mammaries in my old age! I see another photo of the fog lamps mounted in Brian Long's; "Datsun Z, Fairlady to 280Z", page 50, car in the wind tunnel. I have a set of later fog lamps manufactured by Bosch, but these are completely different from this discussion.
-
-
About a year ago, these were on eBay and I thought they were the real McCoy, but with your diagram, Alan, they are missing the lens ring tabs and the mounting bracket appears different.

-
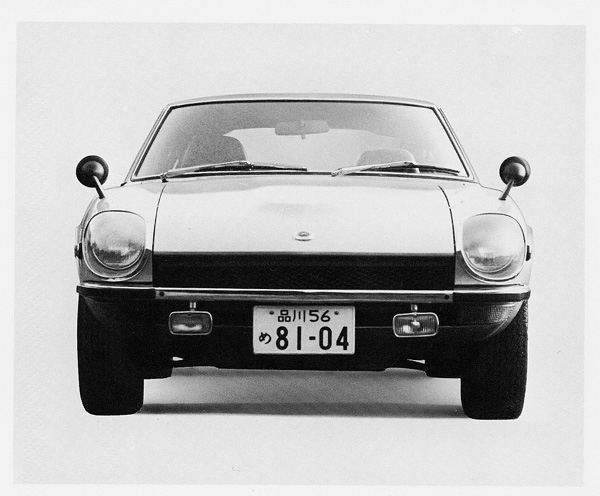
I am happy to see this thread resurrected. This is a Nissan photo of what they looked like mounted.

-
I'll order up some warmth for you, Tomohawk! I actually did see it snow here fifteen years ago. Thanks for the reference, Mrcheeze36. Here is the $20 custom plate link http://www.autogeek.net/japaneseplate.html