thetwood
Free Member
-
Joined
-
Last visited
Everything posted by thetwood
-
View Advert Free - MSA Type 2 body kit Datsun 240Z-280Z - Colorado I have an MSA Type 2 body kit for Datsun 240Z, 260Z or 280Z. 4 piece set includes front air dam, rear bumper and two side skirts. Fiberglass with protective gel-coat, ready for prep and paint. In original box from MSA. New, never installed. Just a few cosmetic scratches from taking out of the box and put back in for storage. I do not have mounting hardware. Came with my son's 280Z when he bought it and he doesn't want to use it. I want it all out of my garage. Live in Louisville, CO 80027. If you want to pick it up, it's yours for free. If you want it shipped, it's still in the original box but no clue what that would cost. Doesn't weight much, but it's large. If you want to pay shipping and want to help with logistics, I'll drop it off for you. https://www.thezstore.com/product/4794/msa-type-2-body-kit-70-78-240z-260z-280z-coupe Advertiser thetwood Date 08/26/2023 Price Category Parts for Sale
-
Thanks for the responses everyone. Some good places for us to start. There was definitely a bit of sputtering at idle, so maybe there's an ignition miss we need to check. Now I'm dealing with another issue that I need to resolve. My son wanted to get some practice driving so we took the car out last weekend. He's not great at manual transmission and this isn't he easiest to get used to. He had a couple of really, really bad starts that he didn't handle well. Lots of jerking. After the second, the car no longer will go into gear while the engine is running. If you turn the engine off, you can get it into first so we could at least get it back home, but no shifting. We're starting research and will start checking the master/slave and hope it's something there.
-
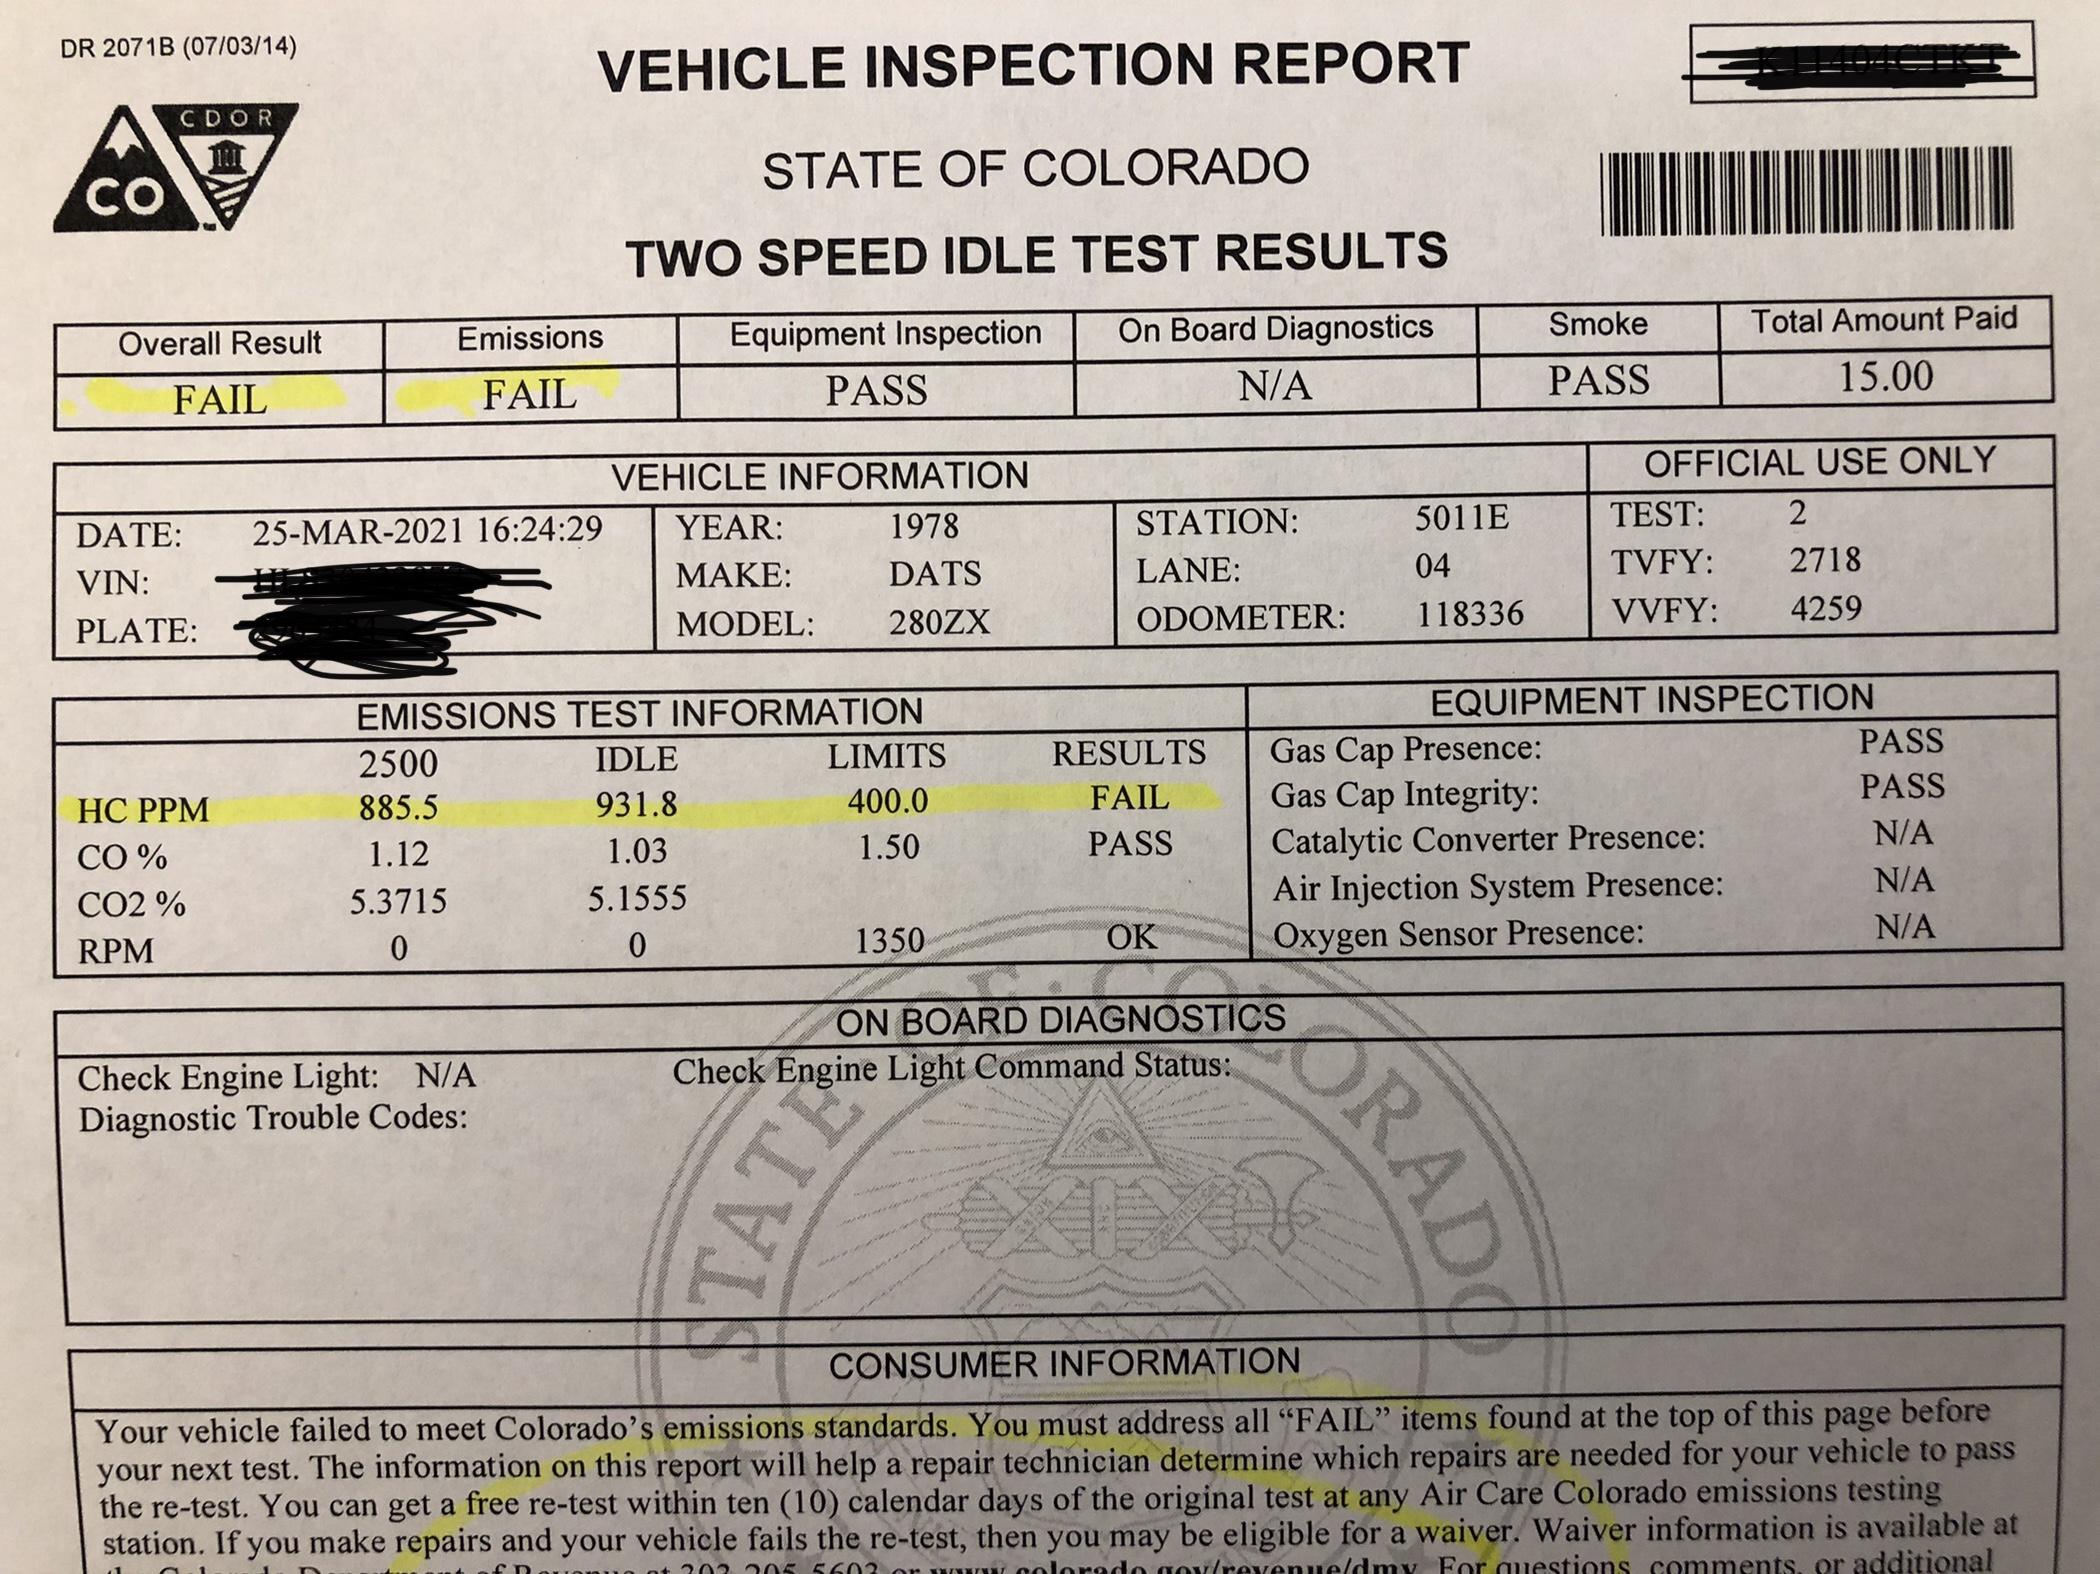
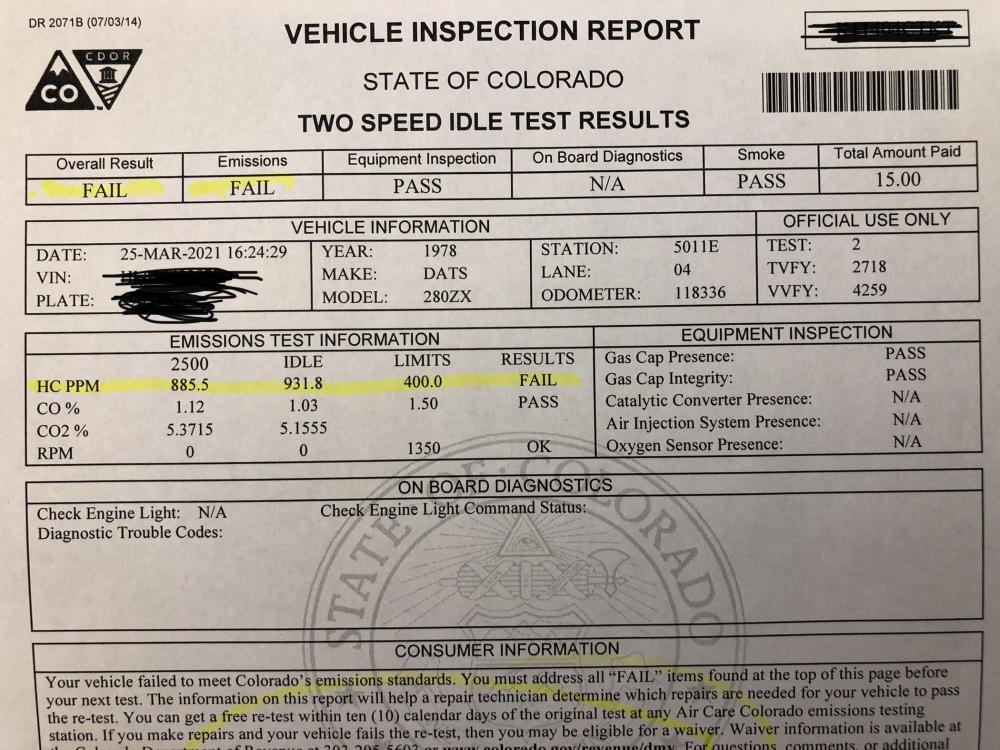
If anyone is still following this, we're back at it. After a pause and some confusion on what to do, we just decided to take a bunch apart to see what we found. After putting things back together, the car was running much better. Not sure why, but we were happy. We got new temp tags and went to fail emissions again. The good news is that we did much better than last time. CO% now passes (went from 7.28 at idle down to 1.03). The bad news is that our Hydrocarbons are still way too high (HC PPM went down from 977.6 to 931.8, but still needs to be lower than 400 so we are easily twice as high as allowed). My son is in his high school auto tech class now and is excited to get back to work on the car and see if we can get it closer to passing. Any suggestions on how to get the HC PPM down and where we should focus? Thanks in advance. This group has been great to us both.
-
When we first started the project we dropped the tank, cleaned and coated the inside (don't remember with what, but it's read and rubber like). I had an inline filter after the tank, but removed it when we were struggling to get the fuel pressure up to norm. When I removed it, there was some debris in it, which I was kind of surprised by given the work we did on the tank. I was hopeful that the filter had caught anything we didn't catch relining, but maybe not. What's the best way to check for this? I can put an inline filter in again. I can replace the regular fuel filter. Other things to do/check?
-
I'll look at the fan and controller and see if I can find anything. Thanks for the direction.
-
Okay. Not sure what happened. Before going on the test drive, everything was running really well. Had the idle around 800. Timing looked good. Ran smooth. Now, idle is low, timing is delayed (I can just get it to 0 but run out of room to turn the distributor). Running really rough. Doesn't sound good. I have no clue what changed, but I'm at a bit of a loss. I did verify that the temperature gauge in the car is working. Temp will go up to ~150 before the after market fan turns on. It'll reduce to around ~140 before it turns off. Tested with a thermometer in the radiator with the cap off. Gauge in car matched temp seen. Seems like it's running cool. I don't know how to change that.
-
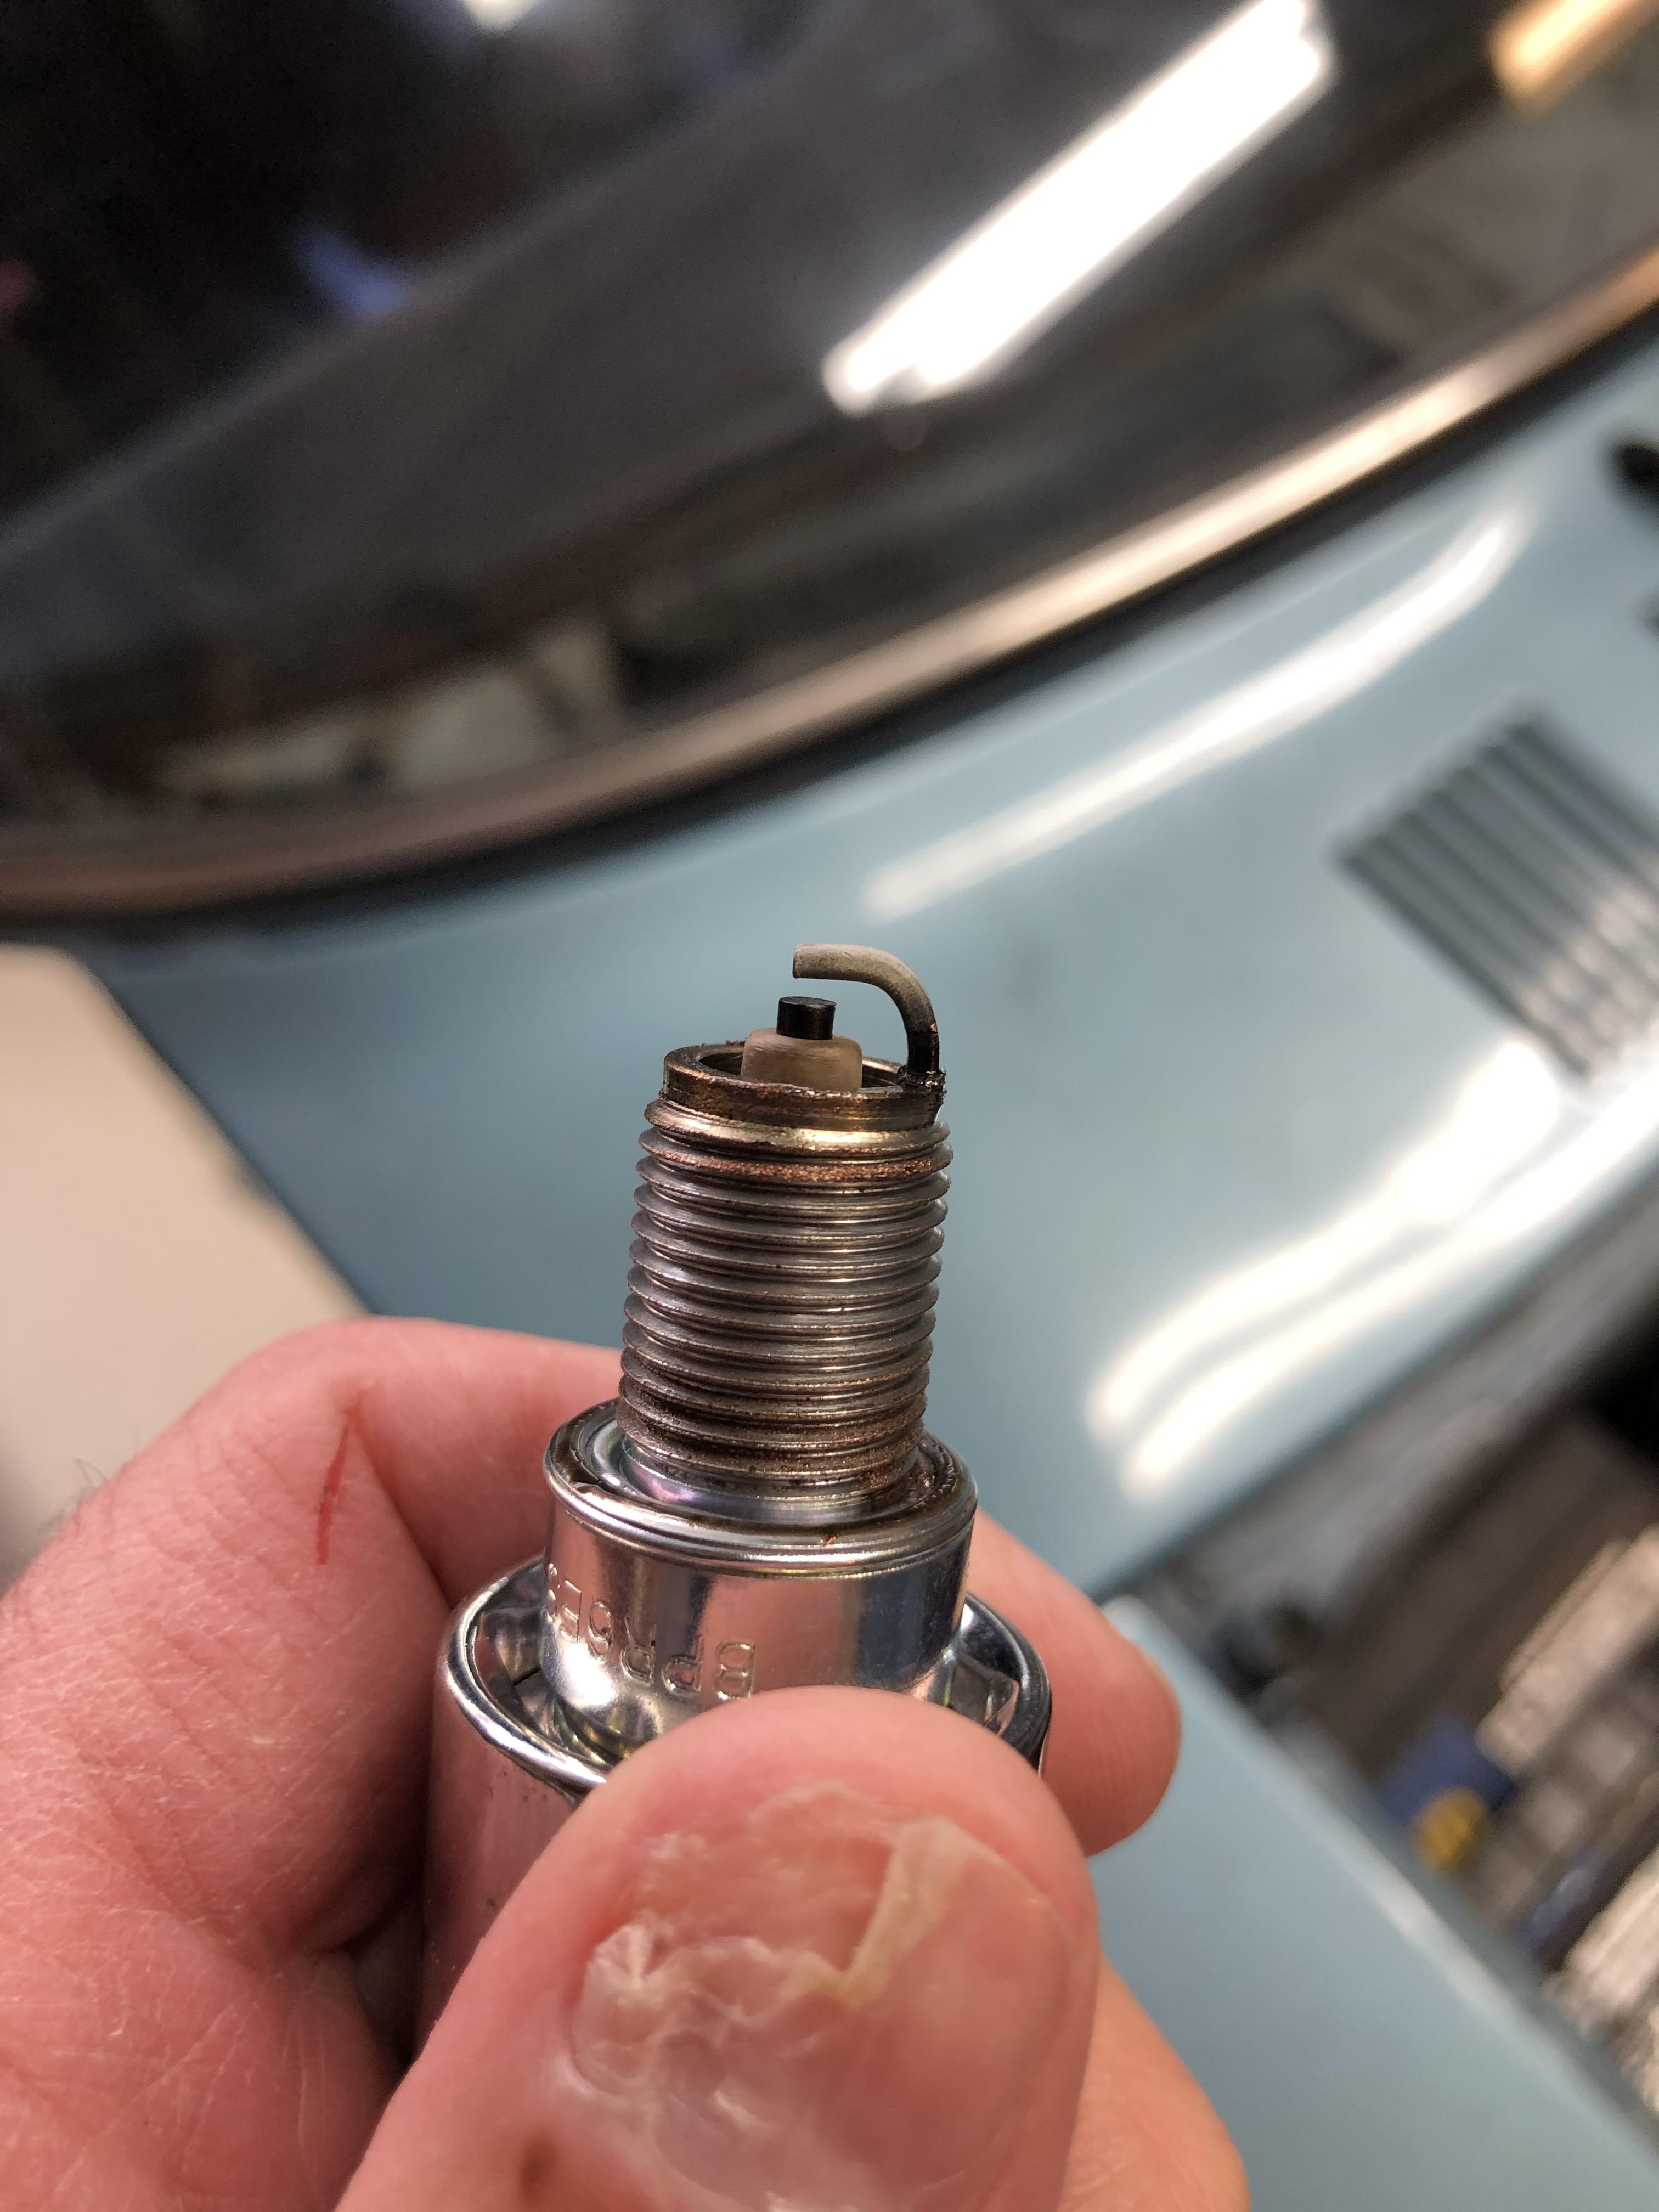
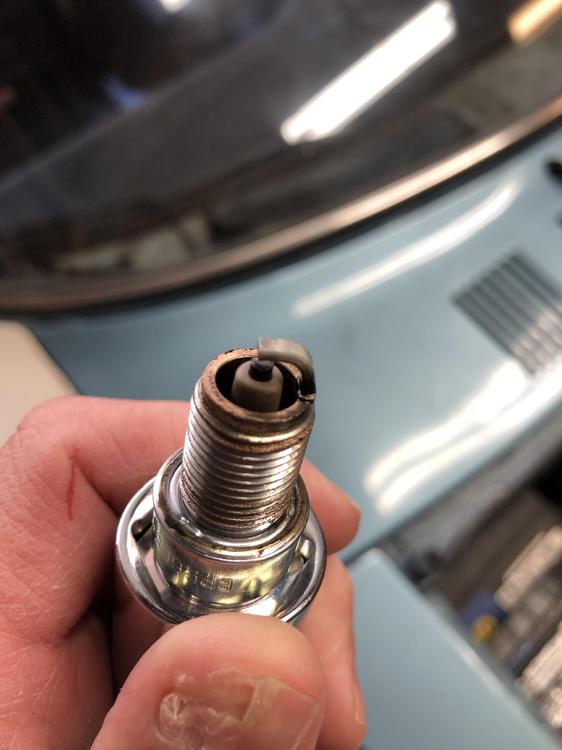
Good news is that I didn't get pulled over. Drove 10+ miles getting gas and just enjoying having it out of the garage. Car felt like it was running pretty well most of the drive, till the very end. After coming to a stop to pull into our neighborhood, the car didn't respond well finishing into home. As I'd give it a bit of gas it would sputter, then catch when I gave more. After letting it cool down, here's what the spark plugs look like. Also, don't think my temp gauge is working correctly, as it said I never went over 120 for the entire trip... Another thing to check. Just put in a brand new temp gauge sensor, but may need to check it more now.

-
Installed the carbon canister today. Two of the four mounting bolts were stripped out completely, so will need to figure that out one day. @Dave WM, I'll try to test the vacuum tomorrow. Everything was running fine after install and hooking everything up, so I'm taking that as a good sign. I found a good timing light on craigslist and picked up last week. Finally got around to using it today. It has RPM as well, so was able to adjust that too. Timing was at 0 initially. I adjusted to 10 degrees, which bumped the rpms up. With a few adjustments I'm at 10 degrees and rpms are around 800 (ish). Sounds better than it did before. Tomorrow, I'm going to swap the spark plugs out for the new and take it out to drive a bit (though my temp tag just expired... will need to be a bit careful of where I go...). See how the plugs look after an initial drive. I pulled one of the ones in now, which don't have much driving on them and they're very black.
-
They messed with almost everything, including the vacuum lines. Sure makes this an adventure. So dashpot does not go to vacuum. In that case, one end of the 3-way goes to the throttle chamber. One to the charcoal canister. What does the third end go to? I think it says to the distributor in the diagram in the EFI manual, but then has a not that it would be for automatic transmissions only. Since this is a manual, does it even need a 3-way? Or does the charcoal canister just go straight to the throttle chamber?
-
I now have a carbon/charcoal canister and it looks good. Looking at where it hooks up to, I see where the purge line goes to but the other line shows going to a 3-way connector. I don't have a 3 way connector. I have line directly connecting the dashpot to the bottom of the throttle chamber. Should I just add a 3 way connector in the middle of that? It's difficult to see exactly in the diagrams.
-
Thanks Dave. The 5s in it now are super dirty already, so might as well replace with 6s for testing.
-
Okay, thought I'd do something easy and get some new spark plugs. Then started reading and got myself confused. Car currently has NGK BPR5ES. But a lot of what I'm reading shows people going with a 6 (BPR6ES or BPR6ES-11 or even other variants). Is there a preferred spark plug for a 78 280z?
-
Thanks everyone. I have a charcoal canister on the way. Believe it's the three nipple, but will see when it gets here and dig into how to get it all connected. This info is all great. Also have found a timing light to use, so hopefully have that soon to test timing. Ordering some new spark plugs as well to do that testing. Progress.
-
I've been looking for a charcoal canister and haven't been having much luck. Can I use a 280zx charcoal canister instead of the 280z? It's still 3 nipple, so I'm assuming it would work fine. But didn't want to spend money before making sure.
-
Progress. Parts arrived and my son helped me with a bit of work. I went ahead and ordered a new temperature sensor and temperature gauge sensor. We installed both, then created a new harness and hooked up the wiring harness to the temperature sensor. I cut off the connectors that were on the temp gauge wires, put a new bullet connector on the yellow wire and hooked that up to the temp gauge sensor. We testing continuity of the temp sensor at the ECU (looks good) and tested the temperature gauge by grounding the yellow wire (looks good). After hooking everything up, the car started up and seems to be running better than it did before. That makes me happy. Seems to be using the temp sensor now and the temp gauge is working correctly. My next question: what's next? How do I judge how it's running (other than going back to emissions)? What do I work through next to make sure it's getting better? And a big thank you to everyone here. This sure can get frustrating, but your support has made a huge difference.
-
Thanks @SteveJ
-
Thanks @superlen, I appreciate the support.I must admit that I get frustrated at times and if it was easy to just pay someone to fix everything I'd be tempted. But my son and I keep working, with all the great help we've been getting here. Thanks also for the offer of the harness. I'm planning on just building one up. But do have a question. Do you know what size bullet connectors are used on the 280z? I need to get some and there are a lot of sizes. Not sure which is correct.
-
That's perfect. Traced it out and the temp and thermotime branch is what's in the picture above. Wasn't hooked up to anything. I'll get a bullet connector tool and a plug and make a new harness for the temperature sensor. Going to ignore the thermotime at this point since I don't have a cold start. Also, you're right. There is no Air Regulator at all. That's all missing.
-
The bullet connectors are not hooked up to anything. They're just hanging empty in the engine bay. I traced from the bullet connectors to the ECU, but there's nothing going to the temp sensors from the bullet connectors. The only thing hooked to any of the three temp sensors was the Thermotime, but I traced that to the aftermarket cooling fan and not to the ECU.

-
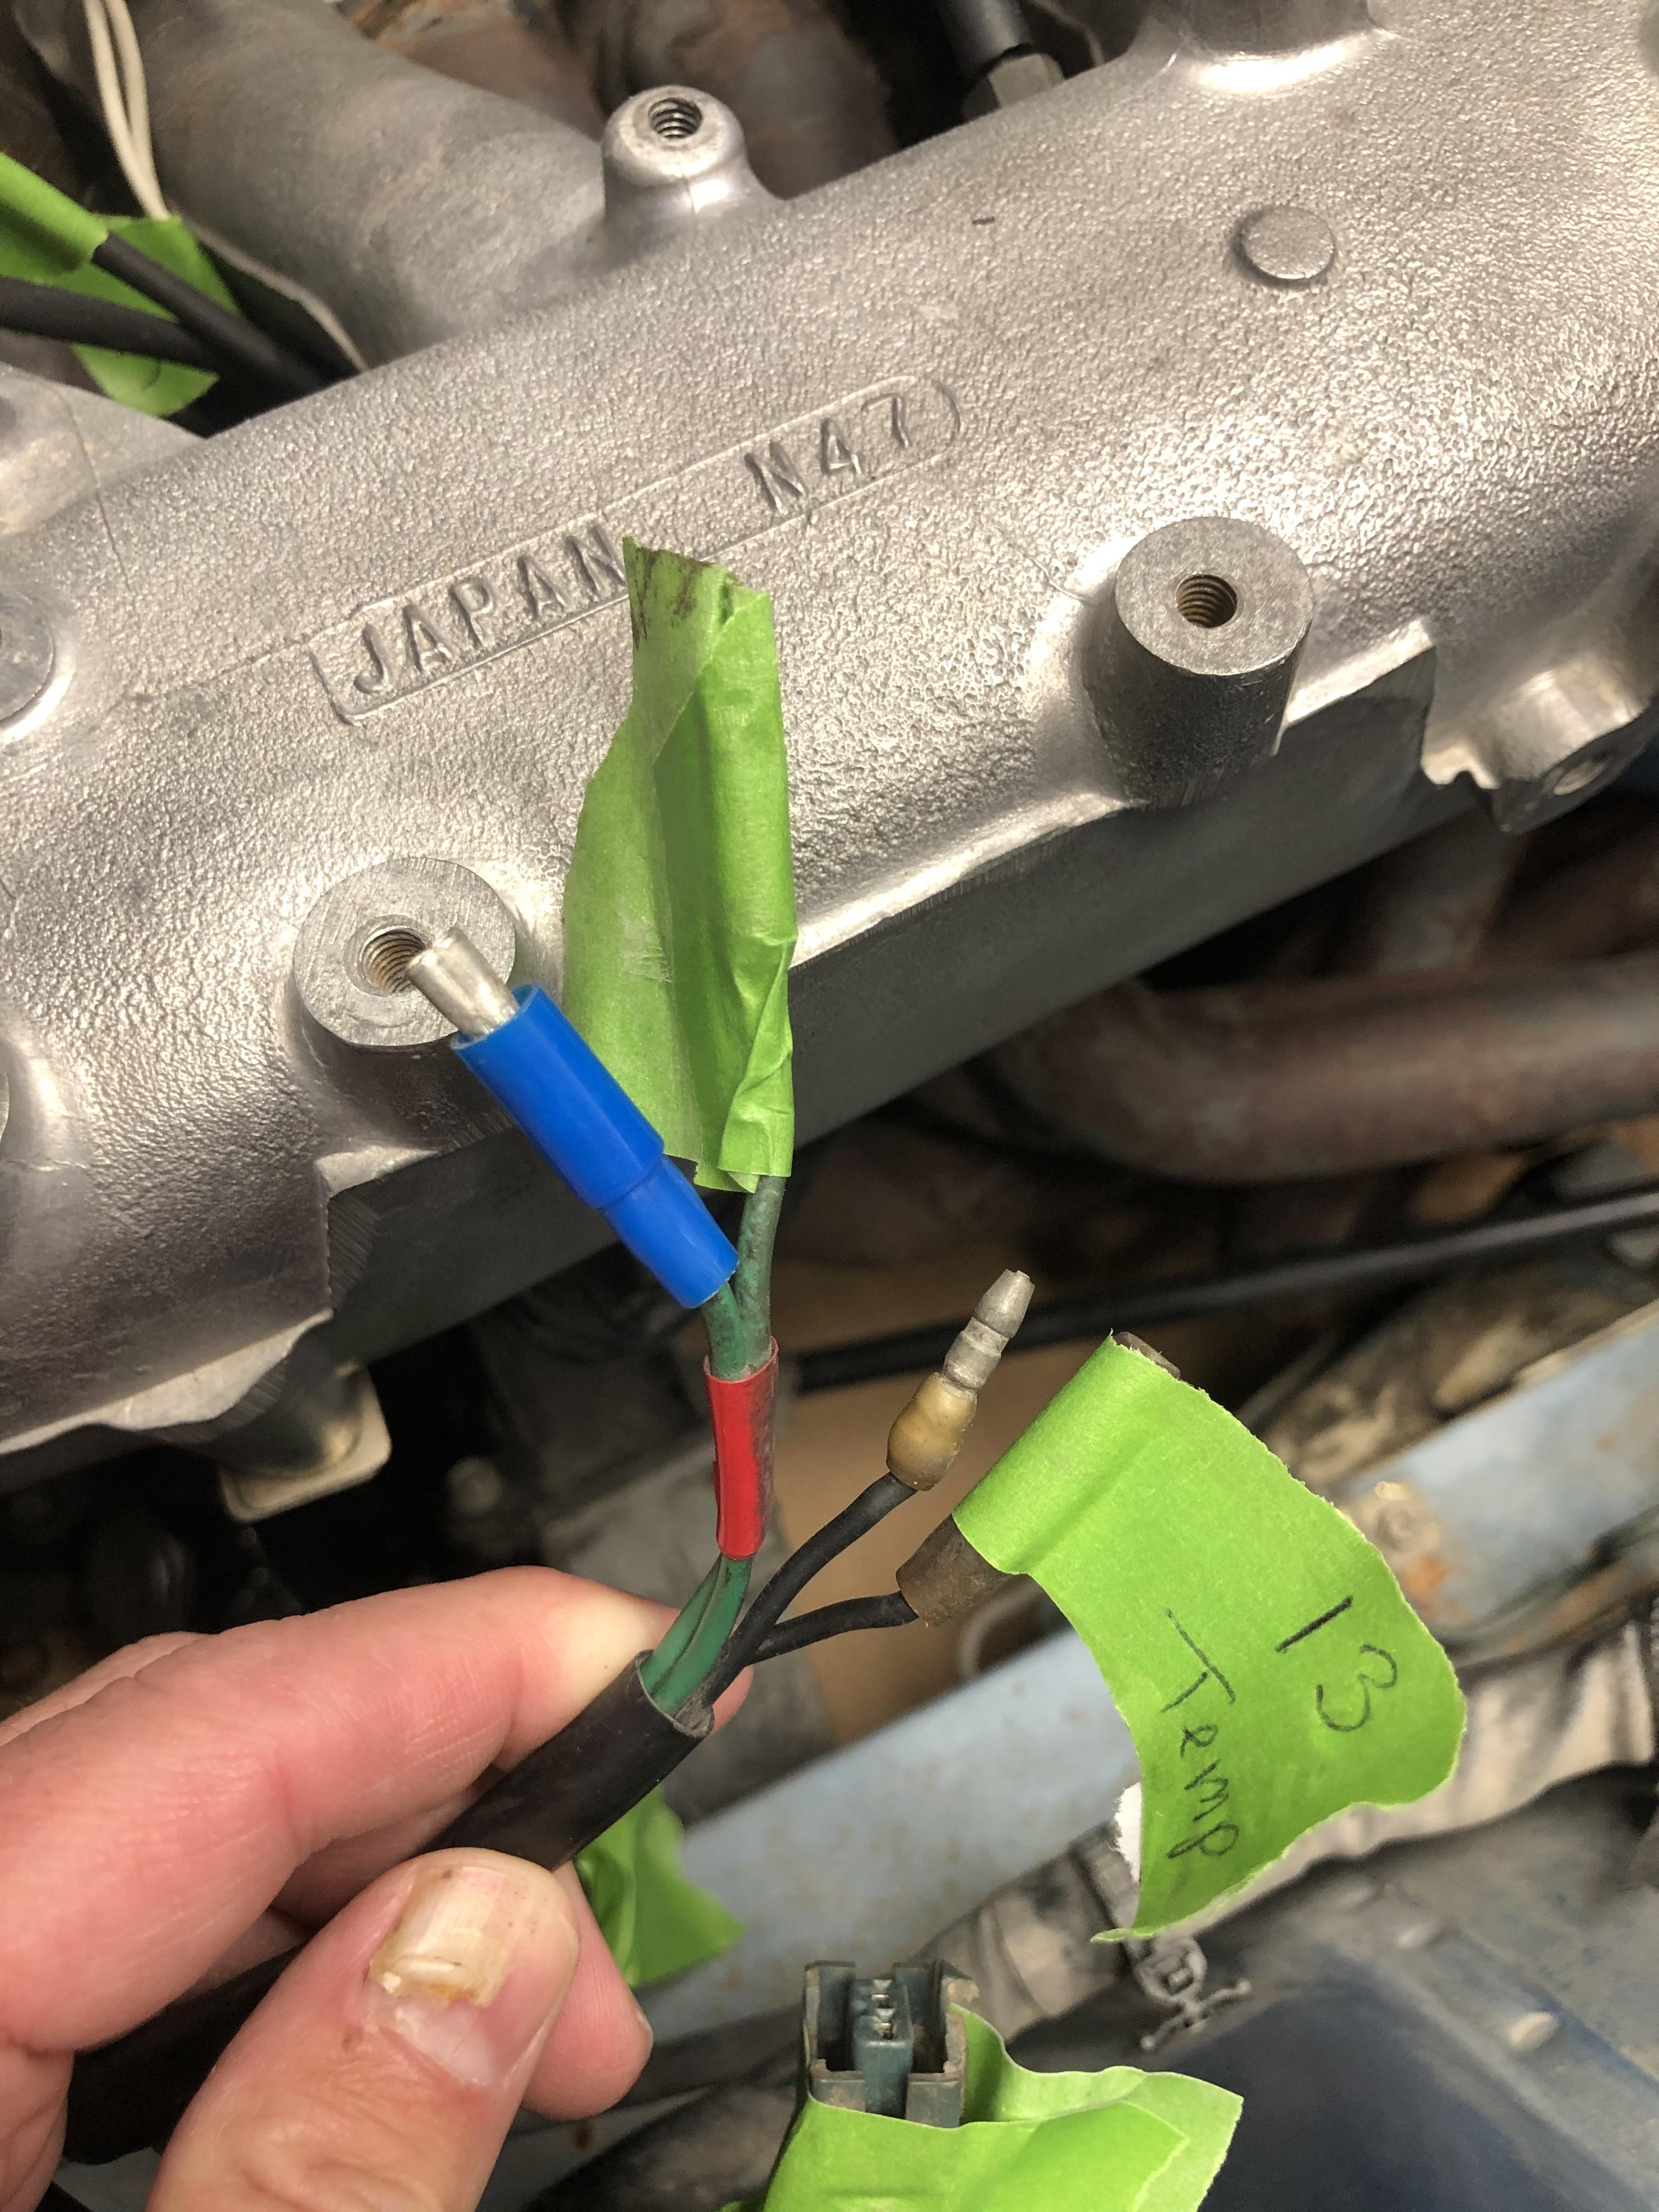
Know it's been a while, but between traveling and a nasty cold, I wasn't much feeling like being in the cold garage... But do have some testing results now. Went through the ohms testing guide in section EF of the service manual along with the same in the EFI manual. Thanks to everyone who pointed me in the right direction there. 1) The second of the three Air Flow Meter tests (terminals 7 and 8 ) had no continuity or reading. 6/8 and 8/9 both had good readings (182 and 103). 2) Water Temperature Sensor (13) had no continuity. After tracing wires, I found a bullet connector in the engine bay that led to this terminal, so looks like it's not hooked up at all. 3) Air Regulator (34) had no continuity. Traced it to an empty harness connector. Don't think this car even has this anymore. 4) Thermotime switch (21) had no continuity. Traced to an empty harness connector and another bullet connector. Knew this wasn't hooked up, but shouldn't need it either with no cold start... 5) The Yellow wire that was hooked up to the Thermotime seems to trace back to the aftermarket fan on the radiator, and also runs the temp gauge in the dash. I'm guessing this should instead hook up to the temp gauge sensor. 6) I cleaned the contacts in the Water Temperature Sensor and still get no ohms/continuity at all. I do get readings on the Thermotime switch, which is why I'm guessing they had something plugged into it (even if it made no sense...). So, here's where I was planning to start (but would love input): Get a new Water Temperature Sensor and new temp sensor plug, hook up to the bullet connector wire (and ground that goes with it) and put it all together. Not sure about the missing the the AFM with terminals 7 and 8...
-
OK. I have to apologize to everyone. I thought I had printed the entire FSM. Apparently not, and I missed the section I really needed to be looking at. Let me study a bit so I'm better informed with my questions... I couldn't get any reading from the temperature sensor at all, but it is pretty corroded. I'll try some more and will clean.
-
OK. A few questions that I know are basic for you guys, but the electrical systems and testing electronics is all new to me. 1) Is there somewhere in the FSM that shows the ECU and which pin is which? I've been looking through and either am not finding it or just don't know how to read it correctly... 2) With the temperature sensor disconnected, should I get an ohms reading by testing the two pins in the sensor? 3) The pins in all of these sensors are corroded. What's the best thing to use to clean?
-
Will work on that tomorrow. Off to my son's hockey game now. But one quick question. Here's a picture of the sensors as they currently sit. Do I just have the thermotime switch hooked up and not the water temperature sensor? Trying to tell from the FSM, but the picture I found is a bit small.

-
Car will remain running after it warms up, but not happily. Of note, if I remove the cover from the smaller vacuum port to release some of the vacuum, it actually runs a bit better (rpm goes up a bit and doesn't sound as rough). If I open the air flow meter and manually reduce, it runs smoother still... I removed the AFM. Connector to throttle body seems good. No cracks. I then sealed that, hooked a tube up to a vacuum port and blew in smoke from a cigar. First of all, bleh. Been a long time since I smoked a cigar and I remember why I only tend to do so when drinking... There does seem to be a small leak in the throttle body. Not at the gasket, but where the throttle goes through the side. Not large (takes a while for to equalize), but does release pressure over 10s of seconds. Is any leaking at all a bad thing? If so, is there a way to seal that section of a throttle body? Or do I get a new one? Next, I'll start learning how to test temperature sensors. Bought a good mulitmeter. Now just need to learn to really use it (and what to hook it to where...)
-
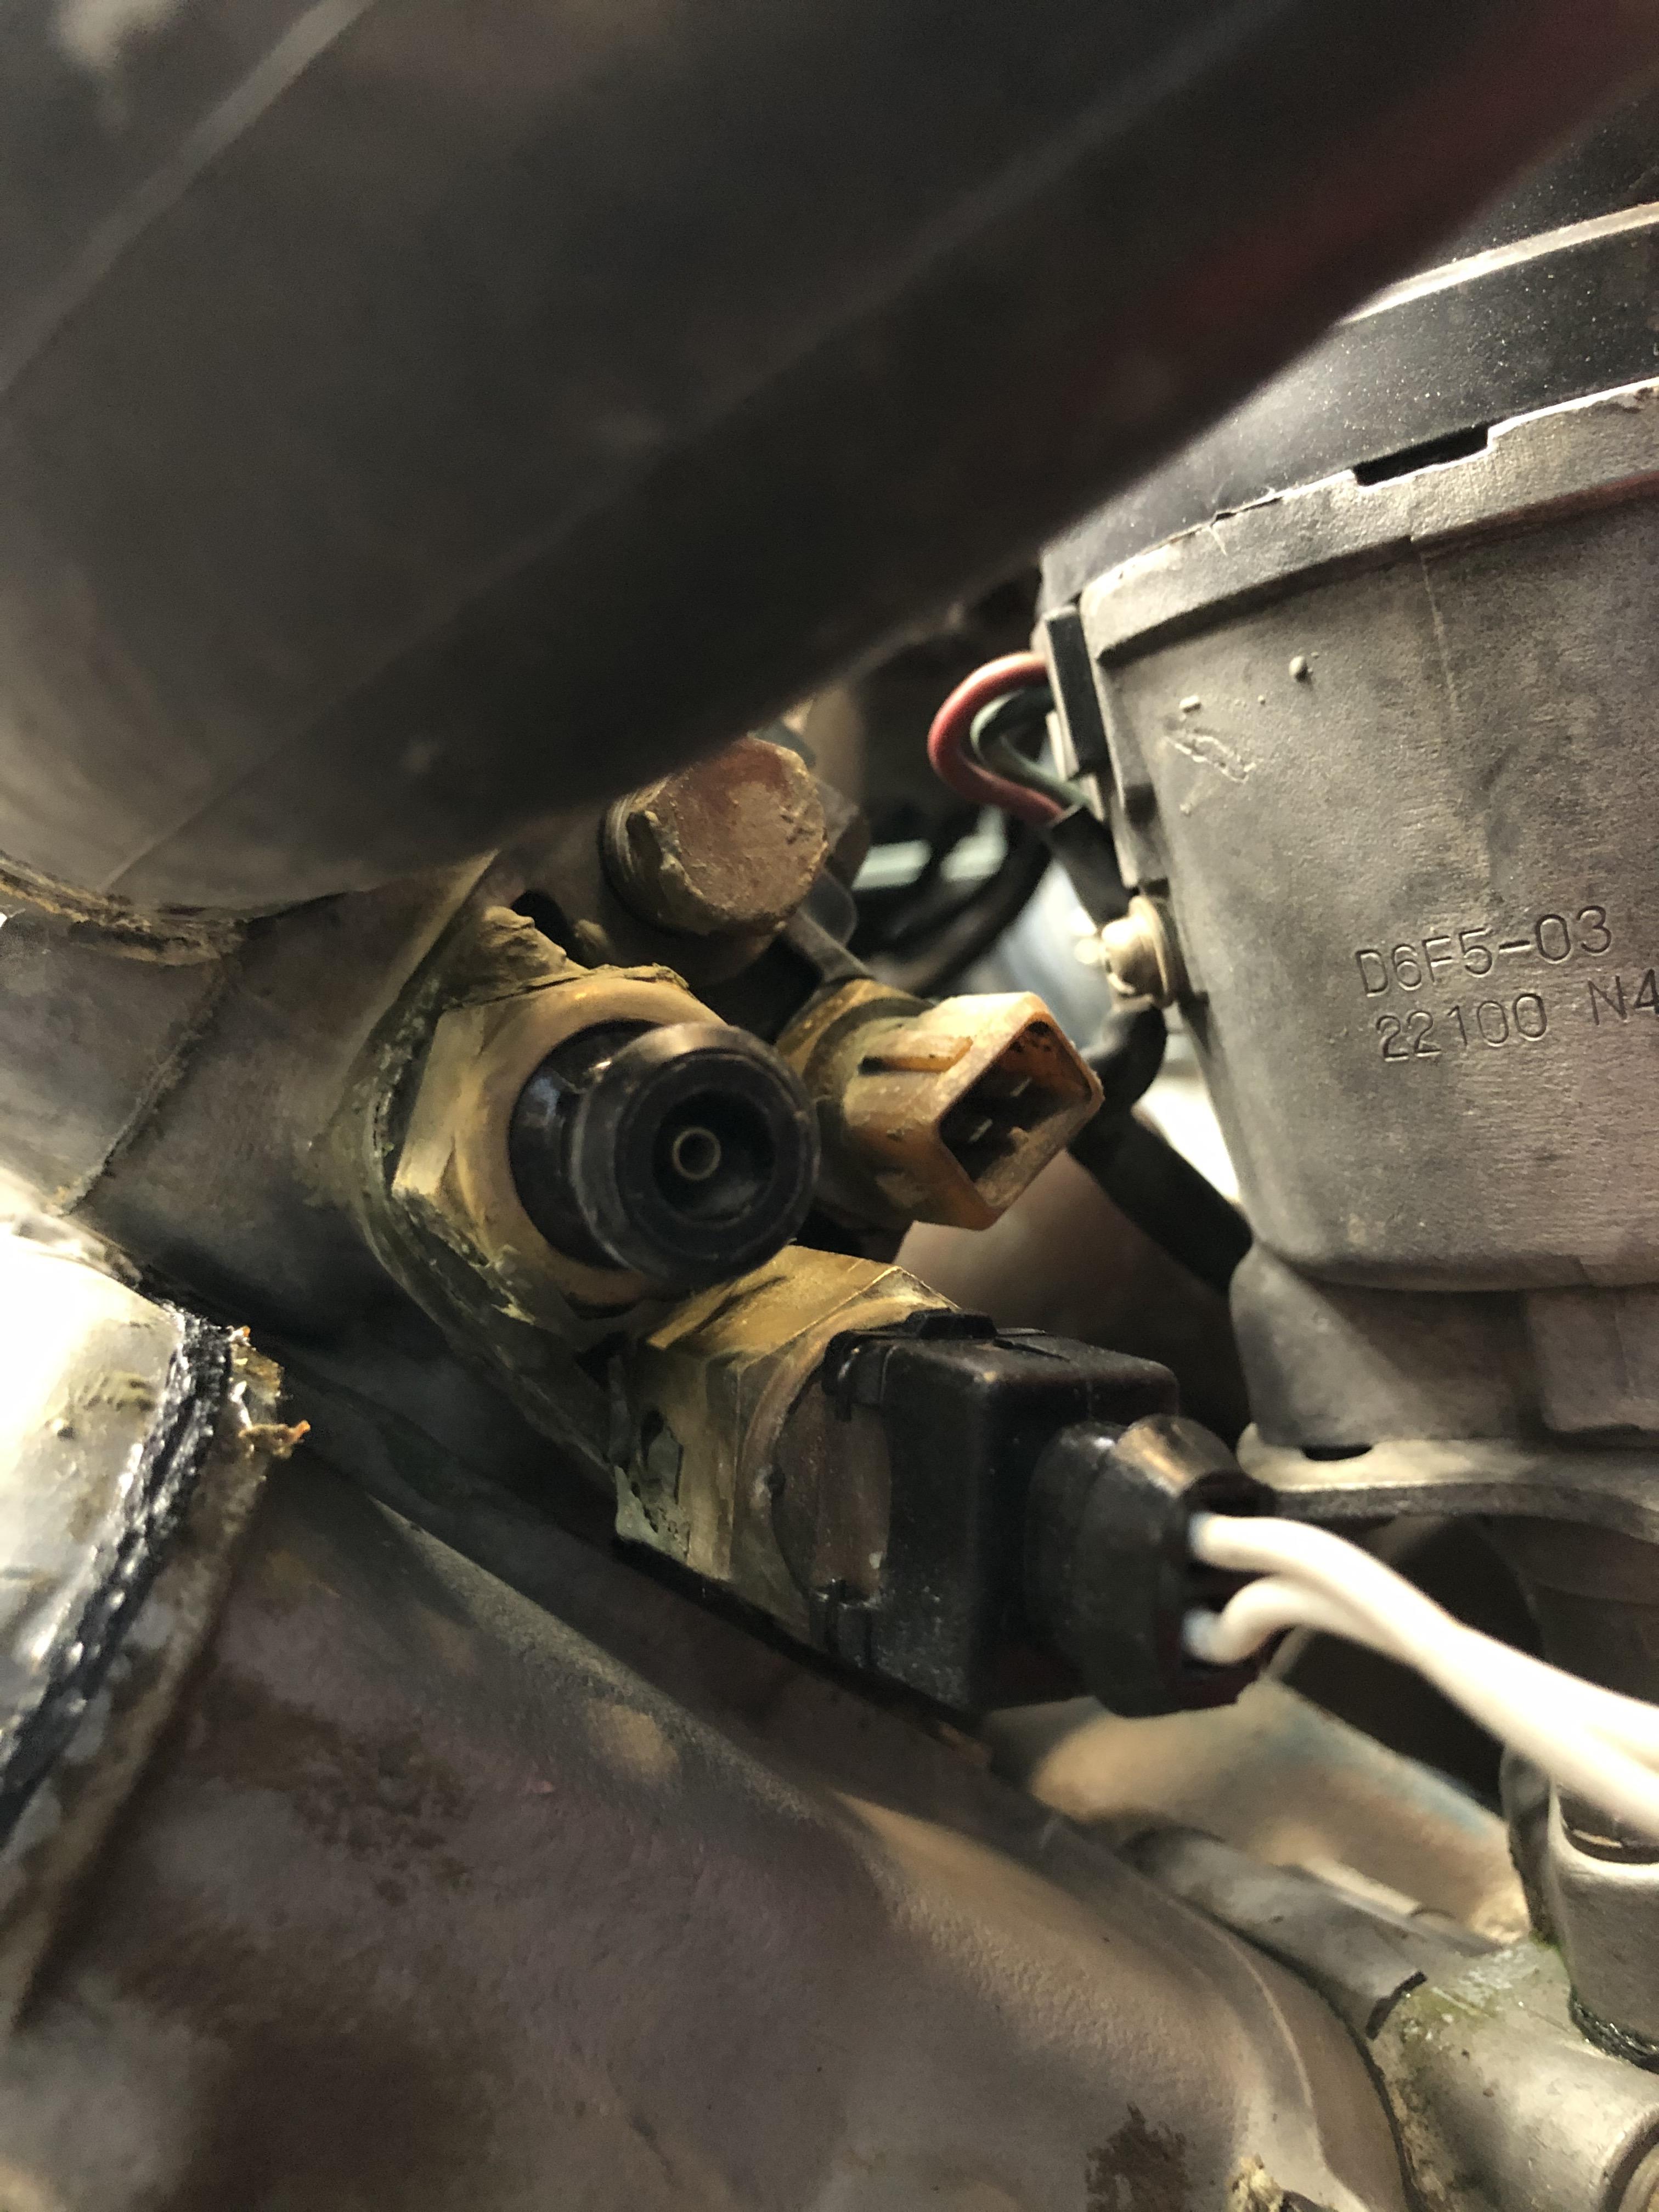
Thank you @Captain Obvious for the help. The good news is that the fuel pressure seems much better. Didn't hook up the good gauge, but the inline one is showing around 34 instead of the 14 it was before. Other good news is that the car starts up, so I've got that going for me. It's not running smooth now though. Maybe I didn't install the fuel injectors .all correctly? They seemed to go in fairly easily. Not the greatest video, but maybe you can hear/see something that helps. I'm shot for the day and will take a look with fresh eyes tomorrow... Can get a better video tomorrow as well. IMG_3134[3].MOV