
ETI4K
Free Member
-
Joined
-
Last visited
Everything posted by ETI4K
-
@Seppi72Had a chance to look over the latest files?
-
They'll sure be pretty once cleaned up. Nice find!
-
I never heard a different version. I was always amazed that someone came up with this one.
-
I built a Heathkit radio when I was a kid. Loved working on it, but it never worked well. I had a lot of trouble sorting the resistors because they all seemed to have the same color bands. Bad Boys Rape Our Young Girls, But Violet Gives Willingly doesn't work well if you're color blind. 😁
-
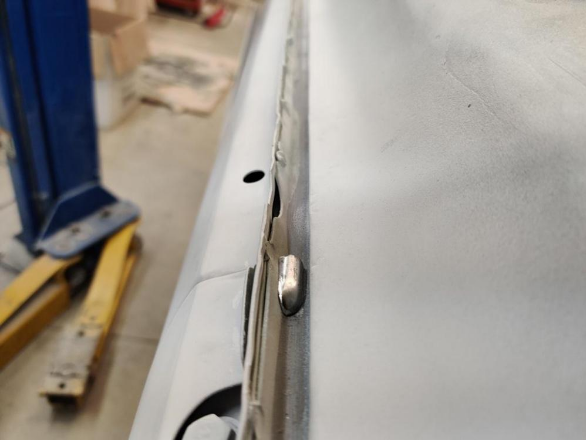
Try wetting that area (inside) and check it in a few days. I'd think the diminishing gap between the fender and its support would still be wet. And that is of course the problem. I recall reading a study from 20 years ago(?) that garaged cars suffered faster corrosion rates than those left out in the dark and cold. It seems the airflow around the cars tends to dry them out faster. To seal a pinch (spot) weld or a folded seam (even a Dutch hem) would require either immersion in a fluid with a low enough viscosity to permit capillary action so the liquid is drawn into the air space(s) and completely seal off the area from water/vapor - or a fluid such as cavity wax if it completely covers all ingress points and can be controlled so as to remain in place after application. That's easy in a rocker panel. @inline6 When you painted your fenders, how did you apply it to this space we're discussing? I am always in search of improved techniques. As an aside, I set up a test 3 years ago where I welded 2 pics of steel to form an L. The joints were very tight, but welded only on one side, so there was a very small interstitial space. I made 4 of them, then treated each differently with topical rust treatments (all from rattle cans). I did this at a friend's. I hung them outside on his fence to weather. After one year some showed a bit of rust. Then I moved away and forgot to check on them. My friend sent me an email recently to tell me his dad threw them away because he was tired of seeing them hanging there. JHC. Two years of testing gone, oh well. What's not lost is Project Farm (IIRC) on YouTube. The guy tests several topicals, and it may be of interest to you.
-
Oh boy! Junkyard run tomorrow - the first in a long time. I have been wanting to change the rear hatch latch mechanism to one found on newer cars, a motorized draw-down type, so I will never have to slam it shut. This is especially important if the new hatch seal pushes back harder than it should. Of course, I might be compelled to find some linear actuators for the hood and hatch. I am a dreamer after all.
-
I do love qualitative claims. One of my favorites is "water-resistant". Everything is water-resistant - for a while.😁
-
Since that area would likely flex on a regular basis, would you be confident the POR-15 would flex with it and remain adhered to the surfaces? I've used similar products and they are extremely hard - which always raises a flag because with hardness, often comes brittleness. I've never evaluated any of them on that basis so I am curious what you think.
-
I love the idea so I had snagged a pic with the intention of doing similarly on mine. Sorry I couldn't properly attribute it to you.
-
Someone on this forum did an interesting modification to prevent water infiltration at the drain holes in the rocker panels. A similar approach might work for a drain hole in the fender.
-
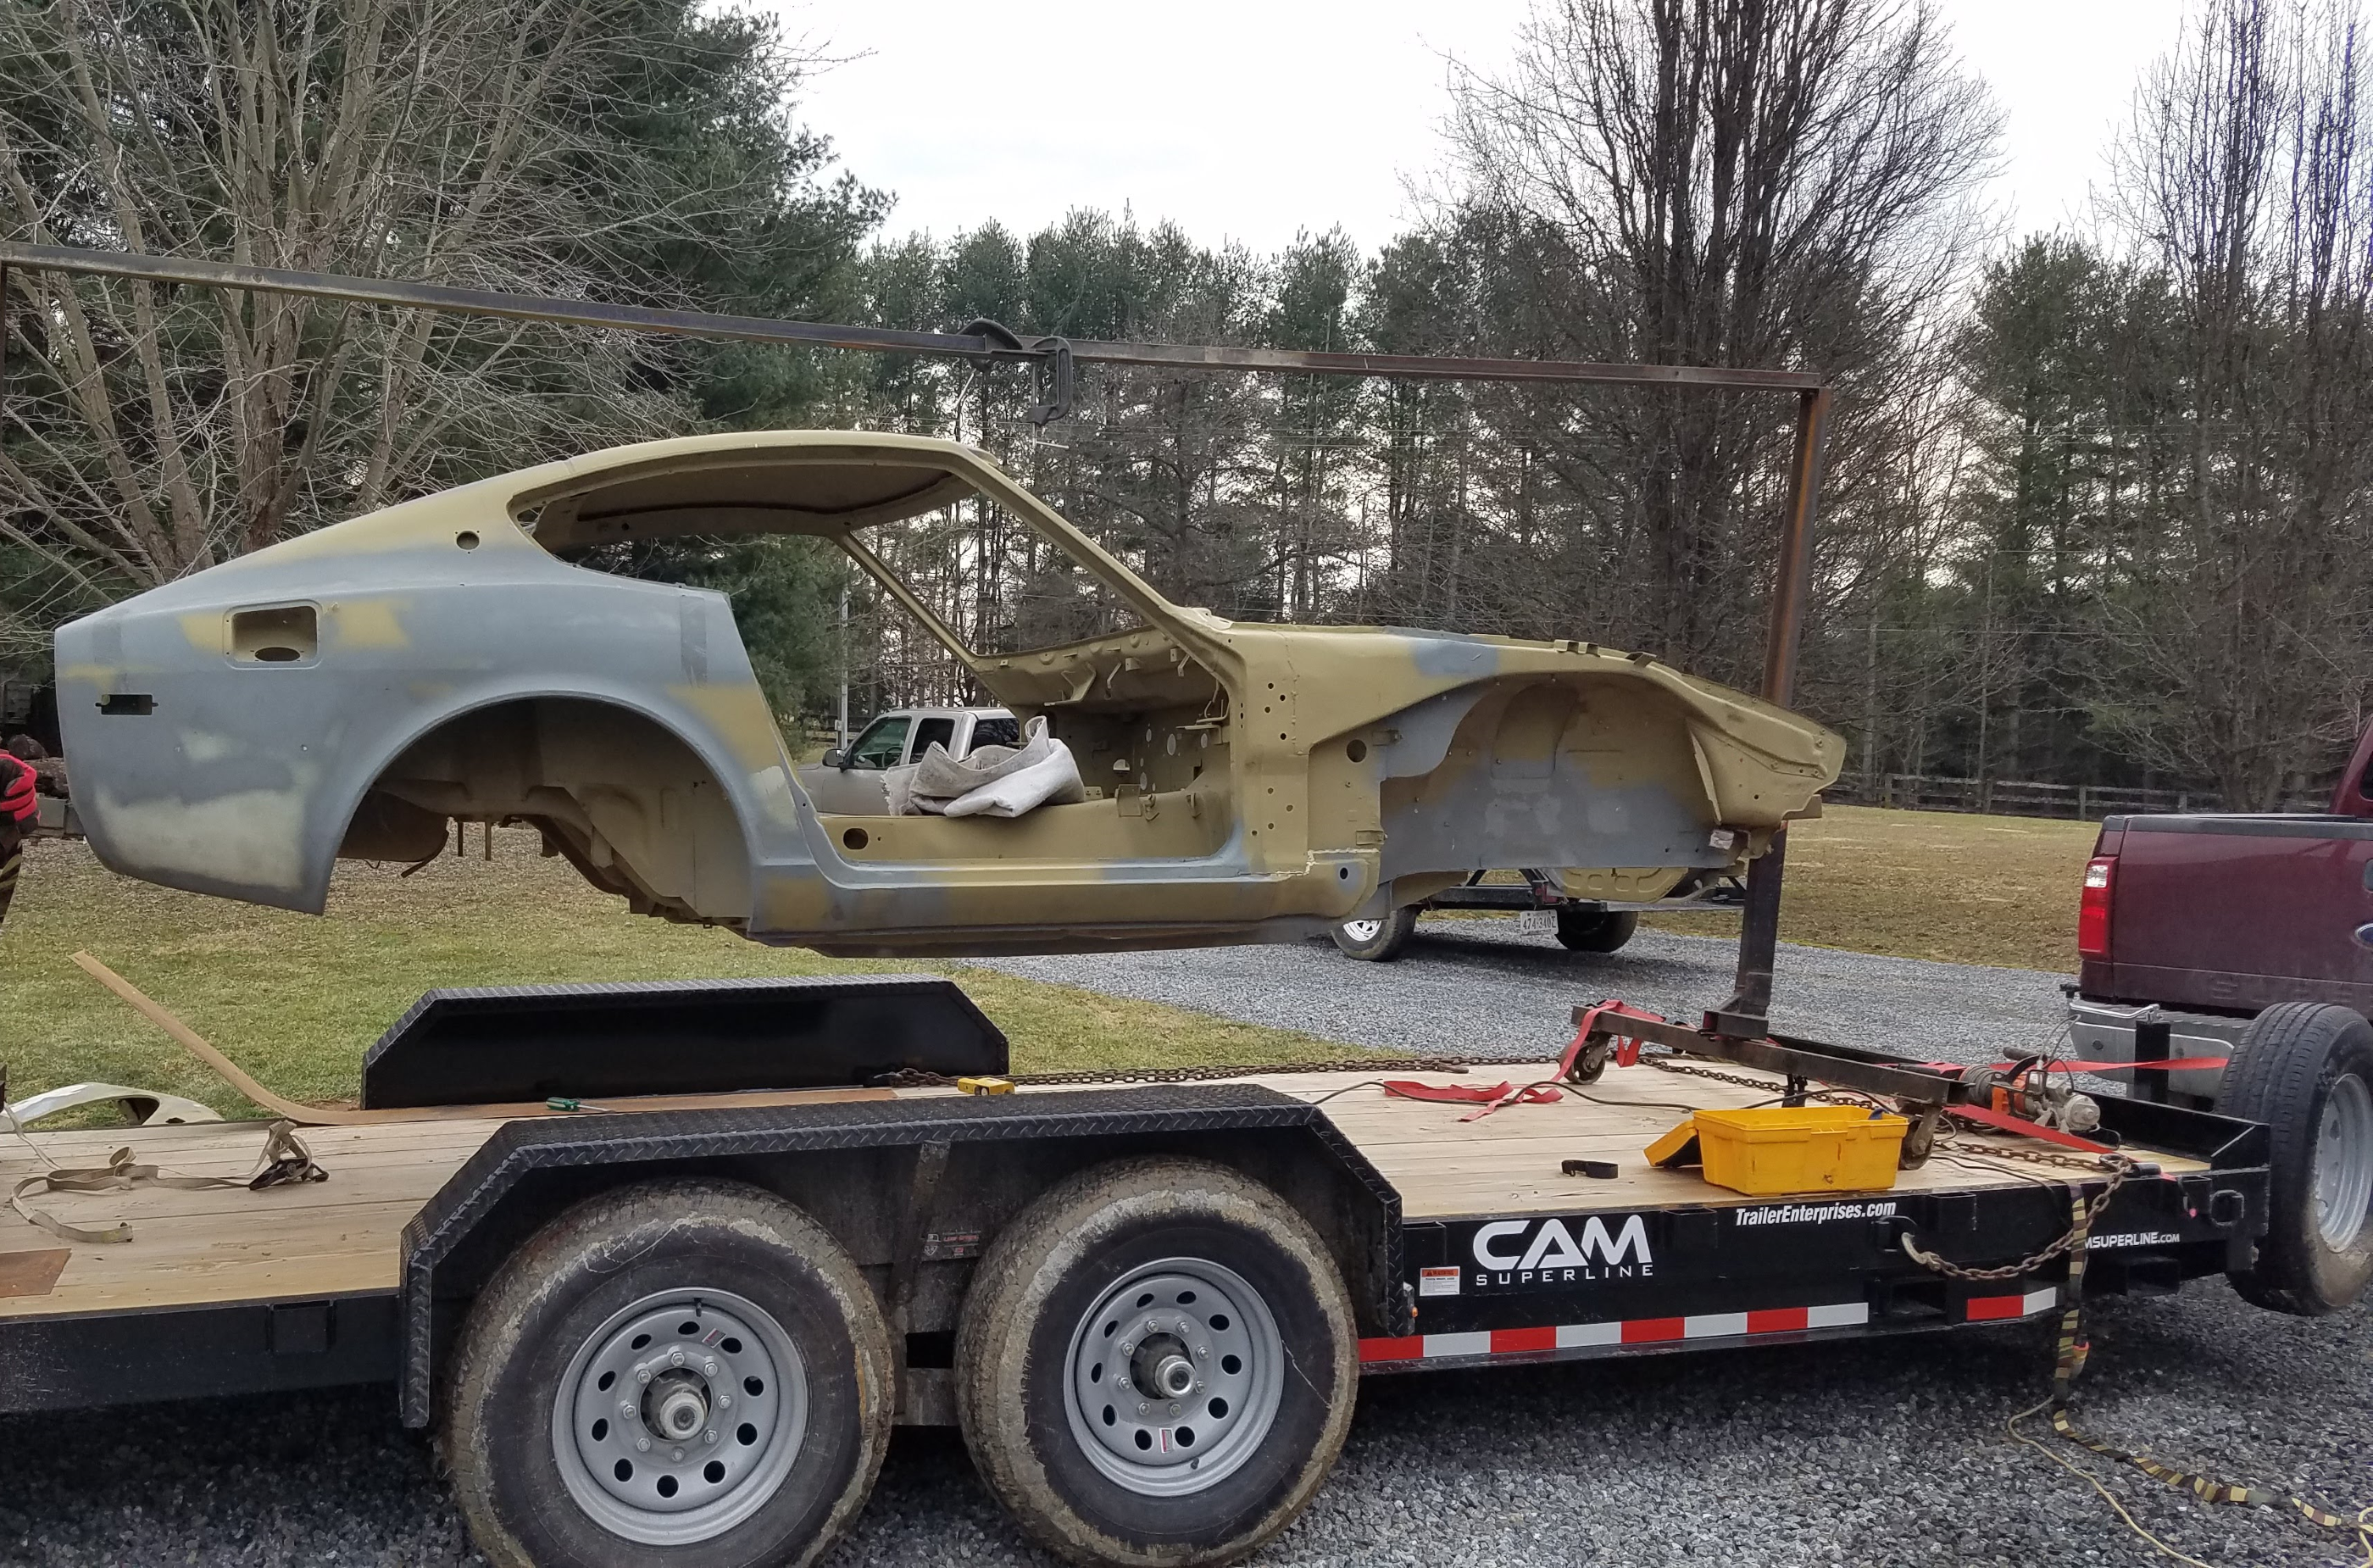
I'd be very careful in trying to seal such an area. If it is not 100% effective - to include preventing air in/exfiltration as it will carry water vapor which WILL condense inside that space at some point - then you'll be certain to seal IN water that makes its way inside. Perhaps cutting out that reinforcing panel altogether and applying modified design - one that is open and self-draining. Sorry I can't be more specific about such a design. I've given no thought to it as yet, but that same problem is headed right at me. I have two new factory fenders to go on my car, and I am determined to prevent them from rusting. I am also extremely reluctant to start cutting them up or modifying them in any way. Right now it's an opportunity waiting for me somewhere deep inside that tunnel, the light of which I am unable to see.
-
If you'll send me the dimensions, I can draw it up in 2D and 3D.
-
View Advert R200 3.9 Hopefully, local to Virginia! Advertiser ETI4K Date 11/04/2021 Price Category Parts Wanted Year 1981 Model ZX
-
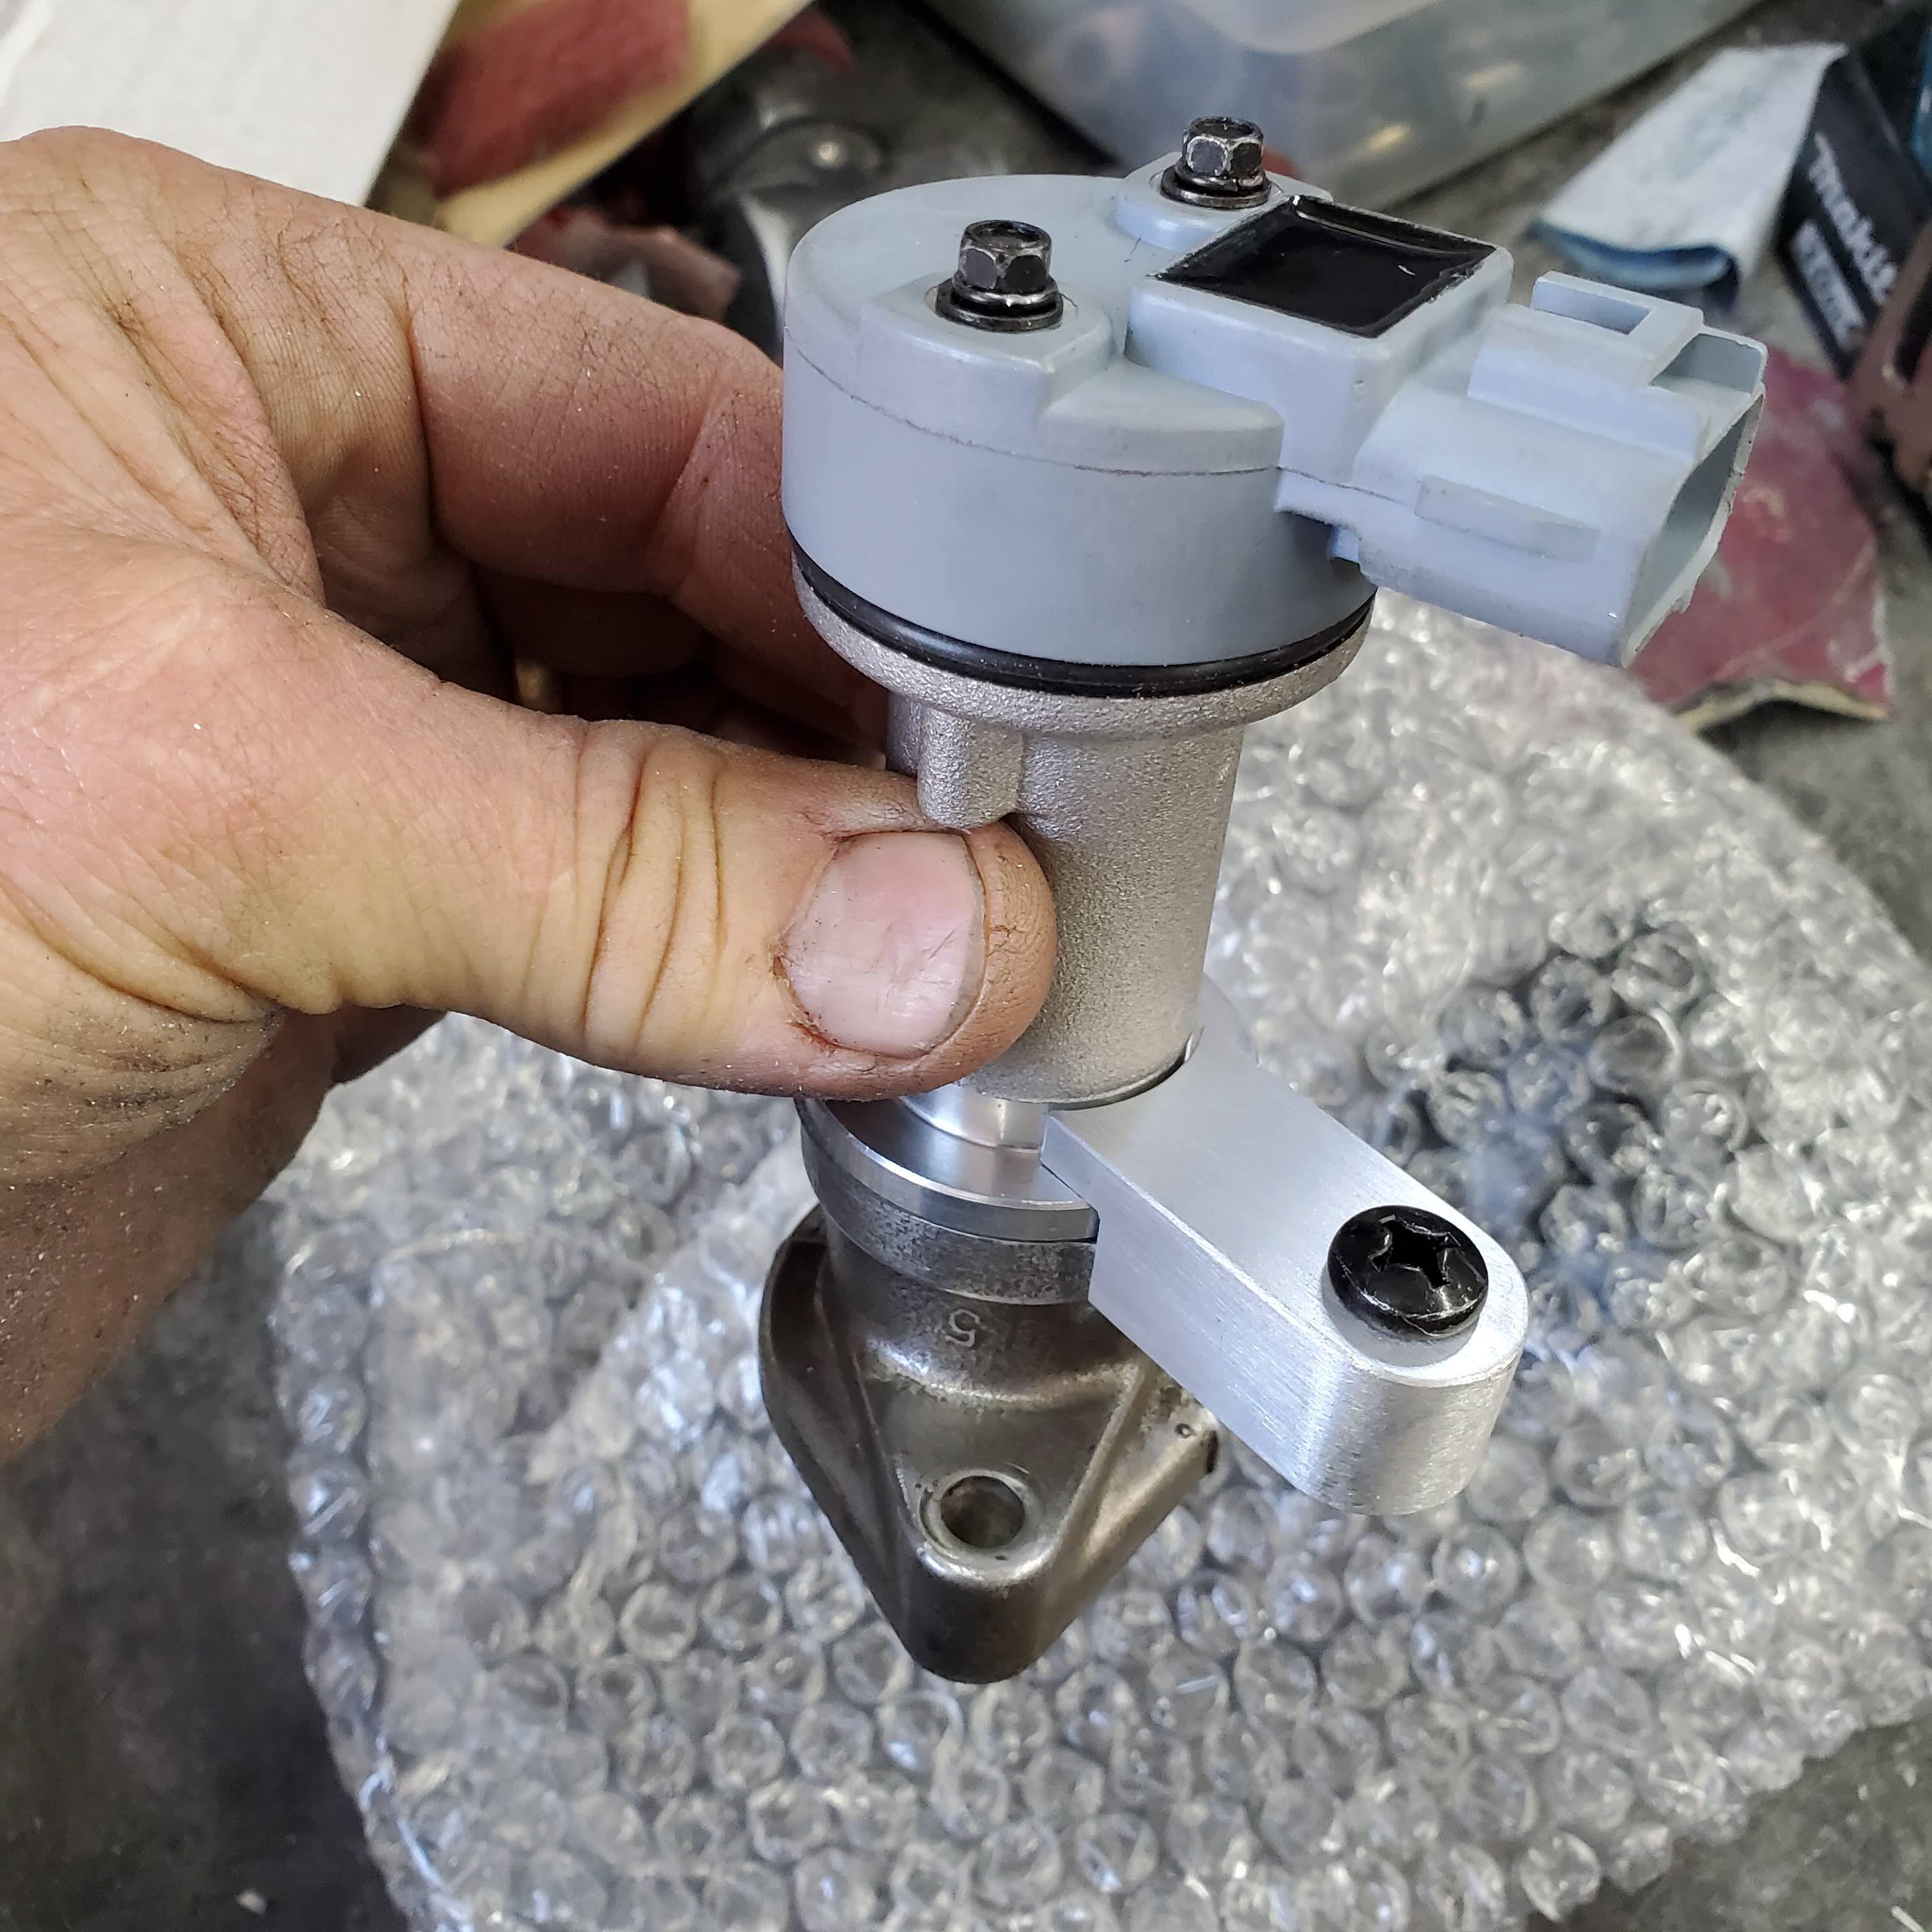
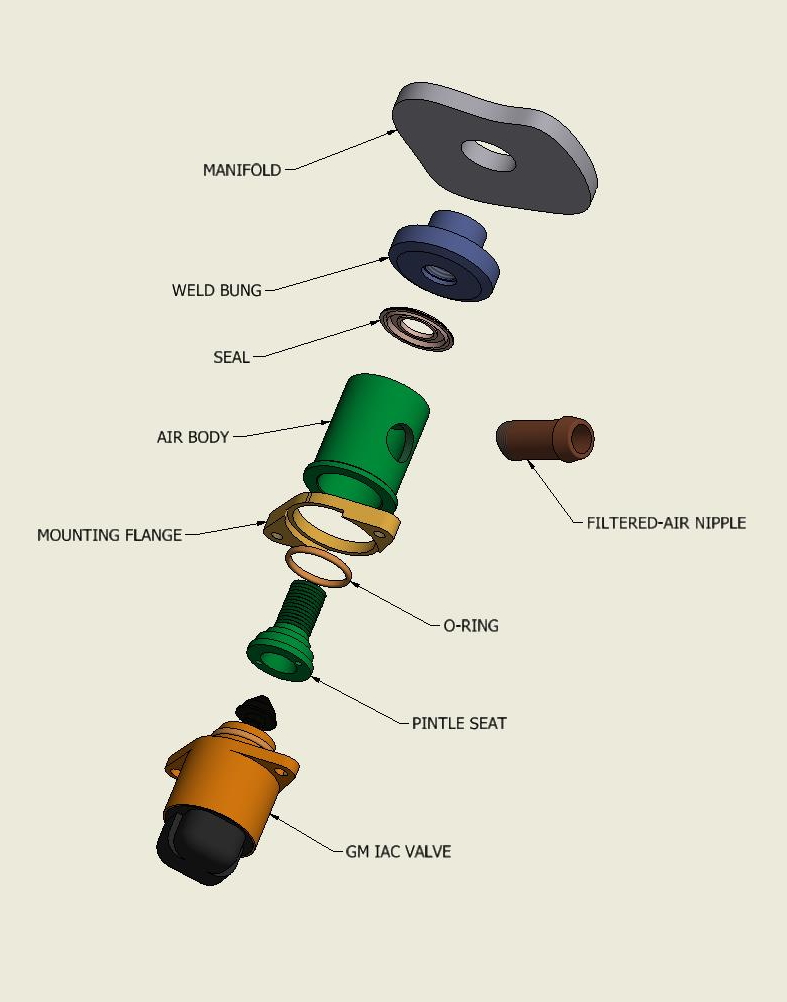
I did see that and gave it a lot of thought. In the end, I was just looking for an excuse to make something on the lathe (and mill). 😁 I am really trying to clean up the engine bay to remove, or make less obvious, all the hoses, wires, etc. running around. That's why I decided to mount mine under the intake. The filtered air hose will run to a port at the bottom of the MAF sensor boot from the air filter. The air valve body can rotate to any position to facilitate the routing of the hose to get it to follow the same route as the boot. Also, the hose, air valve body, and boot will all be black and less visible - especially against the blinding brilliance of the polished intake, head, timing cover...... Well, a fella can dream can't he?
-
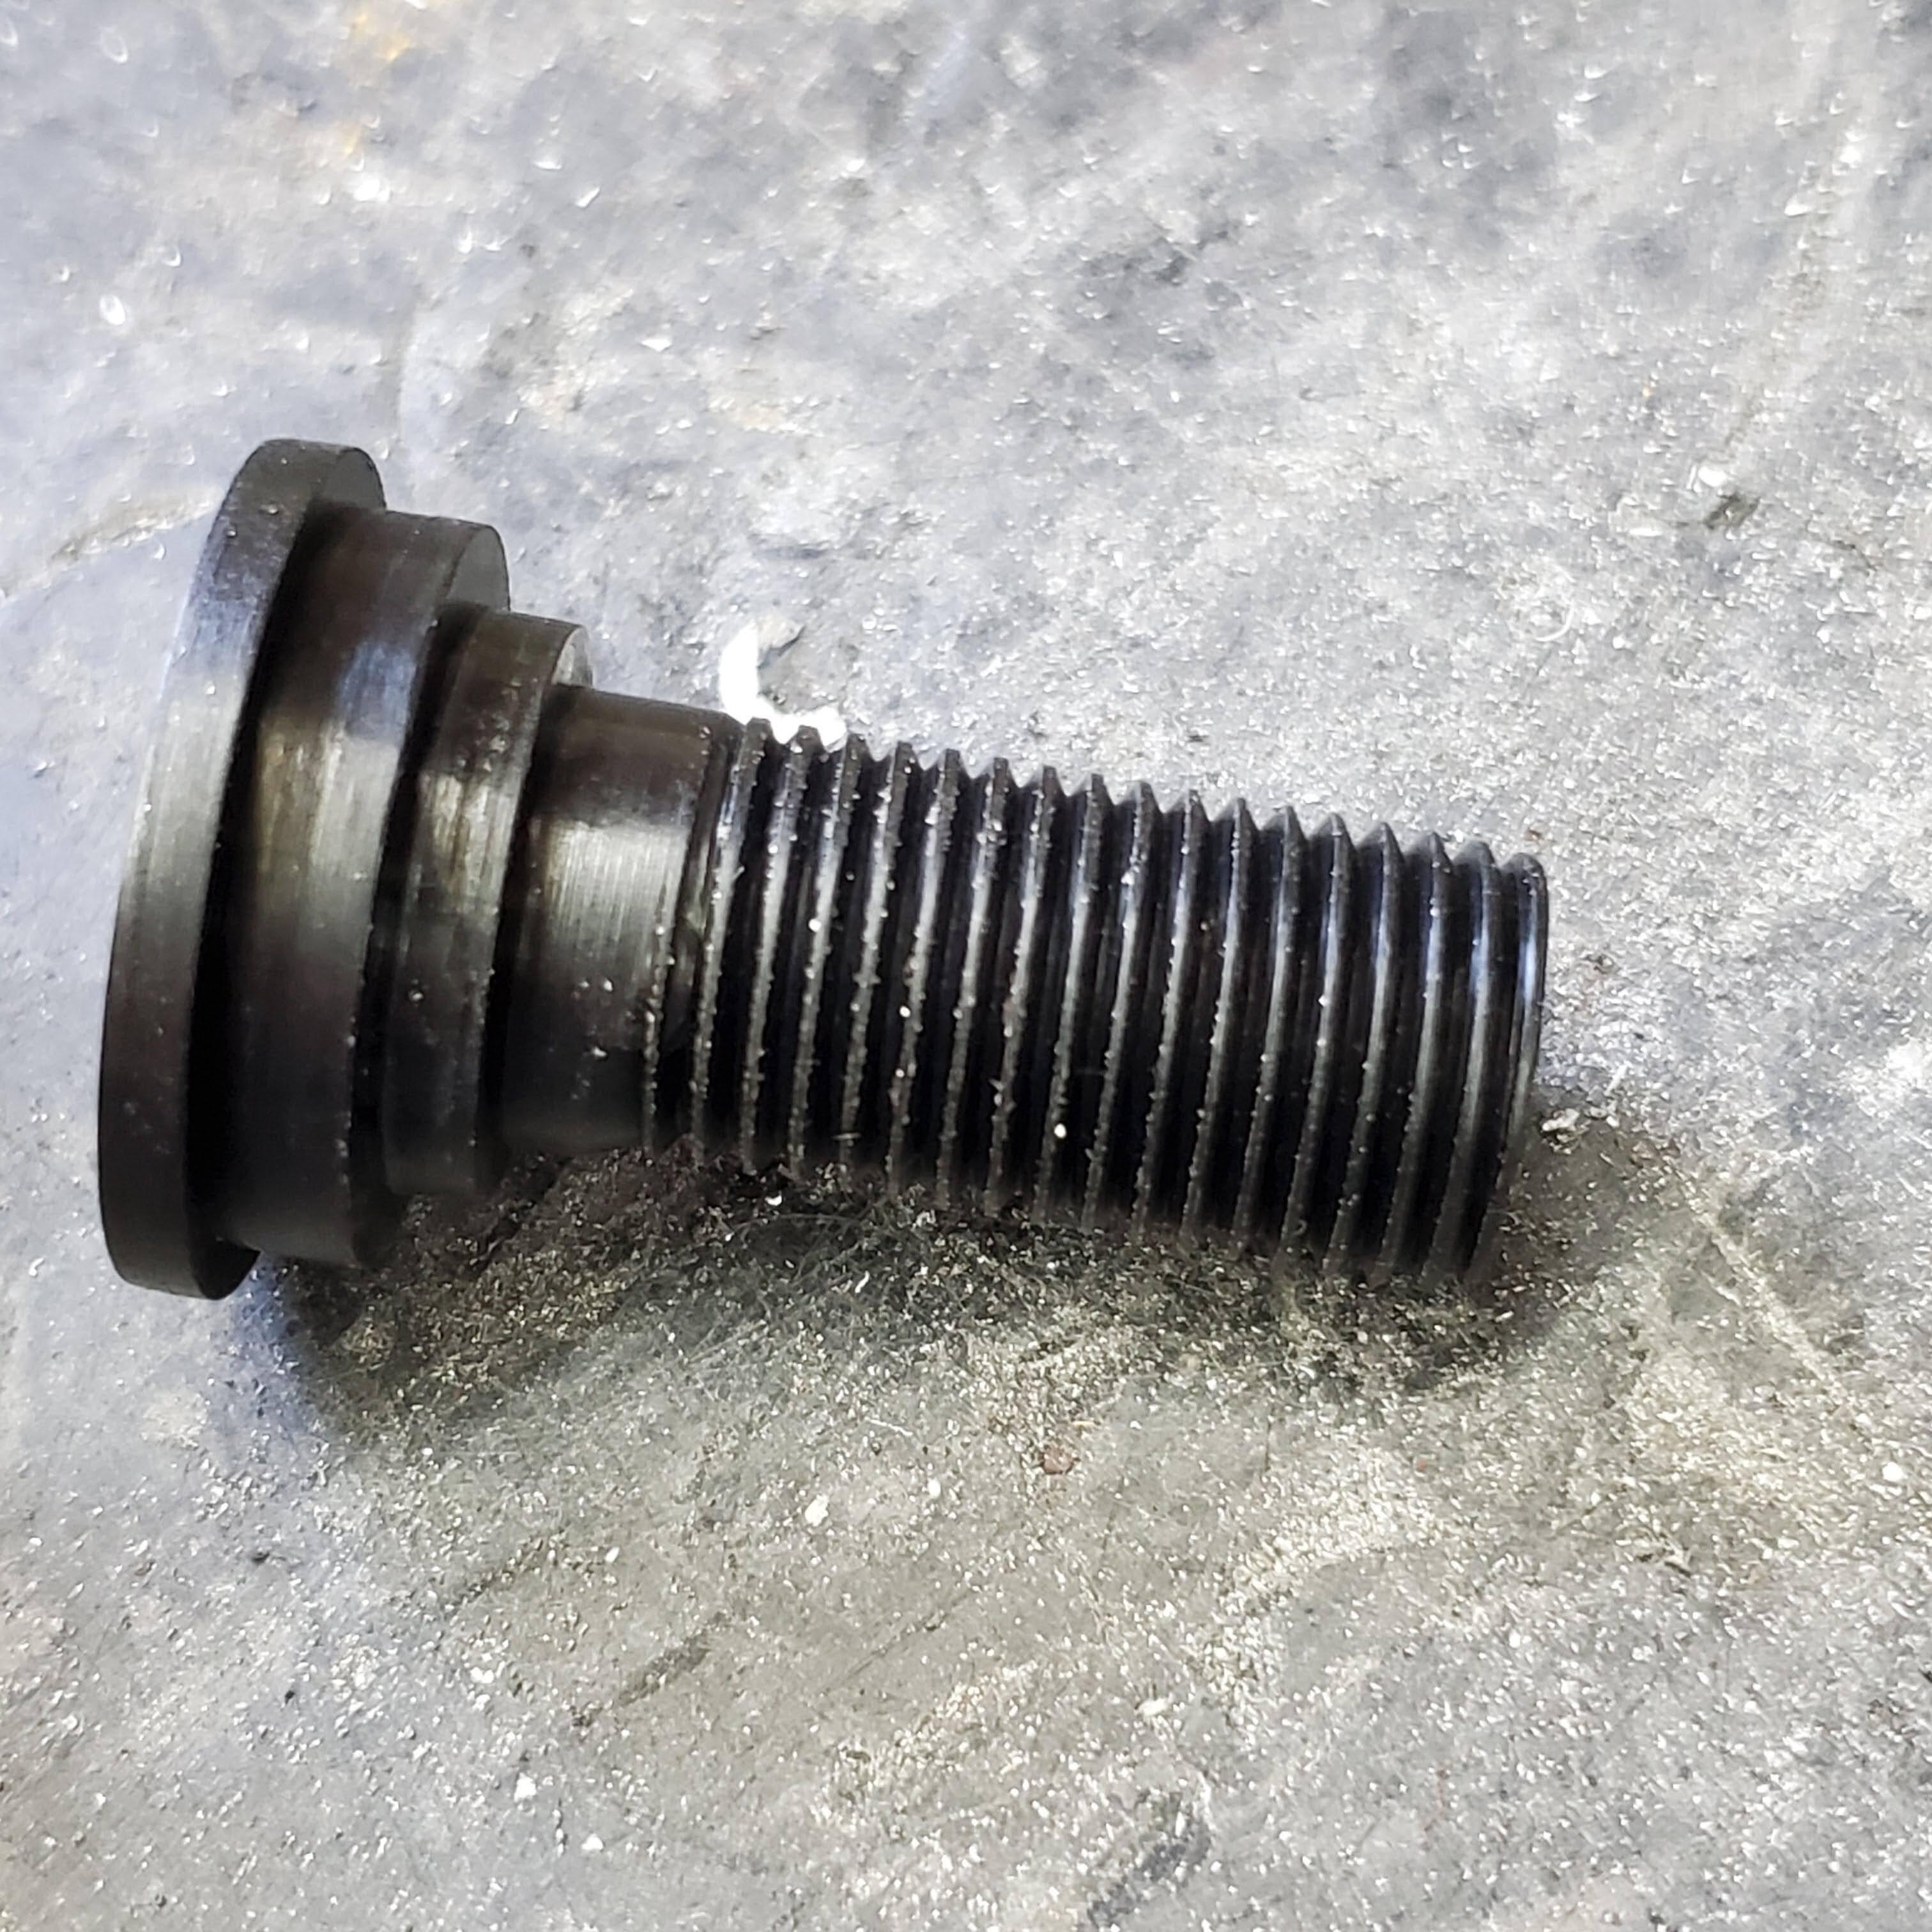
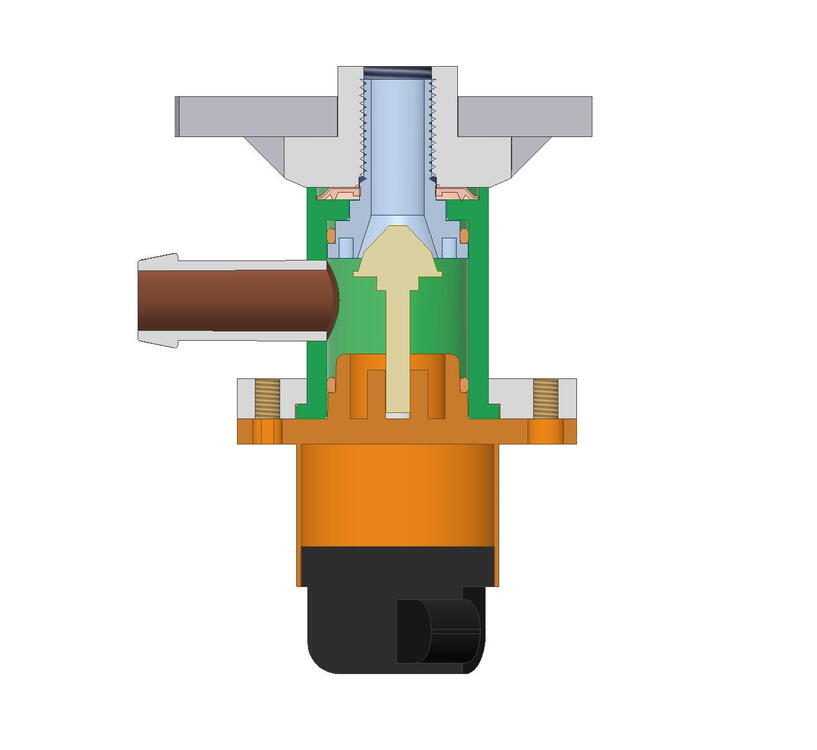
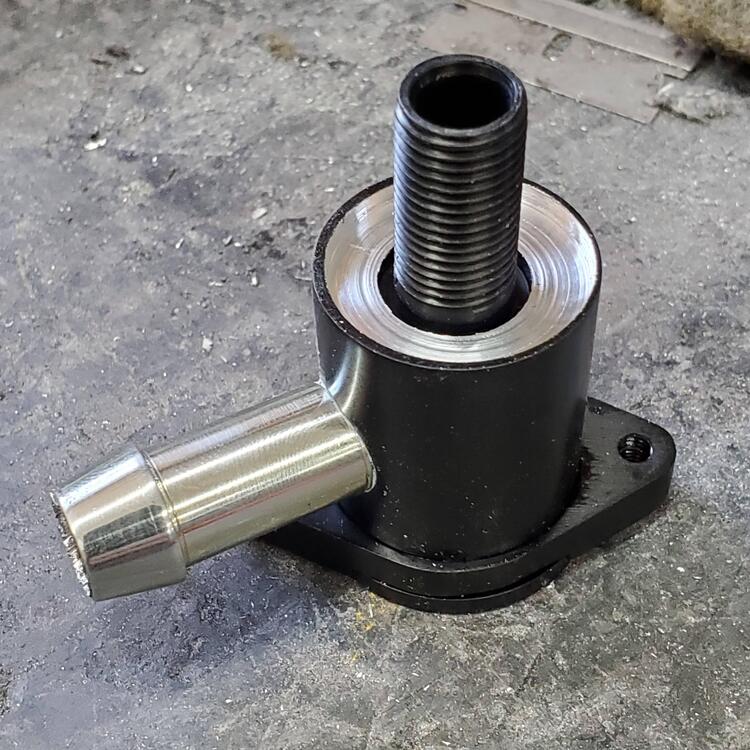
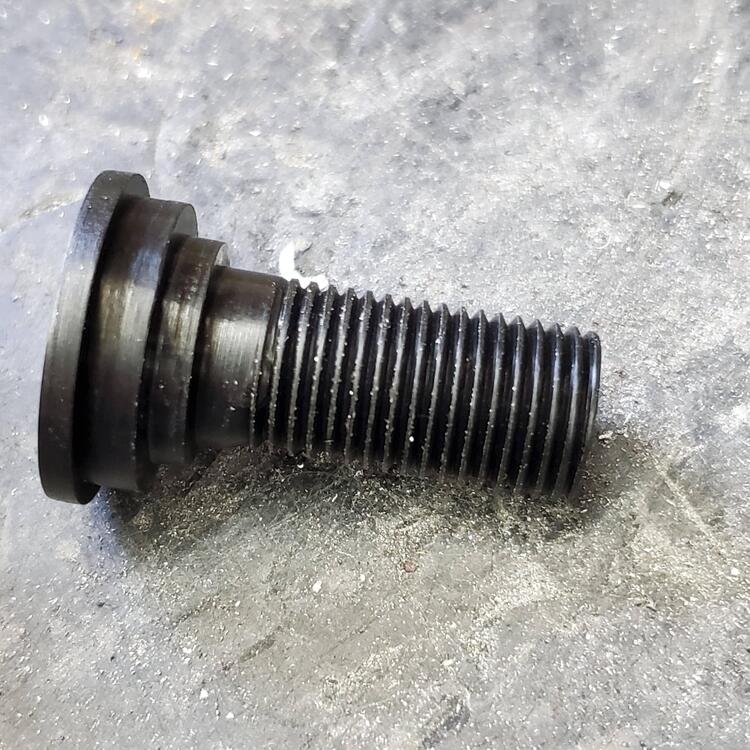
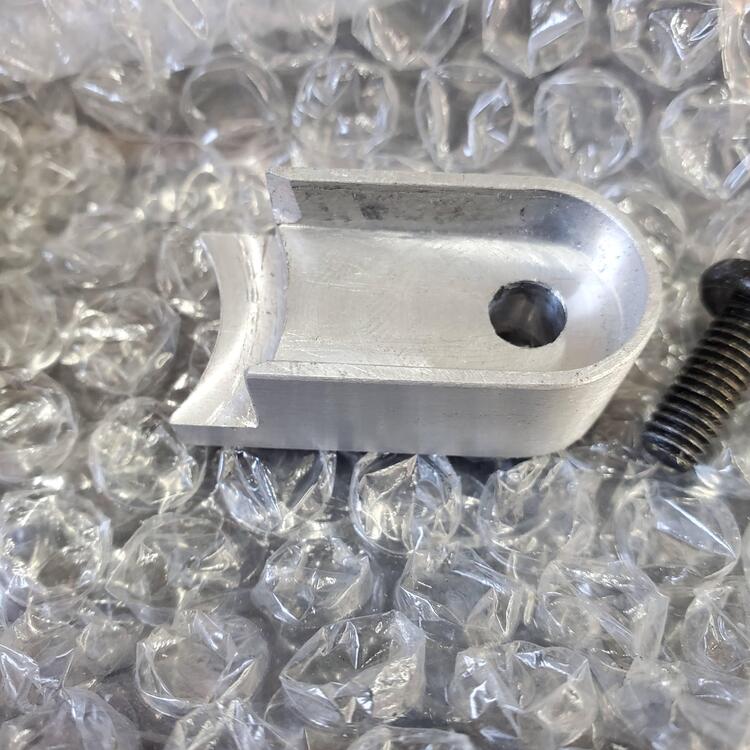
Next up, a new IAC valve and body. I will be using a stepper-type IAC valve from a GM motor to control idle speed. The problem is it also means I need an air body for the valve to mount to. I spent a long time trying to find something off-the-shelf and never found anything I liked very well, so I decided to make one. It's a bit complicated, but that's what I do best - make things more difficult than they have to be, but I have a blast doing it. The Concept It'll be located on the underside of the intake, to stay out of view. When I was shaving the intake, I bored a hole, made the bung and welded it in as I couldn't find one OTS with a wide enough flat to match the Seal diameter. I sent out the parts to be anodized. Found a place in Lynchburg that did a flawless job - Industrial Plating Corp. The guy who ran the shop (Brian) did the five parts plus two others that were zinc/clear for "lunch money" - $20. A deal AFAIC. The Realization The huge bung Assembled air body The pintle seat I have surface finish issues with these parts - they're okay but far from great. I recently acquired some decent carbide inserts to replace the Chineseum ones I used on this. What a difference. Oh well, another thing learned. The assembly seals well as best I can bench test it. Maybe this coming year I'll get to find out for real. 🤞


.thumb.jpg.492a08b9296a21ff4c84b5a439e79025.jpg)

-
At this point, I think I will reuse the rectangular piece if no other reason than to help align the hinge to the lid. However, I will drill two new holes through the hinge and plate in the middle of the plate, apply some zinc weld-through, and plug weld to the lid. I'll use the TIG machine to keep the heat as low as I can get away with and deal with the need to do a bit of bodywork on the lid exterior. No epoxy. There, another one done of only 13,000 more decisions. 👍
-
I'd love to see a pic of your setup. I like the wedge idea.
-
I think I'd use a flat bar, about 1" wide, and round one side to match the radius of the bore. Use it press on the exposed tip. The radius-matched tool won't damage the bore, and by virtue of it having some heft, you'll be able to align the force vector with the axis of the tip. Hopefully, this will minimize any reshaping of the hole.
-
I forgot to mention the conflict with adhesive and welding heat. If I weld it first, I can't get epoxy into the gap. If I epoxy it first, I can't weld it. I'm not sure why they used the rectangular piece in the first place, unless it was to keep the spot-weld heat low to minimize deformation on the outside of the lid. At this point, I am considering not reusing it.
-
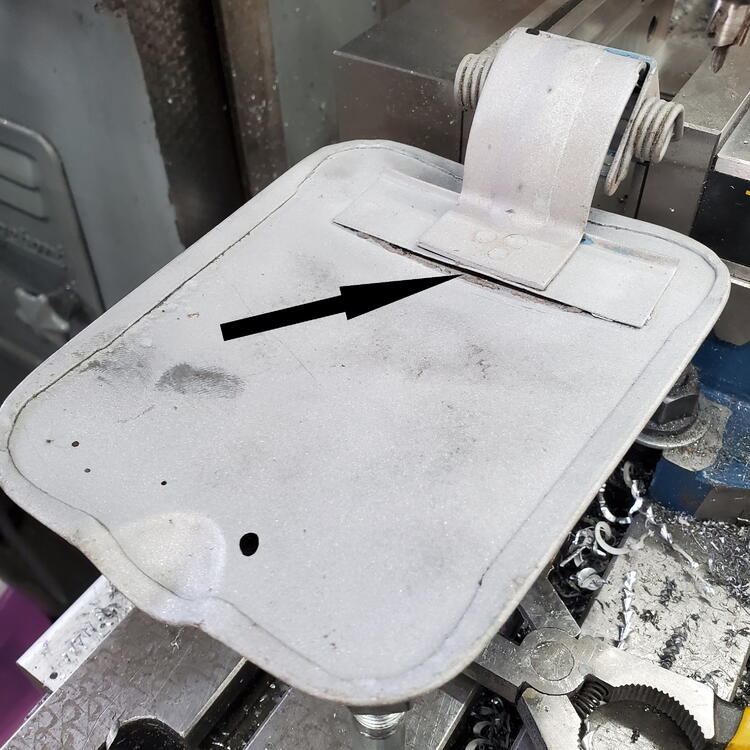
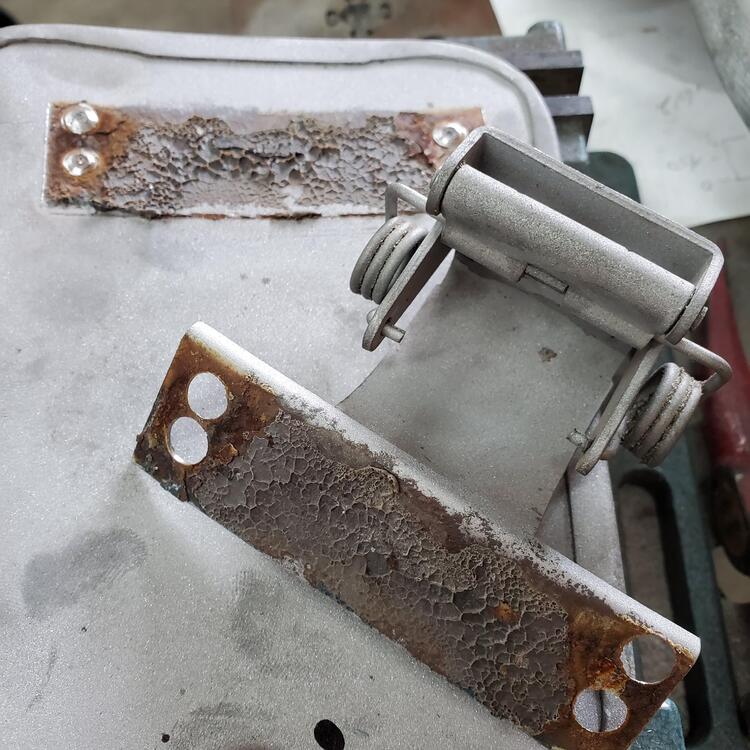
An interesting problem with gas filler lid. My lid never sat well against the body. It looks as if someone walked into it when it was open and created a gap between the lid and hinge. The gap is sprung, so when you press on it, it closes right up, but won't stay that way. Also, there is some smoodge in the gap - I'm not sure if it is a factory-applied sealant or a PO repair. The whole thing has always bothered me, so now is the time to fix it. I drilled out the spot welds to separate the assy into three parts. Nice bit of hidden rust there. This is where I am conflicted. The rectangular piece is very thin and provides very little structural support to the lid. I restored its shape to properly nest with the lid - NP. My concern is based on how easy it was to manipulate that piece of steel. I can easily see it being deformed again, right after I've painted it 😭 Besides more hidden rust, this sure looks like an adhesive (epoxy) that was applied by someone along the way, but the application of a suitable adhesive seems like a good idea for two reasons - it will provide additional structural support and could seal the gap against more hidden rust. I could easily pop a hole through the hinge and rectangular plate, and plug weld the three parts together which would solve the structural issue. But I hate pinching steel together because of the propensity for rusting - although I suppose with some weld-thru zinc primer it would survive my lifetime, so I'll get over it. Comments and suggestions always welcome!

-
I think I read that one about a year ago and that helped me decide to use that Jeep CAS. Completely forgot about it when I started the mods, so I started with the distributor, oil pump, and drive spindle installed in the loose timing cover for dims. Being able to trial fit and test for clearances and spindle freeplay was especially valuable.
-
Distributor Delete So I am using a 2004 Jeep 4.0 "cam synchronizer". It's amazing that the housing is a perfect fit in the Z's distributor base. To make it work with everything else, I removed the gear, cut off the shaft, made a press-fit bushing, into which I milled an offset slot, then pressed it onto the shaft and drilled and cross-pinned it. After that, I needed a way to lock down the body of the sensor after getting the timing set, so I made a clamp that works really well. Not sure if I will powdercoat it or have it anodized. The black screw will be replaced with something stainless. Still have to polish up the cam synchronizer body and distributor base.


-
I'm voting that it's cast iron flashing from inside the block. I just de-flashed mine because I was able to break off a piece with light finger force. Broke out the die grinder and had at all of it. While I was at it, I smoothed up some cast holes for better coolant flow.
-
That's hope (maybe dream) vs reality. I'd bet we've all spent way too much money and would love to have some back.🙏
-
As for static pressure from a pump, think of it as the compressed air inside a balloon. The pressure is essentially uniform everywhere inside it. The pressure inside ductwork of an HVAC system is similar, except the fluid is moving. An oil pump creates a similar pressure that's "essentially" uniform in the region near the OPS. Static pressure is the force applied to all the sides of the containment vessel, and velocity pressure is the force of a blast of air, oil, etc directed at something, like a water hose against your car.


.jpg.d0f7094f1b82a7ee7683adf618b6d38c.jpg)