AnvilZ
Free Member
-
Joined
-
Last visited
Everything posted by AnvilZ
-
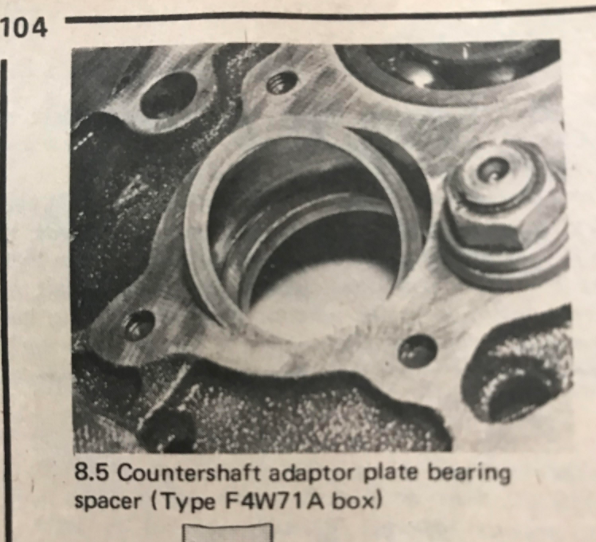
Update to close the loop on this thread, end play was correct on the countershaft so I installed a 1.65mm shim in the adapter plate for #19 and a 1.00mm shim in place for #18. The noise is gone after the rebuild and the transmission is smooth and quiet. I can only assume it was the misalignment and maybe some interference between 3rd gear and the synchro assembly causing the problem. Correcting that plus replacing all the bearings and it feels like a new transmission. @EuroDat @Zed Head @Dave WM Big thanks for your input and assistance on this.
-
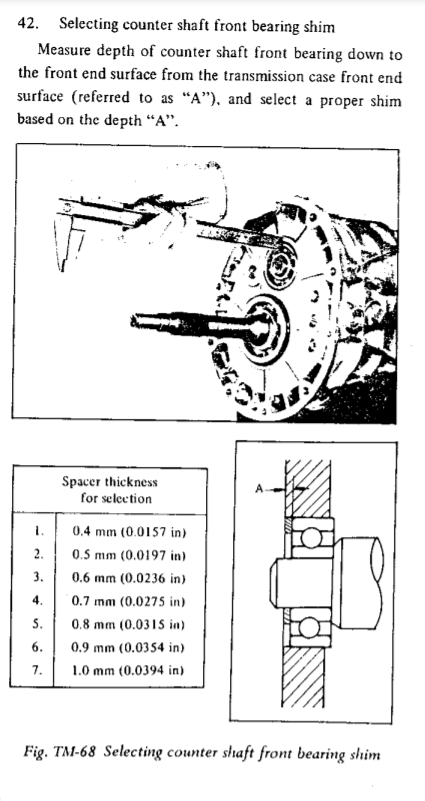
I actually pulled it from this site, Zed Head pointed me here https://www.classiczcars.com/files/category/11-240z/. It is the 1970 FSM uploaded by CanTechZ. Page 57 is the one I referenced. I will check the end play after reassembly. If it is good Ill go with 1.65mm for #19 and 1.00mm for #18. If not Ill likely add additional thickness to #19 up to maybe 2.00mm. Can't imagine the total end play would exceed 3.00mm.
-
This was my exact thought process, although looking back through the 71 FSM last night that Zed Head pointed me to earlier in this thread Nissan does seem to suggest that #18 is not a fixed thickness and uses the same "A" measurement for end play. This is definitely for the F4W71A: Confusing. Now I am wondering if carpartsmanual.com has #18 and #19 backwards? Based on the FSM it seems #19 may be a fixed thickness, which I still doubt I will be able to find, and #18 is variable. It even gives the same range of thicknesses for #18. Given that I likely won't be able to determine an OEM size for #19, I am now thinking I will try to align the mesh as much as possible and use that to determine a thickness for #19. Maybe 1.65mm there and a 1.00mm for #18 as you suggested.

-
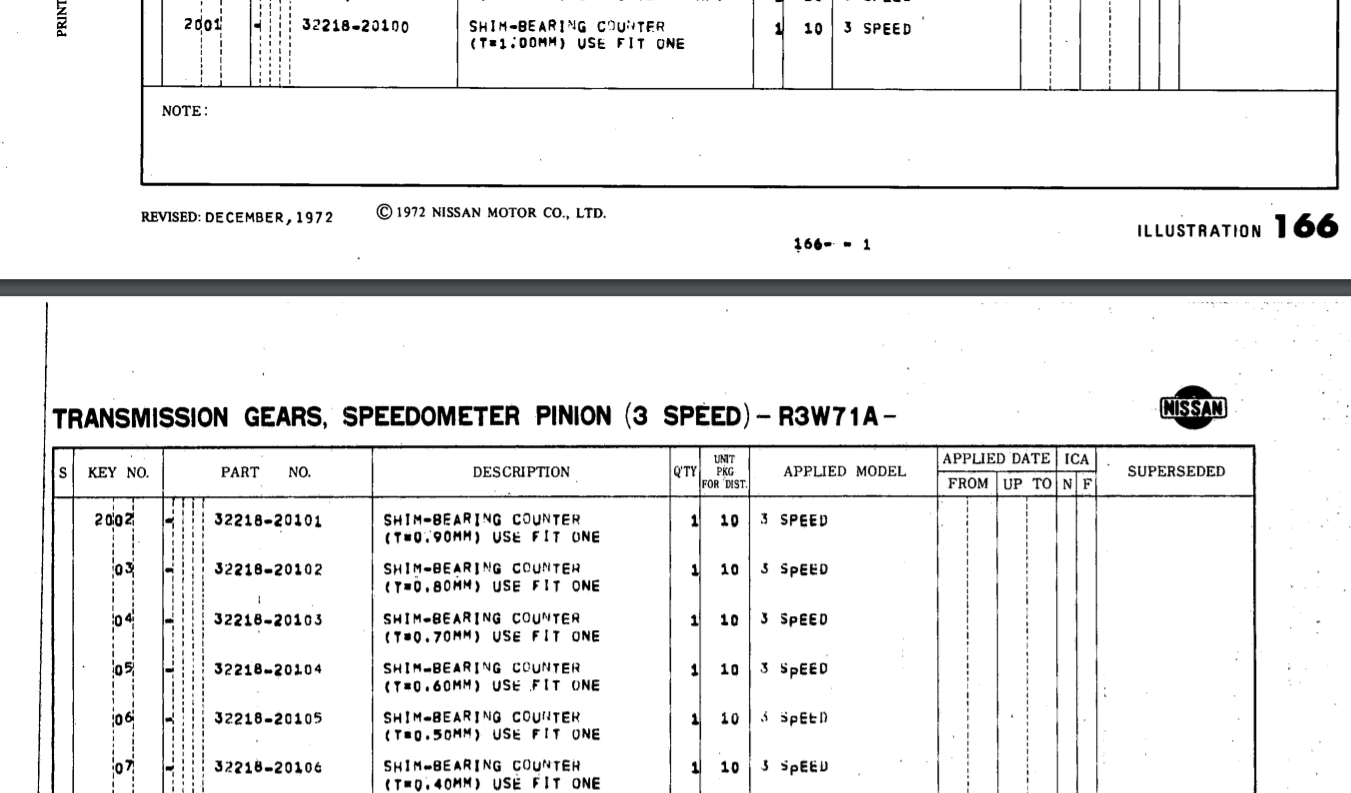
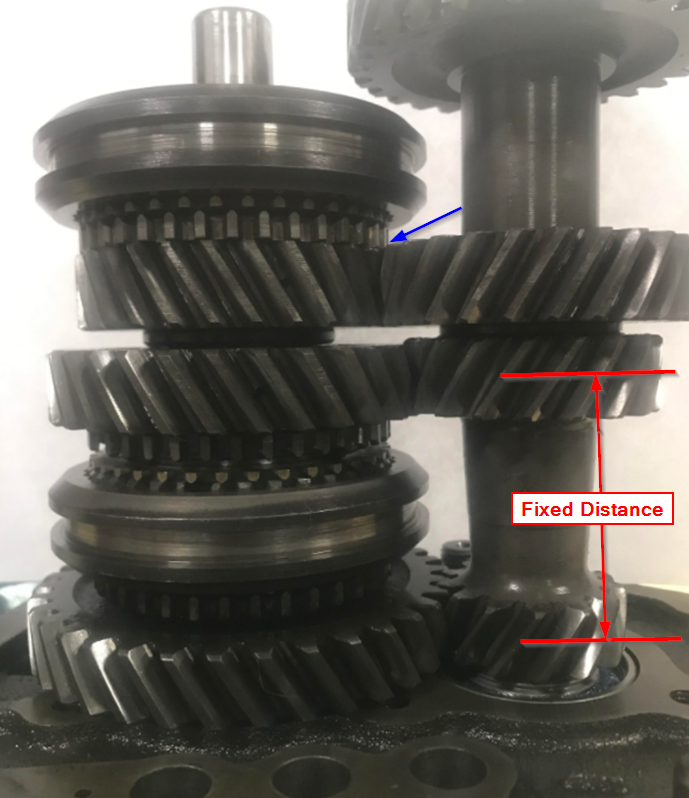
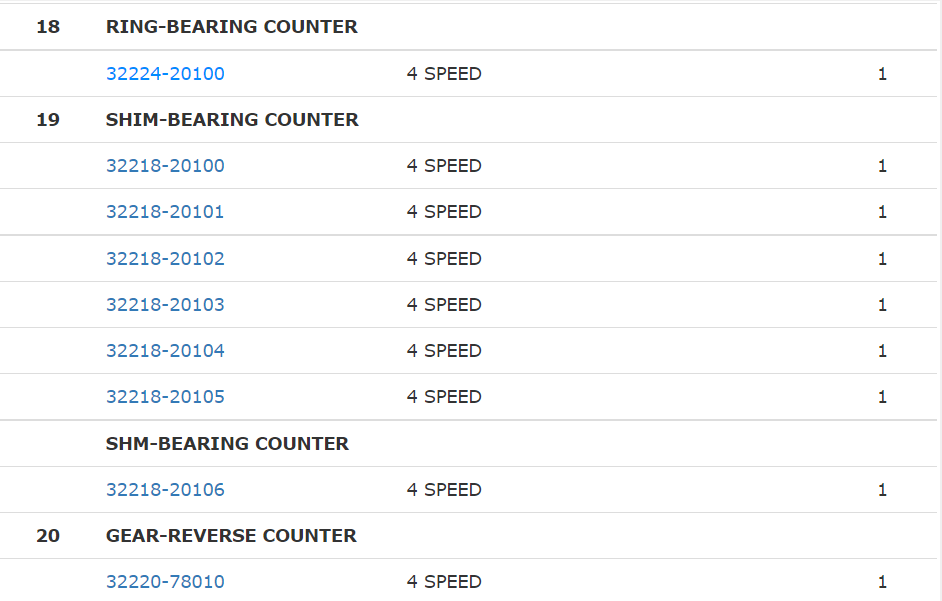
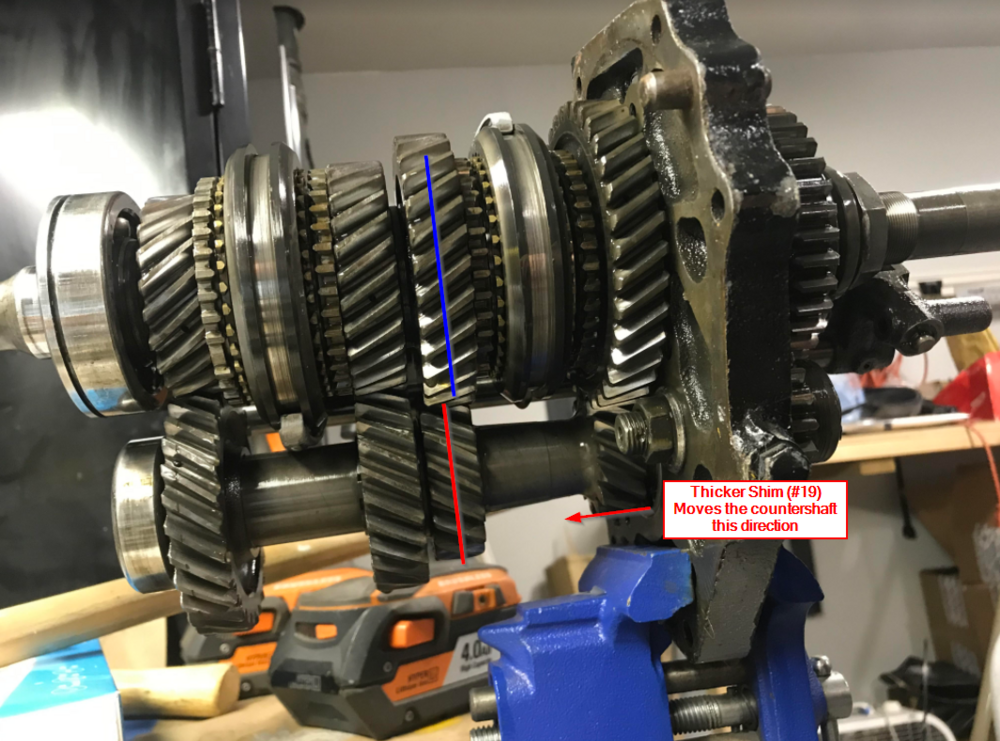
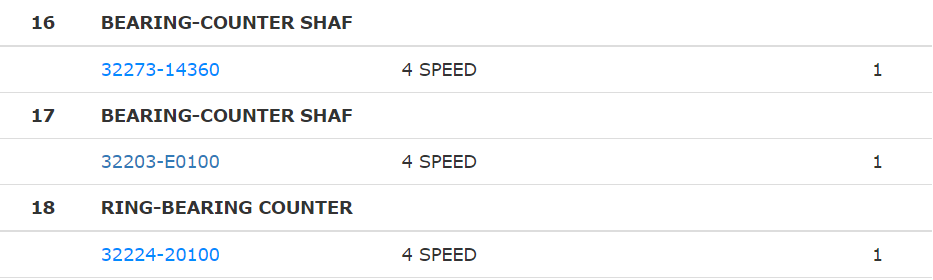
@EuroDat @Zed Headhopefully I haven't exhausted your patience on this thread but I have an interesting update. After digging through quite a few old parts catalogues I actually found the OEM thicknesses for #19 from my previous post in a catalogue for the R3W71A of all things. Here are the part numbers from carpartsmanual: And the parts catalogue with thicknesses listed for those part numbers: I believe I mentioned it already, but the current shim #19 in my transmission has a thickness of 2.65mm, where the OEM range given is 0.40-1.00mm. This brings me back to the gear mesh alignment question, here is another shot of my gear alignment with the 2.65mm shim installed and the new adapter plate bearings in place: Seems to me the effects of the thicker shim are most evident on the second gear mesh, pretty easy to tell since the countershaft gears are at a fixed distance as part of the shaft itself. I also noticed on third gear where I drew the blue arrow that the gear teeth are very close to the synchro assembly teeth. I see no chipped teeth or damage but feels like my thicker shim pushes those too close to each other, maybe some rubbing there caused the noise I heard? My current thought process is to put a 1.00mm shim in for #19, reassemble and check measurement "A" from post #57. What confuses me a bit is the F4W71A seems to be the inverse of the F4W71B when it comes to shim #18. Notice above only one part number is given for #18 on the A type. Still searching for an OEM thickness for that part (32224-20100), but that must have been one of the changes from A to B type. Thoughts?


-
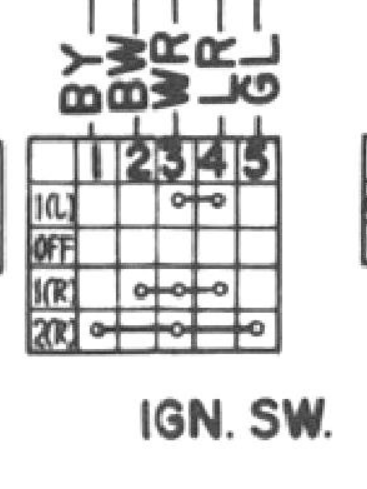
@Zed Head I went back and found the 71 wiring diagram I used from the 1971 FSM Supplement and it seems to show the same thing as EuroDat's 72 diagram. If it is accurate I am still wondering how the car can start with the B/W to the Ballast being switched out of the circuit in START assuming you had that wire "swapped" (connected to Coil +) Not to dwell on that issue too long, but I think this is what was confusing me back when I did the wiring on my car.
-
I agree that it doesn't make sense from a schematic standpoint that the car would start with the wires swapped, and I seem to recall being confused by what the original schematic was saying compared to what I was actually seeing on the car. Sorry I can't remember all the details this was almost a year ago, but I specifically recall switching the two and that fixing my tach issue. Take it with a grain of salt, I completely rewired my car myself so good chance something got messed up along the way. Still works perfectly for now, fingers crossed it stays that way. Like I said it is most likely an issue with the tach itself in this case, but I would just be curious to see if swapping the B/W fixes the problem on this car as it did on mine (or even allows the car to start and run).
-
I had this same issue on my 1971 240Z, albeit after a complete rewire of the entire car. The car would start and run fine but the tach was completely dead, turns out I had the two B/W wires backwards. Skimming through the thread I believe some of the others have already addressed the diagnostics really well, and if I remember correctly how the circuit works the ballast resistor gets switched out of the circuit when the key is in the Start position so that the coil can be connected to the full battery voltage for starting the engine. It gets switched back into the circuit in the run position to keep the coil operating at a reduced voltage, since it would get burned out operating at full voltage for an extended period of time. Someone correct me if I am wrong, but the ballast resistor is actually there to protect the coil, and the points condenser on the distributor is for protecting the points themselves. Anyway, sounds like it could be an issue with the Tach itself but might be worth swapping the two B/W wires just for kicks. Pretty quick way to rule out the issue I had.
-
Understood, I suppose my last question then is how important is it for the center line of the gears on the main shaft and countershaft to be perfectly aligned. I assume the thickness of #19 plays directly into this, and that you would want the mesh to be as aligned as possible. Here is a picture of my setup before disassembly, the center lines are a bit exaggerated but it illustrates the point, they did seem to be very slightly misaligned which could be due to the original shim being replaced by the thicker aluminum one. Which may also explain why there was no #18 in my transmission. I should be able to easily determine a thickness for #19 if I align the gear mesh. Wonder if misalignment has anything to do with my original issues.
-
@EuroDat correction on this post, #19 is the item I was referring to as the shim between the countershaft bearing and the adapter plate, the non-OEM aluminum spacer I showed in my picture was #19, not #18. I was looking at the countershaft backwards in the diagram, sorry for the confusion.

-
That is my concern with this non-OEM adapter plate shim that seems to be in my transmission, I am worried the shim not being original might not be properly compensating for the shaft and housing tolerances. Could also be throwing off measurement "A" in your post for the end float. I also did not have a front shim at all when I disassembled my transmission, can't recall if I mentioned that earlier. I found a picture of the same adapter plate shim in my Haynes Manual, the I.D. looks much larger, which seems to support my theory that my current shim was something installed during a rebuild: Wondering if I can "reverse engineer" the thickness by installing the counter shaft without an adapter plate shim and subtracting out the recommended range for end float from measurement "A" above. Any better suggestions come to mind?
-
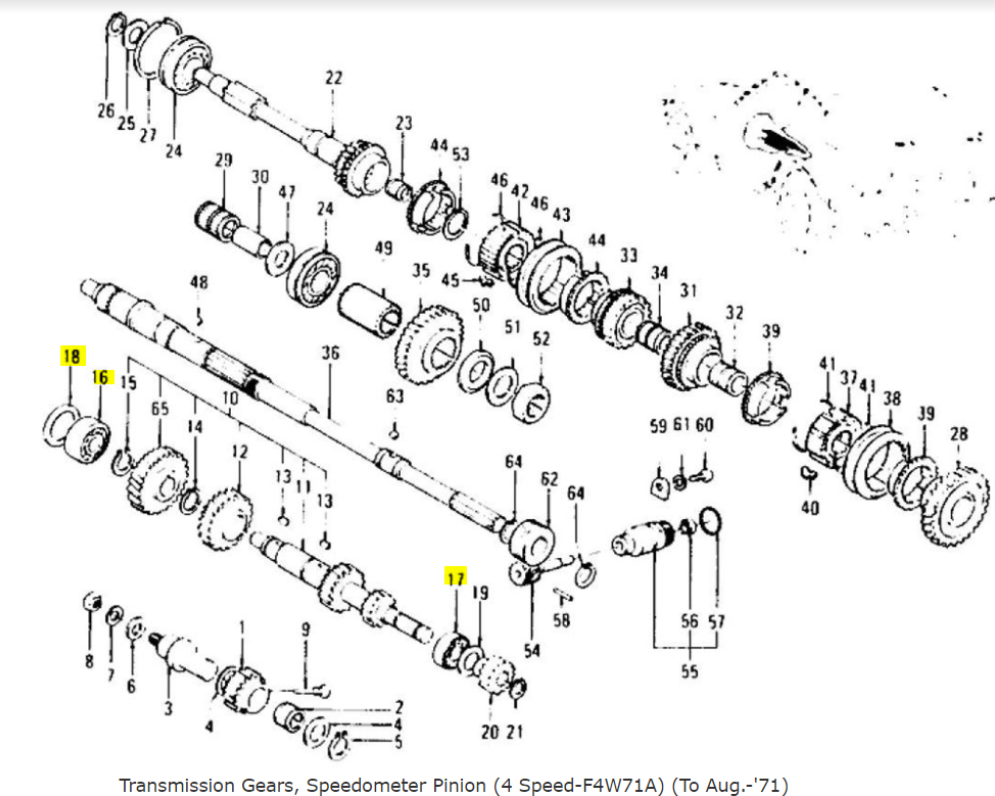
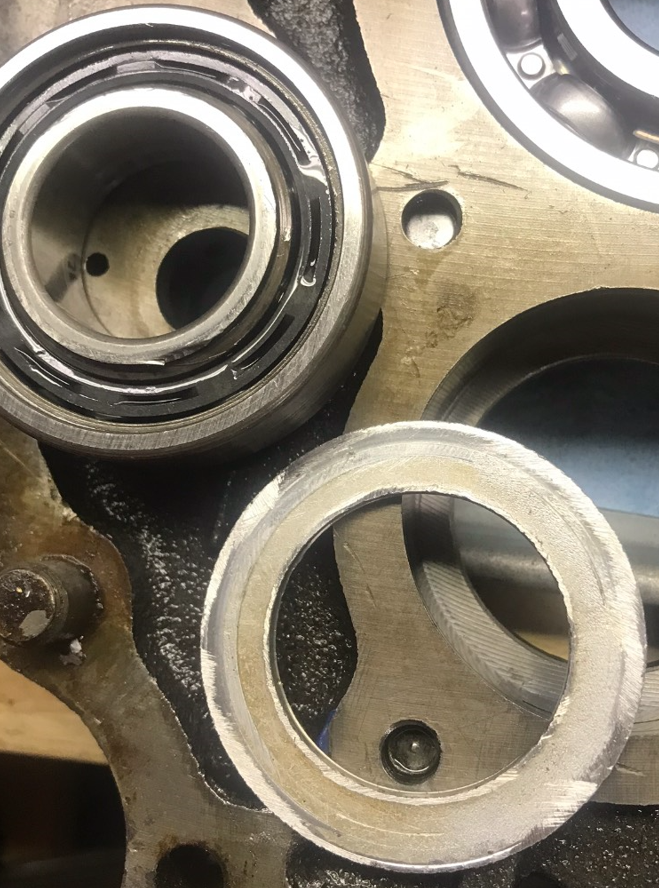
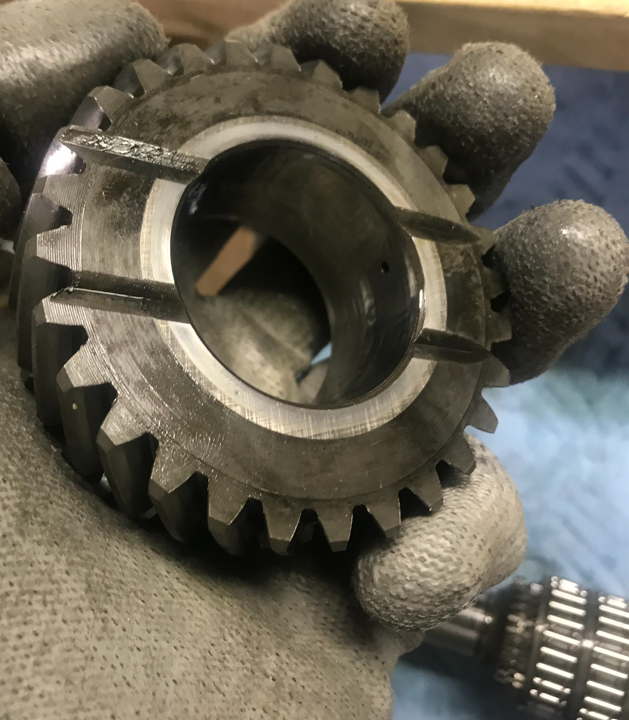
@EuroDat another question for you in the ongoing rebuild saga, item #18 below is some type of shim or spacer that goes under the counter shaft bearing in the adapter plate: I am coming up empty on any information on the OEM thickness for this shim, it is NLA. Do you happen to have one to compare or know offhand? I am pretty sure the one in place currently is not OEM, and neither is the bearing sitting on top of it (item 16), looks like a cheap replacement. Item 17 at the other end of the counter shaft on my transmission is a Nachi bearing which is probably the OEM bearing, I am replacing both with new Nachi bearings. Just want to make sure the shim is the correct thickness, mine is a rough cut piece of aluminum with measurements O.D. - 51.5mm, I.D. 34.2mm and thickness 2.65mm. Picture of the bearing and shim: Also, if it helps anyone in the future the countershaft bearings are listed as NLA but with a little digging I found the Nachi replacements: Item 16: Nachi 6205 C3 Open Bearing (25mmx52mmx15mm) Item 17: Nachi 6304 C3 Open Bearing (20mmx52mmx15mm)

-
@EuroDat thanks for the additional clarity, helps to clear things up a bit. I definitely have 240mm setup with the original shorter collar, it measures 34mm from the face of the bearing to the top of the ears. I removed my pressure plate today and measured the height on the forks, it is approximately 47.5mm. I was right around 10mm short on the 92 mm measurement from the ears to the face of the flywheel with the current collar, it looks like the 75-83 Z/ZX Coupe Non-Turbo collar should match up and get me very close to the 92mm.
-
Thanks for the help, I just rolled under the car to check, I do have the 240mm setup because it has 9 bolts holding the pressure plate on. Sounds like from what you guys said this is fine to run on my car? I do intend to check the 92mm measurement before bolting the transmission back on, something I did not check the first time around. I know for a fact that I have the shorter Type A throwout bearing collar, have a hunch I will need to order one of the taller ones to hit that measurement.
-
@Zed Head @EuroDat @Dave WM I found another possible issue when I was digging back through all the part numbers from my engine/transmission rebuild that I was hoping someone could help clarify for me. When I started this project 2.5 years ago and had little to no knowledge of Z cars, one of the first things I ordered was this Transmission Service Kit from Z Car Source: https://zcarsource.com/transmission-service-kit-240z-260z-280z-72-78-new/ Mark it up to inexperience or my own stupidity at the time, but I did not look closely enough at the fact that this only works for the B type transmission. Pretty obvious based on the compatible years in the title, kind of kicking myself for that. Anyway, this kit is what is currently on the car with their clutch kit (14400103 - Clutch Kit, 260Z 280Z 280ZX 300ZX, 74- 83 Non-turbo 2+2, 81-86 Turbo - new) and flywheel (13100402 - Flywheel (Manual Transmission), 260Z 280Z 280ZX, 74-83 2+2 and Turbo - new). From what research I have done I am a little confused on compatibility year to year but it seems like the flywheel interface is the same for all Zs 70-83. Would that mean that this flywheel will work for my 71 regardless of the description stating 74-83? Similarly for the clutch disc and pressure plate, the overall kit itself states compatibility for 72-78, while the sub kit with the disc and pressure plate says 74-83. Some other kits with a clutch disc and pressure plate say 70-74, that seems to indicate that the disc and pressure plate for a B type trans will also work for the A type? Hope that makes sense, just trying to determine if any or all of those components need to be replaced and if that may be contributing to my issues at all. It may be that other components in the Transmission Service Kit like the clutch fork or rubber shift boot are why it is labeled for B type only.
-
I will give that a shot, thanks. A few of the bearings will not be in until the end of the month. I will update the thread once they are in and I have tested the transmission.
-
Thanks for the tips. I am not having any issues with synchronization, so I will check them according to the manual and hopefully they are fine to continue using. I will plan to replace seals/ball bearings/detent springs/main shaft needle bearing etc. Maybe thinking too far ahead here but once that is done and the transmission is back in the car, assuming I am still having an issue is there a recommendation for how to isolate which part of the drivetrain it is? I had considered the idea of removing the prop shaft and running through the gears to see if there is any noise to try and narrow it down to the trans or something else. However I don't know if the same issue would occur without the load on the transmission.
-
Interesting, based on what we have looked at so far it seems like this is the only issue from the transmission internals correct? Anything else I should check before replacing the main bearings and reassembling? Would you recommend replacing the synchro rings as well while I have it apart or leaving them alone, I know new is not always better but definitely don't want to pull the transmission again in the near future if I can help it.
-
Good suggestion, I did check all of the shifting mechanisms once I removed the transmission housing before disassembling everything. The coupling sleeves and selector forks were aligned and everything clicked into placed pretty smoothly. The forks were held onto the selector rods tightly by the pins. Seemed like the detent balls/springs were doing their job as well. I mentioned in post #31 that I might have found my issue, or one of them. The main shaft adapter plate bearing seemed like it was starting to fail once I removed it from the plate and inspected it further. I didn't really notice it when the shaft was still installed but checking the bearing itself once removed it is not rolling as smoothly as it should. Maybe under higher loads it causes excess vibration. I have a replacement on order and will replace both of the main shaft bearings when they come in. Thanks, I will definitely check that out. Probably more helpful than the 72 FSM I have been using.
-
I should also ask, do you know if this applies to both the A and B transmissions? I downloaded my copy of the FSM from Xenonzcar but the 72 version was the earliest available and I would assume it covers the F4W71B. Is there a 1971 FSM floating around somewhere?
-
Good to know, thanks for the suggestion. I will triple check the hub orientation during reassembly.
-
I wondered about this as well, however I may have found one of my issues. When I pressed the larger main shaft bearing out of the adapter plate and inspected it further it does not spin smoothly. It chatters a little bit and seems like it may be going out. I am wondering if under load in 3rd gear it causes the excess vibration. You mentioned 3rd puts the most load on the main shaft correct?
-
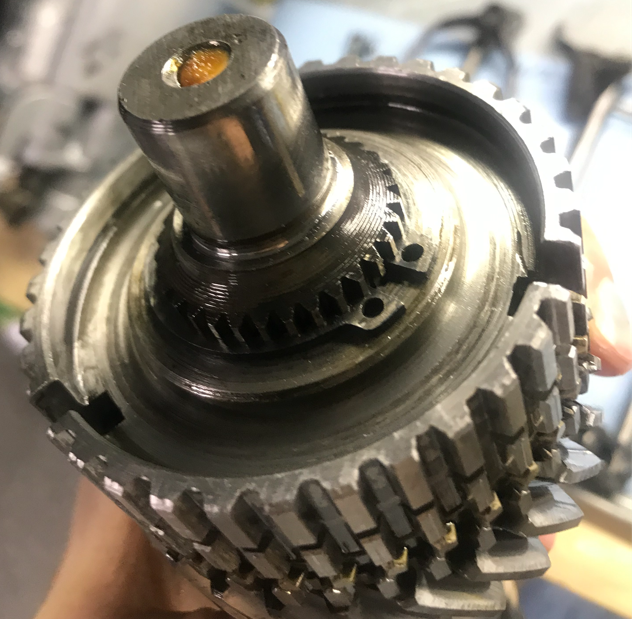
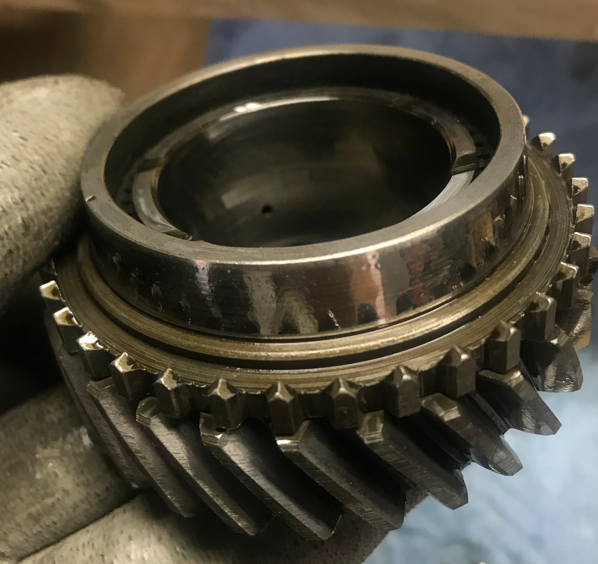
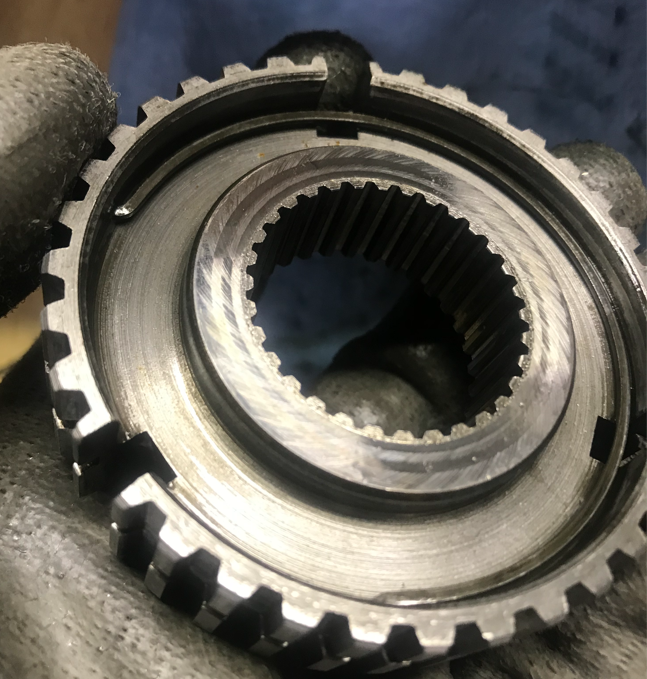
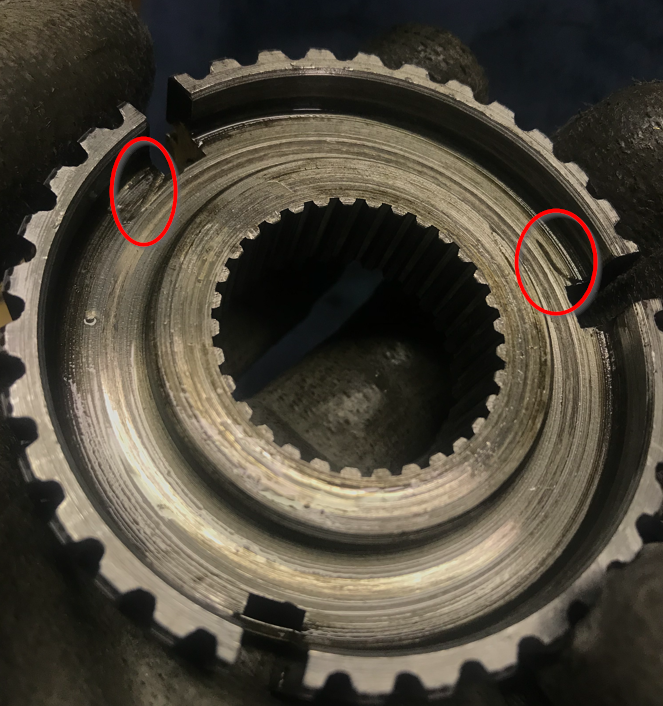
Yes, that is my mistake. The 3rd gear needle bearing is not blueing, just the lighting in the picture. No discoloration on the left side row. The circlip was in place and tight, no damage that I could see. The 3rd gear assembly looks ok to me as well. The only thing I notice on the hub is some wear on the 4th gear side where the 4th gear synchro rides. I circled it in the picture but there are two dents or chips there, the 3rd gear side looks much better. I assume the wear around the inner diameter is from the circlip, is that normal? You can actually see one of the dents/chips I mentioned in the assembly picture above as well, on the right side of the hub.
-
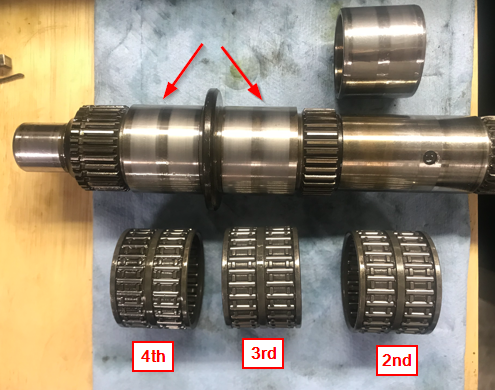
I finished disassembly of the main shaft, all the individual gear needle bearings look to be in good shape. Even wear patterns on the collars that they ride on as well. From what I can tell the collars that my arrows point to for 3rd and 4th are part of the main shaft and there is no ball bearing under those collars like the one under 2nd? (I removed that small ball bearing, not pictured but it was in place).
-
1. Yes, there was clearance with the shifter and the transmission tunnel. There were no modifications, original engine and transmission is still being used with the original mounts. 2. I did not specifically test this, however I don't recall any changes when holding the gearstick. 3. It seemed to be through the whole rev range, I didn't notice it getting significantly louder at higher RPM though, mainly just a proportional increase in frequency with RPM. 4. I did not notice a change between acceleration/coasting/deceleration. I should have spent more time on this to note differences, but I only put a few miles on the car with the issue for fear of causing further damage. The noise seemed bad enough that I was worried I would cause significant damage if I kept driving it. Hopefully this helps, sorry I cannot offer more detailed data now that I have pulled the transmission. I believe I mentioned it already but I did also notice a slight clunk and maybe a bit of grinding in reverse as well. Nowhere near what it was in 3rd, but still enough to notice. I have been hunting down bearings, I have ordered the two larger main shaft bearings and I am searching for the two smaller counter shaft bearings. I may replace the main needle bearing as well just to be sure. From the diagram you posted above it looks like there is another needle bearing on the main shaft that 3rd gear rides on, #34. Could that be causing similar issues?
-
@EuroDat I attached a video of the needle bearing you mentioned between the main input and output shafts. It looks in good condition to me, maybe I should plan to replace all the bearings while I have it apart anyway just to be sure. Any other thoughts on what could cause the issues in 3rd gear? IMG_6370.MOV