
ckurtz2
Free Member
-
Joined
-
Last visited
Everything posted by ckurtz2
-
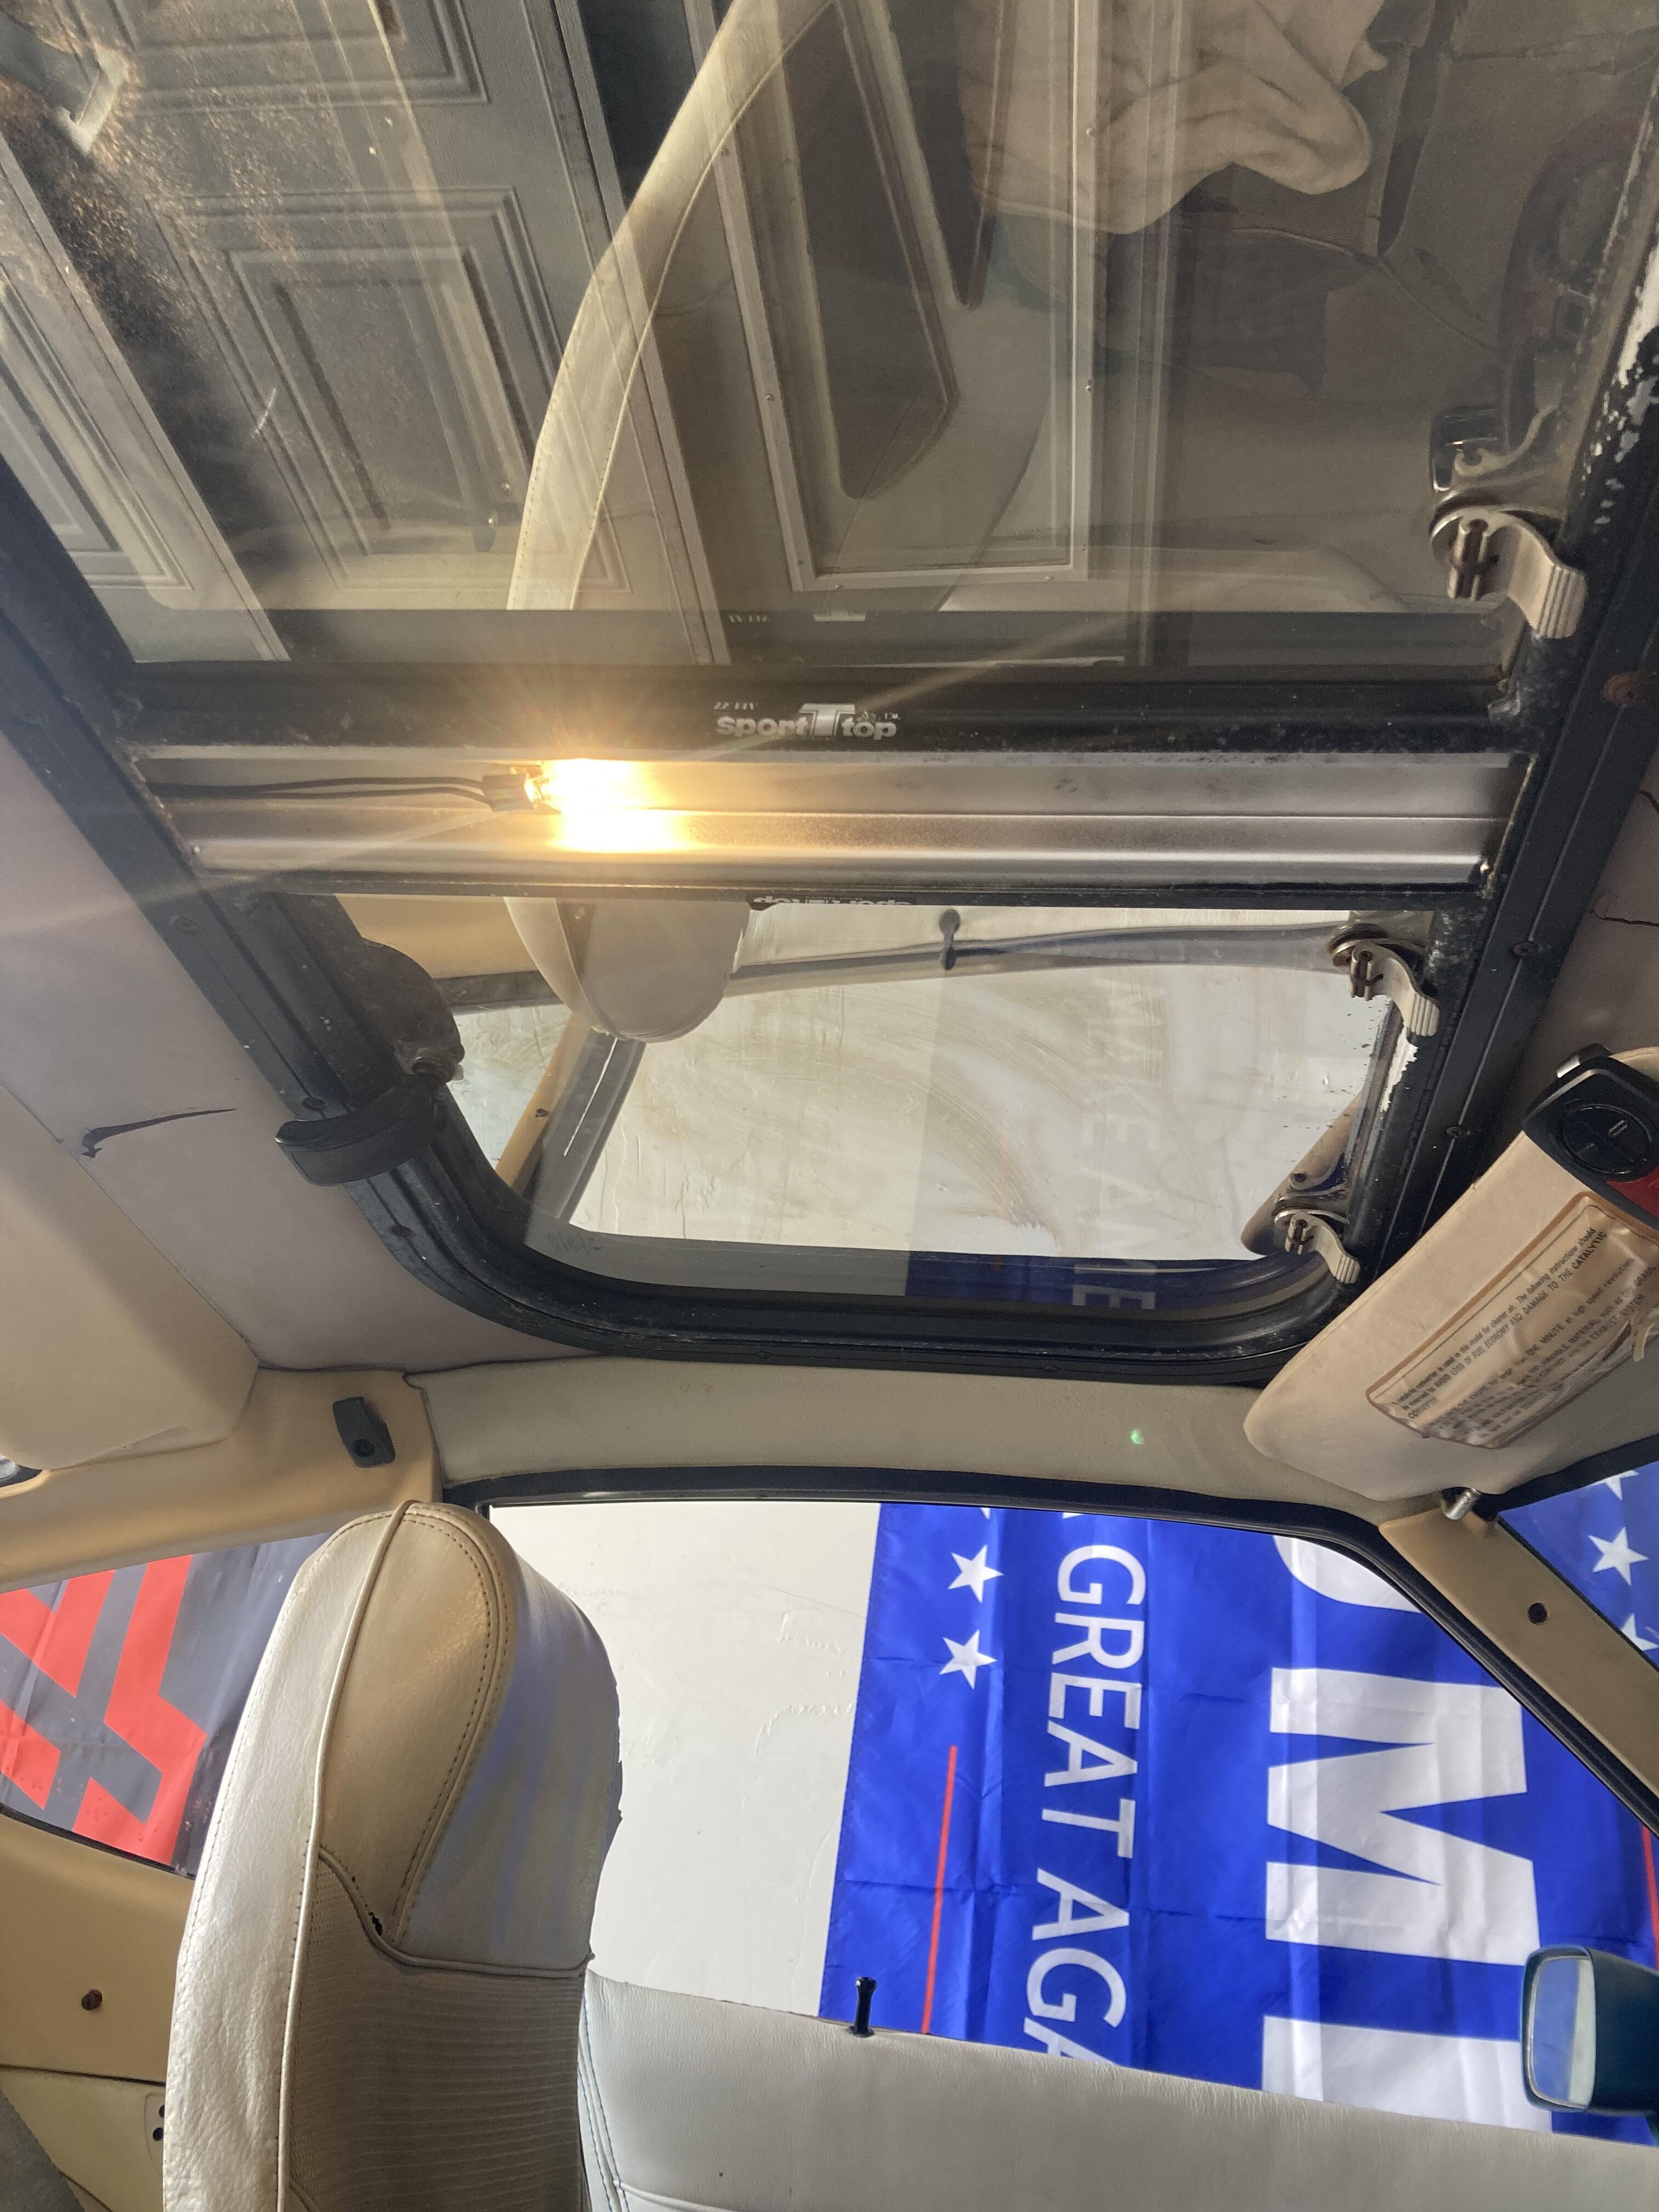
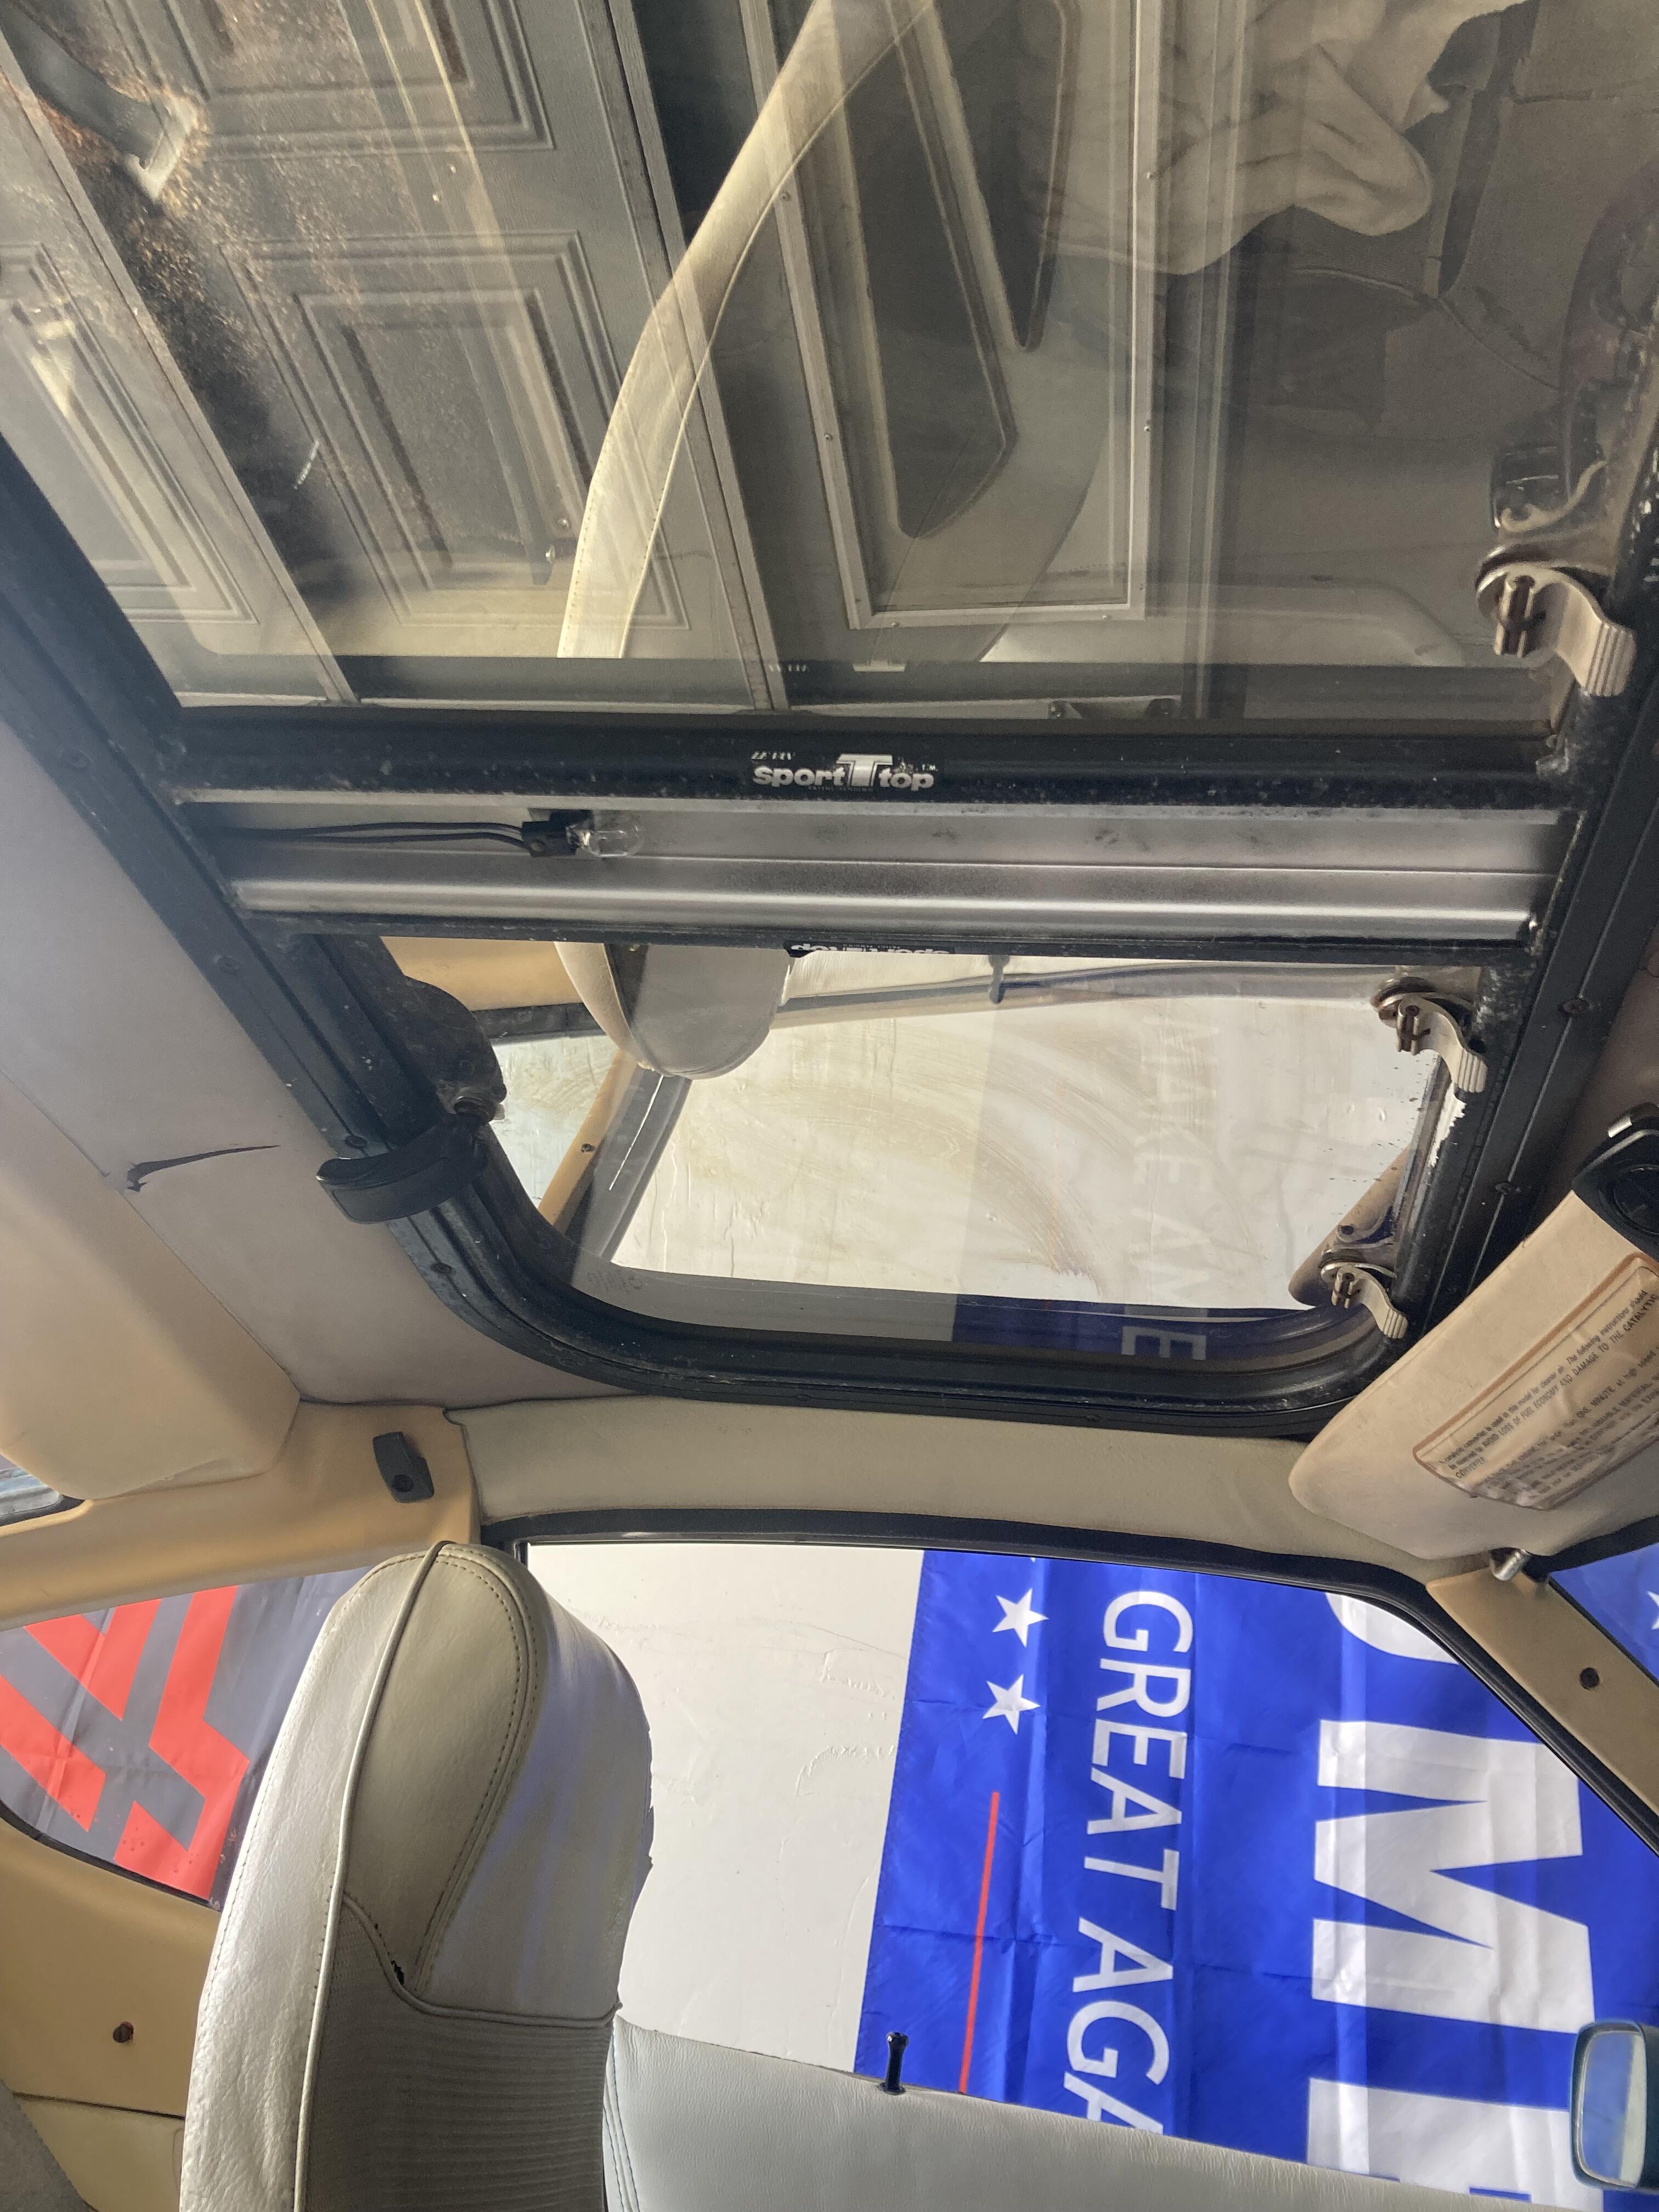
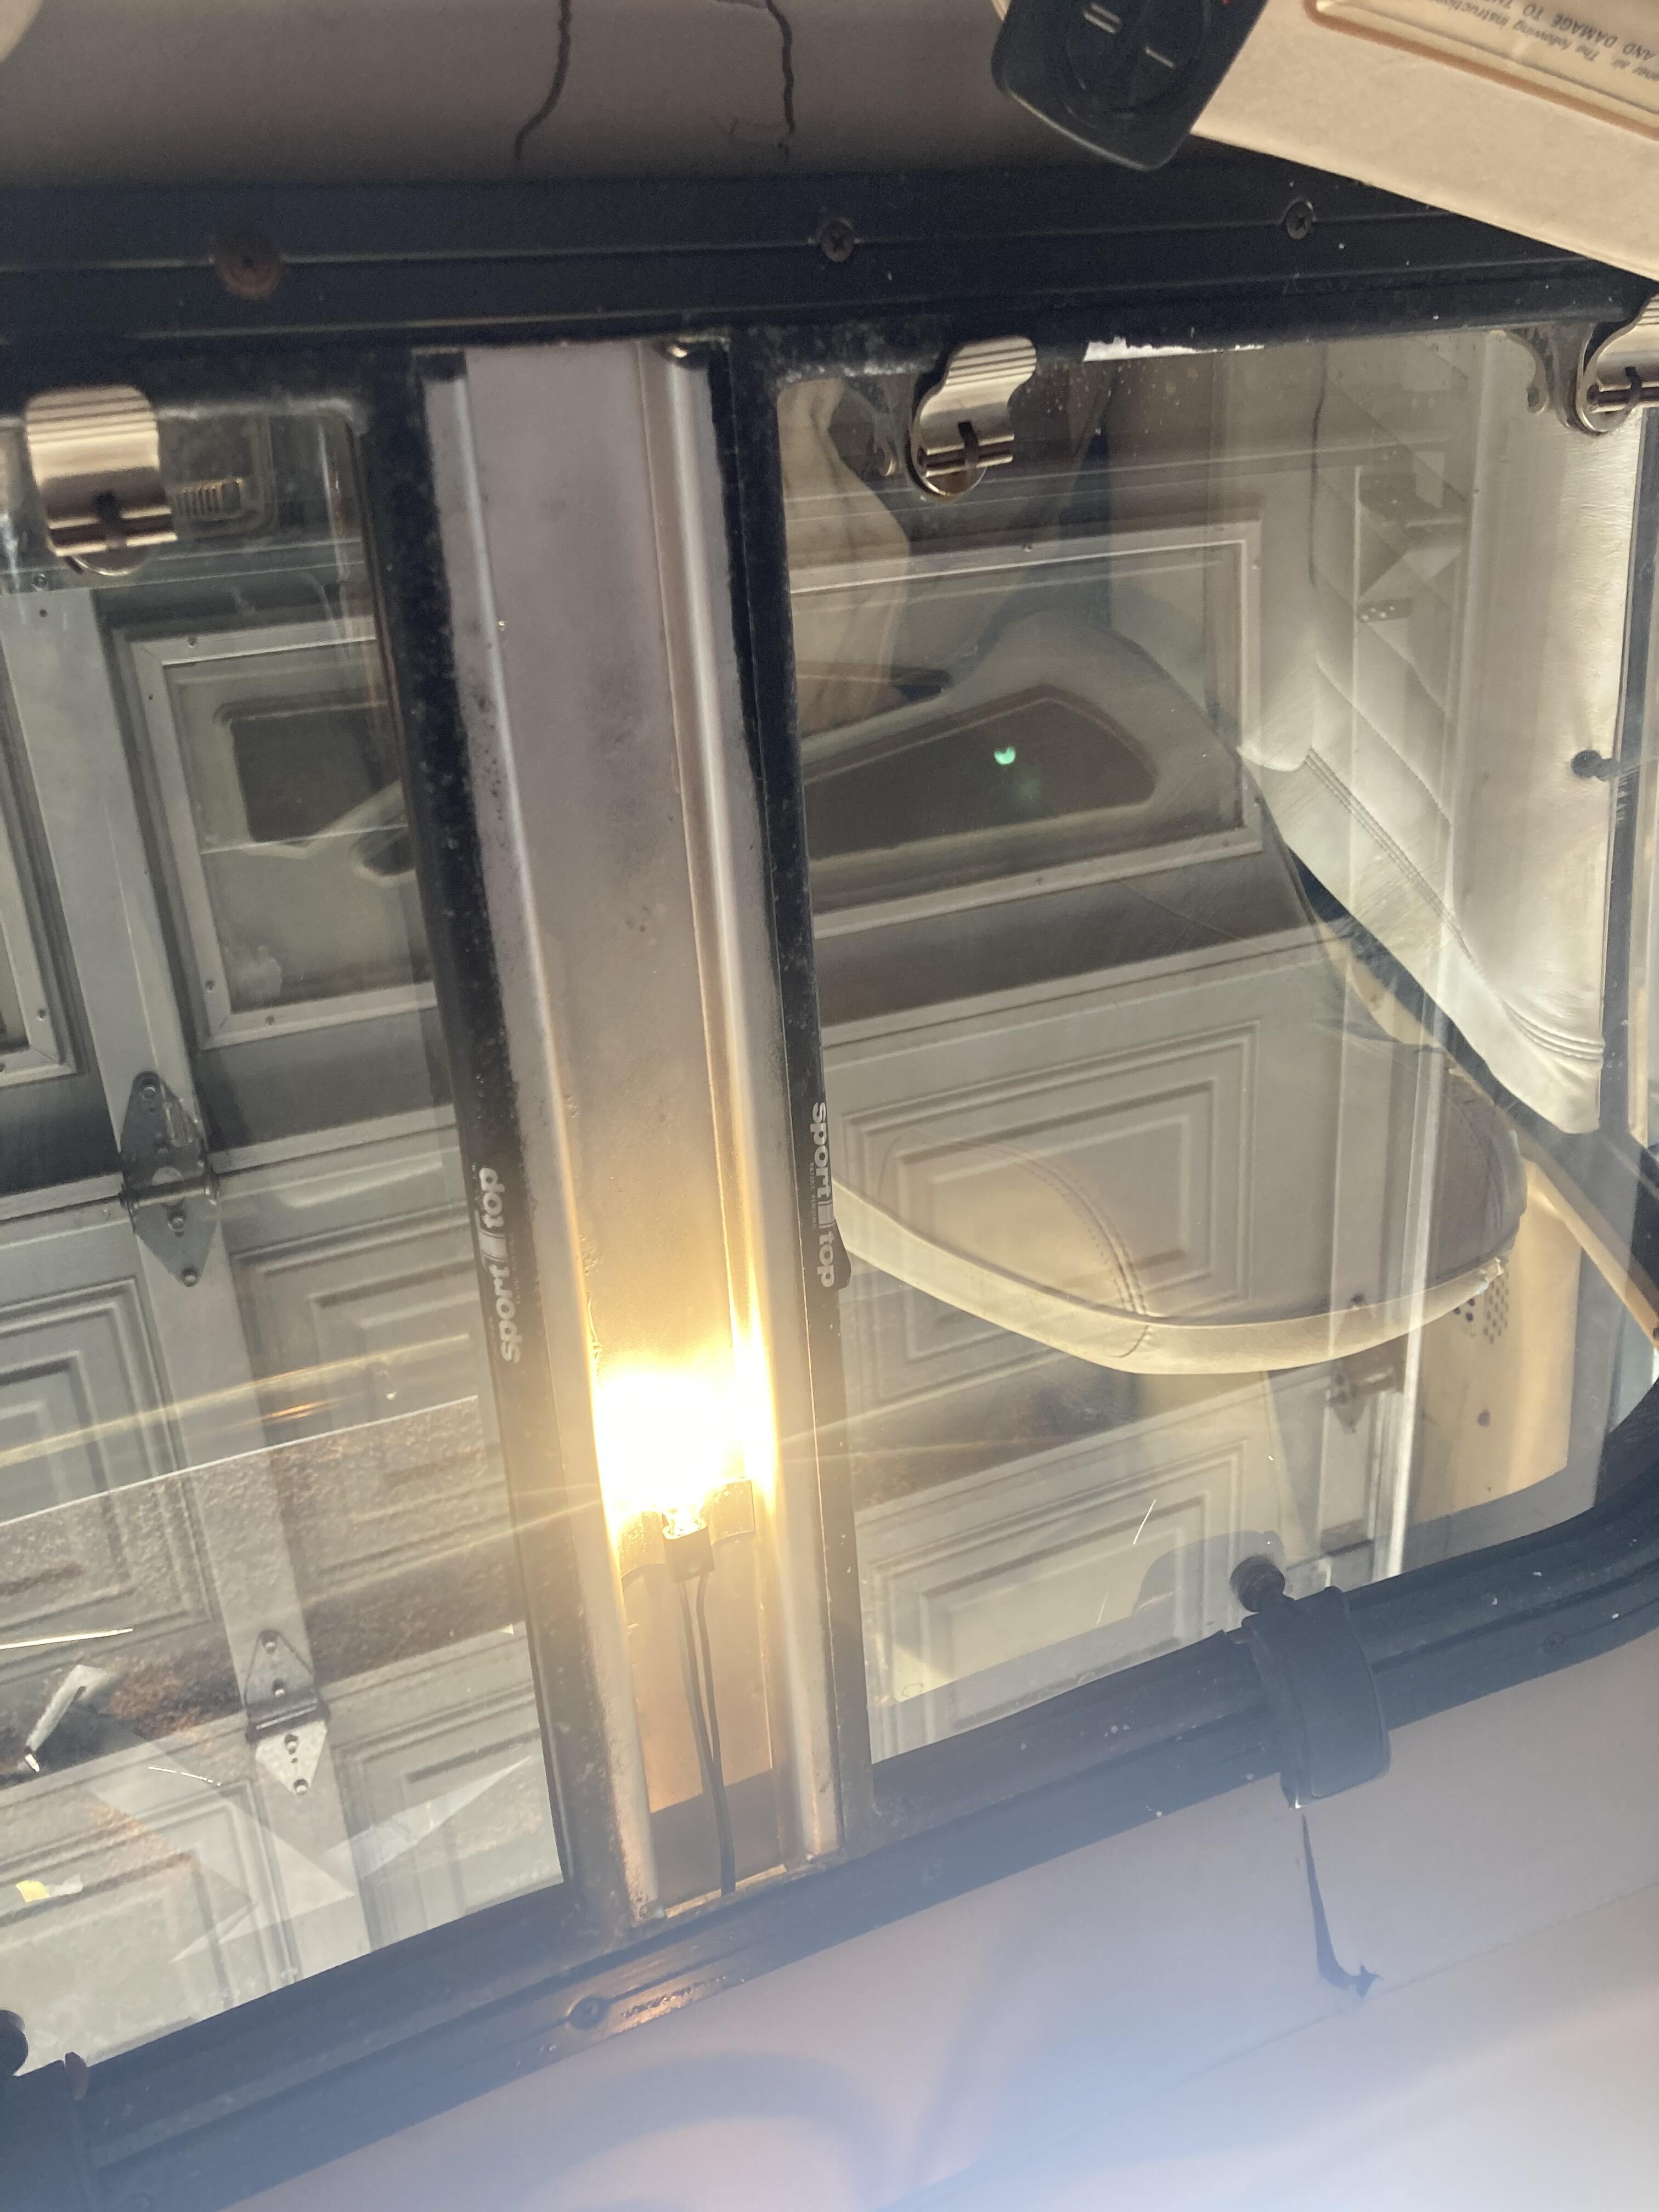
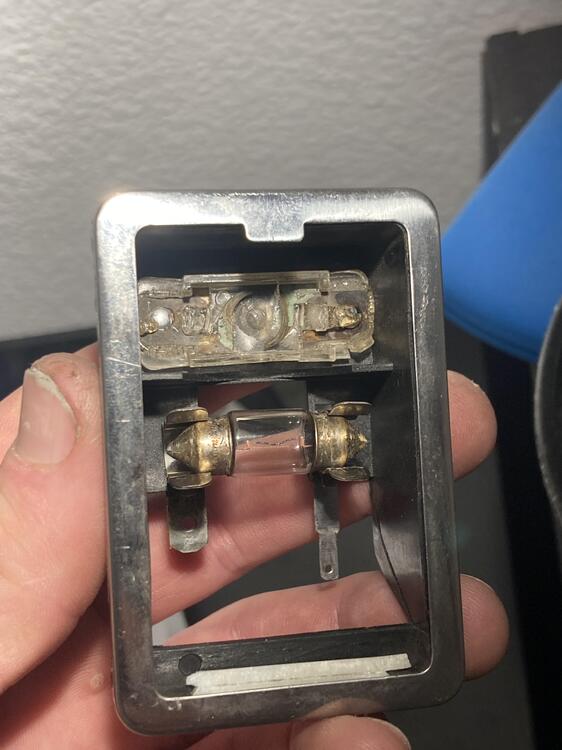
Hey everyone! My 1977 280z has the infamous split sun rooves from a dealership. I know they are extremely undesirable (I am not restoring my car to make a profit) to collectors, but they are so practical I absolutely want to keep them. Anyways, as some of you may know I just got my dome light working. As it turns out, my car has a second light alongside the dome light that perfectly lights up the interior (I never once noticed this light until it I fixed the dome light). I can't seem to find much written material on these rooves, and even less photos, but it looks like my interior is missing some sort of trim piece that covers the bare aluminum and light. Does anyone have any photos of what this piece should look like? I provided photos, thank you in advance! If you have one that you could sell that would be even a bigger plus😁


-
Well, I got the dome light working with both doors! I can't give an exact answer on what needed fixing, except that I cleaned every ground possible, and it still wasn't working. Then I blew the dome light fuse when scrubbing the fuse block. Replaced the fuse and came back about 30mn later and it was working. So mission accomplished, but still lost as to what was wrong. The fuse was fine until the moment it blew (tested it multiple times for continuity, also the metal band was visibly fine). Thank you to all above who took the stab in the dark to help me. I appreciate any and all advice.
-
View Advert 280z License Plate Lamp Sub Harness Hey guys! I am looking for the sub harness to the 280z License Plate Lamps. Needs to be in good working condition. Mine were toast at the sockets as there was corrosion inside and out. Tried cleaning them, but the plastic crumbled. Advertiser ckurtz2 Date 11/21/2022 Price Category Parts Wanted Year 1977 Model 280z
-
@Racer XFrom the B wire and BR wire I get continuity from the wire to anywhere on the chassis. In this case I put one end of the probe on the wire and the other on one of the bolts that mounts the center console to the chassis (I had to open the lid). If you want other odd thing I noticed. I purposely shorted the B and the LW wire to see if it would spark (I figured the worst that would happen is I would blow the fuse). Well, nothing happened. Not sure if this helps anything, I know its an extremely stupid way of testing, but at this point I was merely curious.
-
Yes the bulb in the photo is the one I used. No LED So I tested to see If I got voltage at the bulb socket with the bulb removed. I did. I then tested the bulb by a continuity test and I got it as continous, which I assume is proper. I then used a brand new bulb in the circuit and it still did not light. Maybe I need a basic lesson on how these festoon bulbs work. To answer your other questions. The input for the push button (B wire in diagram that goes right to ground) showed continious between it and the chassis. The other female spade connector (BR in the diagram) showed 0.01ohm with the chassis when the door was open and then was not continous when I closed the door. Thus I believe it is functioning, but maybe with some resistence. I removed both switches and they both were disgusting. I cleaned them up at the door and also where they connect to the harness. Circuit still doesn't work. Should I also clean the area on the door where the switch pushes into? I provided photos of the before and after. So between LW and B and LW and BR I read voltage. Also between LW and chassis ground I get voltage. I agree with you I think it has to be corrosion at this point blocking the flow, but I am confident in the door switches. I can't test between battery positive and the LW wire, because I don't have long enough multimeter leads. I have the $12 autozone special for a multimeter haha. Looking to upgrade to something if you have any recommendations, I have been dealing with enough electrical problems to justify it.


-
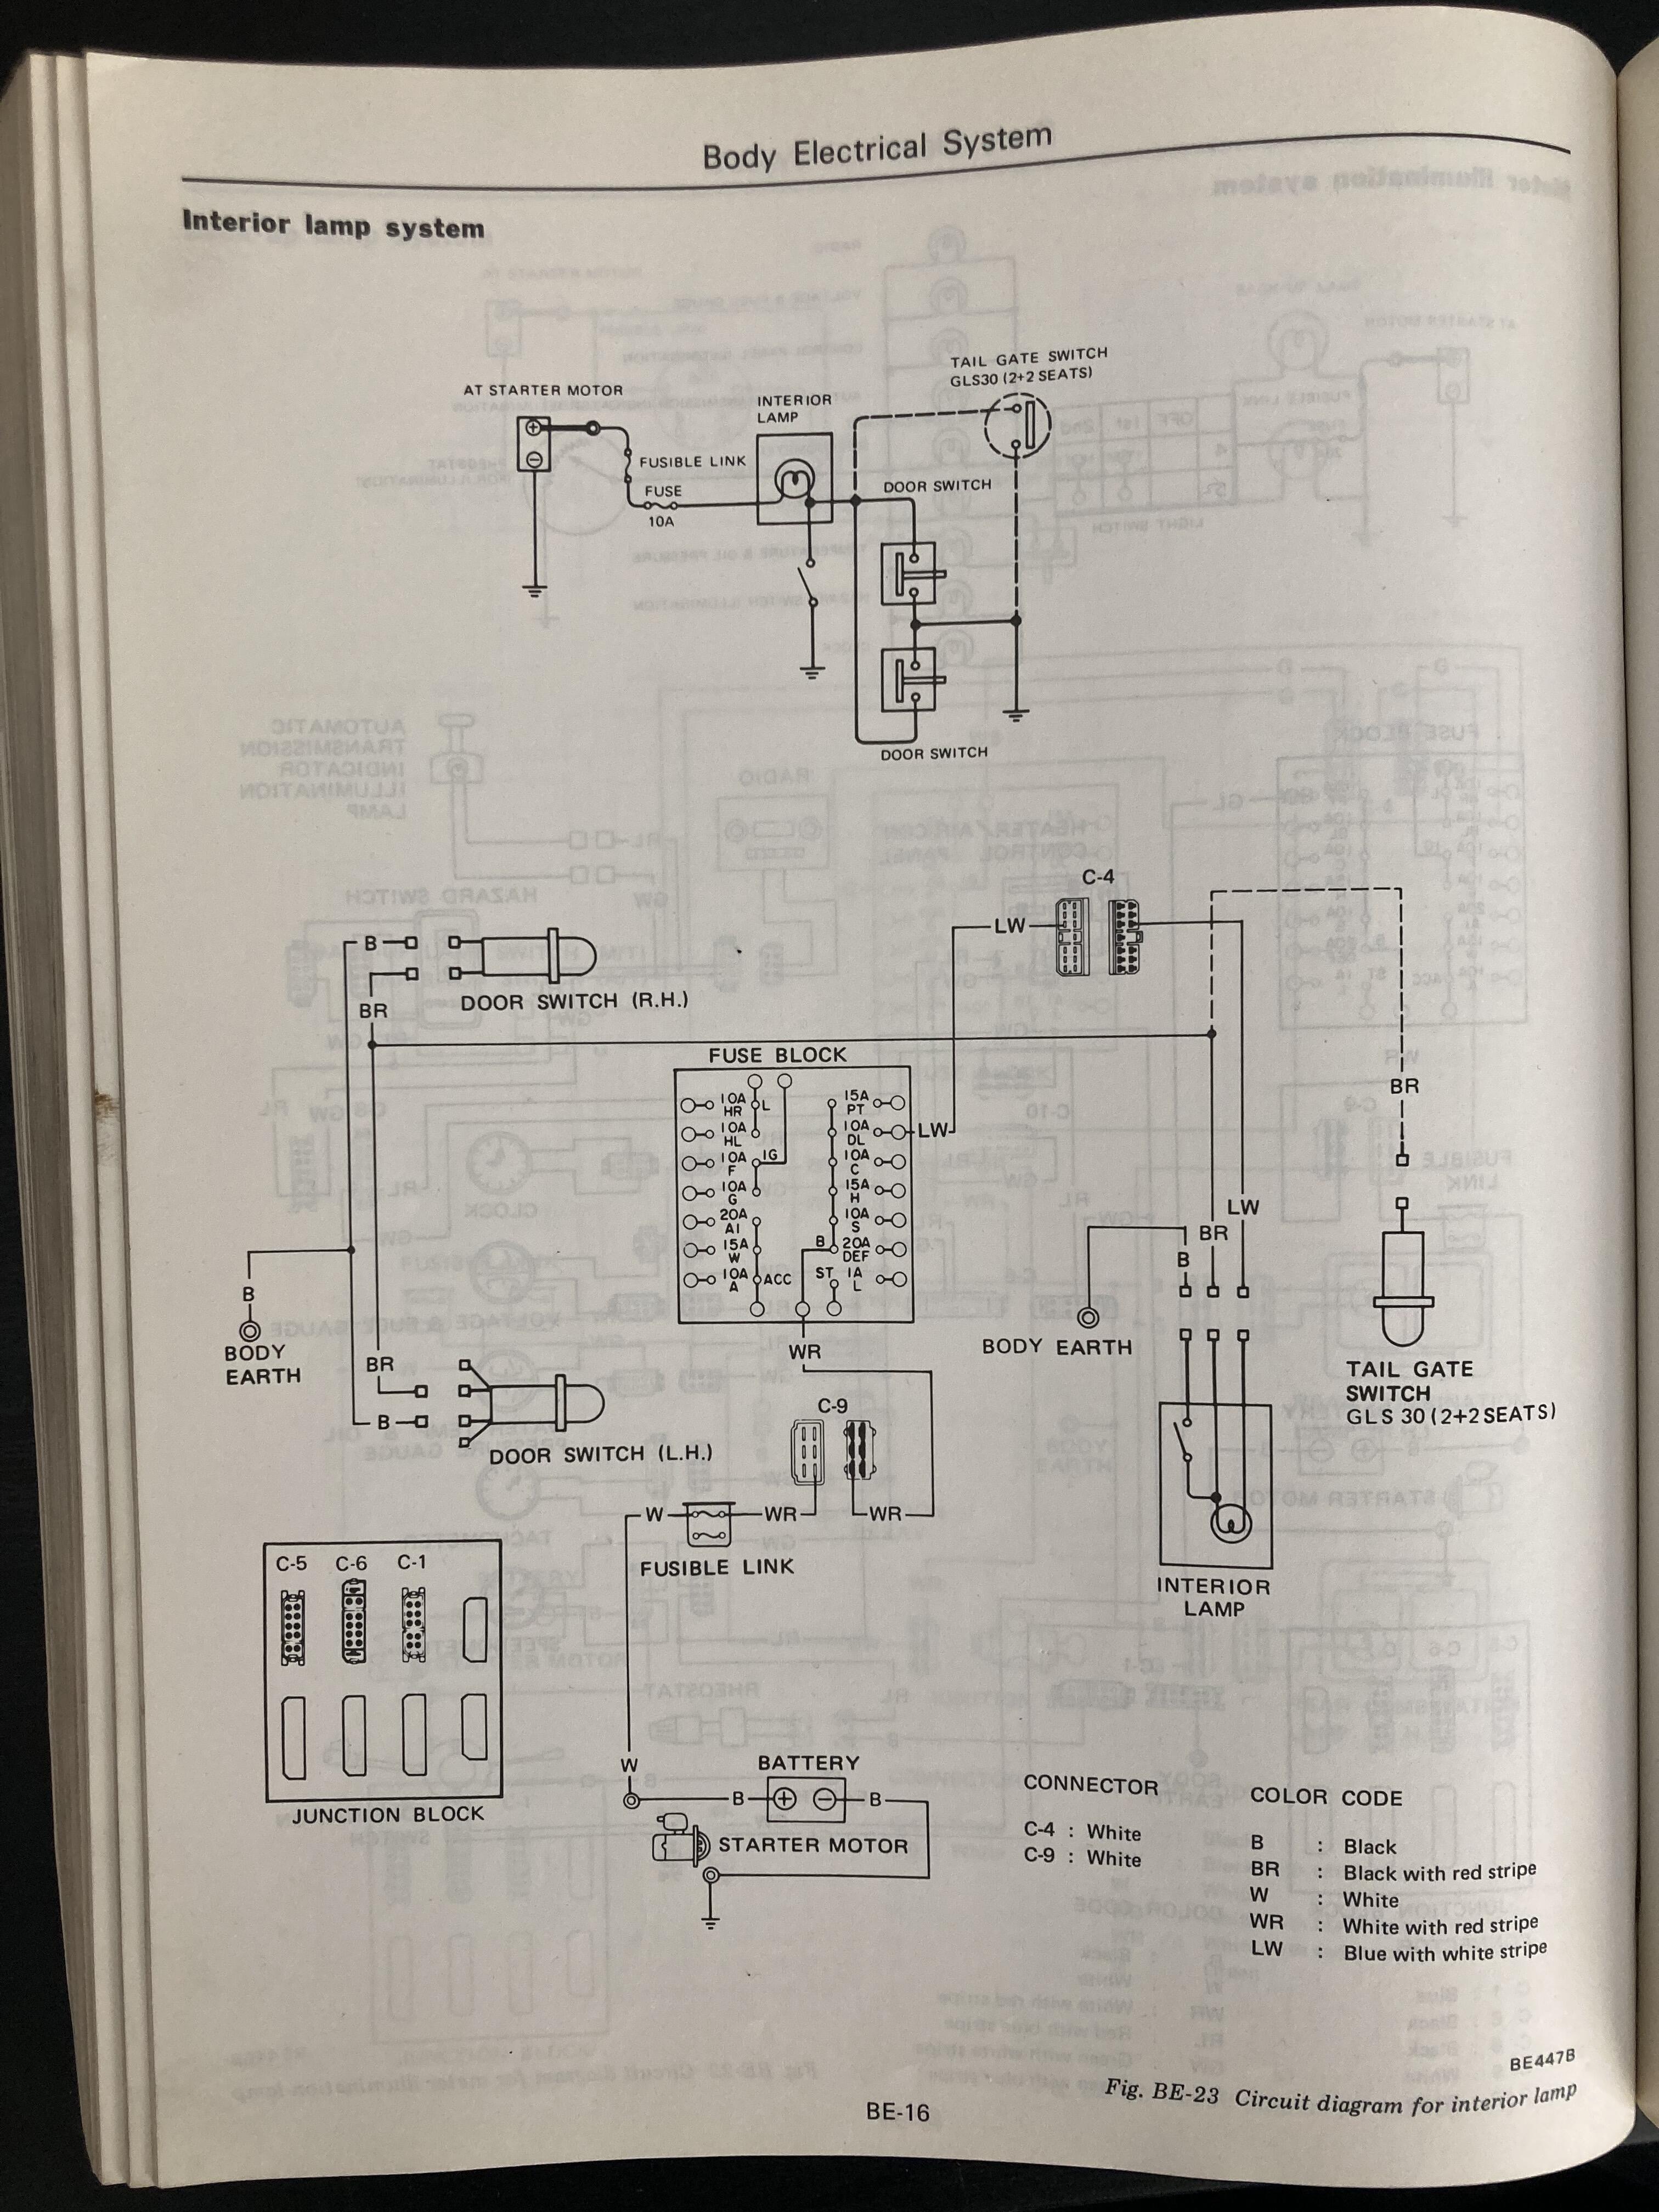
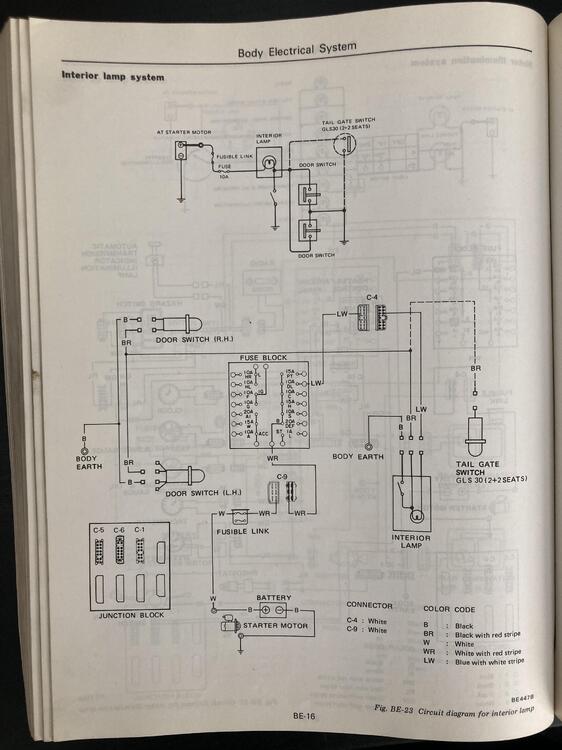
@SteveJYes, I believe I understand it. I wasn't just measuring one end of the bulb socket and then connecting the other end of the multimeter to a ground. I physically had One end of the multimeter to the positive, and one end to the ground portion of the socket, and it read voltage. I then while doing this would push in the door switch (which disconnects ground as you already know) and the voltage would go to zero. I am pretty sure that is how the circuit is designed? This is why I am so confused. Voltage reads fine at the fuse too. I think I am just going to get another interior light assembly, and just clean up grounds, but I am still mystified by the electrical magic. I have the FSM for a 77 280z that correlates to my car so here is also a great photo of the circuit. Maybe someone in the future will find this forum and get to use it too. And to confirm to remove the door switches I just use a screwdriver and pry them out from the front? they seem like they are on there pretty good. Thank you for bearing with me!
-
@Captain ObviousThe more I read into this the more I get confused too. Haha, yes, mine is definetly goofed beyond repair judging by that extremely helpful pic you just shared. Not sure what happened to mine. Pretty sure the lense probably broke way back in the 90s and the switch has just been festering with rust/oxidation ever sense. Any remaining part of the lense literally crumbled into a million pieces when I touched it. I saved this car from sitting 30 years outside so it has been full of awful surprises (somehow very little to no rust). Anyways to try and explain my issue better. I put a multimeter prong at both ends of the socket for the light bulb and I was able to read around 9-12V. So the fixture itself was getting battery voltage. Now my simple way of seeing if the door jamb switches were working was to hold the multimeter prongs at the fixture like before. Then I actually used my foot to push in the door jamb switch (disconnect the ground). The volts at the fixture then would drop to zero. Did this for both door jamb switches, and both times volts went to zero. So I can conclude the door switches are ok and providing ground for the fixture? However, I still could not get the dome light to turn on. So I bought a new bulb and still nothing. So I am a little confused what I am missing here. It seems like the bulb is getting voltage, but it won't light up. Then I realized my dome light is all messed up, because I can't use the on off button it provides. I was wondering if somehow the dome light assembly could have something to do with my problem. Let me know if this helps.
-
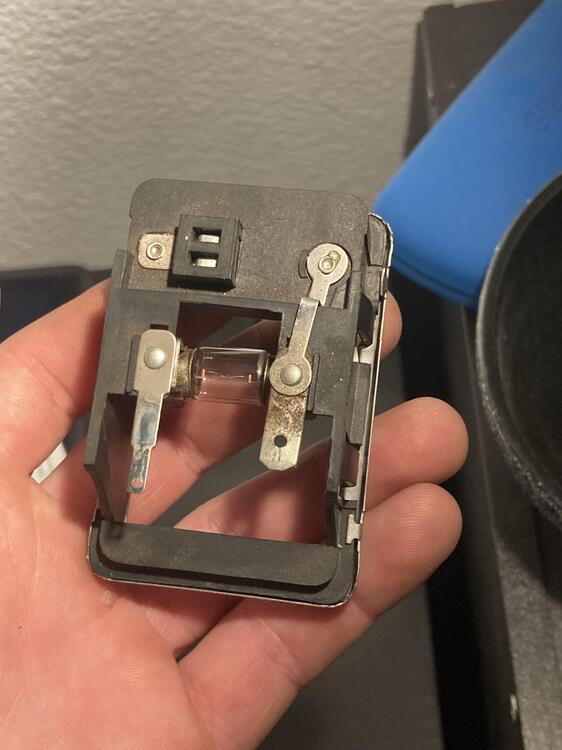
Sounds like I will be the source of amusement tonight for some of you. Decided to tackle why my dome light was not working. First made sure the switches at the doors were pushing in and out. Sprayed some deoxit in there and they freed up pretty nice and looked shiny. Next went to the dome light and measured voltage. I saw I was getting 12V between both terminals at the light bulb so I thought that was odd. I then measured voltage and then pushed in the door switches. Volts dropped to zero like I had hoped they would. Ok, so this made my brain all fuzzy why the bulb was getting 12V, but wouldn't turn on. Bought new bulb. Still didn't work. Then... 💡went off in my head. The lights require a push to turn on, and my entire lense is missing. So I think I just wasted several hours of my time, because the dome light requires a push to turn on? Can someone completely explain to me how this mechanism works? The dome light assembly itself. Wondering if there is a way to jump things to see if my light would work, even if I can't push the lense. Also judging by the photos I provided, do I pretty much have to buy a new assembly? Kind of disheartning considering the price for a new one. Thanks! Edit*** Now I am even more confused, because I just read that the push button on the dome light has no correlation with the door switches. The door switches turn on the light when the door is open and the dome light is on the off button. When the dome light is in the on position, it is just perminantly on.
-
@SteveJ I was putting pressure at both terminals at one of the fuses trying to read continuity and then I heard a click. Looked a little later at the dash and saw it was reading volts. So I didn't wiggle any connections, besides adding pressure at the fuse block. Only other thing I could think of is cycling the ignition switch a few times. I also think it is an intermittent connection somewhere.
-
They read 0V when the ign was off, when I tested originally. Now they read voltage. Hmmm. Hard to pinpoint the failure until the next time it acts up.
-
Also now looking at the fuse cover, the radio, defogger, and hazards are on seperate fuses. So that makes this a little more intersting too...
-
I went through the fuseable links. All were continuous, and also read 12.6V. Went back to the fusebox. Started testing all those you circled. All read 12.6V with the ignition on. All fuses read continious. While doing this I heard a click and then the radio turned back on. Voltmeter worked again, and hazards/defogger worked as well. So far my theory is that one of the fuses is making a bad connection with the block. I think it read voltage when the car is on, because the alternator allowed it to overcome the resistance. It may just be as simple as I need to clean the terminals on the fuse block. However, this may just be a symptom of the issue, as I don't know why the first fuse blew in the first place. Only time will tell.
-
@SteveJ Hazards do not work with the ignition on. They do work once the car is running though. Same with the rear defogger and radio. I don't really know where to start looking for how to start diagnosing this.
-
I have a new issue developing on my 1977 280z coupe. I am running a 280zx internally regulated alternator that is about 7 months old, as has been functioning properly. Anyways, the other week I got in the car and noticed my voltmeter on the dash was not working. I tracked it to a blown fuse on the passenger kickpanel, so I replaced it. I then started to notice the voltmeter would bobble slightly at idle which was odd. Today I came out to the car and noticed the voltmeter was not working again. I immidietly checked the fuse and it was fine. So I turned the key to the on position and the voltmeter would bobble a little, but it still was showing 0V. I started the car and the voltmeter swung right to about 15V and stayed there. So the voltmeter only reads while the car is running. Any ideas what these symptoms might be leading to?
-
Puns were terrible. Well that's a bummer. Hopefully someone else can help you out.
-
View Advert 1977 Datsun 280z Seat Hinge Cover Looking for the plastic cover that goes on the driver's side of a 1977 280z. Mine was missing it. However, the passenger one I still have so here is a photo. Reupholstering my seats:) Advertiser ckurtz2 Date 10/25/2022 Price Category Parts Wanted Year 1977 Model 280z
-
Hopefully yours is like this one and this helps you out!
-
Well shoot. I realized this is for a ZX. I have a 77z. However, I think they are the same part, as my heater valve was also vacuum operated. Let me see if I can find the video I watched.
-
Are you positive yours is broken entirely? Mine was rusty as all hell from leaking. It can be pulled apart and the rubber seal replaced. Thus it stops leaking. I was looking for a new one for a long time, until I just took the time to fix it.
-
Took off and then apart the old connector. Nothing loose nor viseably wrong. I had a quick disconnect AFM connector on the shelf from a long time ago. I was just too lazy to wire it in before. Wired in the new connector plugged the car all back up and it started up on the first crank. No surging, popping out the intake or exhaust, etc. Took it for a few mile test drive and drives like a dream all the way to redline:) Thanks again everyone for all the ideas and support! Glad it ended up being this over any of the dozens of other possibilities it could have been.
-
@siteunseenPCV valve is in and working well. Actually was one of the first things I looked at. The PCV valve is at the center of the intake, not near where those EGR connections were. Anyways, by sheer luck everyone I believe I discovered the issue. I think there is a broken lead in the harness at the AFM connector. The connector is solid on the harness, however, when I wiggle the harness directly beneath the connector the engine either dies, stumbles, pops out the front, or surges. In other words, I got it to display all of the lovely issues the engine had. Funny cause somewhere in this thread I said that the "AFM connector is solid". Goes to show that you really have to pay attention to the little things on these cars, and not assume it's fine. Even if it was before. Now I am not 100% positive the AFM is the problem, because I have not gone in to try and fix it, but I am about 90% sure. Here is a video proving my point!
-
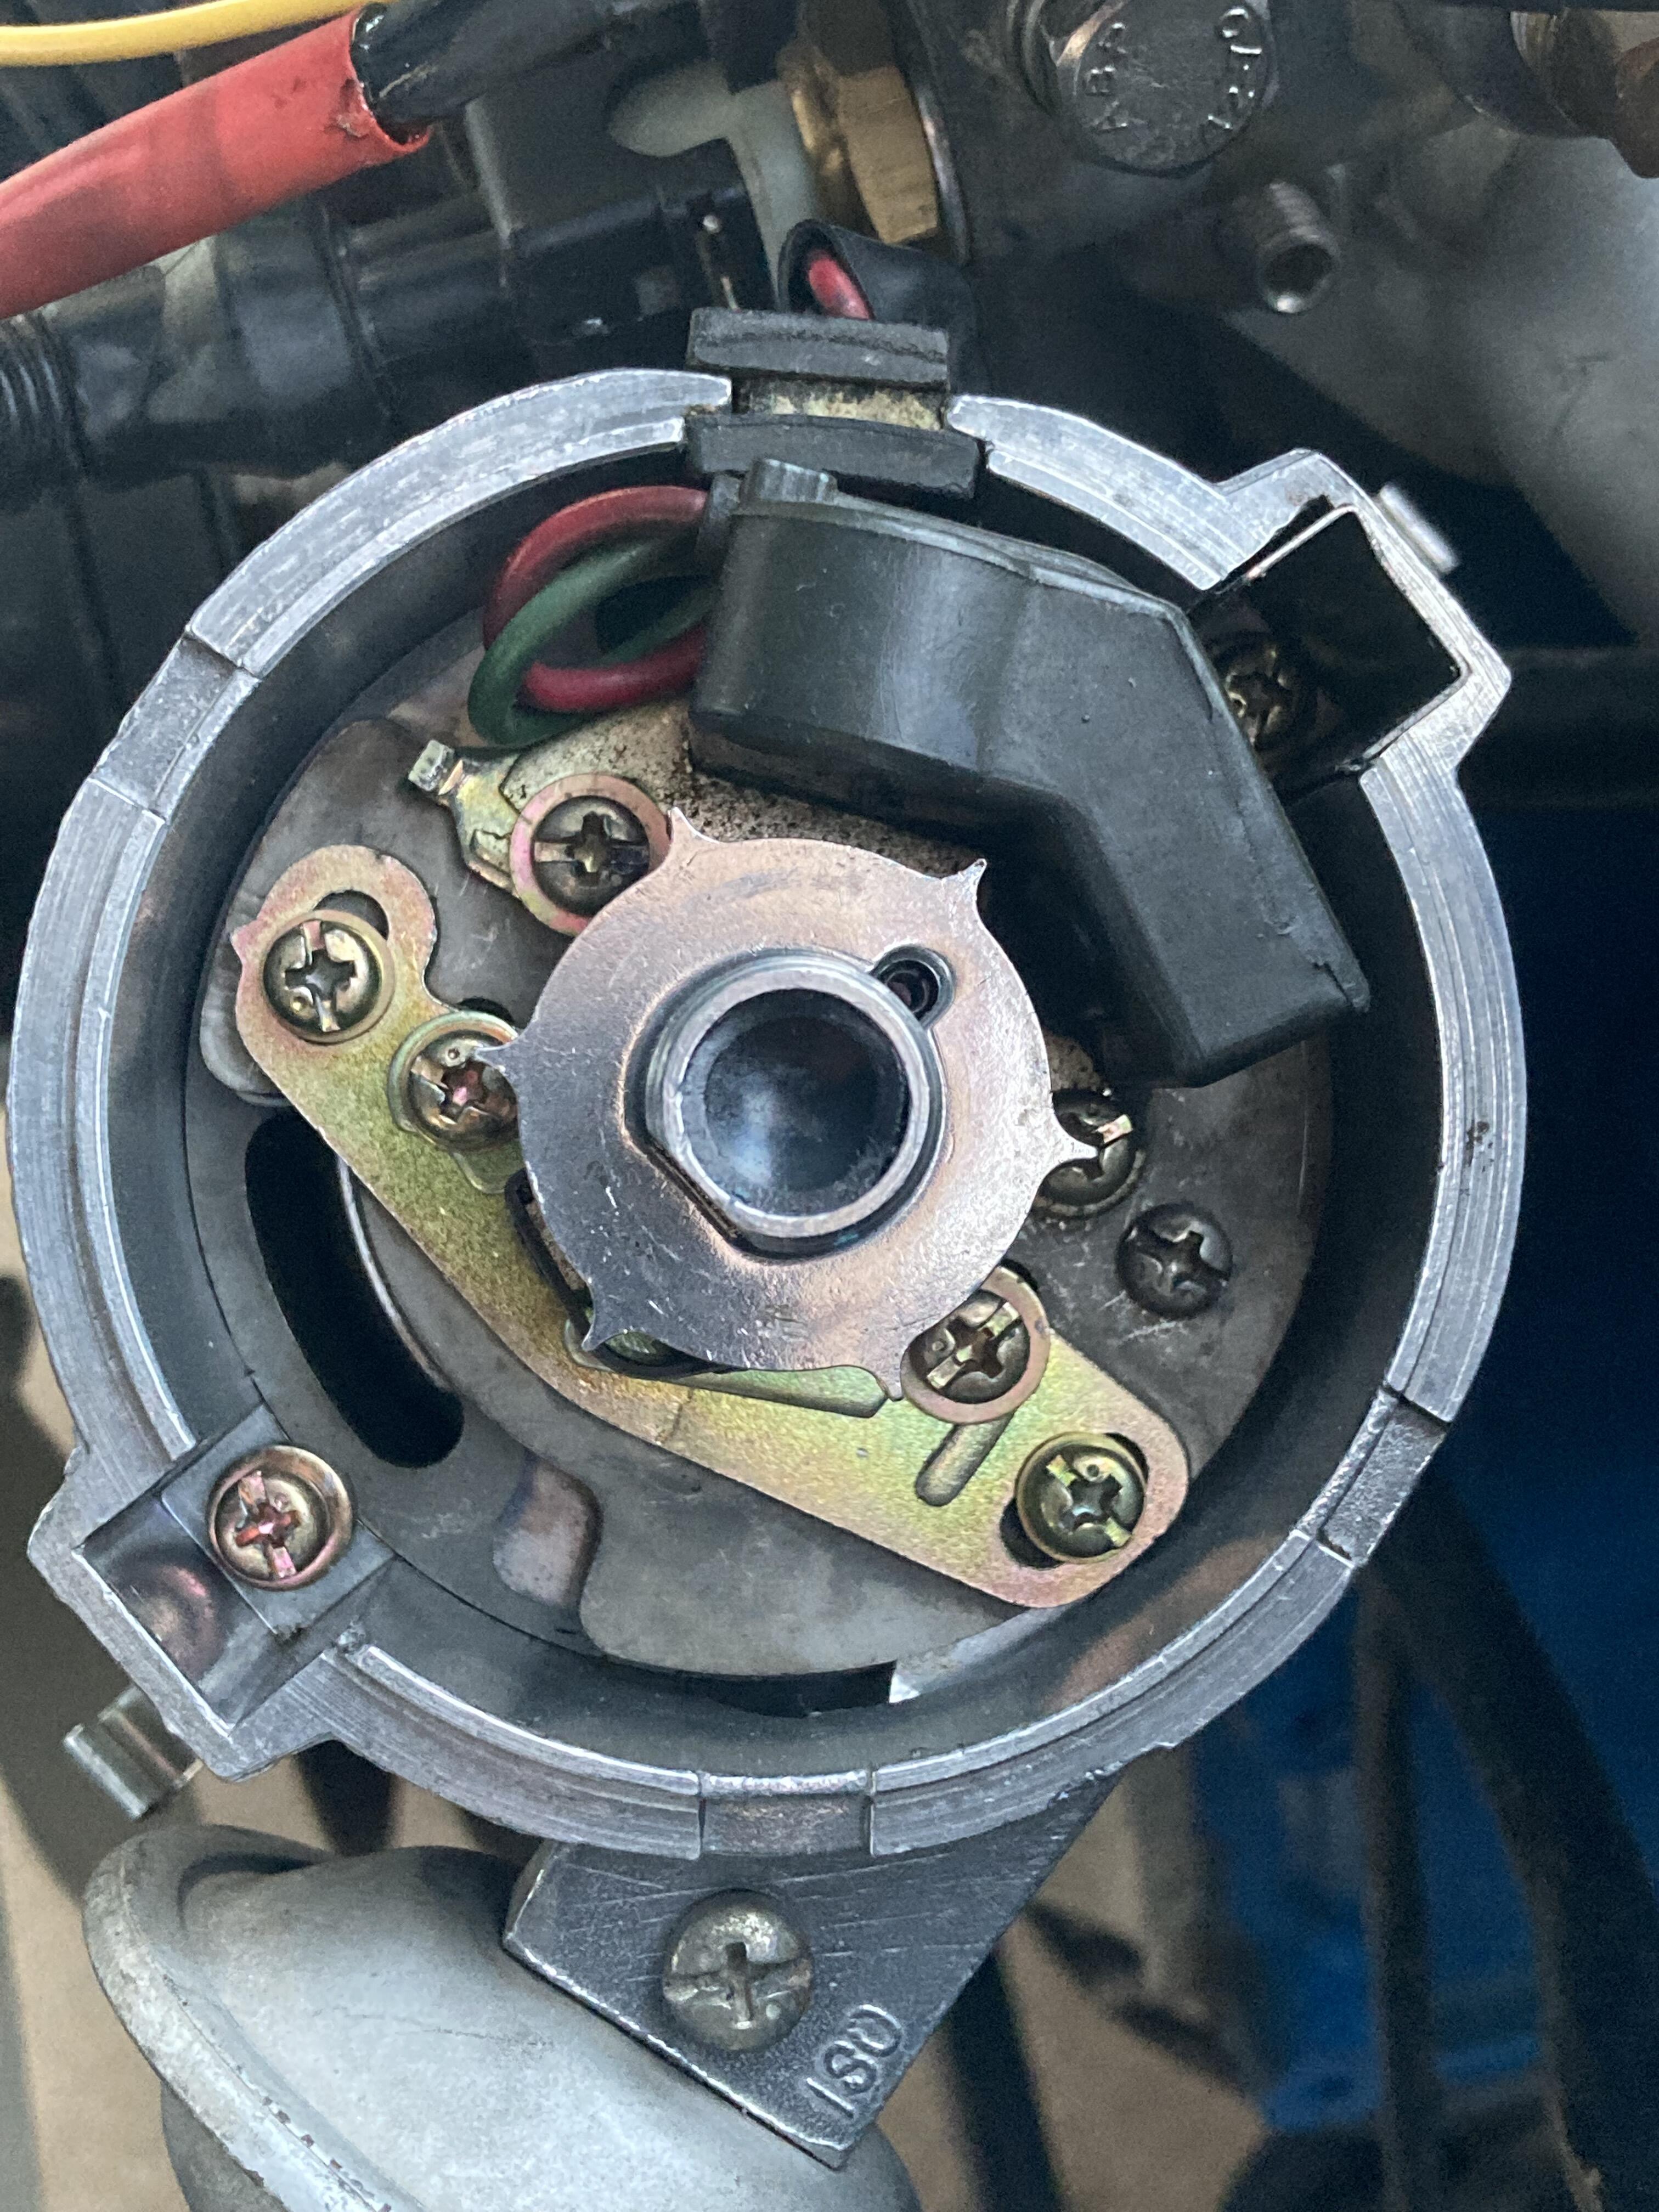
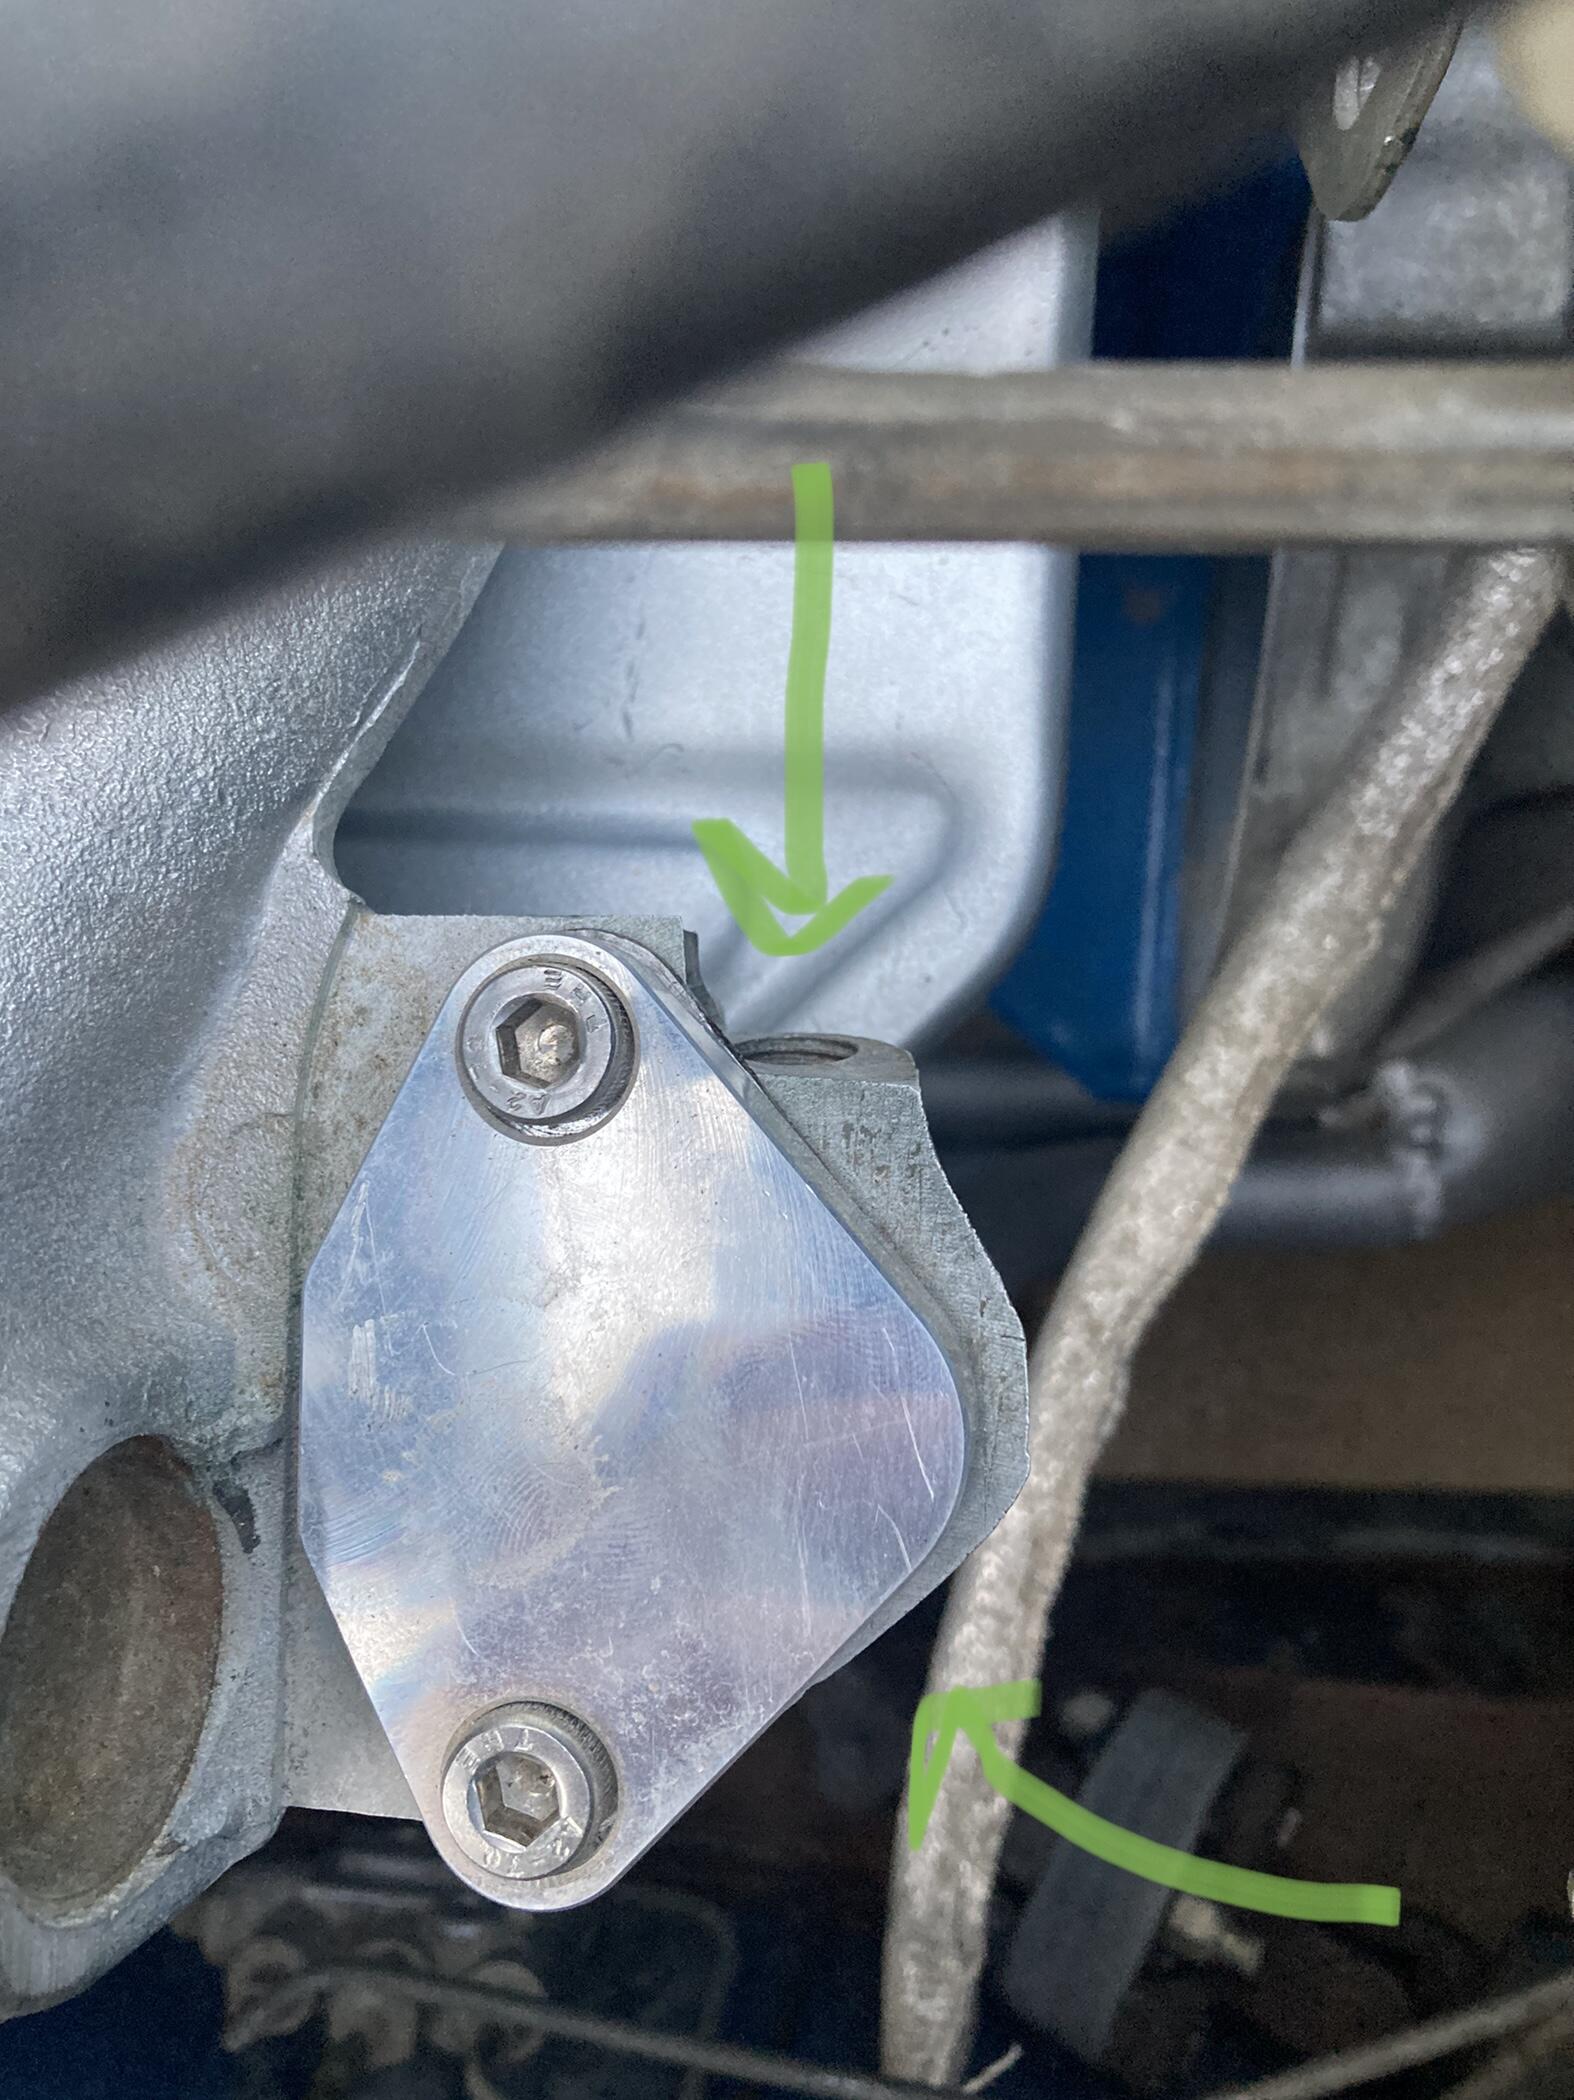
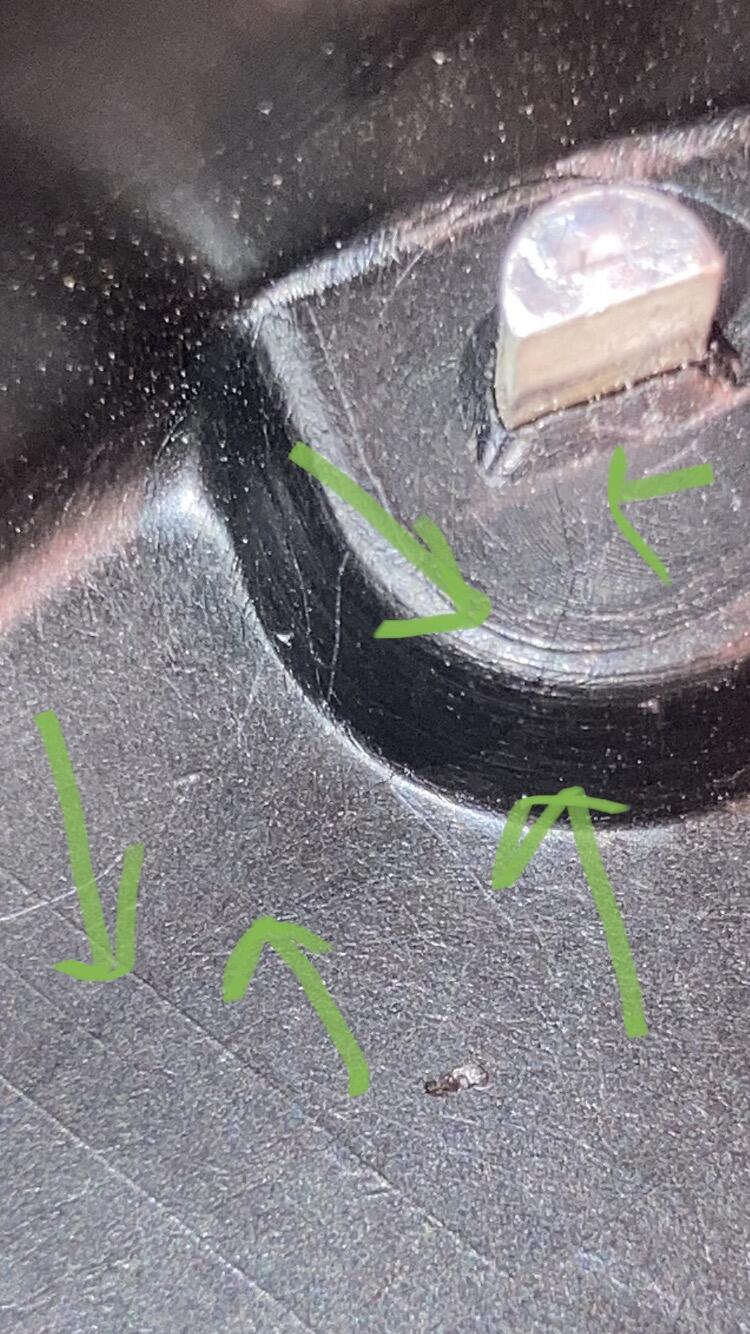
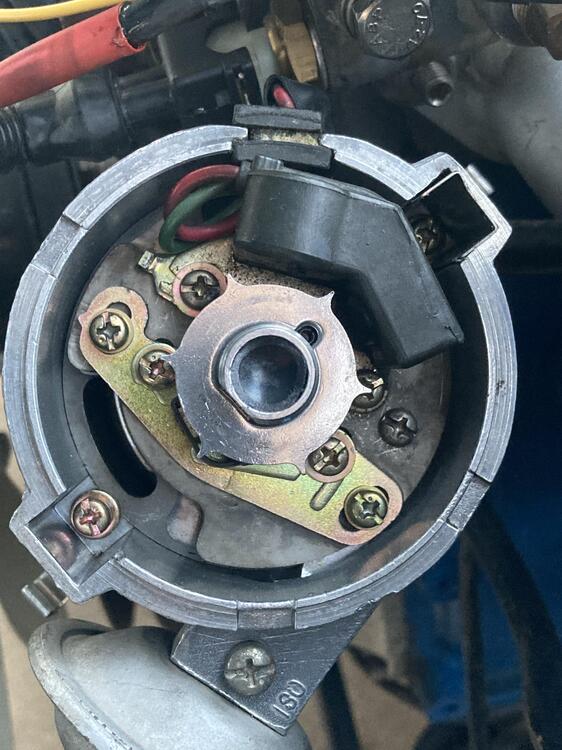
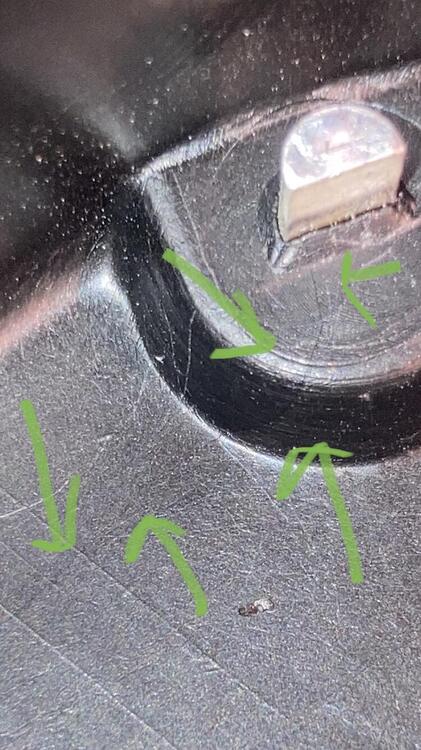
Thanks guys for the replies! I will try to get through everything. @Zed Head My ignition system is bone stock. I am running about 6 month old spark plug wires, about a year old cap, rebuilt stock dizzy, original and transistor ignition unit. The distributor I believe has a single pickup? I provided a photo. Ok. I am assuming by the vacuum control solinoid you mean vac advance. Yes I am running it. It is connected directly to manifold vacuum as I am running the Comp Cams 260s on stock injection. I know it's a debated topic, but I got great advice from @Chickenman and I pretty much had it running near perfect for a few weeks before this stupid issue. I am running 6 to 1 headers so I deleted the entire EGR system. Capped it at the top of the intake. TPS has not been checked yet, tommorow is the big day for running through FSM things, but because things are so erratic I doubt I will find anything wrong. If it is the TPS it is something like bad wires to the connectors or something. I have had the cap off of it for diagnostics and all the contacts are adjusted just right. When I get the surging again I will try disconnecting vac advance and see if that helps. @siteunseen That sounded like quite the issue! Now I am not sure exactly what you mean by where the intake had rotted through, but I took photos. While the engine was running though I covered both the opening under the intake and the one on the side with my finger and noticed no change in runability or RPM. Thus I am assuming it is fine. I also got a mirror underneath the intake and when looking through the hole I see the shiny block off plate. Arrow on top shows side opening in intake. Curved arrow represents the opening underneath the intake at the EGR. @kickstand80 No I don't have a spare distributor unfortunately. Also to expensive for me to buy one:( Really trying to limit myself on buying uneeded things. Yes ground is hooked up and good. I will check continuity tommorow. So I actually ran some tests, but couldn't come to a viable conclusion. I am 100% confident something is amiss with cylinder #1 at the very least. Popping out exhaust at idle goes away when removing injector connector/plug wire. I cleaned spark plug and the popping went away for a few minutes then came back. Makes me think the injector is bad/sticking, but I just don't believe that yet at all given how new it is and clean my fuel is. Popping does not follow injector wires or spark plug wires. Ok, so I pulled plug wire and put against valve cover. sporadic spark. I took a video. Every other cylinder maybe had a miss every once and a while, but not as consistent. I also put a timing light on each wire and it confirmed that the spark was sporadic on cylinder 1. However, I almost wonder if my timing light was wrong, as it seemed to be different every time I disconnected and reconnected my timing light. However, I put the plug wire against the valve cover and then hooked up my timing light, and the timing light looked consistent with the plug wire zapping the valve cover. Once again the car has confused the hell out of me. Sometimes cylinder number 2 looked sporadic was well, but not nearly as often. The loss of spark was not dependent on RPM, I revved it up and at higher RPM from time to time the spark would dissapear. This is super frustrating as it isn't consistent enough for me to tell if it is a bad timing light, only related to cylinder number 1, or following plug wires. It seemed like it kept changing from loosing spark, to sometimes loosing spark, to being consistent, etc. Here is a vid. @zeeboost could you send a link to the type of tool that you mean? I don't have any fancy diagnostics tools besides my dandy multimeter. If I had an oscilloscope I would already have gone through the entire ignition side of the FSM. Unfortunately they are super expensive, makes diagnosing ignition circuit hard as hell. The idle RPM wasn't surging violently today, so I don't know if I am chasing rabits or if this cylinder issue is a clue. I was able to replicate the RPM surging by holding the AFM to be more rich. Odd stuff. This car gives me a headache.

-
Thanks all for the ideas. @Captain Obvious I had the original coil, so I swapped it in. No noticeable change. I will get photos next time I am out there. I agree it acts mechanical, however I have held both the AFM throttle vane steady and the throttle body steady at the same time, and the engine would still burble on and off. This I believe also rules out the sticking AFM vane. I am confident this one is an electrical demon. This morning started beautifully. After about 30 seconds fell into its rythms again. started popping out intake on acceleration. Turned off car and back on and it started popping (real metallic like clank) out the exhaust again on acceleration and idle. It was running extremely rough at this point. For the hell of it I pulled injector connectors while the engine was running and the pop went away with cylinder #1 disconnected. Reconnected and the pop would return. Very odd. Pulled spark plug and it was carbon fouled, but just barely. Cleaned and reinstalled. Car ran beautifully. I want to state that this injector is brand new. I mean like 50 miles on it new, and so are all the rest. Drove it a few miles after cleaning the spark plug and then randomly when I was back in the neighborhood it started running like crap again (complete loss of engine power, and surging). Not sure really if the engine surging and loss of power was related to cylinder #1 or if whatever the hell has been going on with my engine fouled it. I have had problems before with this cylinder not firing befire due to the injector not firing (tested with a noid light), but that problem randomly went away a long time ago as it started firing one day just fine. This injector also has new injector connector, as do the rest. I wonder if somehow the ECM is messing up fuel timing/duration for this cylinder. CTS sensor tested good for ohms. It is a solid connection, as when I pull it the engine dies completely and immidietly. I really am wondering now if it is the ECM. I can't think of anything else that can change the engine mixture so quickly. the popping out the intake and then exhaust just screams to me that the mixture is drastically changing. I don't think it could be the AFM, because I held the vane steady and it still was surging. Possibly it was gaining and loosing connection, but I strongly doubt it as the connector to the afm is rock solid. I am also going to rule out the distributor cap as being bad, because if it was bad I don't believe I would get periods where the car works perfectly.
-
@Captain Obvious Yes, unpleasent is the kind way of putting it. EDIT** I went through the ole EFI bible and realized the even the EFI is controlled by the ignition. The coil sends the signal to the ECM and then the ECM does its magic with grounding the injectors. Just tested my coil. Primary windings tested 0.6-0.7ohm. Secondary was around 9.6kilo ohms. So all seems fine there. Wires hooked up in right order. Blue wire from the resistor to negative coil terminal, black and white to positive coil terminal. Not sure if a coil can intermitently fail. I will definetly make sure the fuseable links and those grounds are good when I work on the car Wednesday. Rotor seems perfectly fine. Cap seems fine. There is a possible microcrack in the cap, but it is hard to tell. I did resistance test all throughout the cap, and it all tested out as should. No terminals were continuous with eachother. As you can tell the crack is super small. I couldn't see how this could be my issue. As I would assume if the cap was bad it would be a constant misfire, not bobbling rpm like power keeps cutting.
-
@Zed Head I have his post locked down in memory. The switch, connector, and bullet connectors are all new. Working as should. I wanted to see if the AFM had anything to do with it. So I cleaned the inside carbon trace. When it was running I hald the vane still, so that it would not rise and fall with the bobbling RPM. The idle still continued to surge. I really feel like the AFM is just fine, and I know the CTS sensor is fine. I also agree that I don't think the usual Nissan diagnostics are going to fix this one, but I am going to do it for peace of mind. I also wanted to mention my CTV and BCDD was deleted from the system. I just filled all the ports for the BCDD with RTV and then put the block off plate on. Funny to mention hitting th ECM. I did multiple times and got no result (they weren't very hard hits as I don't want to ruin the module if its actually fine). I almost wonder if it's cutting spark. However, this wouldn't make sense in the other videos where it looks like I was hitting rev limiter. As the car would have just died if spark was cut. Here is a video of the idle problem. I actually held the throttle a little open to exasterbate the issue.