Roberts280Z
Free Member
-
Joined
-
Last visited
Everything posted by Roberts280Z
-
That might be true of teachers, but it wasn't true for my bosses. I've been following this thread because I have a closing issue as well. It's good to see an outcome like this.
-
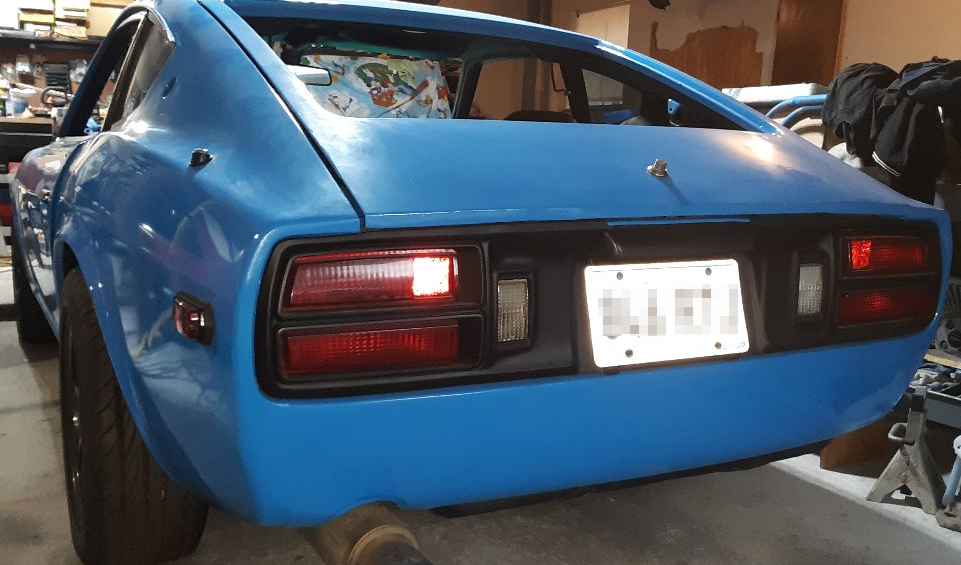
I originally put my kit on about 20 years ago: There were no bumpers underneath. I since concluded that the side and rear panels were contributing to rusting problems in the metal underneath. Mine were merely bolted on, so removal was easy. Reparing the rocker and quarter panel rust was not. I'll keep the front, but eliminated the sides and rear:

-
I powder-coated everything black, except for the locks. I assumed that the process (including the necessary prep work) would ruin them.
-
My son learned this the hard way on a 455 cu.in. that ran hot in an old Olds. He installed 2 puller fans and 1 pusher, but the alternator couldn't keep up, so he installed a larger alternator, but that overloads the single v-belt drive. He had also been contemplating an electric water pump, but now understands that the electricity isn't 'free'.
-
I repaired my 280Z hatch last year, but I don't think I knew the Tabco panel was available. If so, I would have used it. I fabricated several patches out of very thin sheet metal and tried to handle the compound curves by using multiple sections. I welded on the lowest voltage available and backed up every weld using copper bar for heat sink and to avoid burn-through.
-
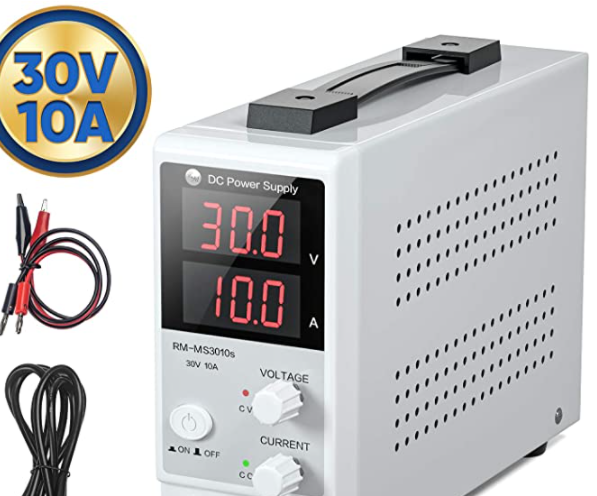
I got this about 18 months ago for $64 from Amazon: It is no longer available, but it looks like the same unit, with a different 'brand', is available for $60 (DC Power Supply Variable,0-30 V / 0-10 A LW-K3010D Adjustable Switching Regulated Power Supply Digital,with Alligator Leads US Power Cord Used for Spectrophotometer and lab Equipment Repair: Amazon.com: Industrial & Scientific).
-
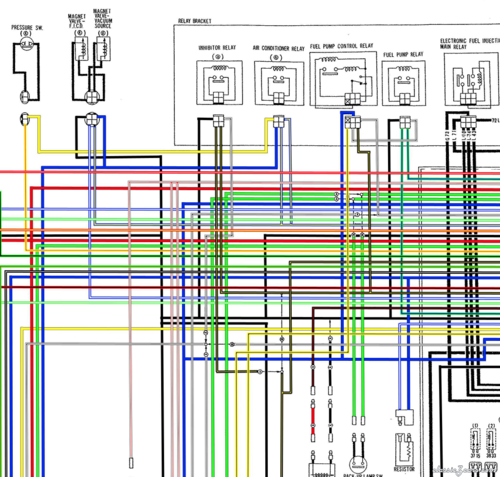 First, I can't believe I got fooled by a download link for some browser before I saw the 'real' download button. Second, I would pay for a large-size laminated version of this. Does anyone know if it exists?
 -
I realize that I'm late to this thread, but I would like to add my experience while I recently brought my entire electrical system back on-line. Rather than use a battery, I used a cheap 'laboratory' power supply, capable of 12 volts at 10 amps. The nice thing is that you can put it in current-limiting mode to limit the current to, for example, 1 amp, or even less. This can let you do a lot of testing and probing without burning things up. It also lets you see the current draw of the working circuits.
-
I did get one of those nicer HF guns, and I'm sure it does a nicer job than the cheapo HF gun I was trying to use. Since I'm spending well over $1000 on primer, paint, and clear, I thought something more than a $50 gun is justified. But, my painting still is not good. I don't think I can learn technique and skill from youtube videos, but they help. I need a peloton of painting.
-
That would have been good advice for the previous owner. But, it so happens I bought this Z in 1976. The only previous problems in this area were with the shoes grabbing the drum, requiring the adjustors to be backed off. But I will apply the anti-seize for the next guy.
-
ouch. Amazon had a 'used' one for $108, and it looks brand new. In fact I suspect that somebody used Amazon as a 'tool loaner' service by buying the tool, using it, and returning it. I'm not one of those people, and I'm sure I'll have future use of the tool.
-
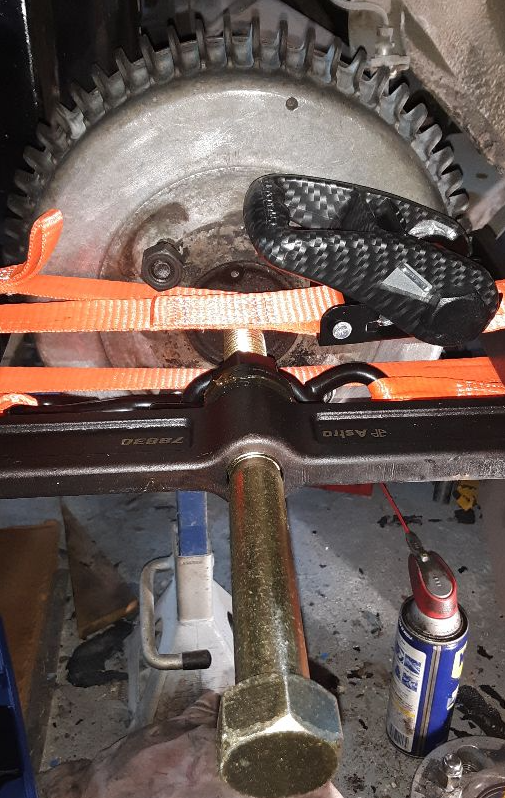
I had an issue with a stuck rear brake drum, with the drum stuck to the hub, and not to the shoes. I tried hammering, PB Blaster, heat gun - all to no avail. I tried to borrow a puller that Autozone seemed to have, but couldn't locate one. I ended up buying what I think is the same tool from Amazon (Astro 78830). This did the trick. I wrapped a ratchet strap around the tool jaws to make sure they would not slide off. I couldn't wrap it around the drum, as is recommended, because the fins caused the strap to slide off. It took a fair amount of impact-wrenching before the drum popped off with a loud snap. Hope this helps someone in the future.

-
Got it, thanks.
-
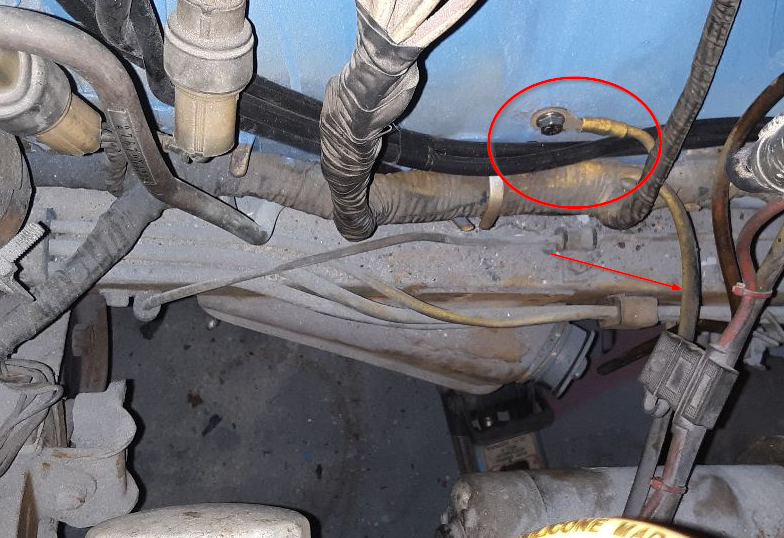
I did try to search this, and realize this issue has been discussed from 6 to 16 years ago. But I was hoping there might be some newer experiences that would help me. I replaced my clutch hose, then attempted to bleed the clutch. There was leakage where the clutch hose connects to the slave cylinder. Based on the research, either there should be an inverted-nipple connection (I'm not sure I'm even allowed to say that anymore), which leaves a few threads exposed on the clutch hose, or there should be a copper crush washer, with the hose flange bottomed out against the washer and slave cylinder. Unfortunately I managed to throw away the old hose, so I can't compare, but I'm fairly certain there was no crush washer. This is the slave cylinder and new hose: The new hose seems like it wants a nipple connection, but the slave cylinder won't accommodate. Should I try a crush washer? Neither the slave surface nor the hose flange are decently machined. To clarify, this is also a new slave cylinder, but the old cylinder also did not have a nippled seat, but its surface was better machined than this new one. Thanks in advance, Robert

-
I bought everything from Mouser. I agree with you on Radio Shack, but it must have been a difficult business selling one or two components at a time.
-
I replaced the transistor and capacitors in my 280z clock, and that got it running again. You would need soldering skills. There is a procedure for this somewhere, and I can probably find it again.
-
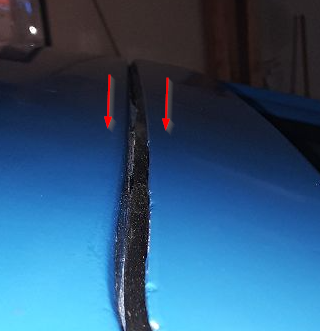
I finally tried to mount my hatch yesterday. I was relieved not to see this type of clearance issue. I do see that the hatch contour matches the roof contour fairly closely: I was concerned because I had done a fair amount of patching across the top of the hatch (as well as the bottom). I had fitted the hatch after the bodywork, but that was over a year ago. In your photos, your hatch does seem to be 'flatter' than the roof? Of course with new weatherstripping, I cannot close the hatch all the way, but that's another matter.
-
I just saw this thread, and will be anxiously watching it. I'm just slightly behind you with my 280z. I had to fab a lot of patches on the liftgate itself, and to the rear of the right quarter, and to the lip across the top and right side. I'm just now carefully attaching the new weatherstrip (which caused much of the rusting in the first place). I'll try to help as soon as I get the last of the weatherstrip on and try to mount the liftgate.
-
That white 'nut' screws in and out to adjust the outside handle actuator. If it is adjusted too tight, you cannot operate the door lock. Make sure you adjust it with the door lock engaged, as if the door were closed. Also note that the key lock and the inside lock work together. That is, when you operate the inside lock, you will see the locking rod on the key lock also moving.
-
I've assembled my 280z locks in the last couple of days. My key does turn plus or minus 45 degrees (to lock or unlock). My white clip looks a little different from yours, but it is what holds the rod in place.
-
I just noticed a used 280Z tank at ZCarSource for $49, but I suppose they're different for the 240Z.
-
Three questions on this: I have some leftover Thermo Tec. Has anyone seen any benefit in applying this to the door? The openings in the door were each covered with homemade plastic covers that I made 20-30 years ago out of 5 mil Mylar, but I don't remember if I was replacing factory-original covers. Were these original? The entire door was covered by a 'watershield', but I remember even less about that. The FSM only mentions that it exists, but doesn't illustrate it. I think it was a thin plastic sheet secured on the top and sides (but not bottom). Does that sound right? Thanks in advance...
-
If you're talking about the draw with key out, and lights off, that could be anywhere from 0 to 25 ma, depending on car alarms or any other remote gear. I paid $35 for my clamp-on meter from Amazon. That particular unit isn't available, but they currently have a unit for $48. Just be sure you get one that is good for DC current measurements; the cheaper ones are for AC only.
-
I did that not too long ago, and I think I unscrewed one end to put on the boot, but wouldn't swear to it.
-
Yours is too blindingly clean for me to compare to mine: I think your pinky wire (in your pic) corresponds to my wire with the red arrow, which goes to my starter. But mine doesn't have that type connector on it.