


Roberts280Z
Free Member
-
Joined
-
Last visited
Everything posted by Roberts280Z
-
One of the handiest tools I have is a clamp-on DC ammeter. Not only can you check the charging current, but on a low range you can check for those things that drain your battery in a few days.
-
I just received mine from ZCarDepot. My rollers were still in good shape, but the metal had cracked in half on one.
-
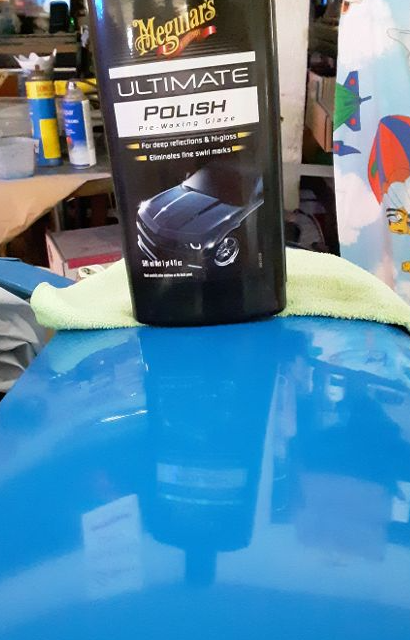
I think the plan on the remaining bits (one fender and the hood), will be to compound more aggressively. I didn't understand that it should be 'shiny' (albeit with swirl marks and such), after compounding. I was just going for a dull reflection of a ceiling light. I'm saving the hood for the last, hoping that it will be my opportunity to 'shine' (sorry, I'm an old guy). So, I suppose the glossmeter isn't justified. I would like to justify the Makita polisher, but I may have to settle for merely moving up from HF to Northern Tool. And I will check out the heavier Meguiar's, although I now have quite an inventory of Ultimate Compound. If I can get the hang of it. I've got 2 more cars (non-Zs) to try. Thanks guys
-
I totally mistyped in an earlier post. I don't compound for orange peel like I typed. I rely on the 1000 grit for that, and then step through 1200, 1500, 2000, 2500, and 3000. But then I only compound once (5-6 passes), and move on to polish. I should probably have done the compound a bit more before moving on to polish. Going back to my original question - I thought it would be useful if I could use a glossmeter to show me the desired gloss from compounding, and then from polishing (given a reference point).
-
I looked again, and still could not find the parts. I'm not giving up quite yet. I don't throw anything away, although I do lose things a lot!
-
I'm pretty sure I've studied that forum before. You guys may recall helping me last March when I first stated the painting. I mostly had problems with solvent pop. I still do, but not as much. Now, I think I've just been too timid with the polish. The guys on youtube are done after 5-6 passes. I tried several more passes and now I get this: I don't know if I can make it better (I killed my HF polisher trying), or if that's as good as it gets. I suppose I could sacrifice the clear on one of the hood side flaps to see how far I can go (after I get another polisher). It's possible that so much polishing is required because I didn't do enough compounding. I figured that my goal there was to make all the orange peel disappear, and stop there. Thanks again guys.
-
Good idea! I've given them $1-2K for the material so far, and still need more to finish, so I'll chat more with them when I go back.
-
Great thanks! I'll look again through what I have left.
-
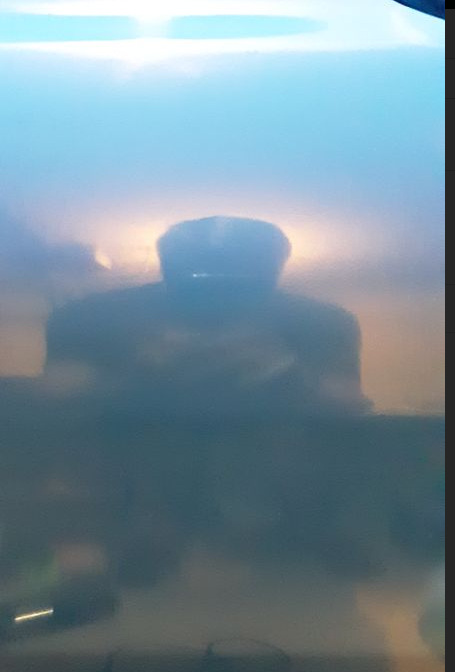
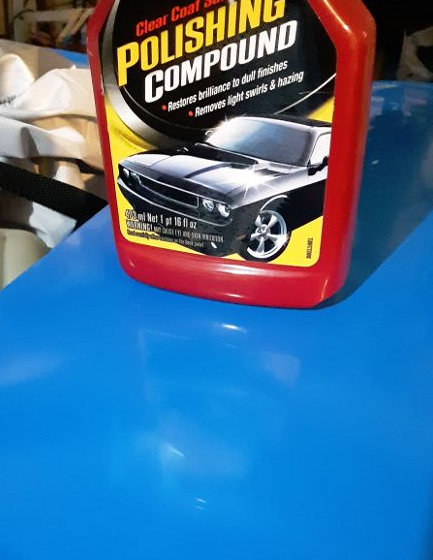
This is my reflection in the upper part of the door - I tried to mask the glare of the light with my head - sort of gives me a halo! This is a reflection off the fender top: The reflection is not well-defined. The paint job used acrylic basecoat 3-4 coats, and urethane clearcoat, again 3-4 coats. The fender was painted 2-3 weeks ago, and the door earlier than that. I wet-sanded from 1000 to 3000 grit. I had to go fairly deep with the 1000 grit to get all the orange peel (I said I'm not experienced). I then used Meguiar's Ultimate Compound and Meguiar's Ultimate Polish (and also some of the stuff in the picture), all with a rotary polisher. I've tried isolated areas by hand as well.
-
Unfortunately, I have destroyed the evidence: The original coating did NOT extend to the tops of the upper frame rails. Also note that the inside of the fenders was also coated. My guess is that the coating was factory-applied, with the fenders attached, before the suspension and fender liners were installed

-
I became curious as to whether there was a way to objectively measure gloss, shine, etc. I found some interesting terms, such as DOI (distinctiveness of image) and RIQ (reflected image quality), and nice instruments that can measure all of that for $4-5K. I also see simple glossmeters on Amazon for $150-200. I almost expected to find an Android app that used the front-facing camera to analyze the image reflected from a test-pattern display, but was disappointed. Anyhow, has anybody used such tools? I'm trying to paint my 280Z, and I have no paint experience. I'm disappointed in the level of 'shine' that I'm getting after wet-sanding, buffing, polishing, as compared to the un-cut clear coat. Shallow-angle reflections look OK, but head-on reflections (e.g. my face) - not so much. I don't know if I can just keep on polishing, or will I just polish away all the clear coat with no further improvement.
-
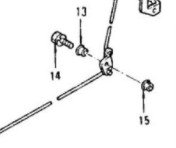
I'm trying to reassemble my doors, and I can't find the hardware that attaches the door lock bell crank to the door metal. A diagram from carpartsmanual.com shows this: ...but I can't find anything resembling 13, 14, or 15 in the parts I removed. I'm also confused by the fact that the diagram calls out qty 4 for the collar (13). Were two collars used, with one on each side of the bell crank? Does anybody know if this collar is metal, or nylon? Of course I can't find any reproduction parts, and I fear that a homemade solution will provide sloppy performance. So, does this diagram look correct? Thanks guys...
-
I am the first owner of a 280Z. Mine has black coating (looks like truck bed liner). In some places it is still firmly attached; in others it could be peeled off. Underneath it was not exactly body color, but more like a primer. I had assumed that it was factory applied. I would not have thought that a dealer in Houston had applied it, or they would have padded the sticker price. There is no paint on top of the black coating.
-
Thanks Jim. I didn't even know that steel pop-rivets existed. This also suggests the possibility of precise-length bolt with nut, if the bolt head is shallow enough so as not to gouge the glass. Fortunately my door panels and fuzzies are in reasonable condition. But for that I see that Motorsports suggests that an upholstery shop can perform the stapling as original.
-
I am having all the bright bits powder-coated, including the door upper moldings, which are the strips that mount on the exterior of the door tops. These moldings originally have a rubber squeegee strip facing the glass. My question is, has anyone successfully reinstalled the squeegee strip? They were originally stapled on, which looks impossible to do again. Thanks as always
-
Never mind. After one more search through the removed components, I found it.
-
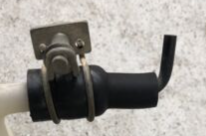
In the process of removing and reinstalling several underhood components, I managed to lose one of the nipples: I tried several searches to find anything to re-create this, to no avail. The best I've come up with is to buy a tank with intact nipples on ebay. Any ideas? Thanks.
-
ETI4K - the cover didn't look like it had been tinned. I just tried plain old soldering, but even when it looked like I had a join to the cover, it popped off easily. cgsheen1 - I'm getting to that beat-down state, can't get the turn or hazard signals working now, I'm working through it one circuit at a time.
-
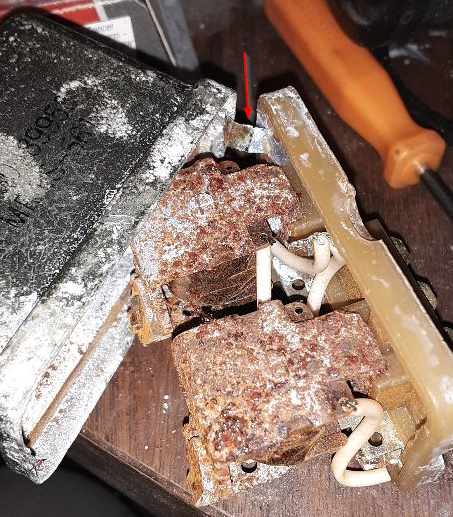
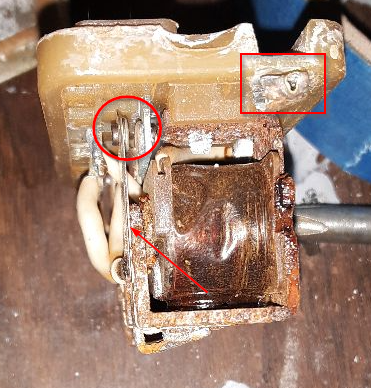
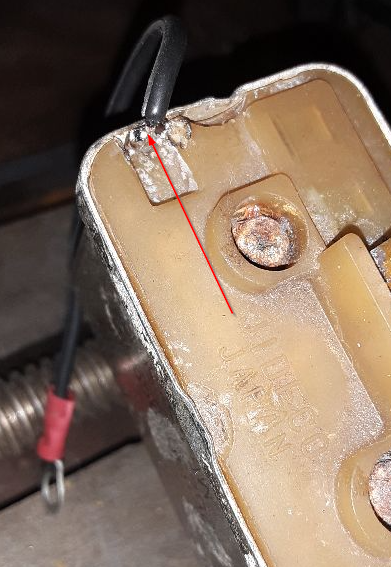
I'm reinstalling the dash, and checking wiring, connections, etc. I was not getting power to the ACC or IG busses in the fuse panel. I could hear the ignition relay 'click' with the key in the Acc or ON positions, and I could see power from the fusible link getting to the white-red wire at the bottom of the C6 connector. I pulled the dash back enough to back-probe the ignition relay connector, and confirmed that voltage was getting to the ACC and IGN contacts, but was not passing through when the relays were energized. I removed the ignition relay, and further confirmed by testing that both relays would click, but would not pass power through their contacts. This forum says the relay is not easily replaced, so I thought I would dig deeper. Start by bending back the cover tabs (circled), but try to be careful of the ground tab (arrow): Open the relay while trying the use the ground tab as a 'hinge': Admittedly, these relays appear to be in sad shape. But further examination showed that the contacts (circled) were actually in excellent condition, but there was a buildup of rust and crud between the coils and armatures (arrow): Note that by this time, I had broken the ground tab (square), which appears to have been spot-welded to the relay case. Clean up the crud with a folded over piece of 1000-grit: Retest both relays to make certain they are really snapping closed and making good contact. Put the relays back into the cover, and re-crimp the tabs to hold it together. If you broke the ground tab, solder a pigtail to the tab. Note that I tried, but could not reliably solder the tab back to the cover where it had originally been welded. When reinstalling the relay, be sure to put the existing ground wire under the relay mounting tab, and then you can put your pigtail ground under the same mounting bolt on top of the relay mounting tab. If the contacts had not been in good condition, I would not have done this, but would have instead resorted to wiring in new relays,


-
Check out this on HybridZ (Dash Lamp Socket Repair - Interior - HybridZ).
-
Argh. Right now I'm sidetracked. I installed the dash a couple of days ago, then tried to test the electricals. The ignition relay clicks, but is not working. I'll pull the dash back out to check out the relay.
-
I suppose I'll do the obvious, and see if I can scrape it cleanly in the most inconspicuous place possible.
-
Yeah, I did indeed read through dozens of posts on numerous threads, but I couldn't find one where someone just ended up stripping the grid off totally. Or perhaps the ppl who put in the defroster blowers did exactly that.
-
None of the lines in the grid are still functional. I don't expect to need the defogger function, and I'm considering scraping the whole grid off. Has anyone done this - is there any downside? Is the grid somehow partly etched in the glass, and will leave a mark anyhow? If so, I'll just leave it alone.
-
I have a Ben Watson book on Bosch FI systems, which states in general that the pressure at idle should be 30-35 psi, and should increase by 5-10 psi with higher manifold pressure (i.e. lower vacuum). I think I recall a situation where my fuel flow was restricted due to the fuel pickup in the tank being partially clogged. I temporarily helped the situation by blowing back through the pump intake line into the tank.

