


Parman
 Subscriber
-
Joined
-
Last visited
Everything posted by Parman
-
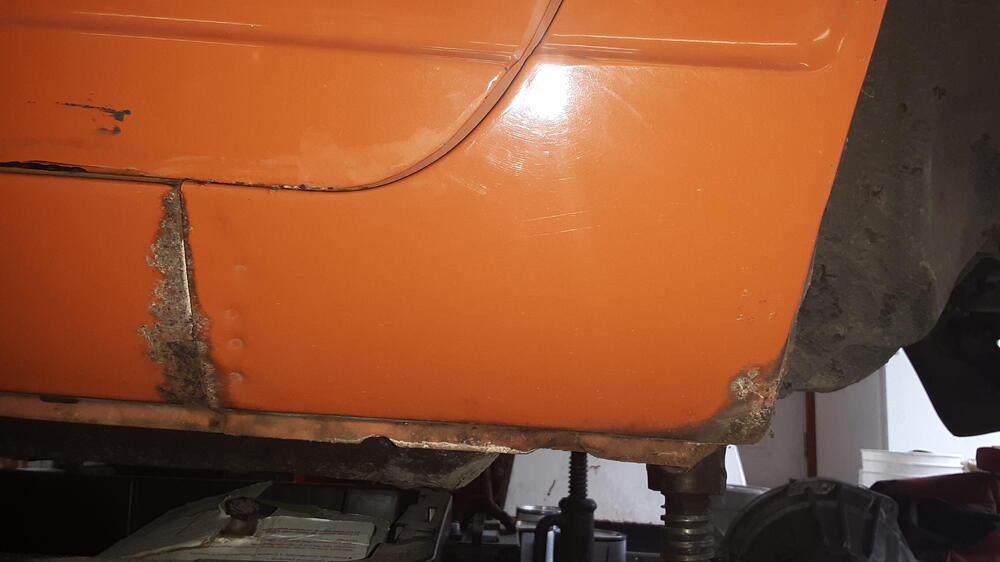
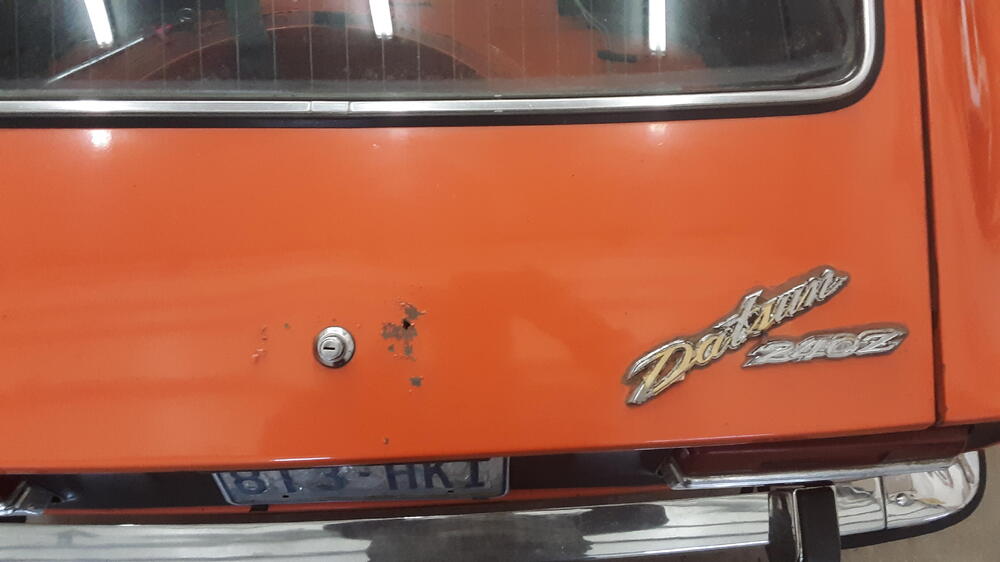
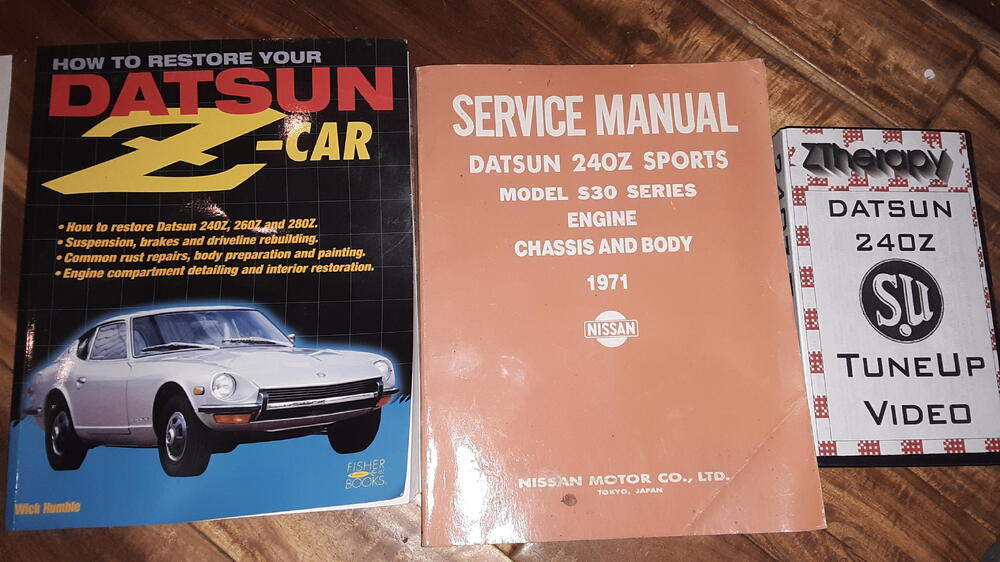
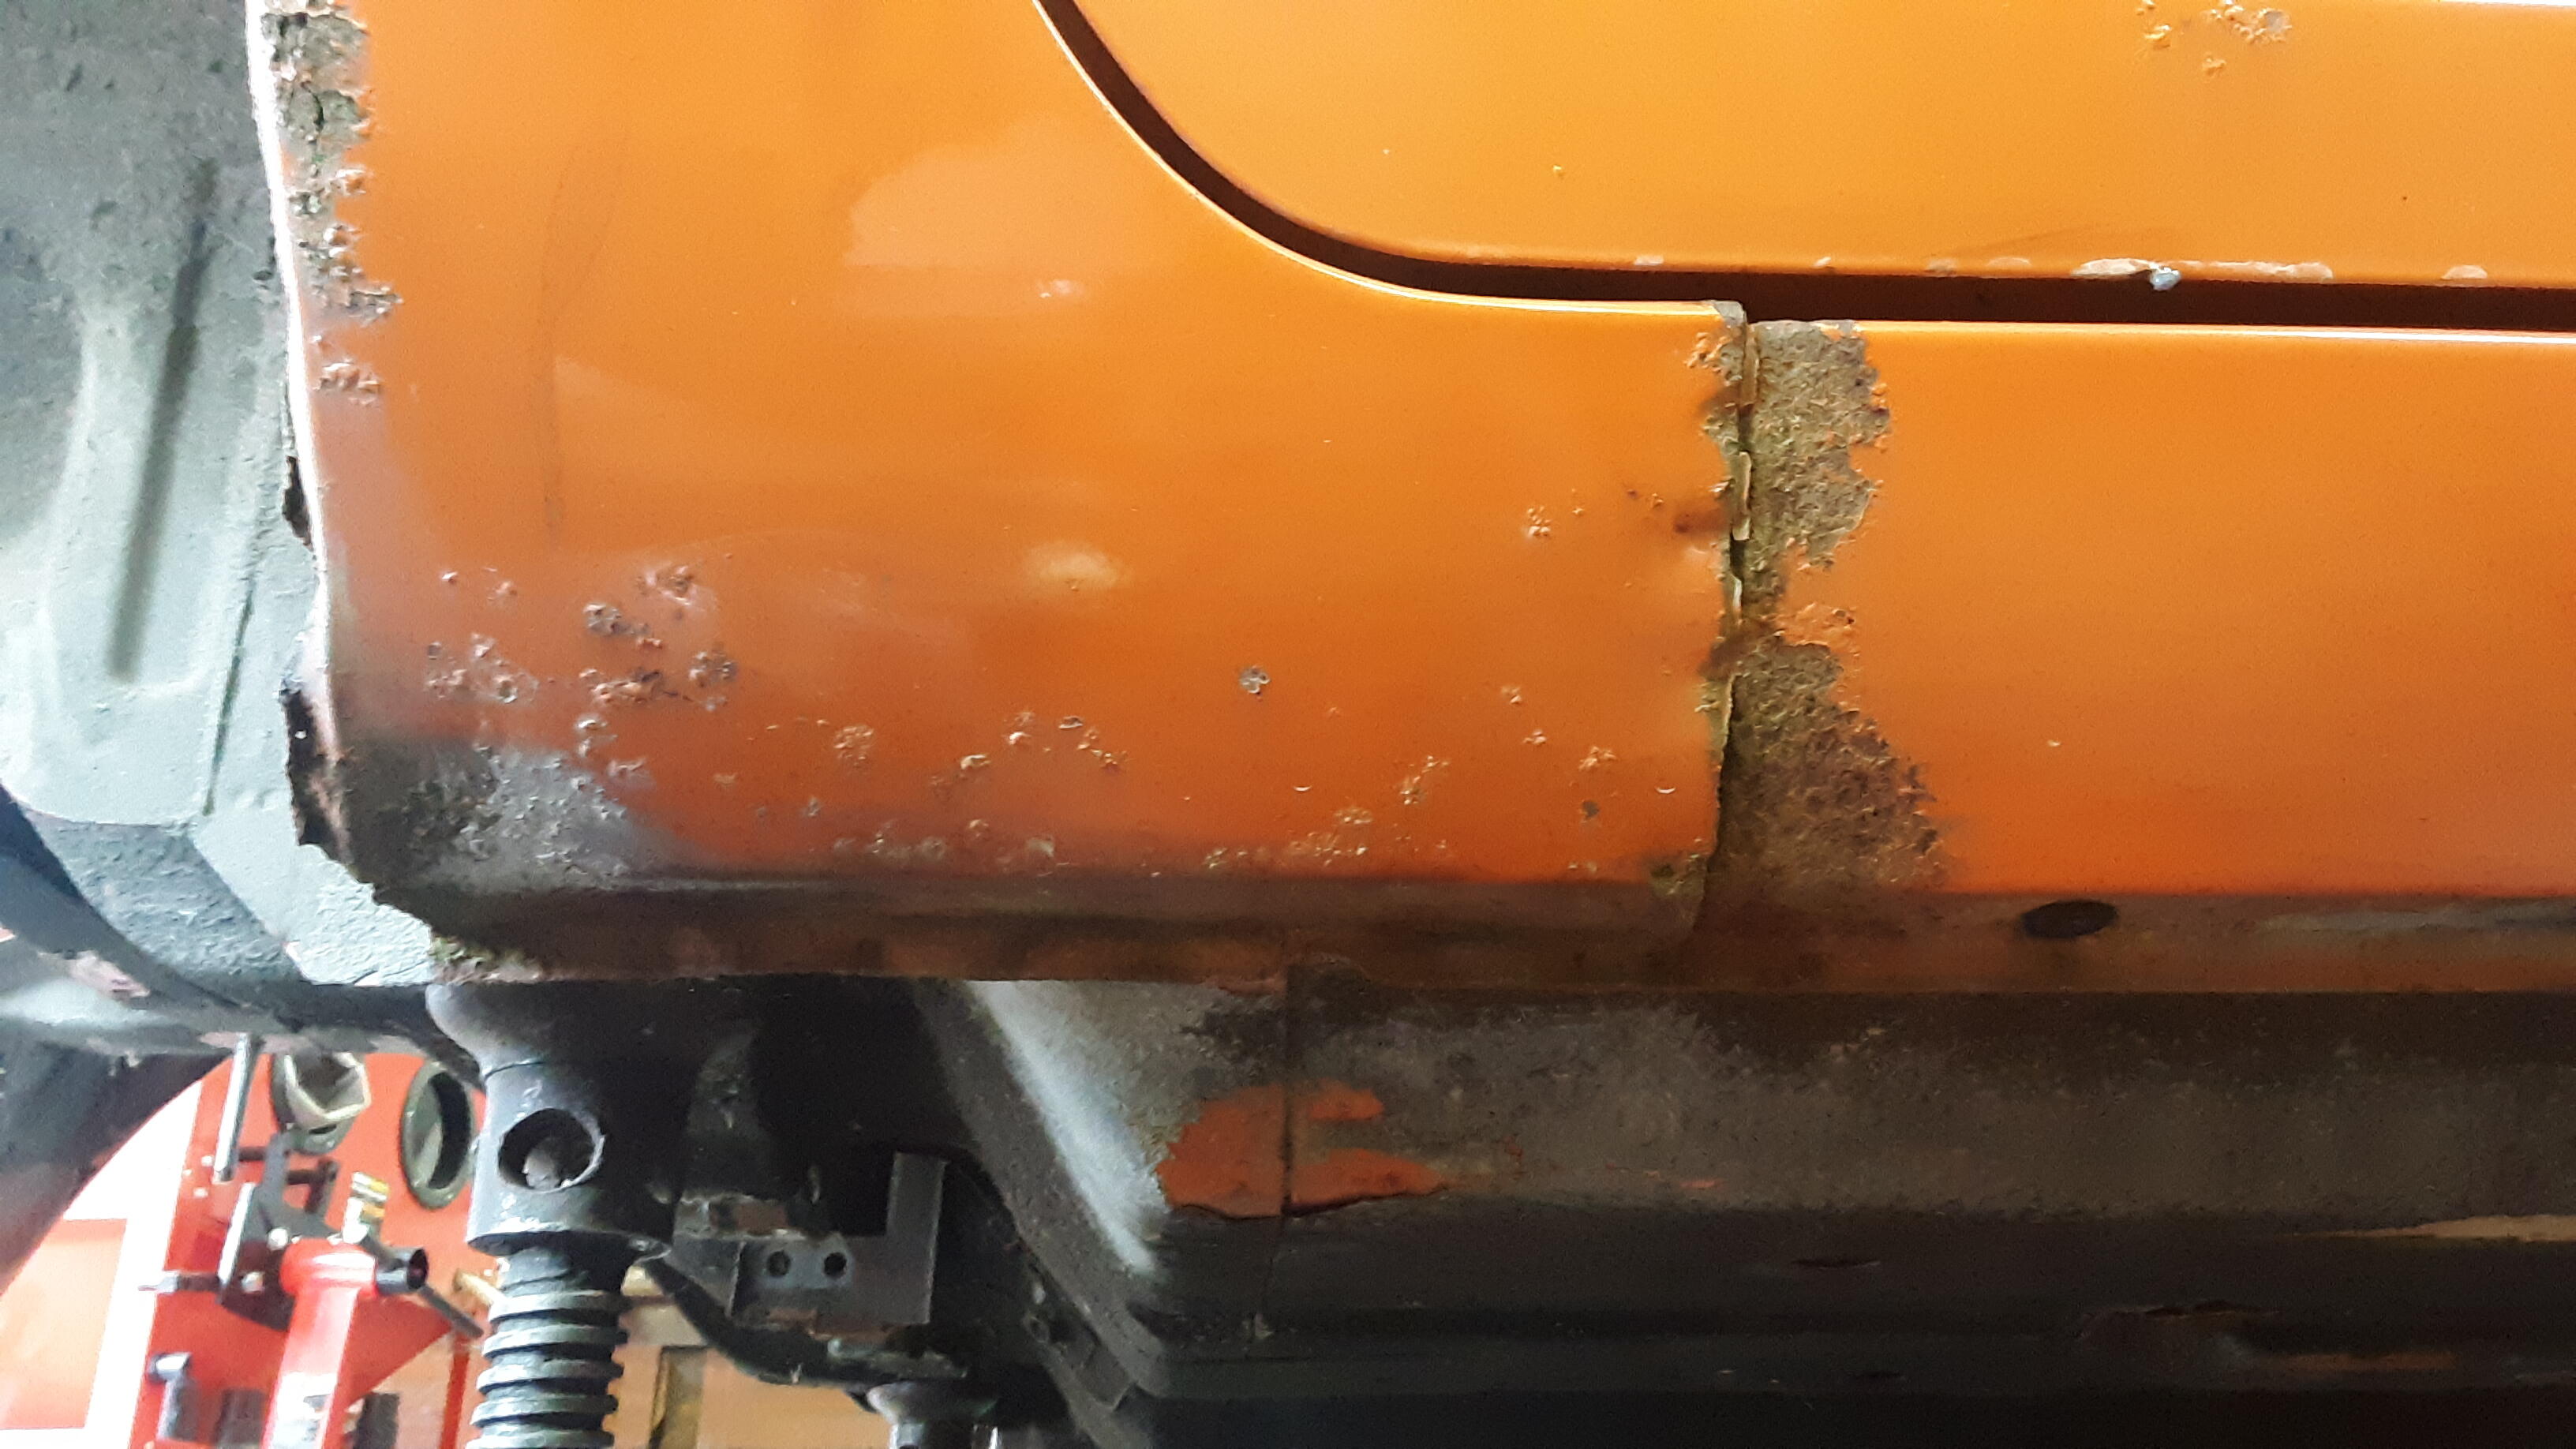
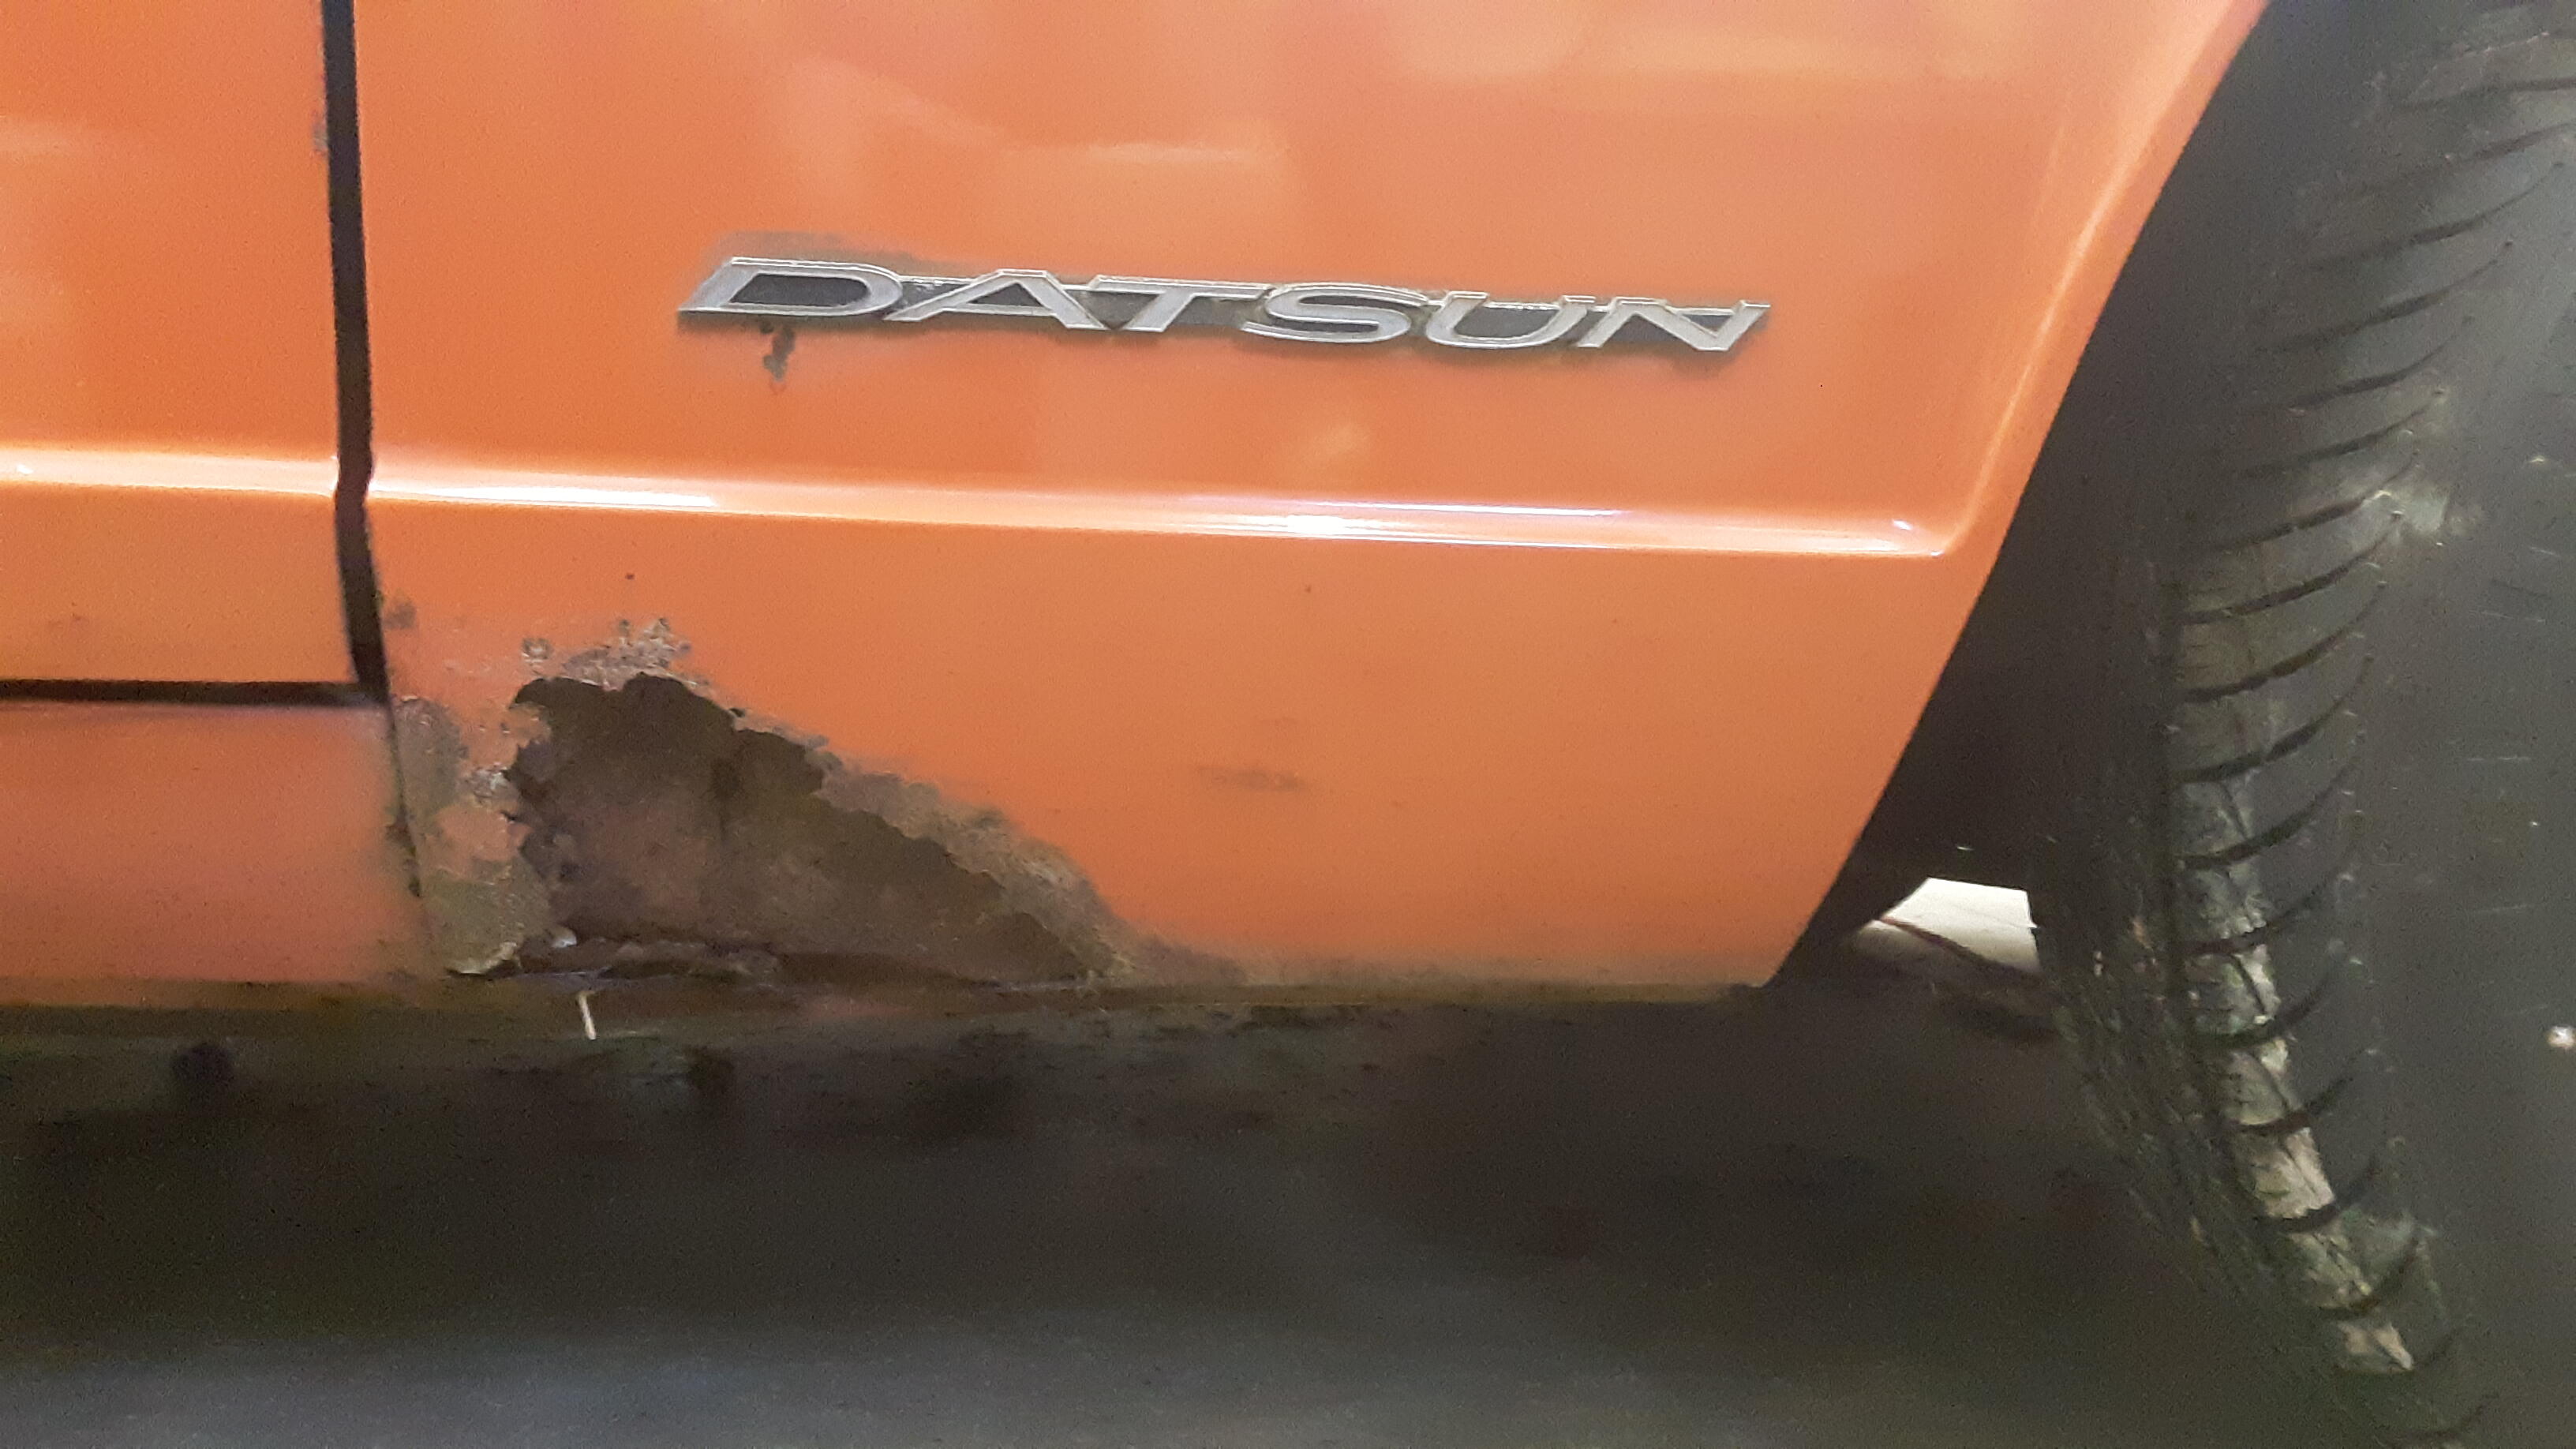
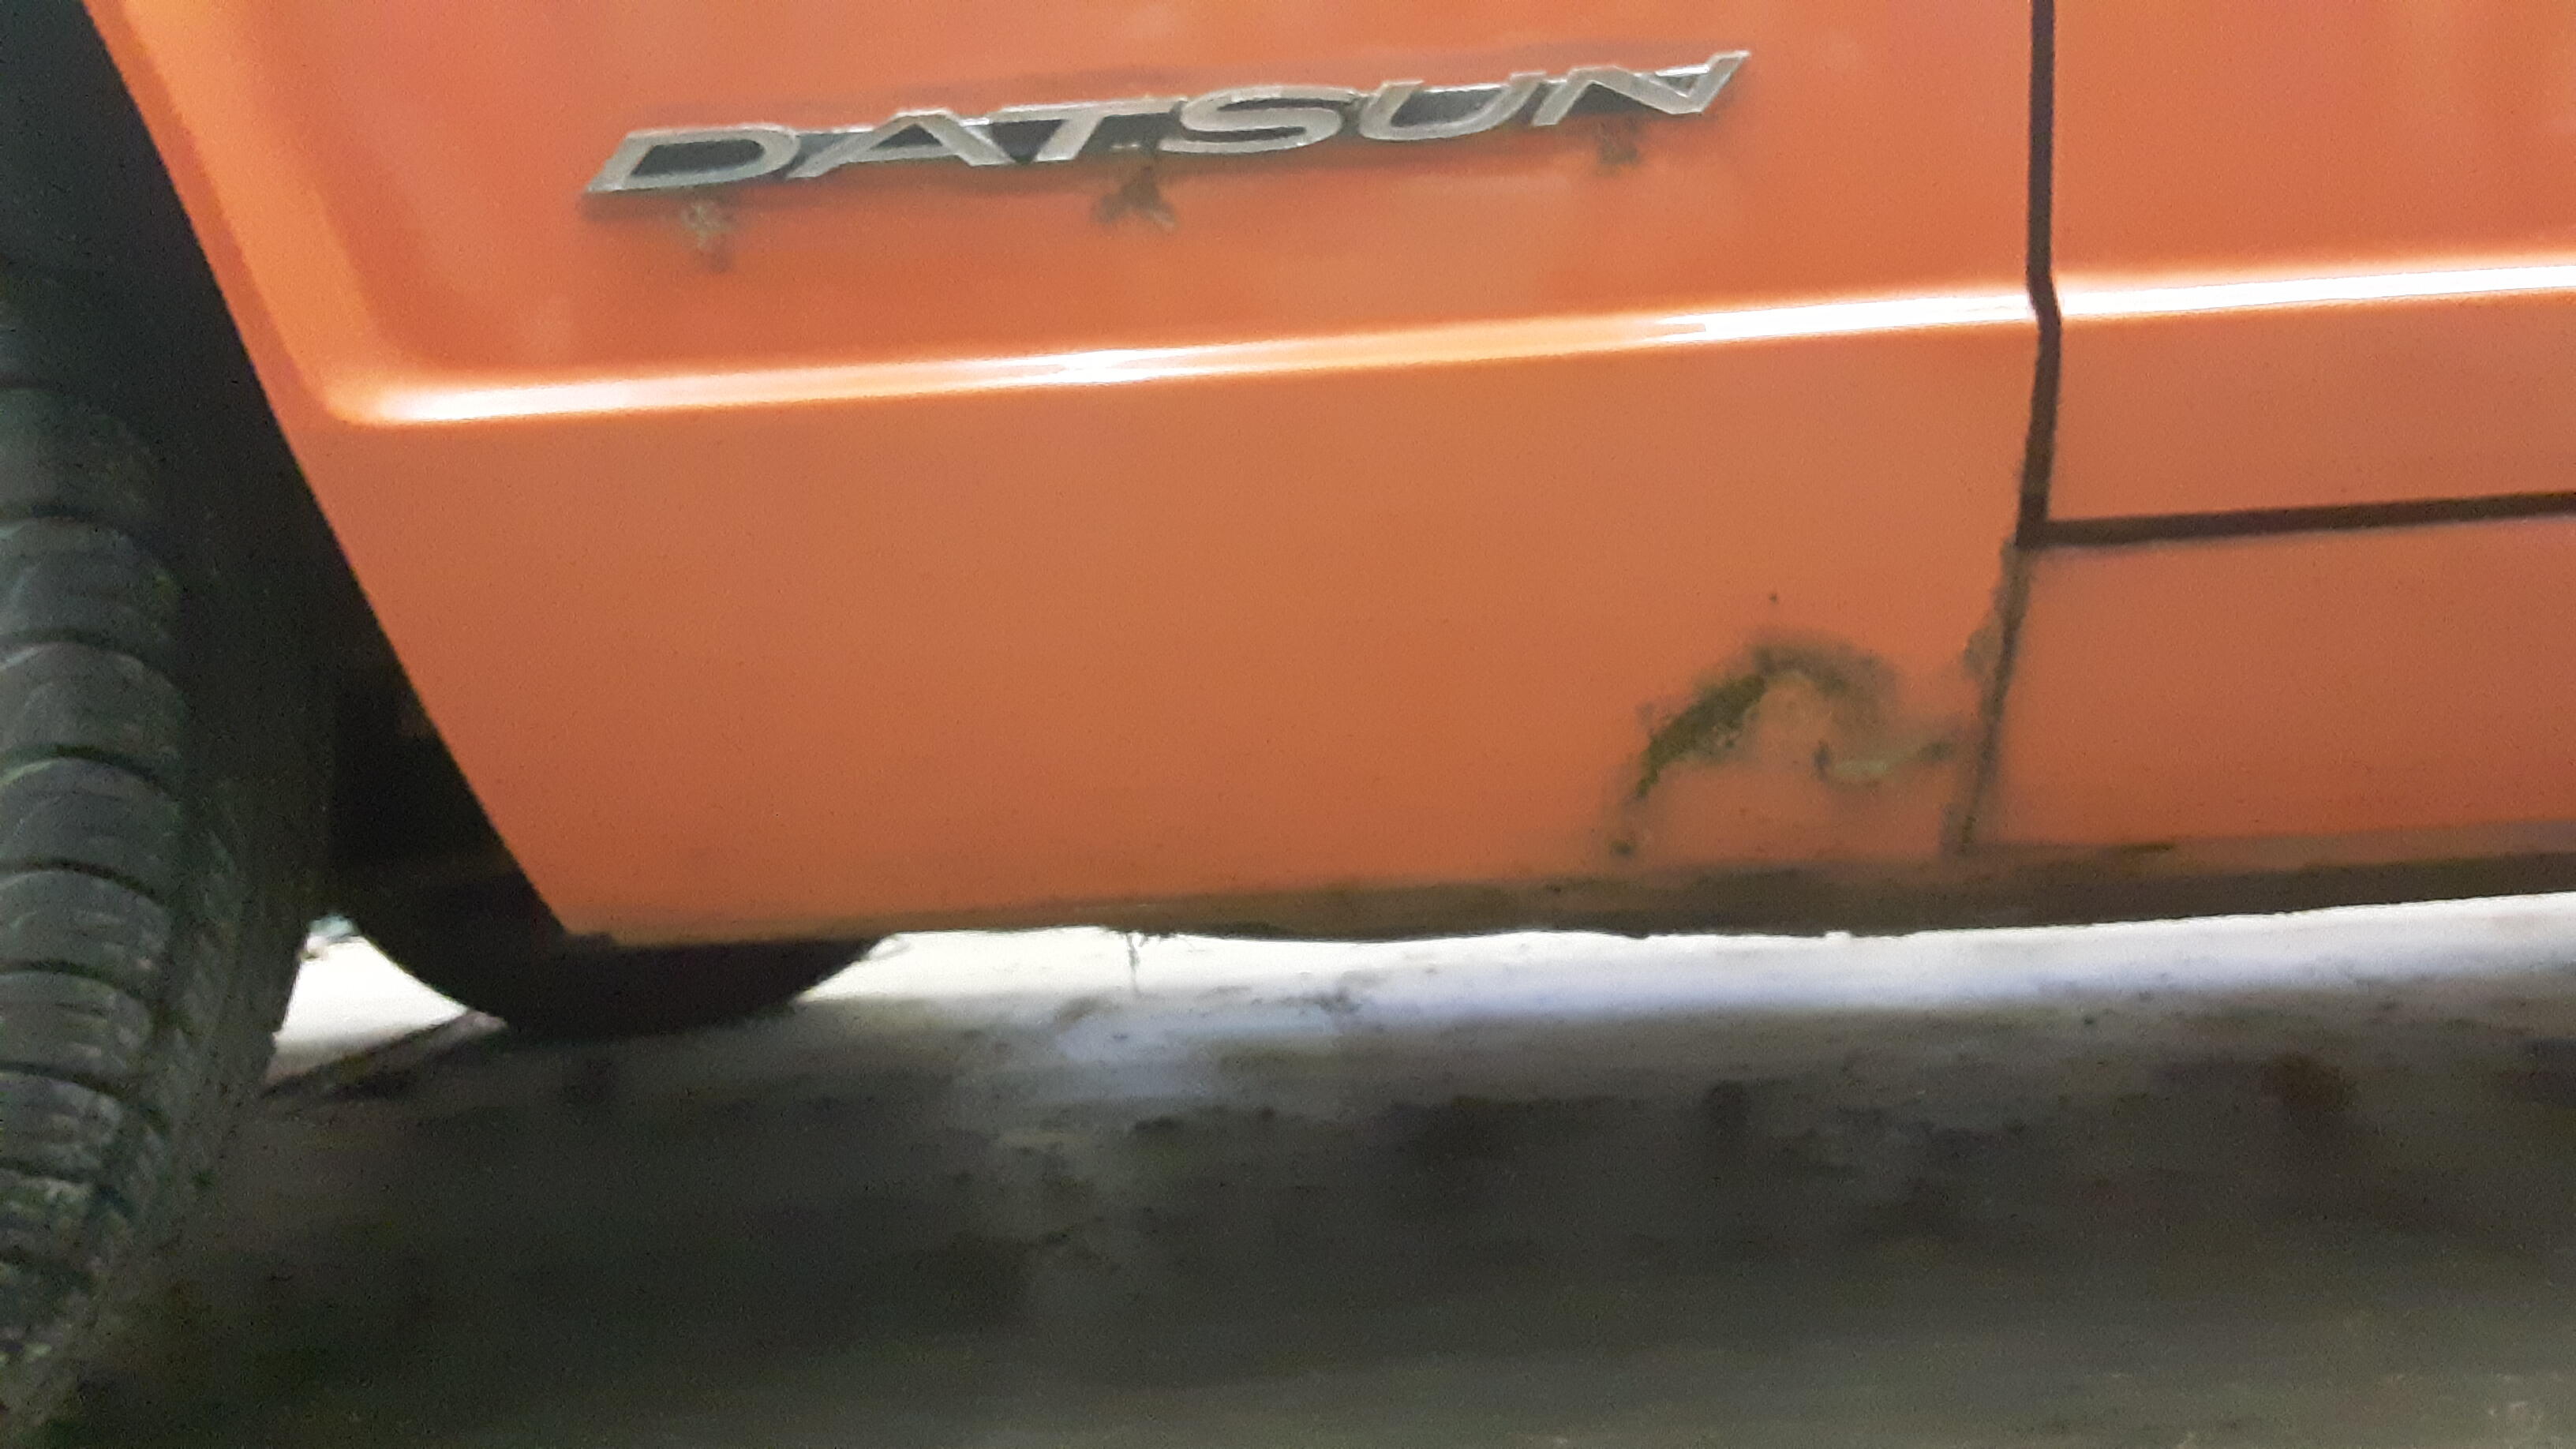
I looked at the book I got with the car "how to restore your Z-car" and said to myself, I am not doing that, way over my head. So I got some polish and my girls started helping me shine it up. That's when I started noticing some rust. I started reading more and more and learned how deceiving these cars can be.


-
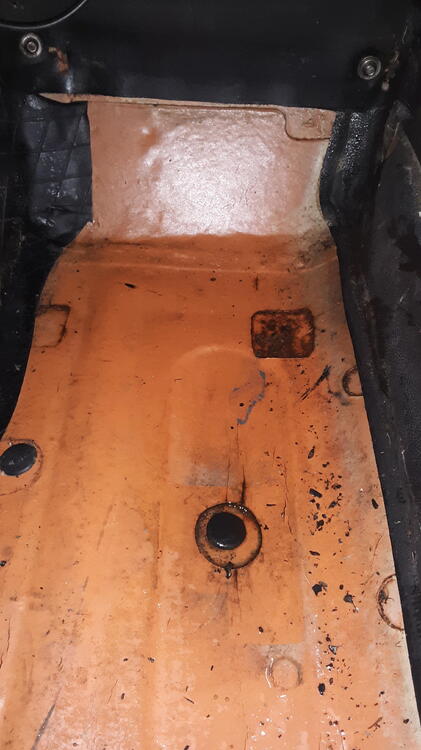
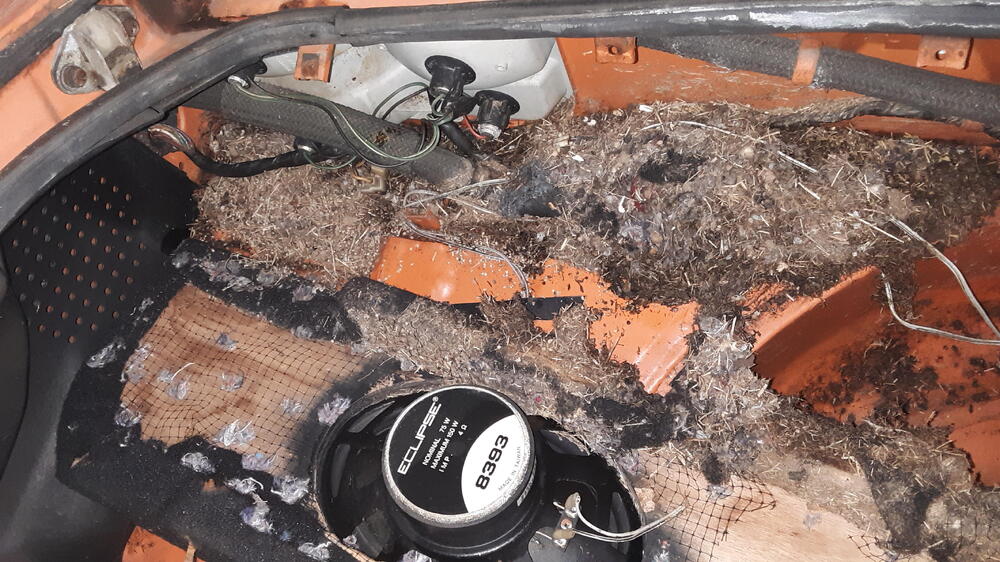
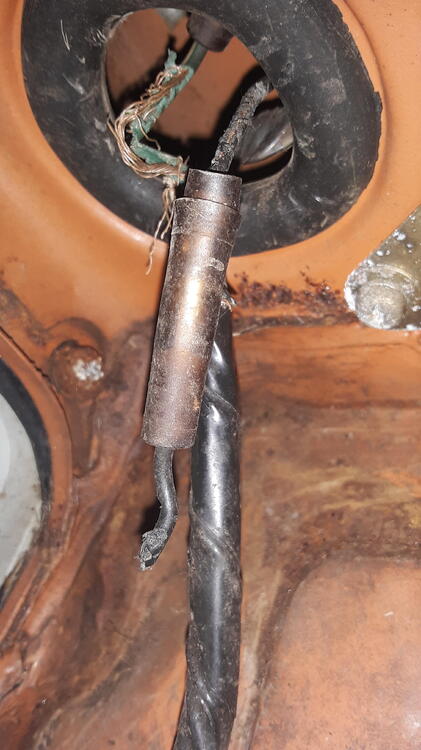
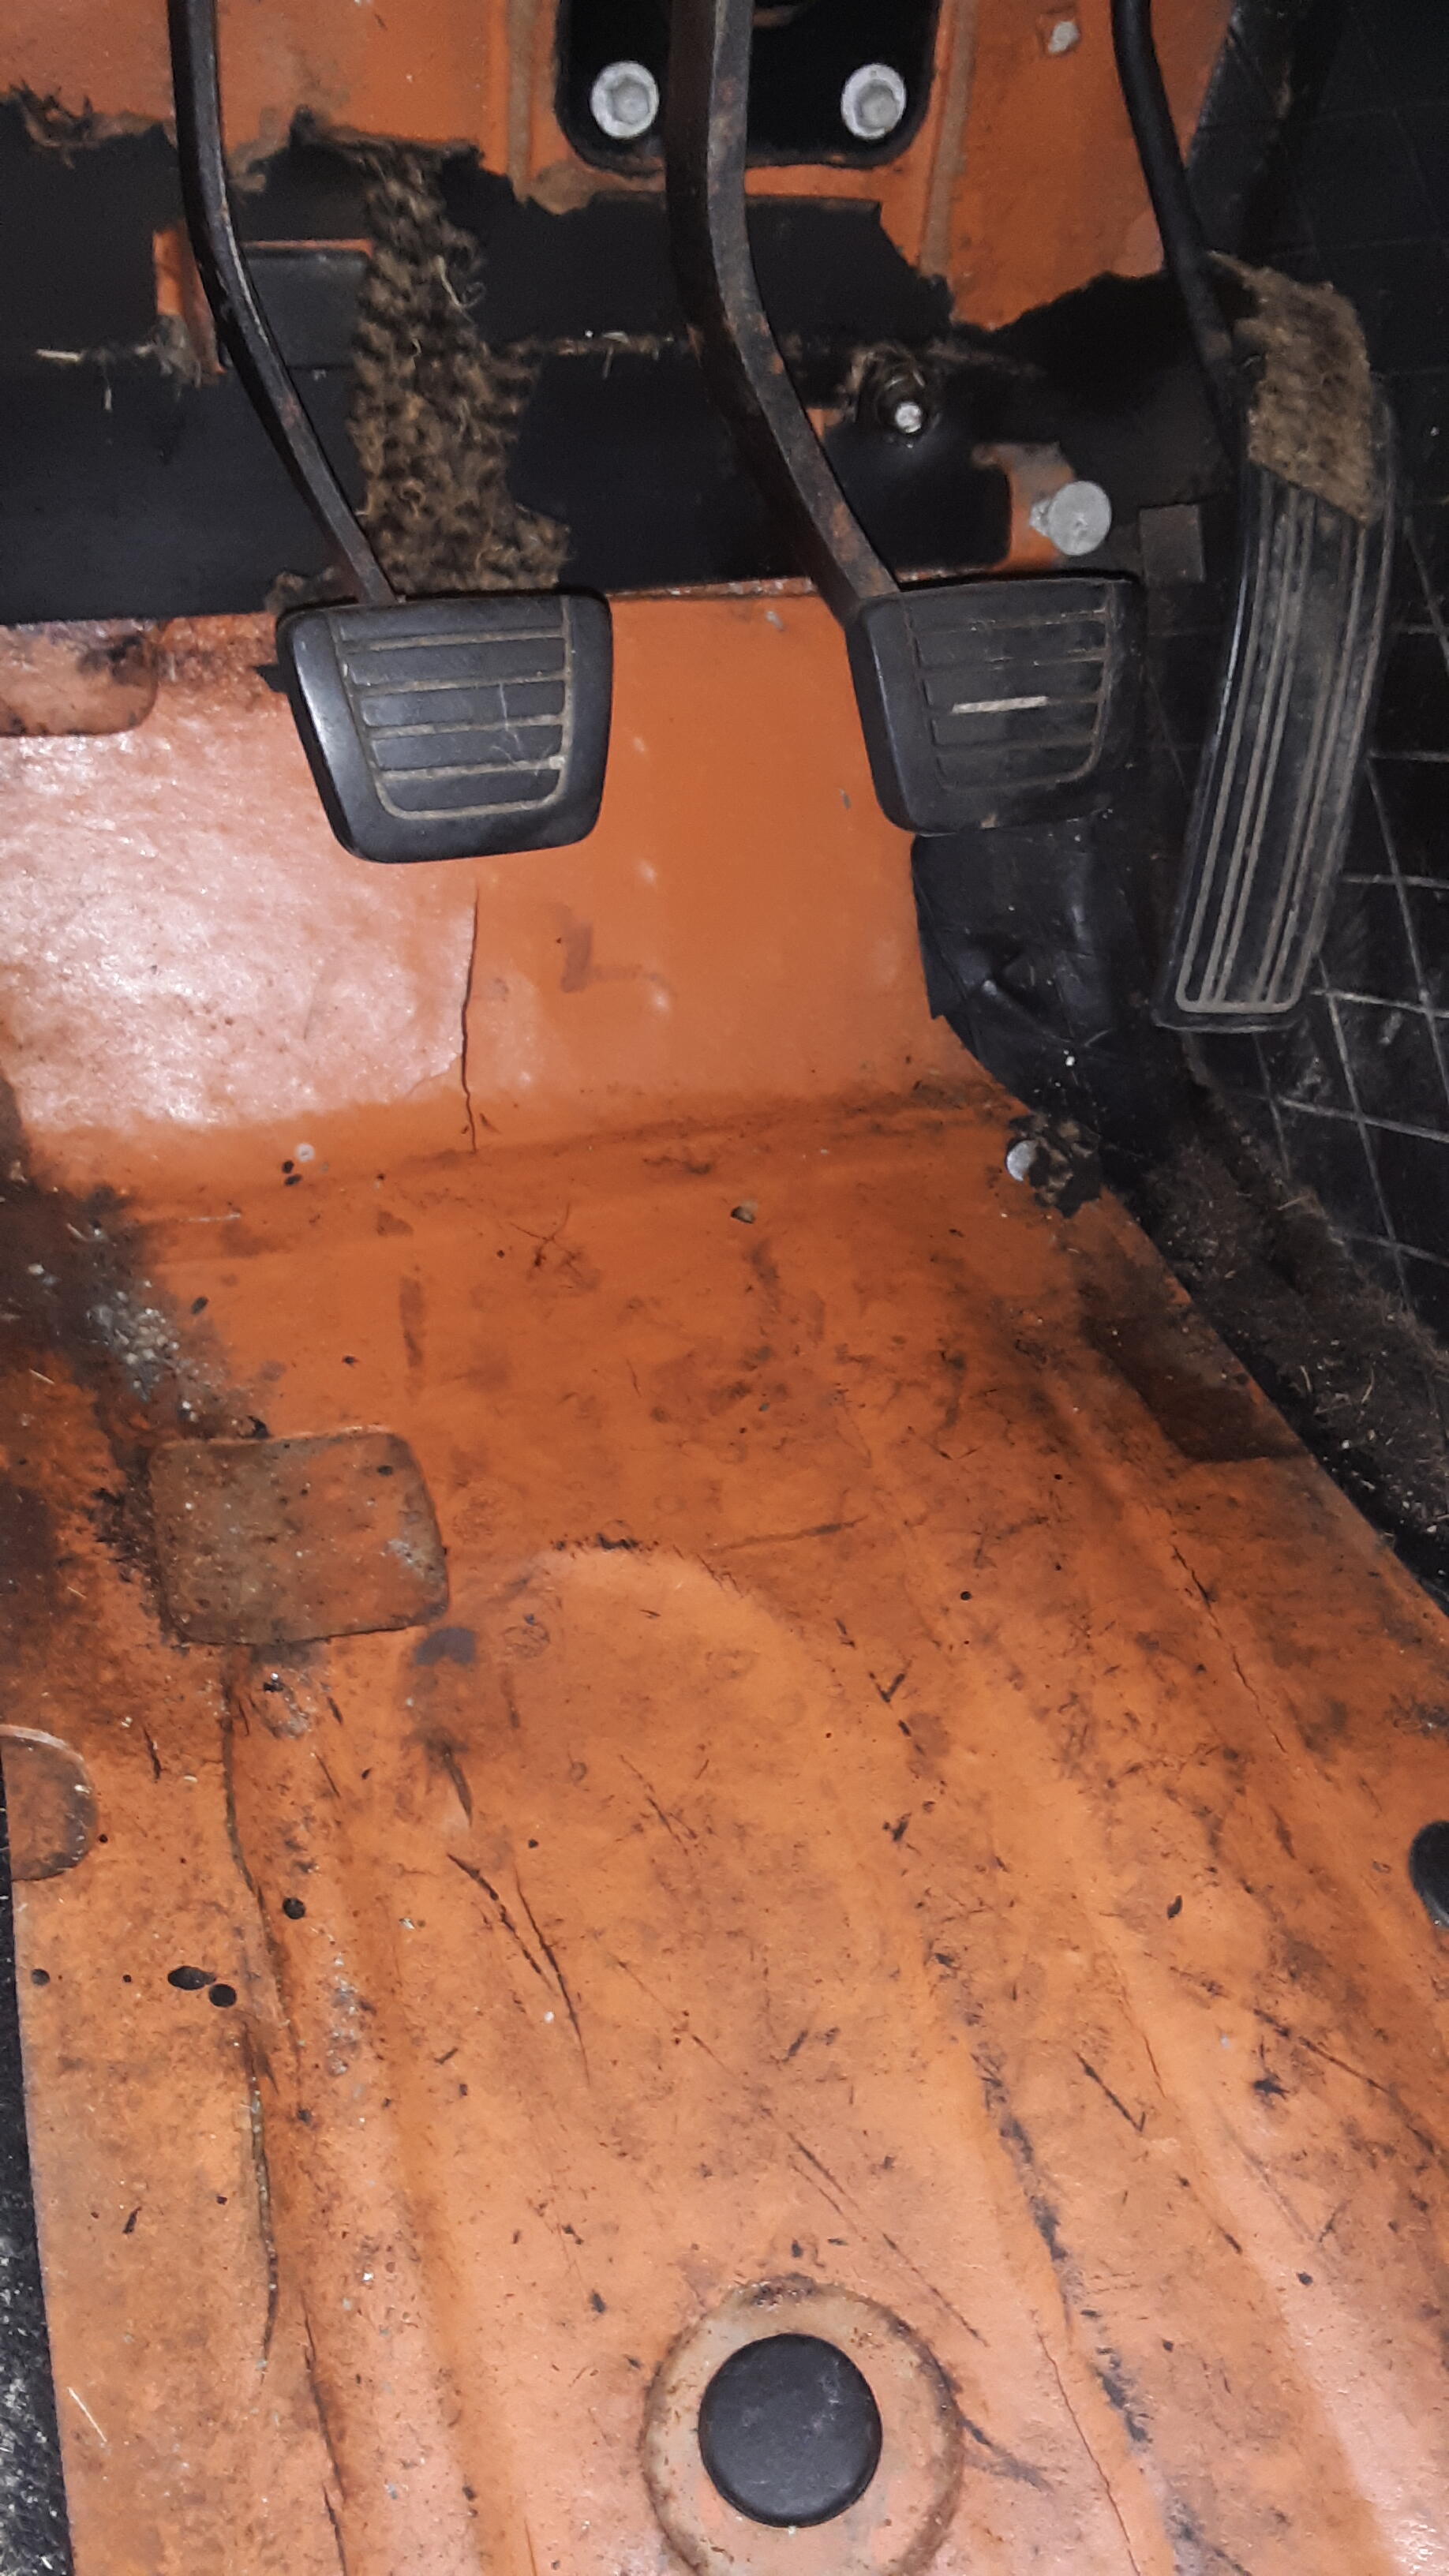
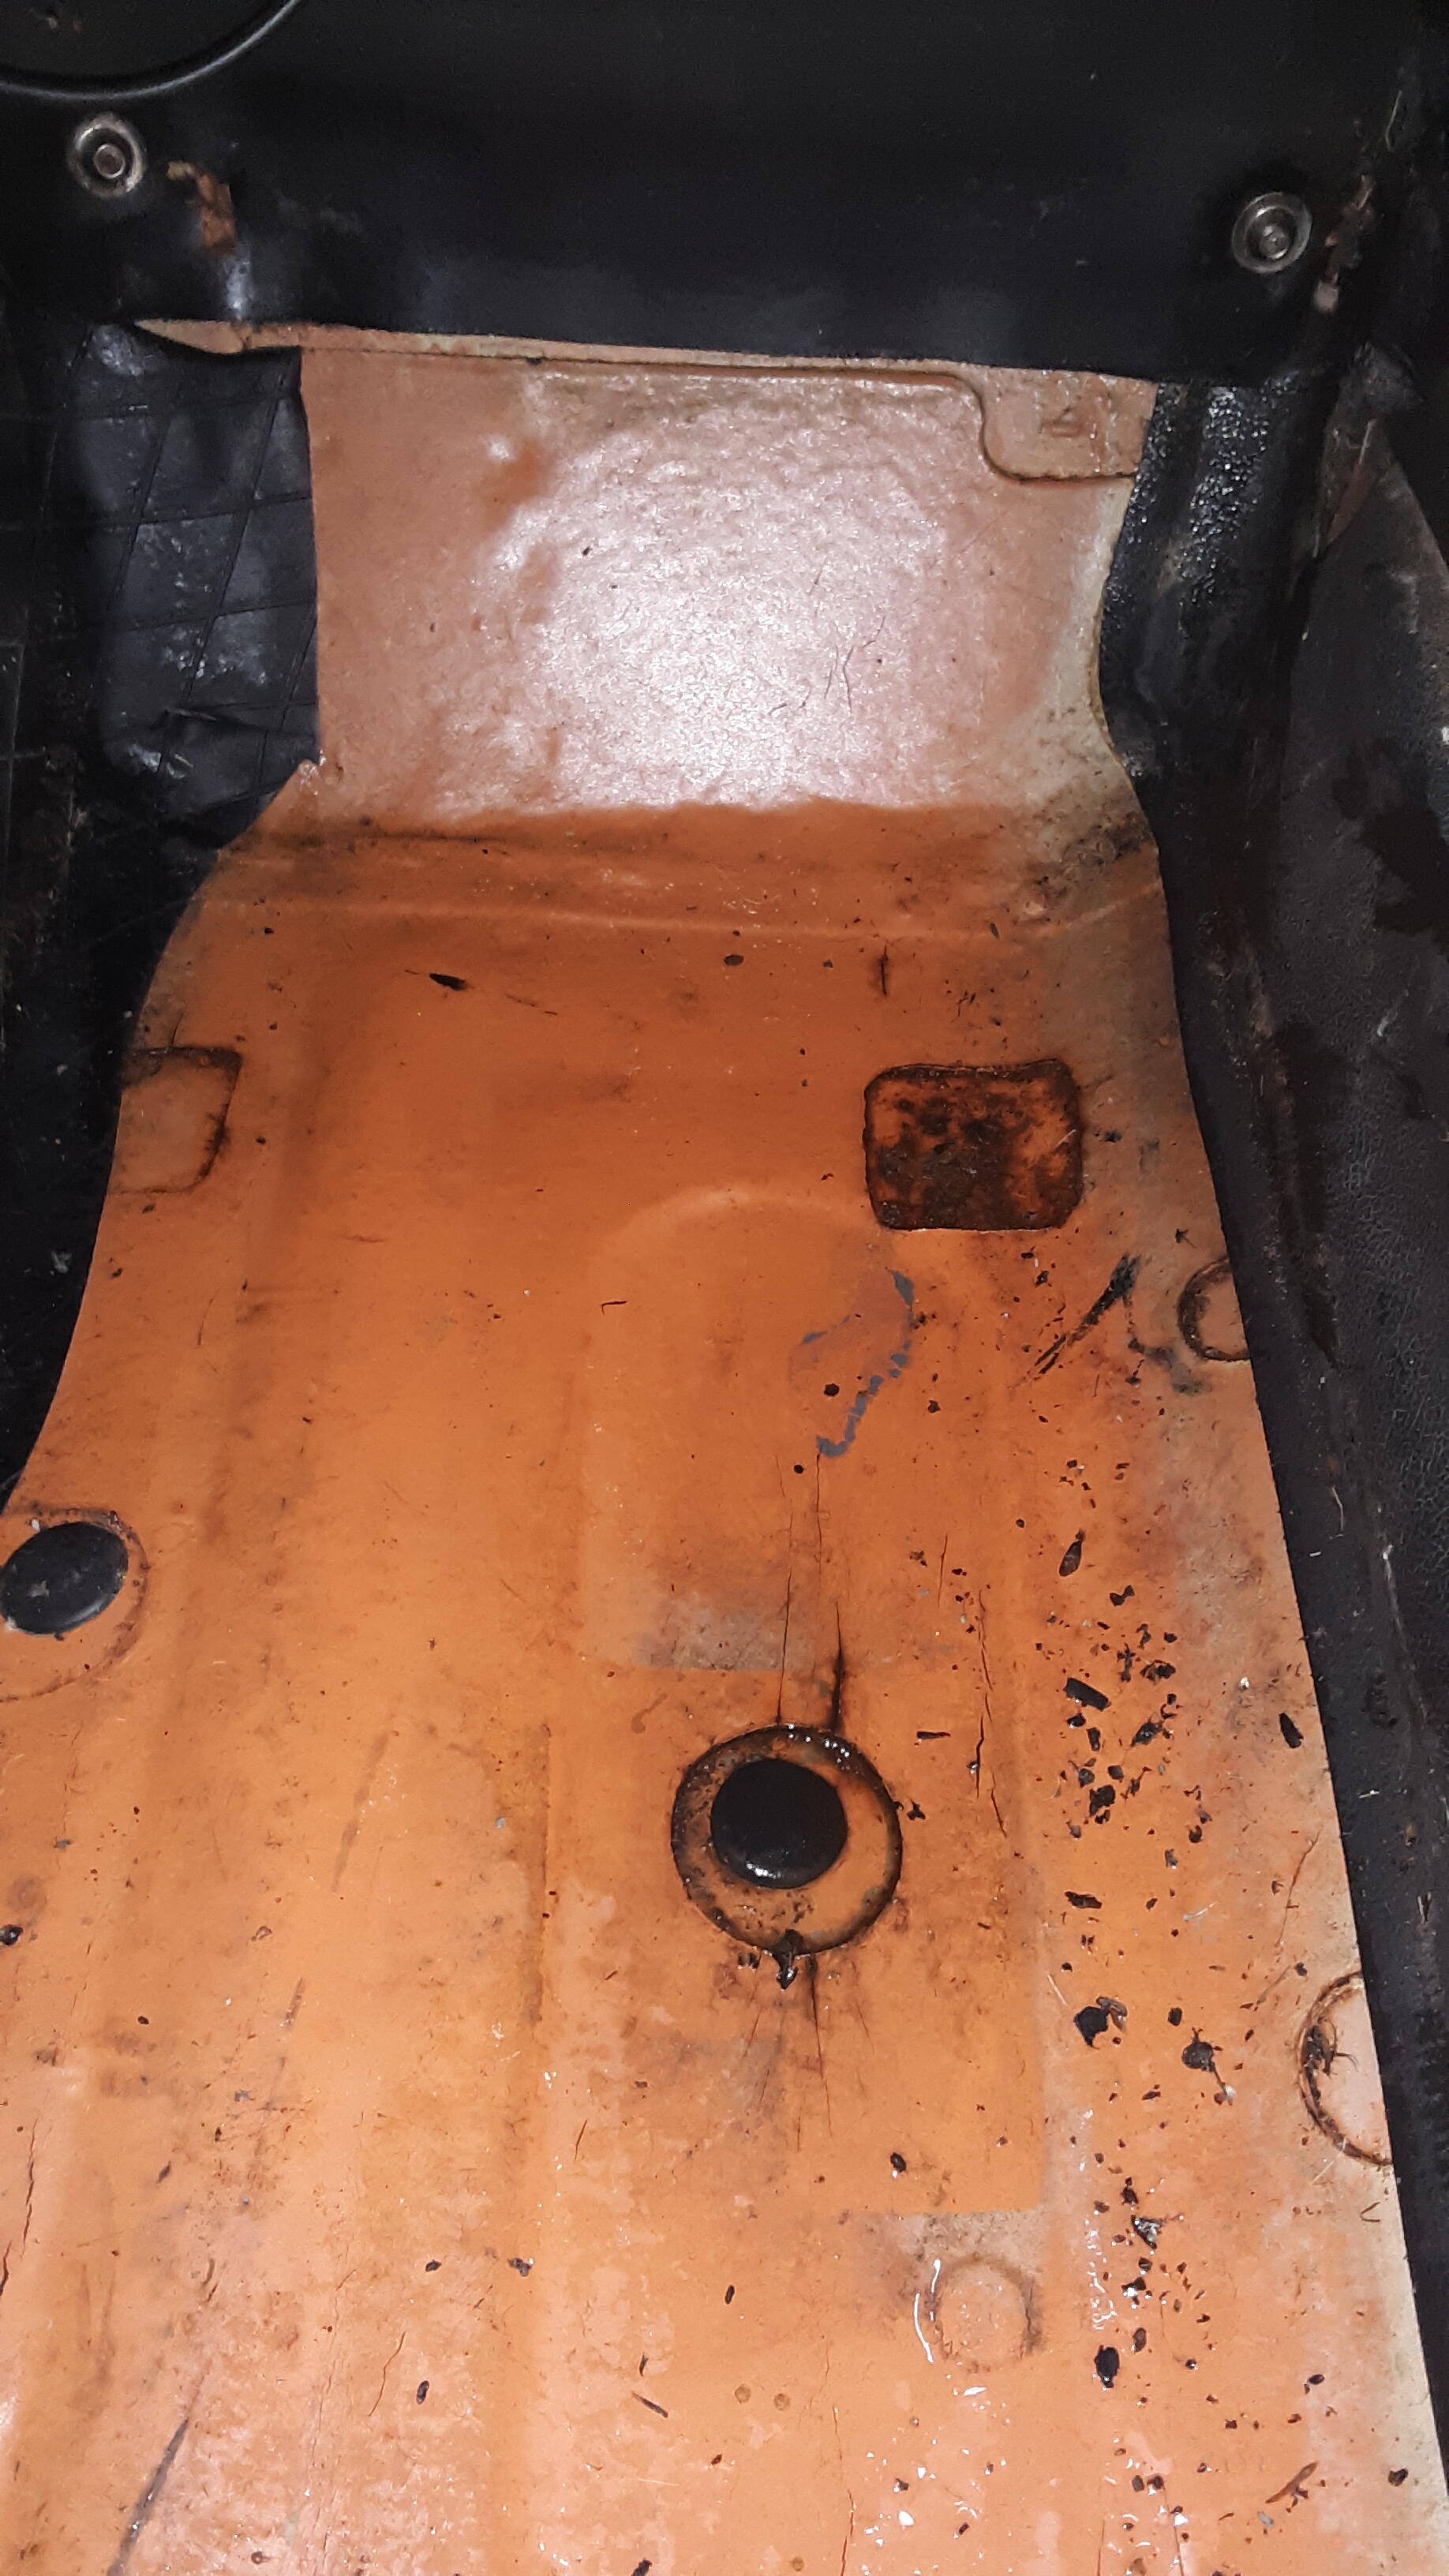
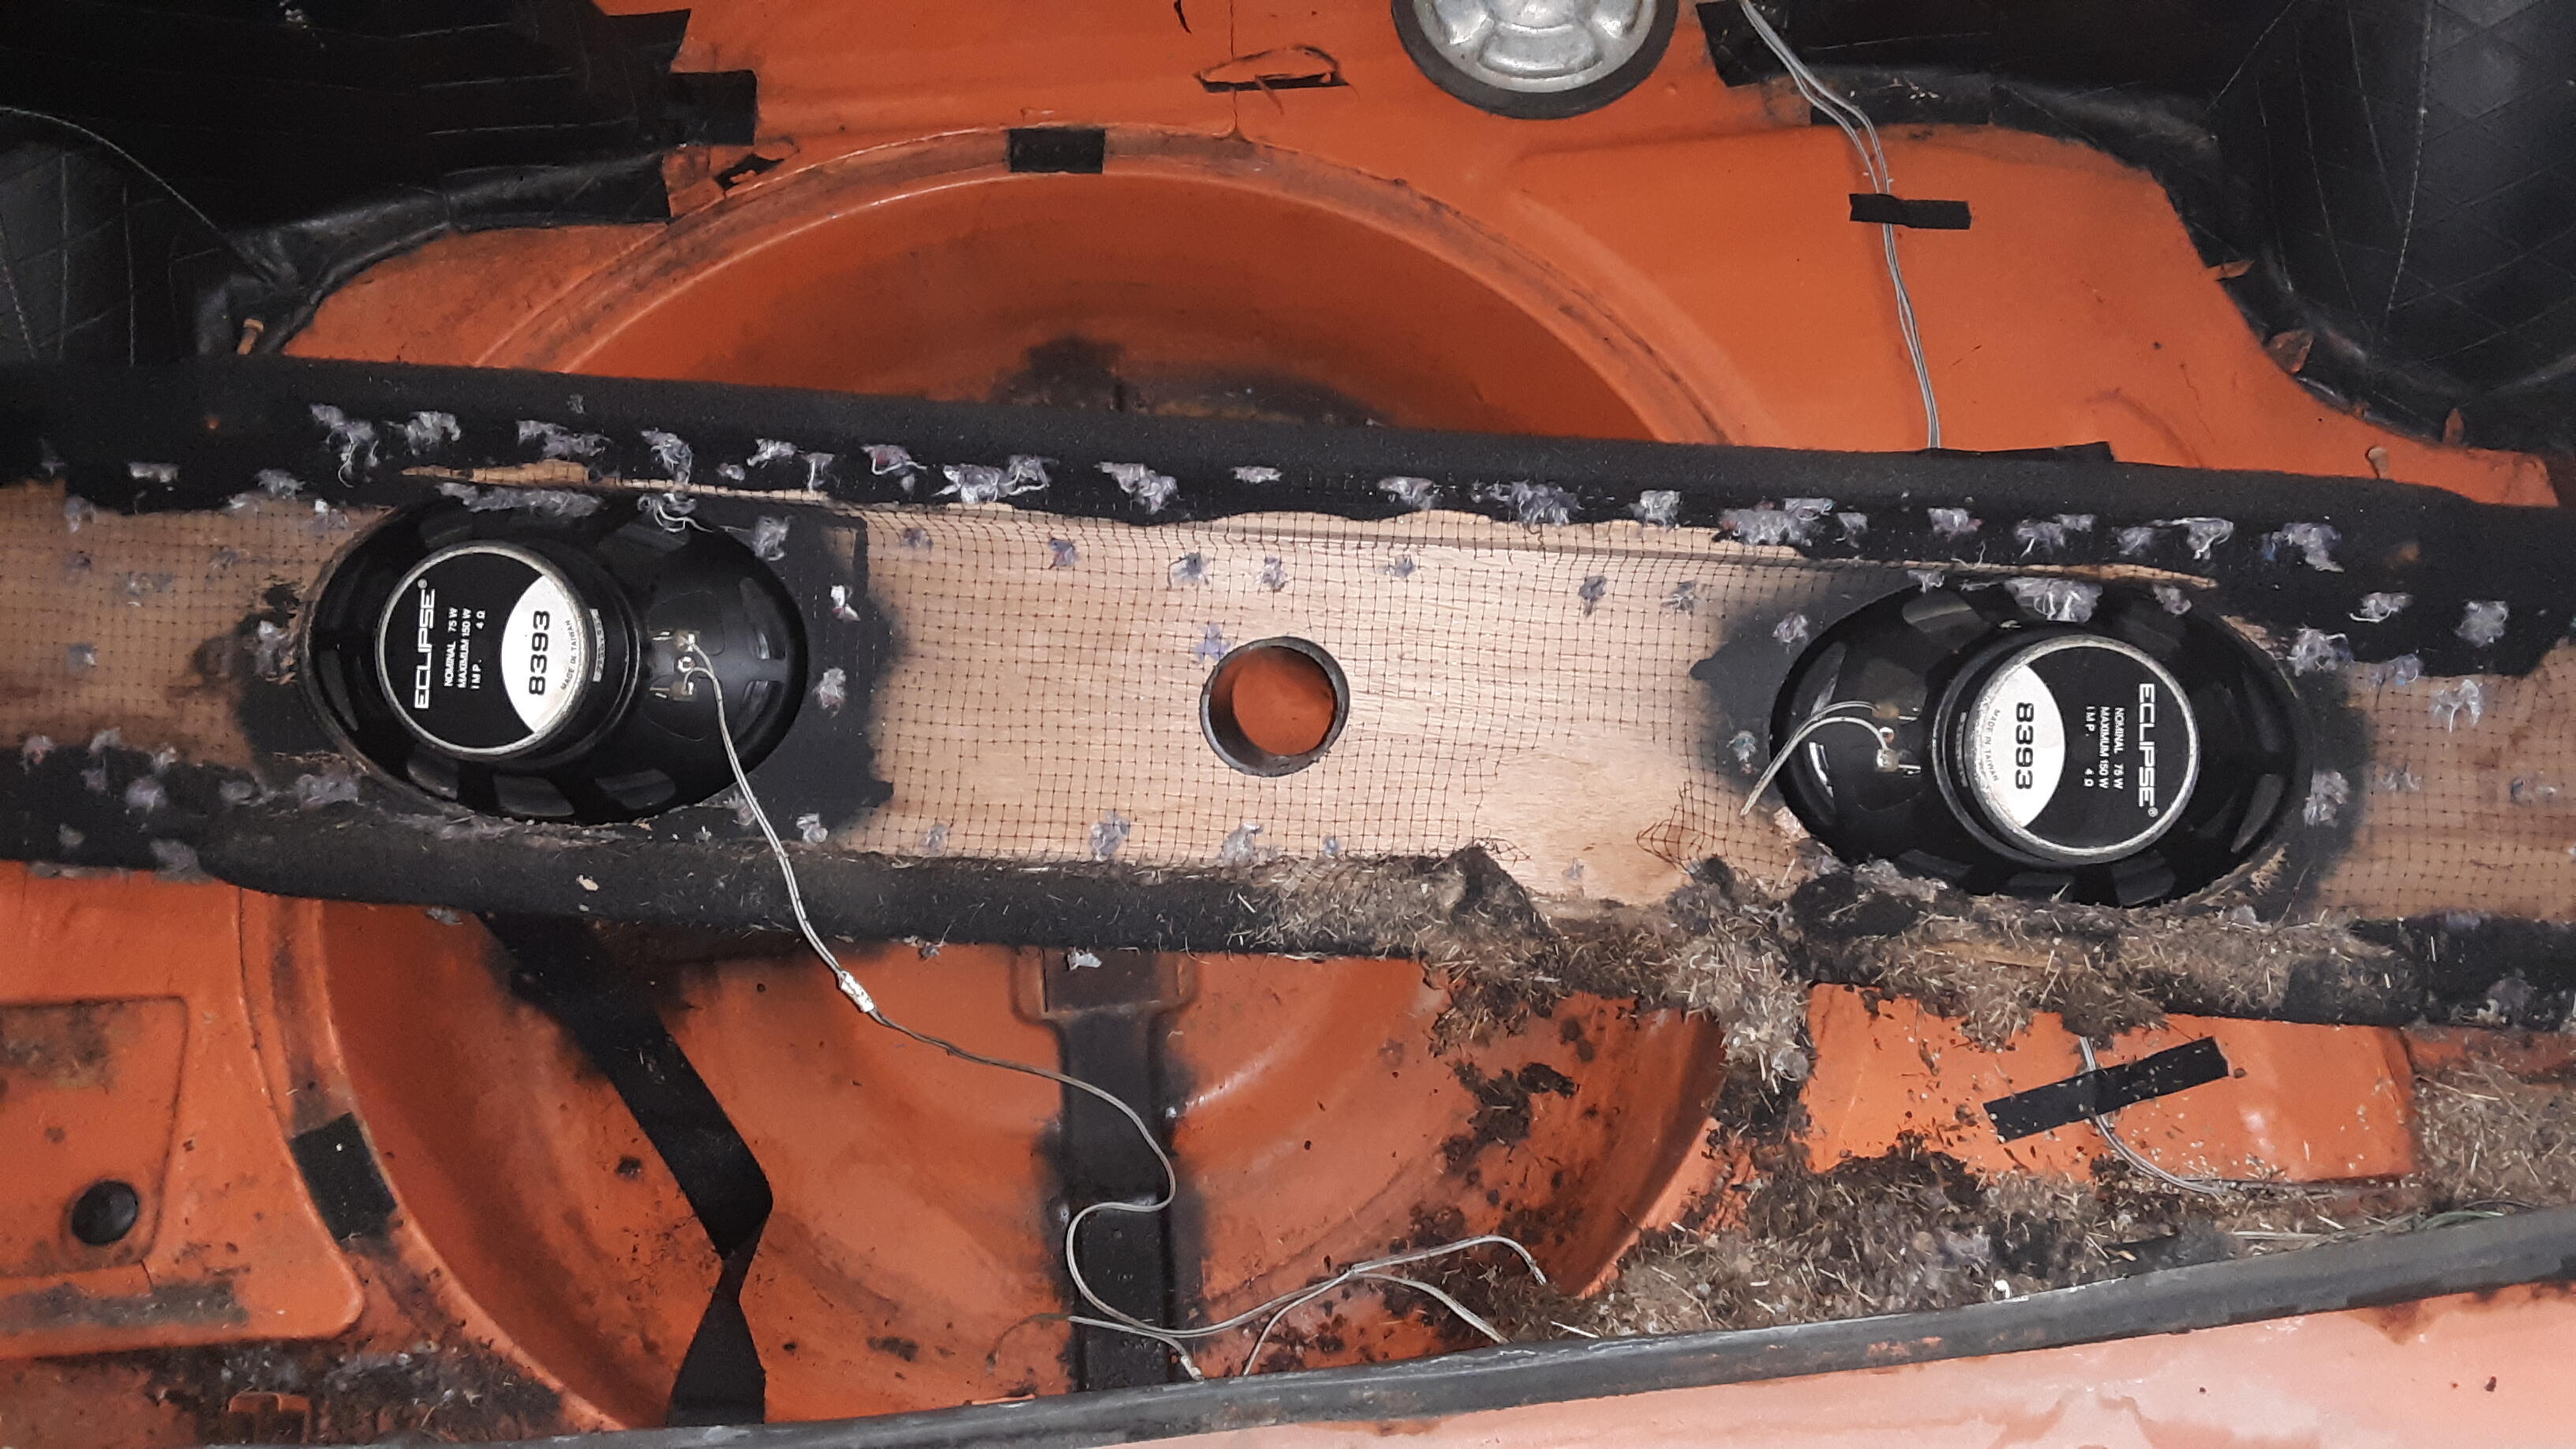
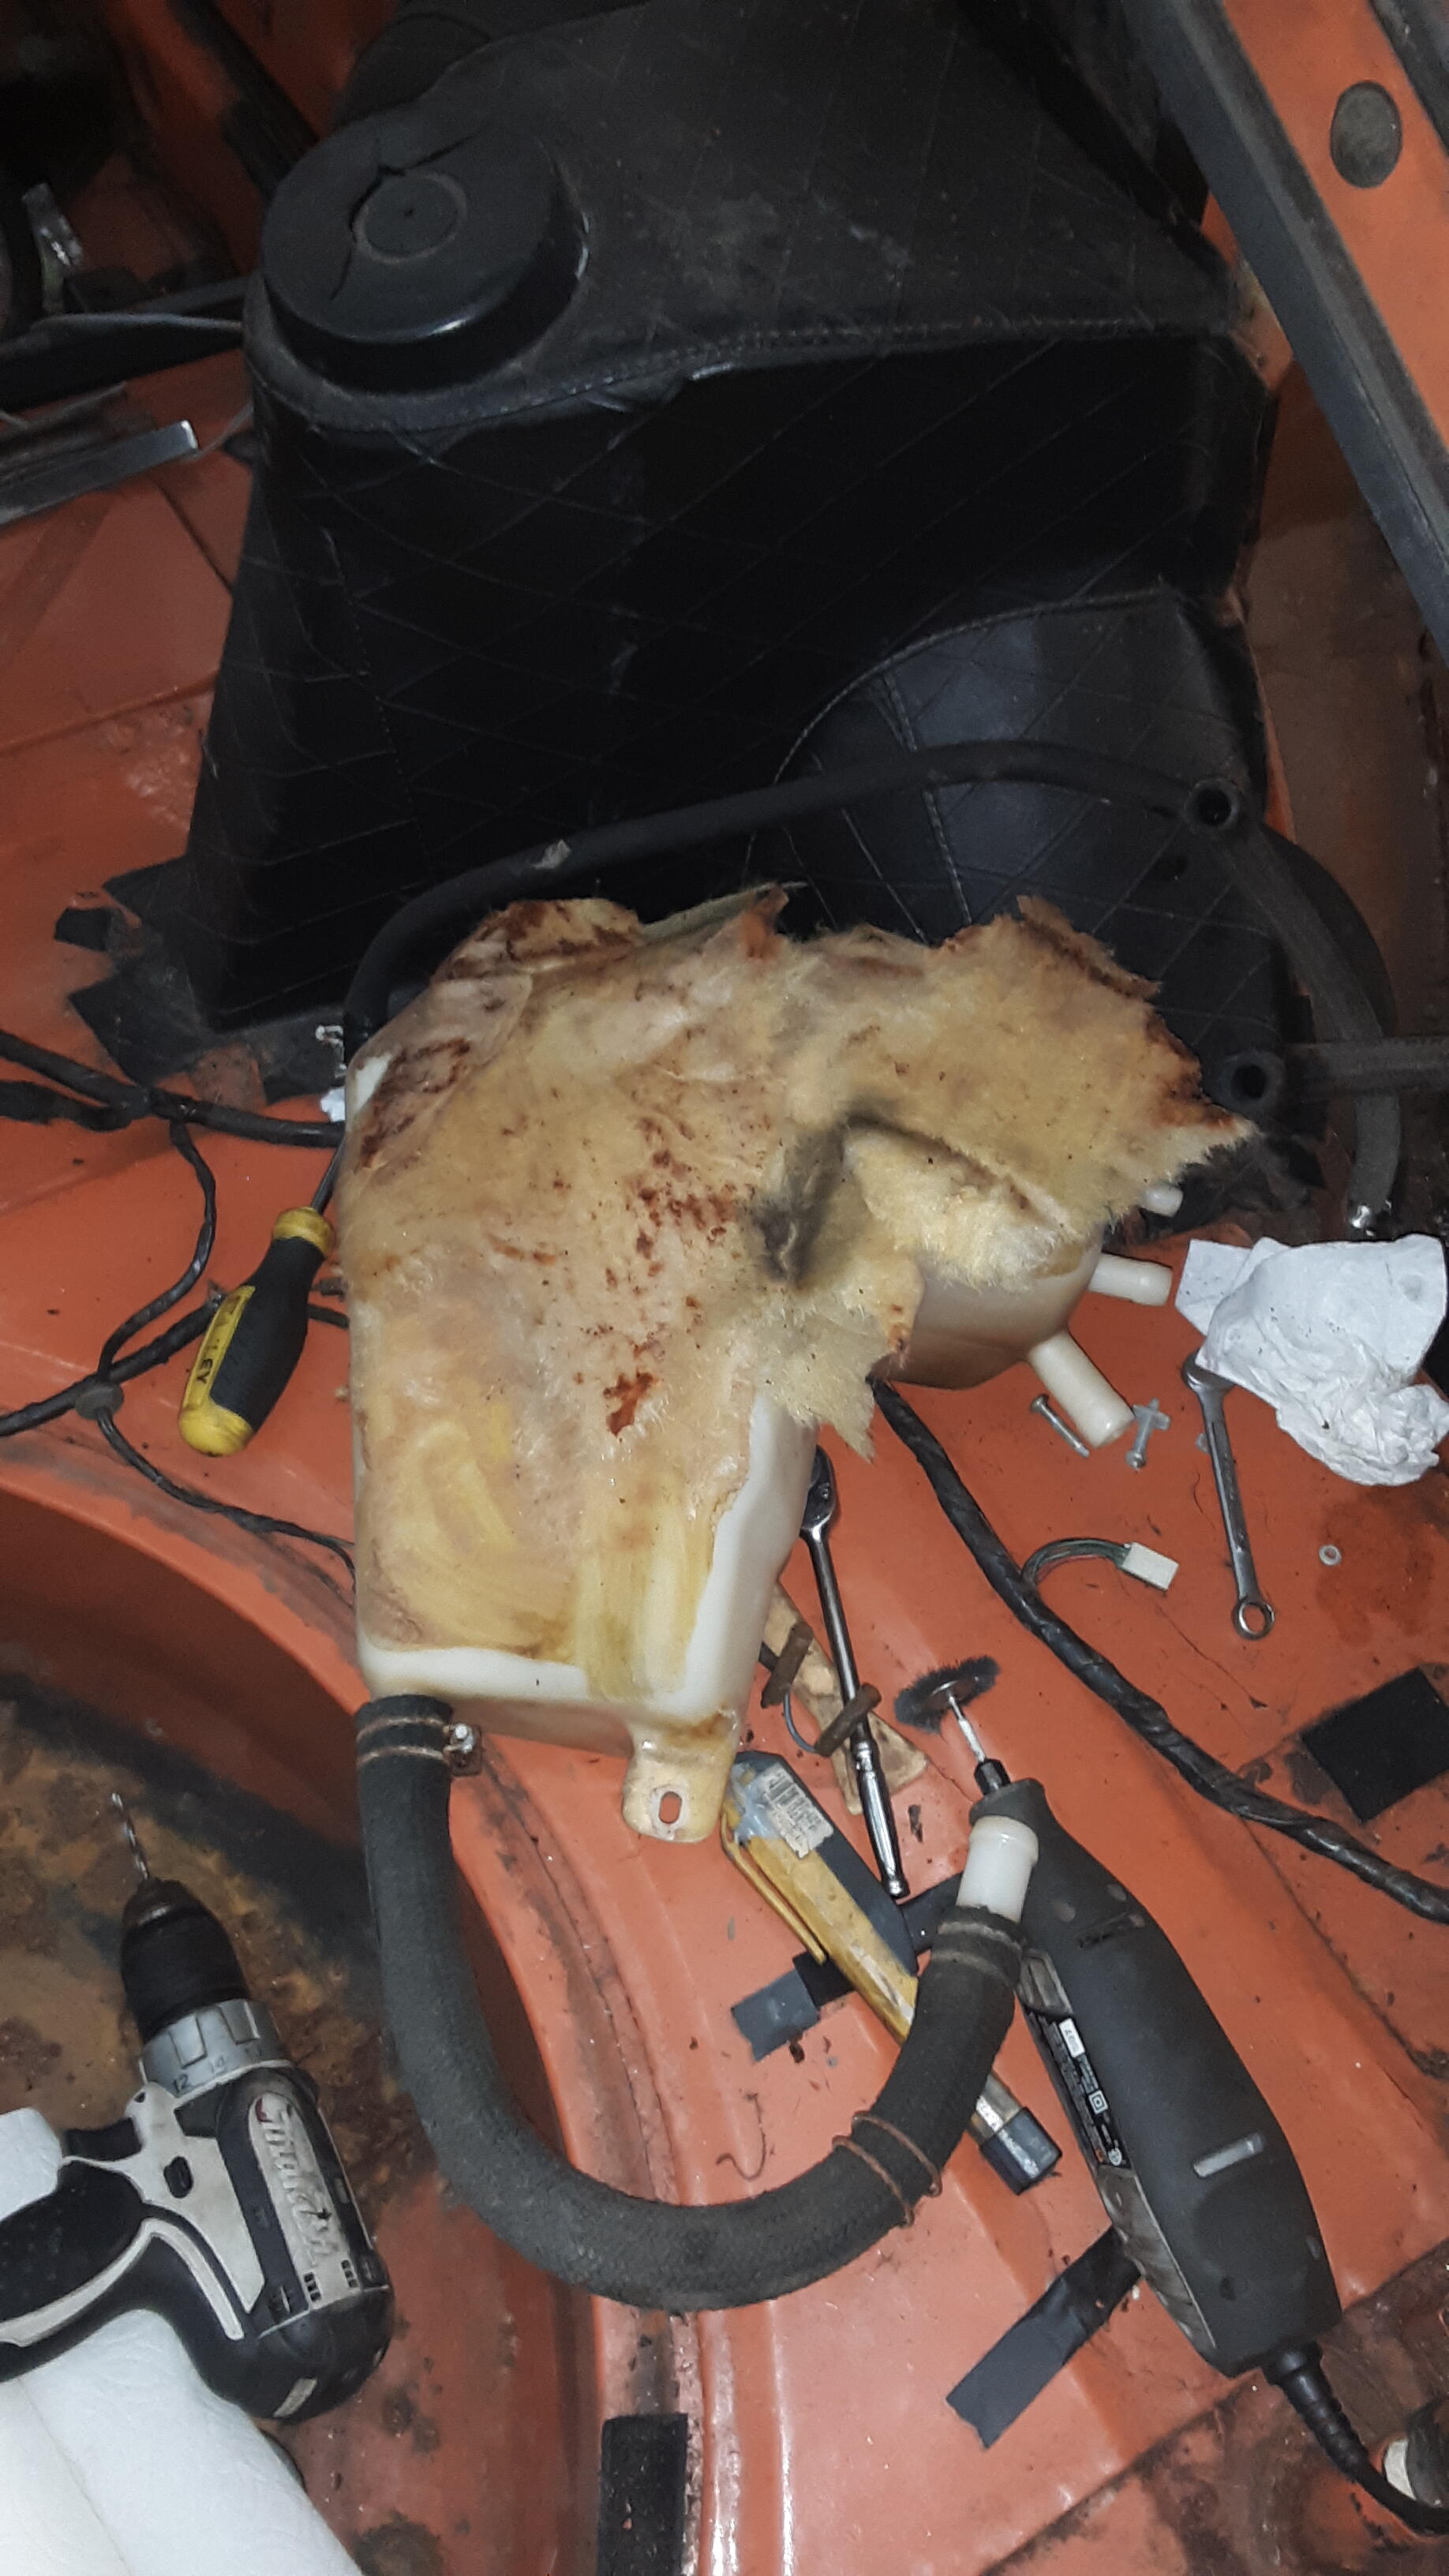
After getting it in my shop, I started removing things, carpet, etc and at first glance, being naive as I was, Wow, this car has no rust! I didn't know that what I was looking at was painted tarmat at the time. But, it looked pretty good. Water continued to run down the passenger side floorboard for several days, where is this coming from? He had a homemade speaker box in the back and when I removed it and the spare tire and found what he was talking about, MICE!


-
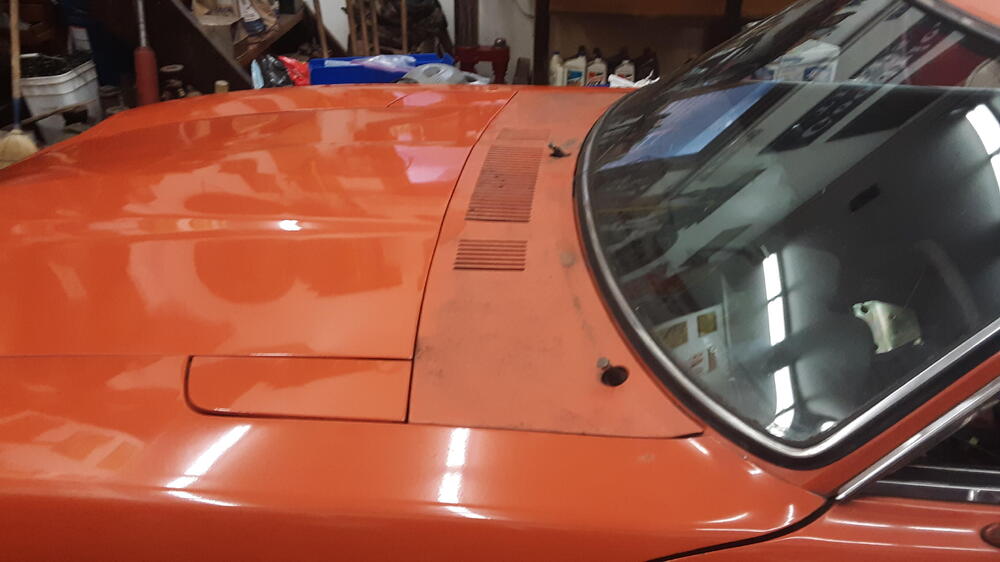
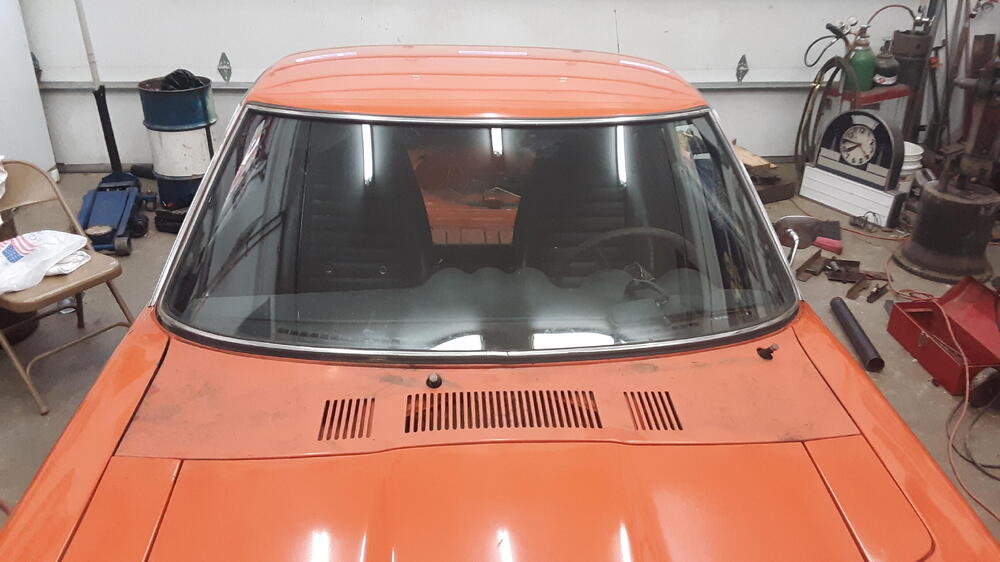
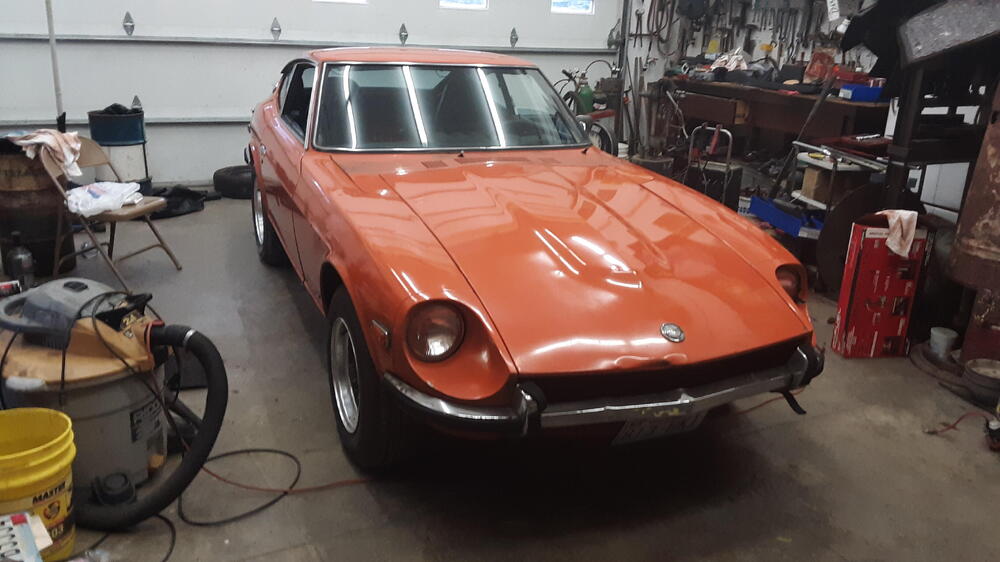
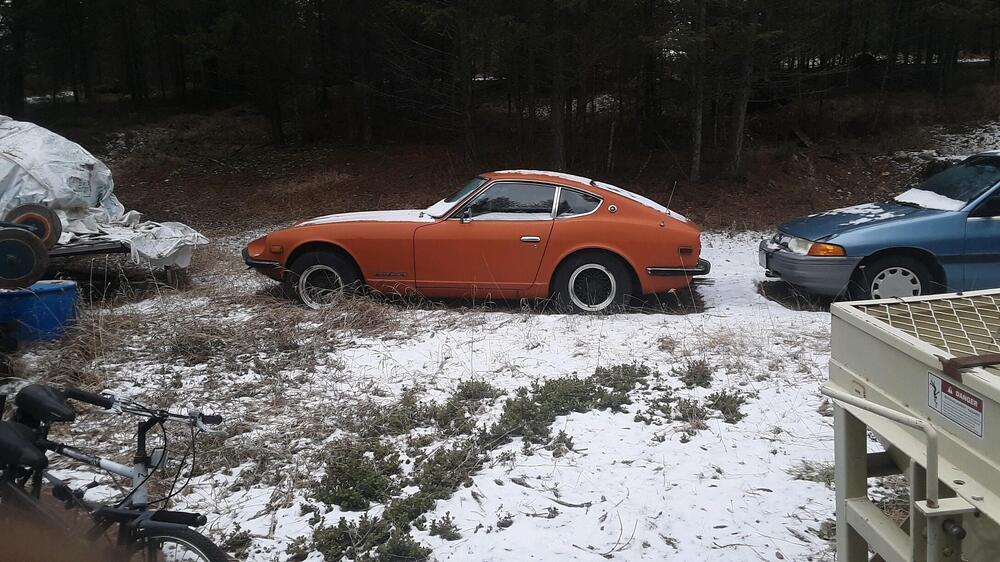
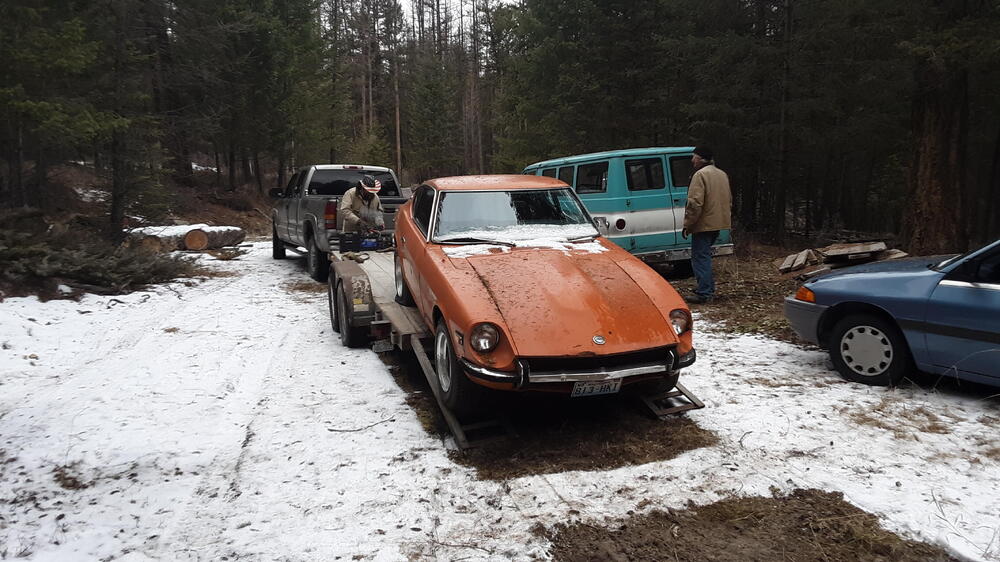
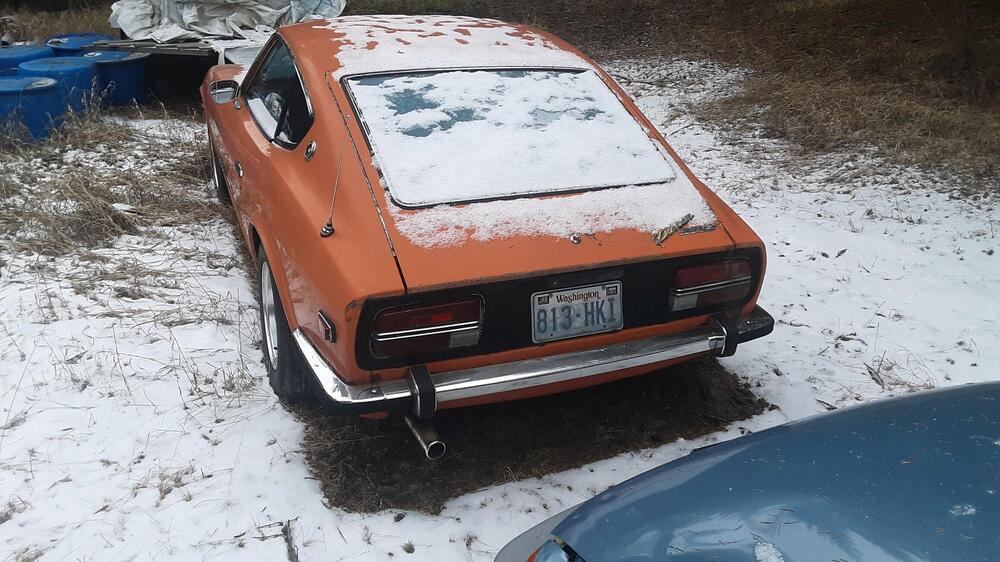
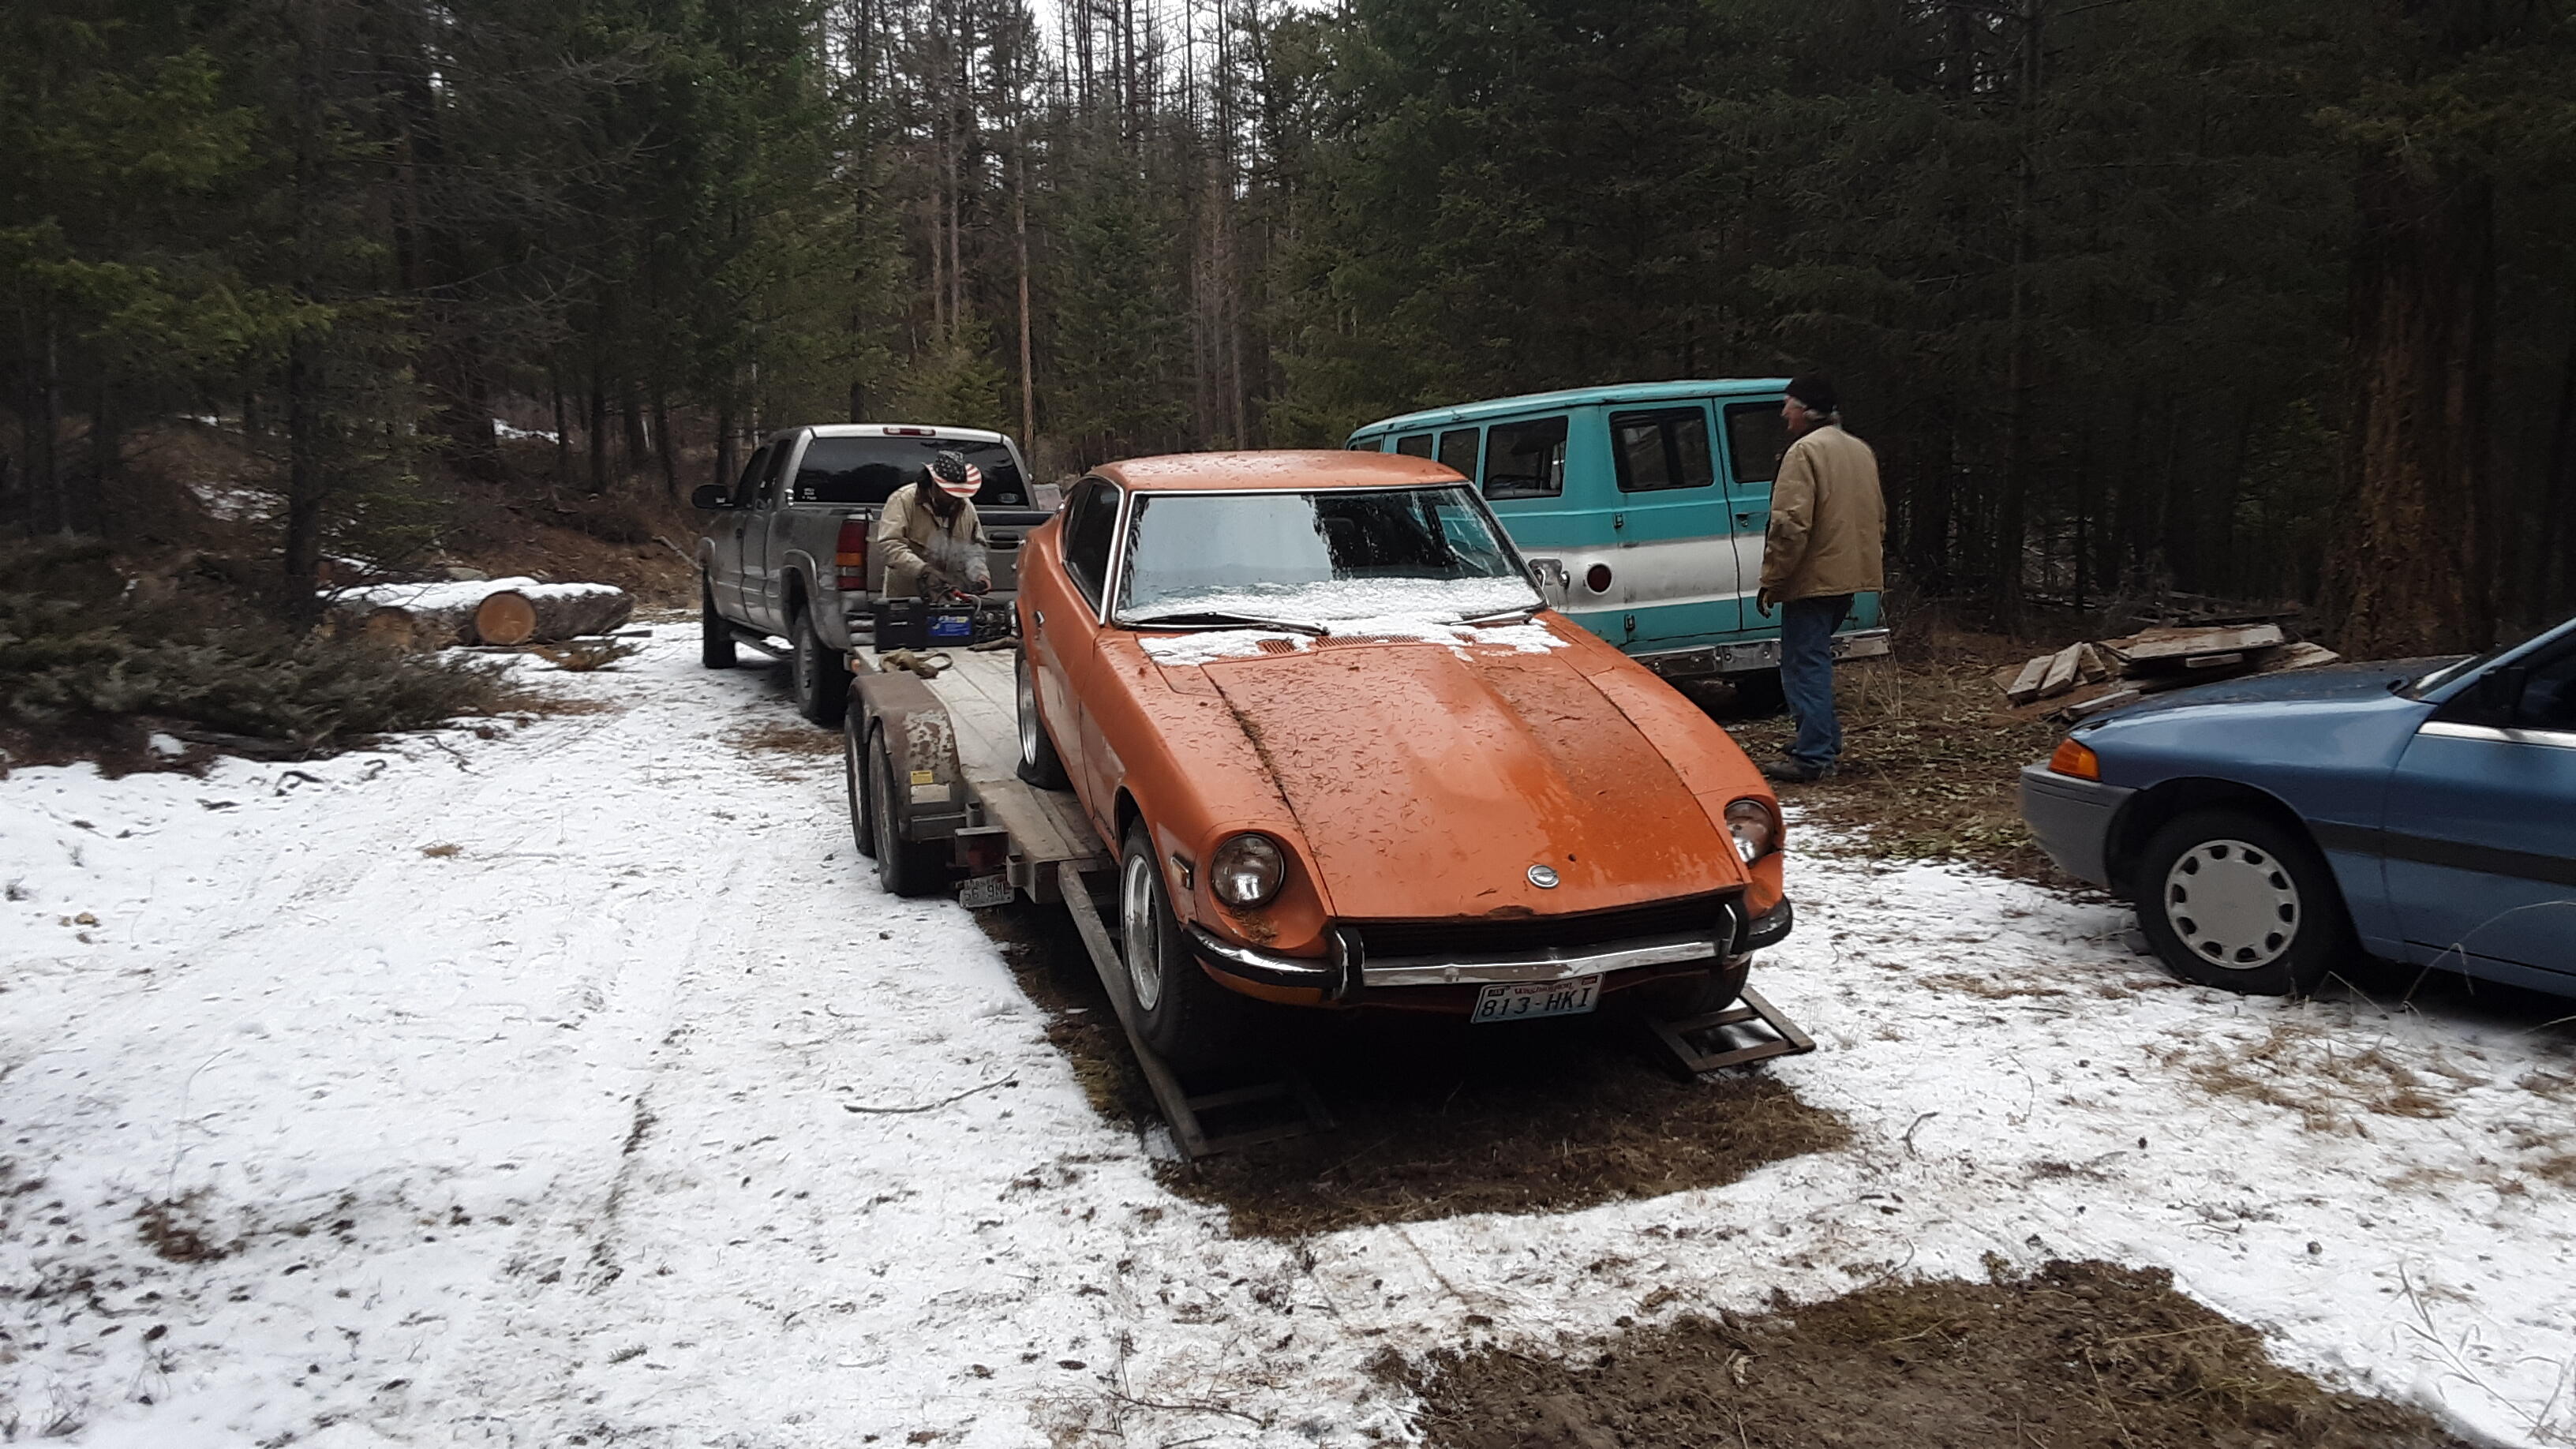
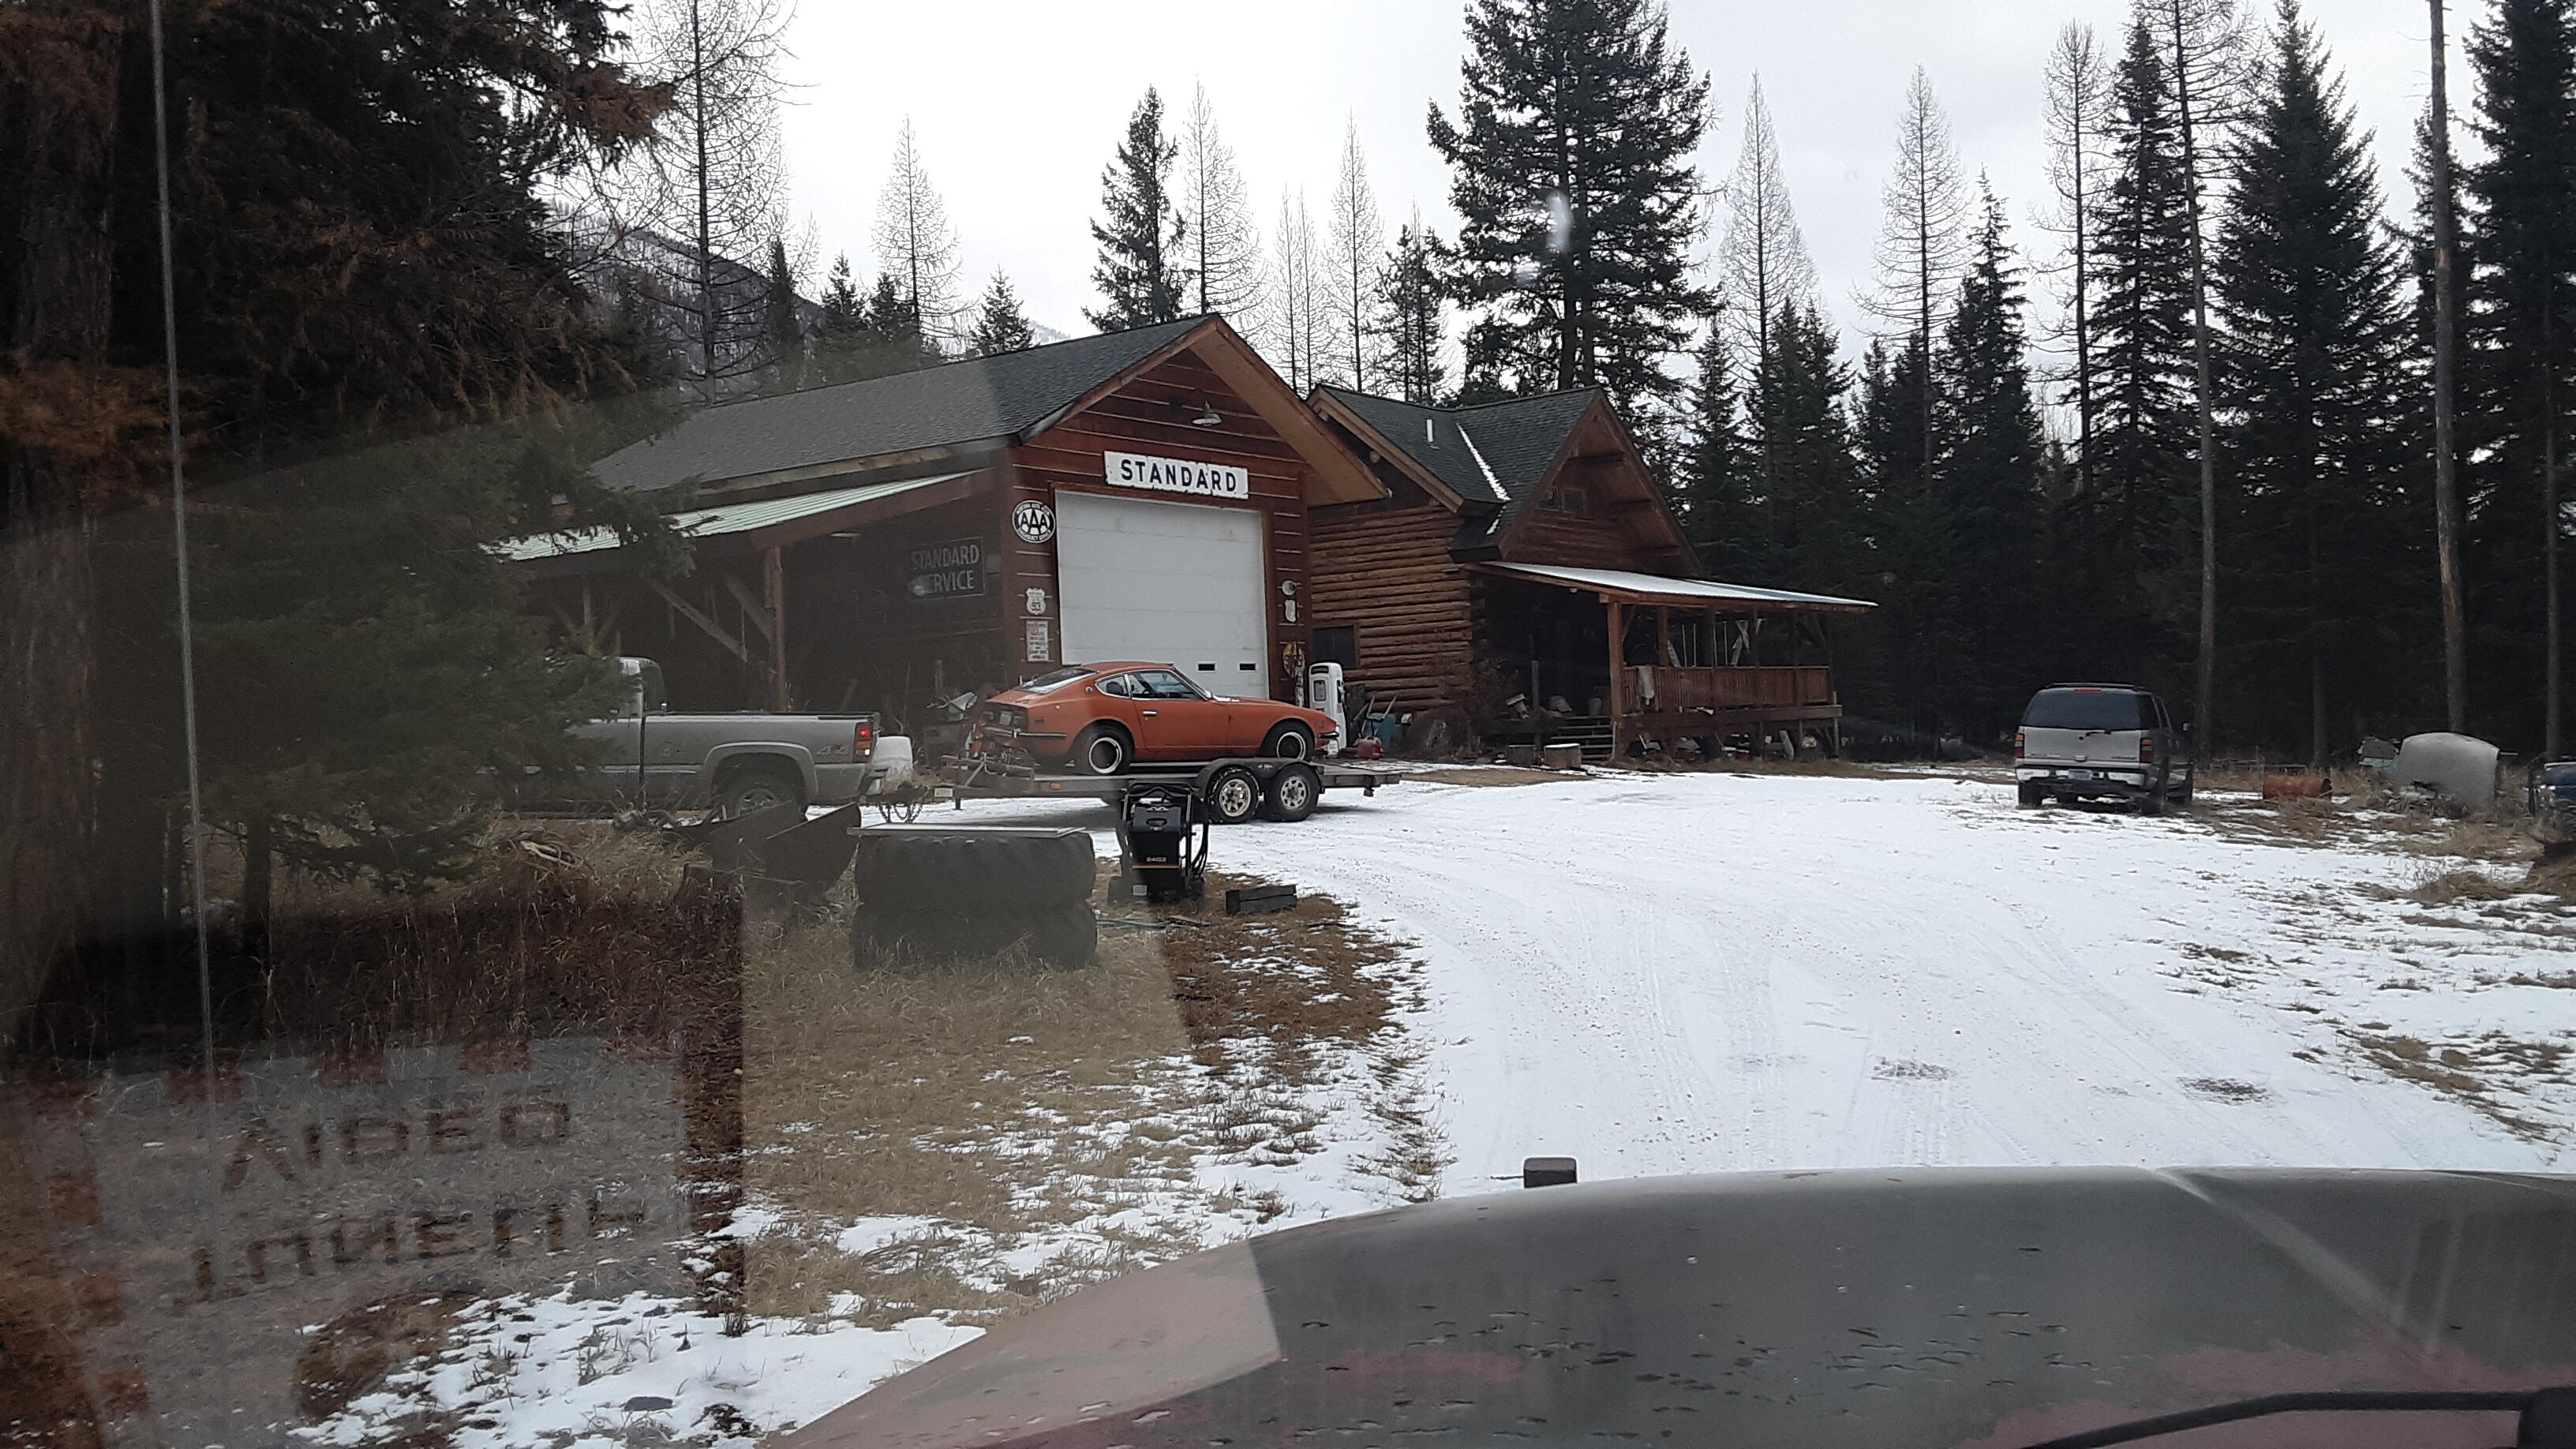
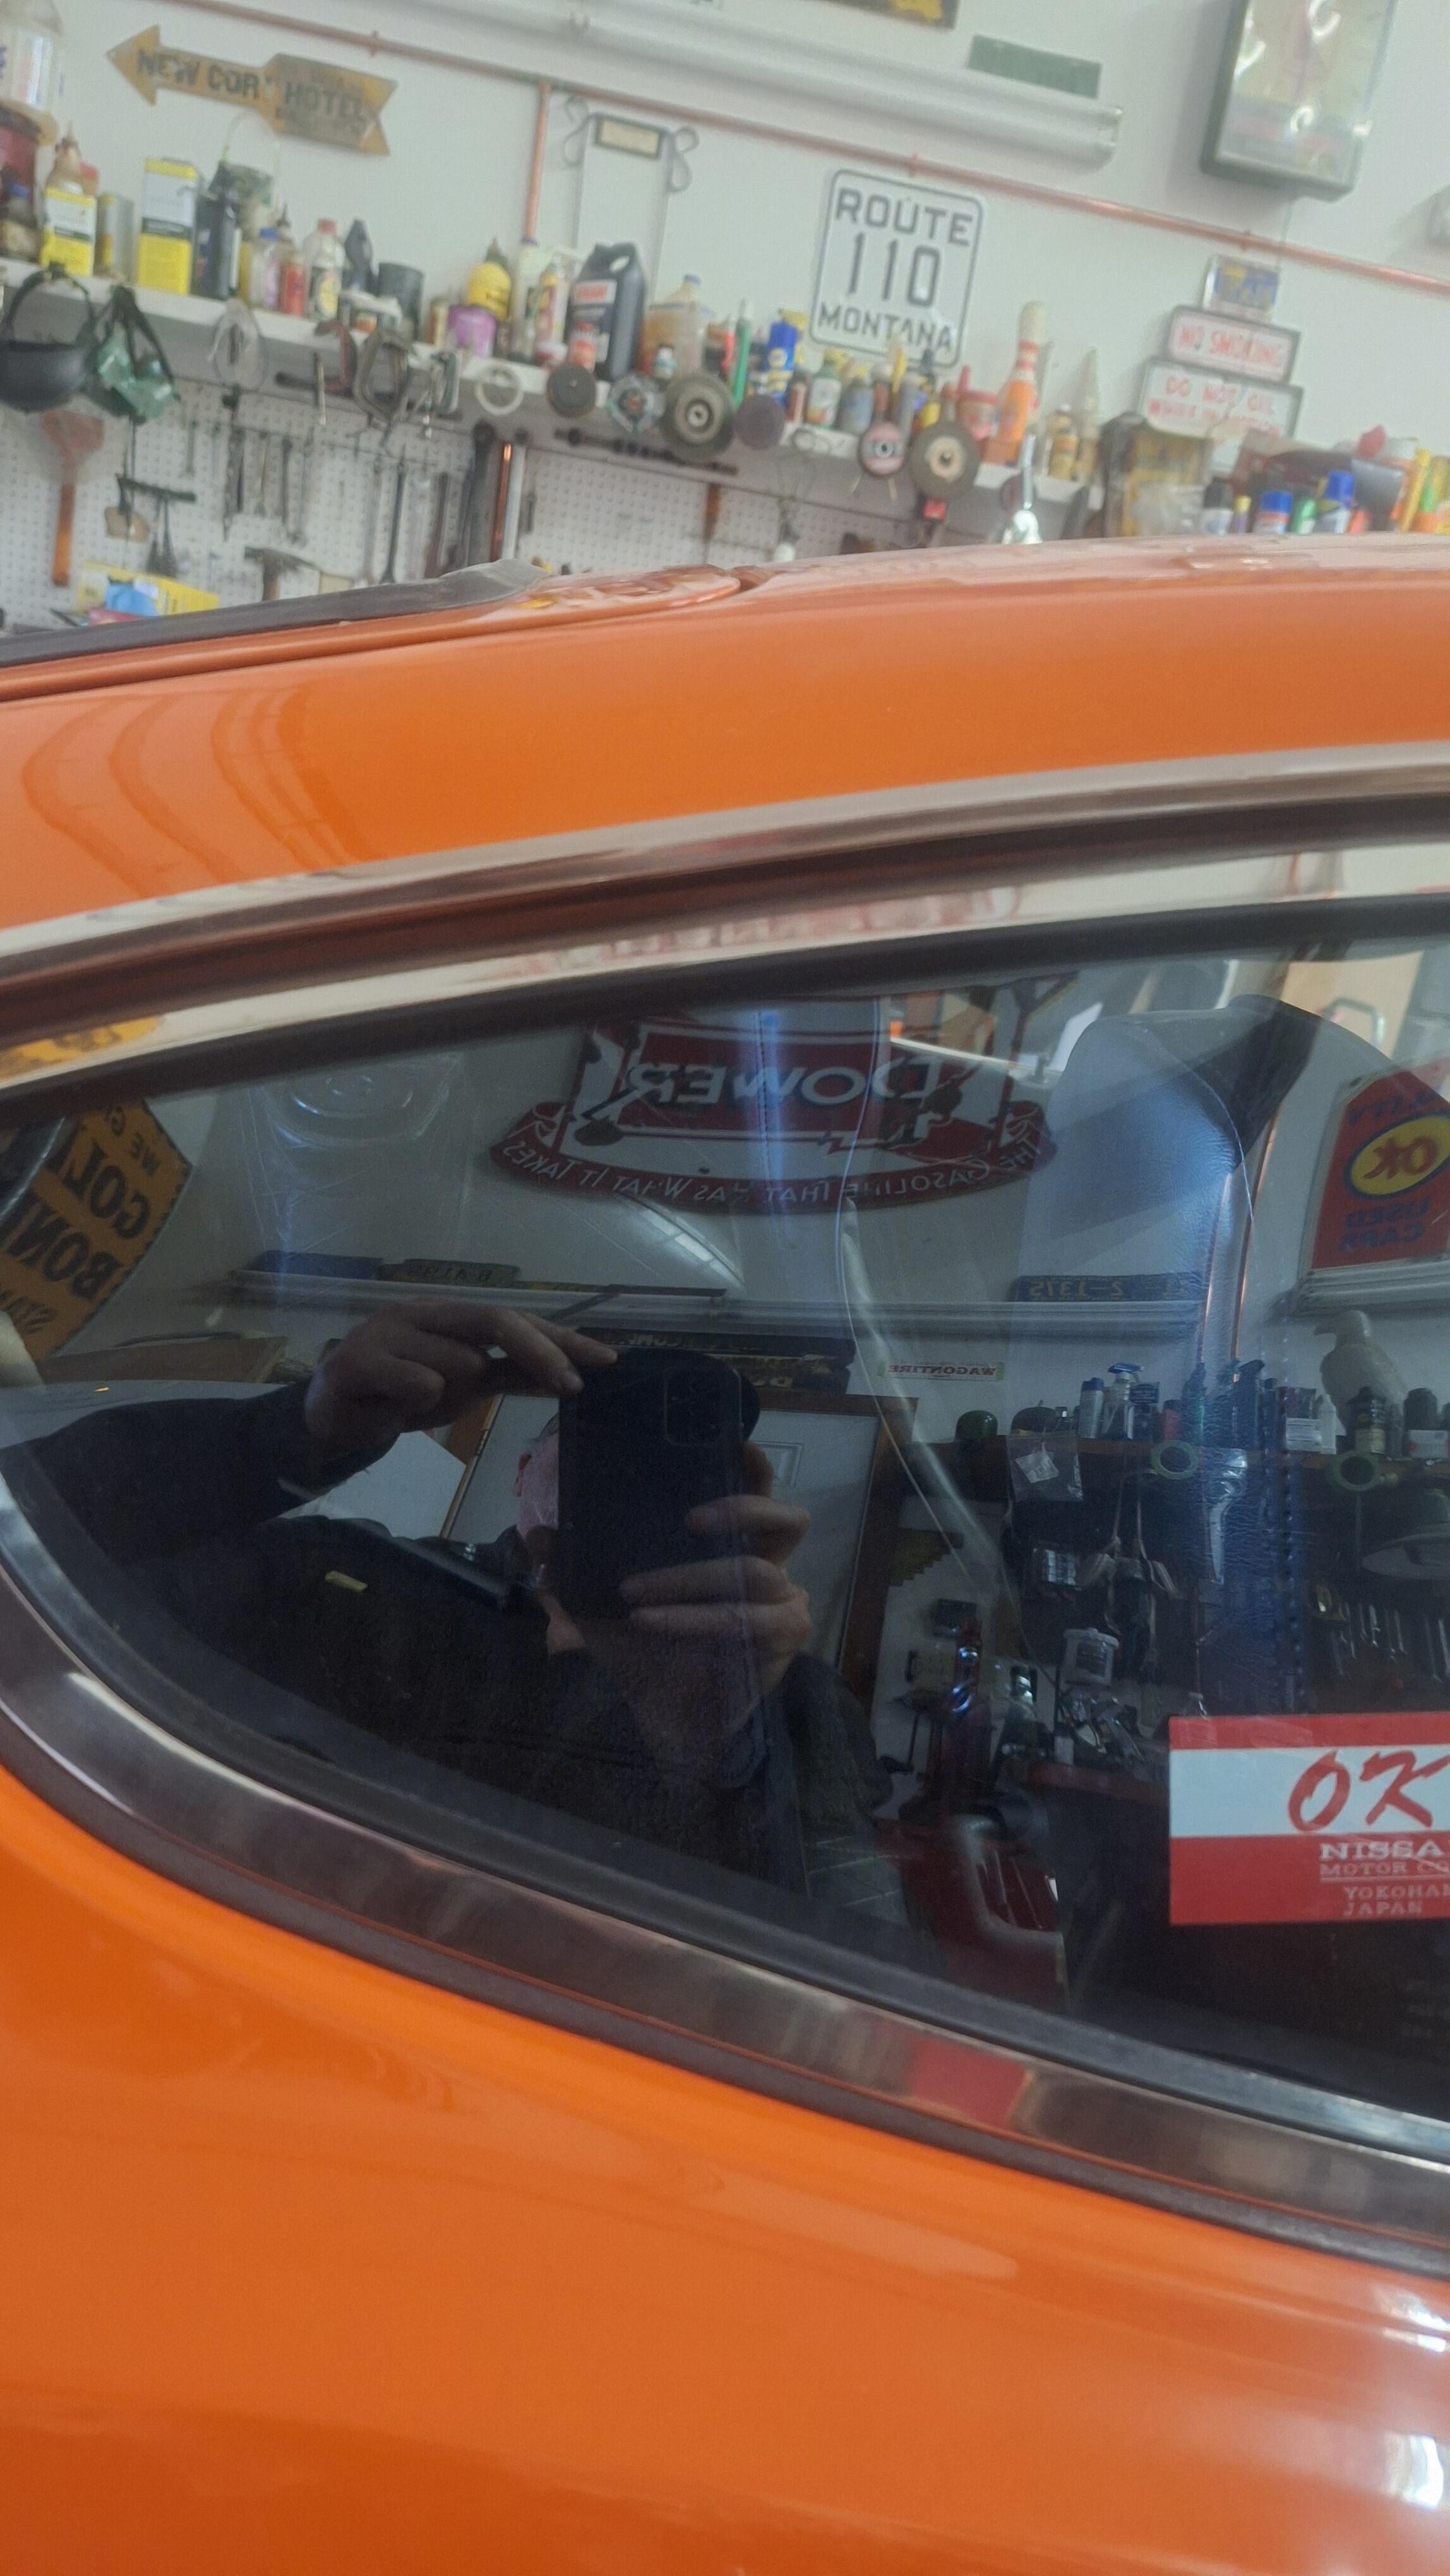
Hi Everybody! First off I have to say, what a great site this is and thank you to all who contribute to it. I stumbled upon this car in January of 2021 while logging my neighbors property about 1/2 mile away. The owner, who moved here in 2003 to help his aging parents on their small ranch, brought this with him from the Seattle area. He offloaded it here in the woods, and it remained there until he showed it to me. He kept mentioning something about the darn squirrels and mice getting in a car, and he was kind of sad about it. "What kind of car is it?" I ask. Oh, "It's a Zcar". Hmmm, I remember those in high School in the late 70's, my friend had one. Let's go look at it! So off through the forest we go, and wow! this is cool! I opened the hood and was immediately in awe. Then, when I opened the inspection lids, This is really cool. He started talking about side draft carburetors and I was lost, but he thought they were amazing. Life on the ranch became overwhelming and time just got away from the gentleman, he is now in his mid 70's and it's been 18 years since he parked it. He tells me he found it on Vashon Island completely buried in blackberry bushes, along with an old VW, back in the late 1990's. So he rescued it, got it running, and his wife drove it for 2 years before it ended up here. I went home, did some research on 240z's and couldn't sleep. I had to save this car! I went back the next day to work and made a deal with him, brought it home. What did I just do? Along with the car, he had a few things, books and a few parts. Back in 1999, you could go to a Nissan dealer and pretty much still order anything you want for these cars.


-
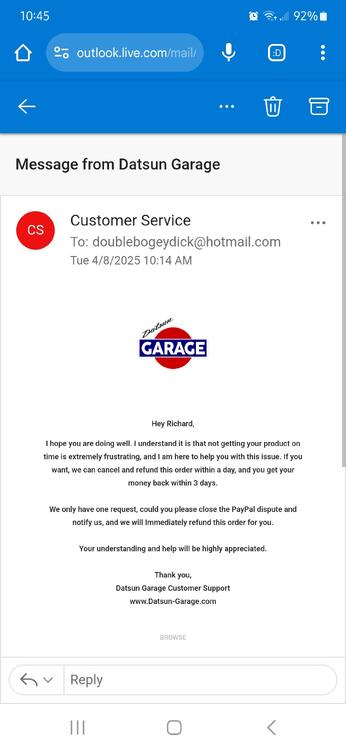
Good you got your money back. It's weird they have no phone number available. 🤔 As soon as I saw this letter wanting me to cancel my PayPal dispute, and THEN they will refund me was a huge red flag. I immediately called PayPal and escalated my case.
-
Yup! Same thing happened with me. I ordered a downpipe January 7th, assuming it was in stock. They emailed me the next day, saying it's been backordered, and it will be 2-4 weeks. OK, fine. 6 weeks go by, nothing. I email them about the status. My email is ignored. Another week goes by, I email them again, this time I get the 7 to 10 days time frame. A few more weeks go by. I get the run around. Now just about 3 months have gone by, I check with JDM CAR PARTS. They have them in stock and actually make the downpipe here in the U.S. wait, aren't both these places in California? Why doesn't Datsun Garage go to JDM and get my part and mail it to me. So, I file a PayPal dispute. Here's is a letter I just received from Datsun Garage.
-
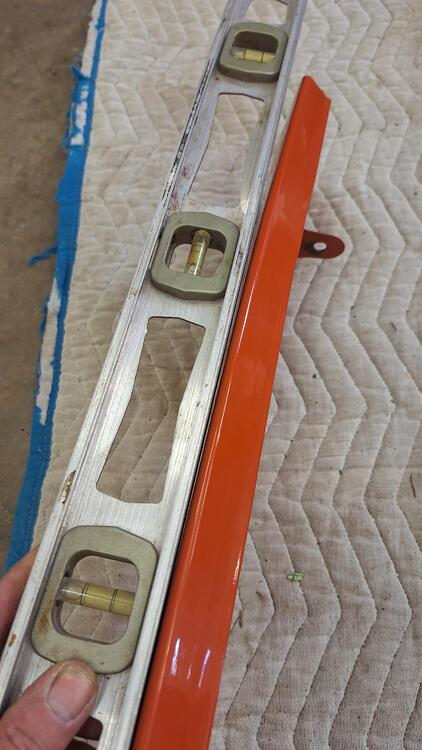
Went out to the shop, decided to swap hinges on the high side, had a couple extra. Closed the hatch and it was waaay better, to within half a millimeter. Oh wait....I removed the weatherstrip in the corner to remove the hinge. I put the weatherstrip back on and right back where I was, 2 millimeters high. 🤣 Why didn't I do that to begin with? It's the &%$#@$%& aftermarket piece of crap weatherstrip they sell. Let me tell you something, I restored this entire car, sure I had struggles, but nothing compared to the struggle with these aftermarket hatch weatherstrips. Attempt #1: I carefully cleaned the weatherstrip of all residue, even scuffed up the area to be glued and cleaned again. Followed the instructions on that 3M super weatherstrip adhesive, did the corners first, taped it down. Next day, did the straight sections, taped it all down. Waited a couple days. All good right? I was doing something and happened to bump the corner, and it came off. It didn't stick! What? I gently lifted on the a section and it just basically fell off. That's where a 2 day nightmare started. Removing the 3M super weatherstrip adhesive, ☹️ It won't stick to this aftermarket weatherstrip at all, none, but have you ever tried to remove it from paint? Without damaging the paint? It took me 18 hours to get that black nightmare off. The hatch wouldn't close anyway. Every piece of aftermarket rubber I installed on this car with that 3M stuff didn't stick at all. So I cut sections of it up, and tried different adhesives. The best I found was goop. It's clear and it sticks way better. So, I ordered another hatch seal from a different place. Unfortunately it looked the same as the first, with spliced in "thicker bulkier" corner sections. That's the problem, I think, these spliced in sections. And that's where I am today. It really sucks. An old timer once told me, "it's made to sell, not to use".
-
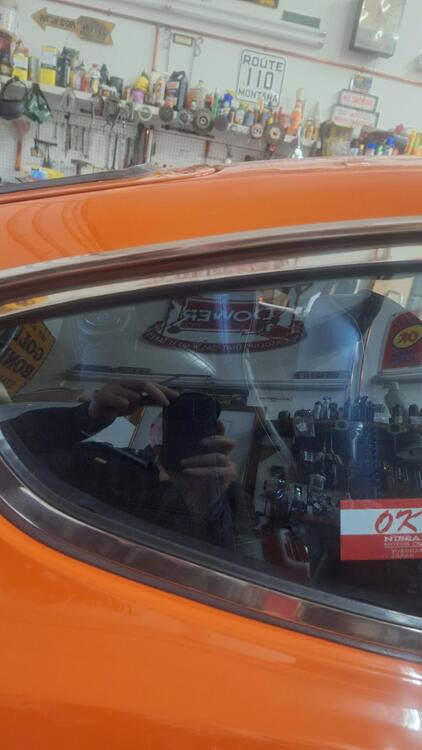
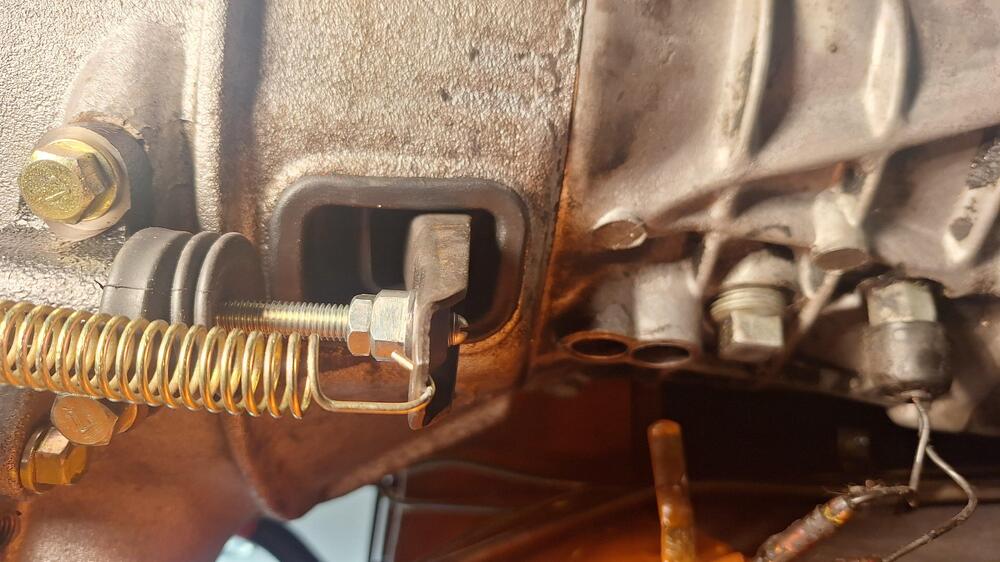
Thank you for that. Here's a photo of the car when I got it, so I know it can be flush. There are some rub marks on the hinge, like it's hitting something down in there, "interference". I did replace the boots.....


-
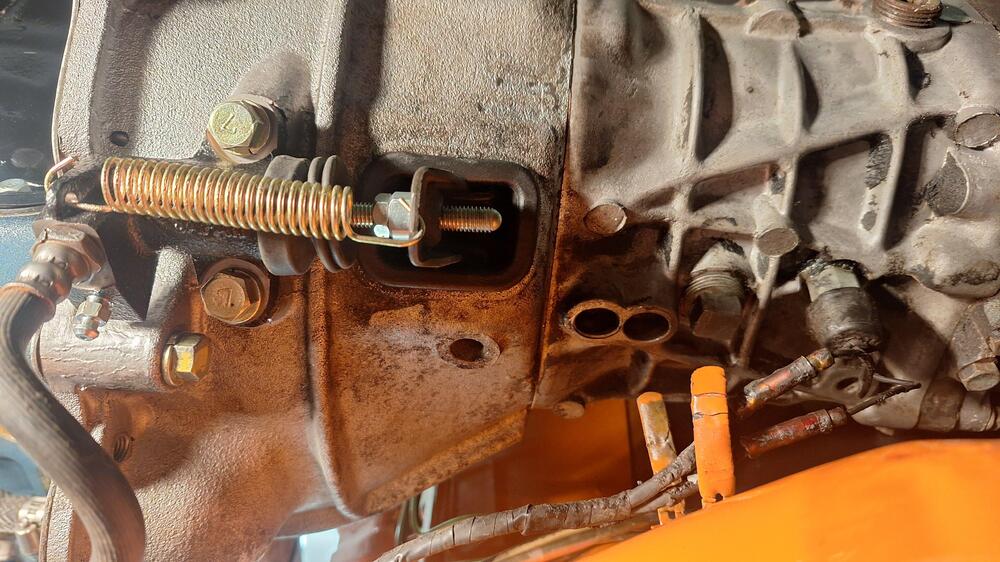
It looks like it's 2mm high. Is that is good as it gets? If it is the weatherstrip that's holding it up, why does the other side fit? Those captured nuts seem to be hitting a curved edge and when I tighten the bolts, they move up? I don't know but it's really a puzzler. I guess a guy could enlarge the holes upward on the hinge but would that even do it?
-
Hey guys, I'm at the final stages of a 4 year restoration and I can't get my hatch to sit low enough on the drivers side. The alignment is good, just too high. I fought and fought this, and just left it alone. But, I'm running out of things to do, so I'm back to it. I swear it fit good before I put this aftermarket weatherstrip on, but I removed the hatch. I don't know what it is. I remove the tailgate stay. Prop the hatch with a piece of wood. I loosen the drivers side bolts, loosen the left side of the right hinge a little, then barely loosen the right bolt of the right hinge, just so it stays. I can push down the left hinge a bit, but when I tighten the bolts there, it creeps back up. Am I doing this wrong? Here's the passenger side.


-
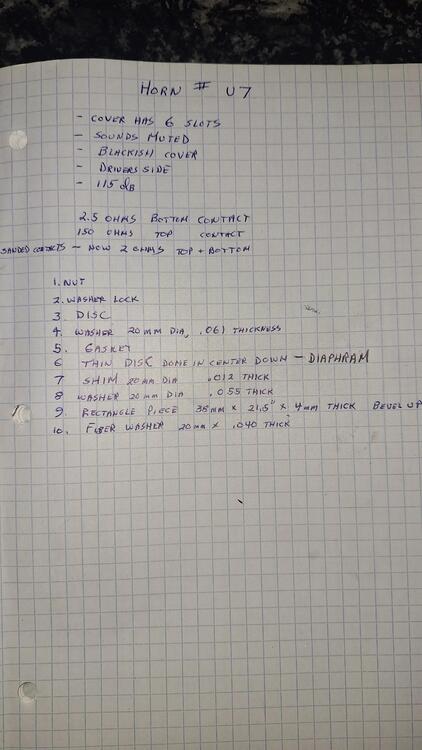
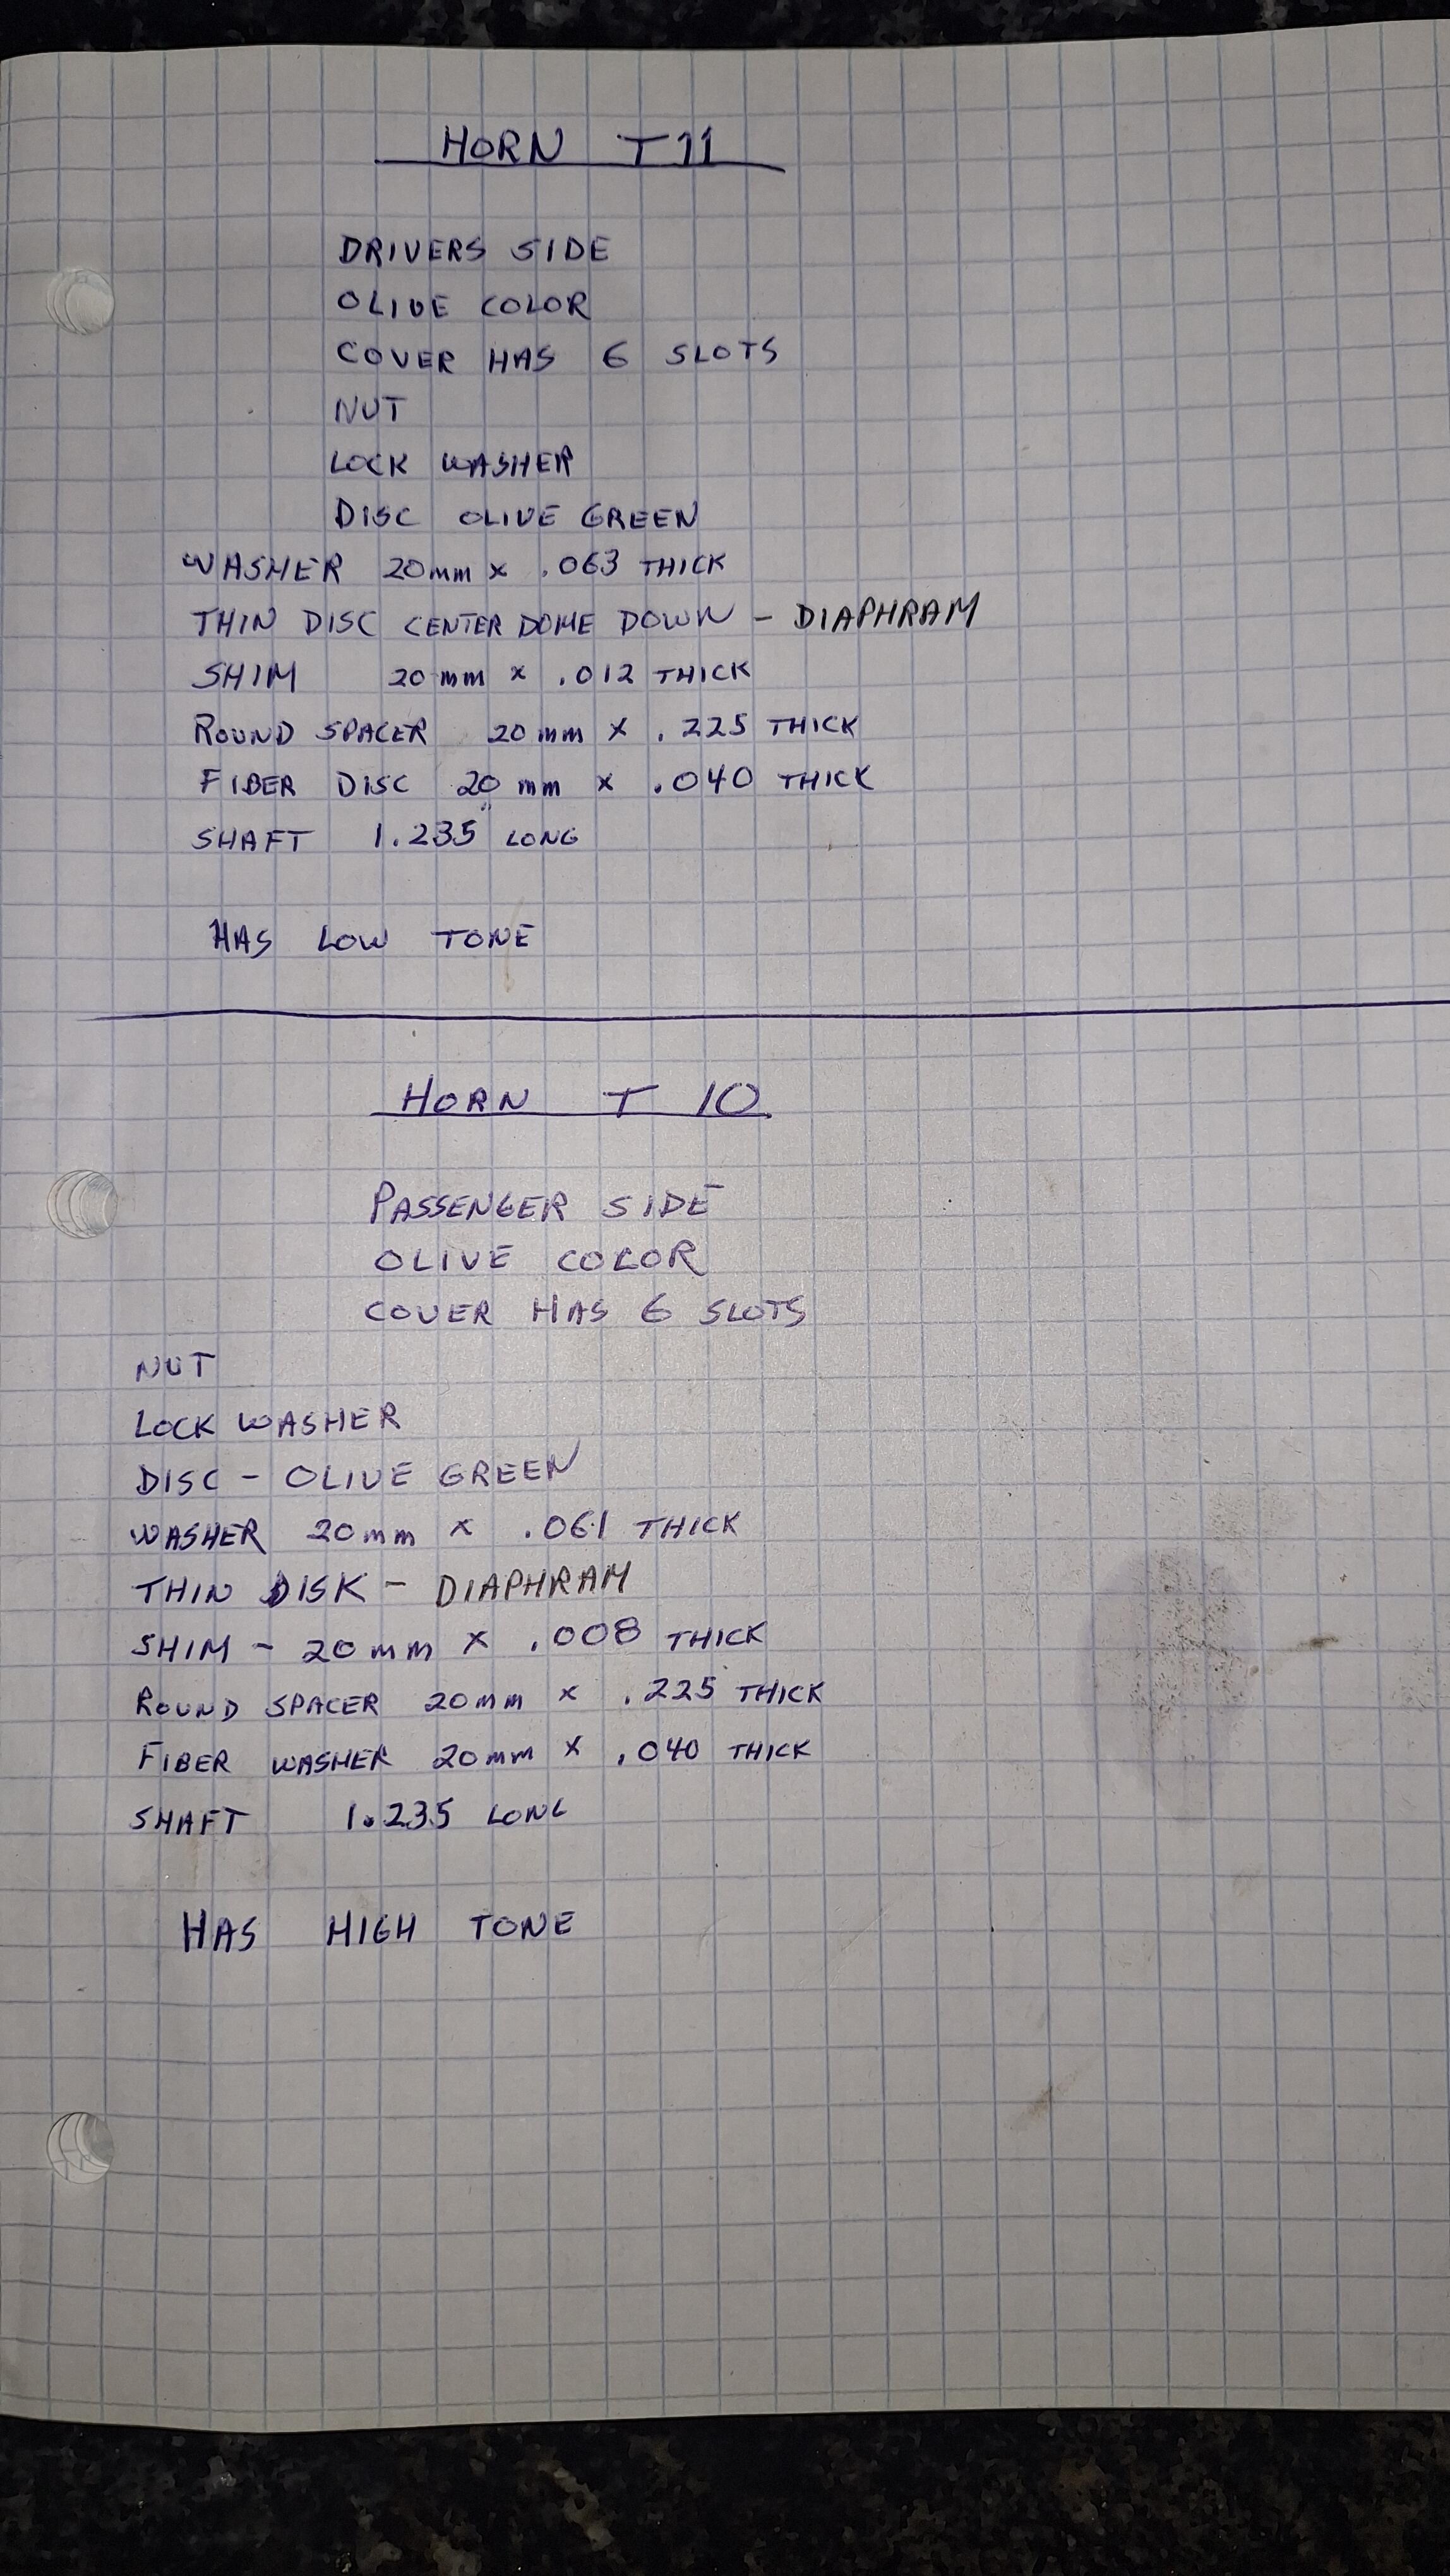
1 last horn U7, 7/71: Looks untouched by how the thin paper gaskets were intact.


-
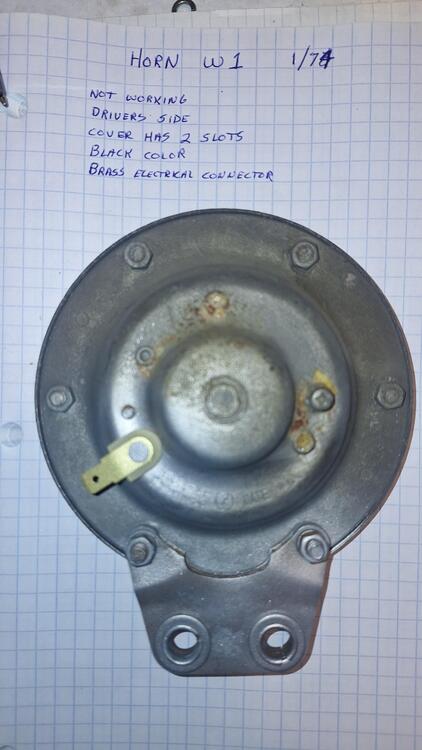
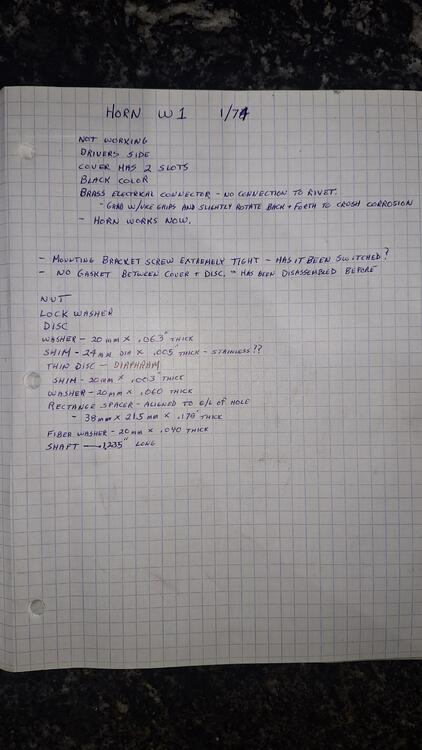
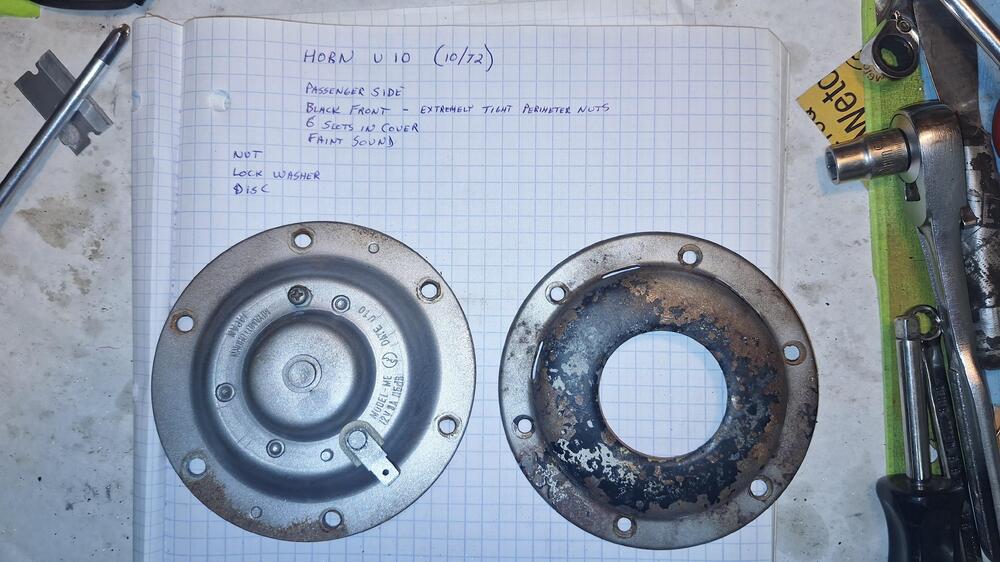
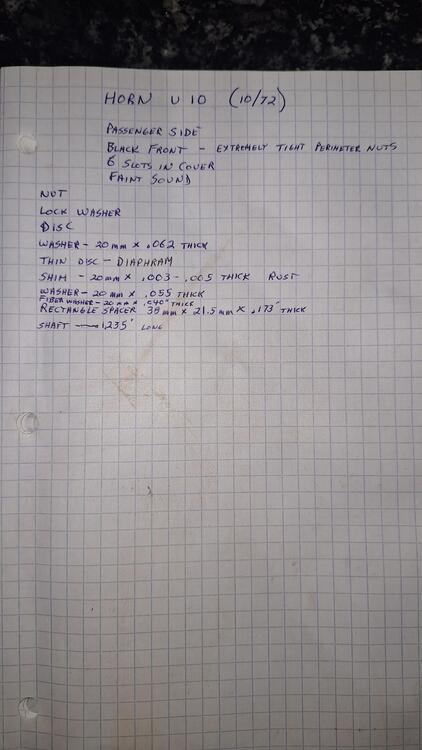
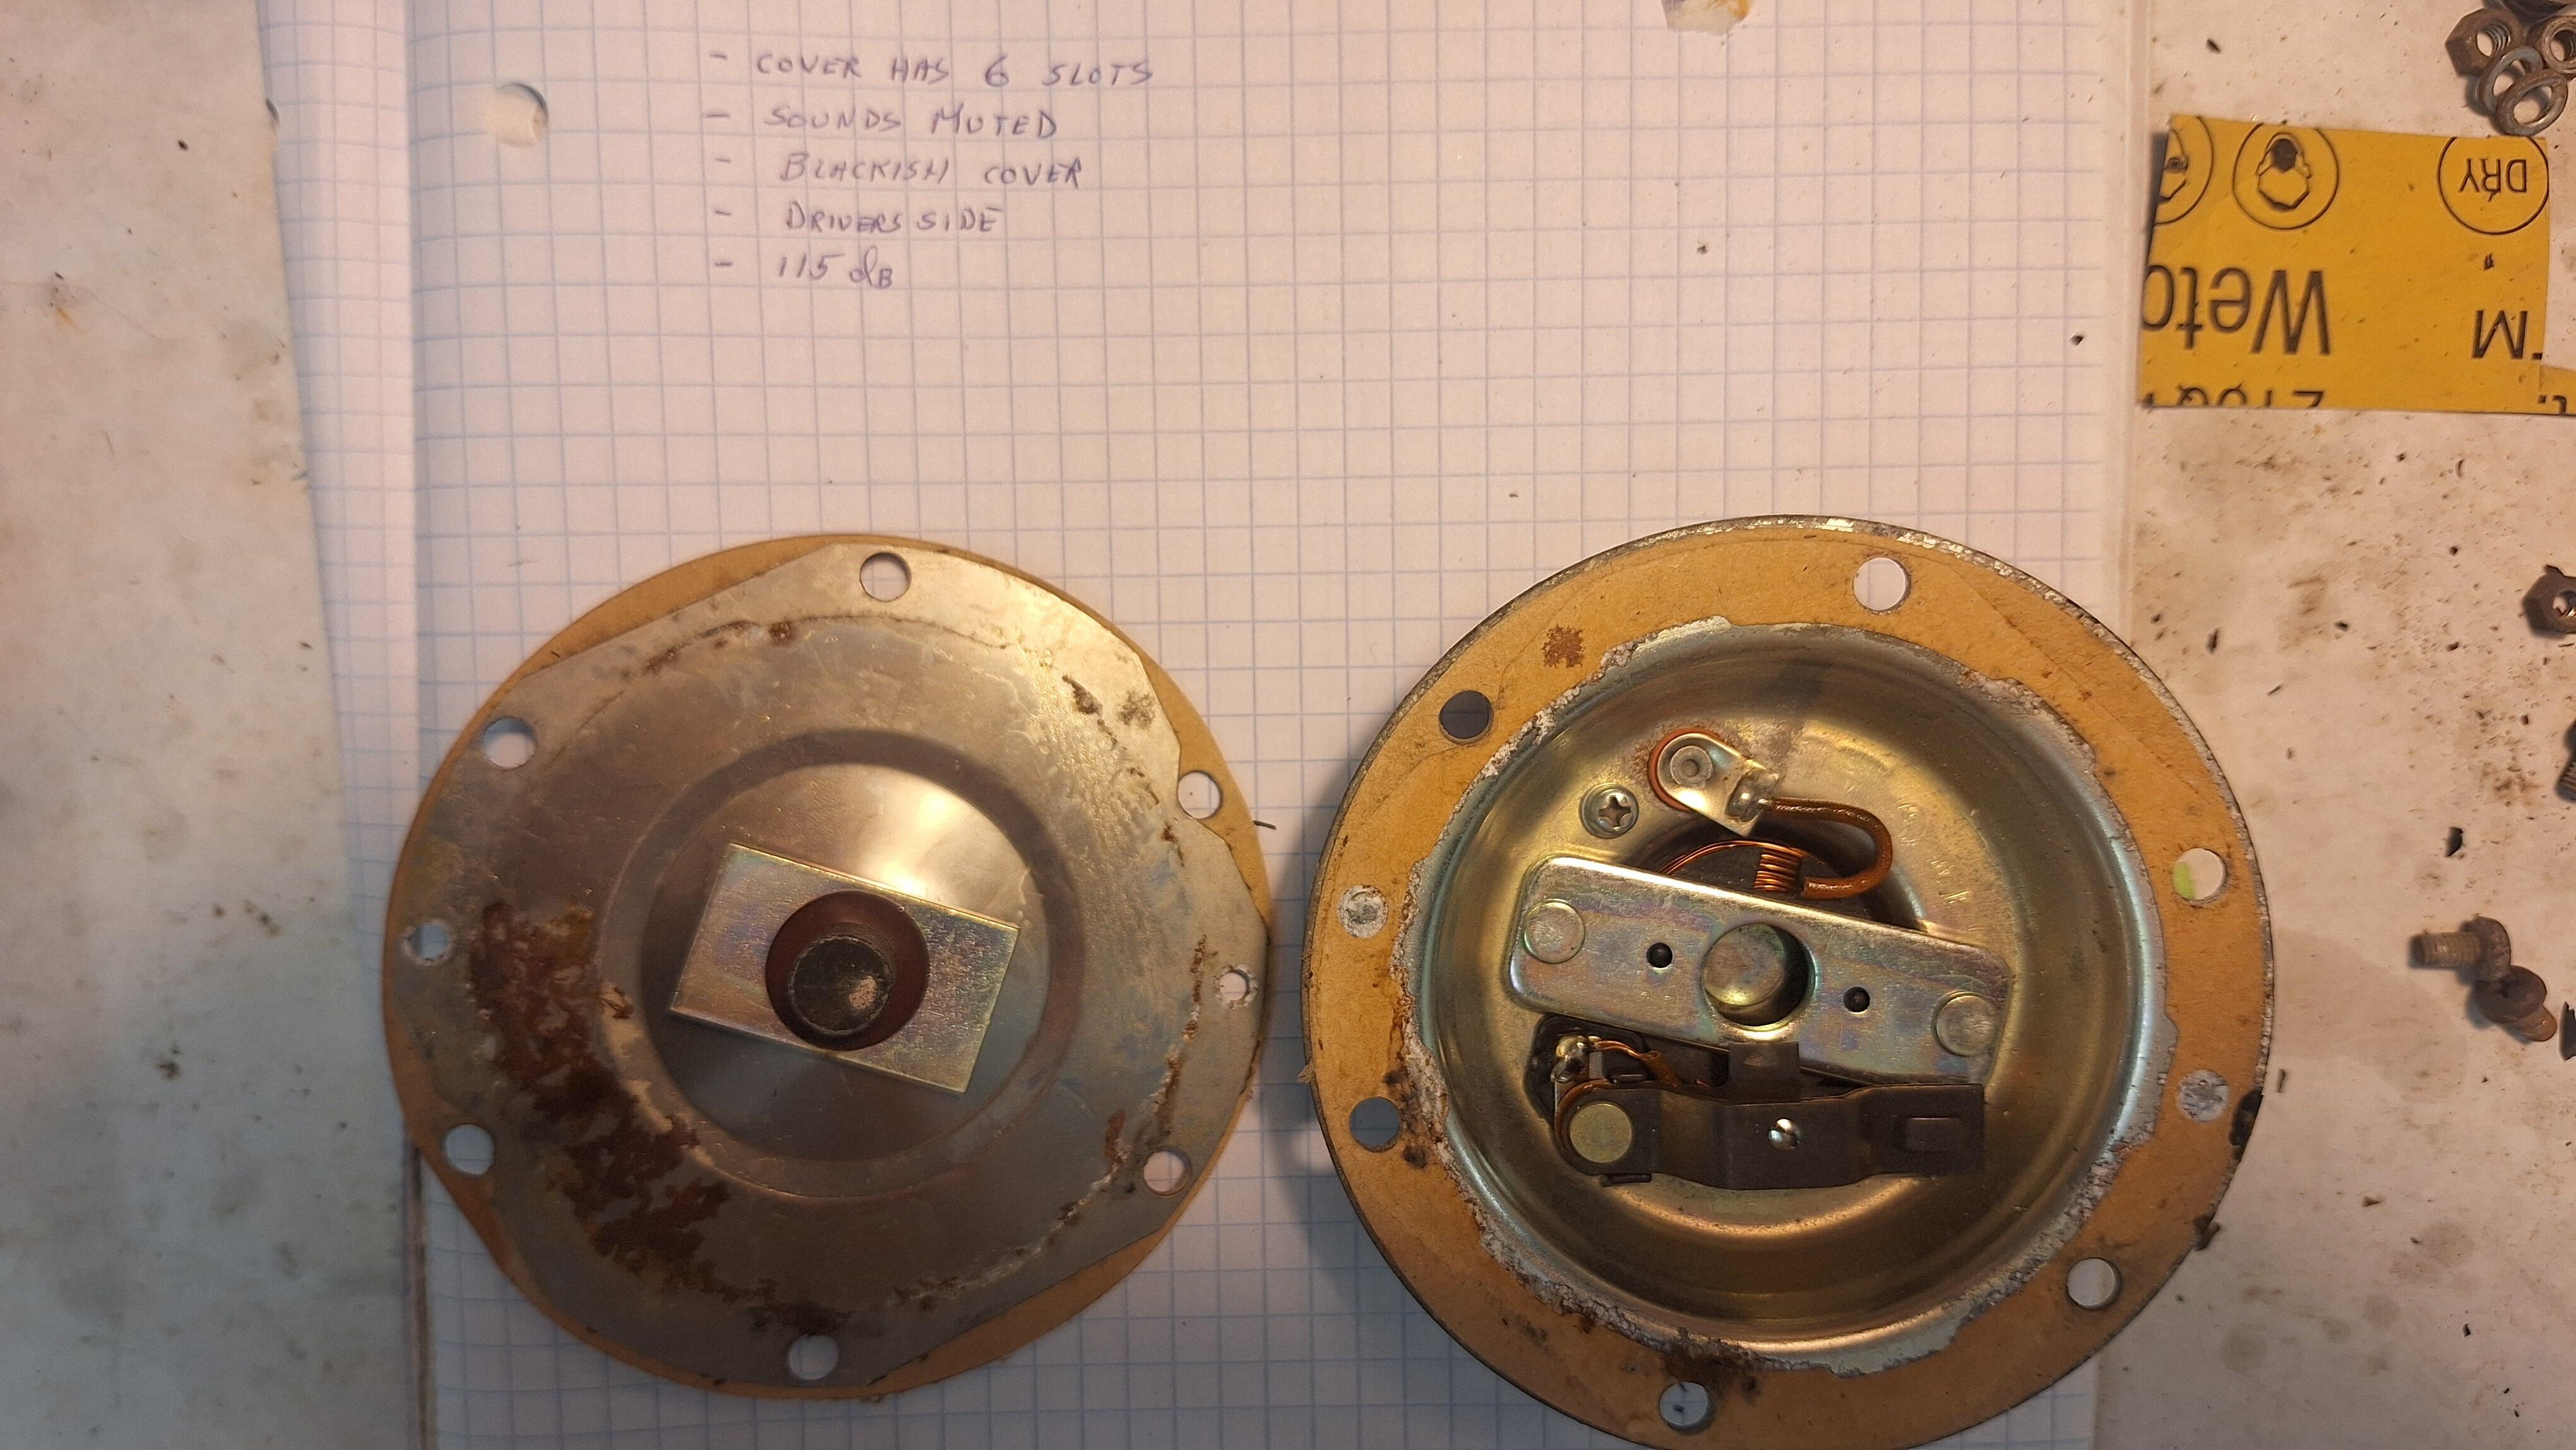
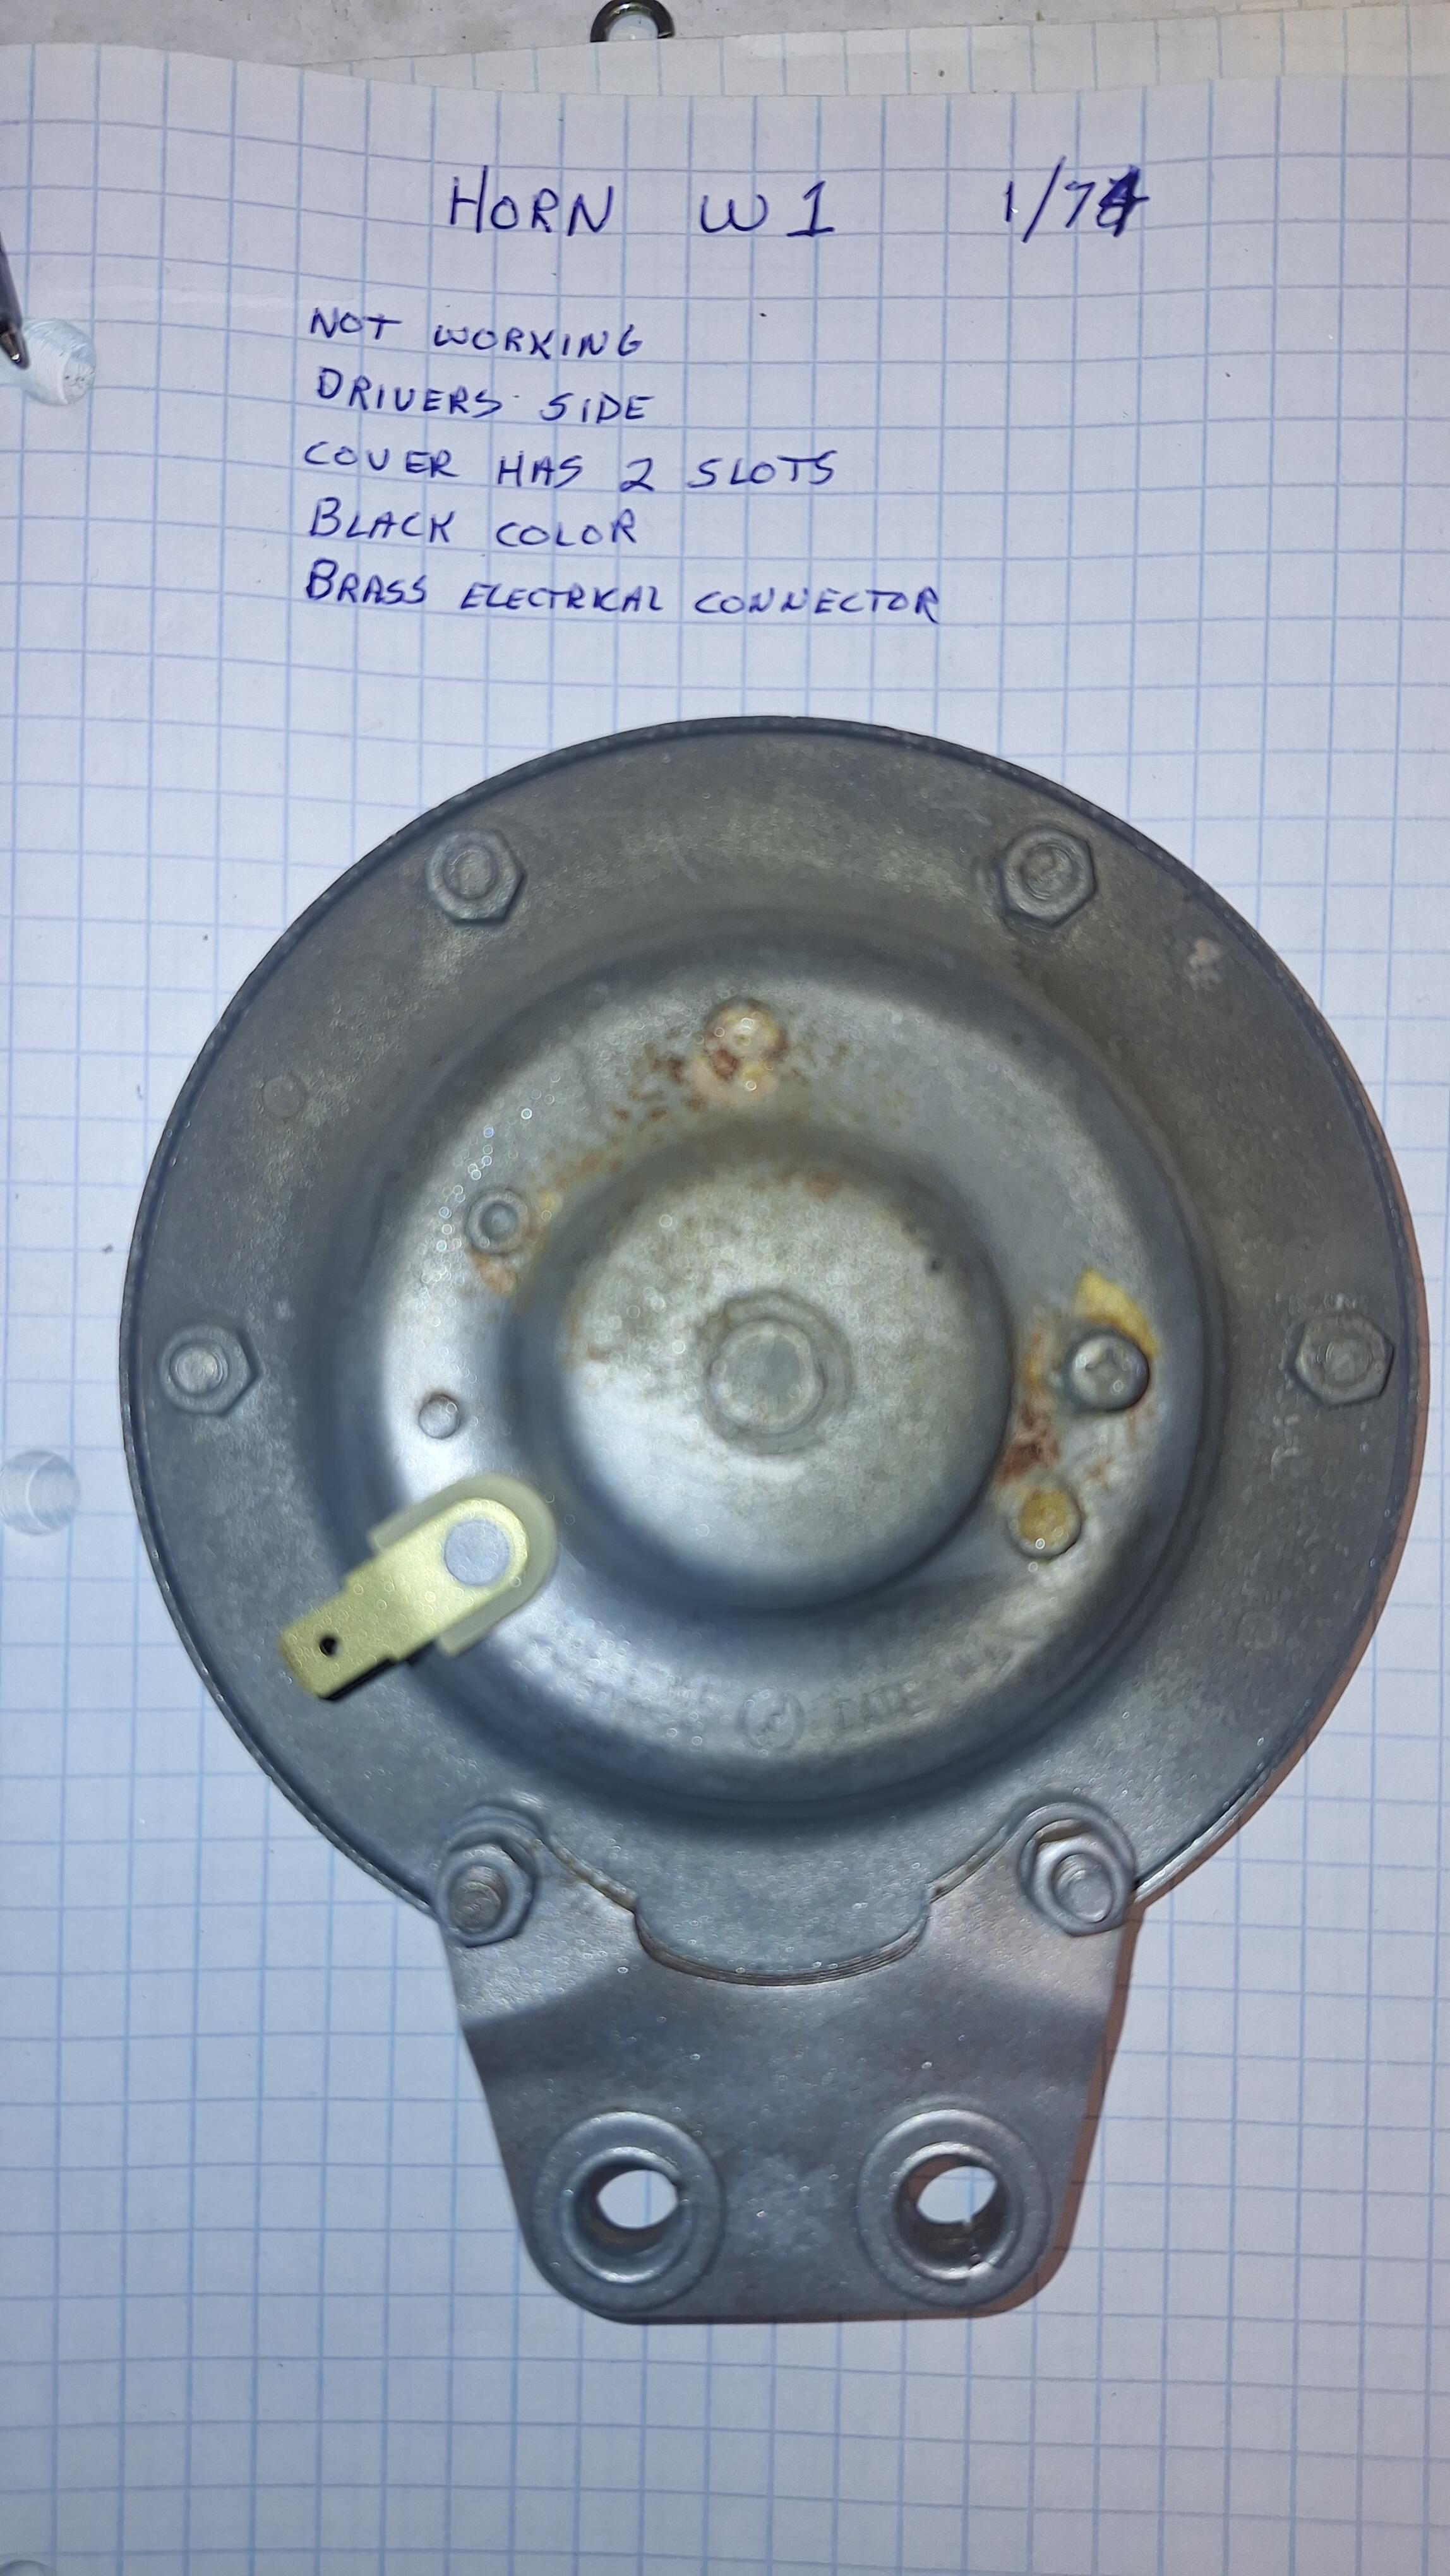
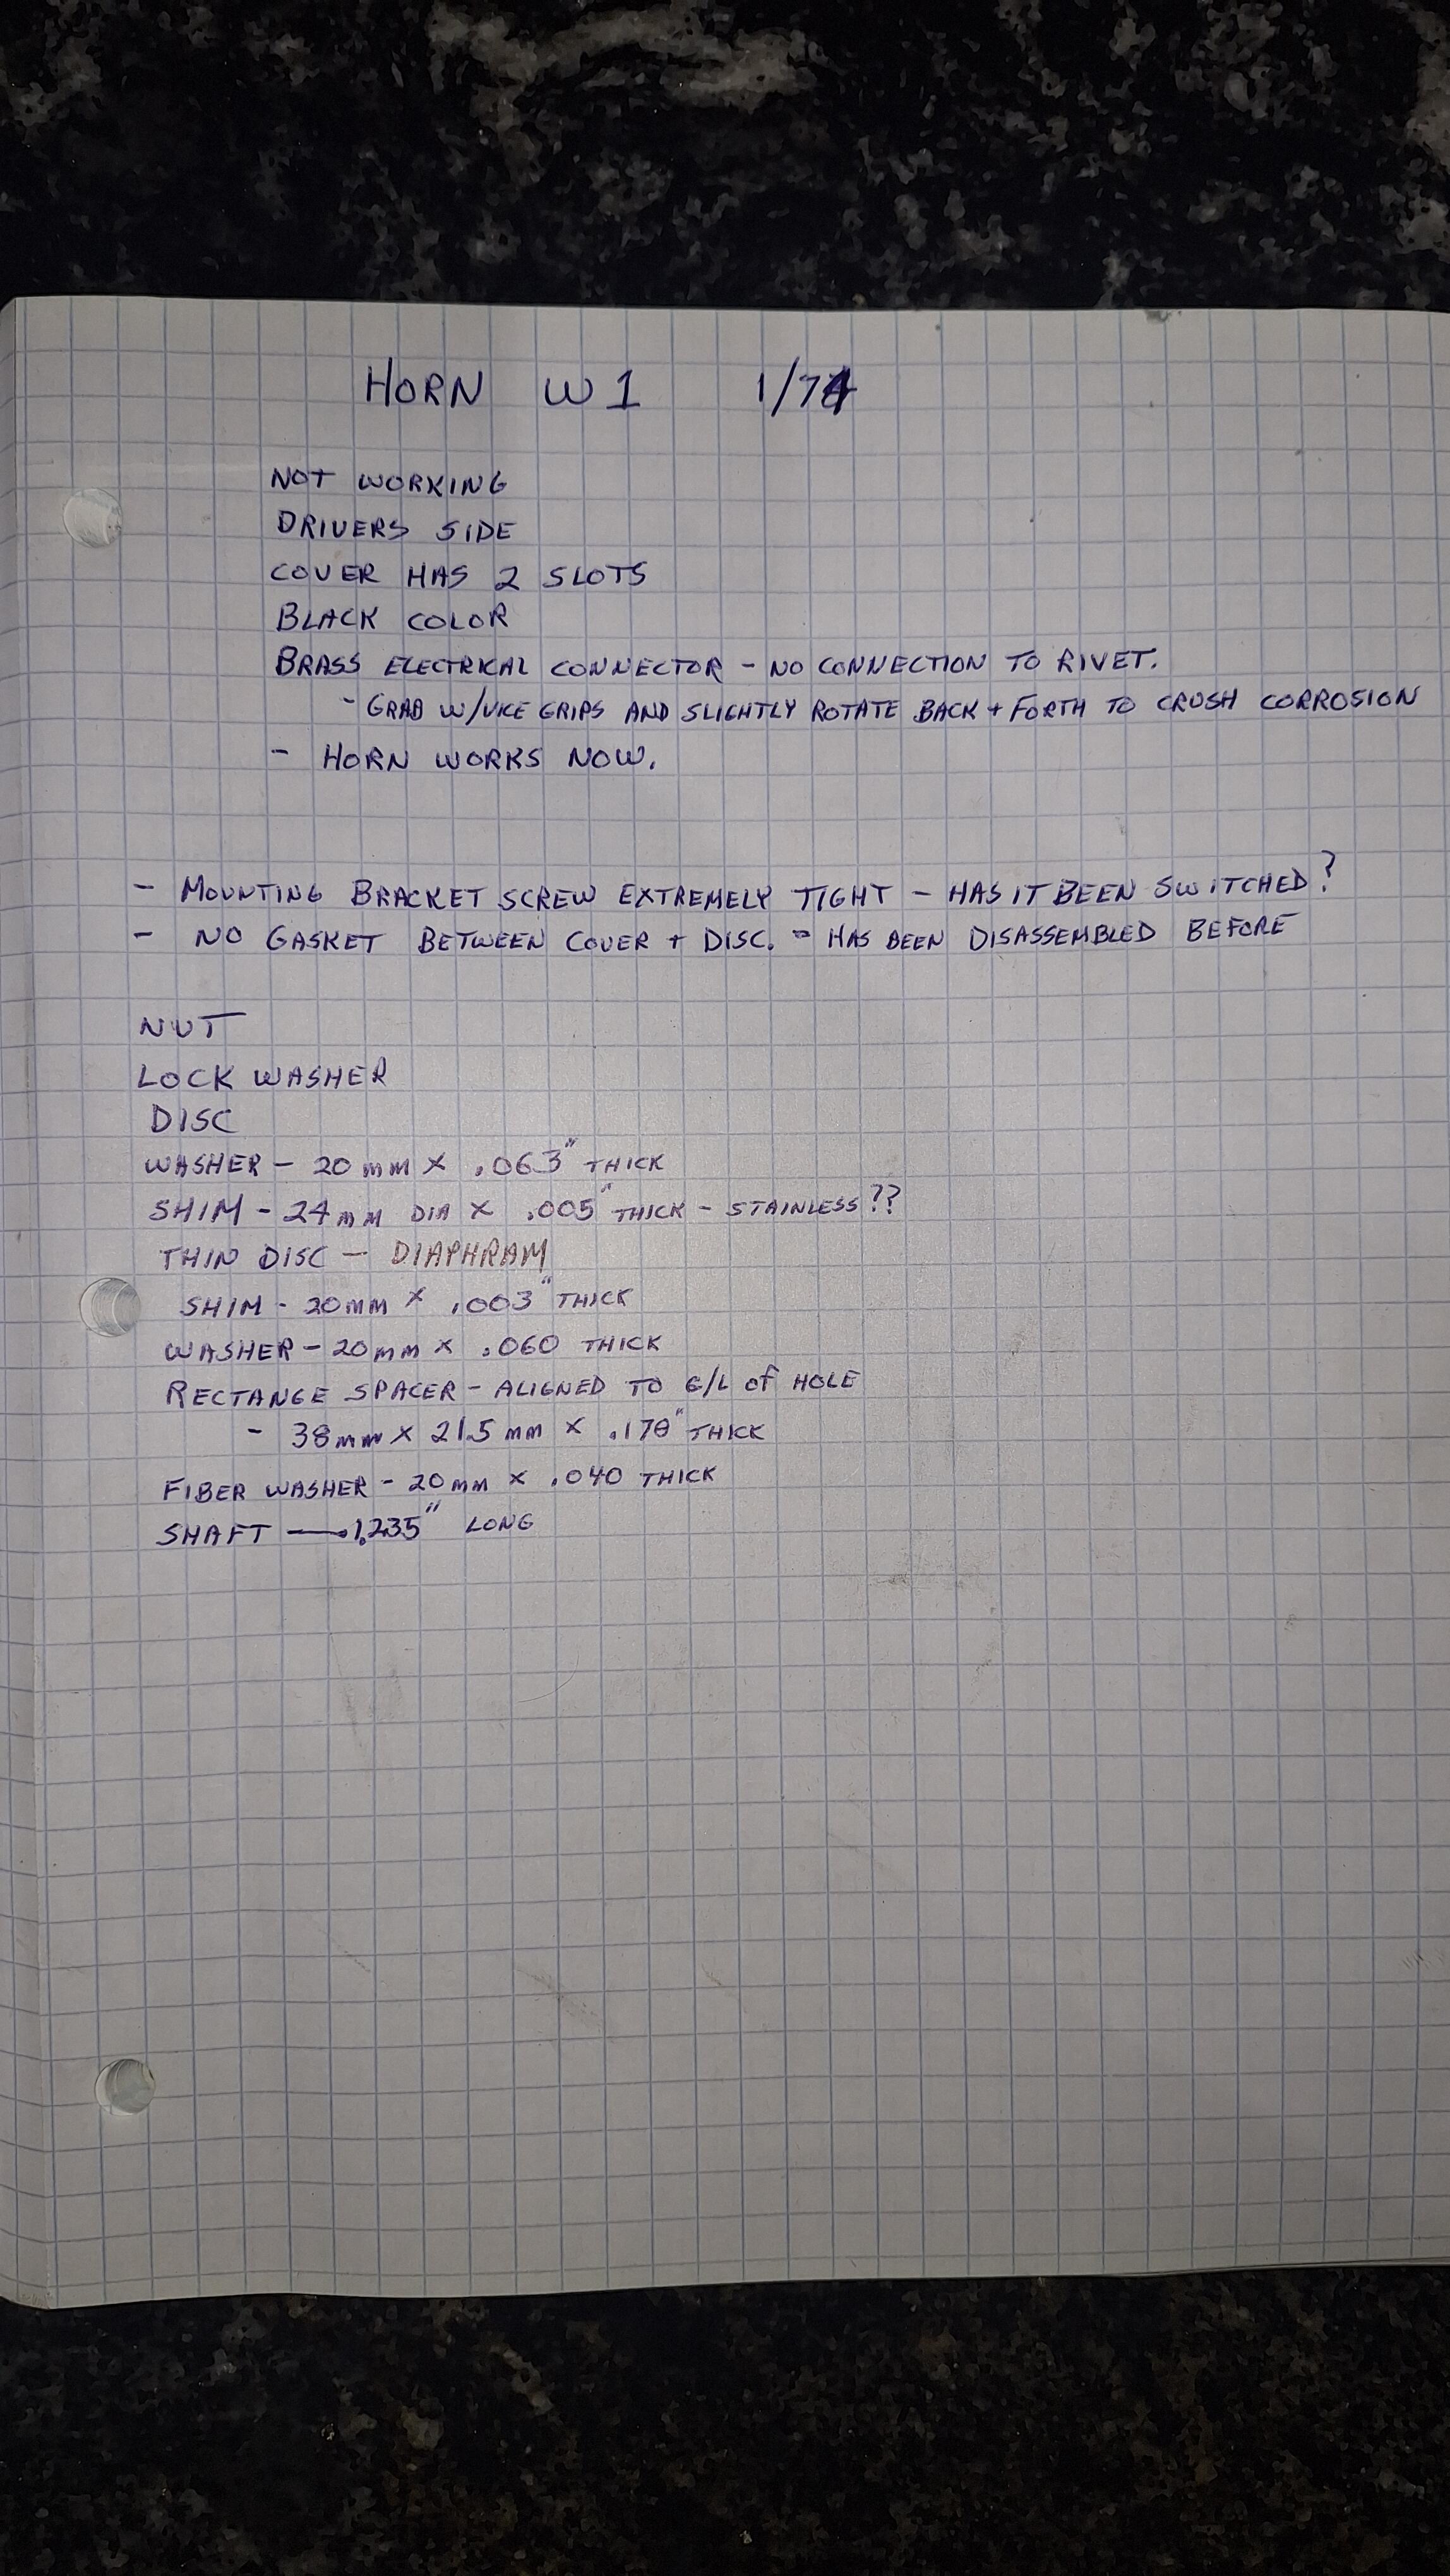
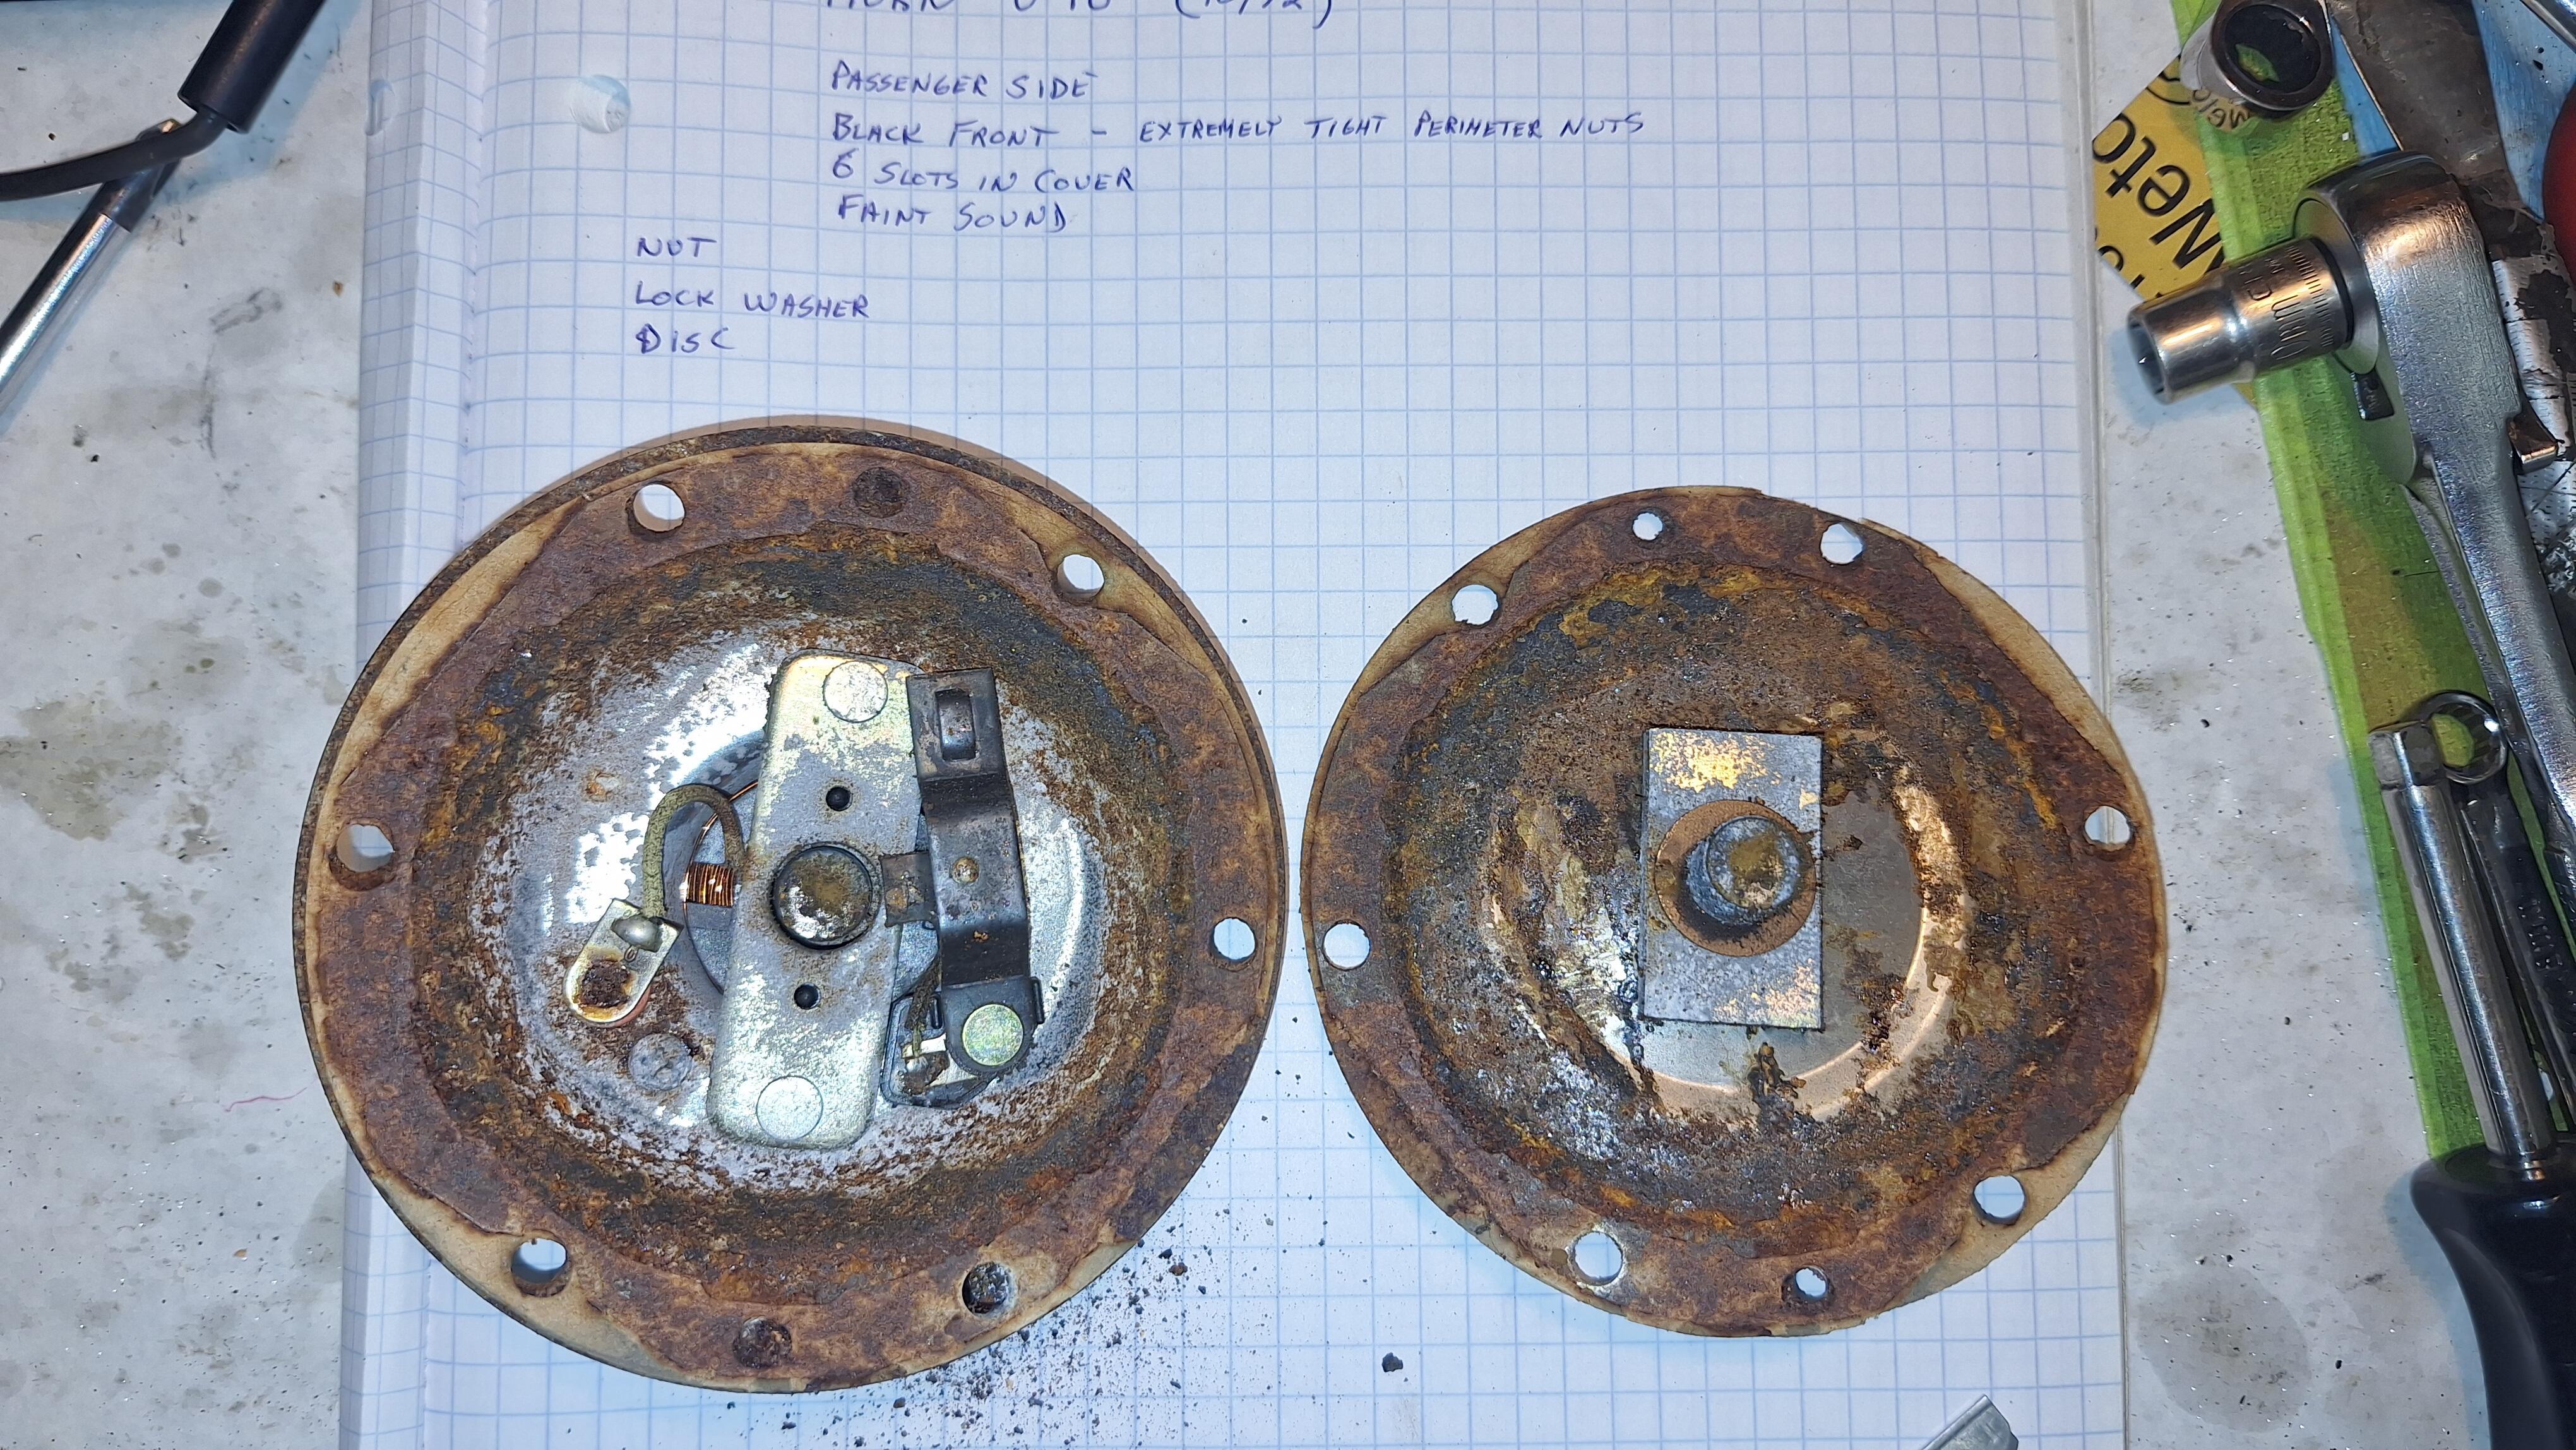
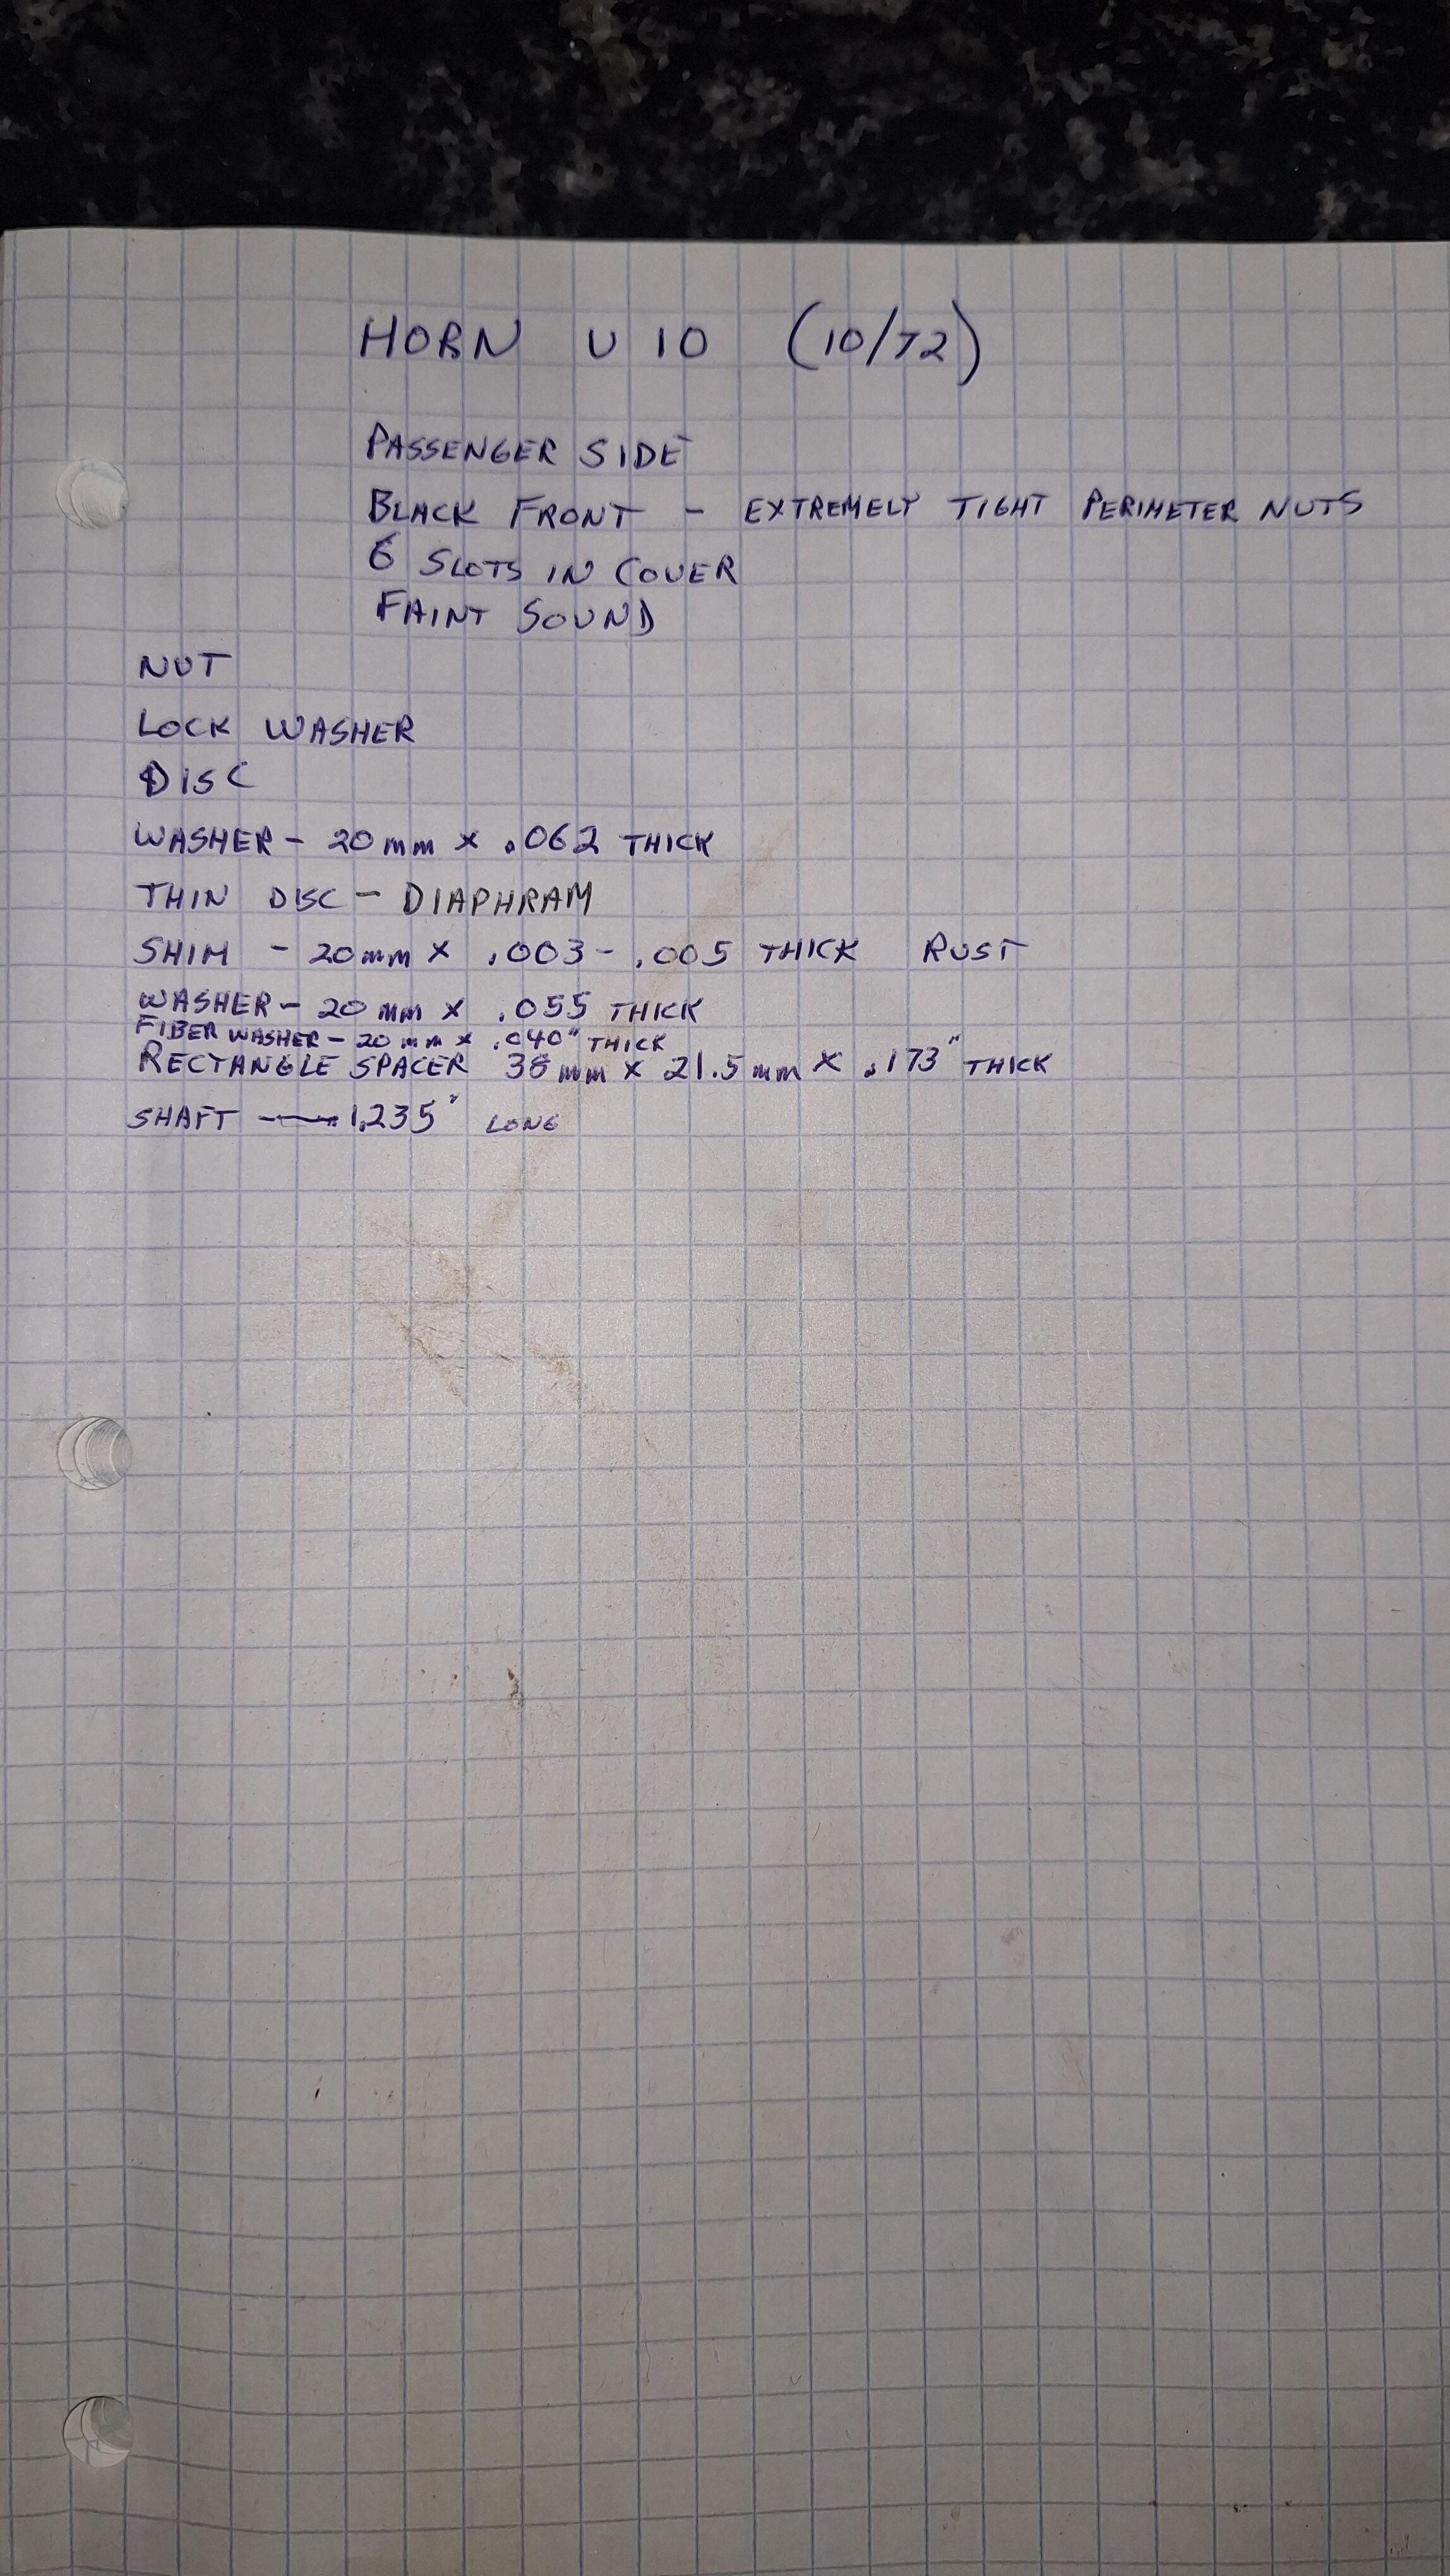
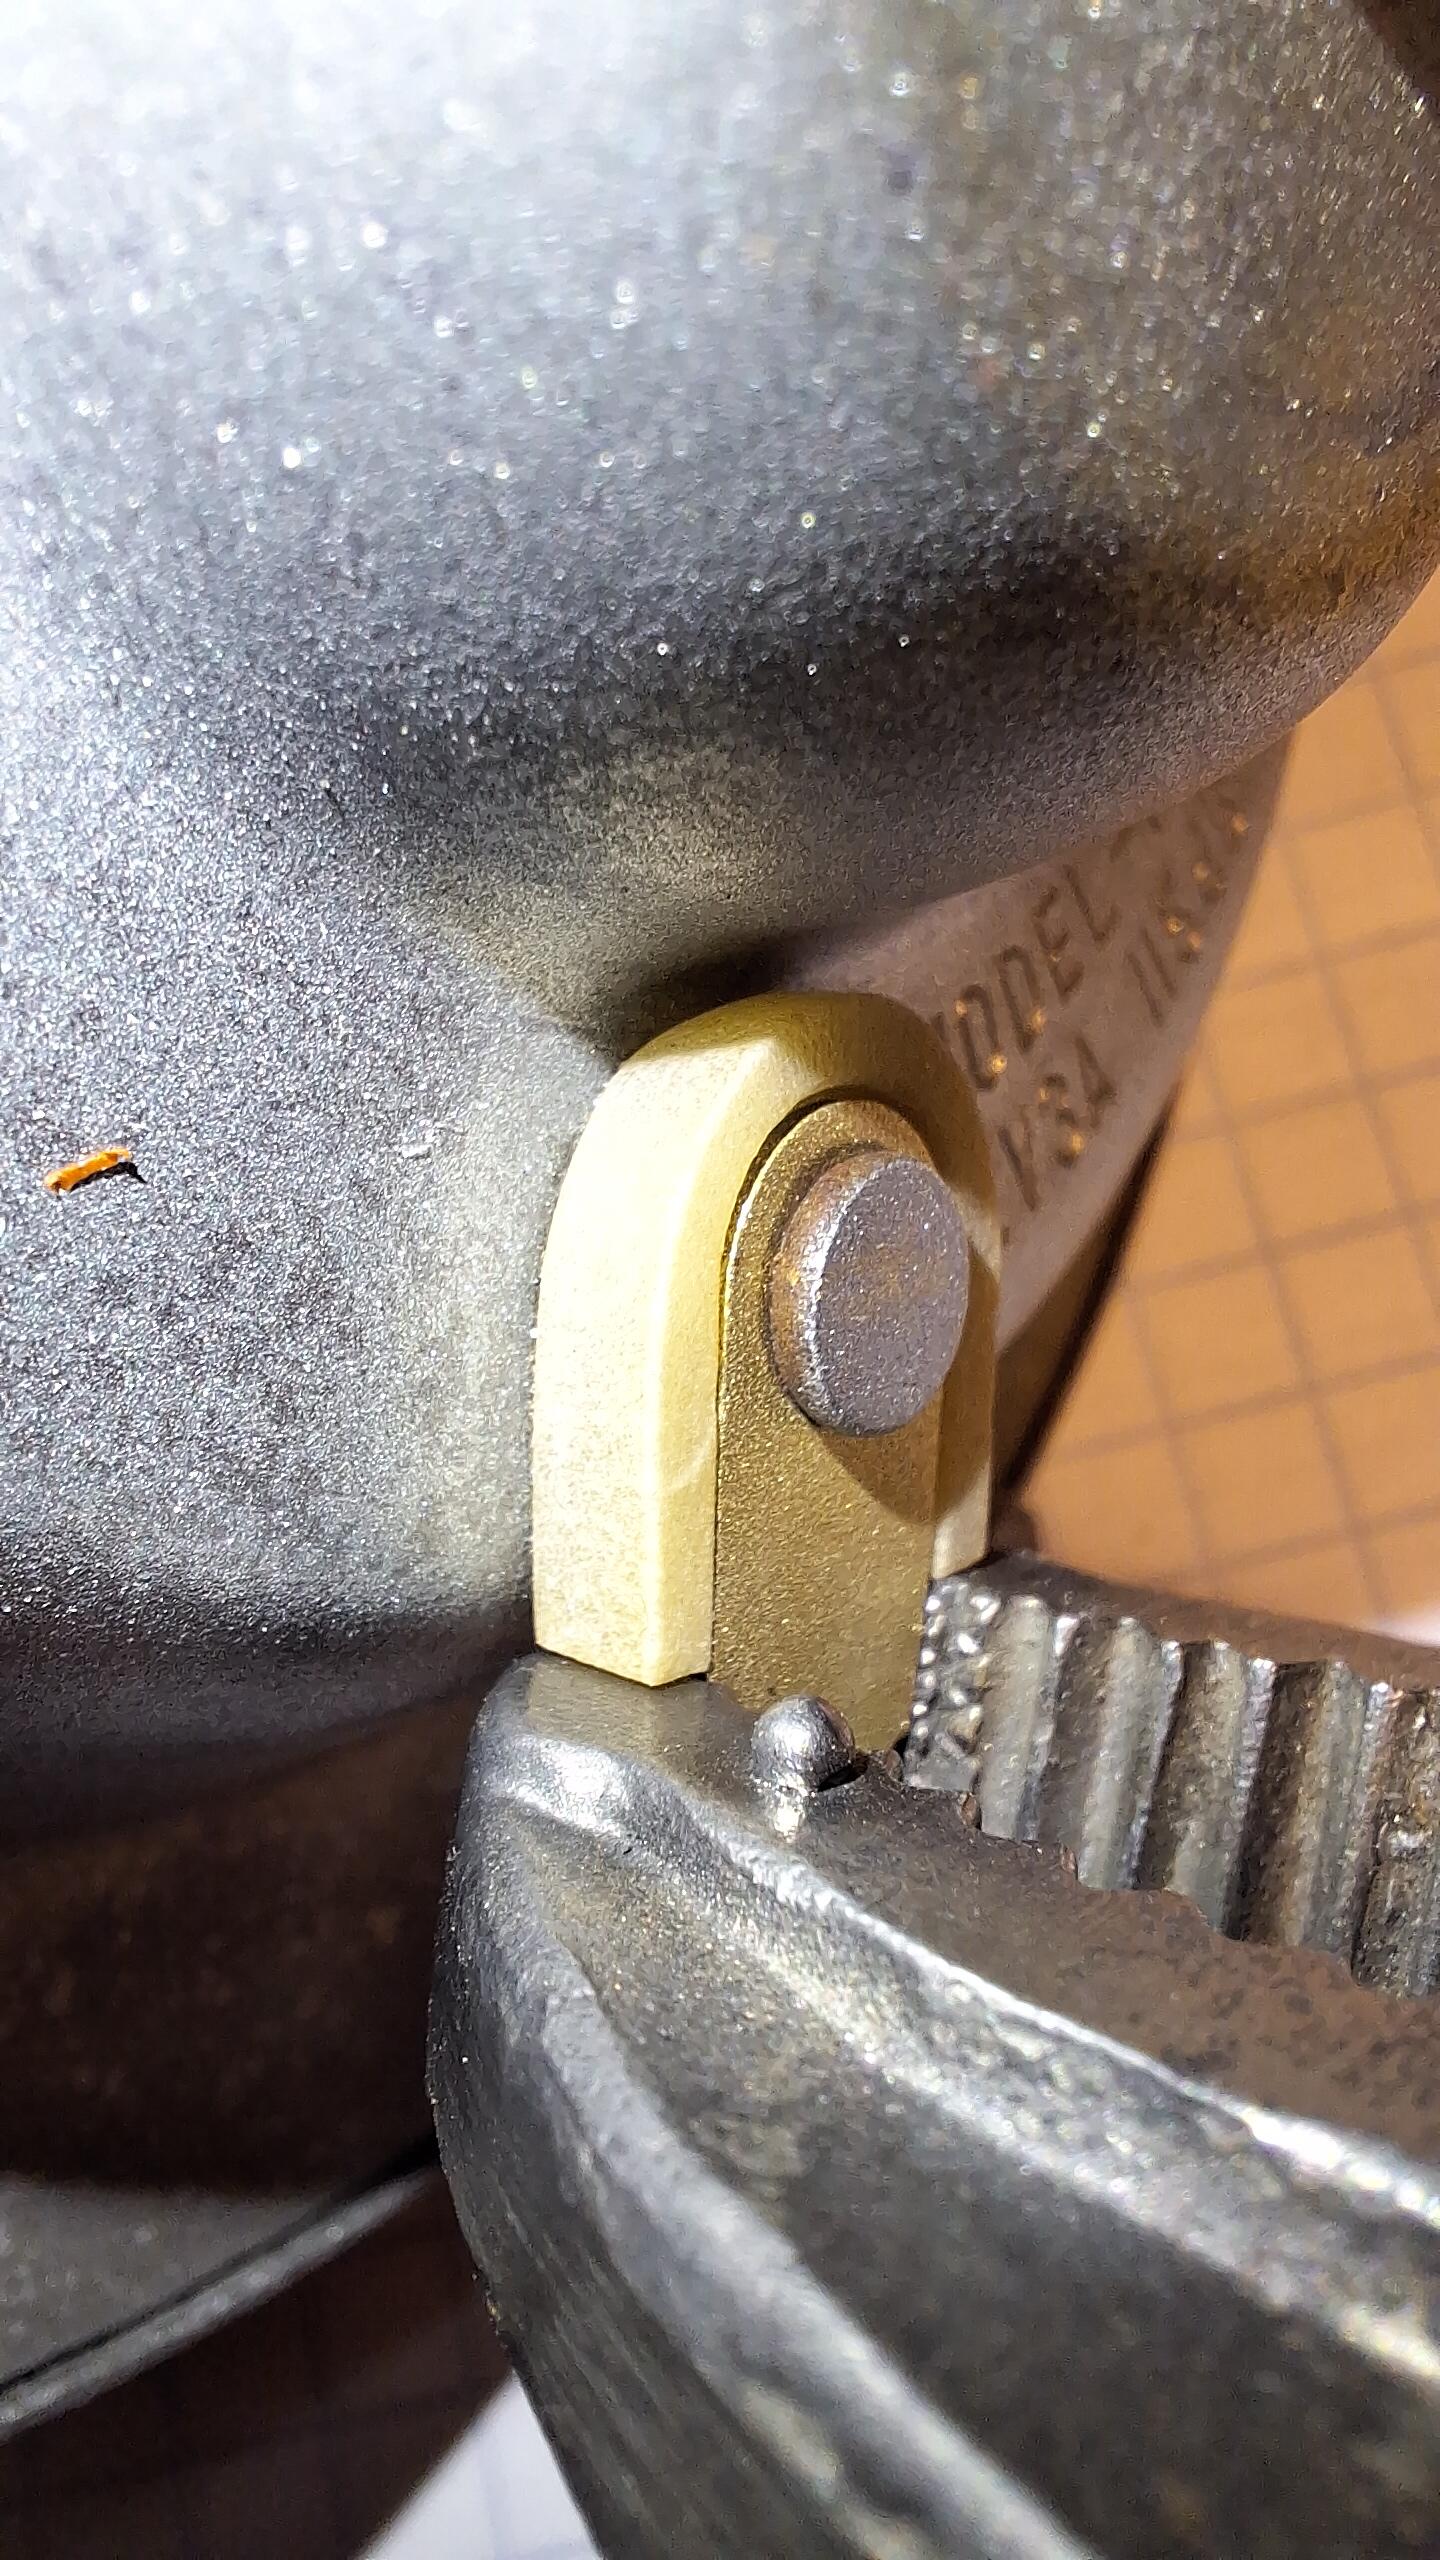
Horn W1, 1/74 had some changes. A brass tab for the electrical connector, didn't stop corrosion on the rivet though, and 2 slots in the cover. This may have had the base changed to an earlier style so fwiw, here's the breakdown on this horn: Here's U10, 10/72. This horn actually faintly worked, believe it or nor. Haha, I have it soaking in rust dissolved, but most likely it's a parts horn.

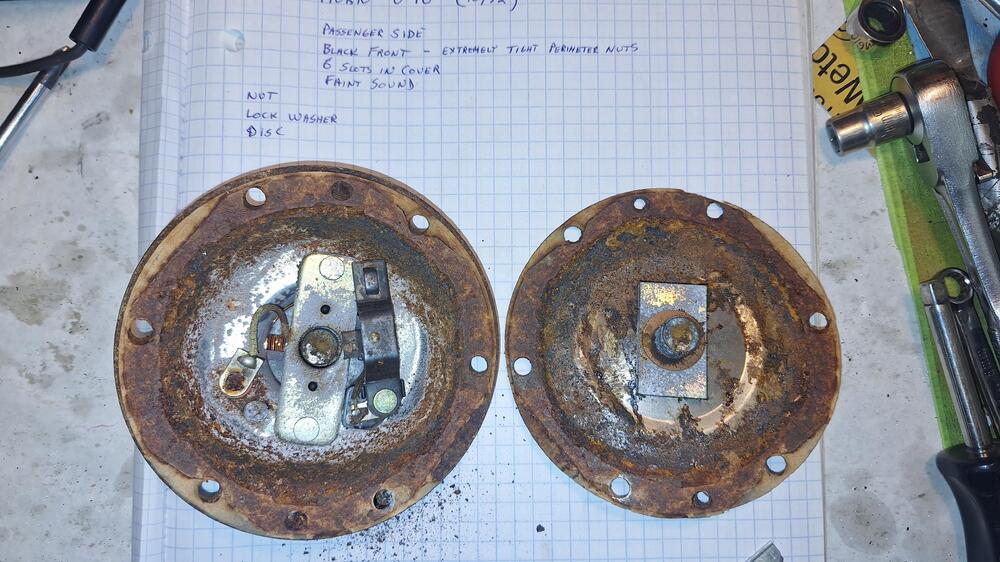
-
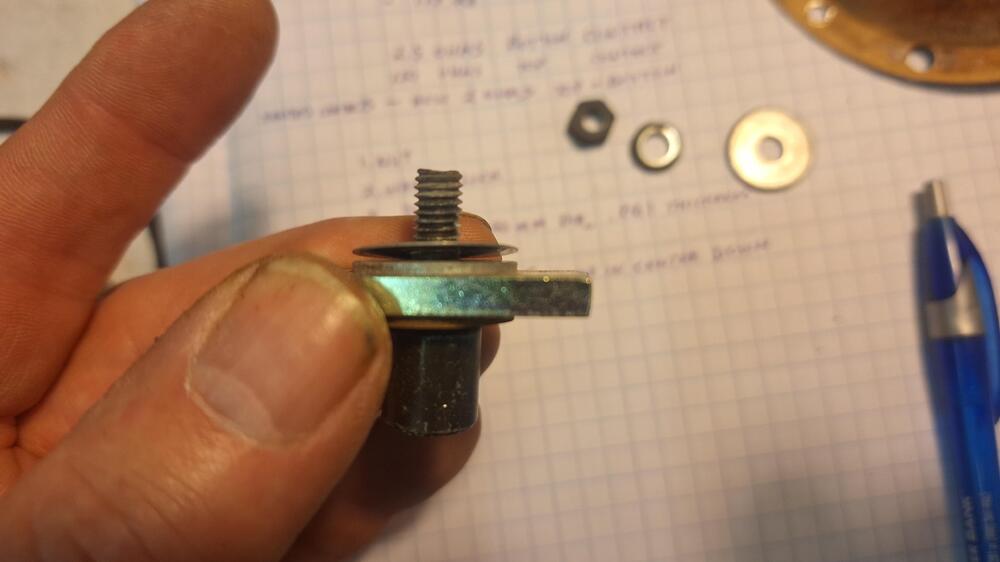
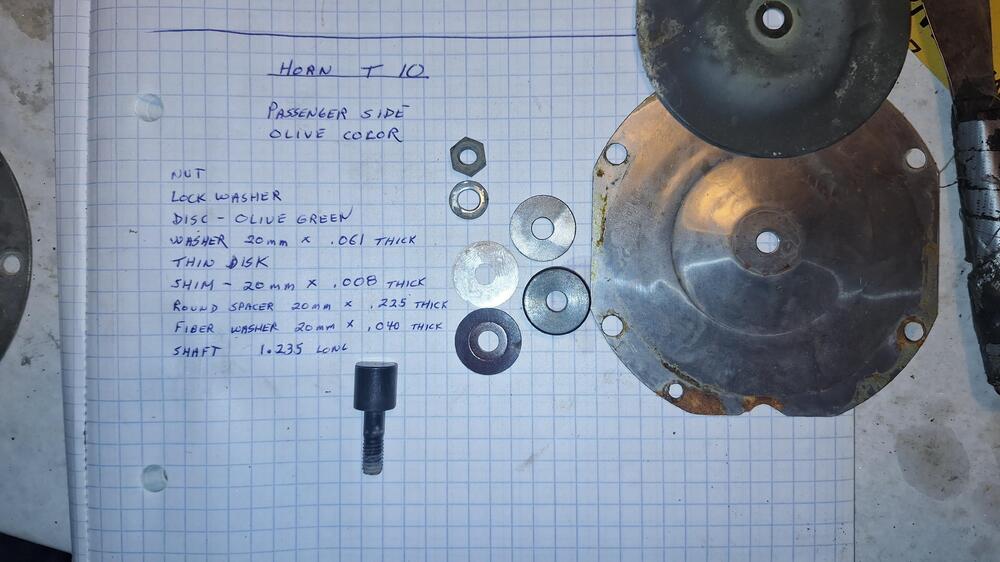
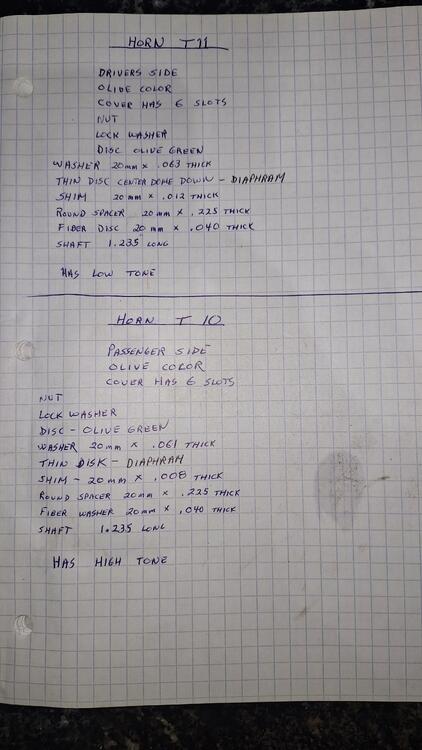
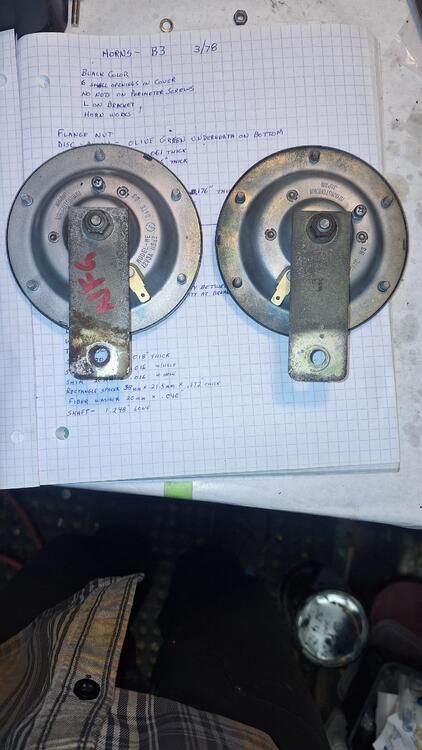
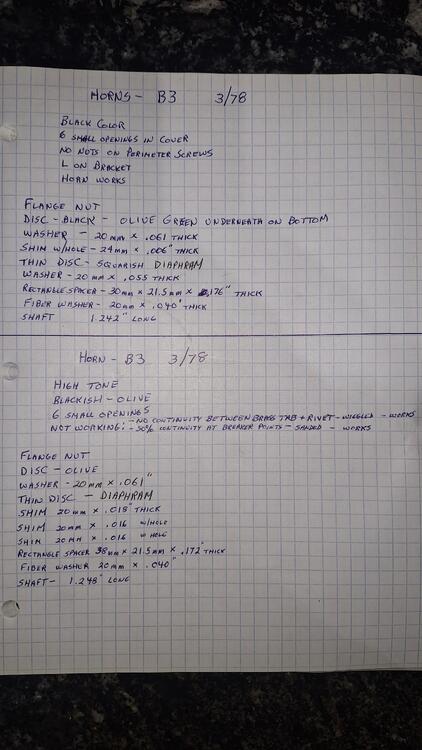
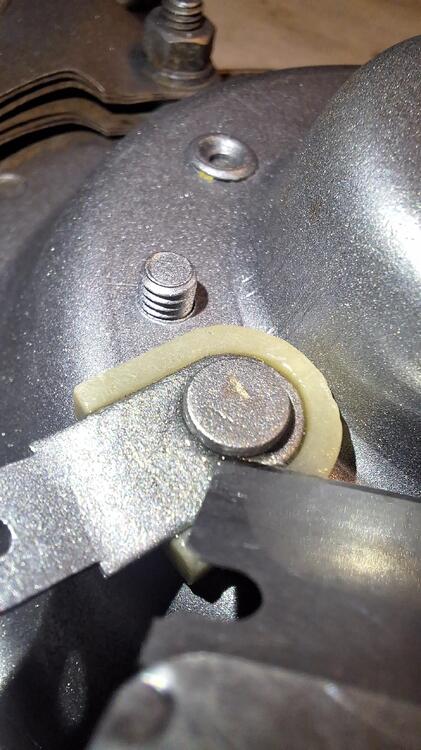
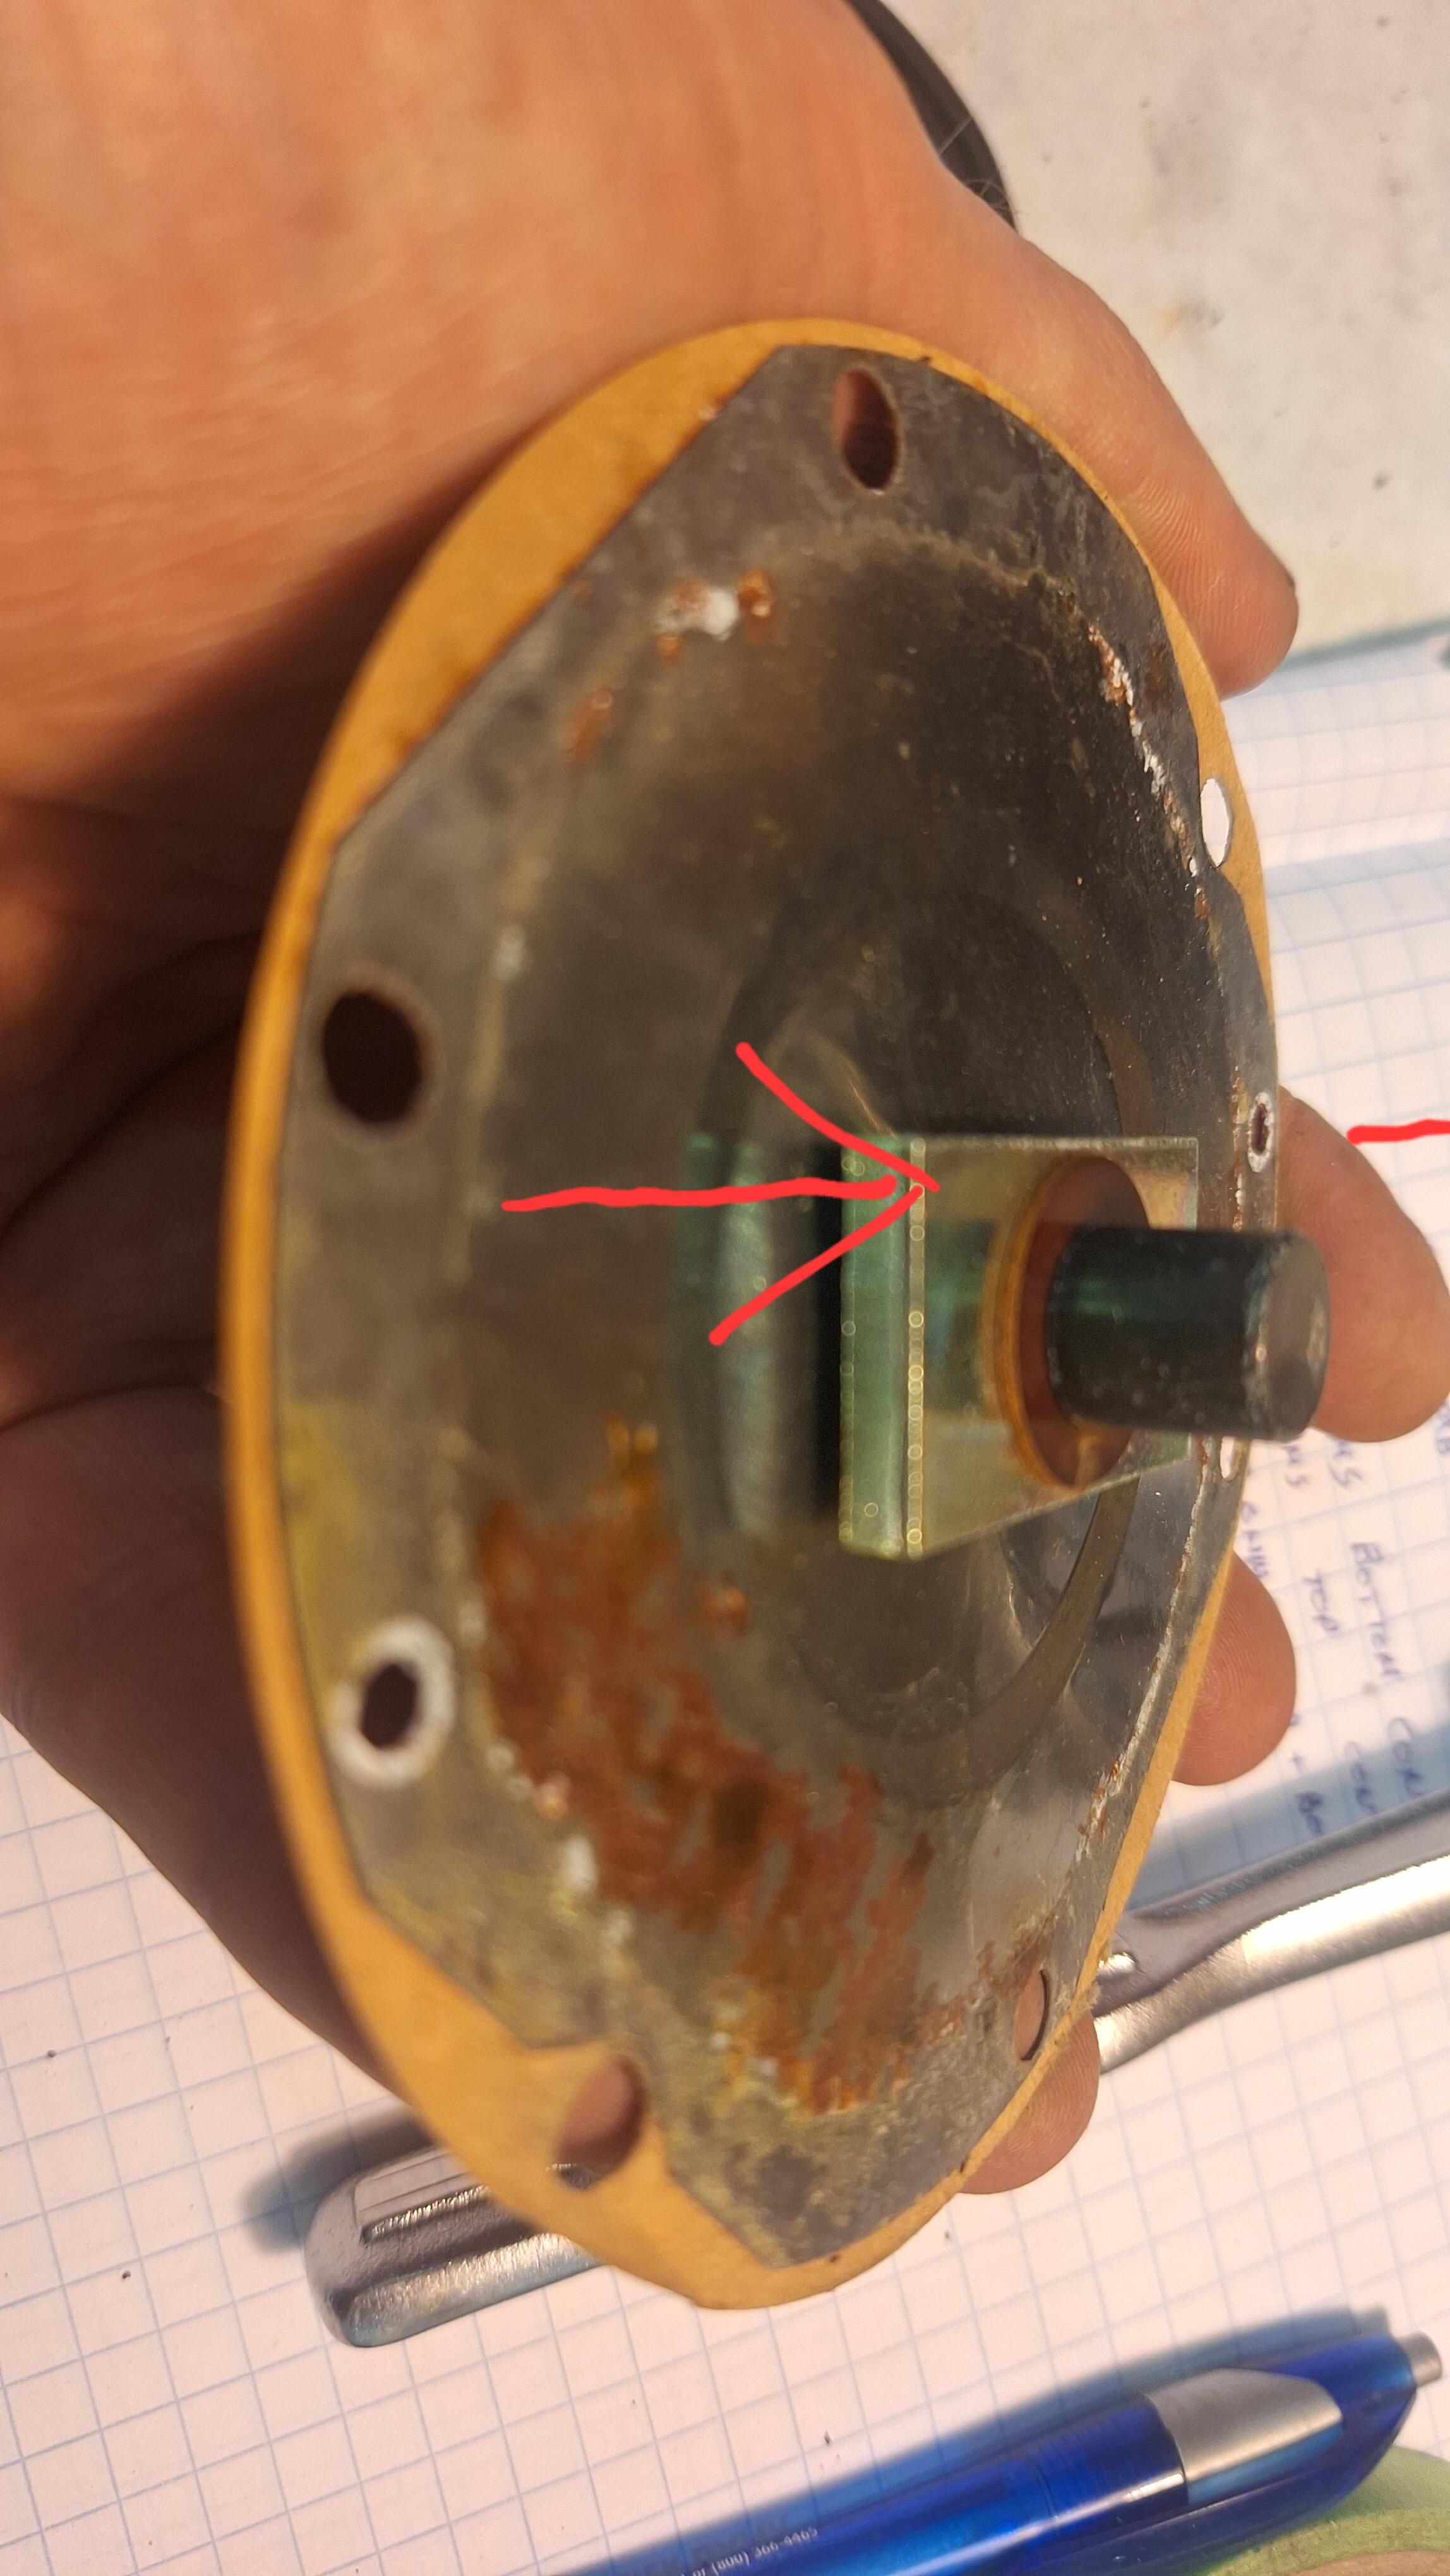
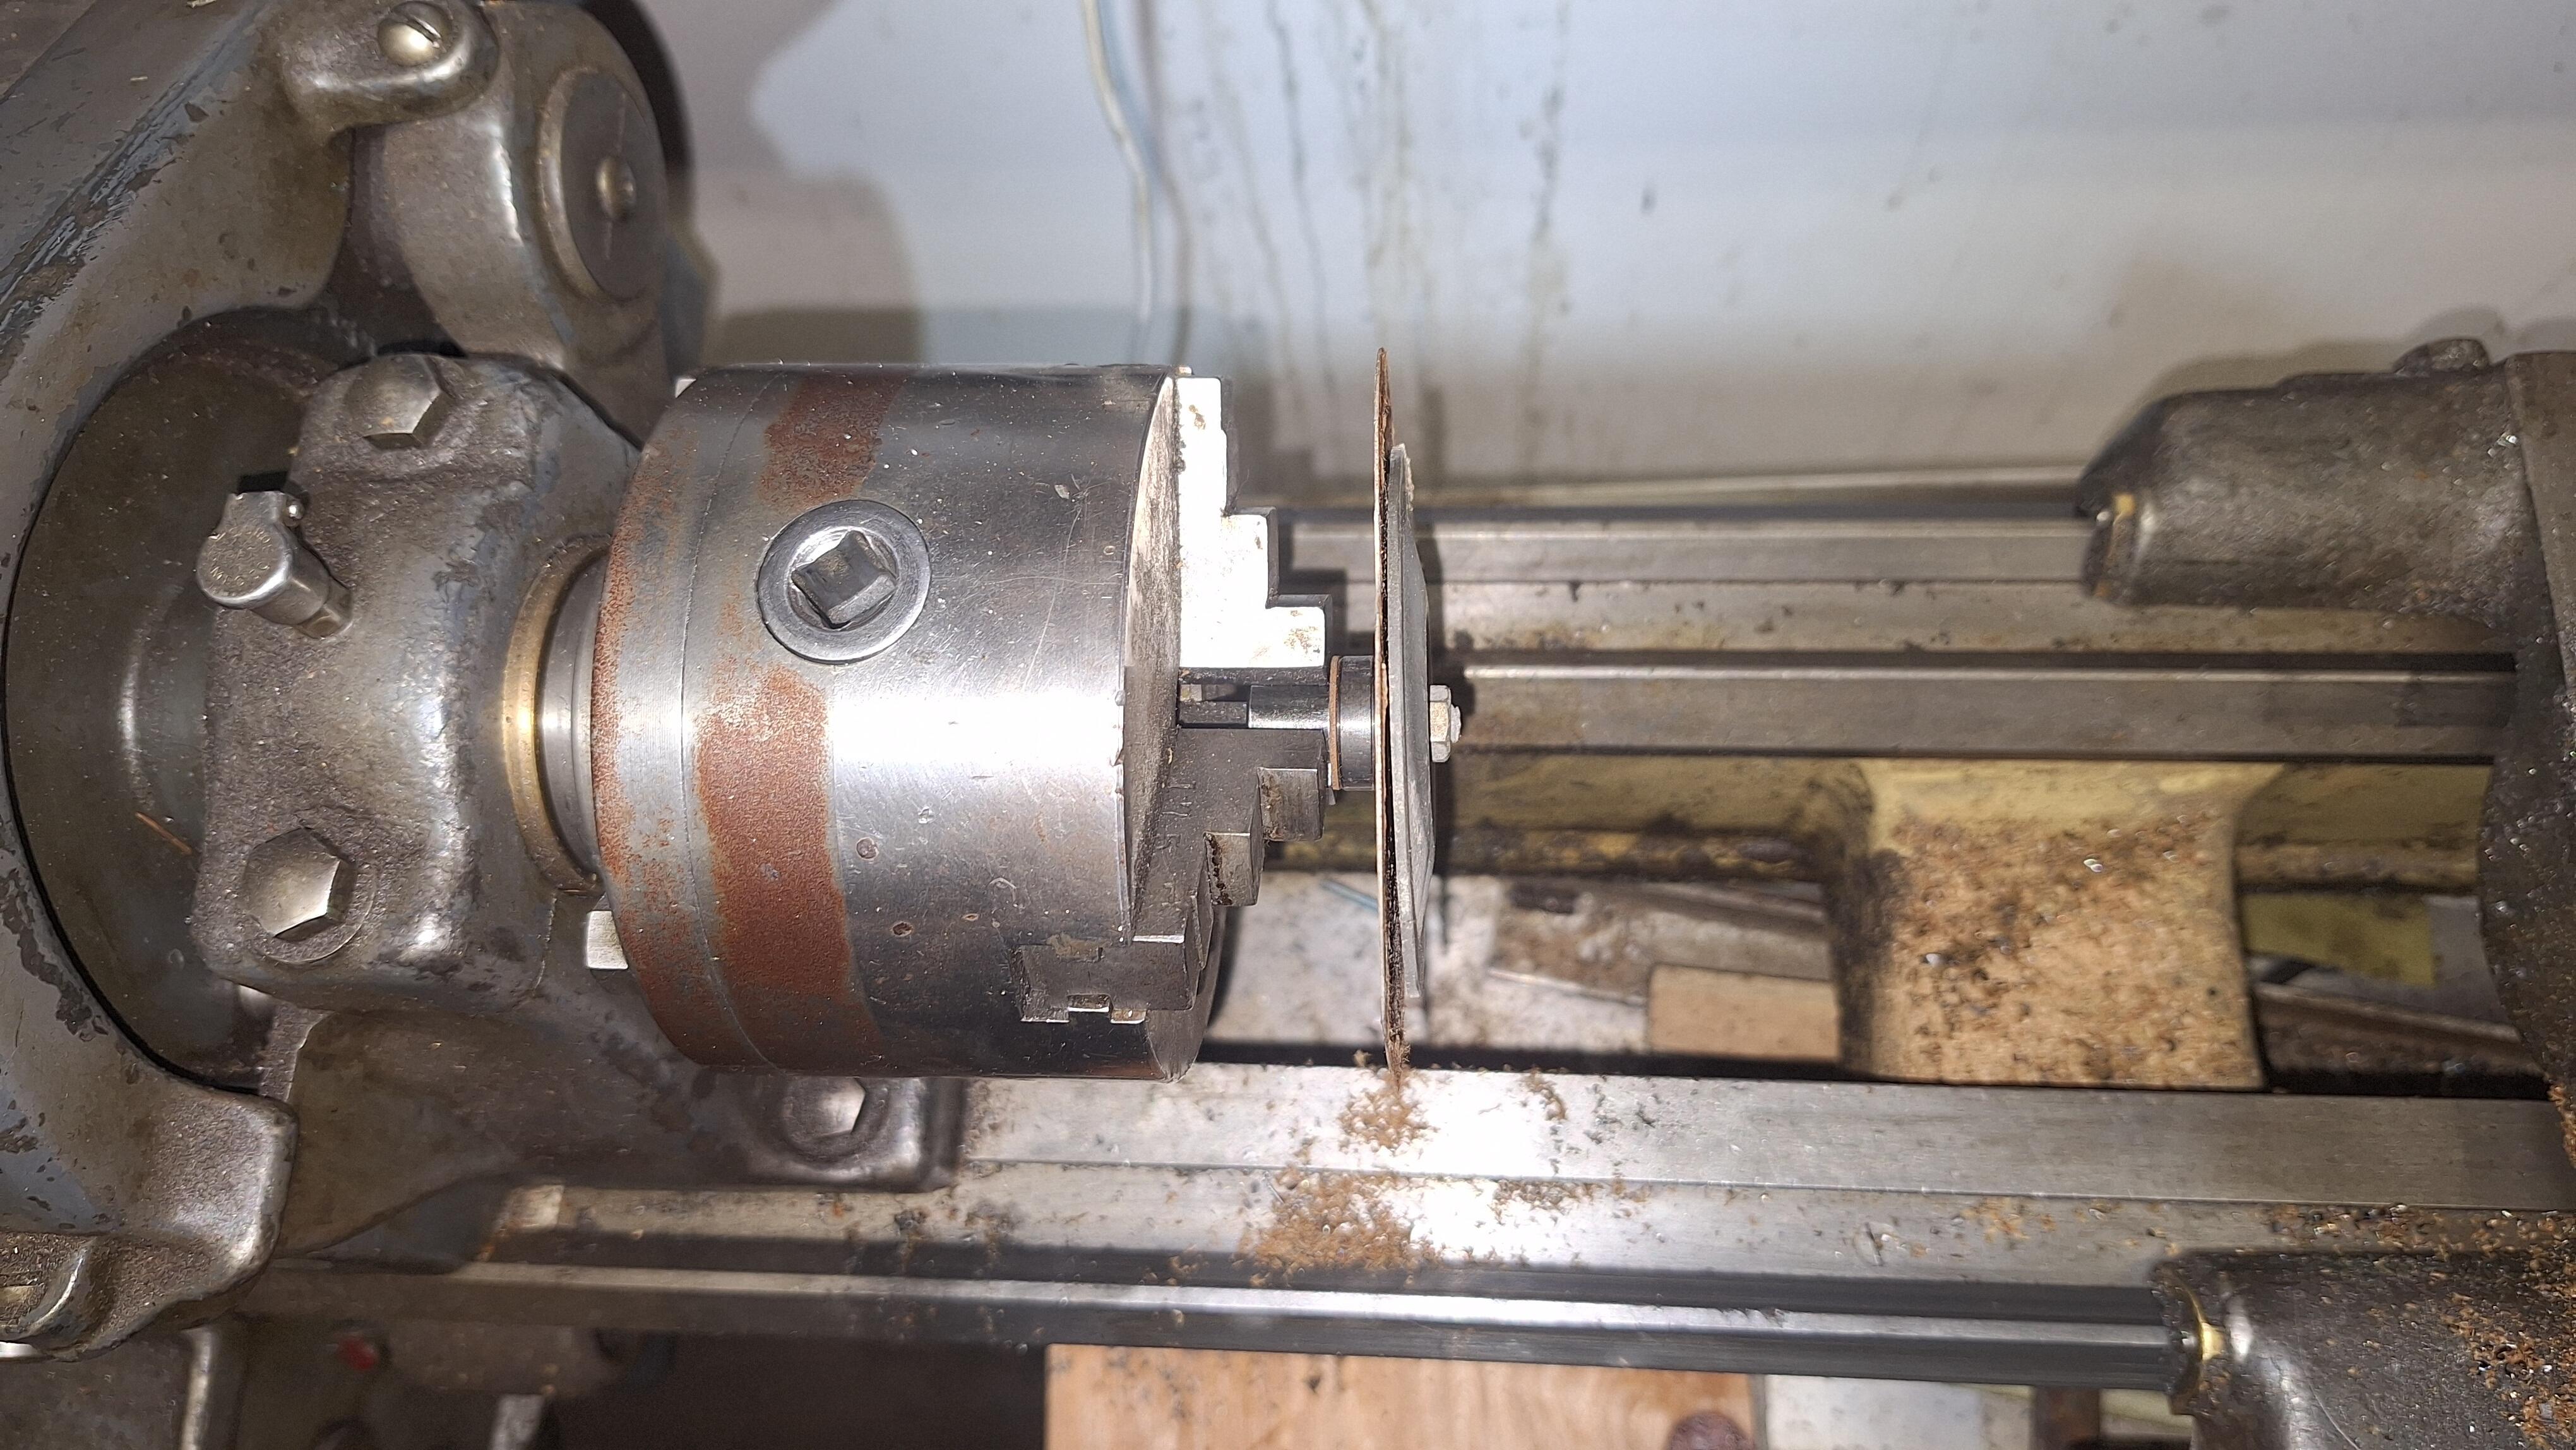
After sanding the contact points, the electrical was good. It helps to have a chuck to hold the diaphragm shaft while removing or tightening the nut. The earlier horns have a round spacer instead of a rectangular bar in the diaphragm. The rectangular bar has to be aligned with the center or the alignment hole. The latest horns I found with the round spacer were 6/71 or U6. The U7 or 7/71 horns had the rectangular bar. Here is the diaphragm orientation of horn T10, 10/70 Here is T11, 11/70 I had a matching pair of B3 horns 3/78, one with a low tone L on the bracket. I thought we might be able to tell what the differences are between it and the high tone: The differences are clear, one has thin shims under the diaphragm, one had a smaller rectangular spacer, not thinner, but shorter.


-
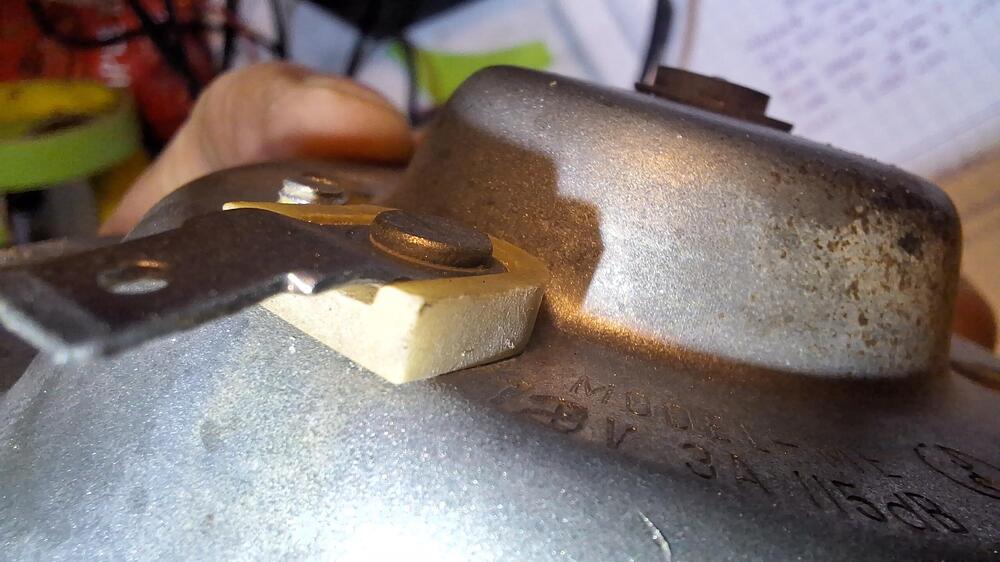
After refinishing some horn pieces, to 6 horns, it came time to assemble them. I did document and measure each piece and photograph the pieces, but what I didn't take into account was, you can't see thicknesses of washers from a photo. And what makes a horn high tone, what makes it low tone. Frustrated, I could only get 3 of my 7 horns working, I decided to dive into this deeper. All the horns I could not get working, had good continuity. So I Figured it had to do with the different thicknesses of washers and shims on each side of the diaphragm. Their placement, I thought, could also have something to do with the high and low tone. So I sourced more horns through Junkyard Jenny, and hopefully they haven't been messed with. If you ever need parts, she's great. I get a variety of horns a few days later, and now I'm a bit more careful disassembling them. Great care is taken to document and measure each piece of the diaphragm assembly as it comes apart. Here are my results. By the way, she called these her unruly horns as many did not work. First off was to check continuity. I found it best to clean the backside before disassembly, by giving it a quick shot in the bead blast cabinet. Next was to check continuity between the electrical connector tab and the rivet taking the current inside the horn. That is where the biggest problem was. I found that rotating the tab back and forth slightly would crush the corrosion. I also put a few drops of wd40 rust dissolver on that rivet, and worked the corner of a razor blade around the corrosion. The connection was fixed.

-
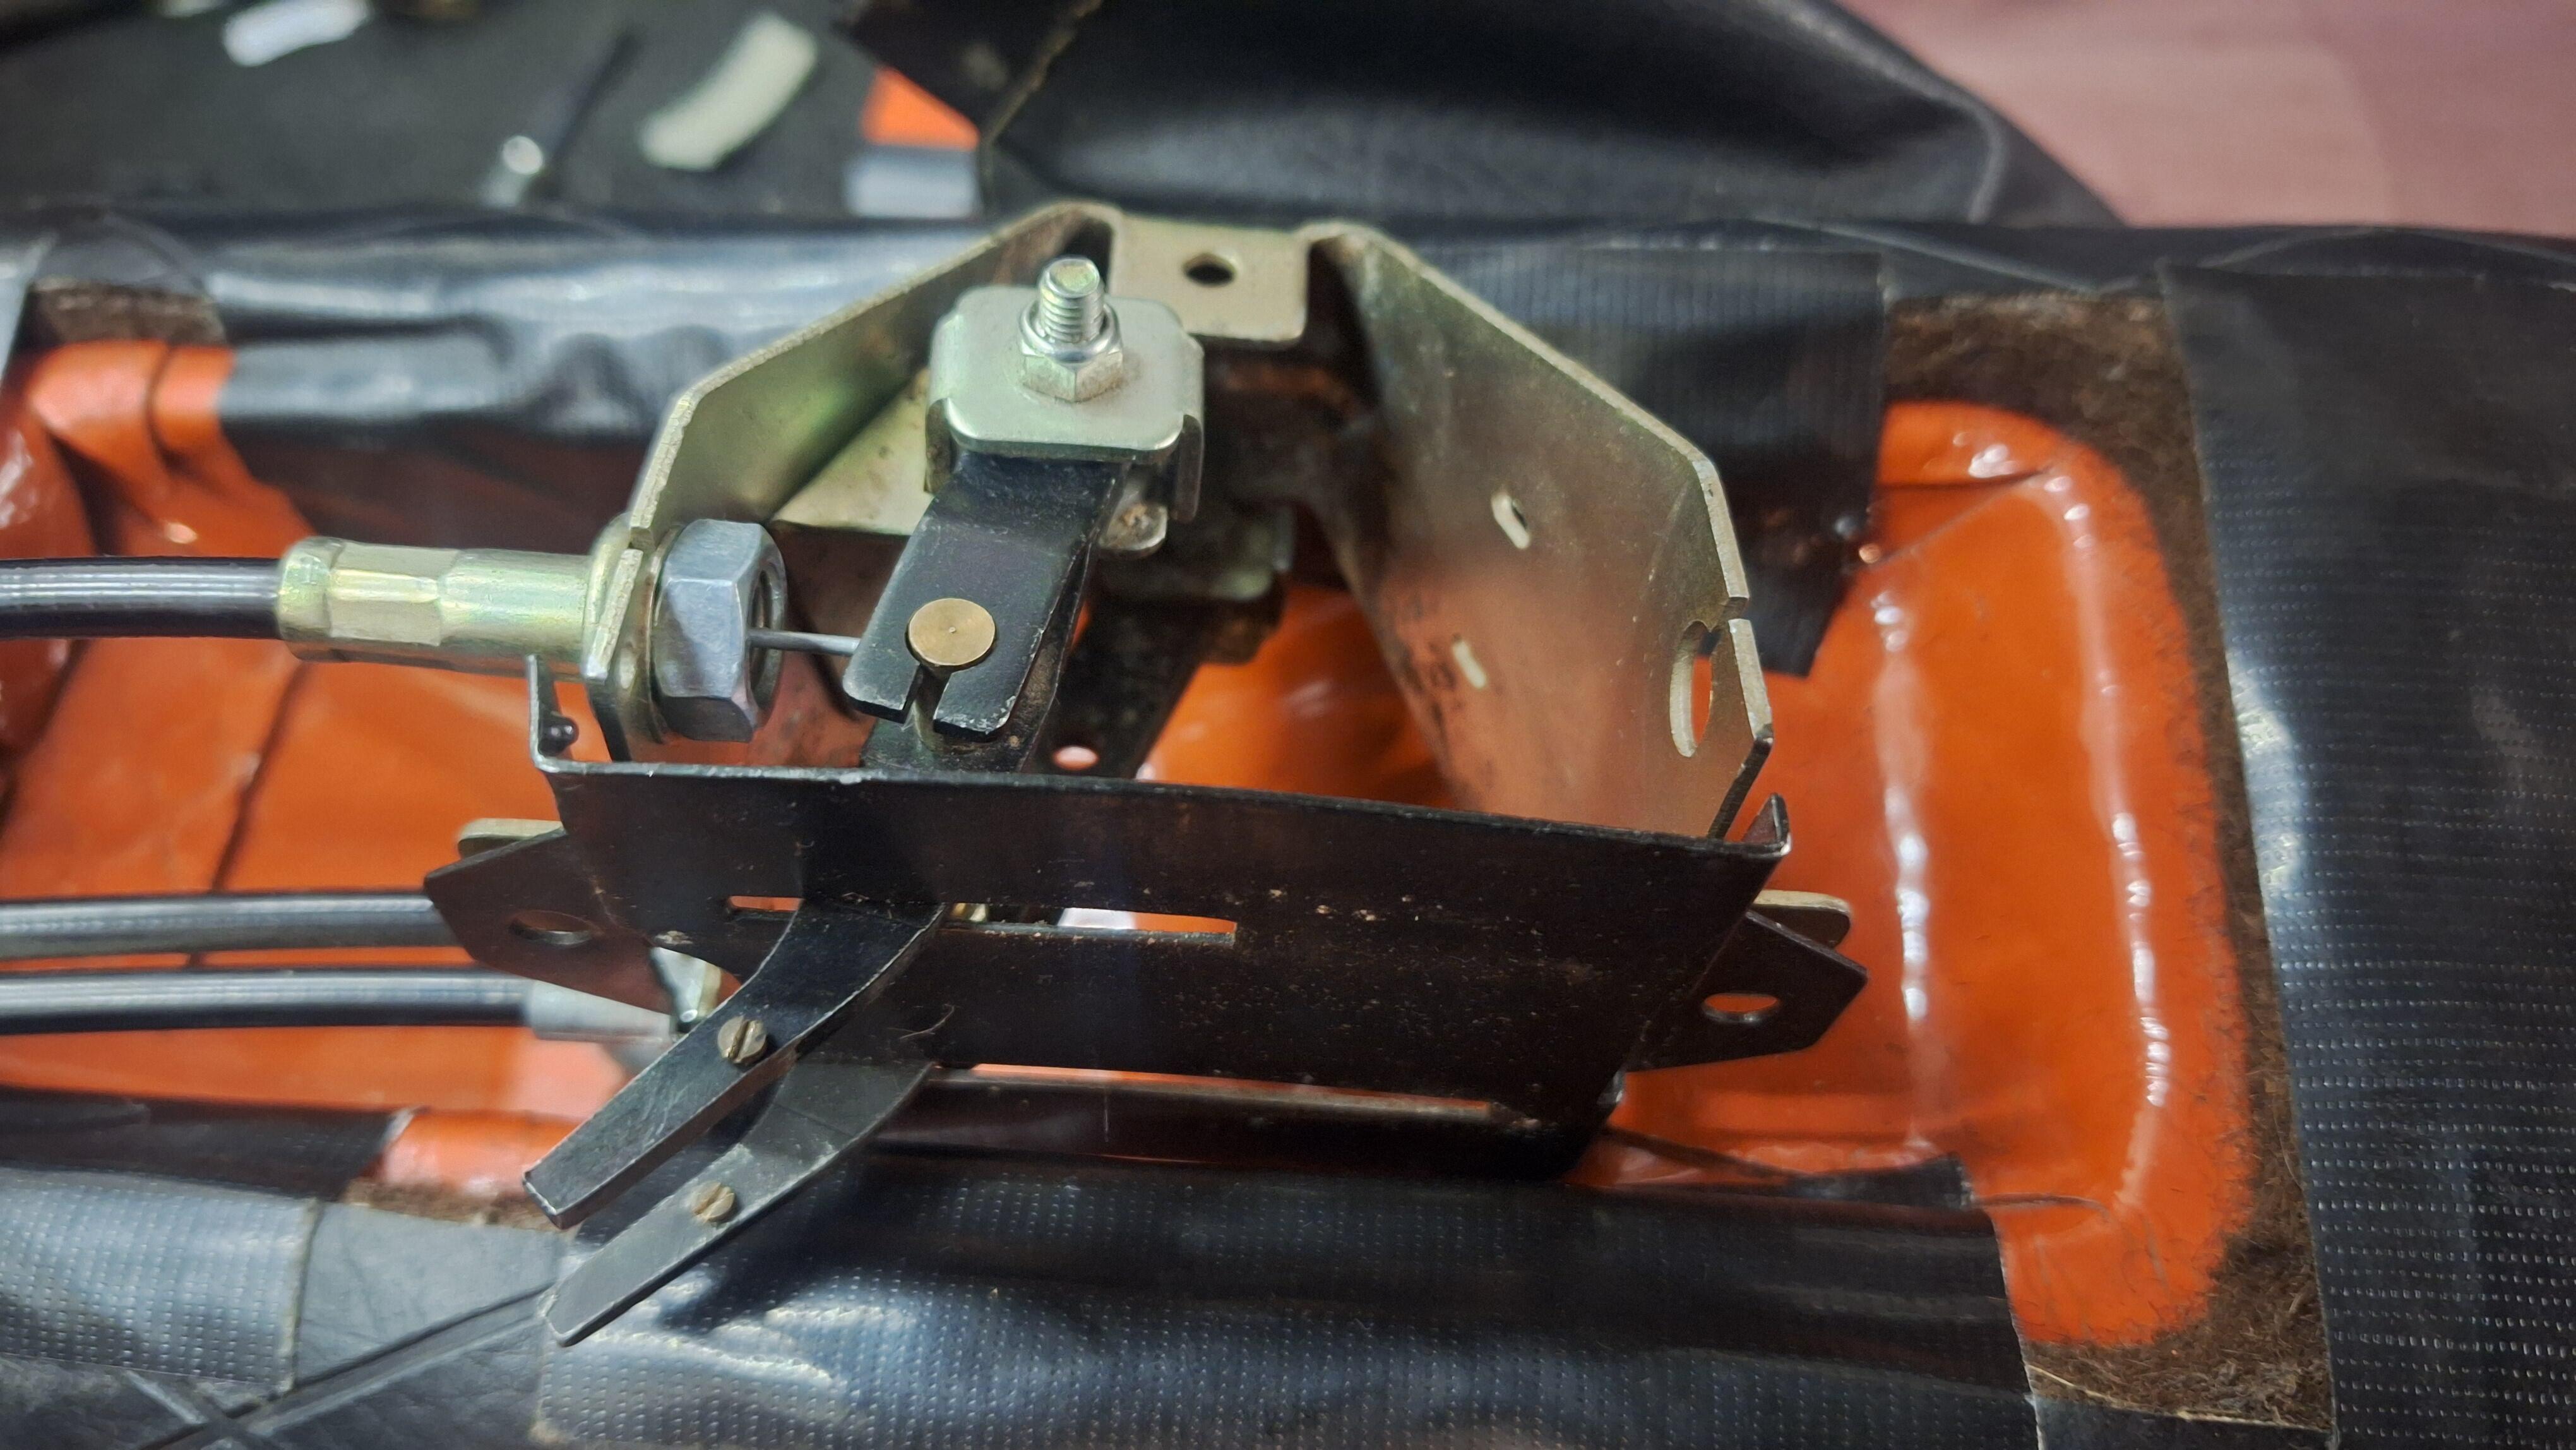
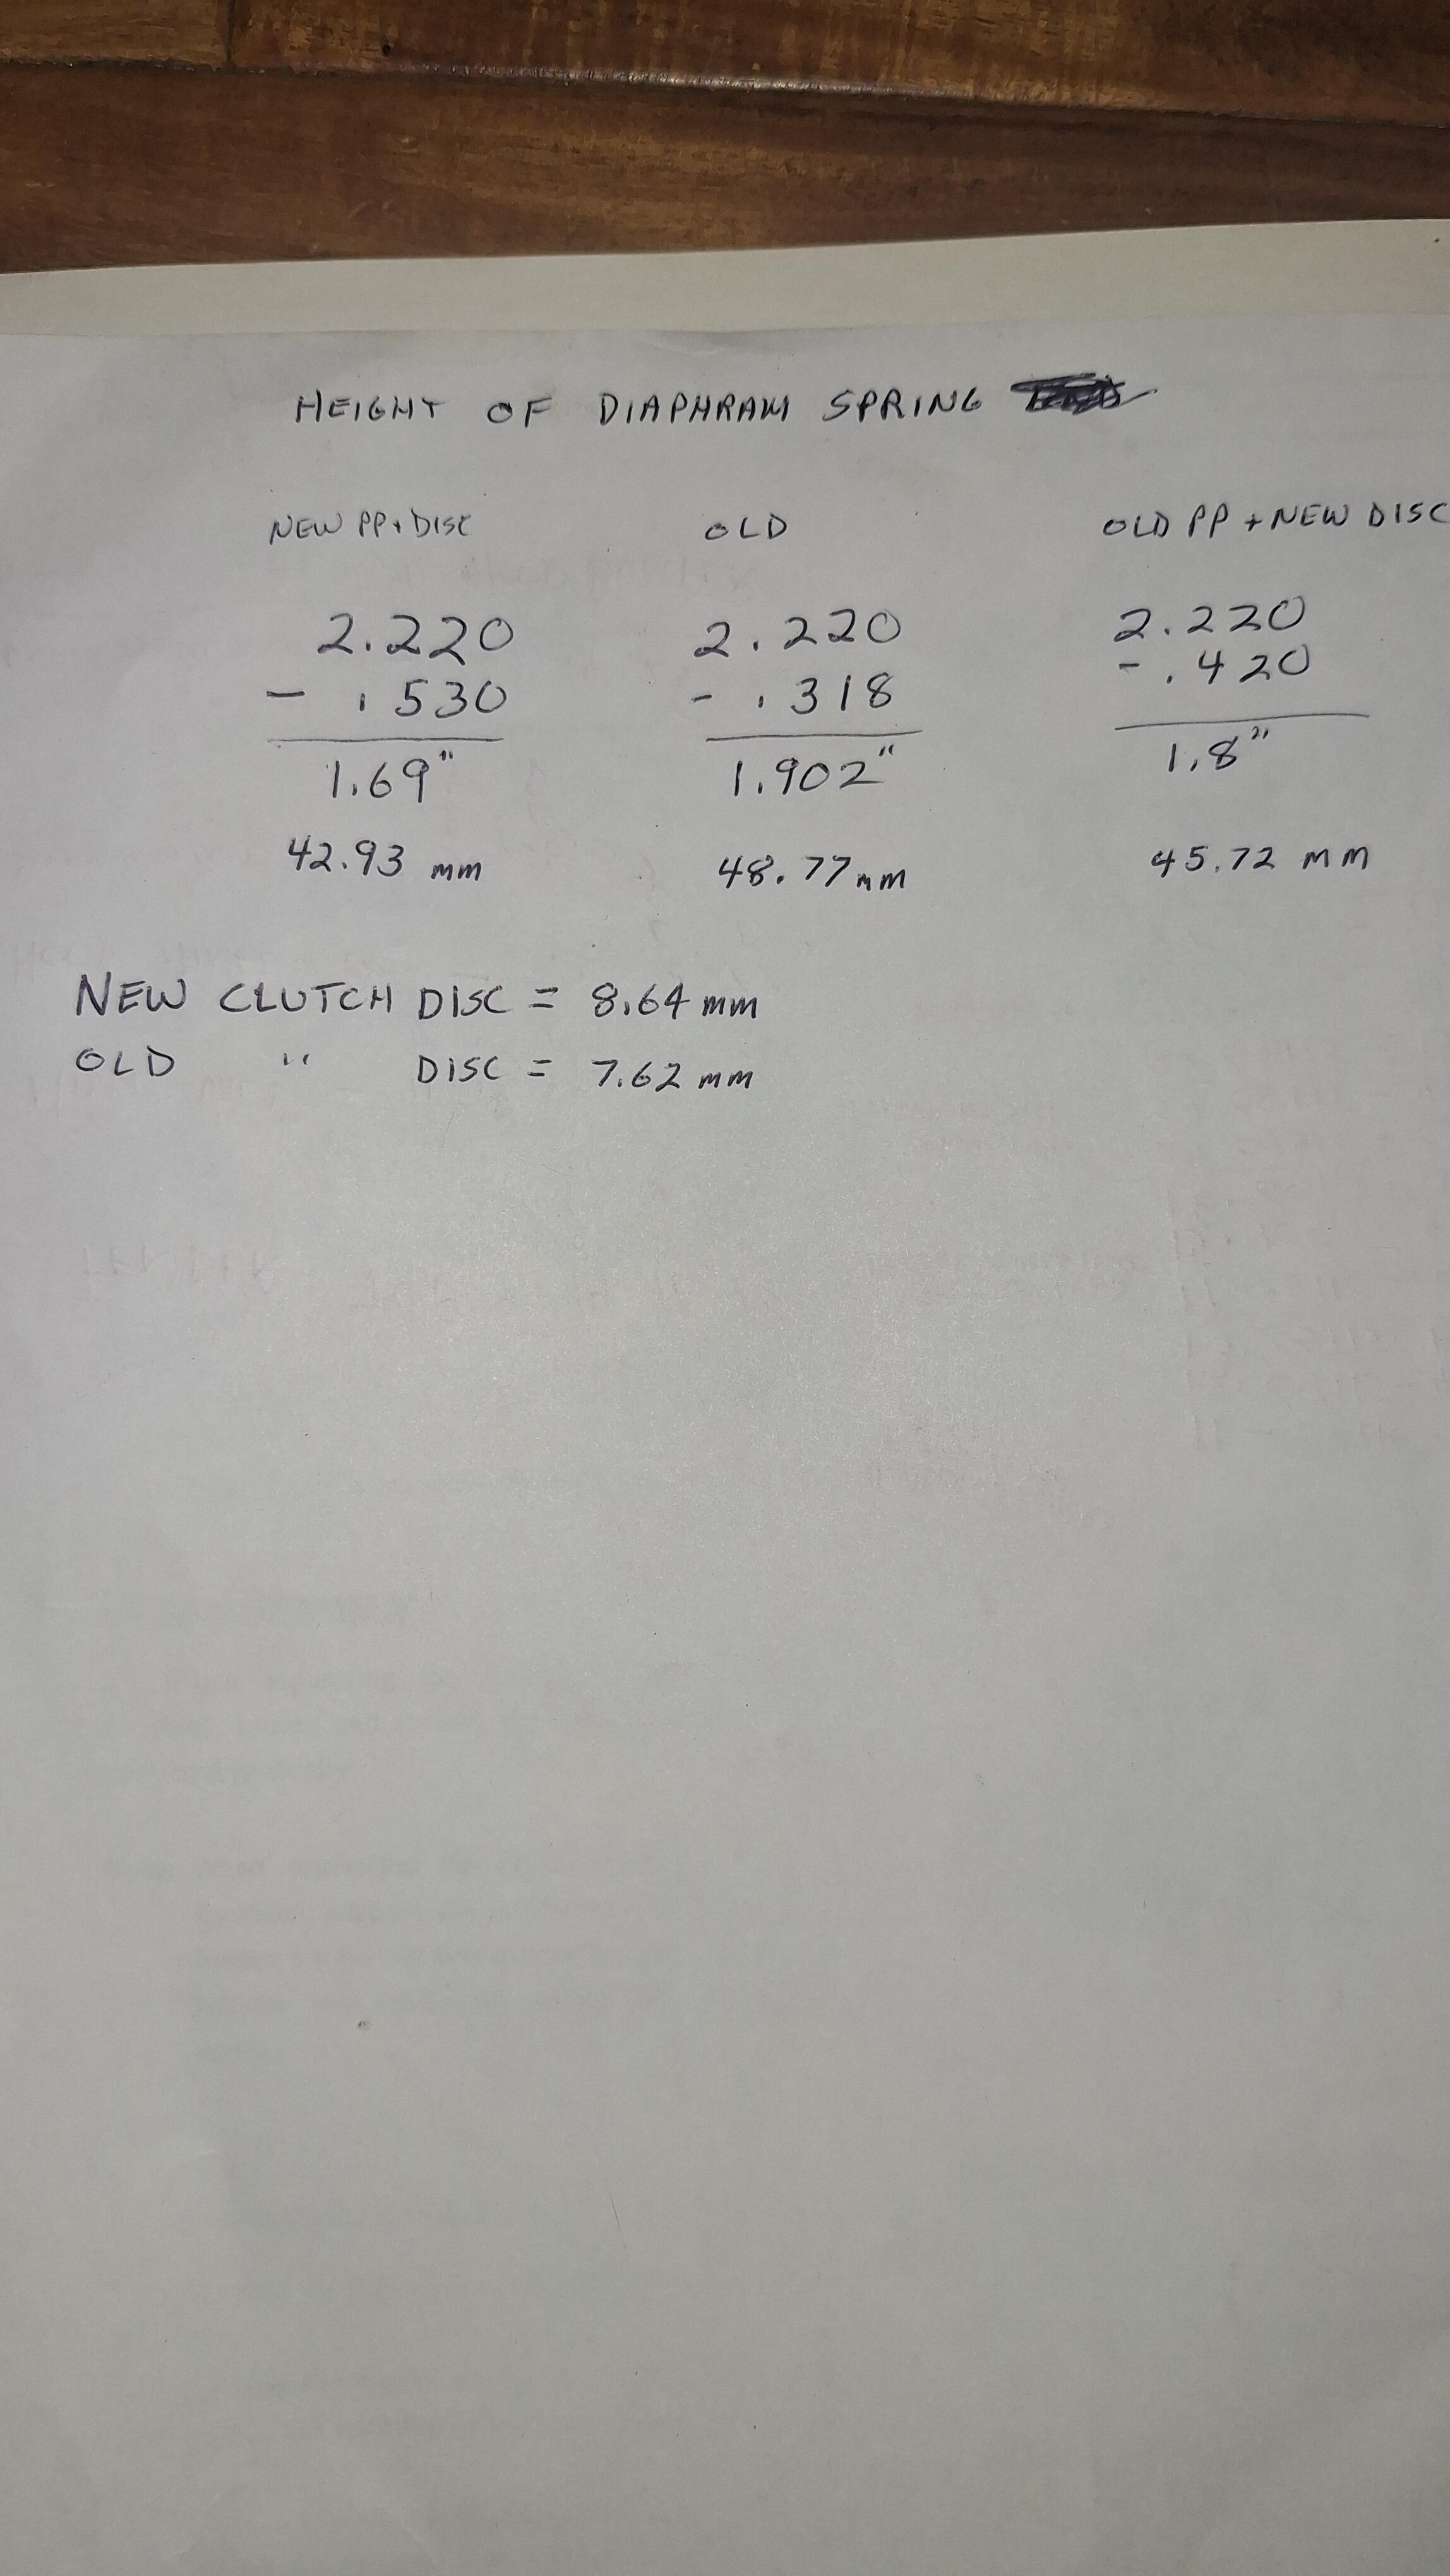
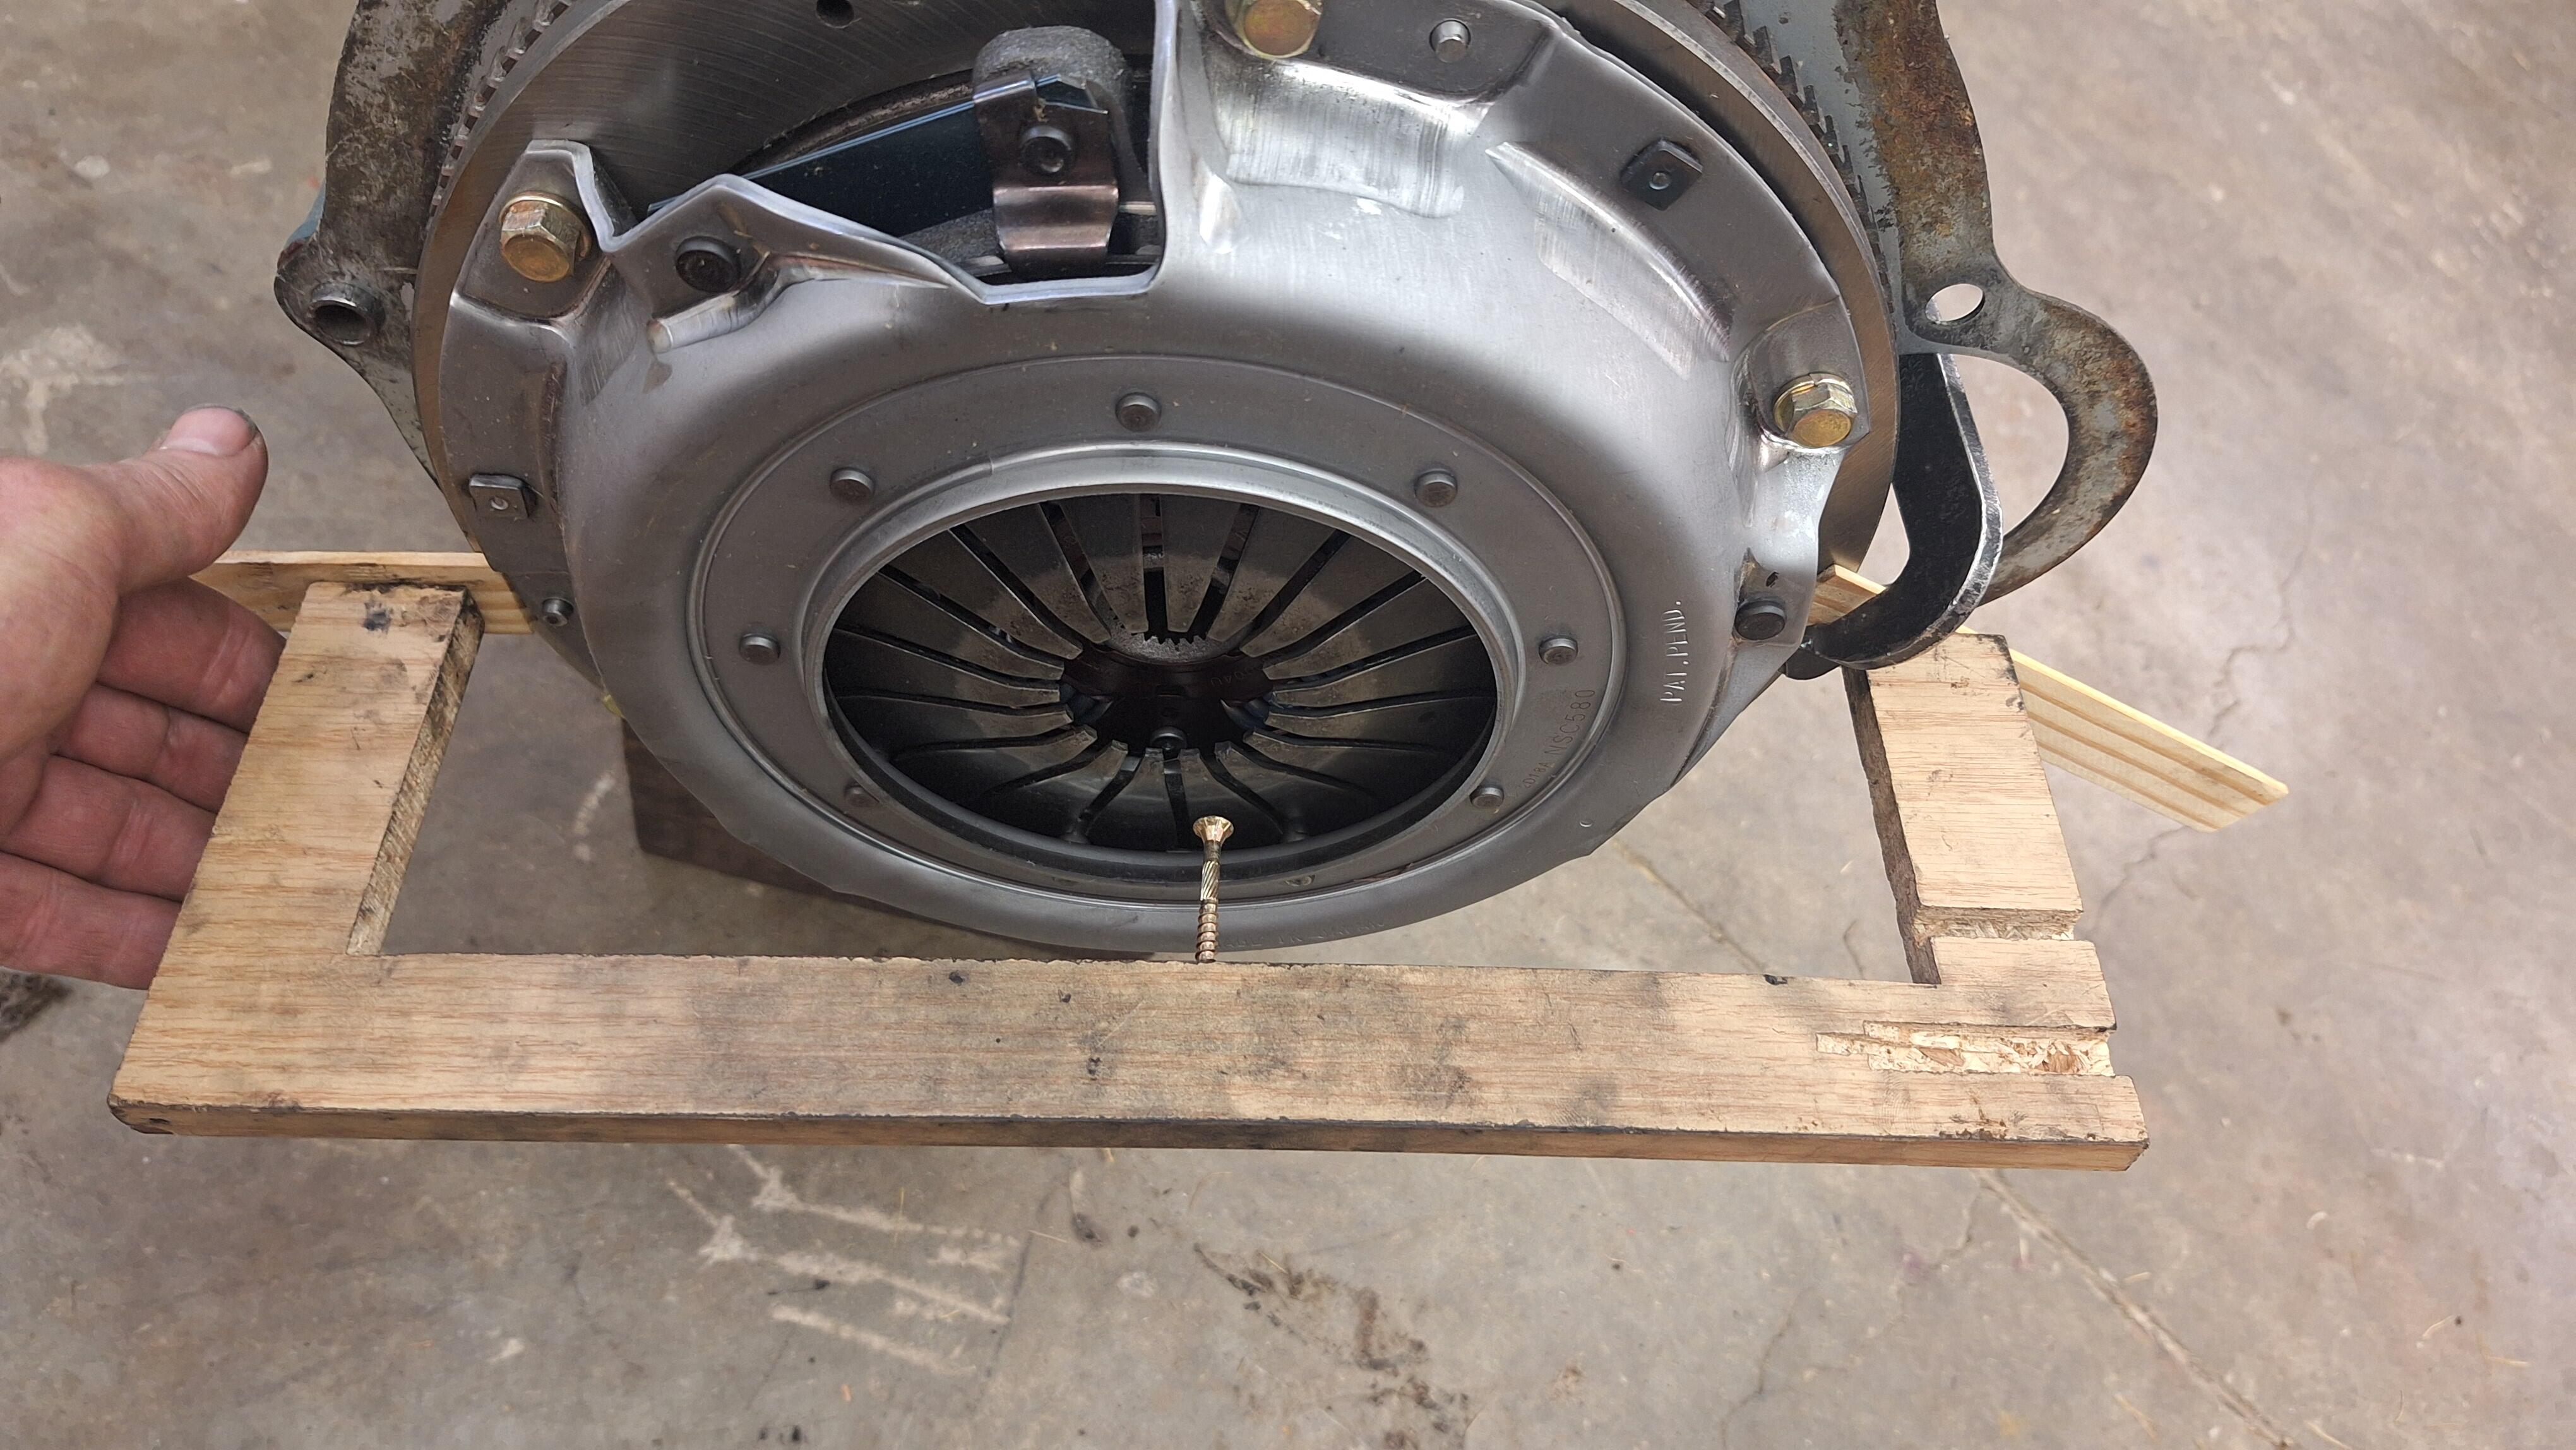
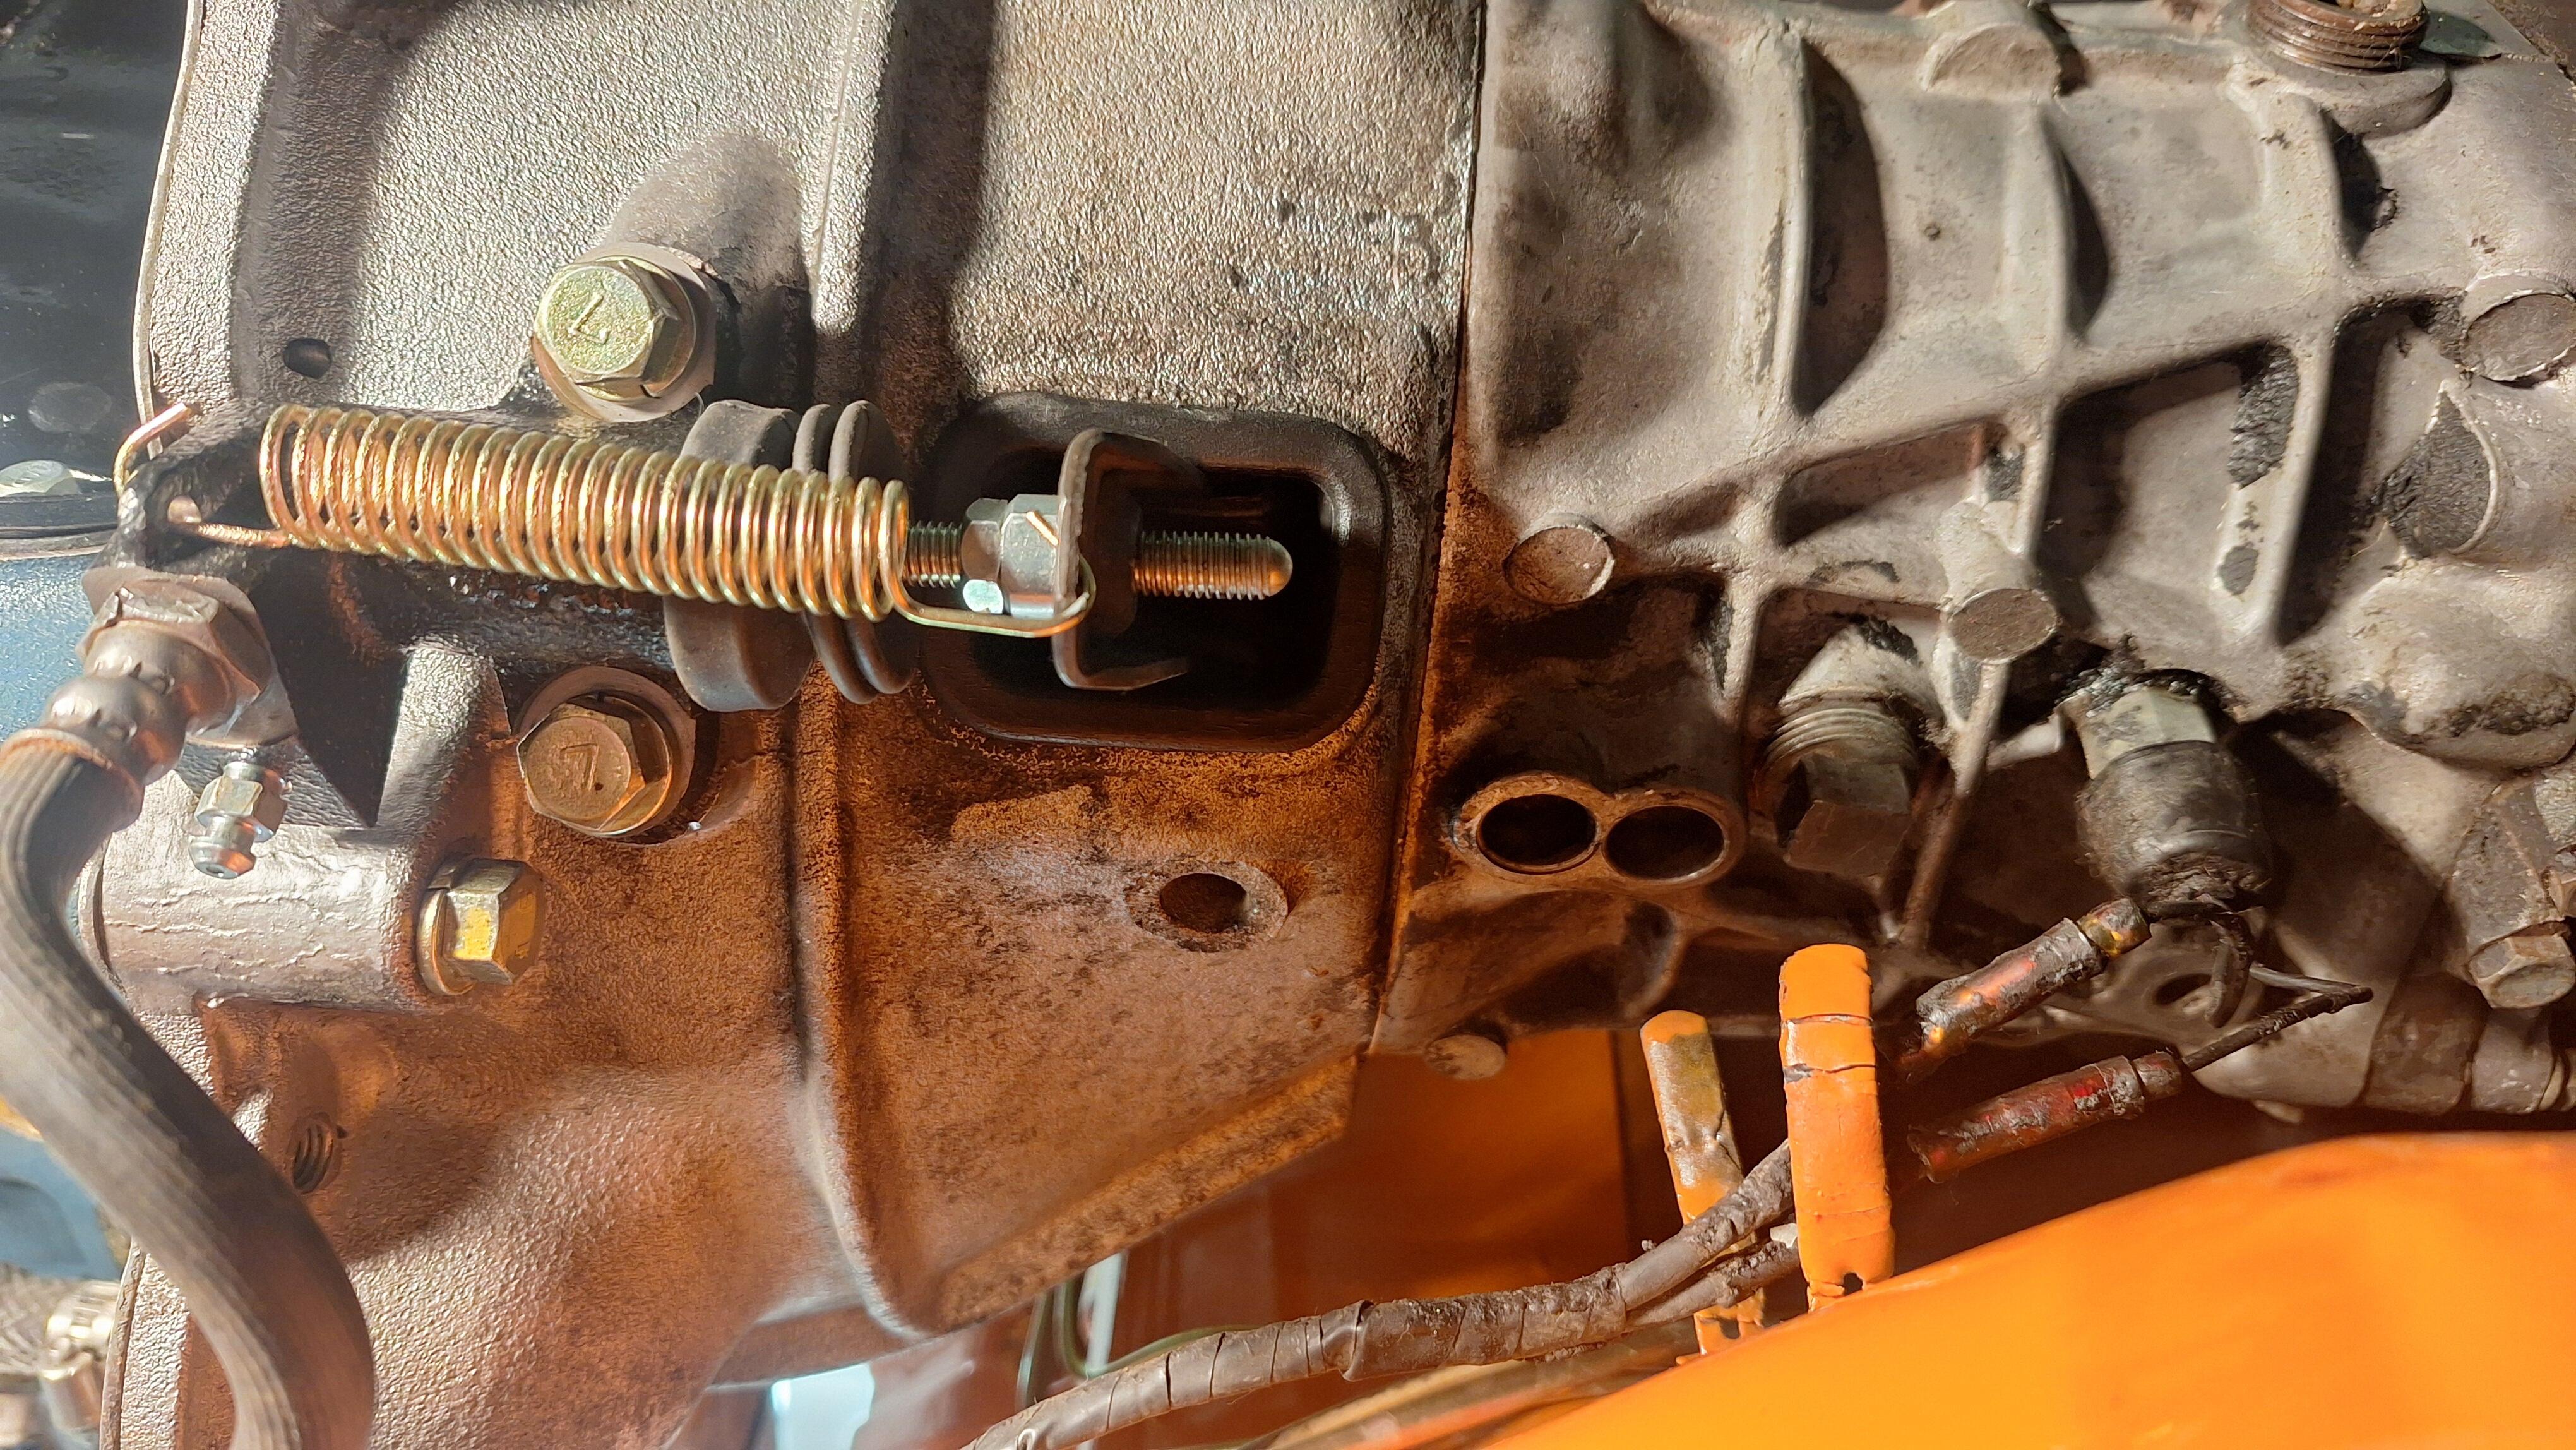
So, if you're searching for "clutch fork" damn! This happened to me too. I installed a new clutch for my restoration on my 6/71 240z. Finally got to the long awaited stage of engine installation. It went well, until I got underneath the car to torque the bolts and bumped the clutch fork and thought why is it so loose?? It was almost at the end of its throw before the throw out bearing contacted the clutch springs. That's when I searched for "clutch fork" Exactly the thread I was looking for. So, I've installed many clutches in John Deere forestry equipment. The manuals always give you the distance from the flywheel to the diaphragm springs. These springs are adjustable. You bolt your pressure plate down, measure the distance, and if adjustments need to be made, you unbolt it, and adjust, until you get it right. After reading this thread, I realized I had to pull the engine out and see what's up. I adapted my Deere gauge for this Datsun, measured the distance from the flywheel to the diaphragm spring. I reinstalled my old clutch (1981) and measured that. I installed my old pressure plate with the new disc and measured that. The problem is in the service manual they use 'distance pieces' instead of a clutch disc. I do not know how thick those are. I should have measured how thick my new throwout bearing is and my old one, but I didn't. I ended up putting the 2 washers behind the pivot ball and am happy with the results, but still don't know why I had to. Is it the combination of resurfacing the flywheel and the new throw out bearing where I lost the distance, I don't know.


 View Advert Wanted: 71 240z front left bumperette rubber I'm looking for the bumperette rubber for the left front bumper, 1971 Offered by: Parman Date 10/26/2024 Price $123 Category Parts Wanted Year 1971 Model 240z
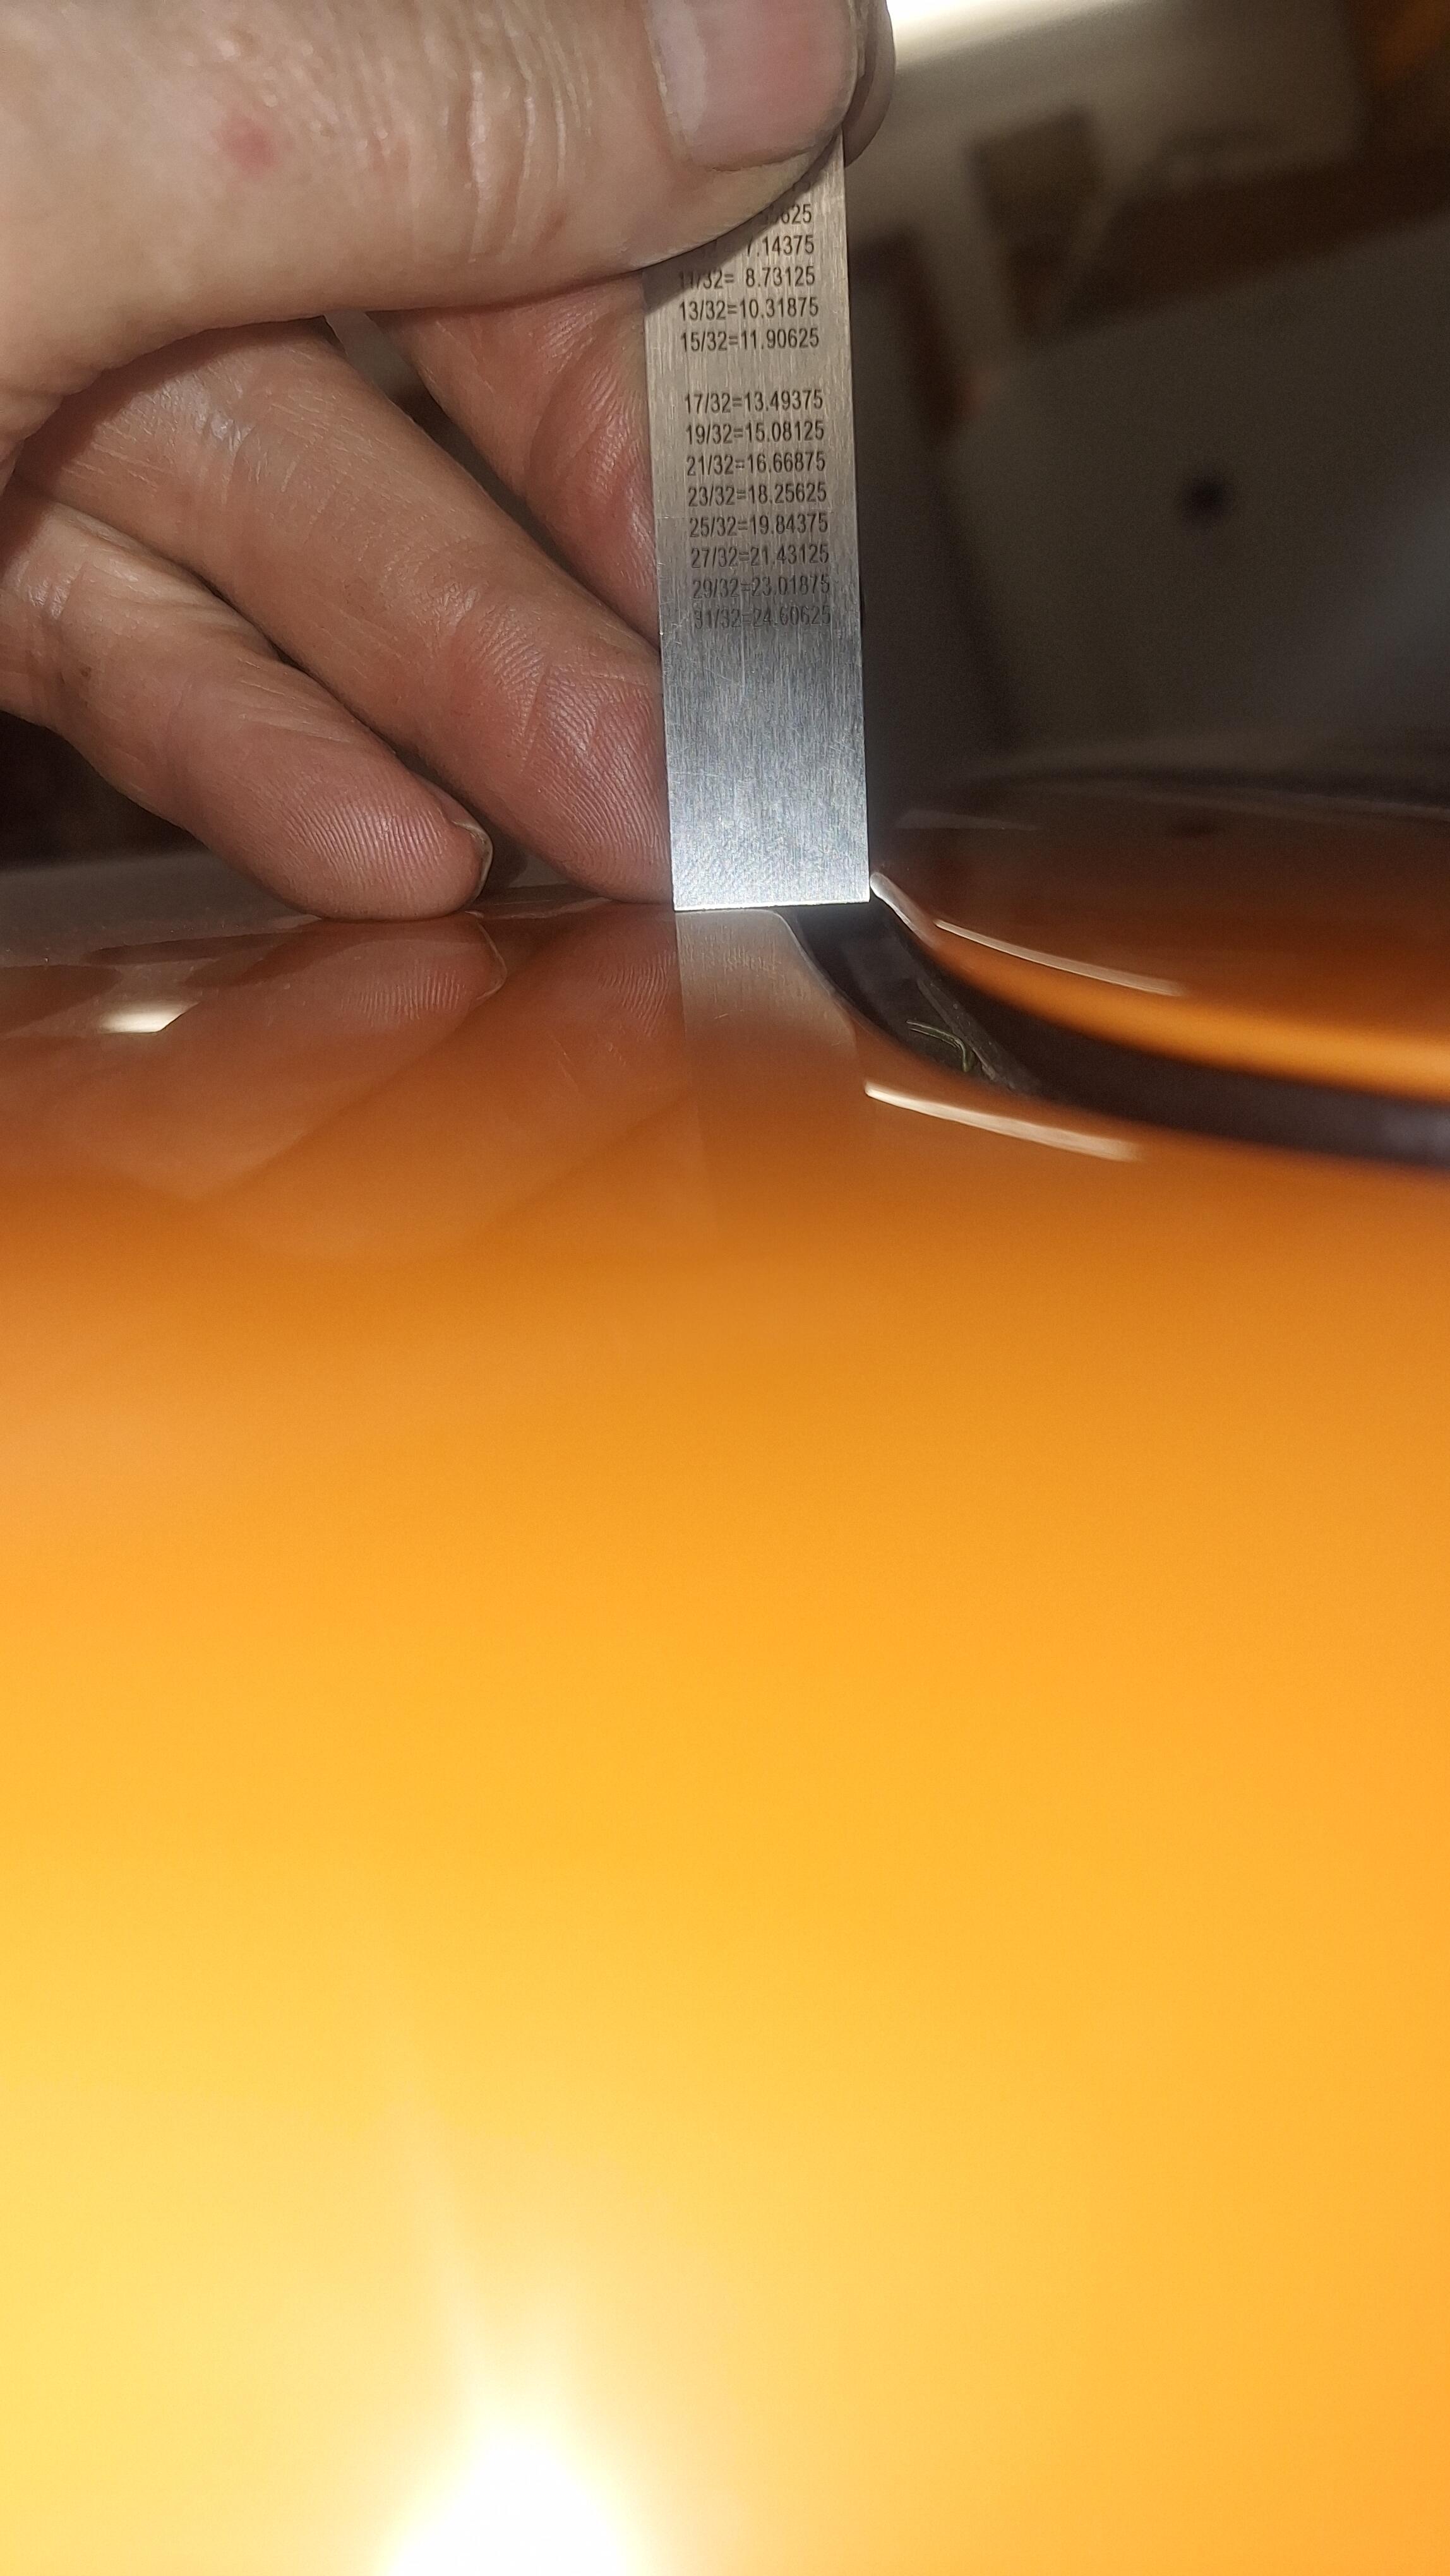
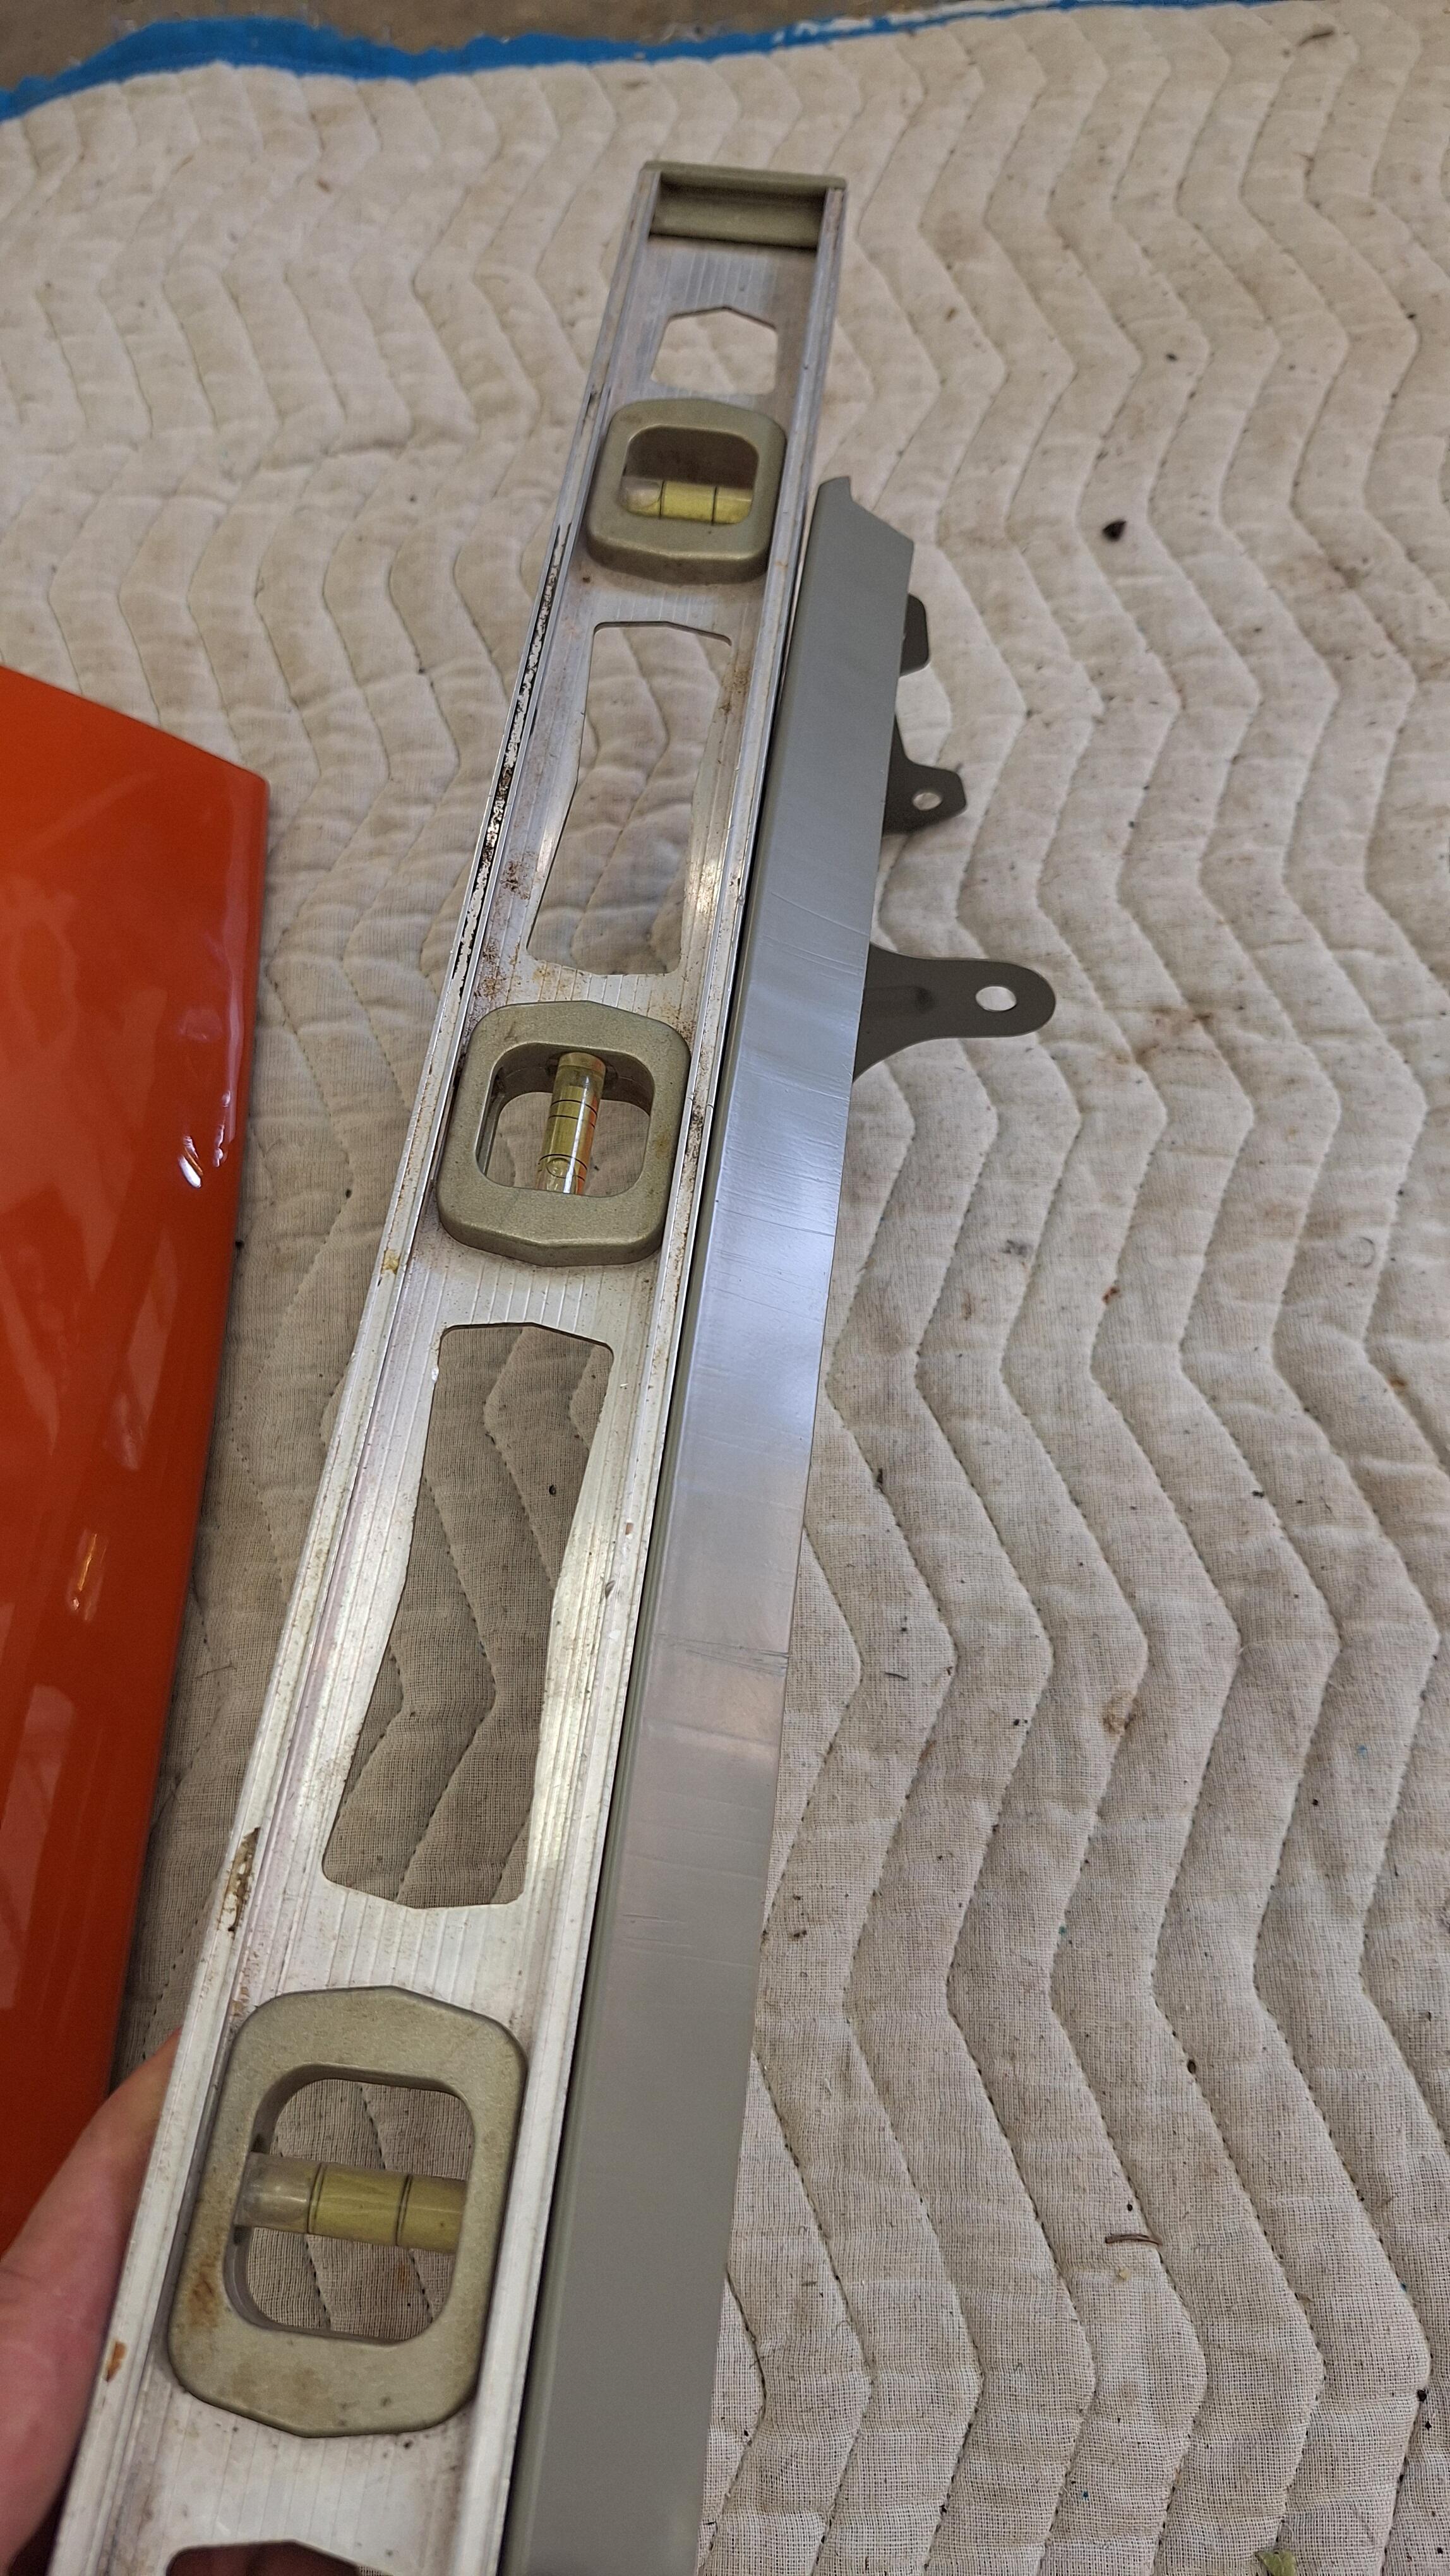
Alright, I was totally wrong about these headlight scoops. I thought since it was thicker, it would be shorter on the inside curve. When I measured it, it was exactly the same as my thinner bucket, so I didn't touch it. Although they vary in thickness and weight, they fit pretty much the same. Some kind of manufacturing genius. Instead I focused on the center valance as my problem. And that is was. The body work done on it had it curved in at the ends. I got one from resurrected classics, and was so glad when I pulled it out of the box, that it was straight and my hunch was correct. Had to modify the holes a bit on the ends but I'm very happy with it!
View Advert Wanted: 71 240z front left bumperette rubber I'm looking for the bumperette rubber for the left front bumper, 1971 Offered by: Parman Date 10/26/2024 Price $123 Category Parts Wanted Year 1971 Model 240z
Alright, I was totally wrong about these headlight scoops. I thought since it was thicker, it would be shorter on the inside curve. When I measured it, it was exactly the same as my thinner bucket, so I didn't touch it. Although they vary in thickness and weight, they fit pretty much the same. Some kind of manufacturing genius. Instead I focused on the center valance as my problem. And that is was. The body work done on it had it curved in at the ends. I got one from resurrected classics, and was so glad when I pulled it out of the box, that it was straight and my hunch was correct. Had to modify the holes a bit on the ends but I'm very happy with it!

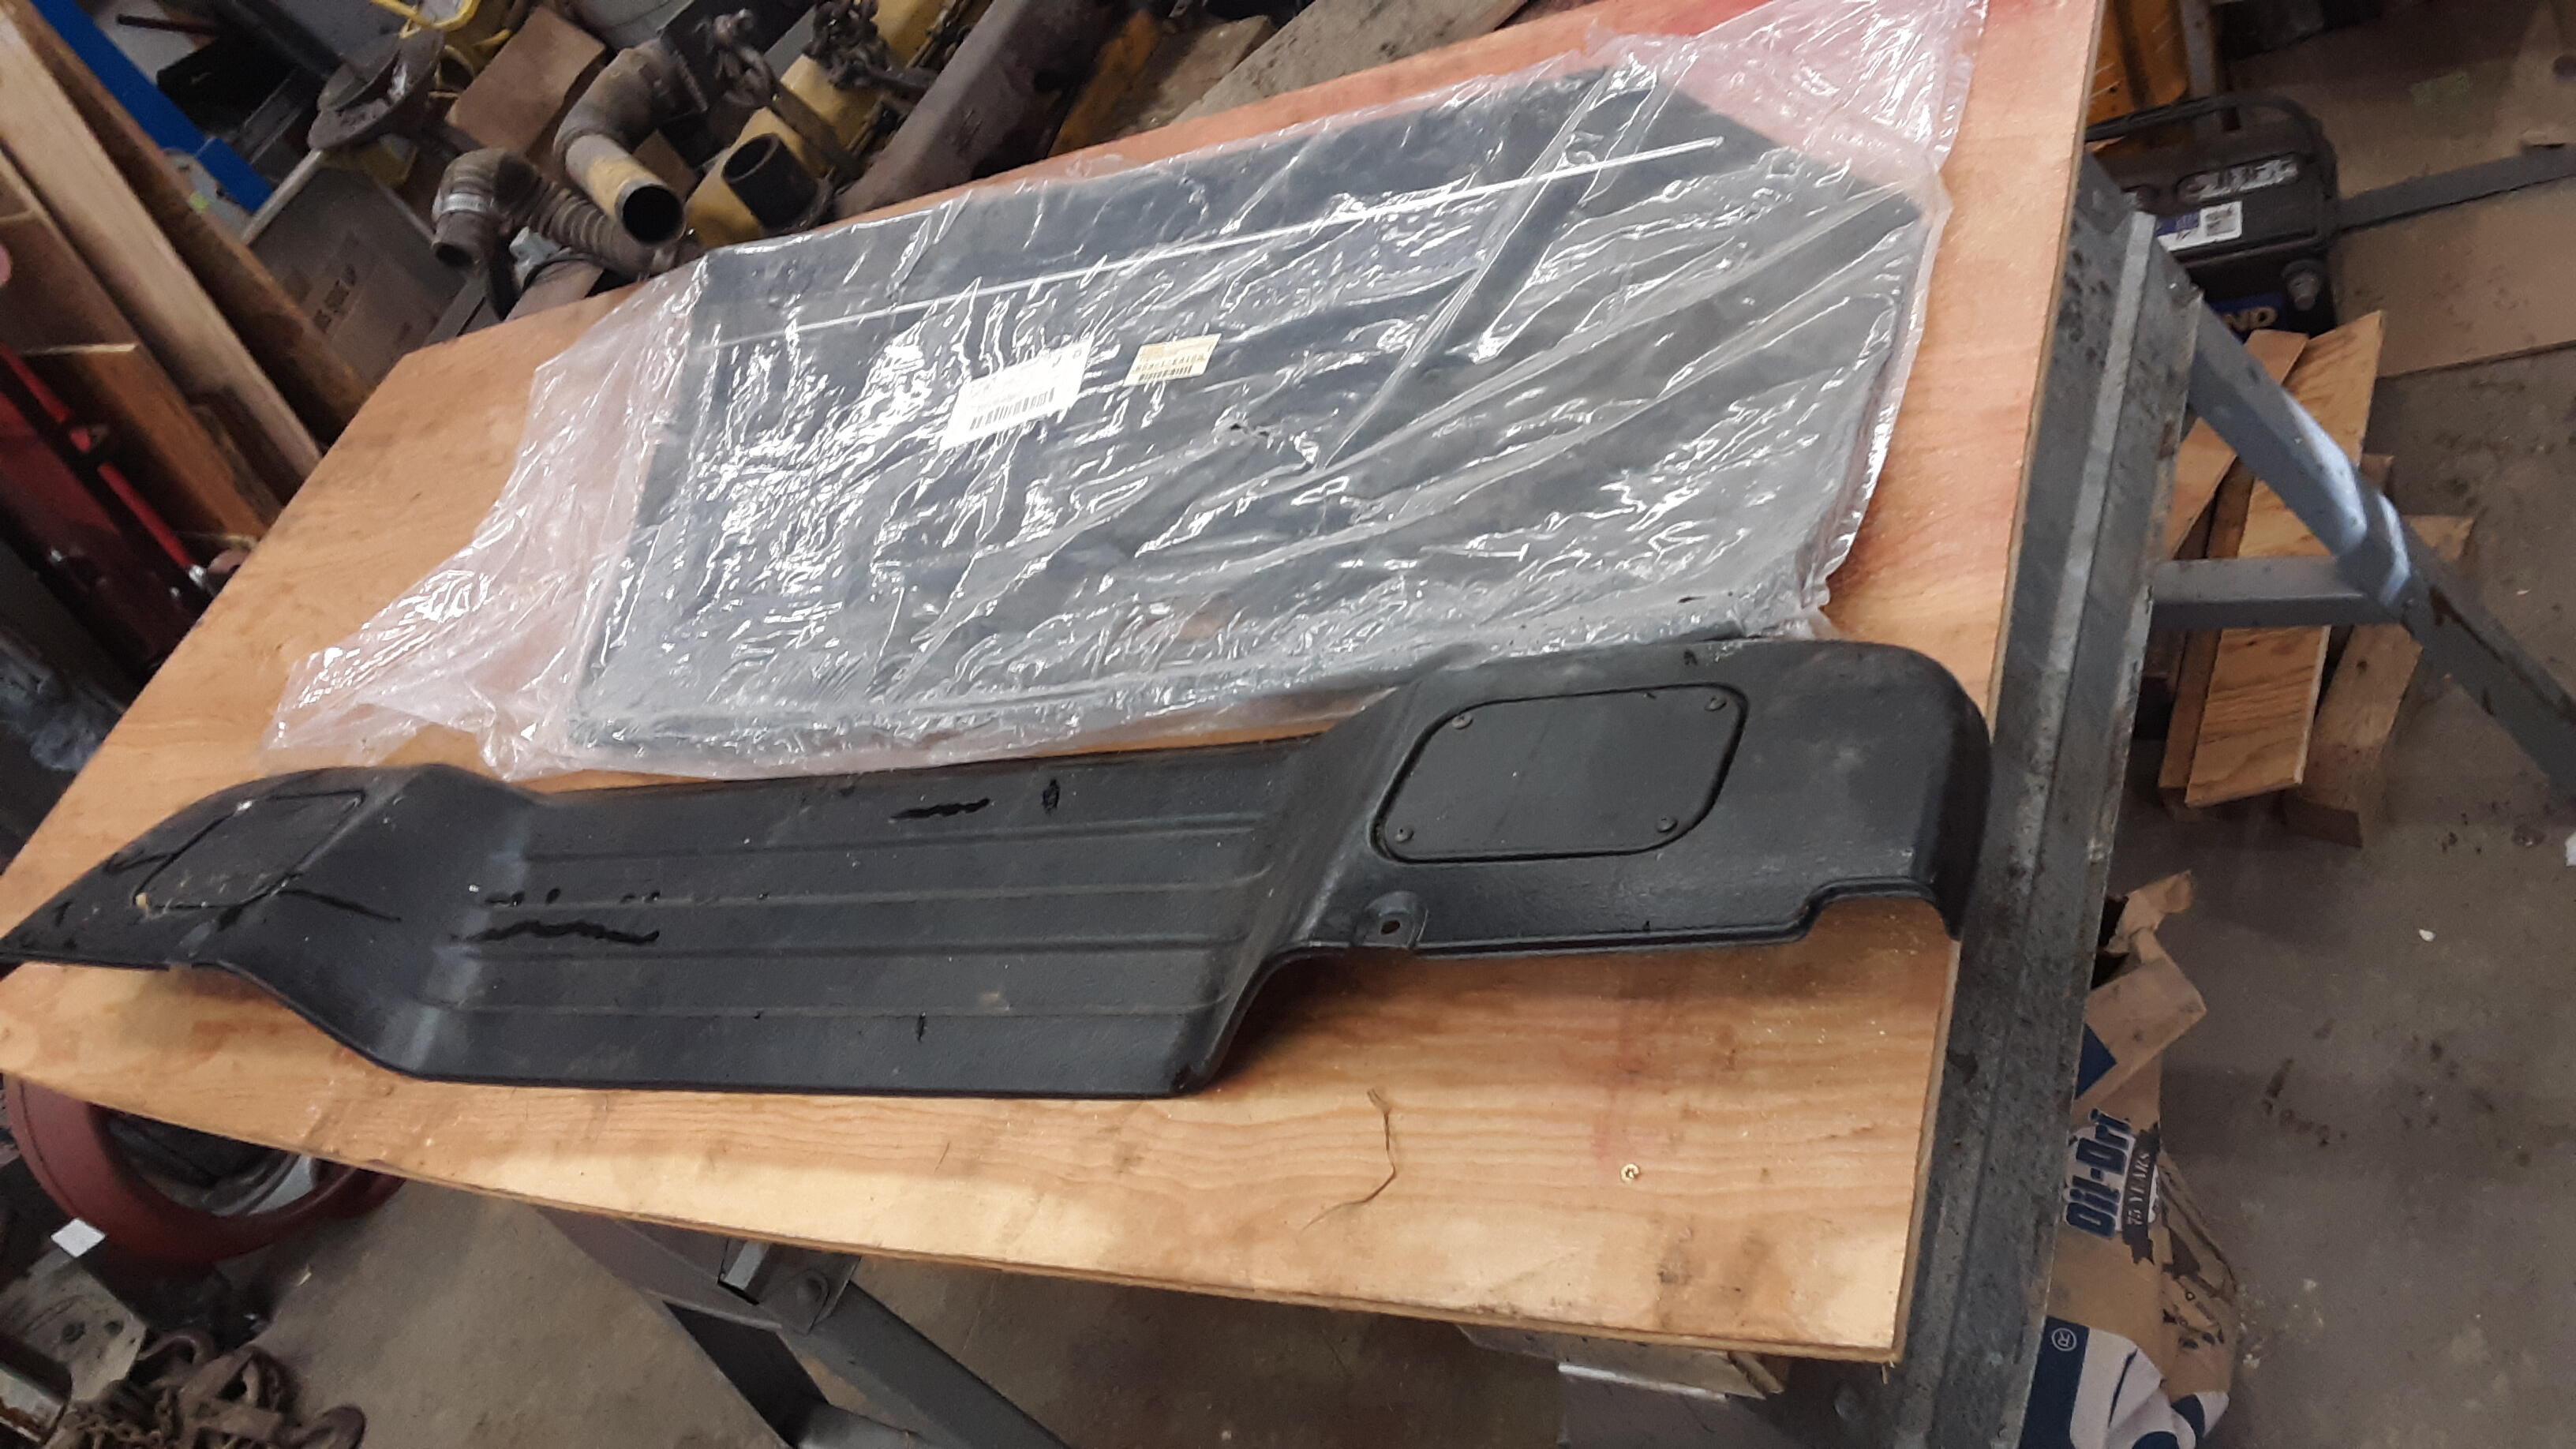
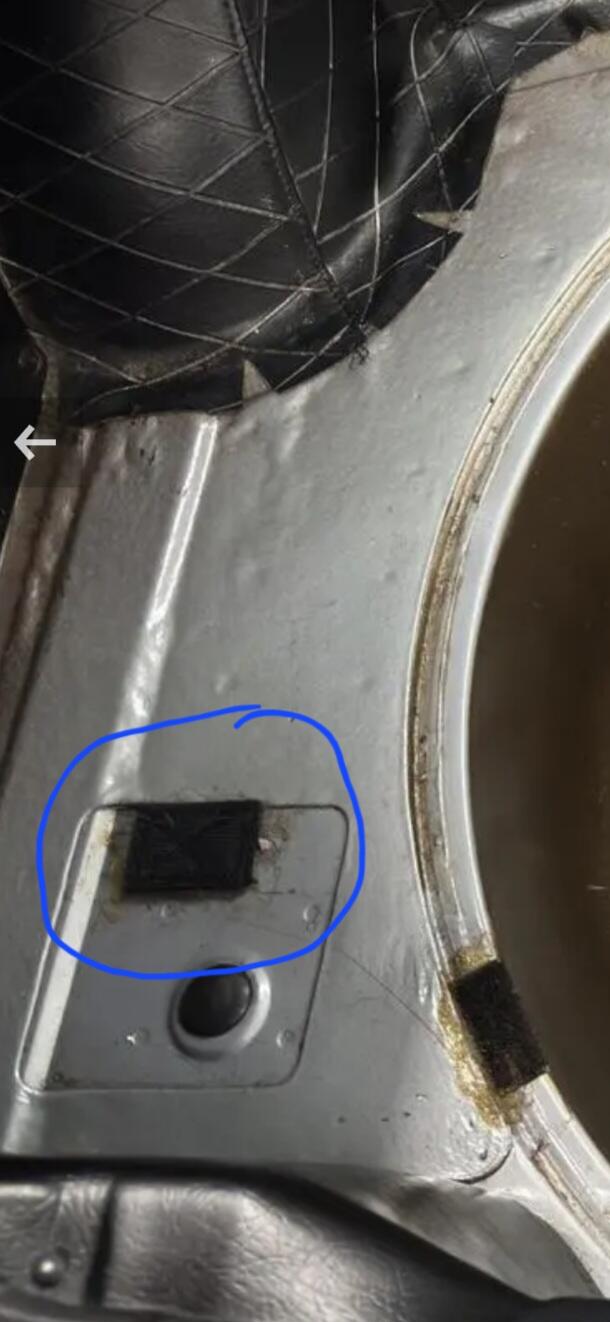
 It turns out it is part of a velcro system for holding the carpet in place. Here's a shot of some original carpet with the velcro attache.
 Yes, I realize there are 3 velcro strips around the tub for the cover, but that black rectangular piece is what I was looking at. I guess I DID get a picture of it inadvertently during my dismantling. It was on the opposite side of the one on the gray car. So, there's supposed to be 2 of them, I think.
 Yes, I realize there are 3 velcro strips around the tub for the cover, but that black rectangular piece is what I was looking at.
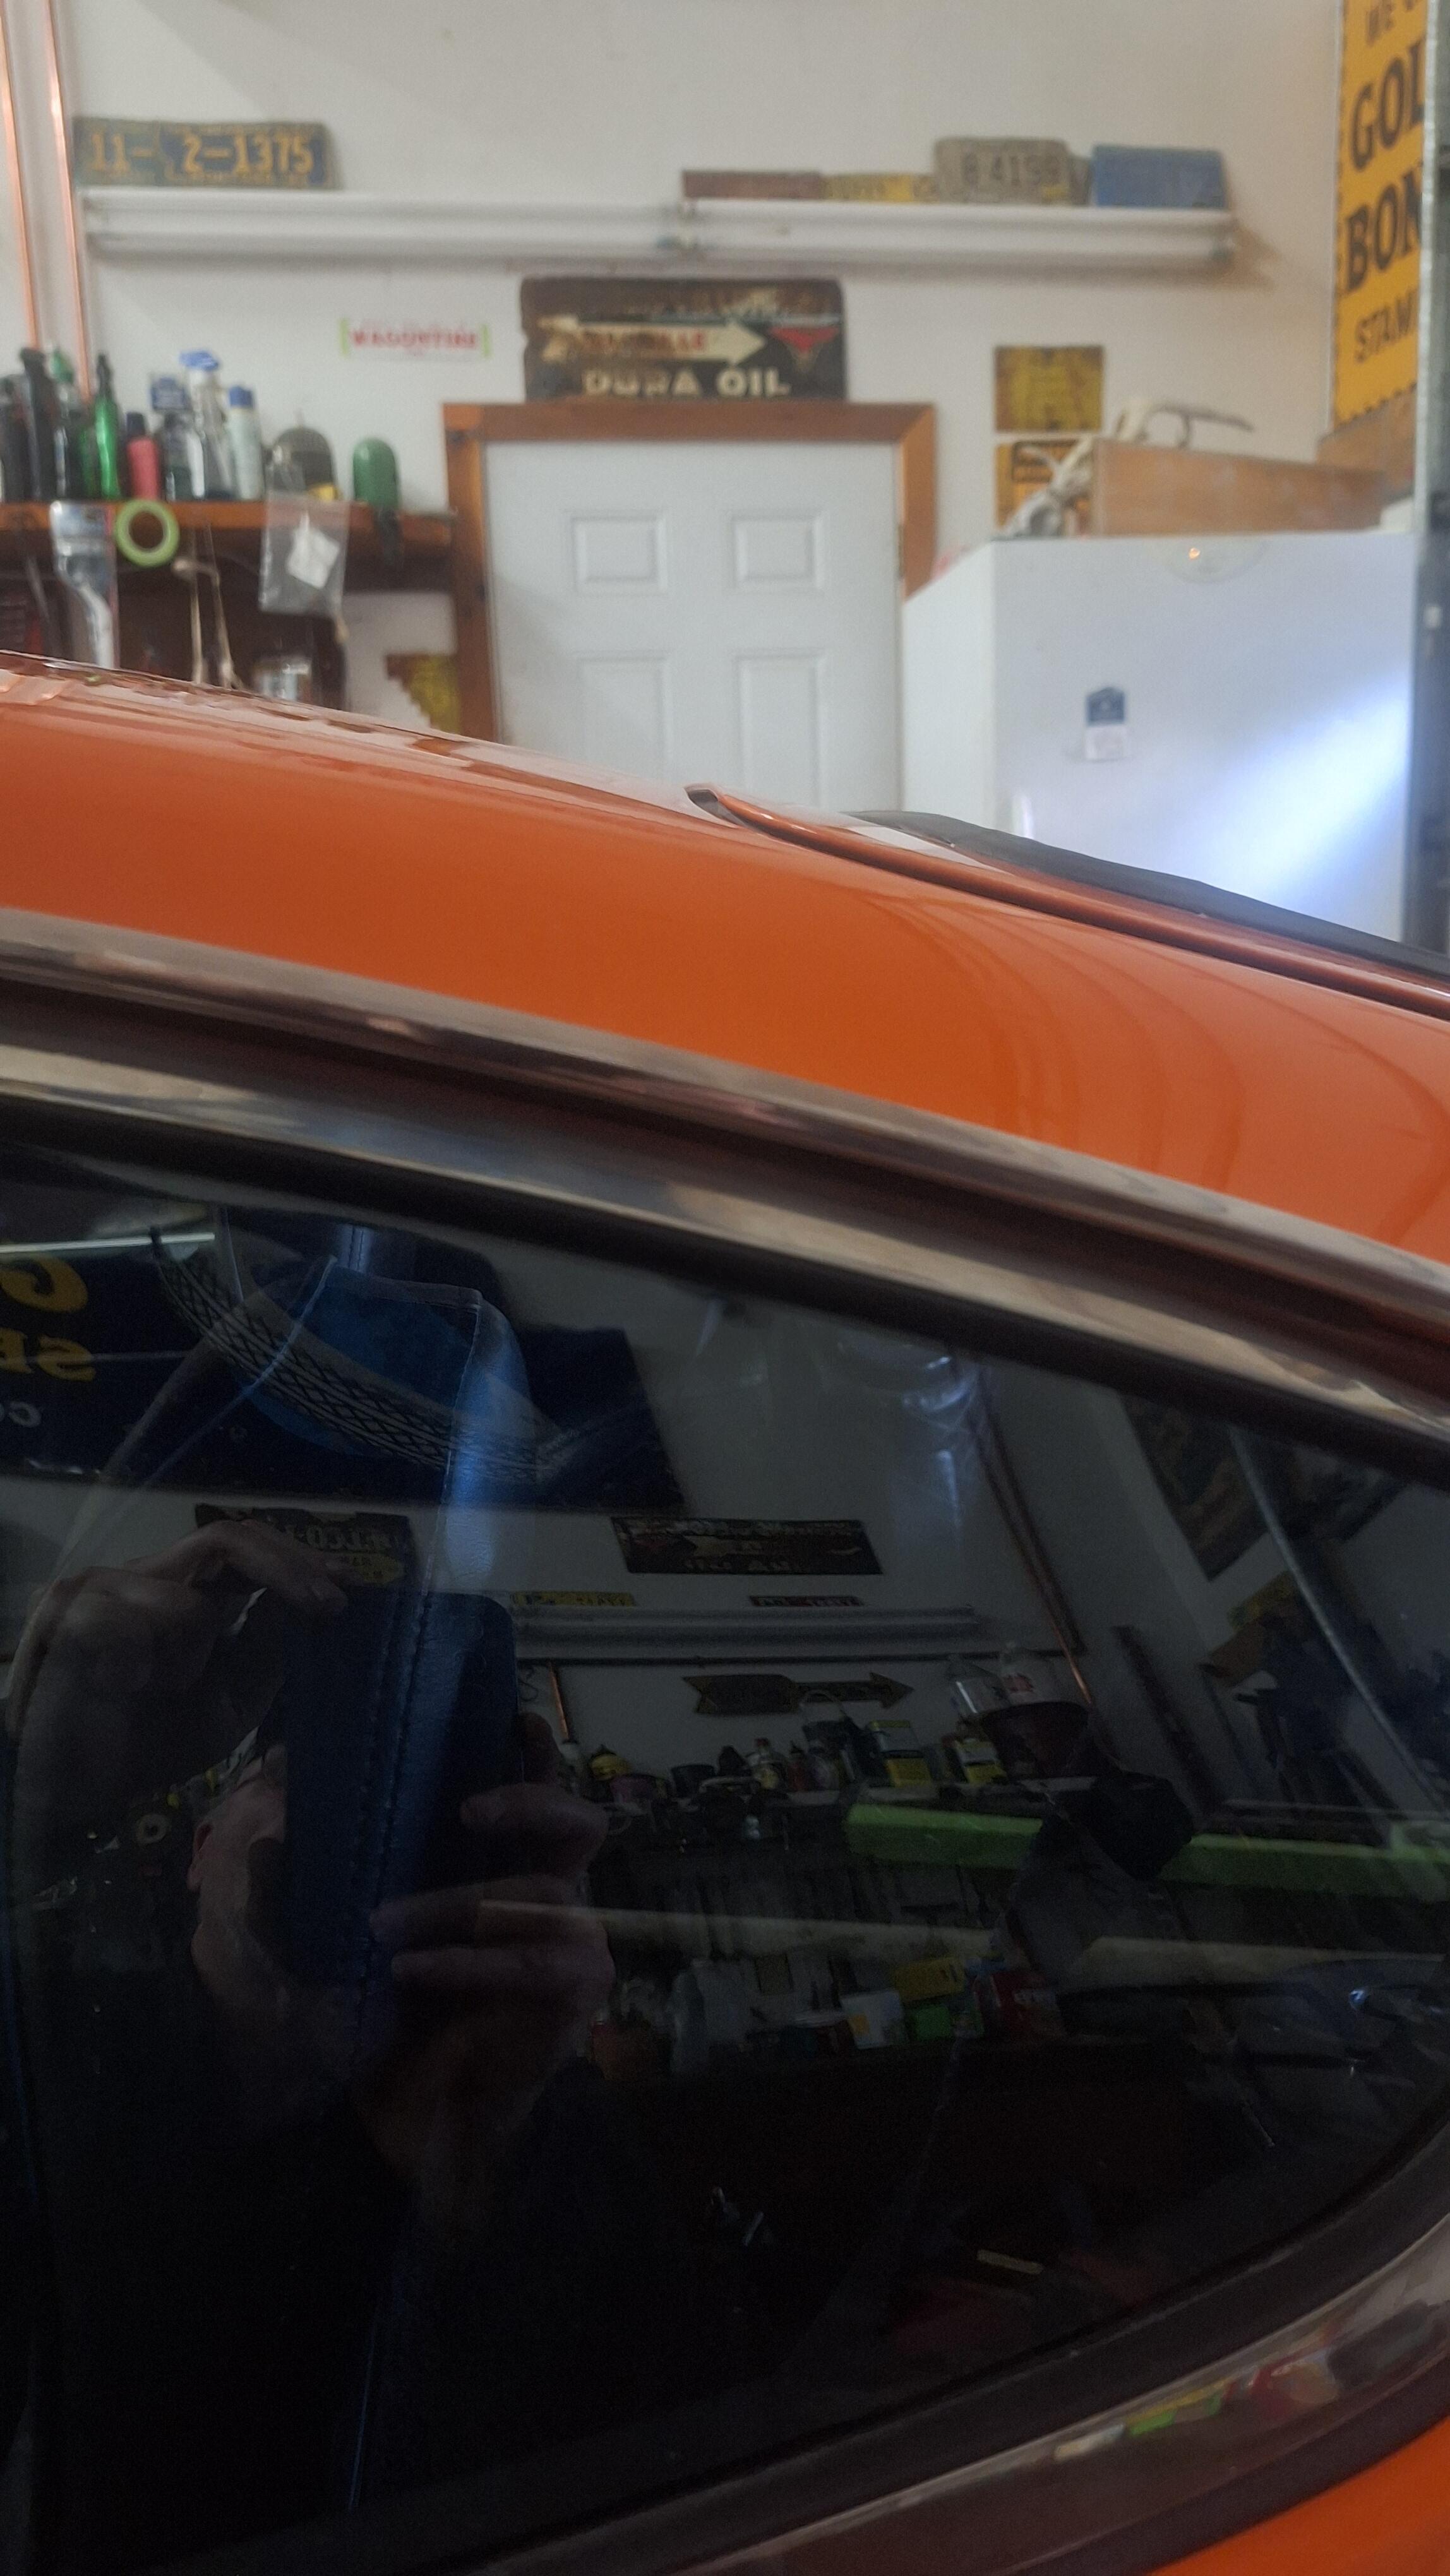
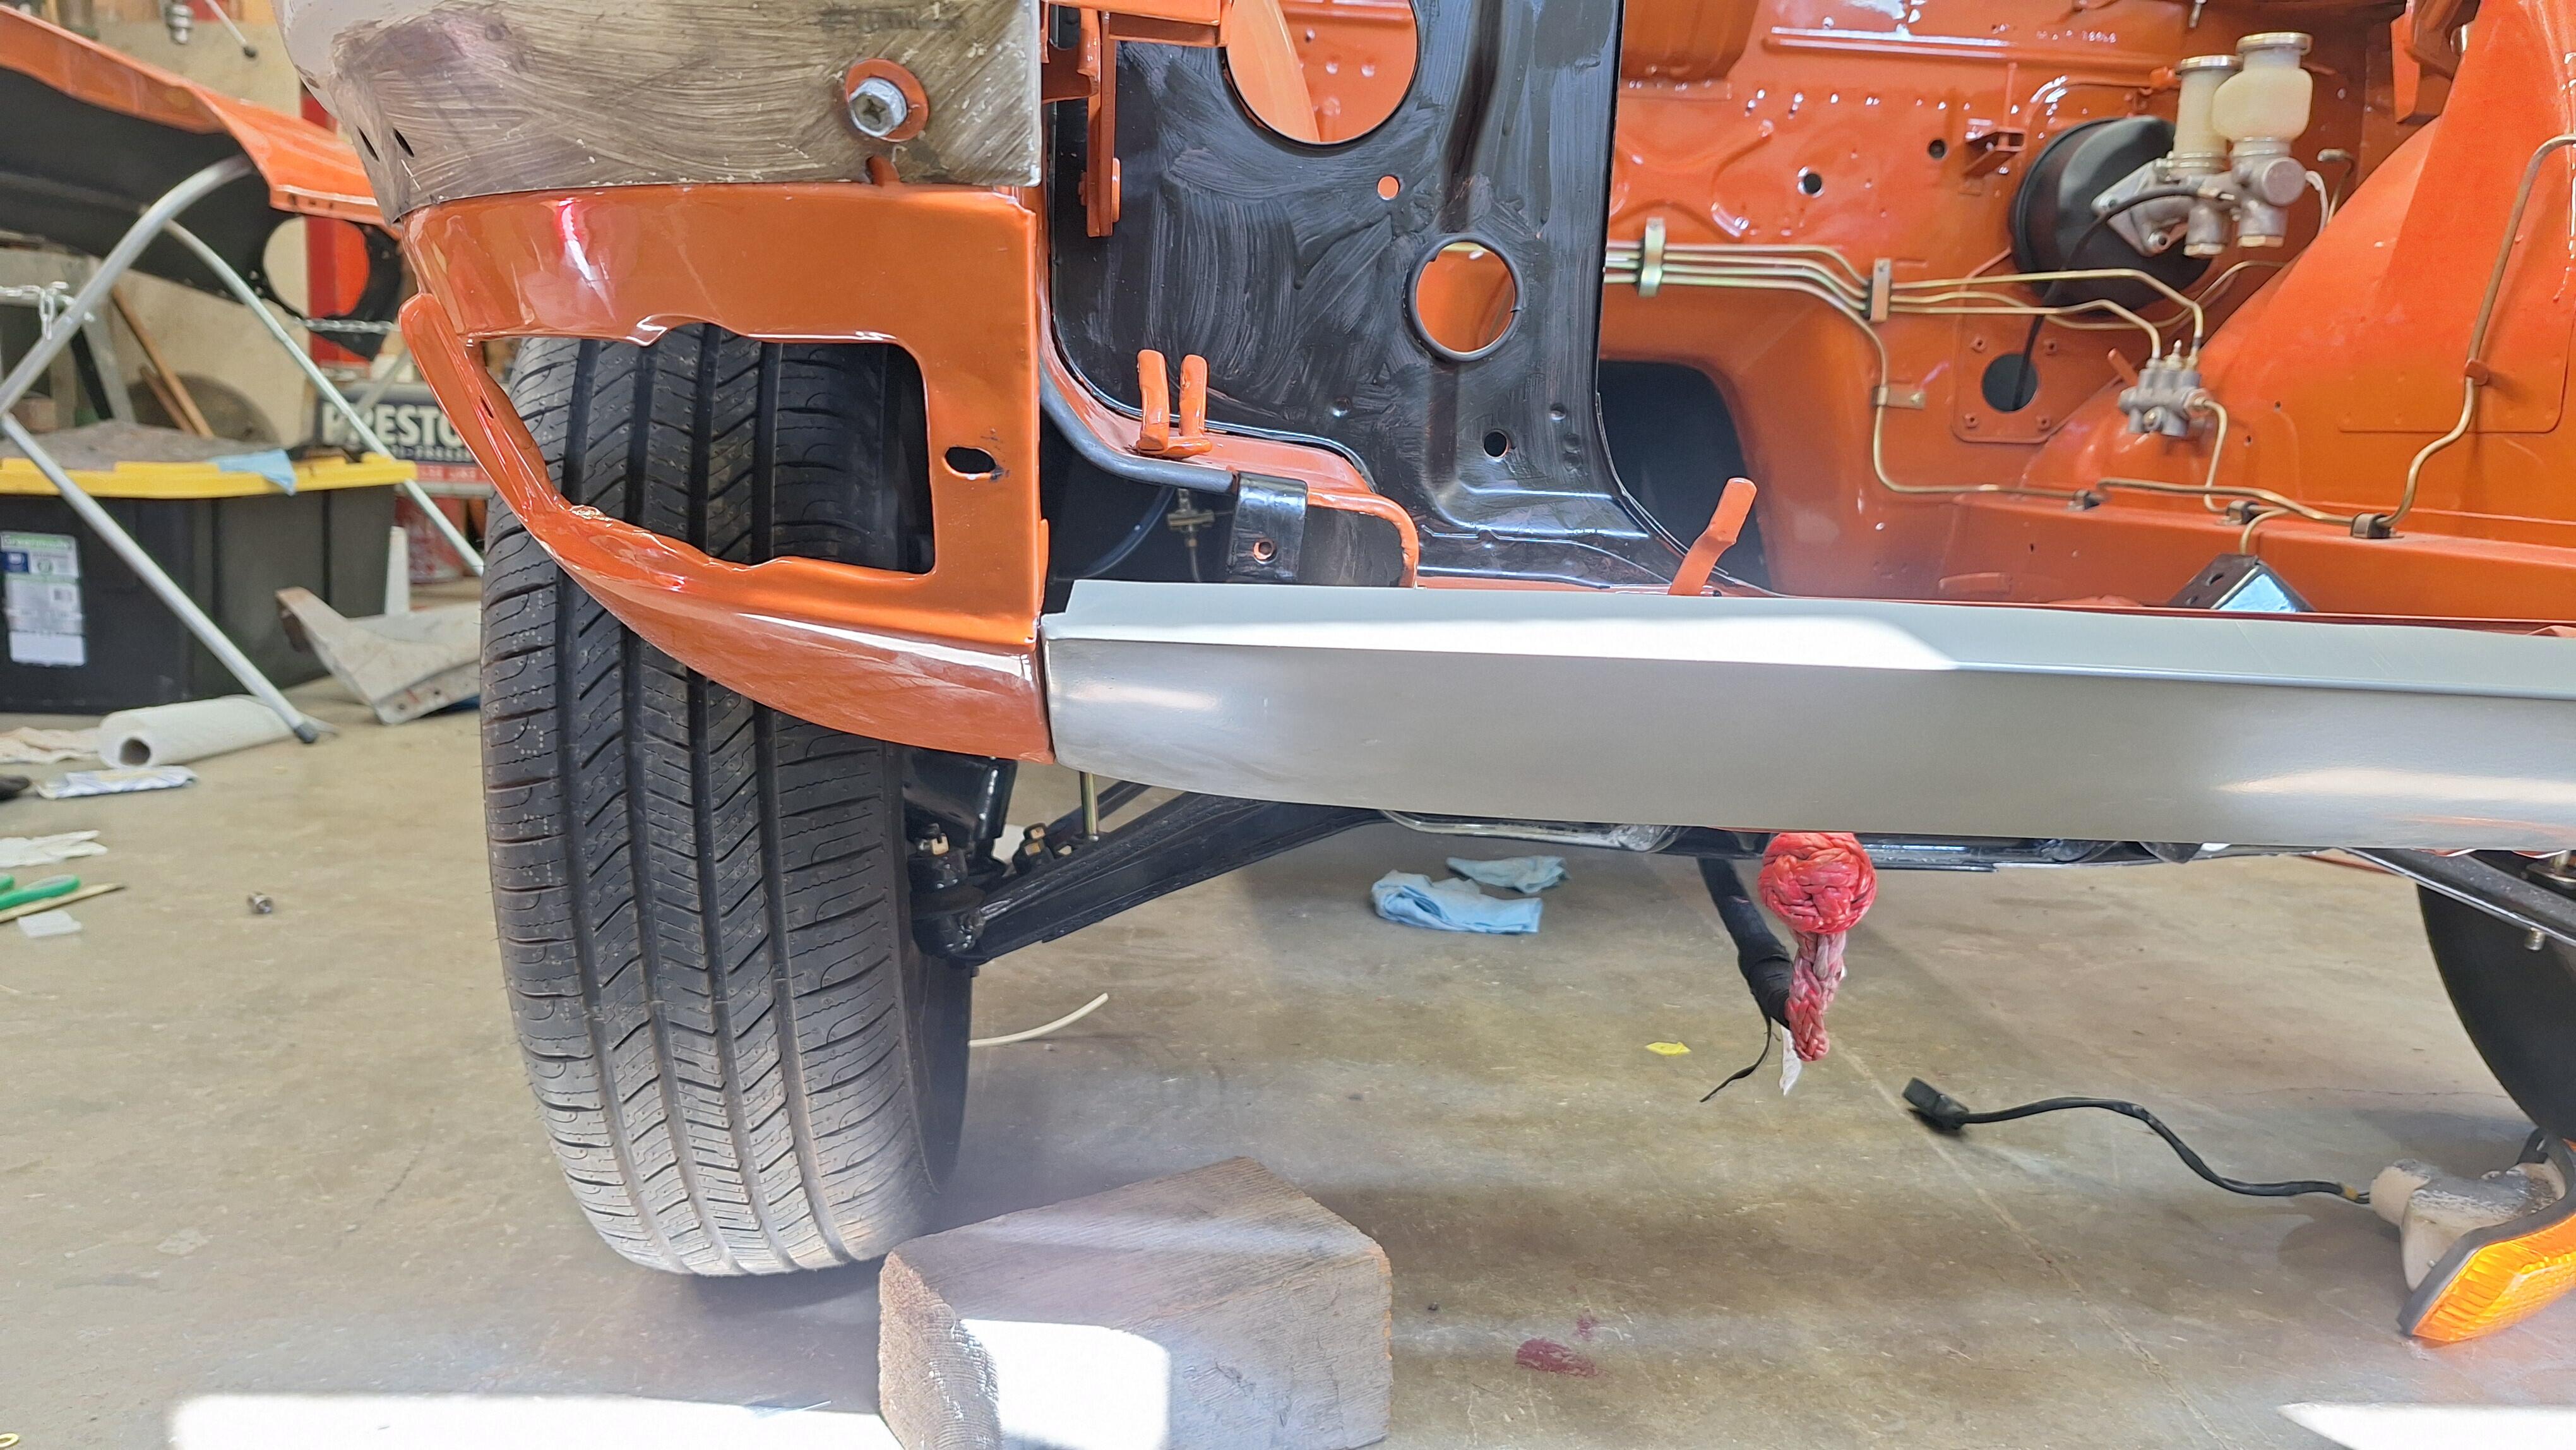
Unfortunately, I can't live with it the way it is. It's noticeable on both ends of the corner valance. I appreciate all the responses, without this group, I would have never come this far.
Yes, I realize there are 3 velcro strips around the tub for the cover, but that black rectangular piece is what I was looking at.
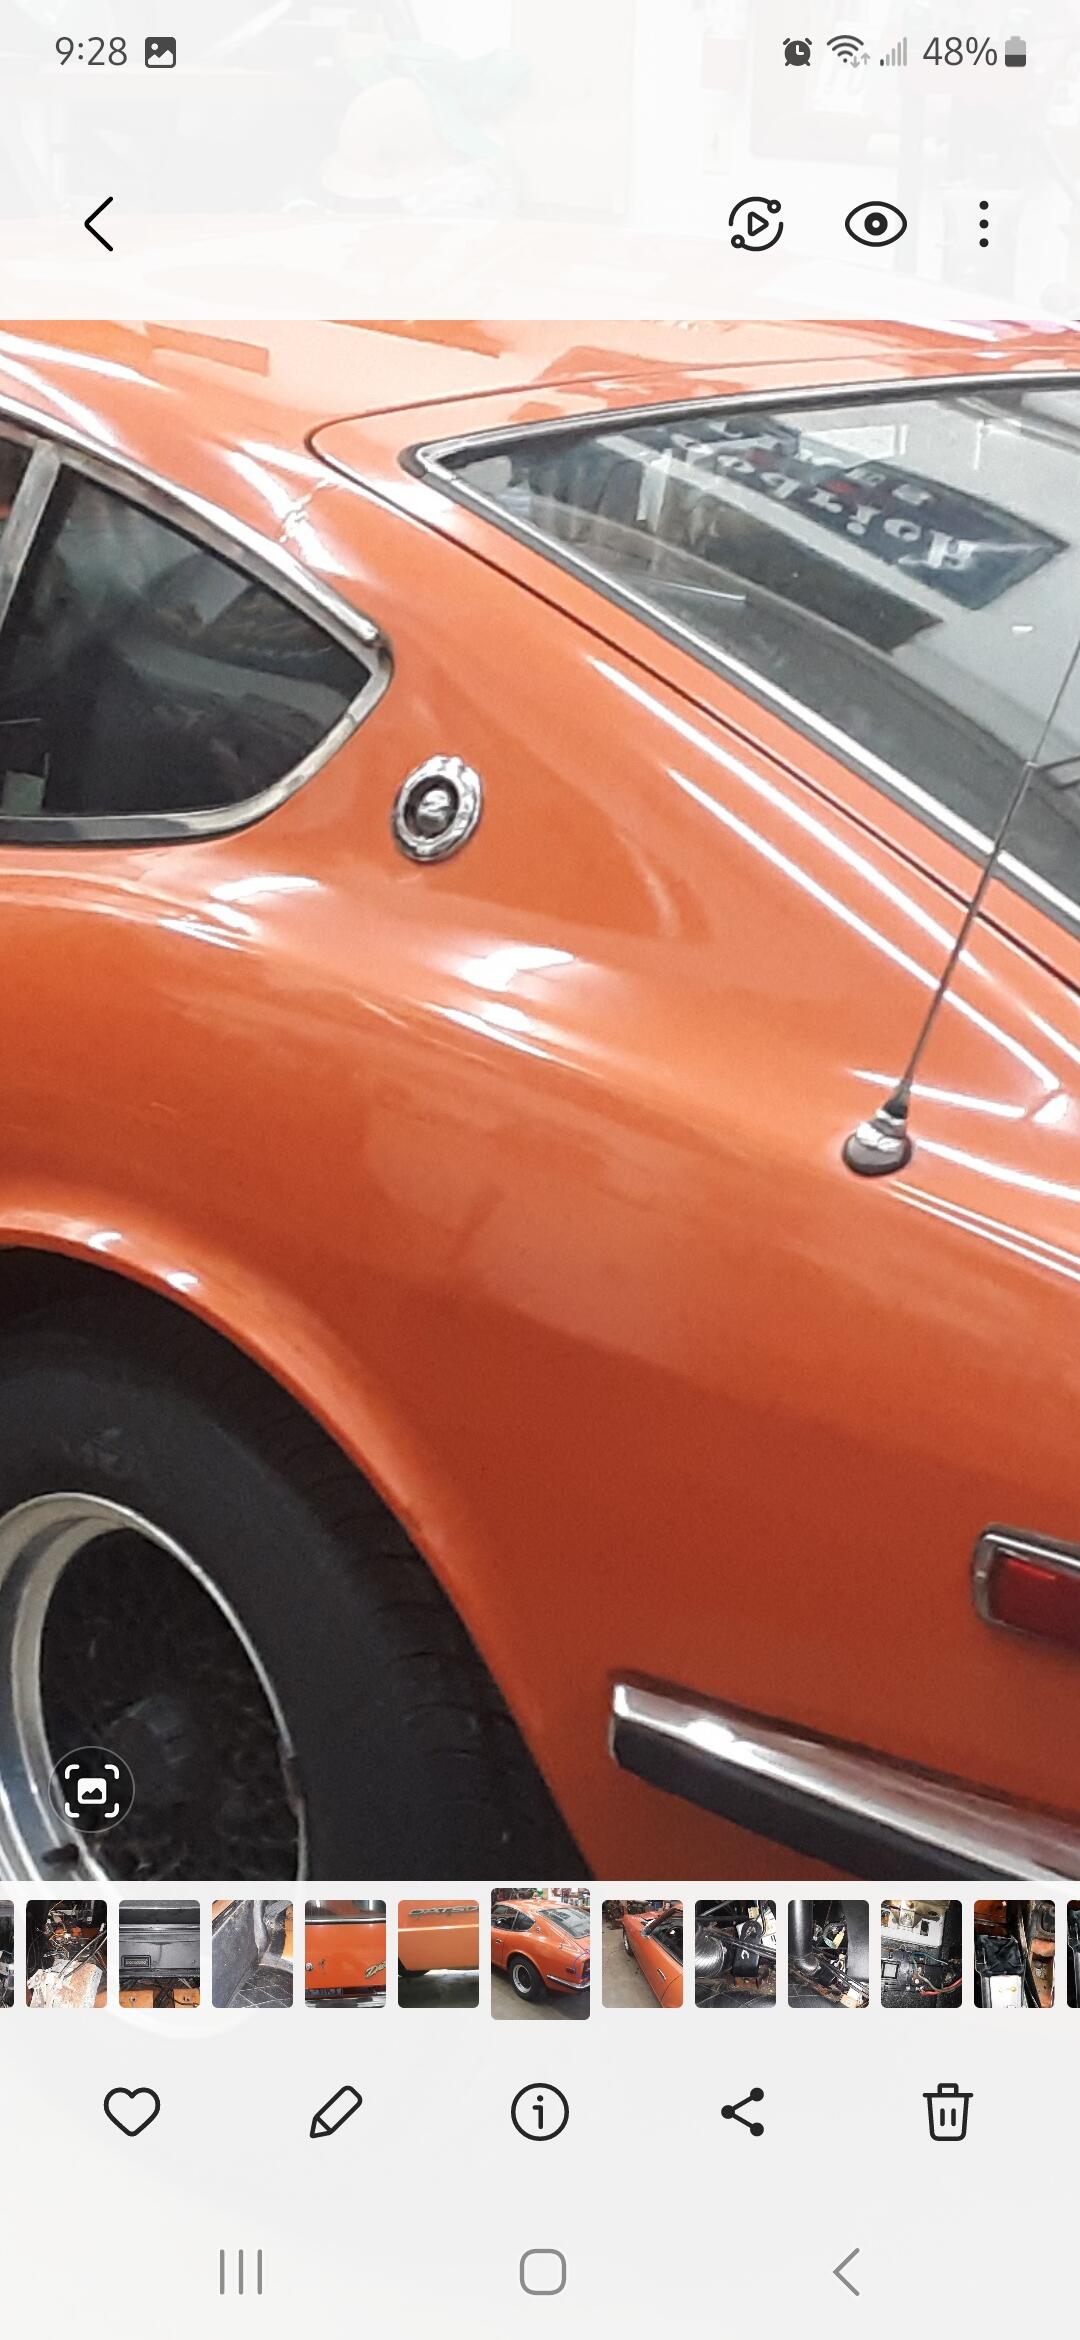
Unfortunately, I can't live with it the way it is. It's noticeable on both ends of the corner valance. I appreciate all the responses, without this group, I would have never come this far.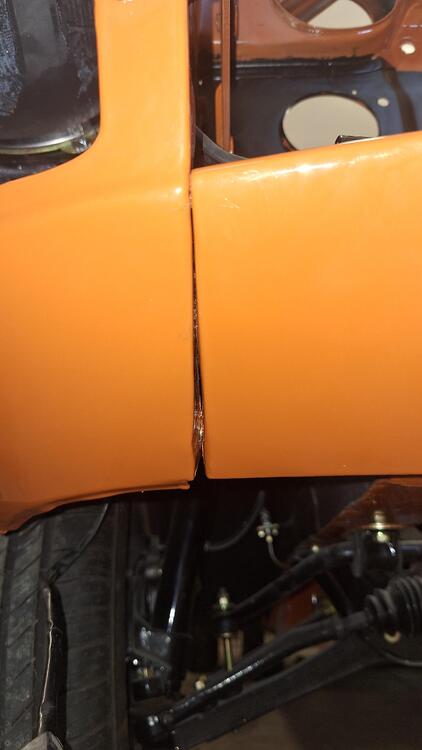 I found this photo on bringatrailer... What is this, and why is it there?
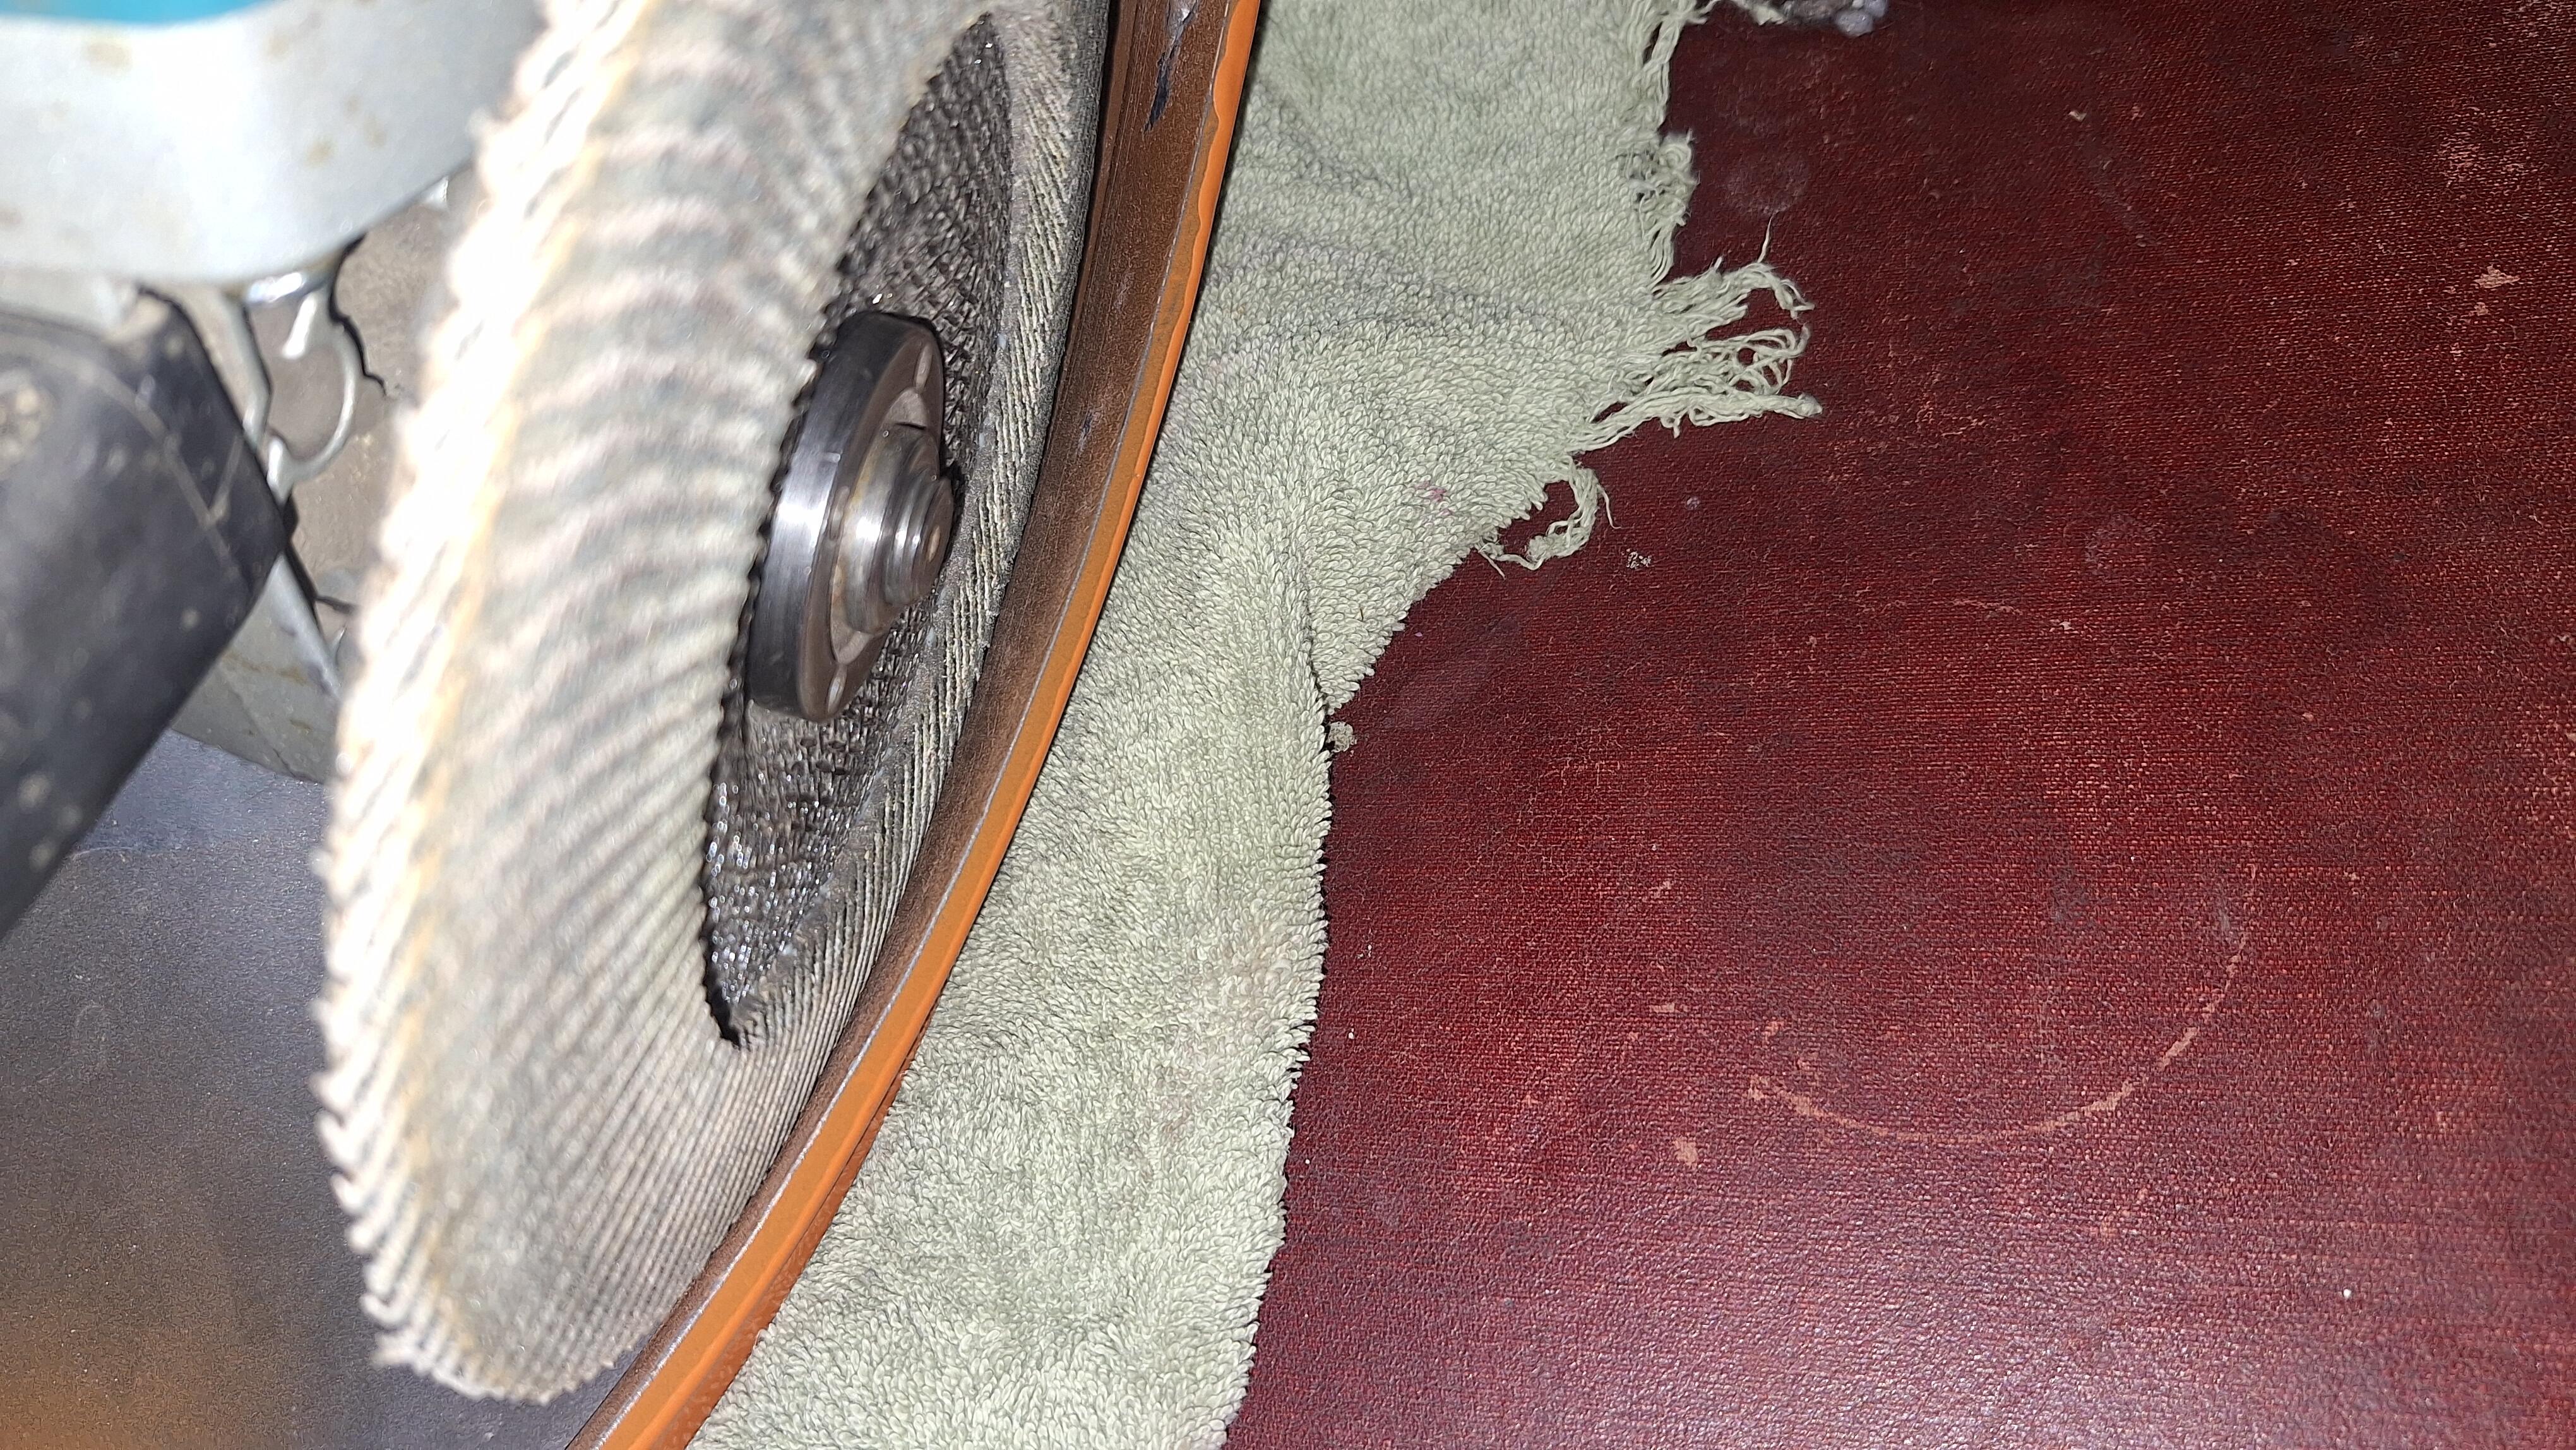
 Thanks for getting me thinking about shaving off the inside, again. That was my first thought, but my DA sander wouldn't reach the center area. A die grinder would be hard to make it uniform with a small bit, however, I have a 7" flappy disc that would reach in there and get everything but a small corner. That would make quick work of it, and be nice and uniform. I could use the die grinder on that corner area followed by a file. Thanks Patcon! Richard
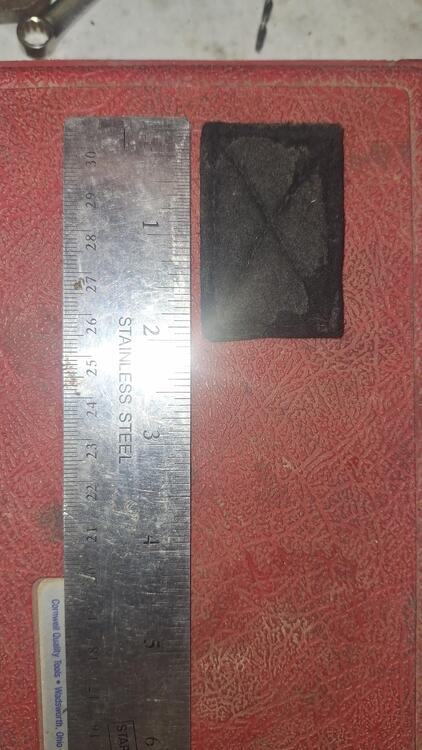
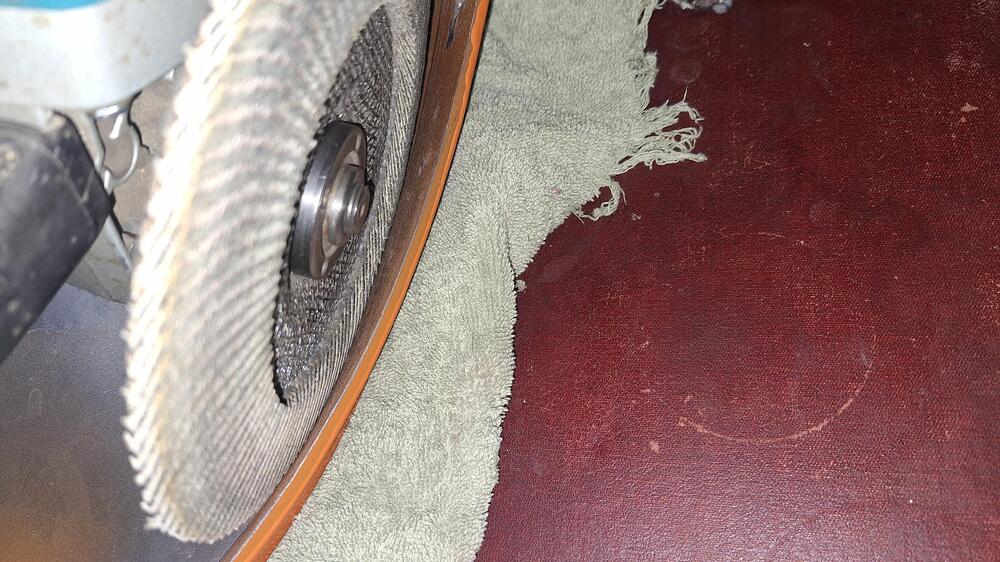 Hi all, I took apart my 1971 240Z 3 years ago, and even though I took lots of photos and documented almost everything, I can't figure out where this felt pad was glued onto. It's cross stitched so it's something special...anybody recognize it?
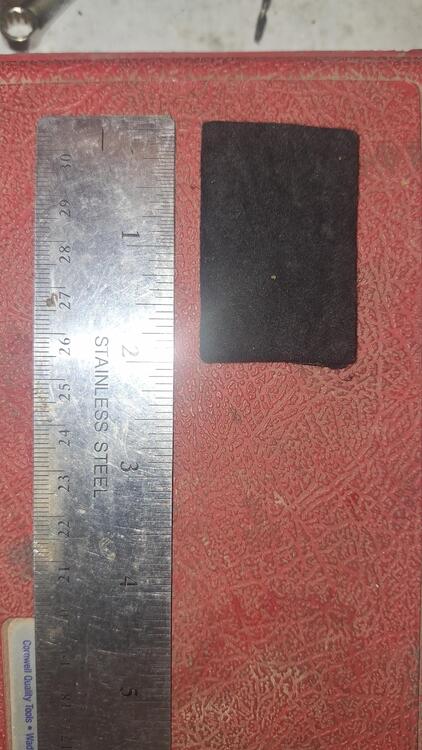


Important Information
By using this site, you agree to our Privacy Policy and Guidelines. We have placed cookies on your device to help make this website better. You can adjust your cookie settings, otherwise we'll assume you're okay to continue.