Barefootdan
Free Member
-
Joined
-
Last visited
Everything posted by Barefootdan
-
 Thanks @Zed Head! I've updated for a little more info but even I need to sit down and remember whats been done over the last few years 😅 I originally copied description from my Facebook post which severely limited me on how much I could write
 -
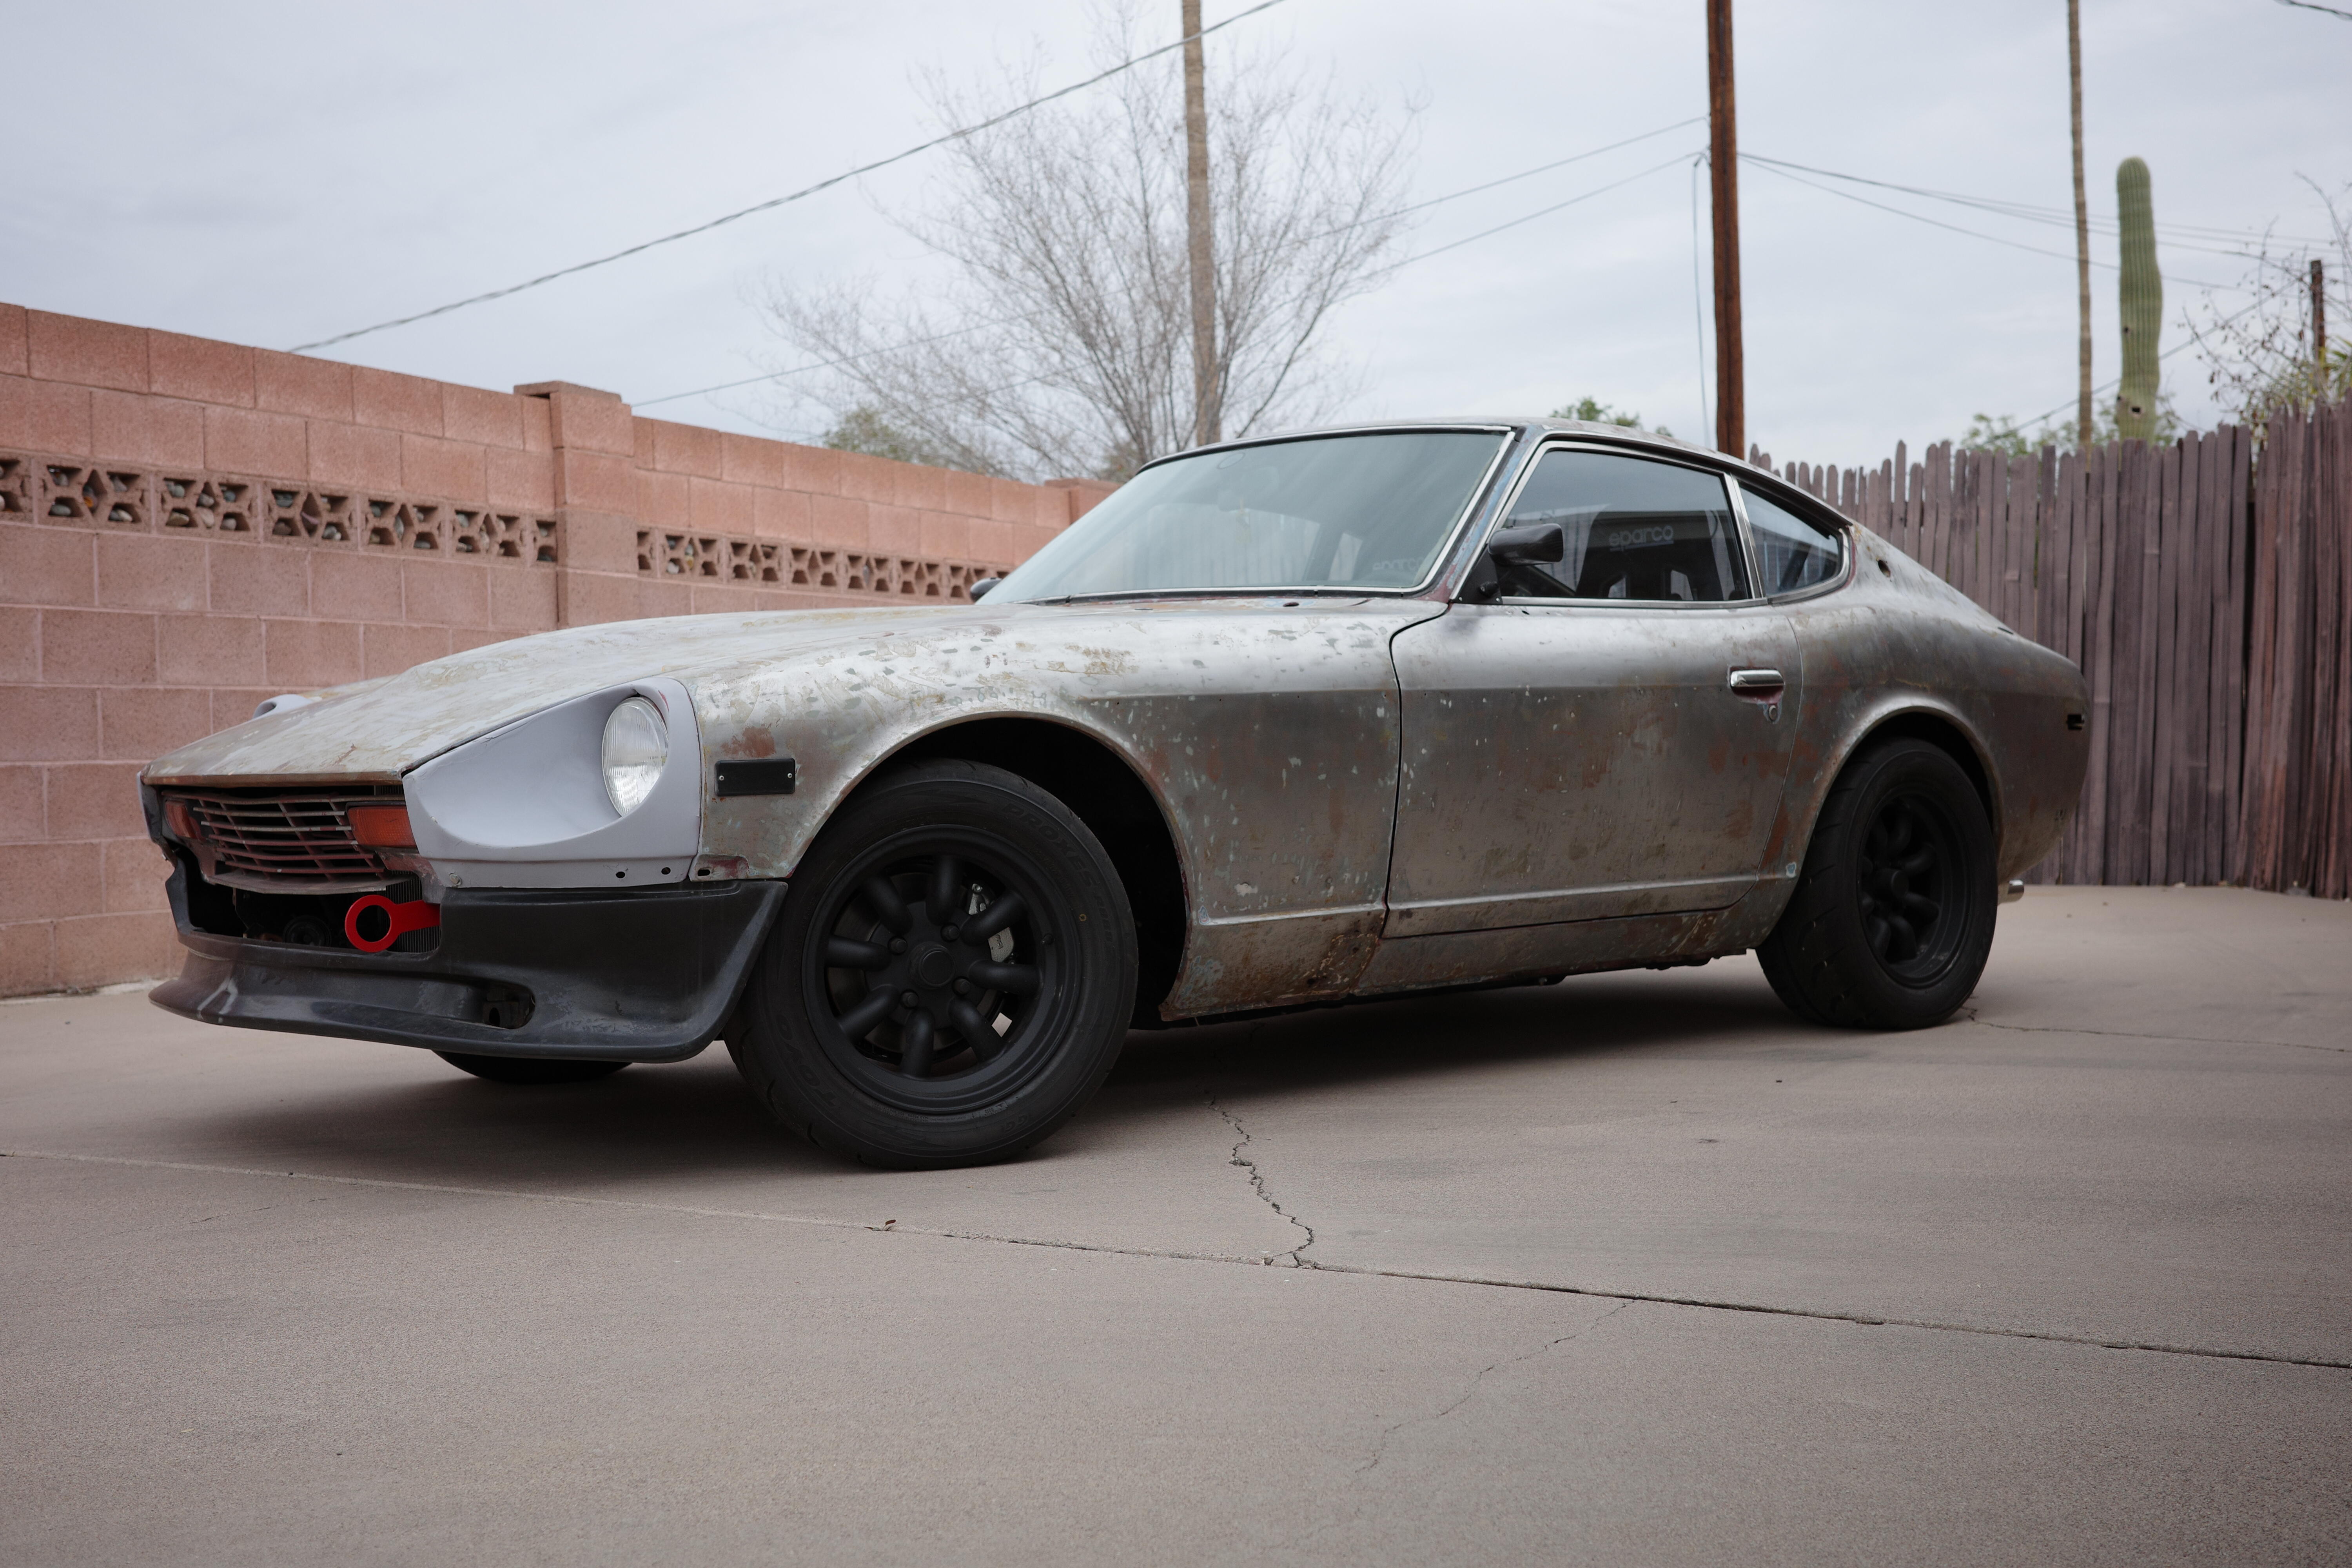
Life is always full of surprises. Unfortunately for me, that means the Rotsun is up for sale. Definitely not a restoration build, so please take that into thought. But alot of hard work and help from many members here has lead to a beautifully fun car to drive on the weekends. Feel free to ask any questions! I have posted an ad in the forum's classifieds for pricing details.
-
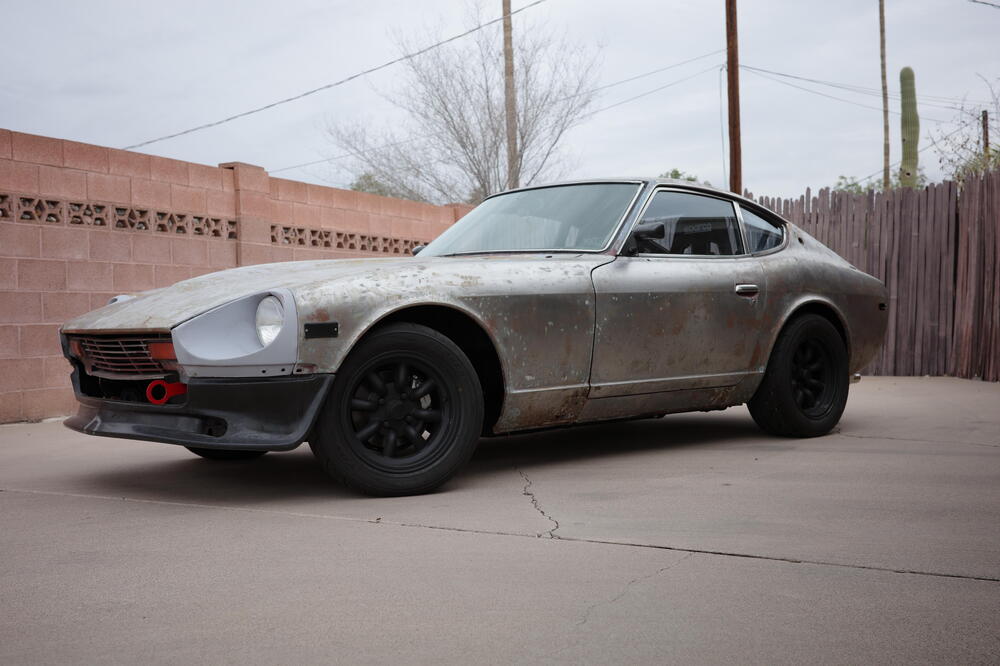
View Advert 1975 Datsun "Rotsun" 280z 1975 Datsun 280z Started as a "Rotsun" build, only three rust spots remain, all fairly small and in easy locations, pics attached. Floorplan rust removed and resealed. Engine was built with flat top pistons, N42 head that was rebuilt, new timing chain, bearings, rings, etc. 6-2 headers and Z story exhaust. Triple Mikuni PH44 carbs tuned with a wideband gauge. Starts and runs excellently. 5 speed swap from the 280zx. New clutch and resurfaced flywheel. All rubbers have been replaced including fuel lines, coolant lines, and full poly bushings. Aluminum radiator with dual fans. New fuel pump and cleaned up fuel tank. Koni Yellow struts with Zcar springs. Konig wheels with Toyo R888R tires. Apex engineering rear control arms. Skillard door cards and trim bits. Engine wiring harness fully redone with a new fuse box. Interior has new carpet, new dash cover, Sparco Sprint seats and Sparco mounts, OMP harnesses, T3 Tuning Harness bar. Open for trades as well. Recently ran this at an HPDE event to shake down. Passed NASA inspection and had no issues other than minor annoyances fixed at the track during 4 sessions. Offered by: Barefootdan Date 10/02/2024 Price $14,500 Category Cars for Sale Year 1975 Model 280z Vehicle Identification Number (VIN)
-
Finally made time to take the Z to the track. What an exciting day. Made it 30 minutes to the track, four 20 minute sessions of track driving, and 30 minutes of driving home without any issues!! I have a list of new tasks to dial in since the first shakedown, but looking forward to spending more time driving the Z before summer hits!

-
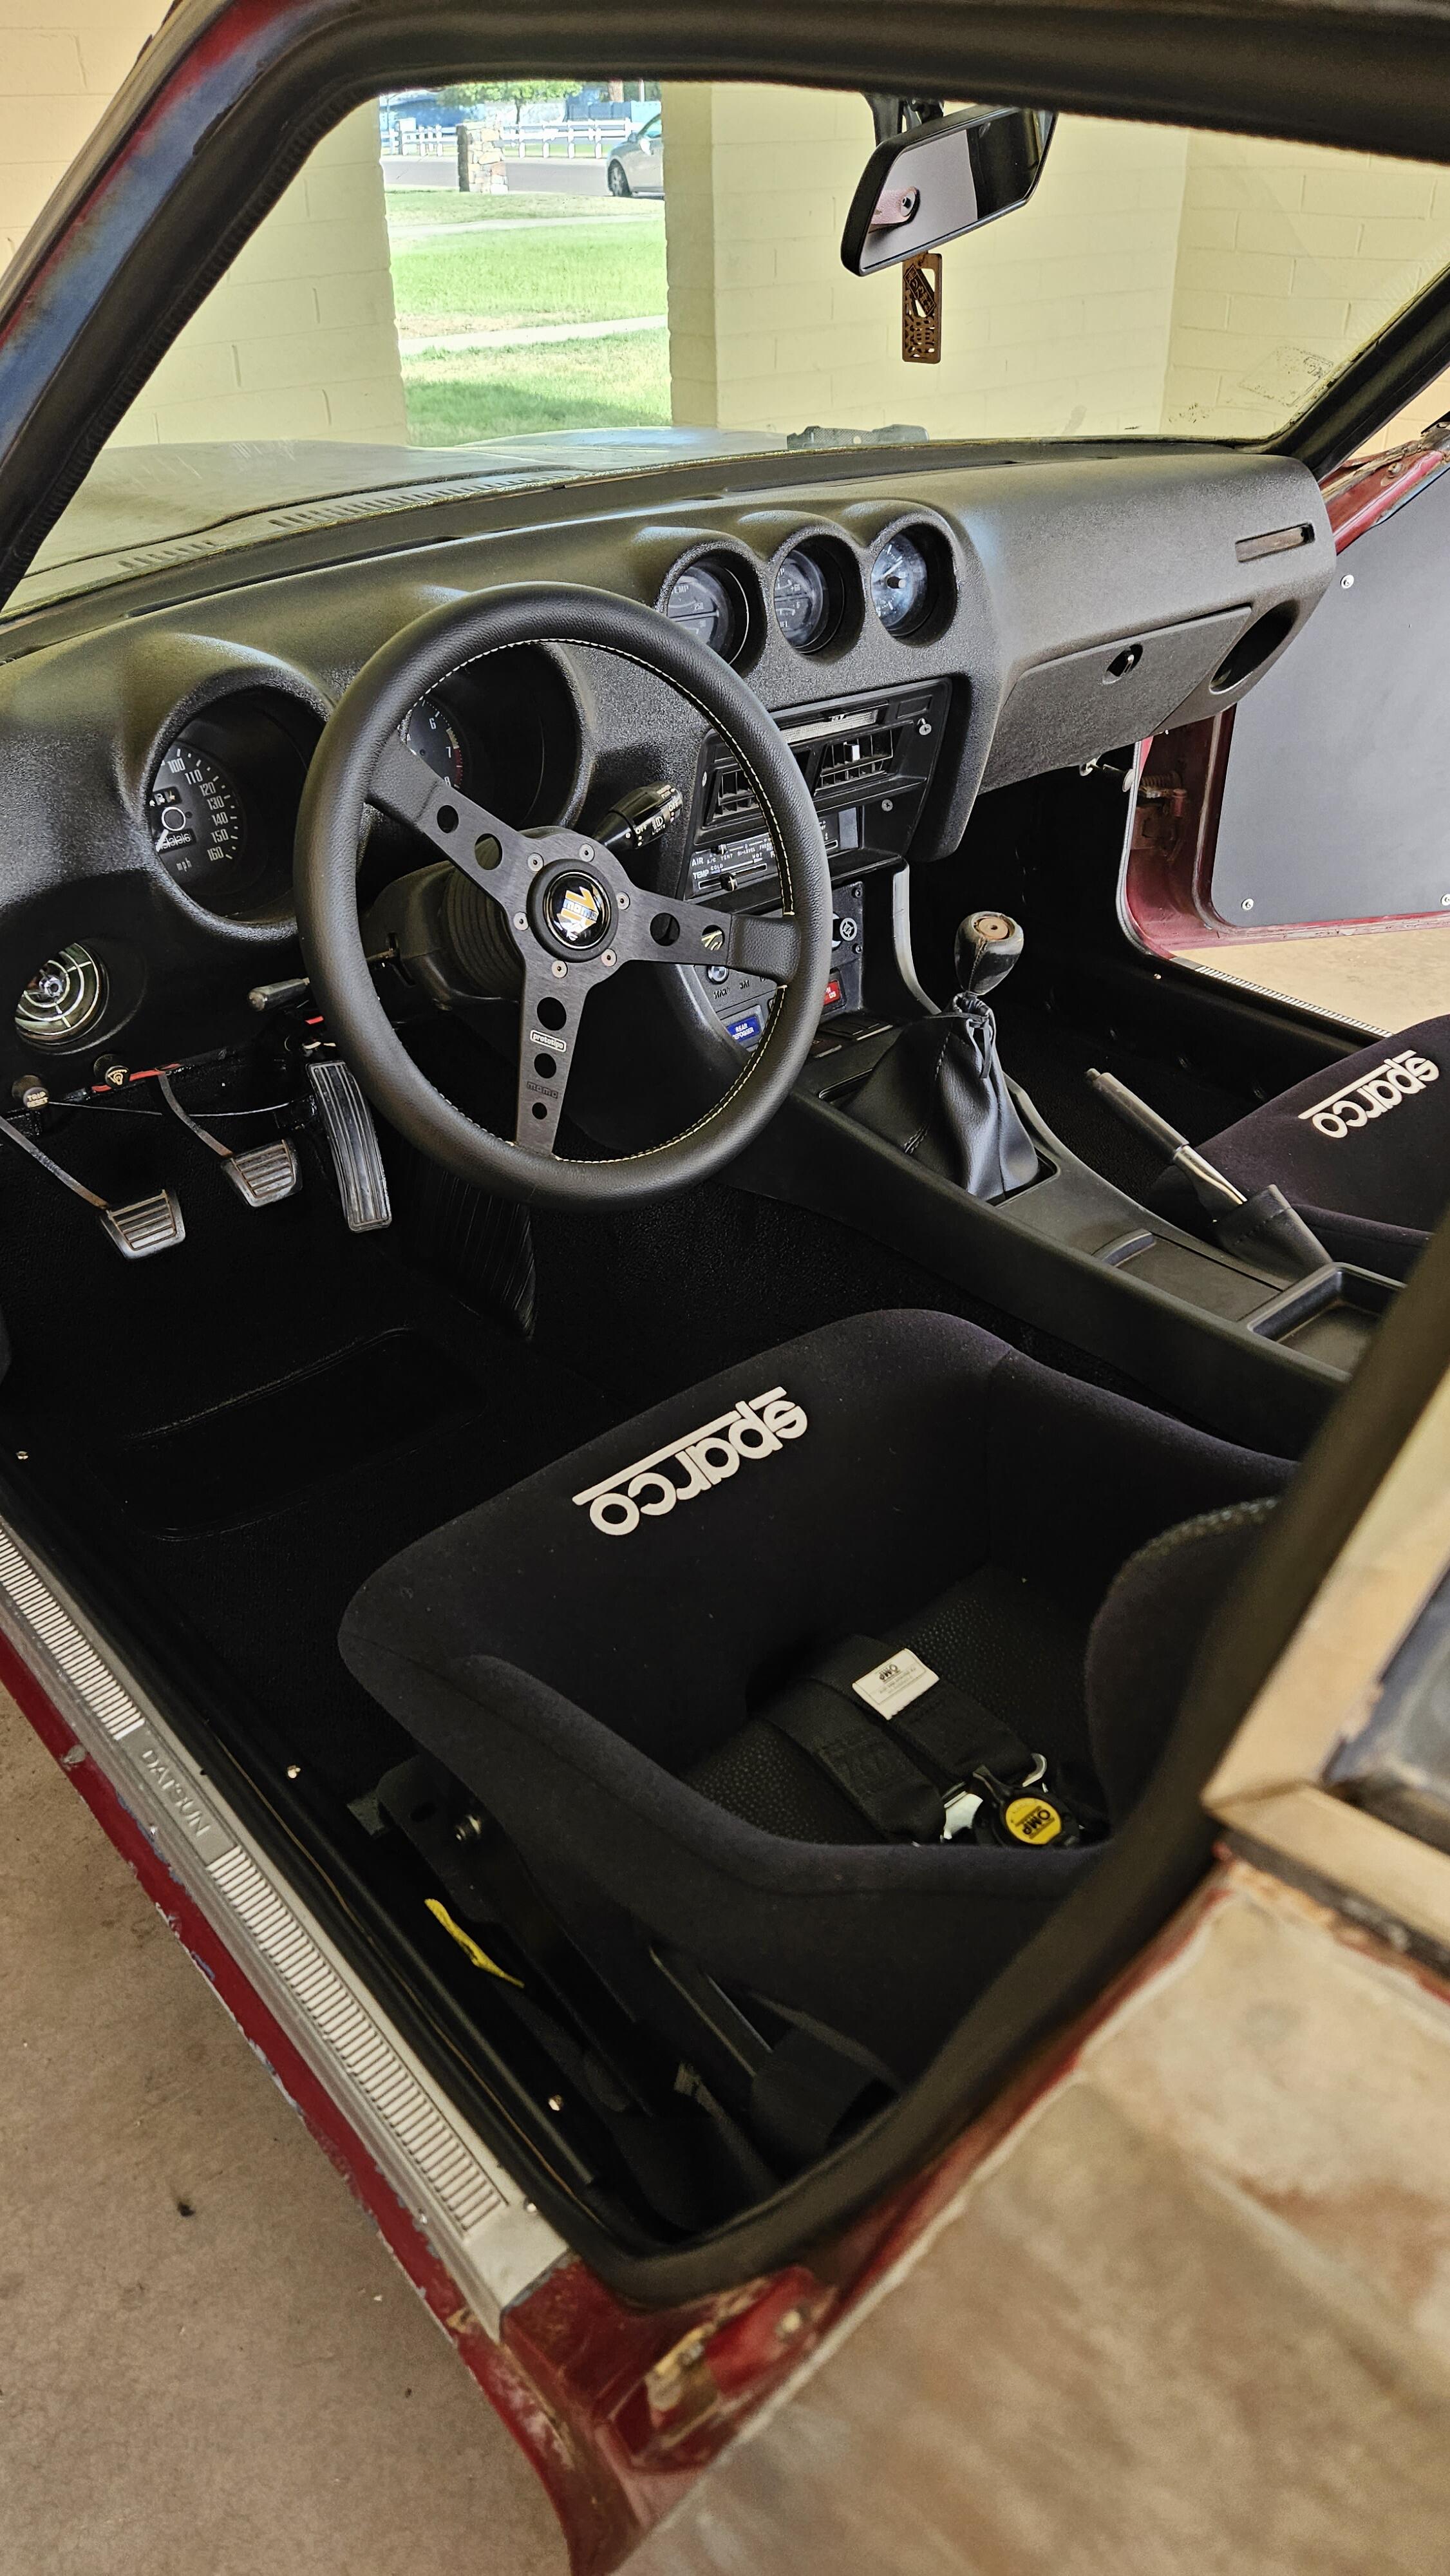
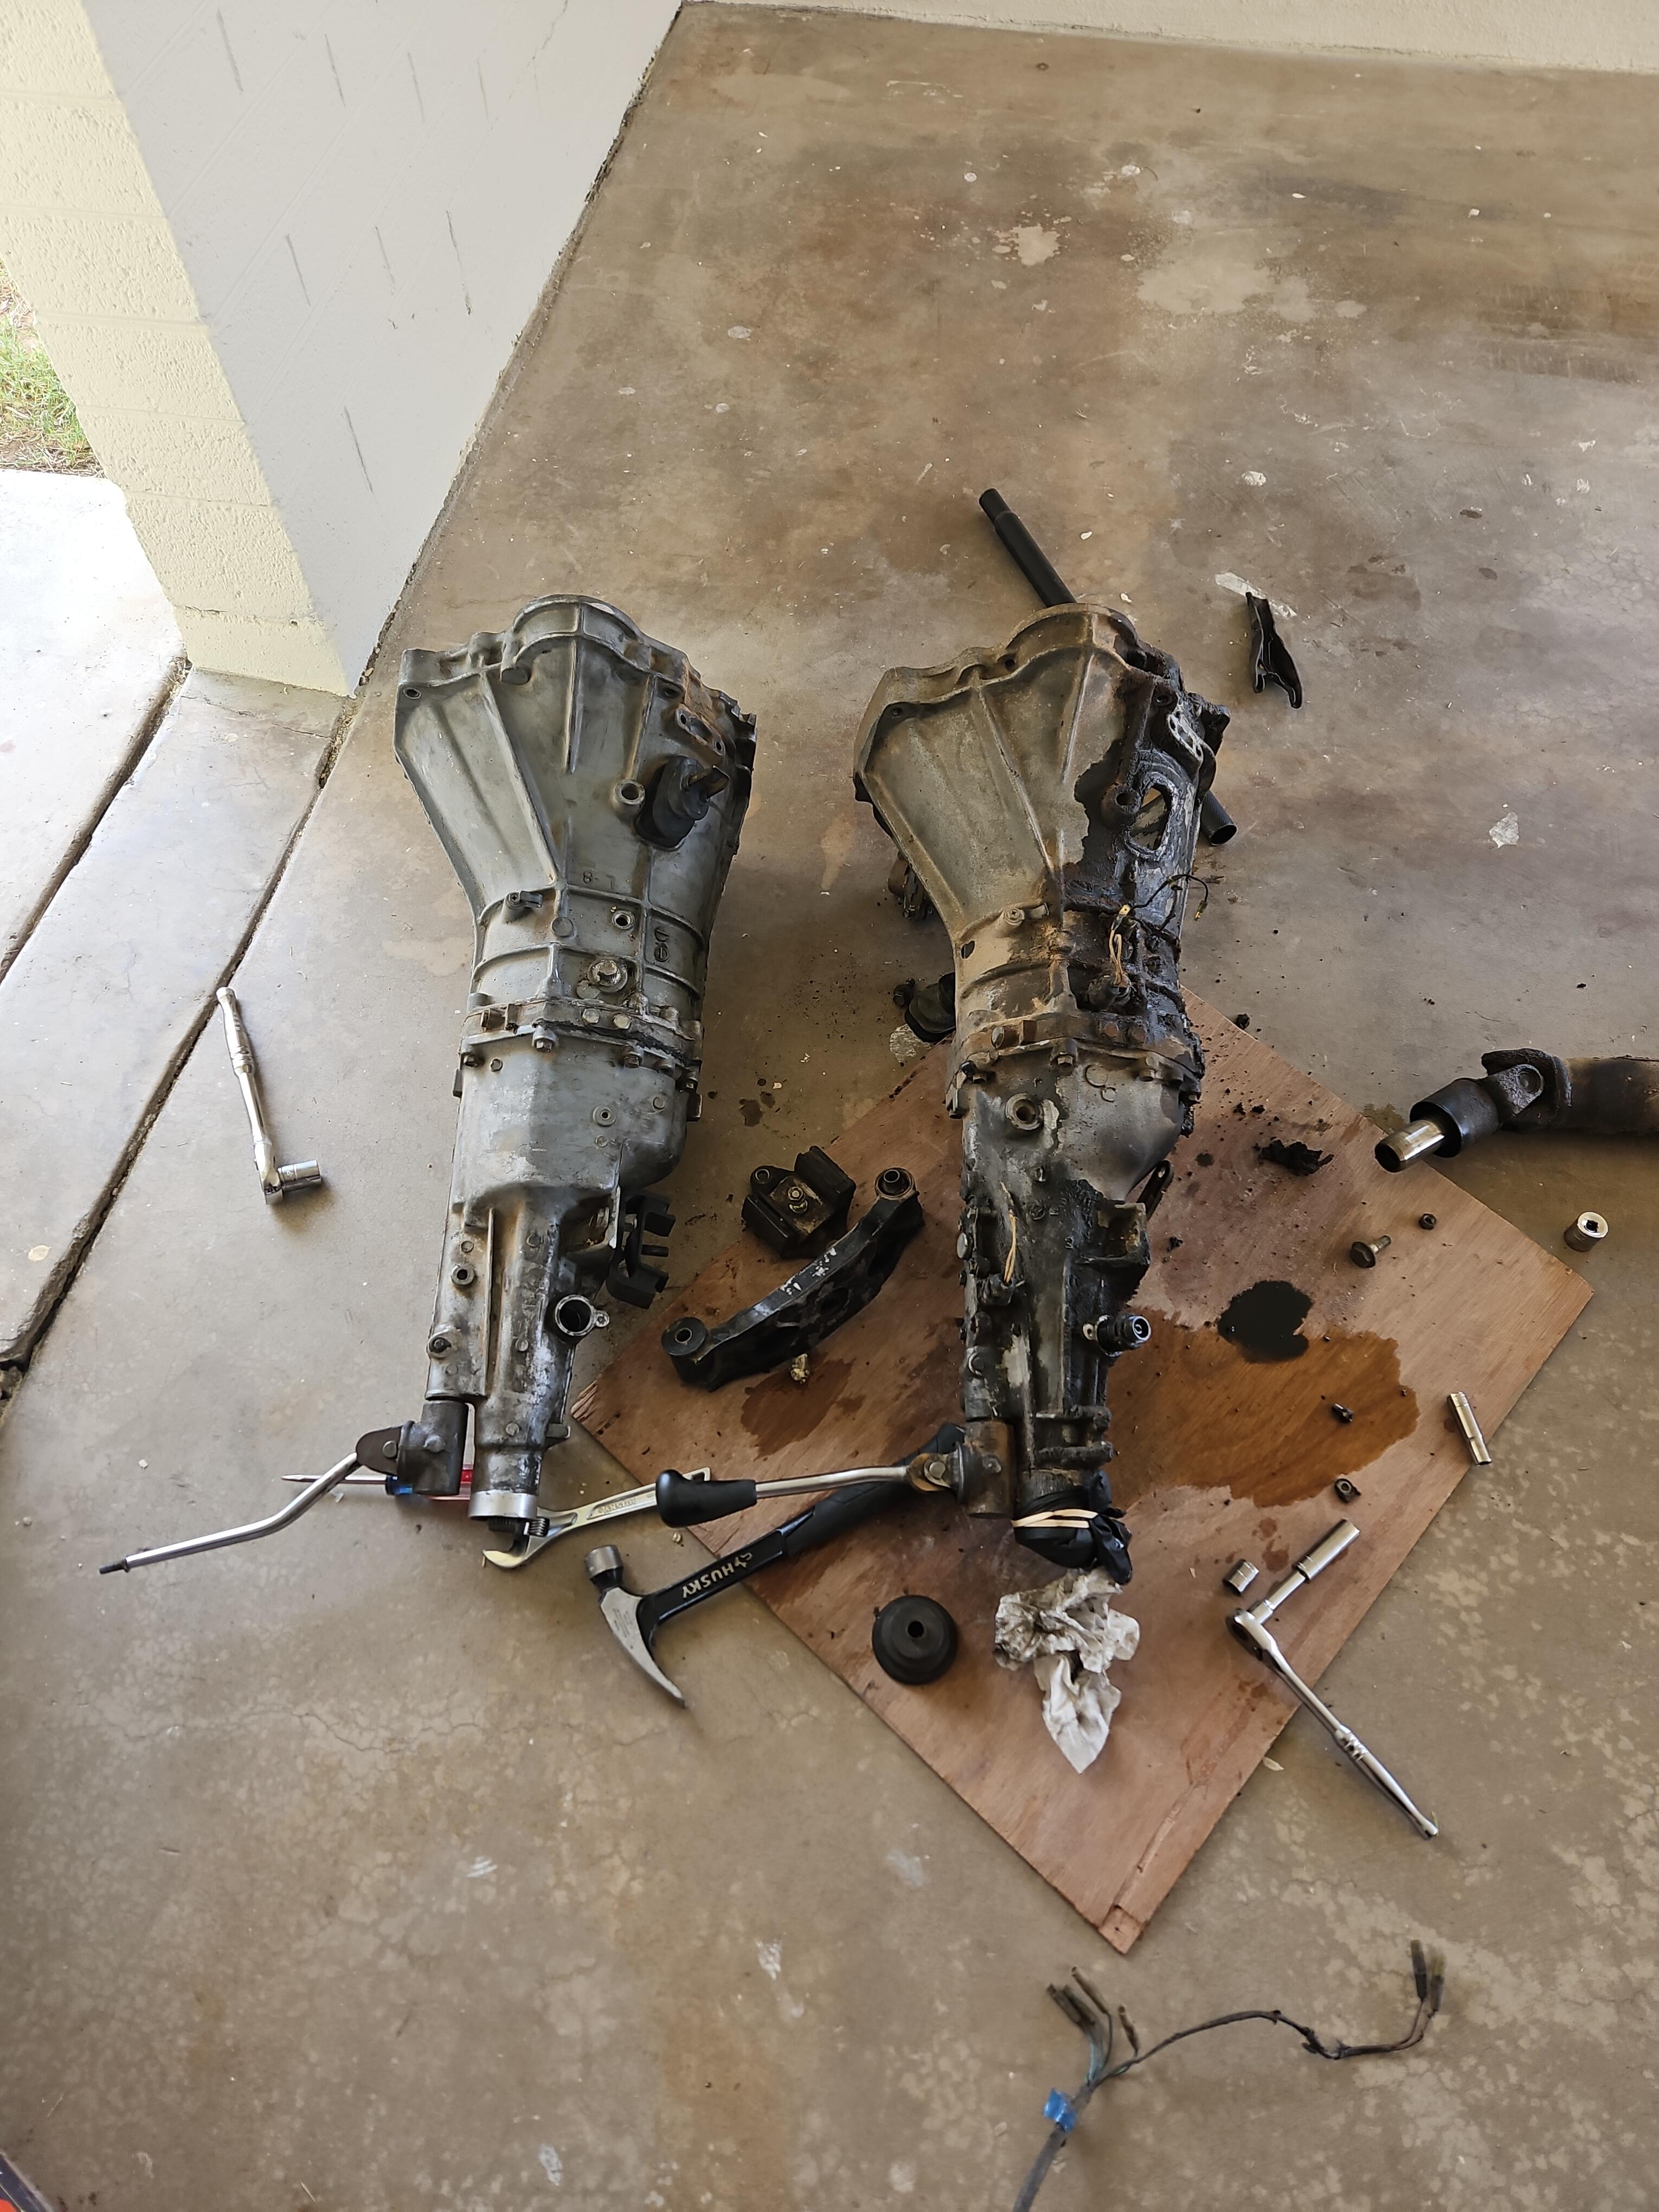
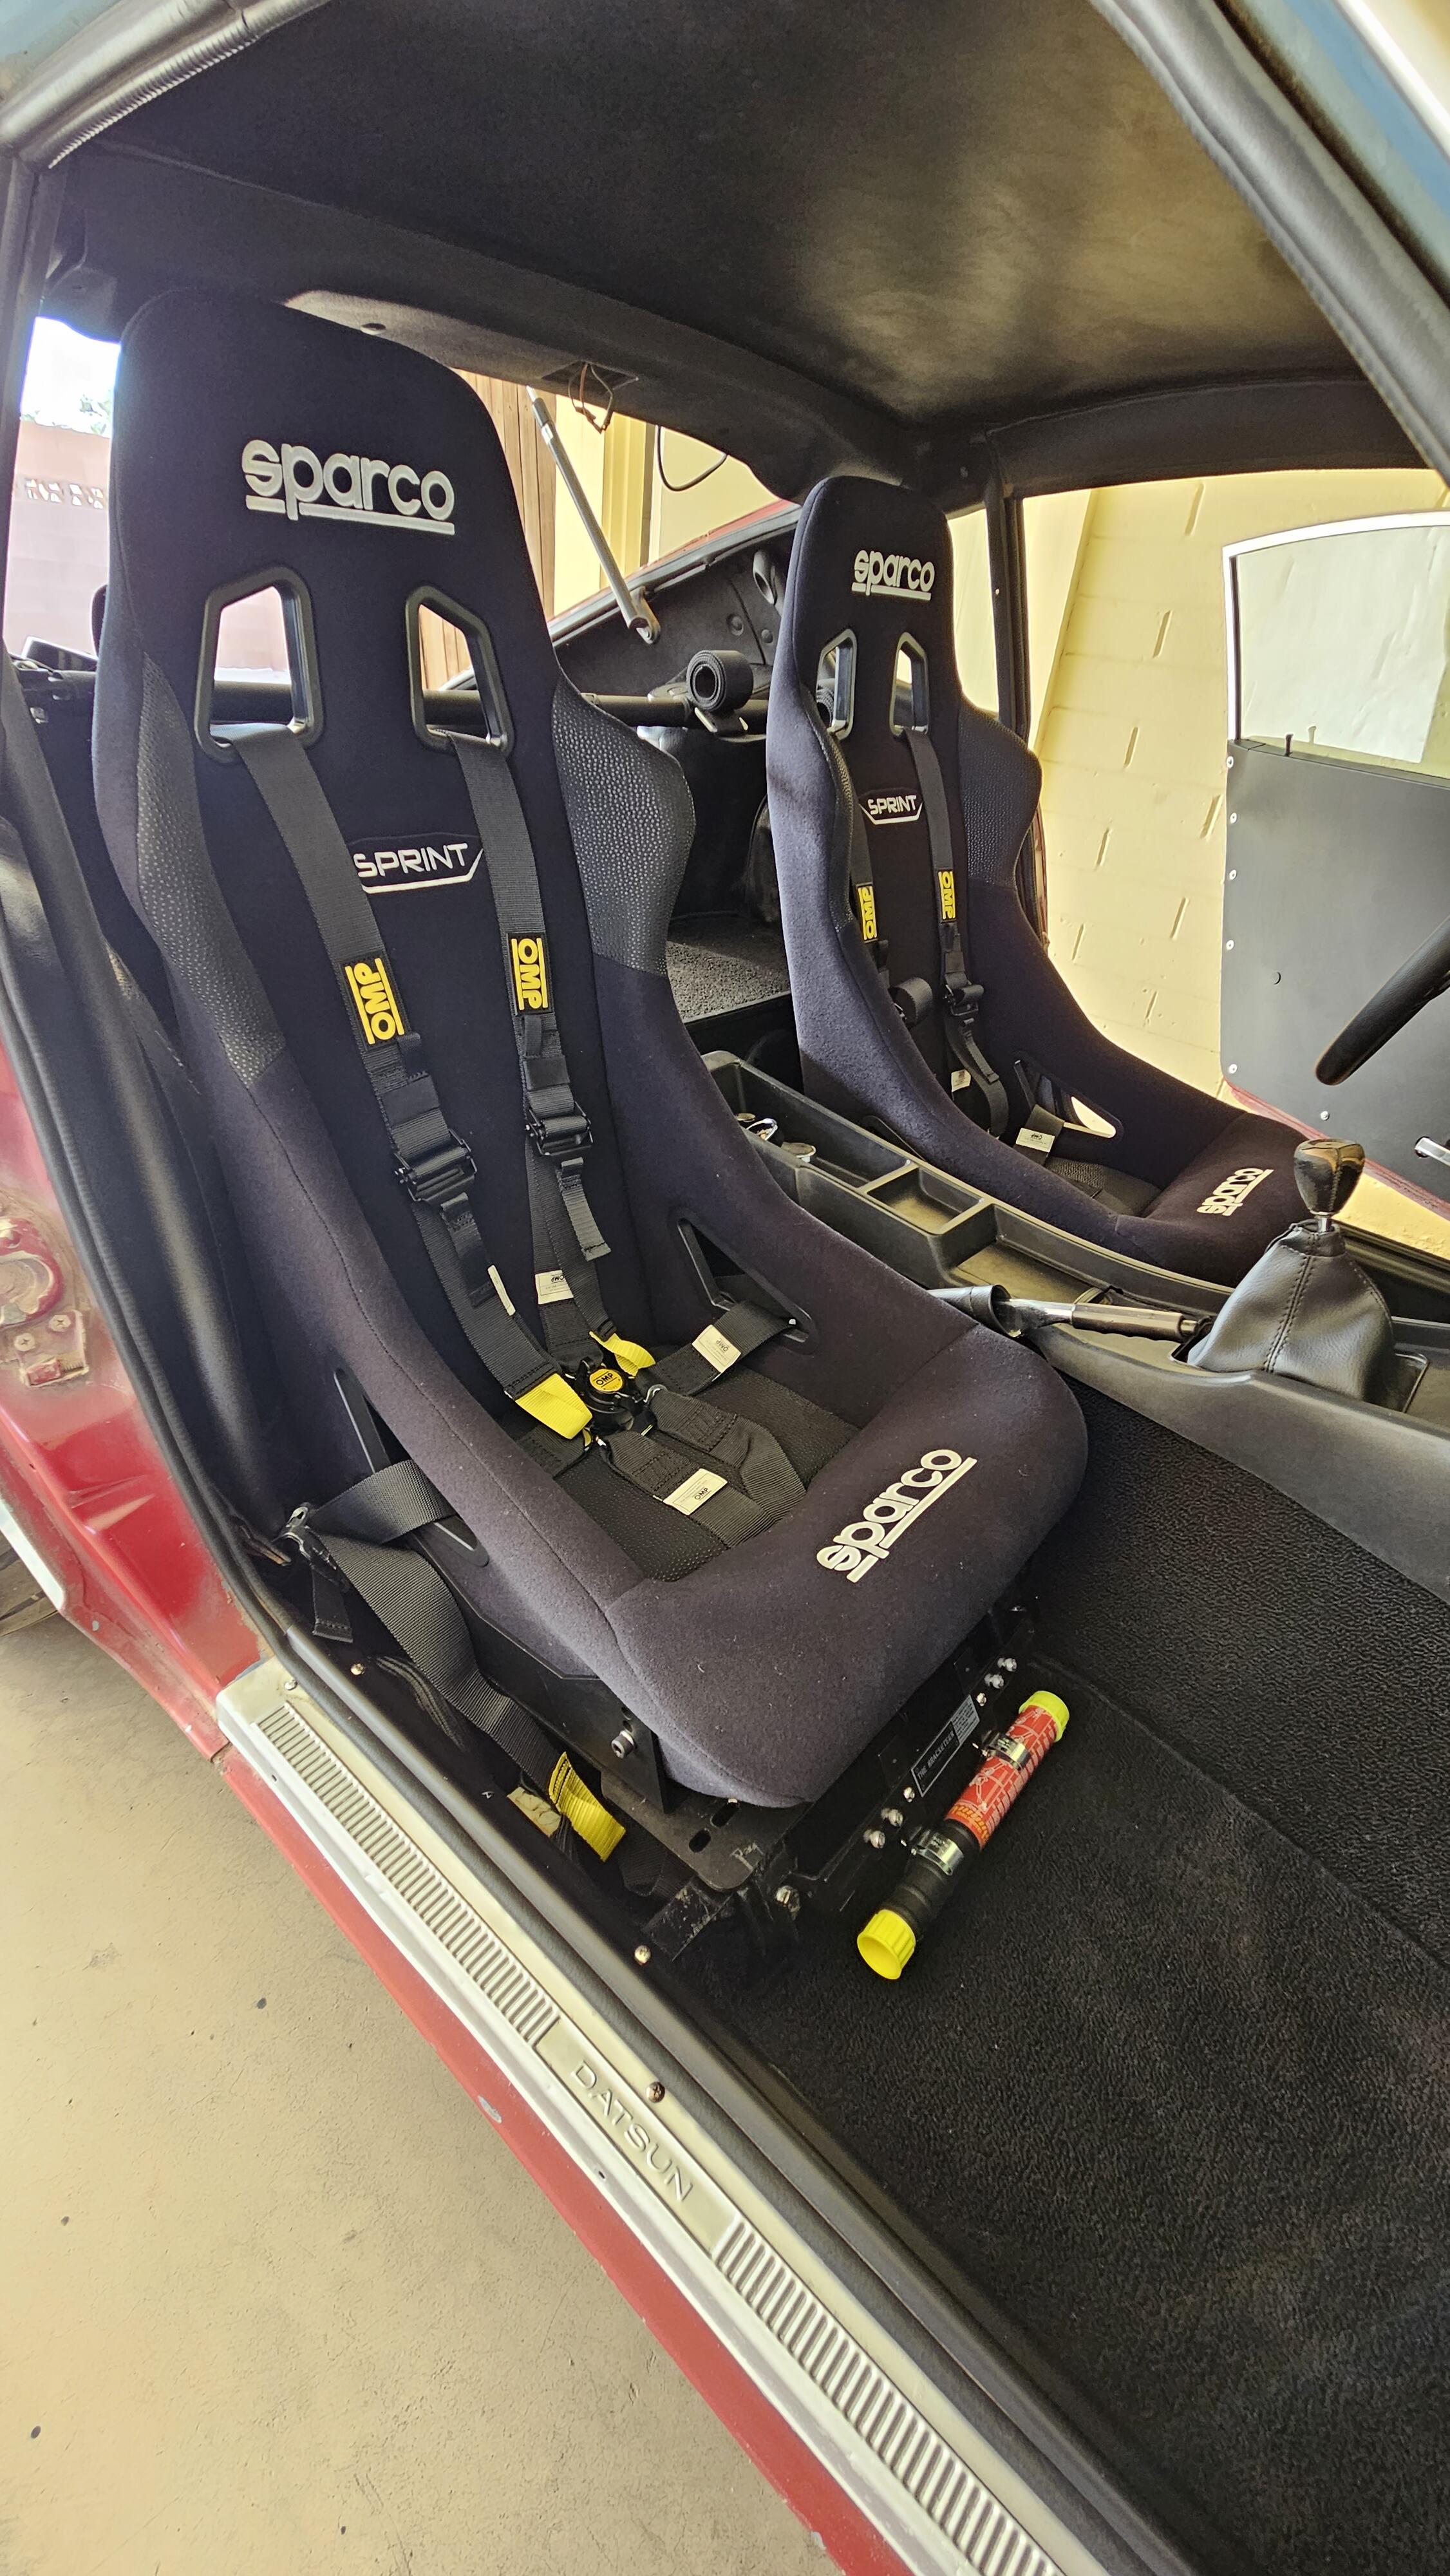
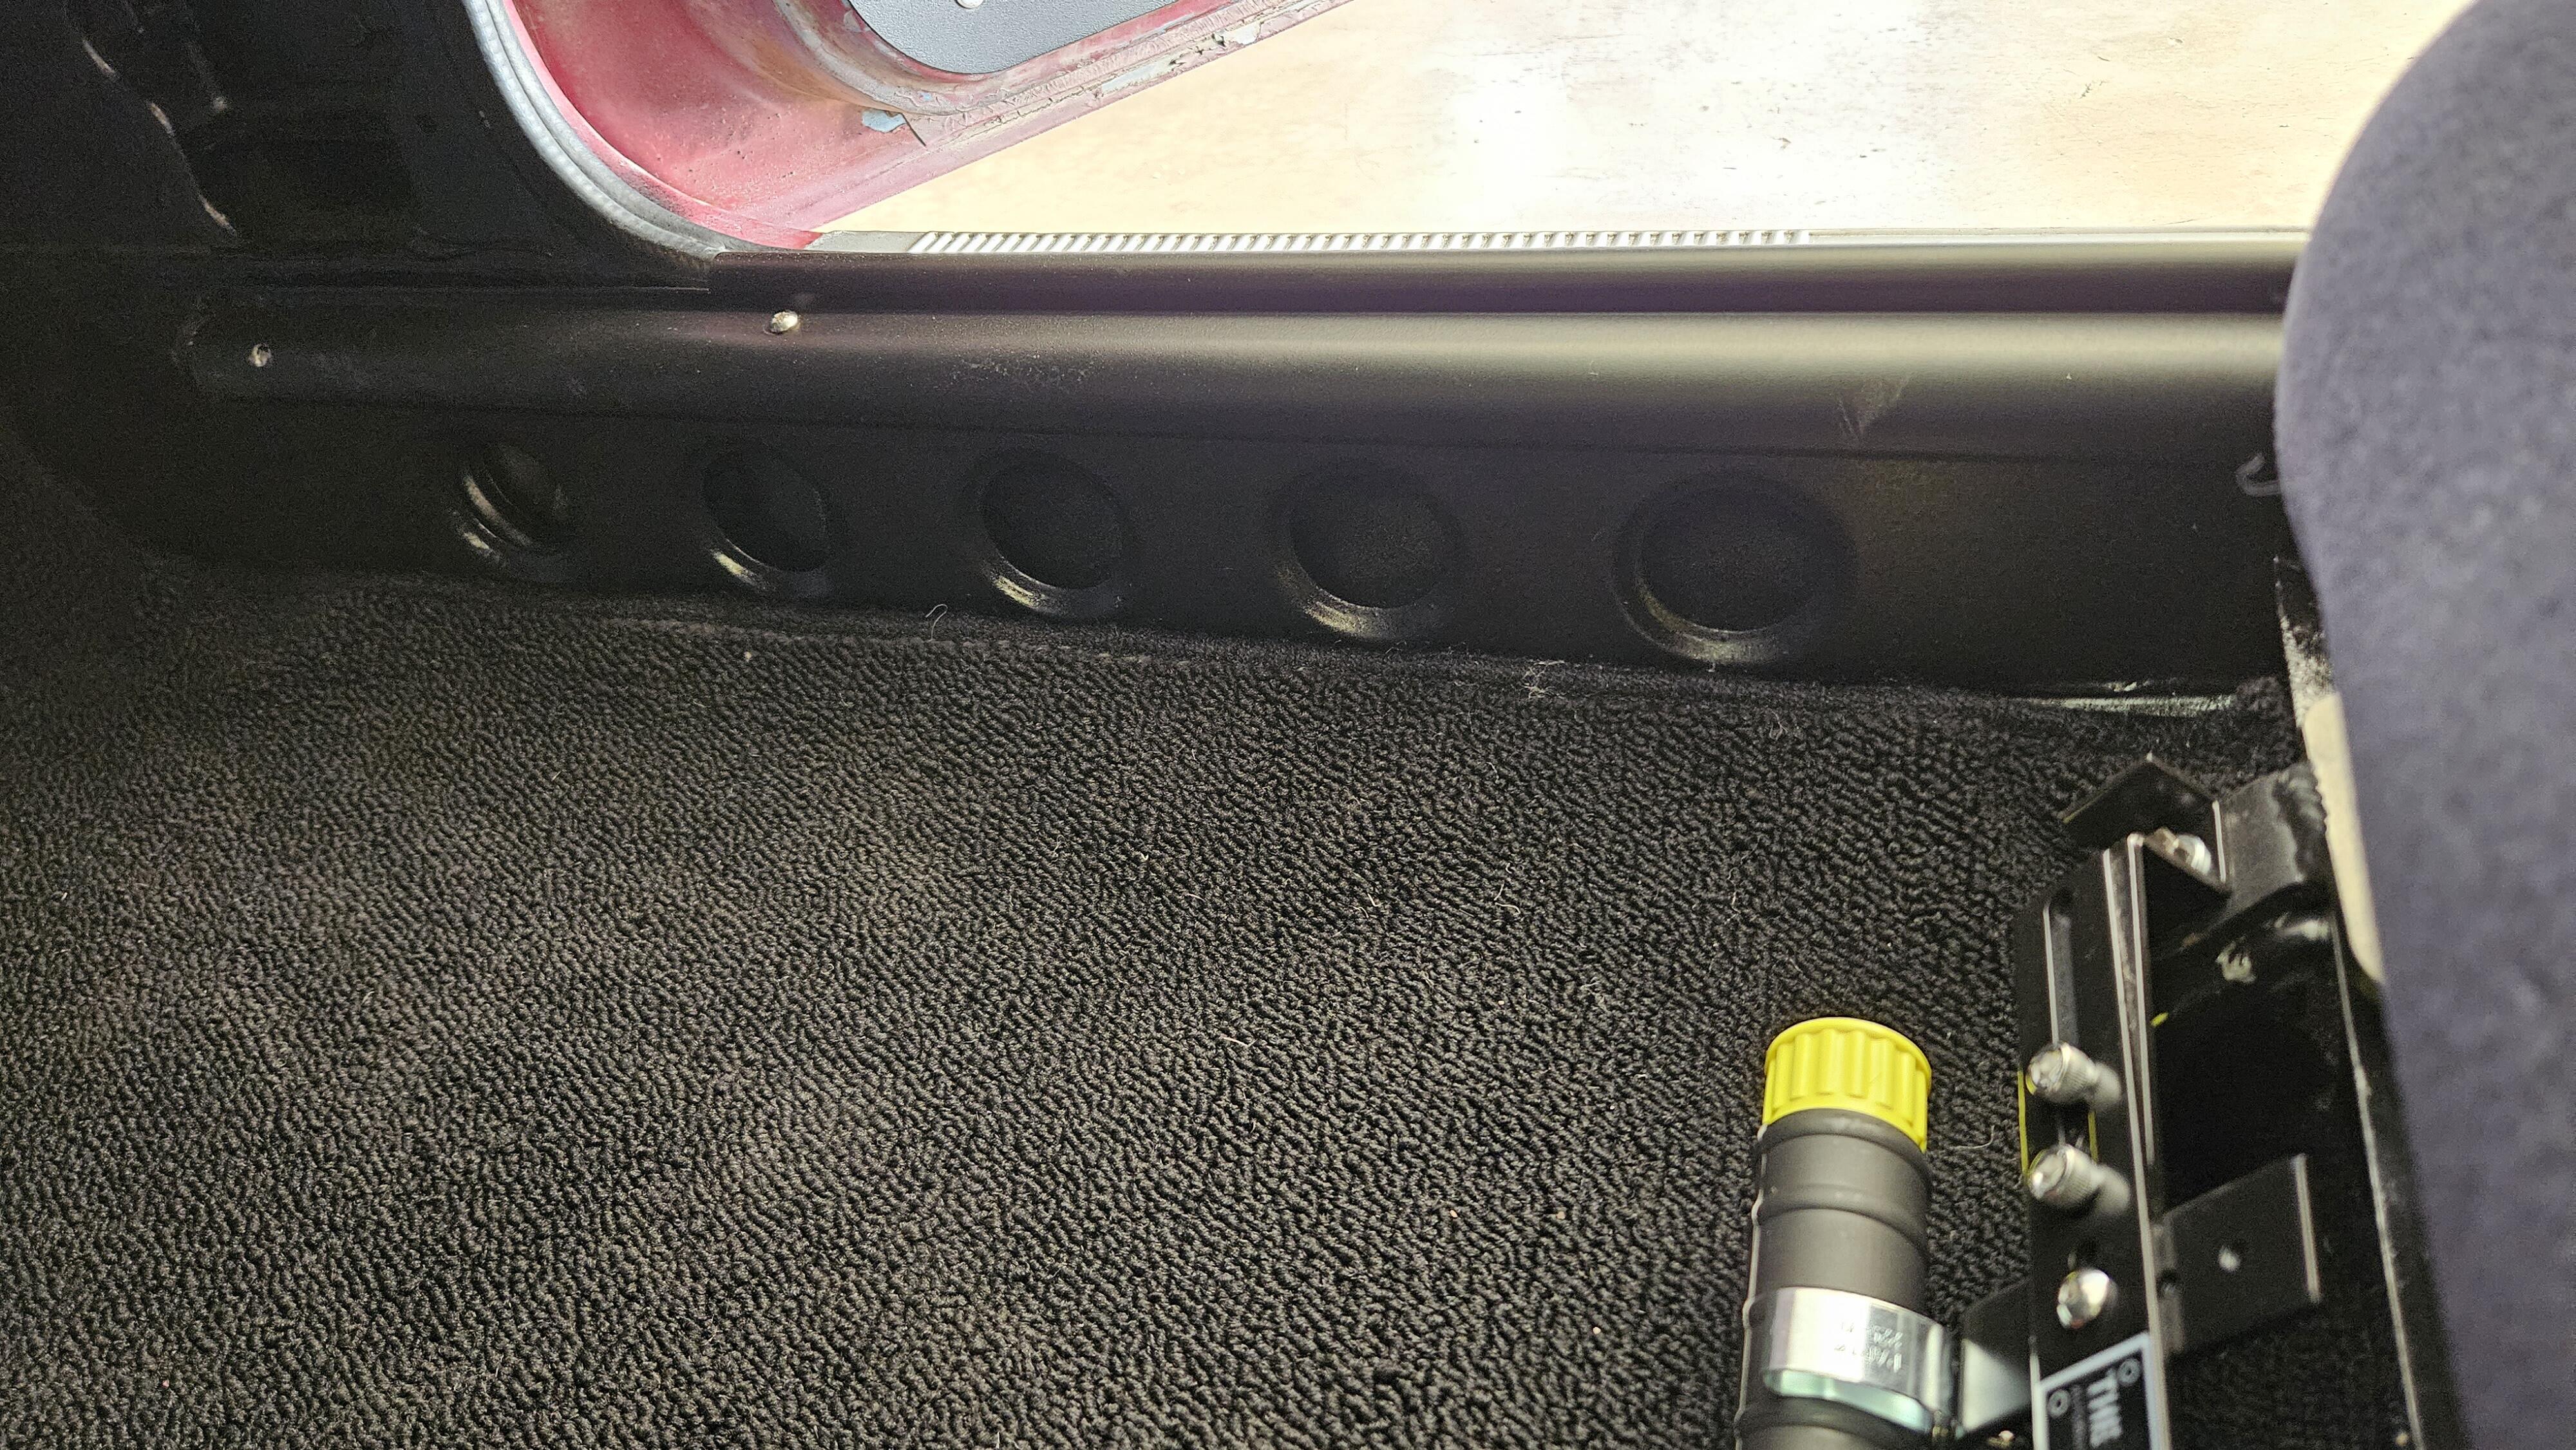
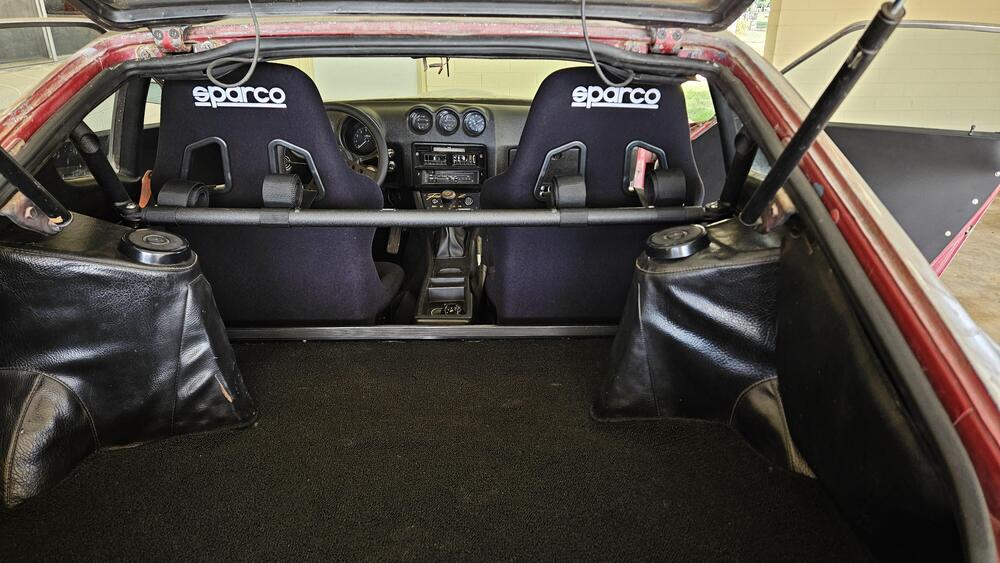
Wow its been 5 months since my last update! I have been slow to work on the Z as I have moved to a new home in Phoenix and it has been a very hot summer. Lately I have been able to get some time to work on the interior. I was never satisfied with the molded carpet kit I originally installed. Probably user error since it was my first kit but it felt very bulky and didn't lay nice. I eventually reached out to Chester and Herod for a carpet set. The gentleman I spoke to was very nice and had my carpet shipped out the following week. This is a loop pile style that I think fits the Z much better than the cut pile. Fitment was stellar and I had no issues installing and gluing down the individual pieces. While everything was out of the car, I decided to finally address my seats and ordered up a set of Sparco Sprints with mounts and OMP harnesses. I am looking into taking the Z to a NASA track day so this made my seat style an easy choice to meet safety requirements. Overall I am very happy with how the interior turned out. It is a comfortable place to be. One piece I completely forgot to pick up was the door sill covers. I recall my original covers being glued down vinyl. And I played around with the idea of ordering new ones or making my own. But I decided to paint the sills first to see how it looked, then decide on what to do. I am pleased with the satin black look. It blends in just fine and I think the pressed circles provide a nice "race" look as well. Lastly, I was able to pick up a close ratio 5 speed transmission out of an '82 zx from a friend who is doing a small block chevy swap. It was a direct swap and the extra 5th feels great. Rowing through the gears without bogging feels GREAT. Thats all for now, happy drives ahead!


-
That is a good solution @Racer X....that requires more work
-
Thanks Zed Head. I think I was misunderstanding the NASA CCR rules for running a catch can. Now that I am rereading, it sounds like it just needs to terminate within a can, but the can itself can be vented. I just assumed it needed to be a sealed system. I am running triple mikuni carbs so running a sealed system was causing a headache.

-
Bumping a super other thread to life. But I'm in the process of building a catch can setup for my Z that needs to be sealed to conform to NASA regulations. I was planning to do crankcase and valve cover to a two port can. But the above option looks like a possibility as well perhaps?
-
I ran one on mine when I redid my wiring. Definitely not intended for theft as I labeled my switch FUEL But I do enjoy having it. I also want to look into inertia switches in case of a crash and I am unable to shut off my fuel manually.
-
Thanks @inline6 This is super helpful. In post #295 you can see the approach I took which is a bit different. First note being the idle mixture screws were turned out 2-2.5 turns which is double your recommendation. I will need to see where I landed at and if I need to change my pilots. Is there a reason why 2 turns out is too much? I was able to get my AFR gauge temporarily installed enough to check my idle AFR. I'm glad I picked this up because I was LEAN. At idle I was in the 17s. It makes sense now, but I assumed that I would be rich just because I smelt fuel. But looking back now, running lean can have poor combustion where not all the fuel is vaporized. Wasn't able to drive the car since its been raining all day so that'll be for another day. In the meantime I'll check my idle mixture screws and adjust my pilots if needed.
-
I picked up an AEM wideband to help with the tuning of the Mikuni's. Before I start blindly doing my own process, curious to see what the order of operations should be. My thought is idle, cruising, then WOT pulls. Thoughts?
-
Yep, its still the 4 speed and original diff from when I got it. Its possible the previous owner swapped something out as I don't think it was the original motor to begin with. Yesterday I softened up the suspension further and took it out for another cruise. I'm learning to trust it more and more each time. It is definitely a conversation piece! First time getting gas under its own power and already had a talk with a gentlemen who owned one in his college days.
-
I'll give that a shot. I think it also has something to do with the needle placement on the gauge itself. As soon as I start moving it jumps to about 20mph. Might need to reseat it in the correct spot.
-
Definitely. Its an easy test to do and would help diagnose the issue.
-
Got around to getting some new tires on the Z and took it out for a cruise around the block...this time without the constant worry of the dry rot tires leaving me stranded! It handles so much better and drives way smoother, who would've thought No overheating issues, solid oil pressure and voltage. The Koni struts need some additional adjustments to get the ride where I want it. One thing that I need to fix is the speedometer reading. It is reading nearly double what my actual speed is. Tested it with some neighborhood radar readings to get a baseline. I looked up the issue but most people are off by a few mph's due to tire size, diff ratio, etc. But I am way off, double or nearly so. Any thoughts on whats going on here?
-
I believe its mainly to show the valves seating tightly. I wont google either just to add to the fun
-
I’m liking that fire extinguisher and mount! Which did you go with?
-
Surprised the mechanic let you/showed you this method. At least this explains the low compression numbers. If you can, do the test again with all spark plugs removed and throttle wide open. You'll get better results 🙂
-
are those numbers dry or wet? hot or cold? throttle fully open? Seems low, but at least consistent
-
Also while doing the compression test, I’d like to see the valve cover off and some shots of the valve train. Perhaps there is something out of wack
-
Are these heads prone to cracking? Perhaps there’s a hairline crack in the #4 chamber.
-
I thought the video was entertaining. Leno puts out great videos for the car community and I don't expect him to be an expert in every possible chassis there is. While his collection is expansive, he is always open to learning from what I've seen. He asks lots of engaging questions and really enthusiastic about the program.
-
Thanks! I'm going to save this for when I need my hatch replaced. Been looking for months now with no luck.
-
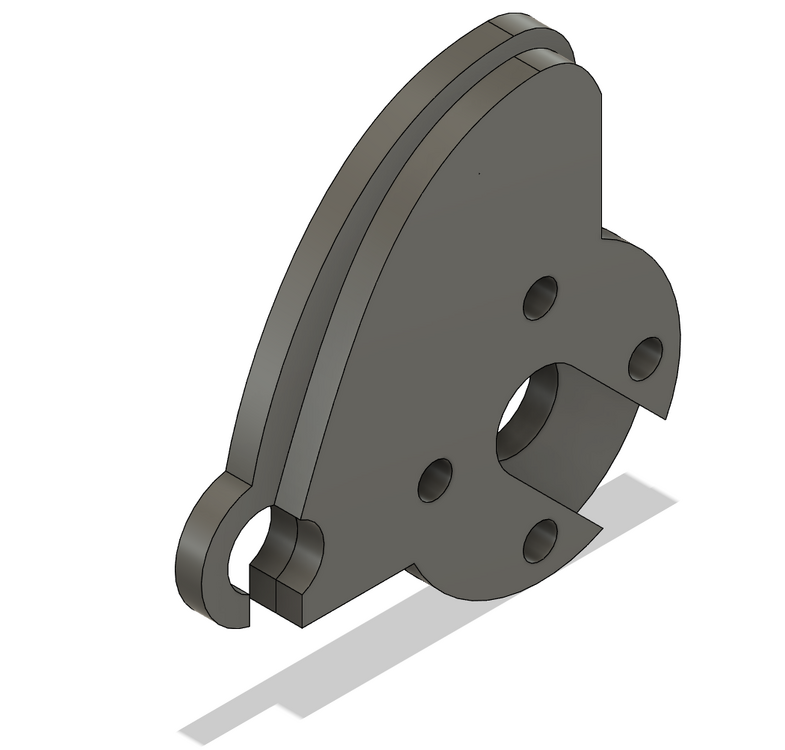
Yep! Thats the thought process for making these. Hopefully by using a larger radius during the first half of the pulley, it will give a somewhat noticeable increase in throttle modulation off idle. Then, it ramps down quickly for high throttle inputs.
-
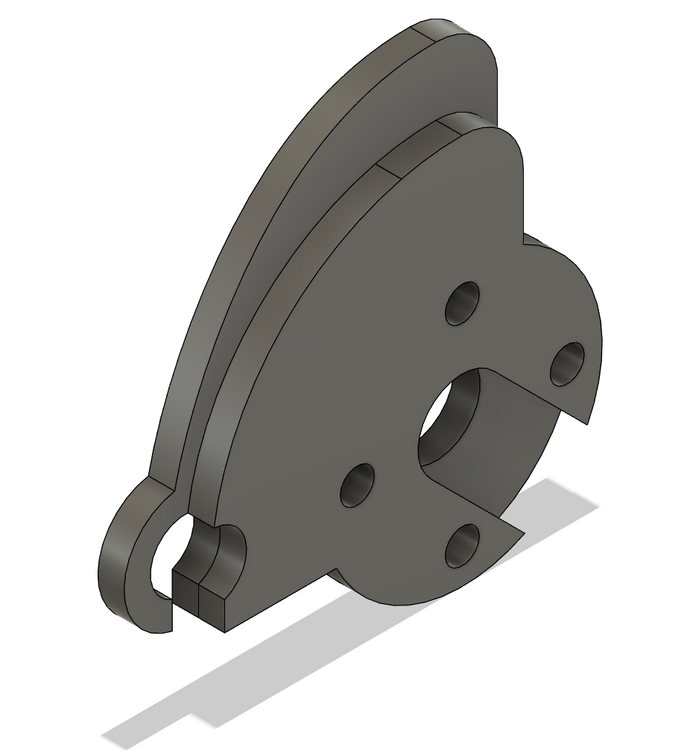
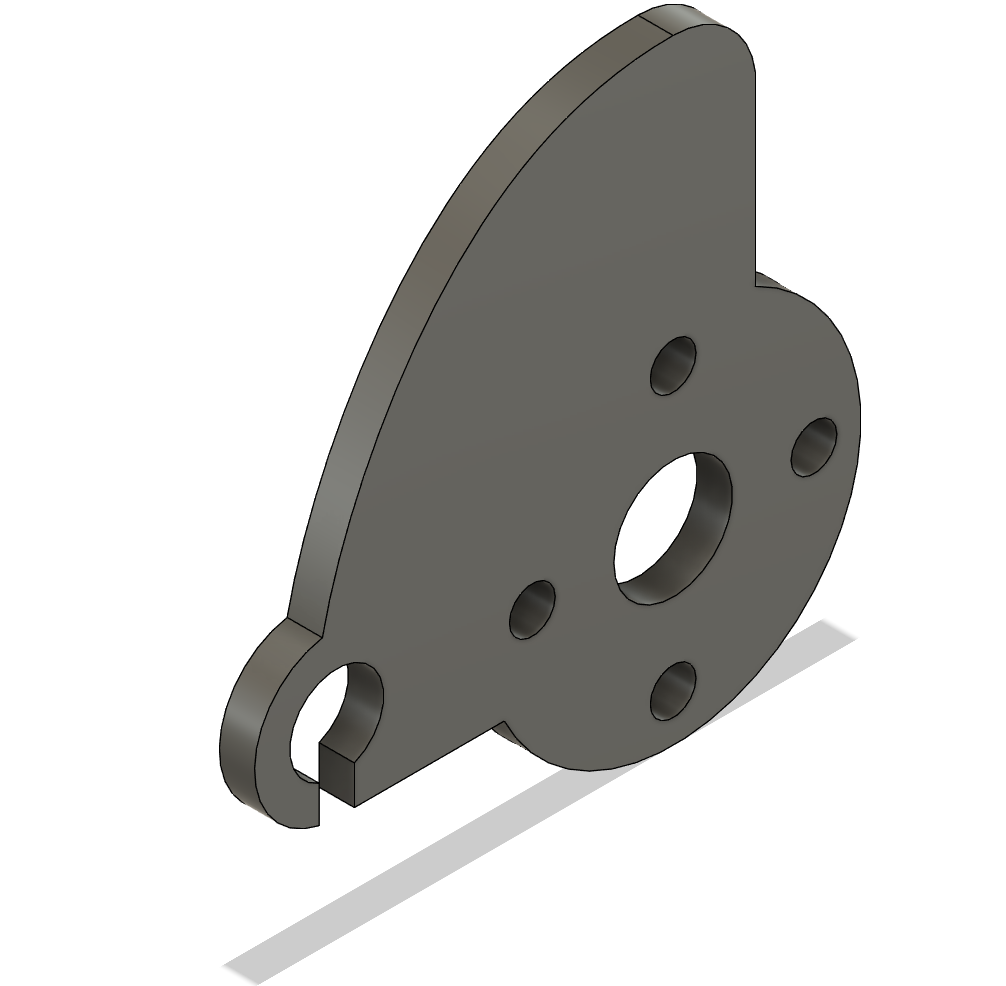
Been tinkering around in the garage lately trying to tidy things up. I moved my fuse and bus bars from the original location in the passenger footwell to behind the glove box (with the actual box removed). Gives me easy access when opening my glove box while still being out of site. If I ever get vintage air, I can just slide it back down to the OEM spot and make a cover. Did an oil change from the break in engine oil that was still in there. Then decided to dial in the carbs again for the new elevation. I dropped my pilot to 62.5 and it liked that a lot. But I could never get the crisp throttle response. I decided to take it back to basics and start fresh. I followed these steps and it felt much better. This is from a Mikuni group member, Duffy Mahoney, that was kind enough to share back in 2020: "Mikuni Tuning 101 I’m not a guru, but it’s pretty simple. Also spelled out in the manual, which I would read a few times. You sort of chase your own tail doing this. Since each step affects each. I would have an rpm gauge hooked up you can see next to your motor. I use a timing gun with rpms visible to tune. Super easy! I did this whole thing 2x in a row. To make sure it’s perfect. Two main things to tune. Pilot and Linkage Pilot system (800-1500, I don’t know the exact range) rpms or so. This is the two thumb screws at the flange between the carb and the manifold. Pre-set to 2 turns out from down. These thumb screws change the air mixture for idle rpm range. Be very careful when setting these. I would gently turn each to seated. If you over tighten them it will ruin or damage the carb. Then back off 2 full turns. Factory is 2-2.5 turns backed out from lightly seated. Linkage- This is critical to making sure the carbs are balanced. This is how much air the butterfly is allowing to flow at idle. It’s the shiny linkage on the side of each carb. 1. Get the car started. Two pumps on the accelerator. Then hopefully it will fire. If I was you I would hook up the choke system (Mikuni calls it the starter system). Once the car is warm and holding a idle you can start. 2. Set linkage first. This has to be done with either the dogbones (or called throttle arms) very loose or off. Dog bones are the small arms that attach the throttle linkage from the intake manifold to the carb throttle linkage. Each carb has a single throttle linkage with a set screw. Using a carb sync (air flow meter) try to get each to be the same (flowing) by small 1/8-1/4 turns. I would shoot 800-900 rpms for each to be balanced at. This is with the engine warm. Basically you are trying to get each to be sucking the same amount of air at idle. This needs to be done before you can get the pilot system done. 3. Set pilots (Total of 3) The goal is to tune each carb to the highest rpm possible. This is can be done with the linkage system on. Basically start at the carb close to the driver and using tiny turns on those thumb screws. You will notice a bump in rpms by turning either clockwise or counterclockwise. So carb 1. Do a single side of the carb. Turn it till it will maintain the highest rpm possible. Then do the other side of the same carb. Once one carb is done work your way through every carb. When I did my car I gained almost 200 rpms by doing this. It’s pretty interesting. I would turn and the car rpms will climb then eventually it will will go lower. Then back that set screw till it maintains the highest bump in rpms. 4. Now that the carbs pilot system is balanced you will need to set desired idle rpms again. I would ask Rebello for what rpms he suggests. But I would guess with your heavy cam you will want 900+ rpms at idle. So again with dogbones off or very loose. Turn each throttle linkage set screw counter clockwise or ccw till the desired rpms are achieved. I would do this pretty slowly on each carb. Matching turns. Like 1/4 of a ccw turn on each. Then using the carb sync match each carb to be exact and are sucking the same amount of air. Then after this is done I would use a AFM to see if you need/ want to change jets. But I bet it will be a blast to drive by just doing this. If the dog bones aren’t loose enough during tuning you will have bad results. Since setting idle will slightly affect other carbs (I made this mistake). Hints: If the car doesn’t want to keep an idle before you start this you can give the linkage a bump. Give each throttle linkage a 1/8-1/4 cw turn then see if it will maintain idle. I set these but it’s a guess. I set the butterfly’s. Which is one the hardest part of the rebuild. Basically each carb has 2 brass butterfly. Each has an infinite amount of movement. My goal is to get each to allow the same amount of light to pass. But it’s extremely difficult to be perfect. If in a super rare situation you can’t get the carbs to sync up. When can chat about resetting those butterfly’s. I’m 99% sure you will be fine. Each Mikuni Carb is basically 2 carbs. So when tuning think that they are separate but connected by the throttle shafts to the butterfly. Floats You can adjust them on the car without removing them. You measure down to the fuel on each carb via the jet block holder and either raise or lower the float adjustment until you get a satisfactory level. The manual has a fuel level set point. The S5 Mikuni have external float adjustments (kidney bean shaped part) Older mikuni’s don’t and you have to pull the cover to adjust the float level." Hopefully members here find this as useful as I did. One piece this left out was the accelerator pump position. There are three spots on the PHH you can set this to and it effects that initial tip in for throttle. Of course, this is where my problem was! Two of my three carbs were missing the cotter pins, so no wonder I was getting a massive bog. I used the middle spot first and it did help. Moved it to the third (highest) spot and it improved even more. This is where I left it. I'll dig into it when I get street time to see if I need a different size or anything to see even more improvements. My next project has been redoing my throttle cable and linkage. Not a fan of how I set it up on my first pass. While making new brackets, I was keen on looking into the design of throttle pulleys, or cams. Its interesting that most of the automotive world uses a fixed radius pulley, while it is very popular in the motorcycle world to use varying radius pulleys. Probably not as noticeable in a car, but a fun project nonetheless. I mocked up a "baseplate" for the throttle cable to attach that will allow me to slide in different pulley shapes. Here is the baseplate: Then the baseplate, plus a pulley. Standard single radius in this example: Varied Radius. Starting at 20% larger for the first portion, then dropping: I have a couple in-between curves as well and curious to see if I can tell a difference in the real world. I wanted to keep the overall length within a few millimeters as to not need a new throttle cable for each iteration, but this did limit me in my overall curve shapes. There will be another baseplate, not shown here, that will sandwich the pulley to create a channel that allows the throttle cable to ride in. Everything is connected to a flanged collar that finally locks to the carb linkage.