


Richie G
Free Member
-
Joined
-
Last visited
Everything posted by Richie G
-
Thanks Nate. I took a shot on the 5/8 x 8 1/2 spring from amazon which is probably going to be a tight fit for what i believe will be the 17 mm hose for that section. I'm thinking the tighter the better but if not amazon has free returns and they come overnight. I'll just have to play with the bend since the hose there now is completely mangled / pinched totally shut from what i can see peeking under the valence. It's certainly part of the PO hack job in place to deal with. I like what you did with your upgrades, impressive. I'm a ways from that I'd expect and as best i can tell its all stock right now for the next steps. I kind of like the idea of trying to keep it as accurate as I can but realize this won't end up a concourse car by any means. I have this idea in my hand that is grand for someone like me and will take the turns in the road as they come. I can't change the purchase I made at this point 20/20 hindsight and all but am really enjoying the work I have ahead, the learning, and even some of the mistakes I would have caught earlier in the process. Couple of other questions if you don't mind. You mention the shield you replaced. Newbie question where is that exactly and any links to pics to compare would be great? Yours was missing and mine might be too without even knowing it. The other question was back to my actual problem of starting after a few days of sitting. Another newbie I'm sure. I pretty much can predict the problem because I can see there is no fuel in the filter and the fuel level has probably dropped back down into the hard line. If i see fuel in the filter it seems to be fine. Is it normal for the fuel to drop like that after a few days of idle? Is that drop some indication of pressure loss somewhere even though I don't see any significant leaks?
-
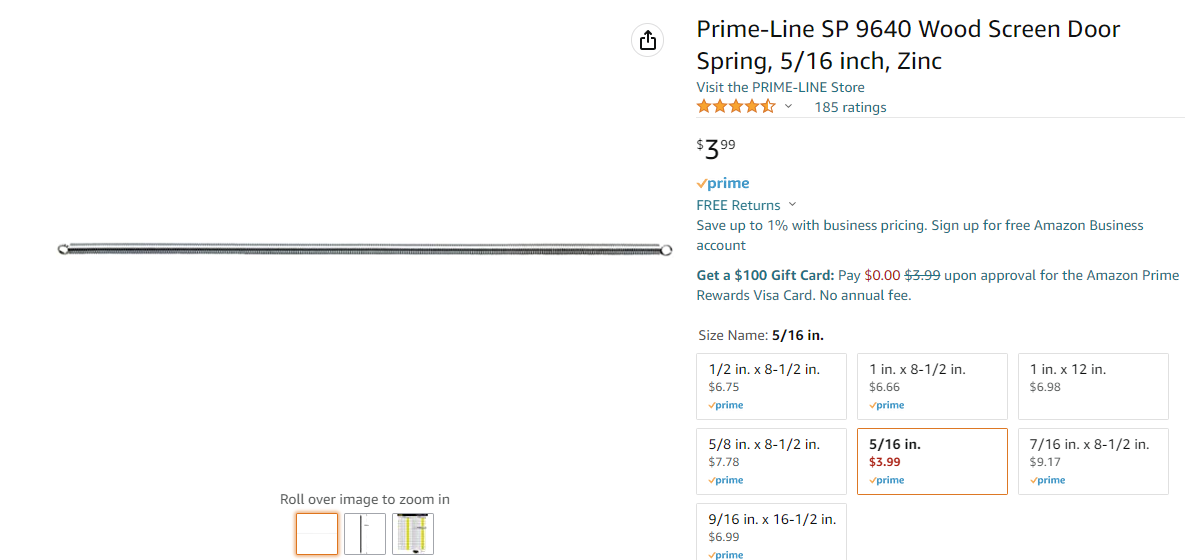
Znate you talking about something like this for the spring? Which size would I get for the short hose on the rear of the tank? And once I have the right size just slip it inside the hose and form the bend? What keeps the hose in place, doesnt the spring want to flex back to straight?

-
Znate thats great advice thanks so much for the thorough write up. My hope is that all I have to do is get these hoses straightened out. The PO has already installed new sending unit, filler tube, and sprayed gobs of undercoating all over the tank but the filter is always crystal clear so maybe they at a minimum did a boil out of the tank. I just don't get why you'd do some of the basics but leave such a mess of these hoses. I mean some hoses have three different transitions for couplers and fittings. Why? Ok you didn't want to buy braided hoses, but at least home run the hose to the tank, not multiple transitions. The car was a "partial restore" in that they did rebuild the numbers matching engine, refreshed a bit of the interior but not all, did a decent glass out two stage paint job, but at some point was in it to make money on the flip. Original paint and 50 years of dirt behind these panels, under the new rug, some surface rust under the sound deadening, etc. I'm at this point where my limited access / space / time has me fearful of getting it out but no way to get it back in lol. I'm going to buy all the supplies I need and then gauge where I'm at. Thanks again for the advice and quick reply.
-
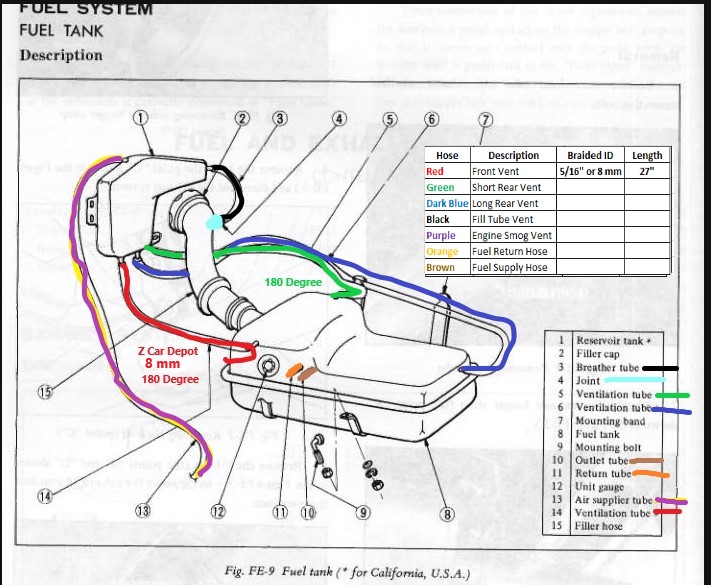
I'm doing an interior restoration on my late 71 and when I pulled the rear interior panels found a mess of the vapor tank hoses. Seems the previous owner decided to patch work as best he could to ready for sale a combination of original braided hoses and all types of couplers and adapters to just make it work. To be fair, there is no smell of gas so his connections seem to be nice and tight but I just can't let myself leave it that way after seeing it. One issue I do have though, which may be unrelated, is that if the car sits for several weeks (especially in the hot 100 degrees days of Sacramento), I seem to get vapor lock and the mechanical pump struggles keeping the carbs going. Starting the car requires full choke even in the dead of summer and then it dies when the carbs empty. Once that happens, I have to "prime" the carbs with gas by pulling a rail to carb hose to fill the carbs then while the hose is off actually hand pump the gas up through the rails to get enough in the line to keep it going when starting it. It's a total pain. I'm not here to tackle that today, but maybe fixing some of these vapor hoses (especially the ones with the bends that are pinched shut) has a positive effect. So back to the hoses. I've read all kinds of articles here and elsewhere but can't seem to find an easy and direct answer to the question of what sizes and lengths each should be. Since I don't seem to have end to end original hoses I can't just pull and compare very easily either. My plan is to get the hoses, clamps, possibly a coil to create the magic 180 bend, etc. ready then go to a place that can help me drop tank and replace. I have very limited access (and ability quite frankly) to drop tank and take this one step at a time. So I'm hoping to find some help for a newbie. To get this going I found as best I could a blank diagram to start from and added a color code to all the hoses. My car is a 6/71 with the metal vapor tank but this picture seems to maybe be the older plastic ones? Not sure if that impacts size or length of these hoses? I began this project by looking for the hoses on the typical sites and was only able to find the front side hose in red. Since it is one of the ones with the funky bends I figured at least start with what I can buy rather than build for someone like me. If my research is right, the green one called the short rear hose also has a funky bend and most people use a spring coil to produce a safe bend and just buy a straight hose. I'd be Ok with that I think. BTW I just went to look at mine as best I could from underneath and sure enough its a rubber hose, hopefully fuel rated, and hand bent to the point its completely collapsed. Maybe part of my vapor lock issue who knows. As I mentioned earlier, my current setup has adapters mid hose, at the joints, and anywhere else you can think of so one of my questions is also, do I need adapters anywhere other than the one on the replacement fuel filler neck in light blue? Assuming my tank nozzles are all good and healthy I assume its find the right size hose and slip it on without issue? Can someone help fill in the gaps in my chart to make this a bit easier? Oh and if possible, any advice on how to deal with this once I'm ready? I've never emptied and dropped a tank but am willing to try with my limited capabilities. Is there anything I'm missing here?
-
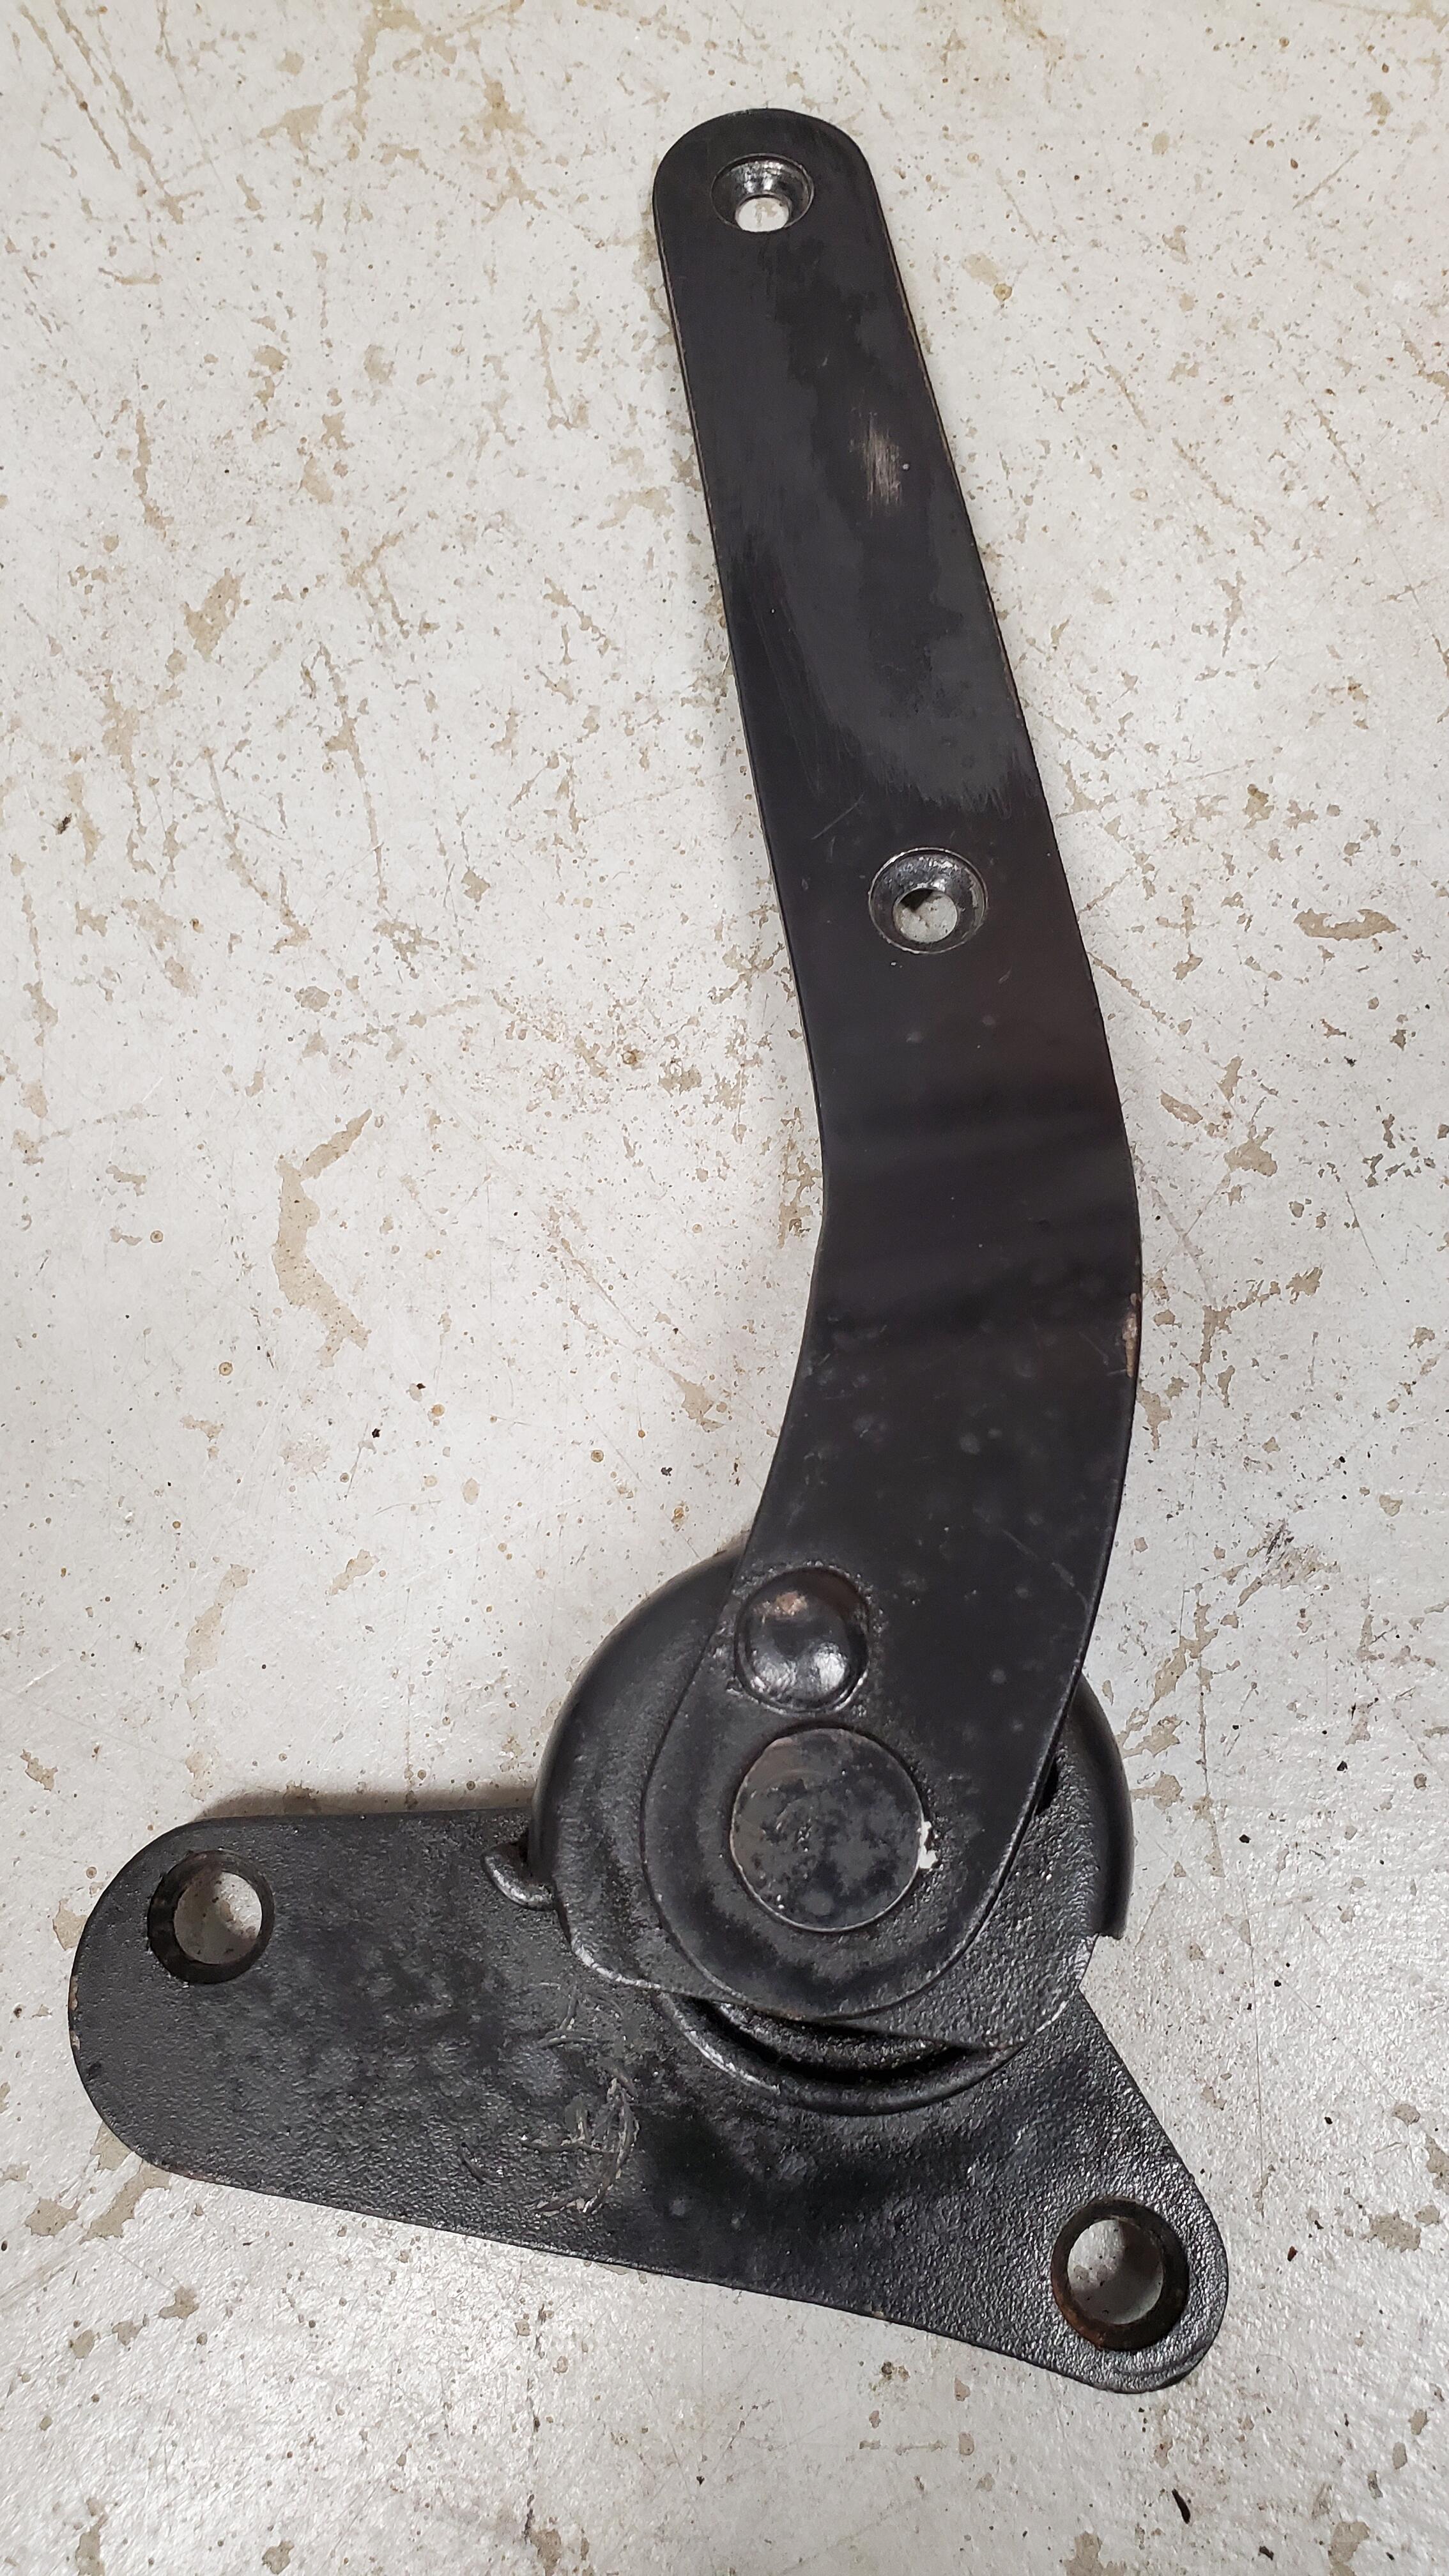
Just wanted to post some after pics of what've Ive done. Heres some before / after comparing a pair of the seat hinges I've finished vs what i took off the car. They aint perfect, but they are 100% better than what they were. The pics don't do justice to how badly pitted and so grease / dirt bound the mechanisms and steel were. Not bad for a 1st time DIY'r like me. Feeling good about the rest of the work I have planned. Also picked up a pair of the re-pop mechanism covers that were missing from both sides which I'll add back to the car when i finish the seats fully.


-
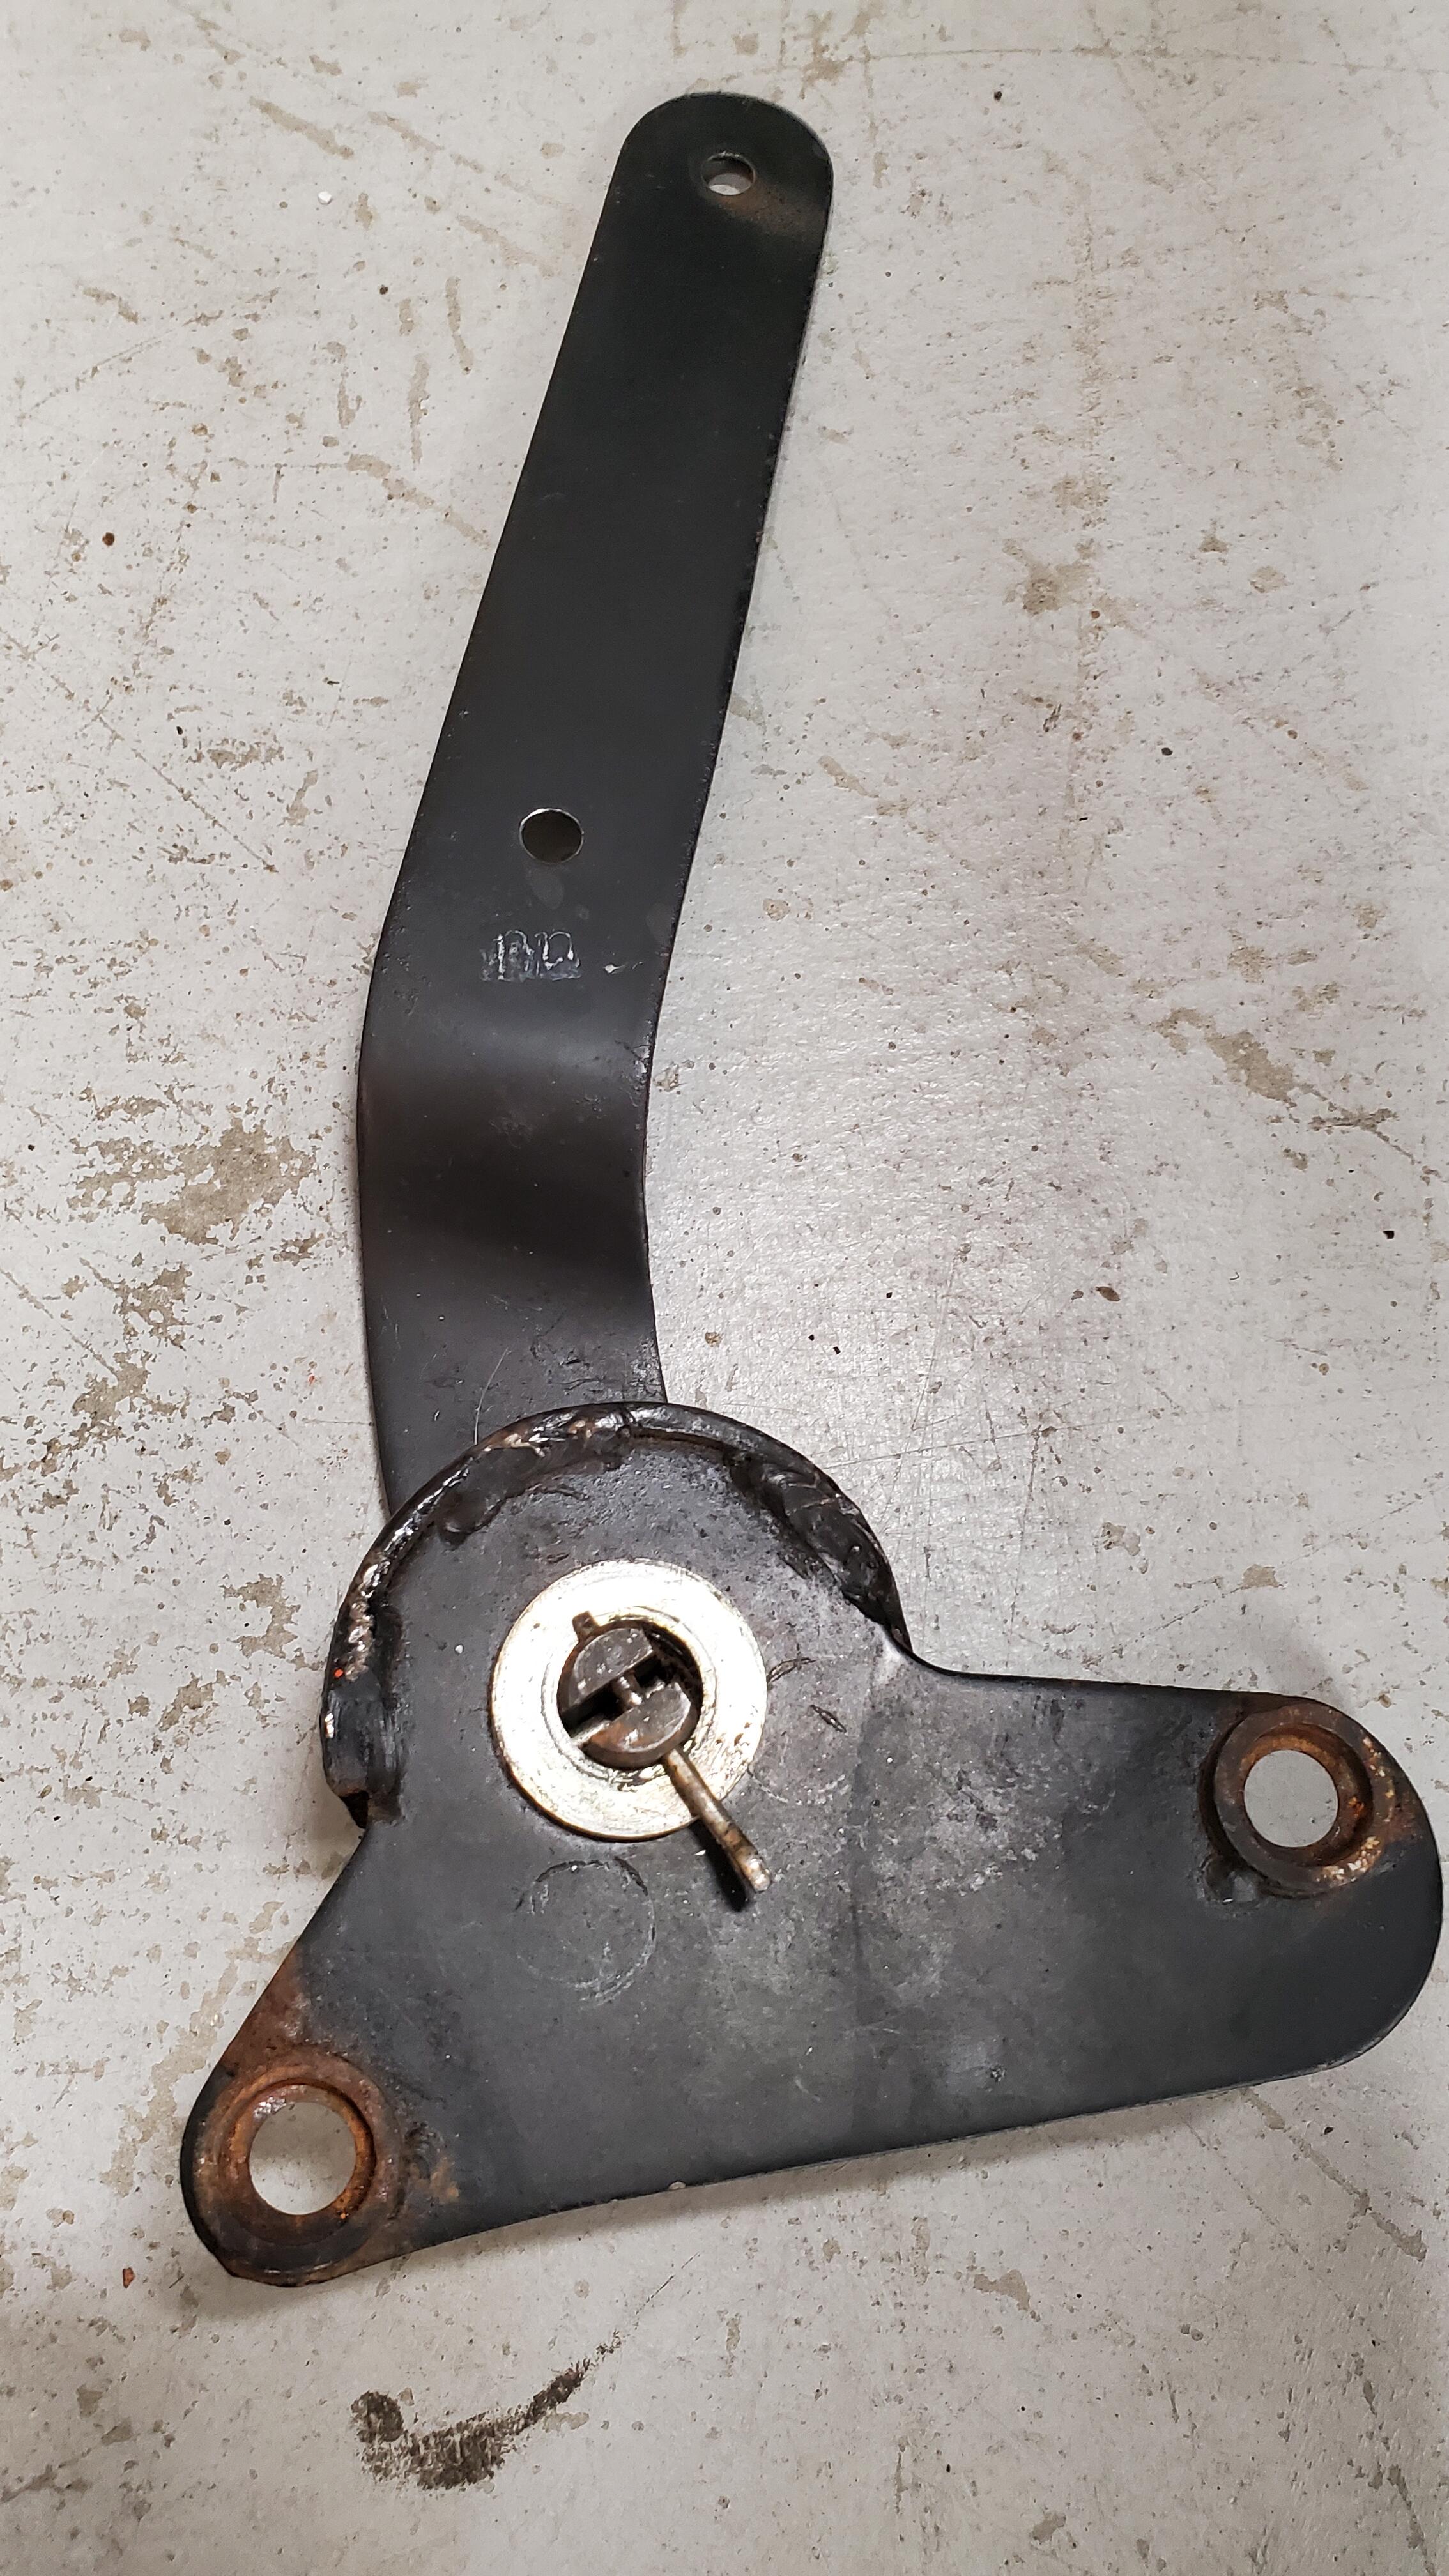
Lol well to be totally fair there's a little bit of tension when I put the spring back in the well and then take the lever side and line it up with the pin you do have to give it a little bit of a pull in order to move the pin that's welded onto the lever into its slot about a quarter inch so nothing to really write home about but just to be fair little bit of a pull is necessary to put it back together
-
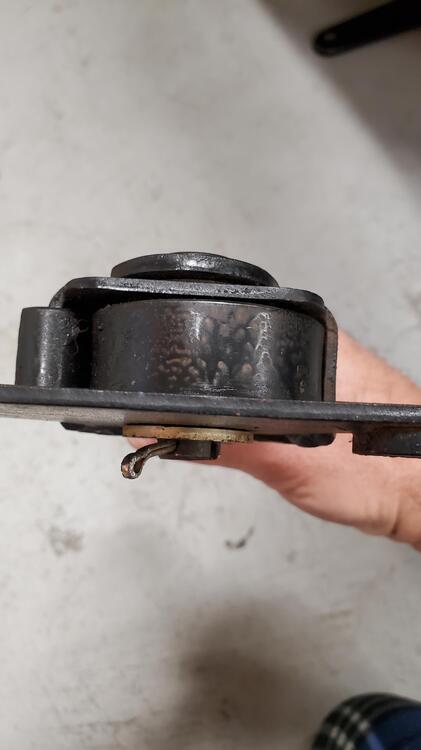
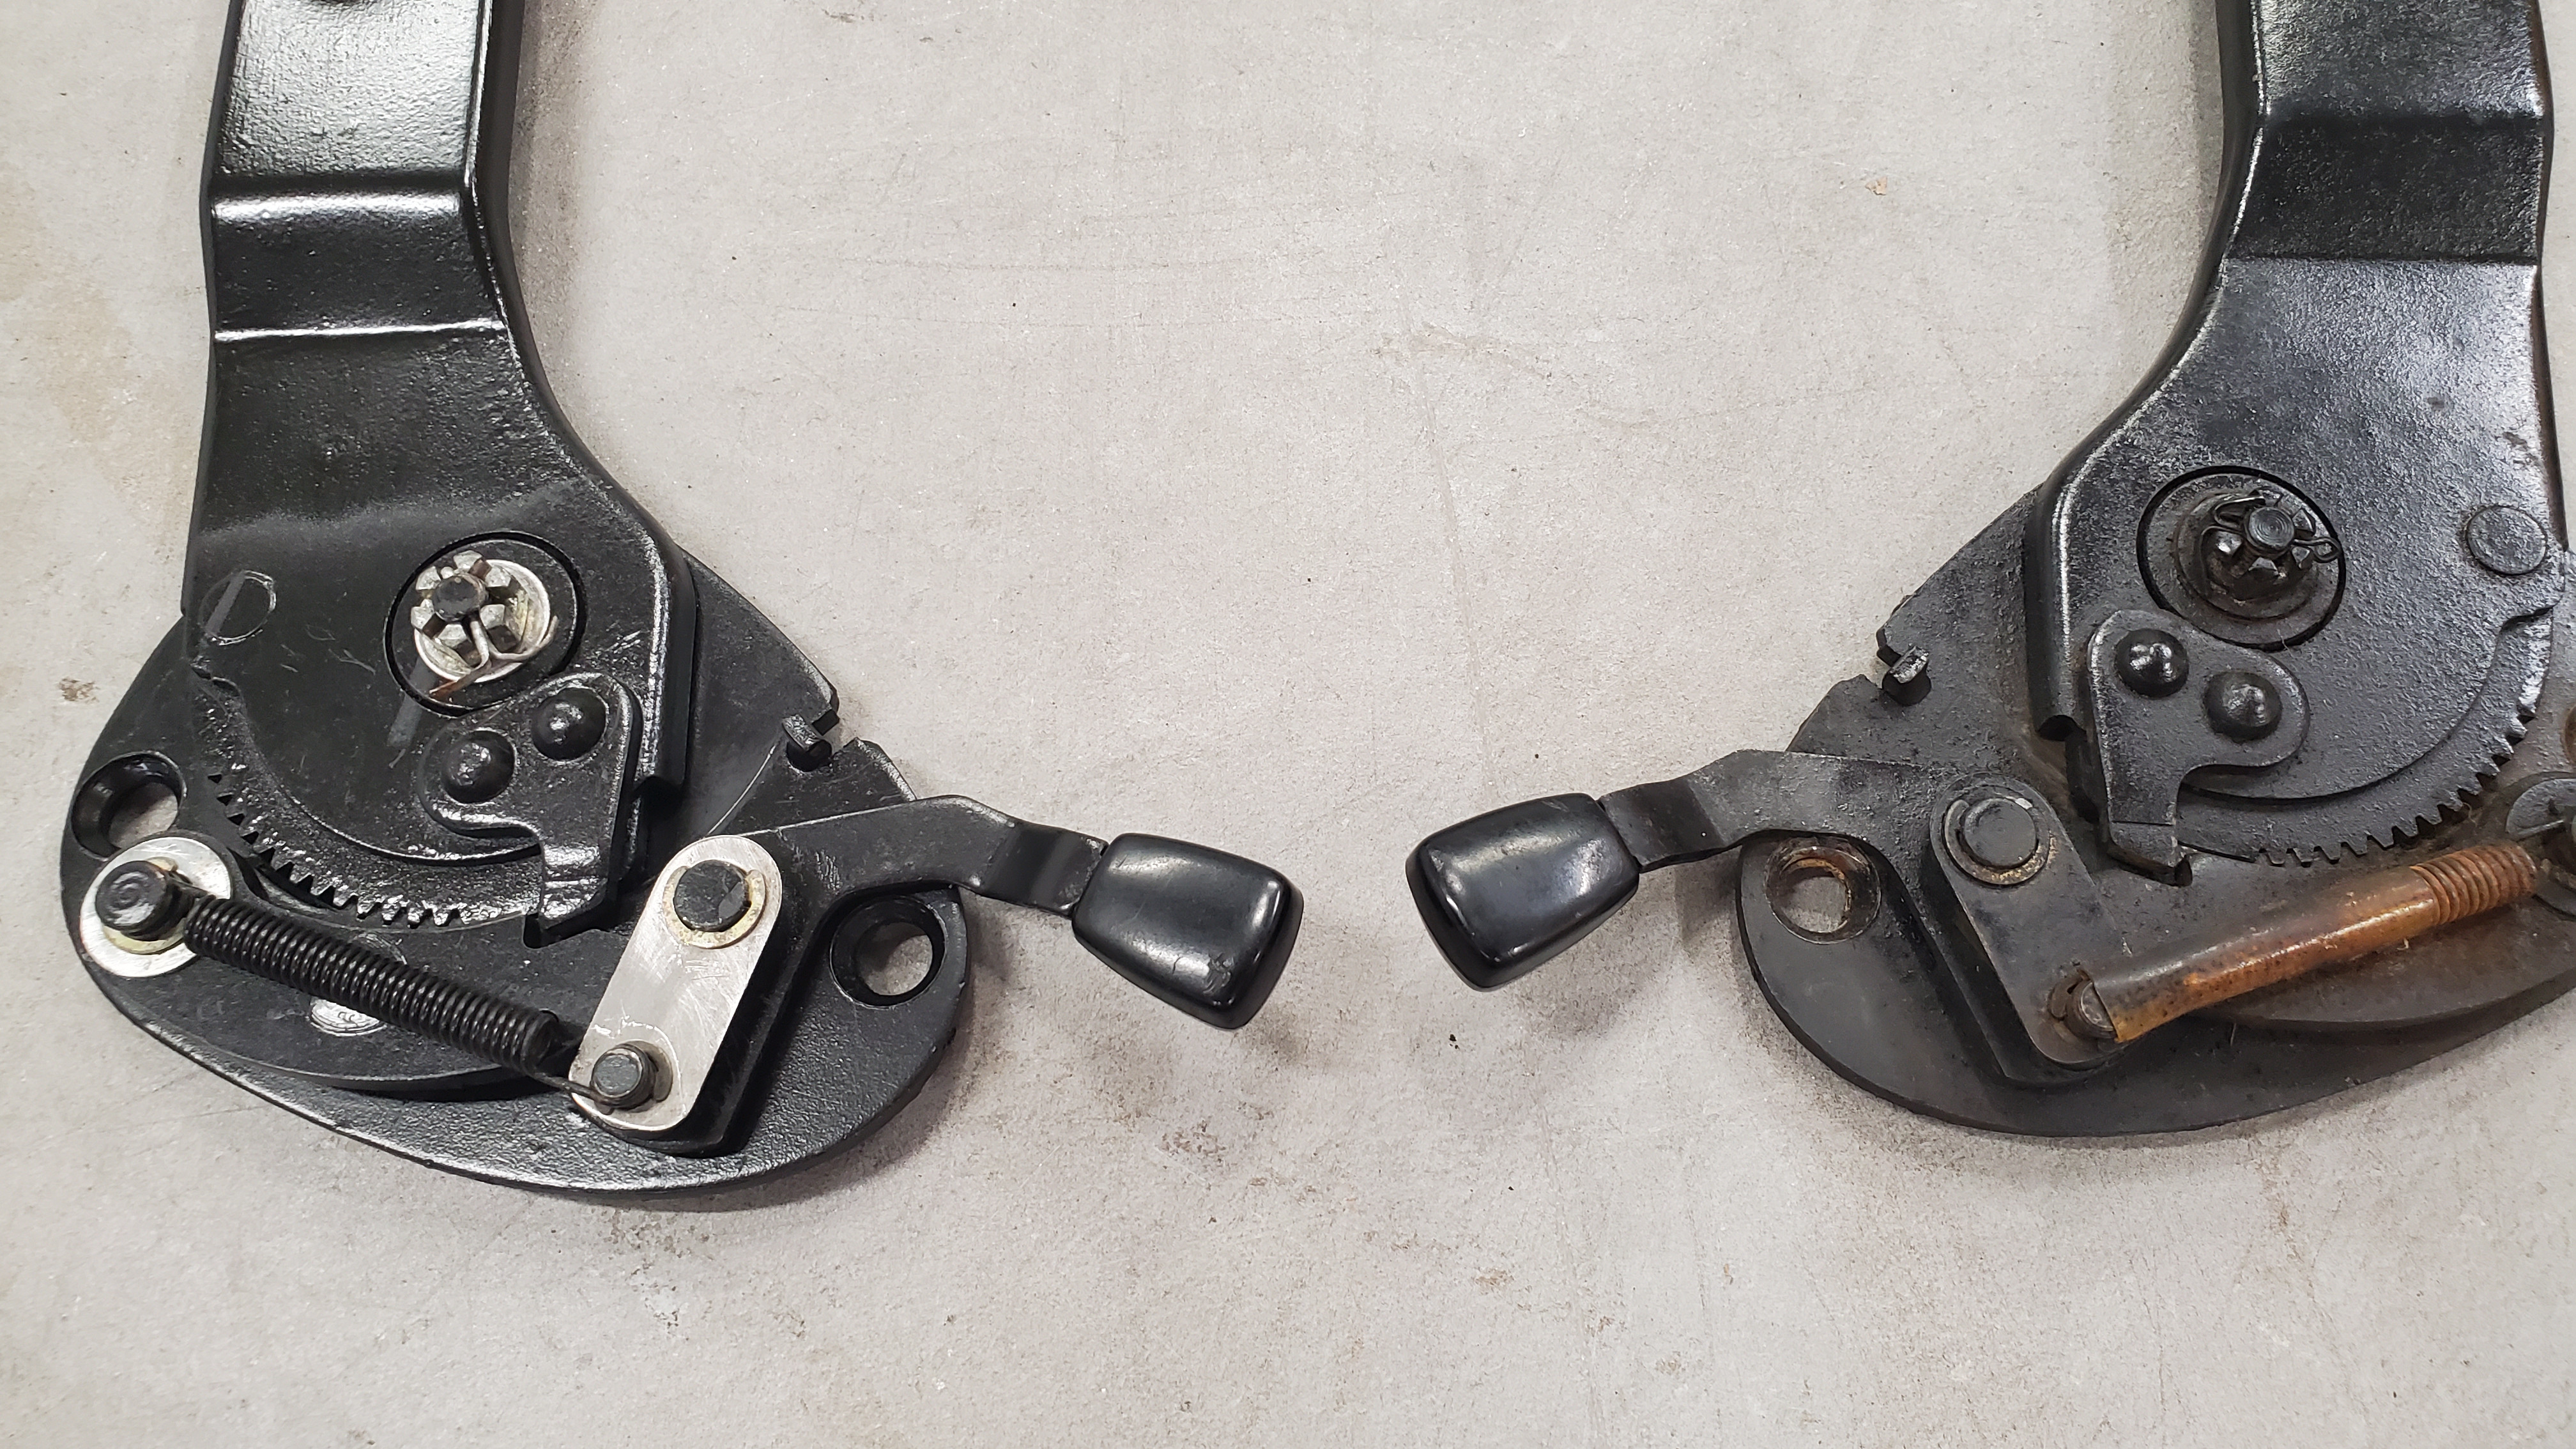
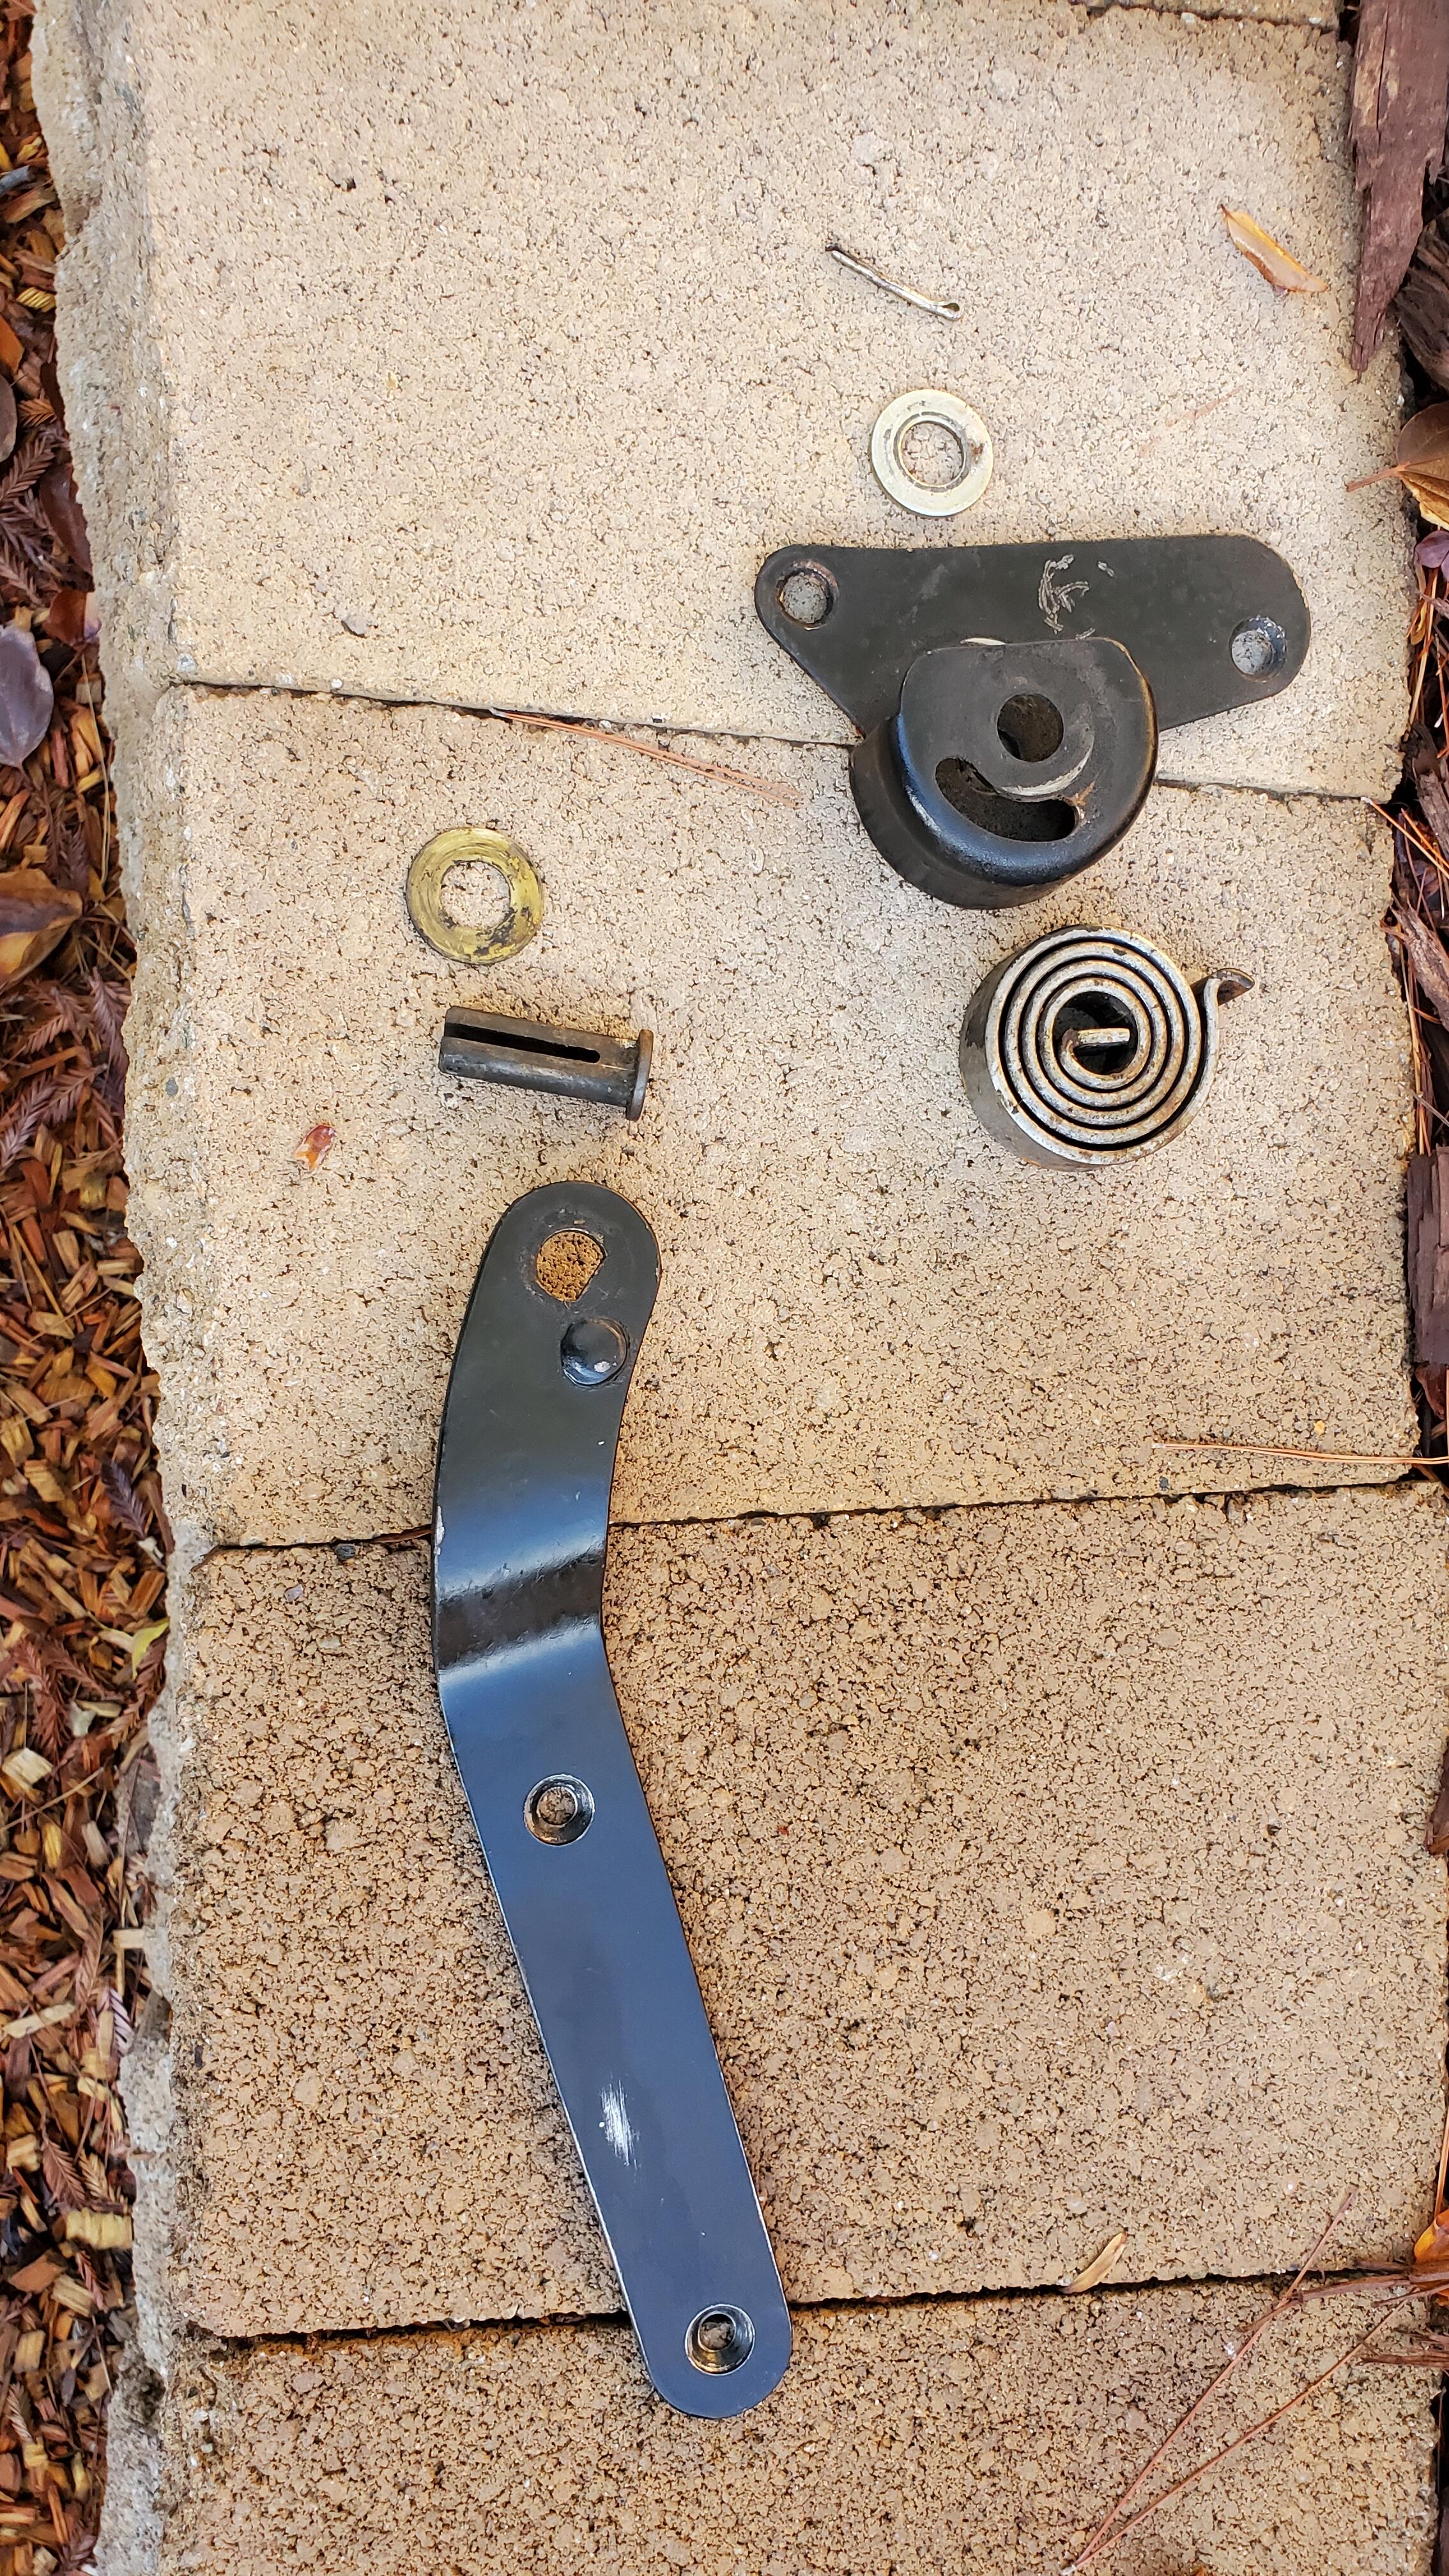
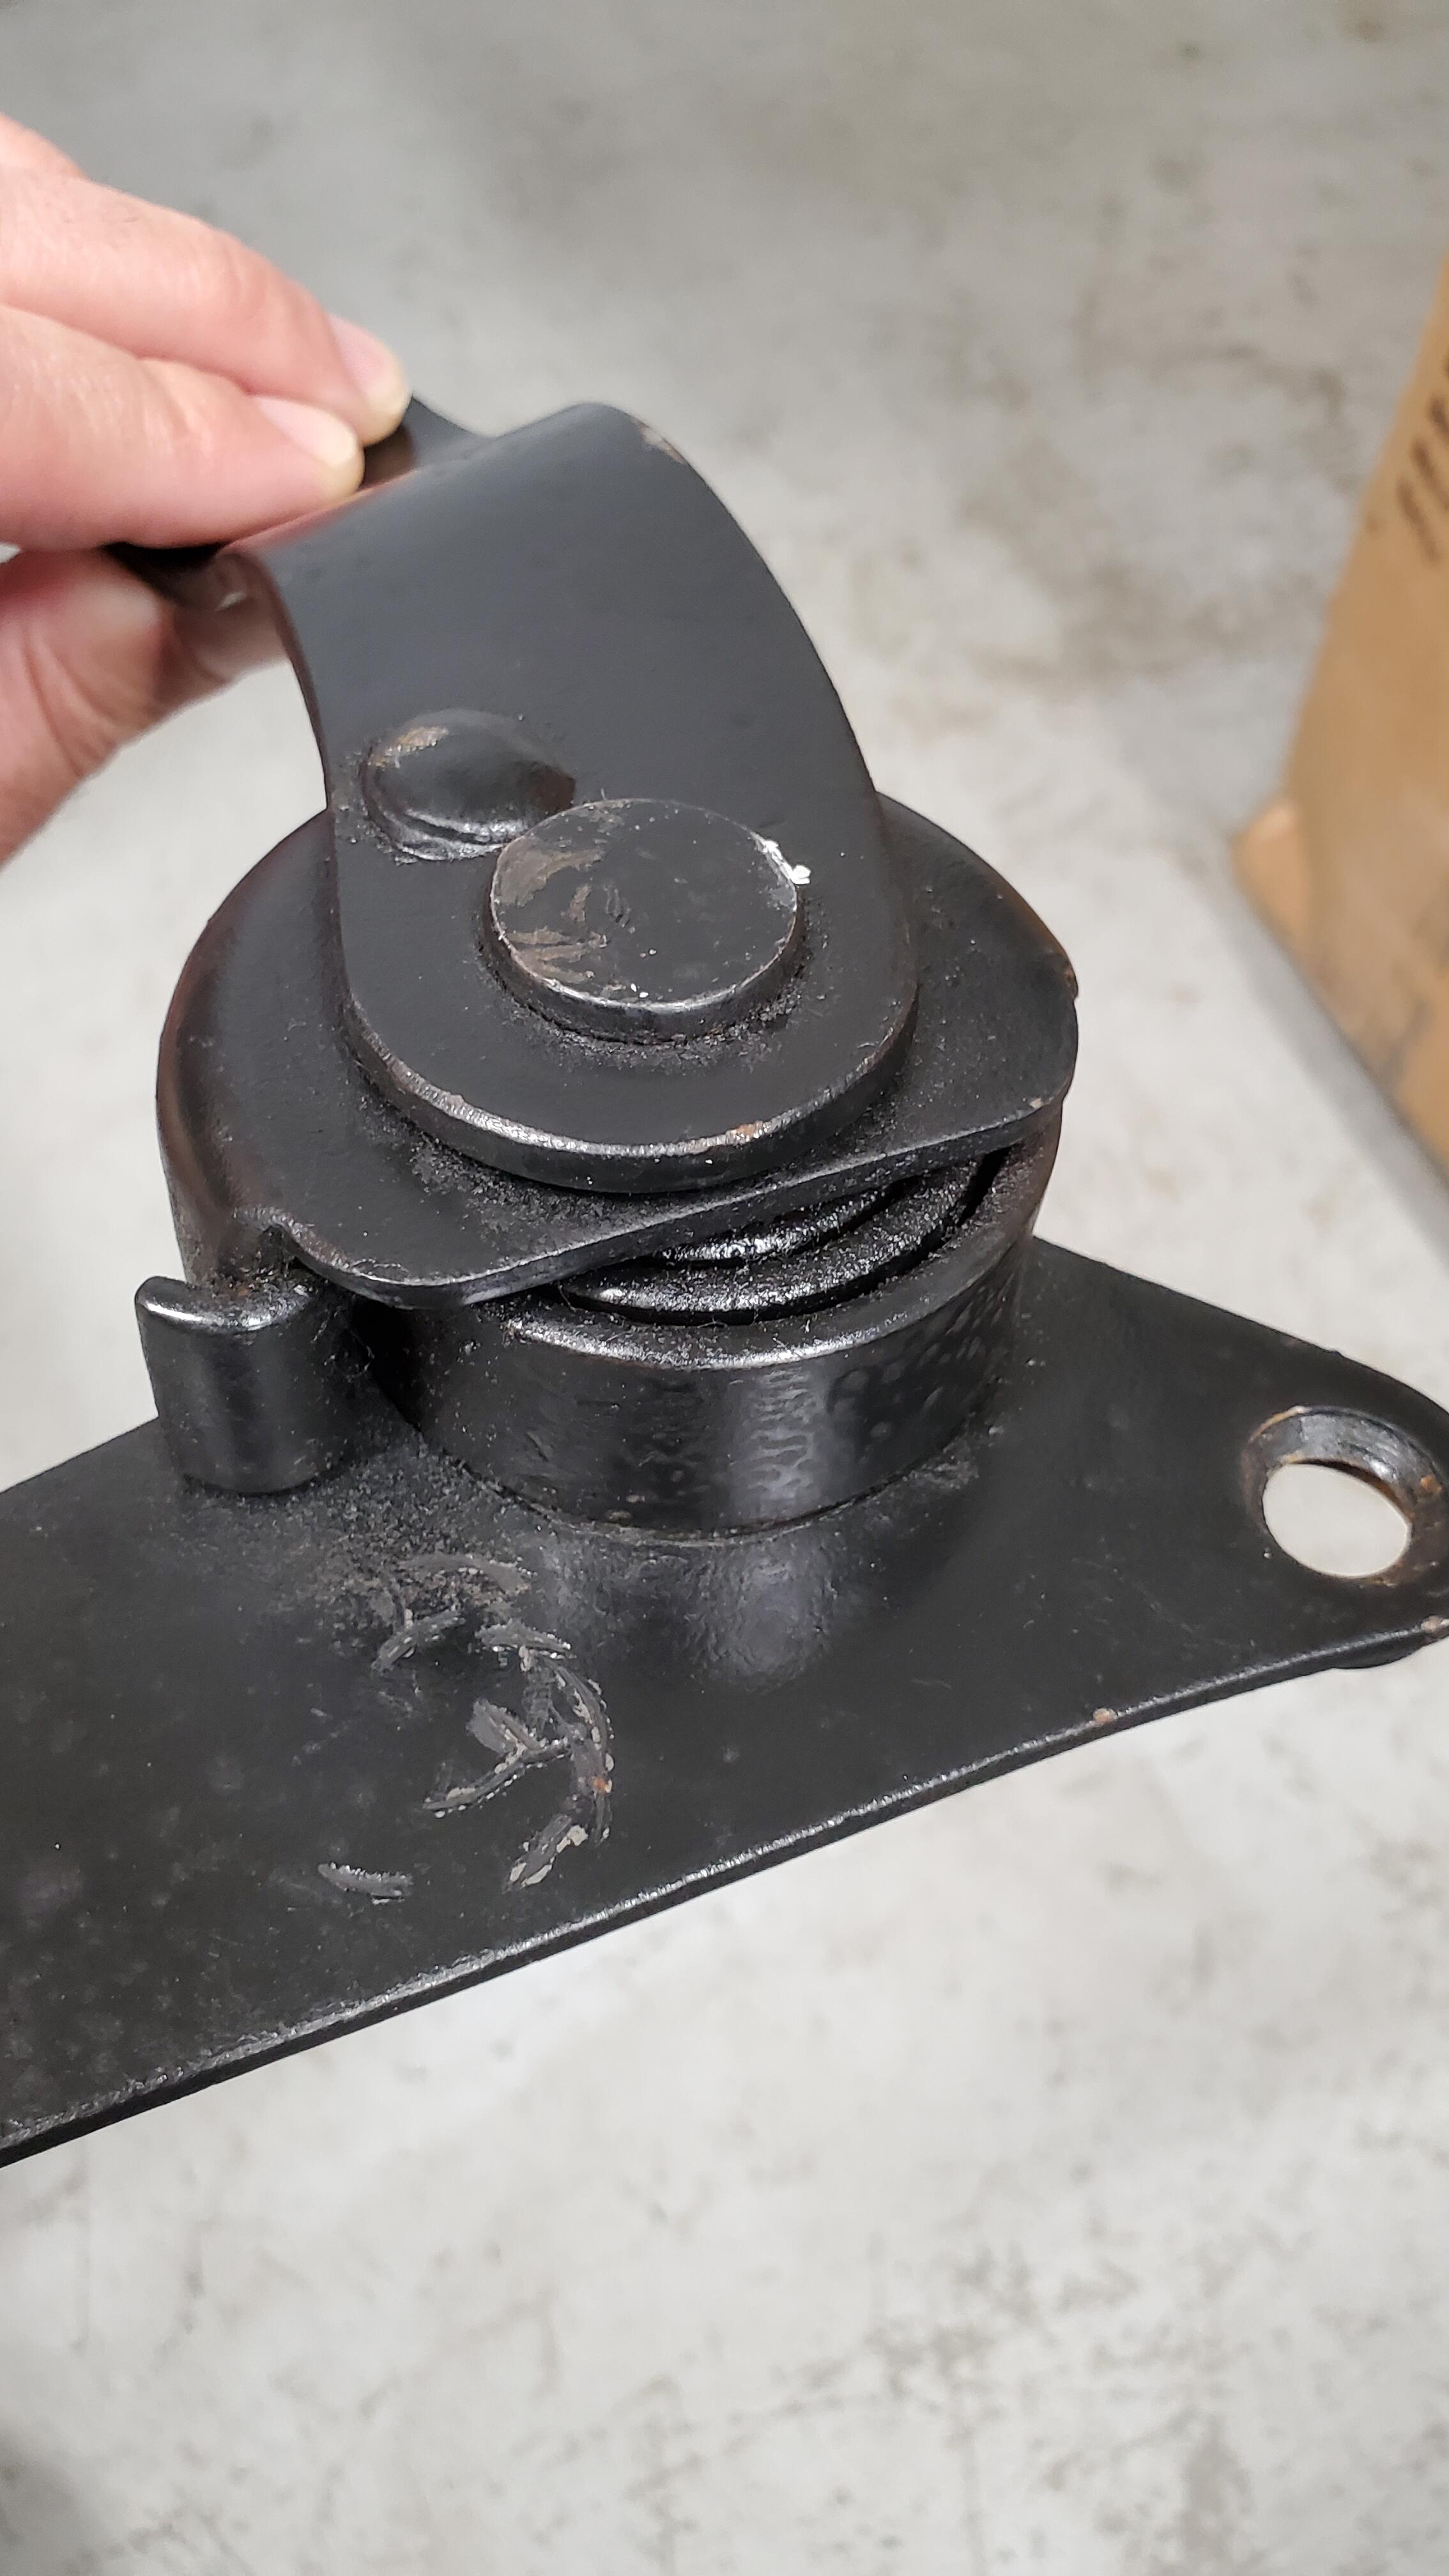
OK so i took a chance since cafebaltimore seemed to have no issues. Well, he was right. No danger nothing to worry about. Since i had no bench i went and made a makeshift set of blocks and just put it between there thinking the worst that could happen was the spring would unwind violently sending the base spiraling out of control. Set it up as shown to have some control over the base, pulled the cotter and washer and just a slight tap with a hammer dropped the pin out and nothing happened. the tension coil isn't under tension until you assemble it. second picture is all the components. piece of cake. Now i can clean and repaint as needed.

-
Paid up, but not sure I'm ready to cash that in yet. I like the idea of extending the arm to increase leverage, its a son of a gun to try and pull back just in hand. I've got tons of other stuff to get to, might leave these for a bit until I'm up to the challenge. I don't really have a good working bench at the moment so bolting them to something with enough of a sturdy platform is something I'll have to work out.
-
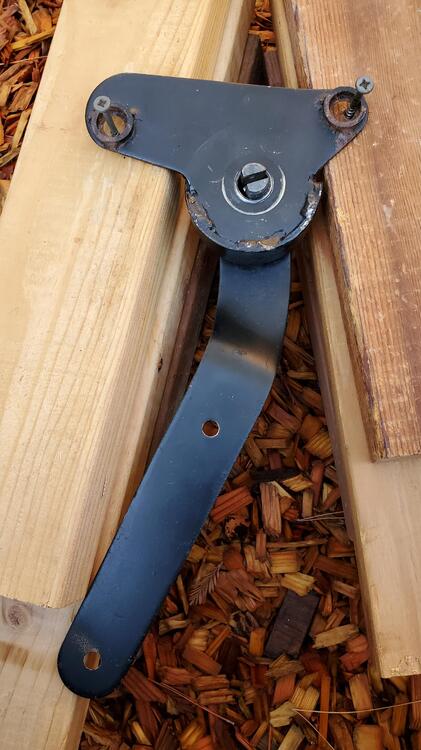
I think you guys may be right. But I did want to add some pics that i should have added yesterday. this is a two piece, probably three piece assembly. Seems there is a wound coil inside the side that has the "well" for it to sit in and then the lever side has that welded pin you see in a slot probably applying tension against the coil. They certainly don't need any repair, the tension is extreme so thats why i was so worried. I've heard others complain about the console side of the seat swaying back and forth, must be from a broken one of these. This was that other thread I was referring to, curious if anyone back then is still around for definitive answer? cafebaltimore seemed to have done it but doesn't explain how? unfortunately he's not been here since 2017 to ask.

-
Has anyone taken the seatback hinge apart that has the large high tension spring coiled up? Safely that is lol? I'm in the middle of a seat restoration and have the seat type with the full recline. The side with the lever and gear / spring is pretty easy. The other side I'm worried its not going to go back correctly or I'm gonna be in for a big surprise after I pull the pin and washer off. I've done some reading here and saw the same question from about 10 years ago but the replies never seemed to follow through on the answer. Any help would be appreciated. Also, I've started the degrease process and was going to paint everything a nice satin black. There's a ton of gunk on these, especially the mechanism side so it's hard to tell if this is all dirt grime, or some type of lube I need to reapply to the mechanisms. Thoughts about mechanism assembly after painting?


-
Great advice everyone. I should have some time tomorrow to try and eyeball a few things. I'll report back. Extra thanks to Zed, that pic will surely help. I'm not nearly enough familiar with all the lingo and location of everything yet. Speaking of lingo, Pilgrim i laughed when i read linguistic lubrication lol.
-
dutch come on man, that's the AWESOME button! 🙂 The guy i bought it from mentioned the radio was shot, probably just an old button he had laying around. I'm also missing the button on the hazard switch and it doesn't work. Mark I'll try that next time i can get her started. It's going to be another rainy day out here 😞 I noticed there's a summer winter valve on the air intake. i downloaded the manual, says over under 60F to use that. Any opinions on where that stands?
-
Mark to me it sounds like the front. More on the passenger side but the driver was thinking he heard both sides equally. Not sure if you could tell from the video but the sound was right there kind of behind the wheel.
-
Thanks Mark I'll give that a try. So no pumping pre start or part of the start? The guy that dropped it off says pump her three times and skip the choke. I was like ummm no I don't so.
-
New owner of a restored series 2 and here's a video of the long haul driver dropping it off at my house. It made an odd clunk as the wheels climbed the curb so I had him roll up a few times to capture it. Can anyone point me in the right direction from this video? Is this something to worry about? I haven't even driven it yet, just arrived yesterday and raining so I can't tell if the suspension is suspect. Suspension Clunk.mp4
-
LOL, that was the dealer video that finally hooked me. Still waiting to make my own. Here's some more pics. Seriously everyone thanks so much for the compliments. This is truly a community feeling.

-
1971 Datsun.mp4
-
Thanks all, I feel welcomed already! I added my vin and build to my profile but not sure I put it in the right place? Pointers? I started her up for the first time and man those chokes are fickle lol. Going to take a while to get used to it for sure. I wasn't able to get her out of the garage yet because of the weather but hoping to tomorrow. I did notice she seems to be running super rich or maybe that was just the choke and she'll lean out the longer I let her idle. Anyone have some tips for choke starting and how long to let her idle? It seemed as soon as i started feathering off she wanted to stall. As for the drip, i do see a bit of old stuff on the pan but it seems like it's up passenger front. I only had her running for a few minutes and maybe not enough to get fresh drips to eyeball.
-
Thanks! I'm dying to get my first spin, at home with the little one waiting for the wife to return. It's like waking up before your parents xmas morning and sitting by the presents lol.
-
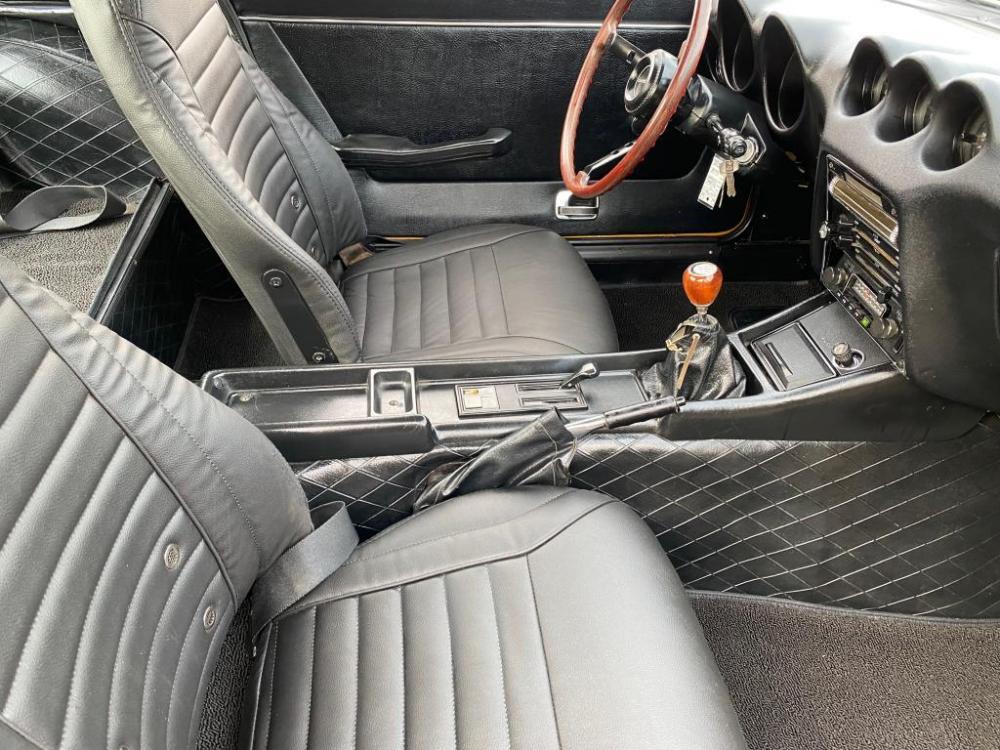
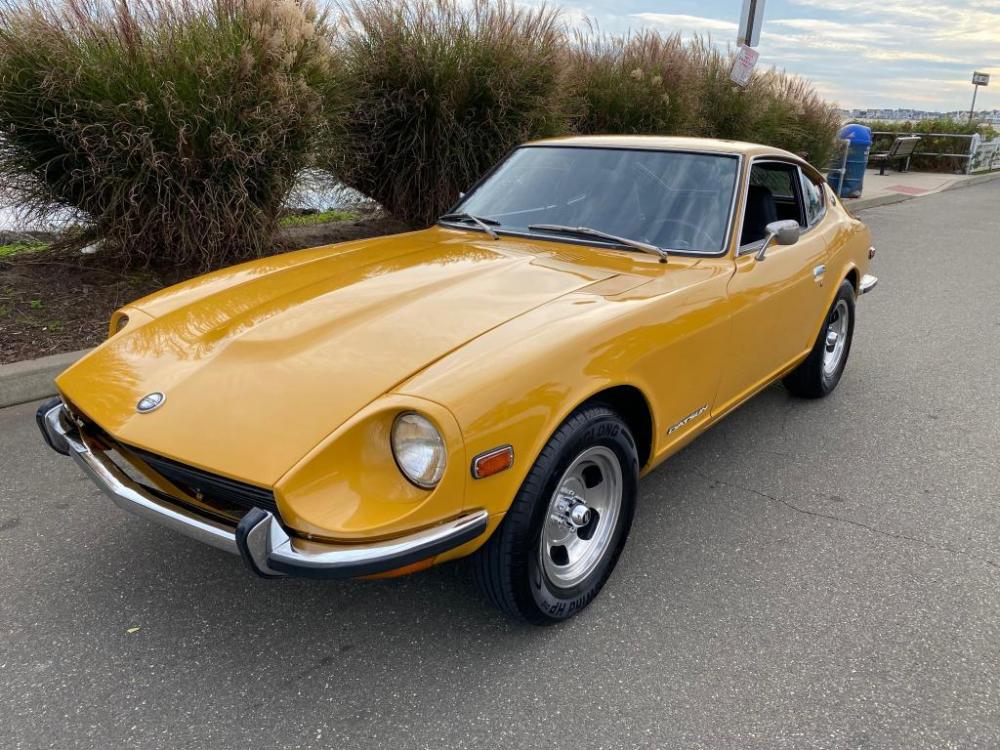
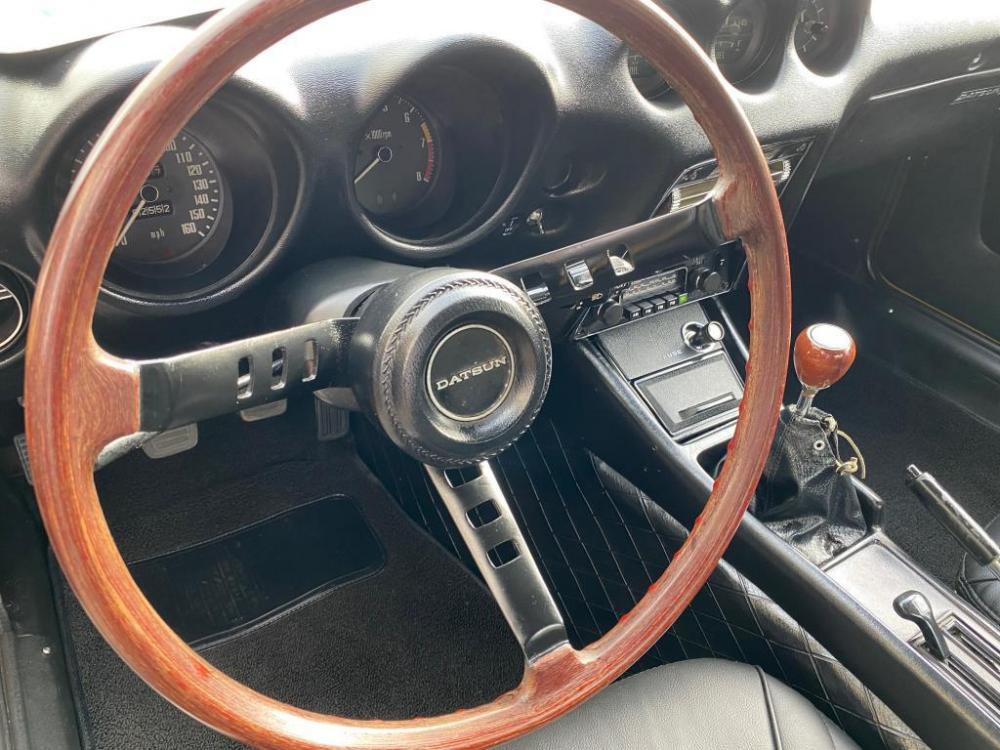
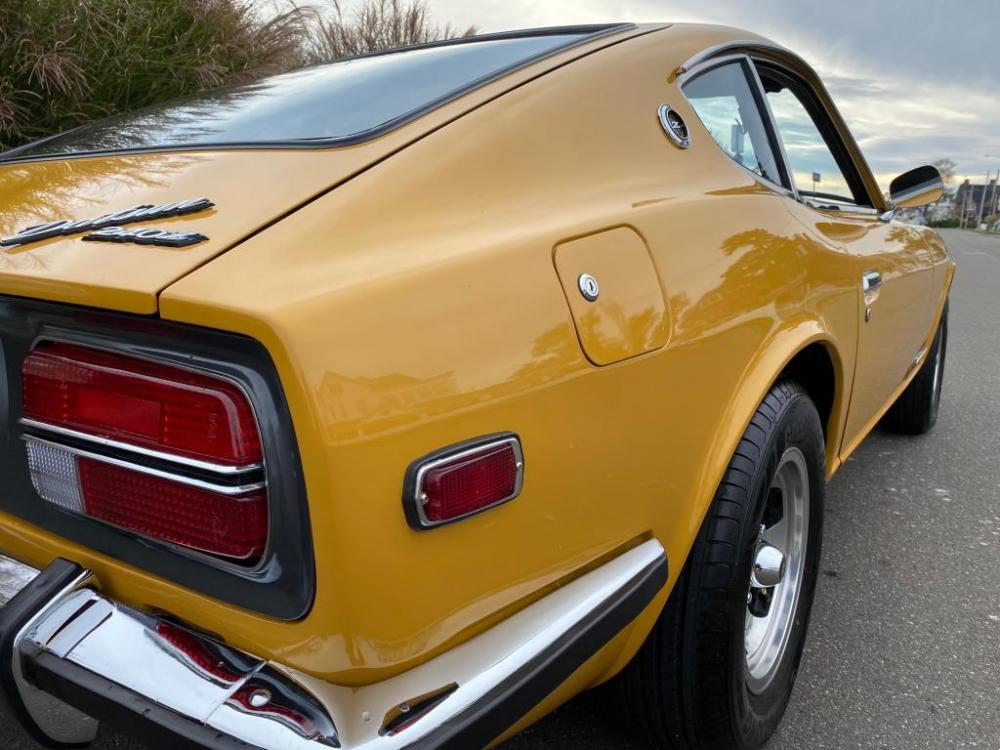
Hi everyone, Richie G here recent owner but long time lover of Z cars. Child of the 70s and my first introduction to the Z car was a friend who had an original 240Z (not sure which year I was so young). When I turned 18 (1989) I bought my first Z a 84 300ZX that was rather rough but I loved it. Babied it for 10 years then needed to sell it as i moved to CA for work in 99. Here we are over 20 years later and the wife let me buy my dream car, that original 240. I just picked up a beauty, matching numbers fully rebuilt engine with interior restored. Has a few cosmetic things here and there but nothing major to deal with. It will be the little things I get to enjoy restoring myself 🙂 It just got dropped off yesterday from a long haul Connecticut purchase and I haven't even driven it yet 😞 Hoping to get out today if the weather lets up a bit. As I'm inspecting it I noticed a drop of oil (assuming )under her way back in the mid section (about where muffler connects to pipe) so it must have come from the pull into the garage. Haven't gotten under her yet to fully take a look though. I'm hoping it's nothing major. Which leads me to my question, anyone on here know of a decent Z mechanic in the Sacramento / Roseville area I can take it to? I want to have it once overed making sure everything is mechanically sound, tuned, etc before I really start enjoying it. I'm somewhat mechanically inclined but I recently had back surgery and I just can't spend too much time down under or in her just yet. I really appreciate any help someone can give. Richie
.thumb.jpg.39f741e4ff2812d5a2e2b4738233bbb3.jpg)


.jpg.64dad8b15b01236a2fbd8aec443fb07f.jpg)