JagoBlitz
Free Member
-
Joined
-
Last visited
Everything posted by JagoBlitz
-
I will probably be using 2 relays. The advantage of the Bosch style relays is that that they are still available and easy to find in case they need to be replaced. I will also keep some of the original relays, but I want to keep the amount of them to a minimum.
-
2 separate relays is my Plan B, but I would like to use as few relays as possible because I will also add new relays for the headlights and an electric fan .... and I fear I might be running out of space. But if there is no other way I will go down that route. Thank you for the link, that helps a lot.
-
That's good to know, but I am thinking about replacing them with modern equivalents, so that I can use them with a modern relay holder/ fuse box.
-
My car was built 08/1977 - I think I have a different relay layout. Or we are talking about different relays.
-
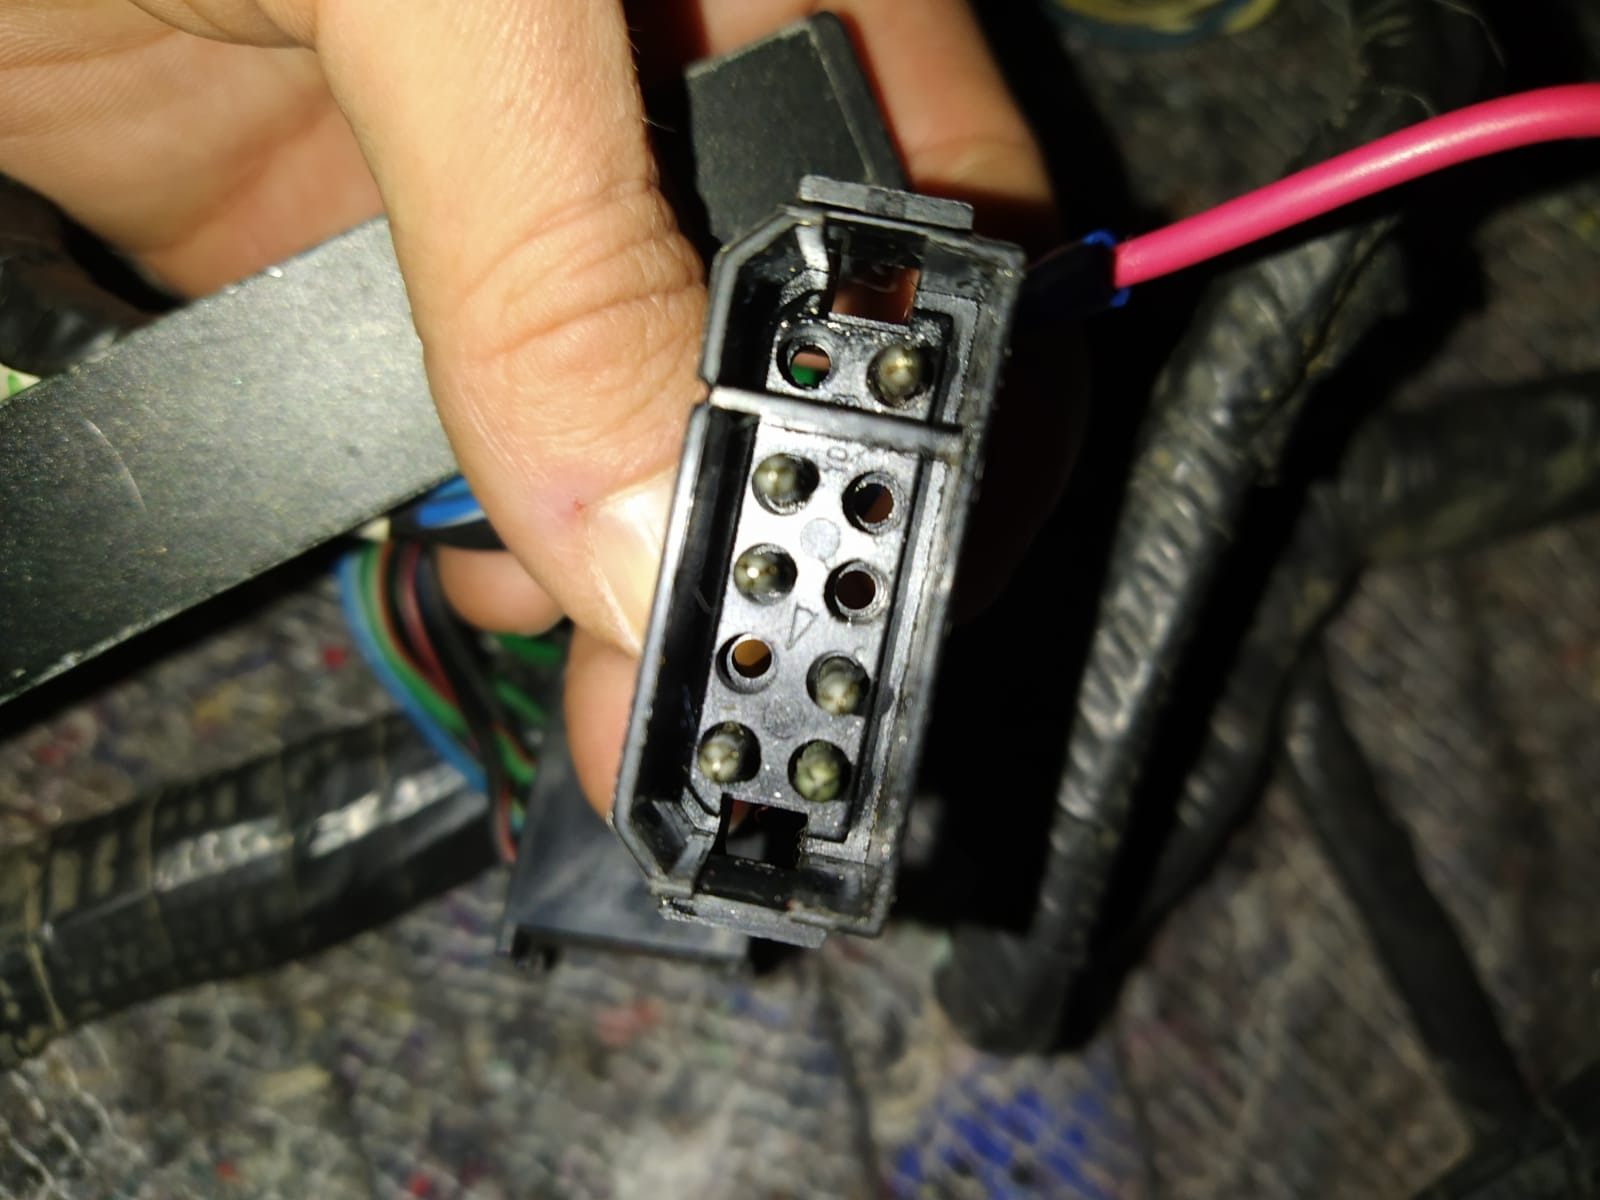
Male contacts on the ECU are 3.0mm.
-
I agree, it is not much difference, but there is a difference compared to the drawing. And all contacts are 3.00 +/- 0.03mm.
-
Maybe the JPT are the correct ones or at least compatible, I just ordered them to test if they might work. But on the drawing I found a width of 2.80mm and I measure 3.00mm. Because I don't have the correct extraction tool right now I could not compare other dimensions yet.
-
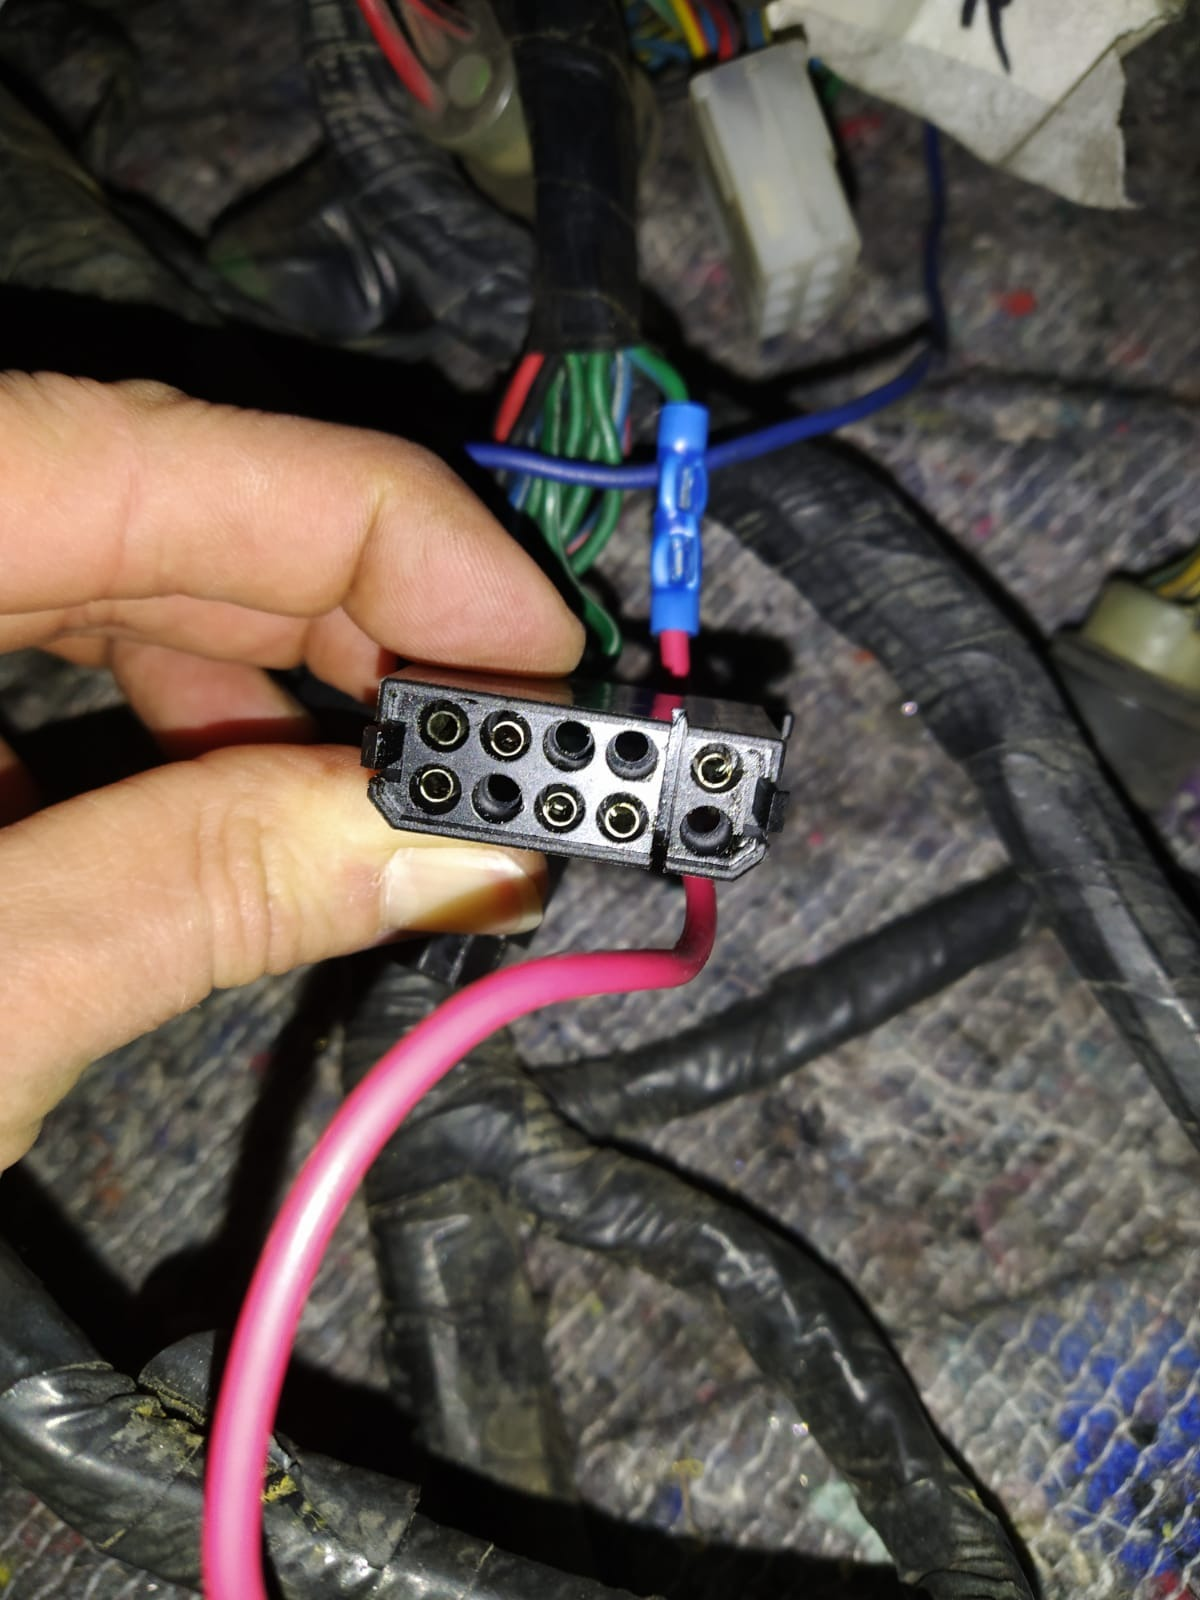
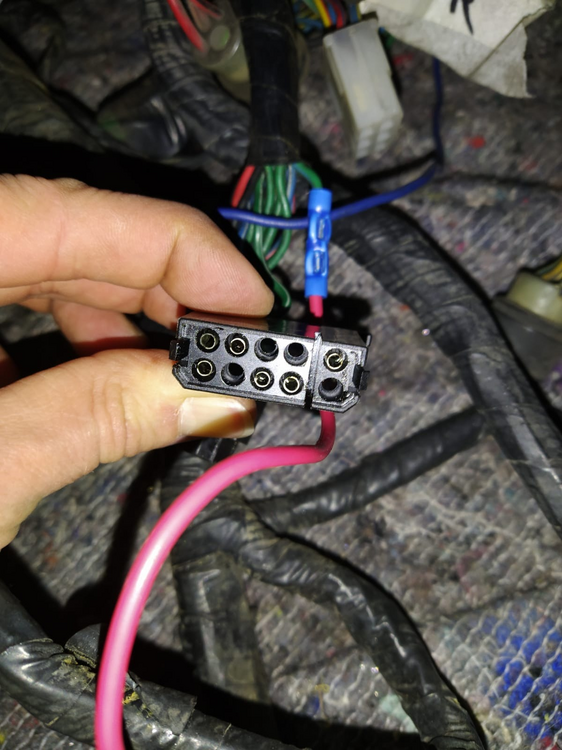
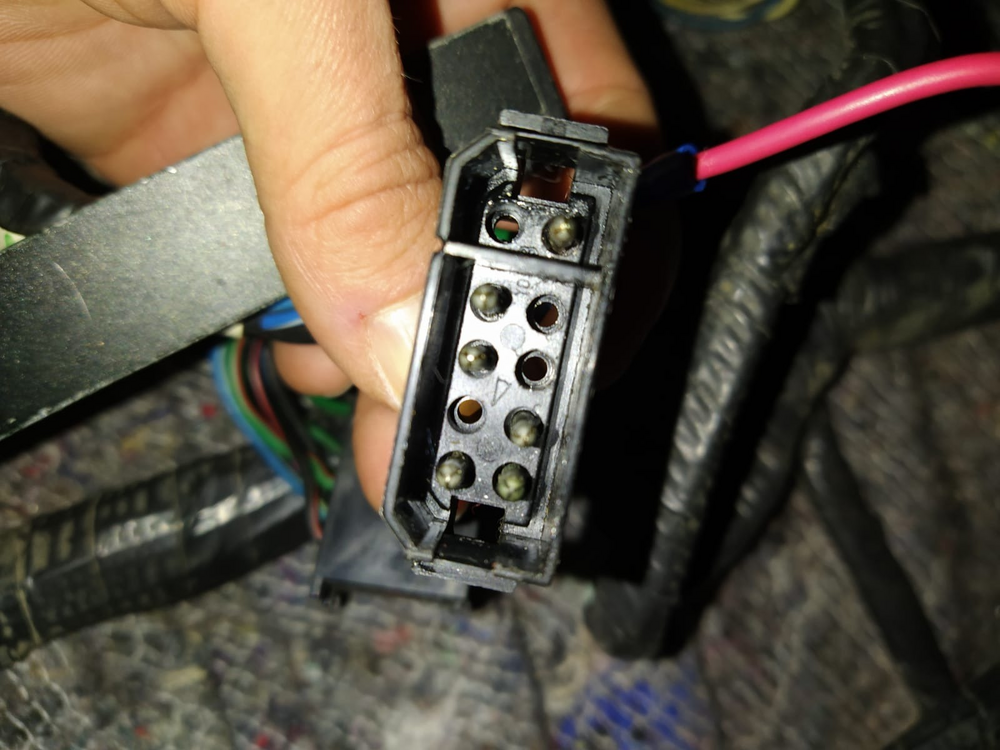
Are there any part numbers for the old male and female Yazaki contact pins? Beside a suitable extraction tool I am also looking for new pins that I can use with the old connector housing. One of the previous owners bypassed a wire and I would like to integrate it into the connector again.
-
Hello, does anybody know what contacts are the correct ones for the 280Z 35Pin ECU connector? It is an AMP connector, but I cannot find the correct contacts. At first I thought it were the Junior Power Timer contacts, but they don't have the exact same dimension - they seem to be a little too small...according to the drawing that I found. I would like to completely rewire the injectors. Thank you for your help.
-
Hello, I own a 280Z and in the book "How to Modify Your Nissan & Datsun OHC Engine" by Frank Honsowetz he describes enlarging the oil-jet from 2.0 mm to 3.17 mm to increase oil flow to the head to improve oil lubrication of the Cam and rocker arms. I found out that the L28ET uses a different oil pump and different oil jets. Unfortunaly, I cannot find the bore size of these jets anywhere and I am really curious if the Nissan engineers increased the oil flow to the cylinder head for the Turbo version. Does anybody have the opportunity to measure the openings of the oil jets for me? Thank you very much.

-
Does anybody have a good replacement heater core that fits into a 280z? The recommended part from the Ford Escort is a little too wide.
-
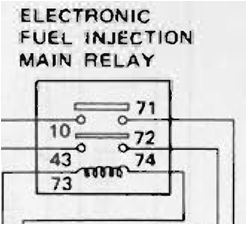
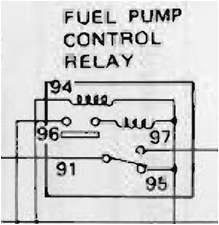
Hi, I am planning to upgrade all fuses and most relays in my 1977 280Z. Are the any good modern standard replacements for the Fuel Pump Control Relay and the Electronic Fuel Injection Relay? Or is the only way to achieve the same function by using multiple standard relays? Thank you for your help.
-
There were the wrong nuts in the package.
-
Just FYI. I had two wrong gland nuts in the package. M52 was required, but they were only M51. Without the damper centering the gland nut, it was a very loose fit and the nut popped out at around 50Nm. The outer diameter of the gland nuts should be around 51.80mm to work correctly.
-
I know that you want to help me and I appreciate it, but I still would like my original questions answered. I was offered a refund, if I sent back the dash, but I need a good dash. Is this a new problem with a new batch? Or is this normal and most people accept this?
-
First photo is from the first dash and the other one is from the replacement. The problem is that the commmunication is not very good (it took me a couple of months to get a replacement) and I live in Germany which always causes additional shipping and fees with customs. The replacement dash look better at the center gauges, but the air vents are now the problem. But TBH I lost faith in them. Before shipping I received photos which showed the center gauge area and the photos were not from the dash that I then eventually received. There is no alternative, so I either have to live with it or find a way to repair it.
-
Hi, I received two dashes and each one had too much vinyl cut away - either at the center gauges or at the vents. Am I just extremely unlucky? Is this a new problem with a new batch? Or is this normal and most people accept this?

-
It's a different problem. I have the same issue like av8ferg described here: https://www.classiczcars.com/forums/topic/61542-koni-sports-for-classic-zs/?page=12#comment-628560 https://www.classiczcars.com/forums/topic/61542-koni-sports-for-classic-zs/?page=12#comment-628872 I am already in contact with MSA - I will disassemble everything tomorrow and get measurements so that we can find out if either the thread on the strut or the gland nut are out of spec.
-
I used the gland nuts supplied by Koni.
-
I ran into the same problem, but only with the front strut mounts. The gland nut popped loose again before I could reach the required torque spec. Compared to the rears, the front gland nuts had a very loose fit. I didn't feel like disassembling the rears again and measure/compare everything, so I just torqued them with a lower value. But I could check the front gland nuts again. What outer thread diameter should the gland nut be? I think either the thread of gland nut was manufactured too small or the thread diameter in the strut is too large.
-
That's the one. But basically any other camber plate or strut mount without the D shape design will have this problem.
-
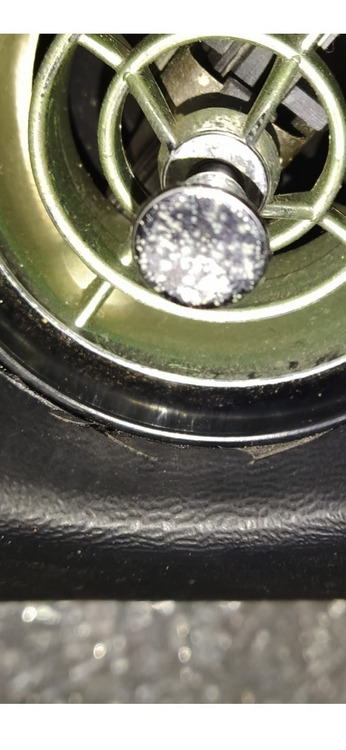
I give up. I will use the OEM parts again and will not use the Insulated Spring Seat & Strut Mount Set from MSA and see if I will have any bump stop issues. You can get enough grip on the damper shaft go get the nut down, but it is still too slipperey to get any decent torque applied. And with the dust boot in the way it is also a PITA to even get a good grip. If anybody manages to do this without an impact gun, please let me know.
-
The problem is that once the lock part of the nut is engaged there is no way to prevent the damper shaft from spinning. Below is not enough space to hold onto the D-shape with an open spanner- I could try to fabricate something from sheet metal though to hold it and get the nut going untiI I can grab the D-shape from above. I really don't want to cut/remove any material from brand new dampers. Alternatively, I could just use 2 nuts instead of 1 lock nut, that would make the assembly easier, but I would still need a tool to grab the D-shape securely from above. In addition, I would need a torque wrench with an open spanner. If the top mounting insulator just had a D shape like the OEM design has, this would make things a lot easier.
-
Does anybody else have an idea how to assemble this without an impact gun?
-
Hello Lee, you mentioned this case where you do not have a top hat with a D shaped mounting hole. What is the best practice here? I am scratching my head how to prevent the damper shaft from spinning freely... especially with the nylon lock nut it is very difficult to fasten it. Is there a special tooling for this to hold everything in place and prevent damage? Thanks.