cbuczesk
-
Posts
1,024 -
Joined
-
Last visited
-
Days Won
9
Content Type
Profiles
Knowledge Base
Zcar Wiki
Forums
Gallery
Events
Downloads
Store
Blogs
Collections
Classifieds
Everything posted by cbuczesk
-
That's an easy fix. Let's flag his ad! Chuck
-
There's a lot of rust that we can see and I'm sure there's more that we don't see. Those side skirts are usually installed to hide rusty rockers. It looks like in pic #11 there's some filler above the left tail light. Has anyone ever seen a blower motor housing that rusty? Sandblasting the roof may have caused warping. I wonder how the rust is in the door jams and cowl. The engine/trans would probably sell for $500-1000 as-is. Maybe less based on how he presents himself. Since fixing the rust is "SIMPLE" maybe he'll fix it for you. Chuck
-
Don't get rid of any of them. Add on to the garage! :-) I know what you're saying. Having 4 (or 19) cars takes up a lot of your time. I'd probably let the 280Z go if I had to choose. Chuck
-
It should be about 1/4" on the front and back of the door. Don't worry about the top and bottom. Just make sure that the body lines are correct from the fenders to the doors to quarters. To get the correct door gaps you might have to adjust the fenders. If you do that then you might have to adjust the hood. It can take some time but it's worth it in the end. Chuck
-

Redid My Tension Compression Rod Bushings Today
cbuczesk replied to Captain Obvious's topic in Suspension & Steering
I built an early 71 Z for a friend and he liked the ride quality when he brought it to me so he wanted to stick with the original style rubber bushings all around. When I took the car apart I discovered that all of the bushings were urethane. Since he was happy with the ride quality before the build we decided to keep the urethane. Just thought that I'd throw that out there... Chuck -
You can't access the bottom of the rivets because the panel that he's trying to remove is in the way. You might be able to unclip the panel at the bottom and bend it up but then you'll have a bent panel, possibly scratched tail light and damaged paint on the hatch ledge. I'm sure that drilling it will work just fine. Chuck
-
1/8" drill bit? You can use a larger bit to remove the head but you have to be careful so you don't drill into the trim panel. Chuck
-
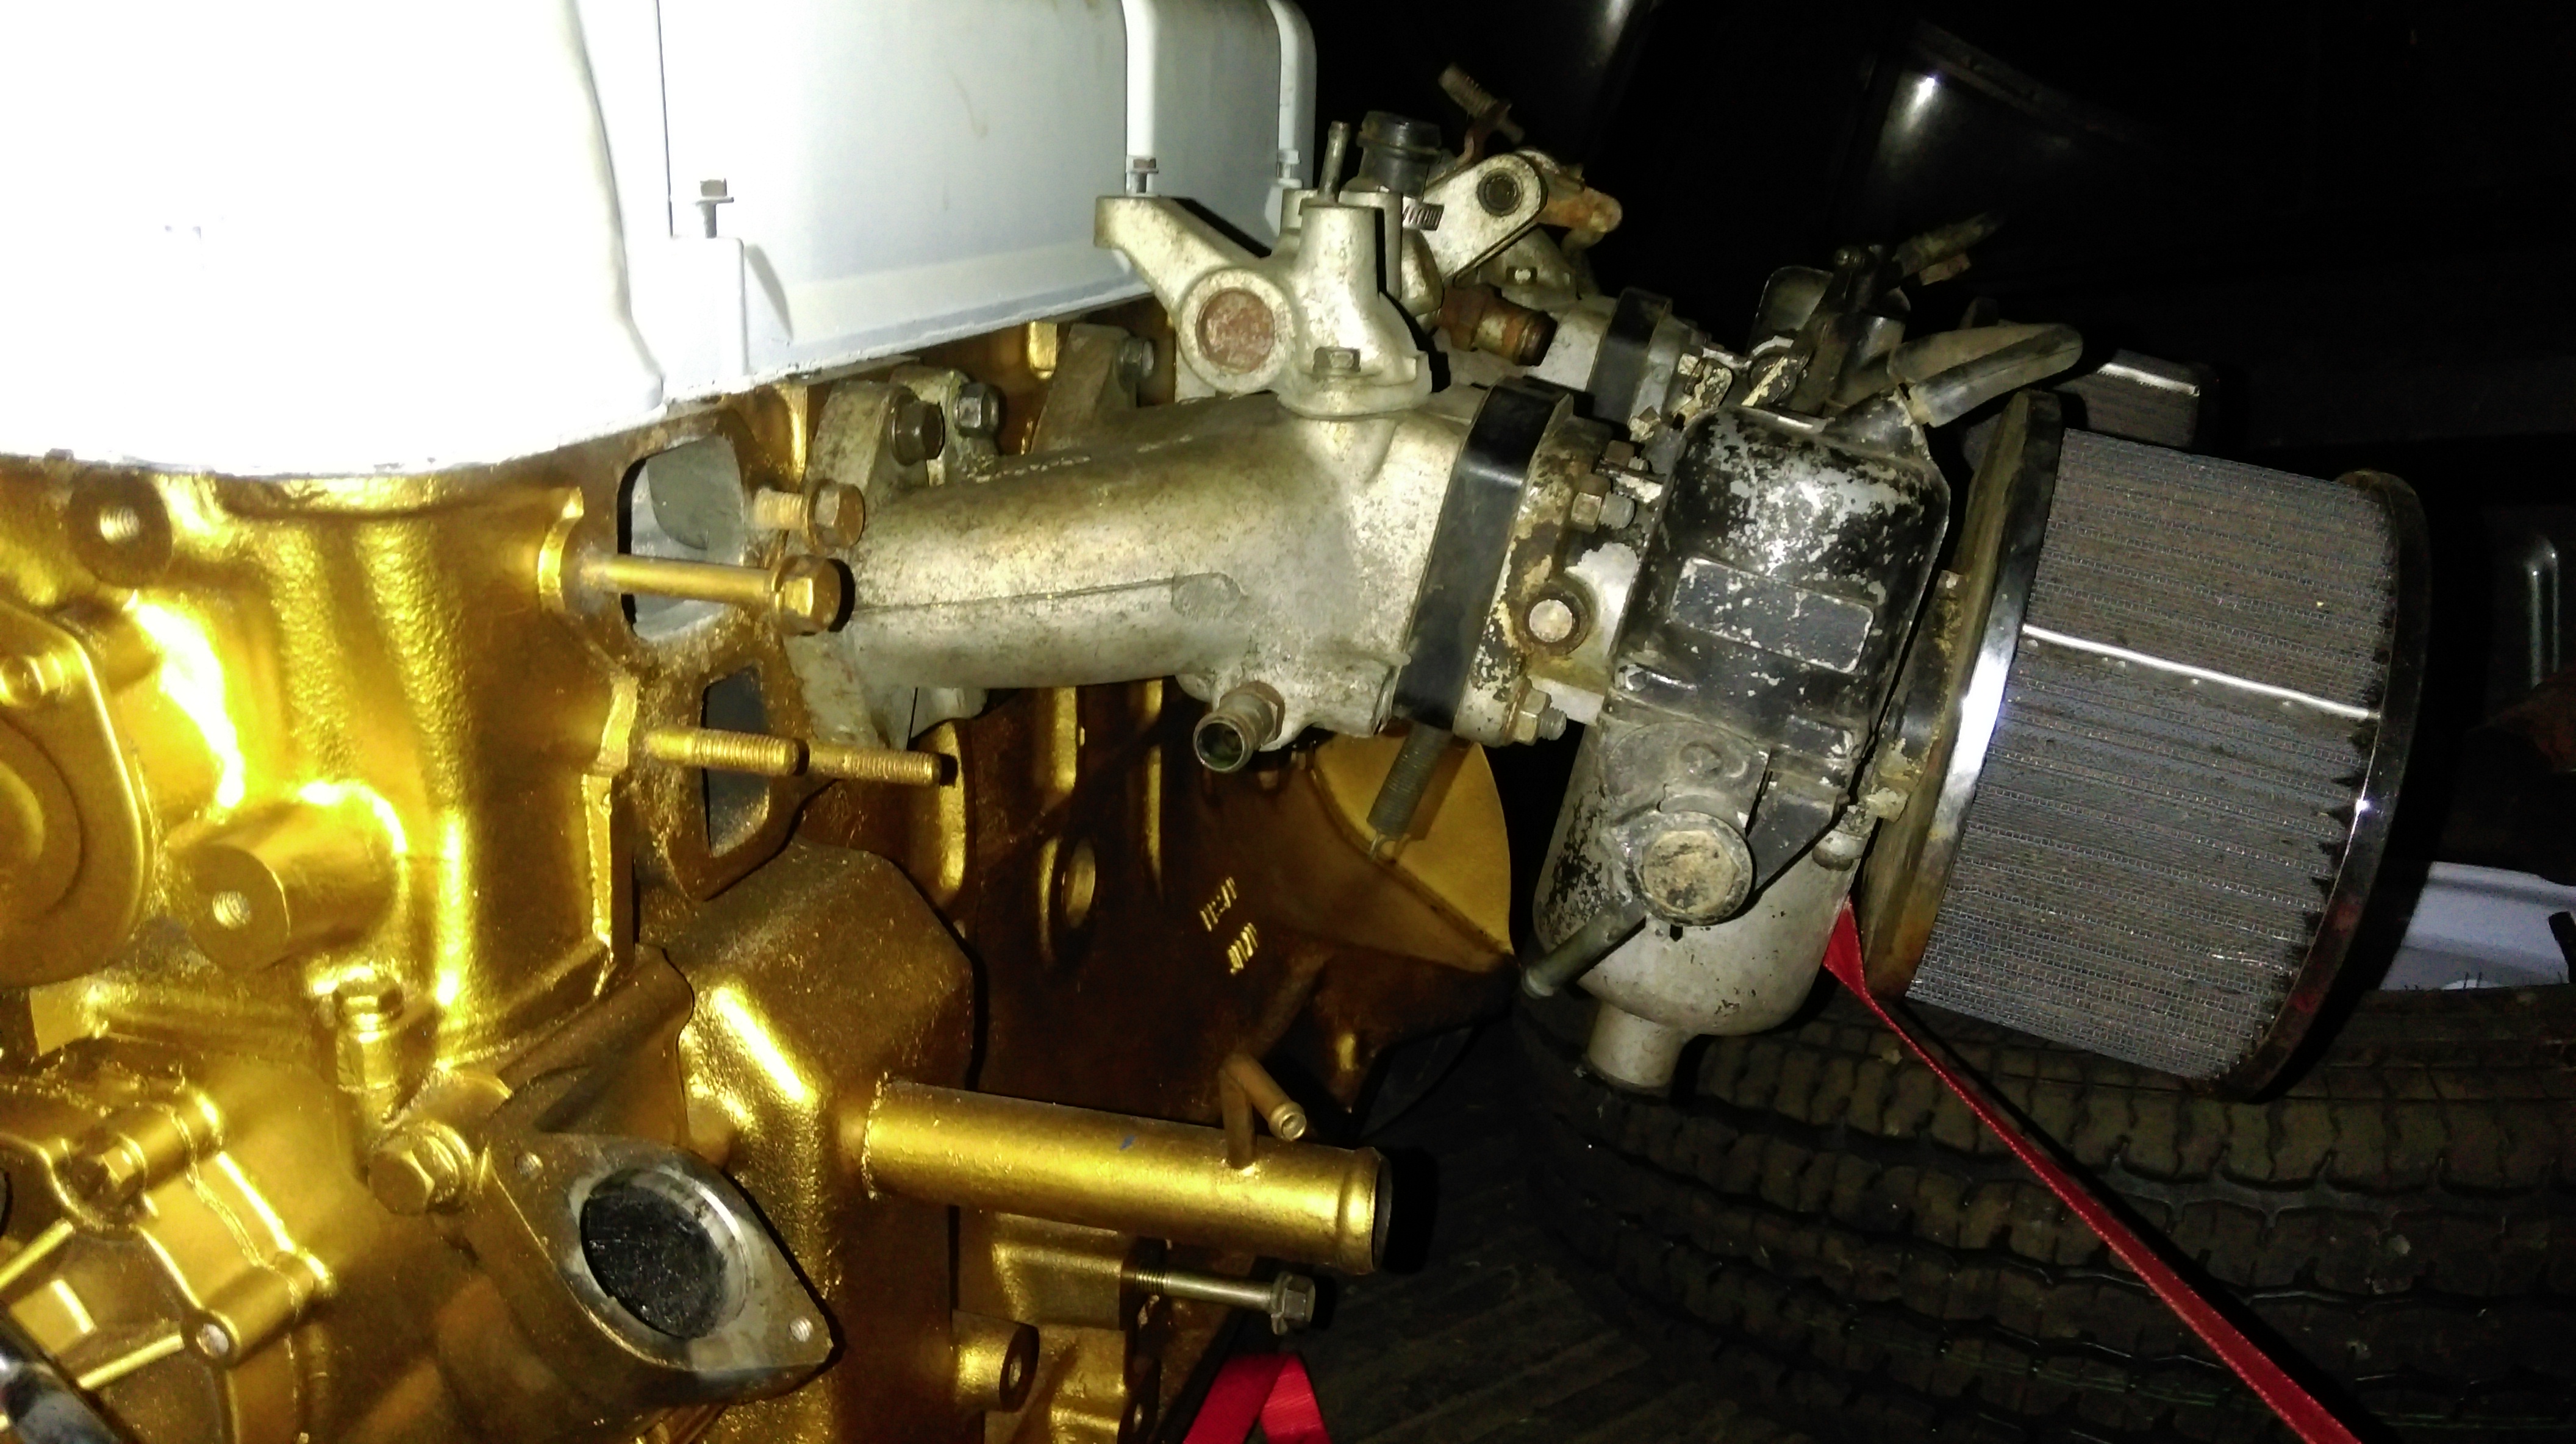
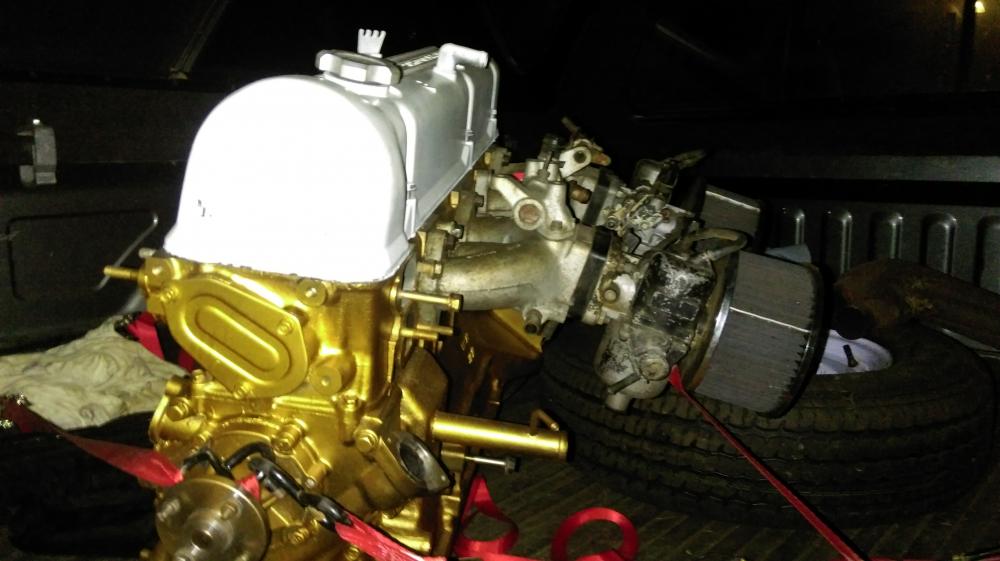
I was just joking around. I answered a CL ad and drove down to get the engine last night. 10k on the rebuilt engine and it ran before he pulled it out for his RB25DET swap. I wanted the E31 for a future race engine. I walked into the garage and was confused by the carbs. What are they? Where's the rest of them? Oh! They're upside down! The seller was a nice guy but he must have removed them at some point and didn't know which end was up...literally! lol The engine will be completely rebuilt before going in the car. CO - if you need a 2400 VC let me know. I really do have 7. Chuck
-
You're right! I missed that. I'll trade all 7 of my 2400 valve covers for the correct cover. Don't worry. I'll cover shipping too. Chuck
-
I picked up this engine last night as a core for the race car since it has the E31 head and cool 2400 valve cover. But it has a slight miss and I can't figure out why... Chuck


-
Here are some highlights of my MARRS 5 race from June. Chuck
-
Check all of the ground connections. Maybe even add some grounds to the body. Chuck
-
I use RockAuto for most of my parts. I like the Centric brand. Use brake grease so the shoes and wheel cylinder can move freely. Chuck
-
I've been using Carbotech on the race car. They have different compounds depending on how you drive. Give them a call and they can help you out. They're family run and you'll probably talk to the owner, wife or son. It's nice dealing with the people who actually make the stuff. Chuck
-
You're going to have to ask someone running a 15x8 about those specifics. 0 or -10 might work but you might have to run narrow tires so they don't rub. You need to see what tire sizes are available in 15, 16 and 17" before getting rims. It's getting harder to find the correct size tires for 15" wheels. I run 225/45-15 tires on my race car and have to roll the wheel lips. You might mind getting flares. There's the cost of the flares and the installation. The wheel wells have to be cut and the rear inner fenders need to be welded and sealed to the quarters. To properly fill out the flares you'll want 8 or 9" wide rims and really wide tires. That adds to the budget. The rubbing I had on my street Z was with the inner lip of the 15x7 wheel against the caliper. Depending on the tires and wheels you get you could have rub with the caliper/wheel, strut/tire and fender lip/tire. What are you looking for with tires and rims? The widest that fit under the fenders? Widest that fit with flares? Wide wheels and stretched tires? Chuck
-
The wheels are 15x7 with a 0 offset. I think it was the inner lip rubbing. It wasn't much but it did rub. I used the practice wheels/tires from my race car. 14x6 would fit because they could be narrow enough and have an offset that has caliper just to the inside of the wheel. I fixed it by going with a set of 16x8s. My car has flares. Chuck
-
Ah, the other left. ;-) The floor looks solid. He sprayed some undercoating over the old undercoating that was flaking off. The rockers look solid too. The seam between the quarter and rocker is still there. It's probably a good, solid car but he sounds like a flipper. And I don't trust flippers. Chuck
-
There are no pictures of the left floor. Two pictures of the right. It looks ok but appears bowed in the middle of the frame rail probably from a jack. It needs a lot of work to be a museum piece or show car. It's not even close to that level. But it is a nice driver. All new vinyl in the interior would really make it look nice. I hope it sells for a lot since I also have an early one. I really don't know what it'll sell for. Chuck
-
9" wide rims are too wide without flares unless you stretch a skinny tire like the cool kids do. 8" is probably too wide. 15x7 is a perfect fit. But 15 might not clear your calipers without grinding them down. I have the Toyota 4-piston caliper "upgrade" on one of my Zs and my 15x7 wheels didn't clear. They were either Konig Rewinds or Panasports. You have the Toyota 4-piston caliper "upgrade". They work fine but so do the stock calipers. Get lug nuts that match your wheel. Some lug nuts slip inside the holes and the flat part of the nut (with washer) hold the wheel tight. The factory steel wheels and other aluminum wheels use the angled edge of the nut to hold it tight. Some of those nuts are simple nuts like the factory ones and others are longer and enclosed to hide the threads of the studs. What tires/wheels do you have now? Chuck
-
Did they put yellow paint on the motor mount bolts after they were installed? Chuck
-
I have the SCCA patch above the pocket and a round DATSUN patch on the shoulder IIRC. Chuck
-
All you need is the SCCA patch. They prefer it to go on the right side above where a pocket would be. It's in the GCR in section 9.3.29... C. SCCA Logo Each driver’s suit shall display the official SCCA uniform patch logo (see figures 2 and 3). Each car competing in an event shall display the official SCCA field logo (see figures 4a and 5) unobstructed and prominently on both sides of the car and adjacent to the side numbers. A third logo shall be displayed on the front of the car unobstructed and prominently near the front number. The logo shall be on the spoiler of cars so equipped. Chuck
-
Exactly! I wasn't sure if I explained that clearly. If you feel like you need to use a lot of pressure to get it out...don't! Get the razor knife out and cut more of the gasket until it wants to come out. I put the windshield on a stand and install the new gasket and then the stainless trim followed by the rope around the gasket. Use a lot of soapy water when you install it. It's not hard to do. Just take your time. Chuck
-
You might be able to do a temporary fix with some sealant. I'd give that a shot for now. And it won't add much if any work to the removal of the windshield later. For removal I use a razor knife to cut out the stainless trim. Then I cut out the rubber on the outside of the windshield between the glass and rubber. You might have to cut on the inside of the windshield between the glass and gasket. Sometimes it sticks pretty good there. Chuck
-
Rear Bumper Chromed very expensive but worth it
cbuczesk replied to SledZ's topic in Open Discussions
Was it Tri-City in TN? They're good and affordable. I had them do the bumpers on my 1970 Road Runner and a couple years ago they did a set of 240Z bumpers. The cost was about $700 to have the pair done. Now that new bumpers are available for the Z I'd call Dave at FutoFab and but a new set for $700. Chuck