
Bcalvosa
Free Member
-
Joined
-
Last visited
Everything posted by Bcalvosa
-
 Additional background... R L Polk & Co. is the source automakers use when they make claims like "60% of all Porsches ever made are still on the road today". They are also the source automakers use to mail recall notices to registered vehicle owners. Polk outlines the products they offer and their data sources on their web: http://usa.polk.com/. The specific product I used is called NVPP: http://usa.polk.com/Products/1_nvpp.htm. Note that their web does not give free access to their data as it is subscription only (tens to hundreds of thousands of dollars per year depending on what product and what level of data you want). I am in the automotive aftermarket where we use their data to understand how many vehicles are on the road for parts we make or are considering making. We can look at their data another way to check the scale of my assumptions: Looking at 1974 Datsuns (the oldest year that Polk breaks out registrations by model), 58% of the registered Datsuns were Z cars. Polk reports that there are 19,973 registered Datsuns that are 1973 and older (meaning my estimate is that 43% of those are 240Z's, the rest being Roadsters, 510's, 610's, 710's, Pickups, etc). If instead we optimistically assume that 58% of all 73 and older Datsuns registered are 240Z's, that would raise my 240Z estimates by 35% and mean that 8% of all 240Z's ever imported into the USA are still registered. Looking back at my earlier attachment: <img src="http://www.classiczcars.com/photopost/data/3192/medium/Z_Car_Registrations.jpg" /> note that the oldest Z's with 8% or more of the imported vehicles still on the road are the 77-78 280Z 2 seaters (vehicles that are significantly newer, more rust resistant, and more accident tolerant (impact absorbing bumpers, reinforced unibody, etc.)). That would seem overly optimistic, but it could serve us an upper threshold. Feel free to use this data as a foundation, refine the 240Z assumptions, estimate the percentage of stored, being restored, & rebuildable wrecks, etc. to arrive at figures you are comfortable with. Enjoy,
 -
Using US registration data (where available) and historical export figures accounting for historical percentage that falls off each year (where registration data is not available), the attached projects the number of Z cars on the road by year. For 1974 and newer vehicles, the registration data is compiled from state records by R. L. Polk. Estimated quantity of older Z's is derived from assumptions noted in the file. In my experience, these assumptions have pretty accurately forecasted future vehicle populations, so they should be pretty sound for historical populations: http://www.classiczcars.com/photopost/showphoto.php?photo=32488&ppuser=4388 I own a 1971 240Z, so from this data it is one of roughly 34,000 produced, and 2000 left on the roads. It is also a Series 1; it is much more difficult to project how many of the 1971 produced models were Series 1's, since dealers had some ability to decide what year to title the car as. Since the change happened in early 71, it is obviously less than 3,000 and more likely between 1,100 - 1,400 Series I 240Z's still registered. Thanks, Bob
-
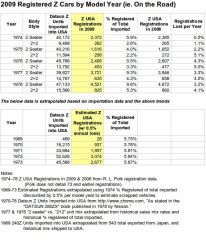 This file uses lists the number of cars imported into the USA by model year, along with the number registered as of 7/2009. For 1969-73 Z's actual registration data is not available. The file uses historical data and trends to estimate the number of registered vehicles.
 -
 This file uses lists the number of cars imported into the USA by model year, along with the number registered as of 7/2009. For 1969-73 Z's actual registration data is not available. The file uses historical data and trends to estimate the number of registered vehicles.
 -
If moving the throttle consistently makes it come back, it points to something that would react with the throttle movement (the throttle position switch or the air flow meter). If it is not repeatable, and just time makes it come back, relays or electronic circuits are more likely. If vibration, bumps, etc., are the cause and solution, loose connectors are more likely. To eliminate the fuel pump, lines, filter, etc., you could tee a fuel pressure gauge into the fuel line, snake the hose through the hood vent, tape it to the outside of the windshield, and drive around waiting for it to cut out. Fuel pressure should fluctuate with boost pressure and manifold vacuum, but shouldn't die. If it doesn't die, you are looking for something that would interrupt the injector pulses...
-
If power drops, it has to be fuel or spark. When cruising and power suddenly drops, if the tachometer needle immediately dumps to zero, it is likely ignition (since the tach is triggered by the ignition pulse). If the tachometer keeps indicating (slowly dropping in RPM), it is likely fuel. Fuel could mean Air Flow Meter (as mentioned), loose connections, etc. Ignition cutting out is often caused by the pickup for the ZX Turbo optical distributor.
-
The "packing sheets" are no longer available. You can use thin black foam weatherstrip to make up gaskets. If going for a concours restoration, the only way I have found to get new gaskets is to buy complete headlamp assemblies (the gasket is pre-installed).
-
Oops. Forgot I was in search results...
-
It may sound basic, but before pulling the trans, try tightening the alternator belt (and A/C and air pump belts, if equipped). The symptoms sound more like belt squeal to me. You can also remove all the belts and briefly start the engine when cold to see if the noise goes away. If it is the throw out bearing, the noise should change when you step on and release the clutch. Good luck...
-
Try a couple things to narrow down the cause: 1) With the car stopped, rev the engine in neutral with the clutch depressed, Vibration means it is not the transmission. Possible causes could be a broken flywheel, clutch cover or cover bolts, flywheel bolts, harmonic damper (aka balancer), crankshaft, connecting rod or piston (in rough order from bad to worse). 2) Rev it again with the clutch not depressed. If there was vibration in step one and now the vibration is different, the clutch and flywheel issues are more probable. If there was no vibration in step one and now there is, clutch disc, pilot bearing, or transmission main shaft / main shaft bearing is likely. 3) If step 1 or 2 did not produce vibration, the driveline is the likely culprit. Transmission, transmission bearings, or driveshaft u-joints are the most likely. Good Luck...
-
It sounds like your rear countershaft bearing is failing. The rear most gear set in a transmission (excluding reverse (and fifth gear for five speeds) is first gear, 2nd to last is second gear, third to last is third gear, and fourth is direct drive. When the rear countershaft bearing fails, it is most noticable in the sequence you describe (loudest in first, a little quieter in second, quieter in third, and normal in fourth. If you have a 5 speed, 5th will be around as loud as first. To replace, remove transmission, remove rear transmission housing, unstake the countershaft nut, use a bearing puller to draw off the rear countershaft bearing, press on the new one, and reassemble (a service manual is key). The bearing is Nissan part number 32319-N4870 (I believe this crosses to Timken bearing # 204 (available at auto parts stores)). This is the smallest bearing inside the trans (and the most failure prone). While the trans is out, replace the drive shaft seal for good measure and inspect the clutch. Good luck.
-
-
-
-
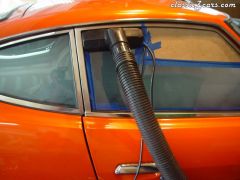
Z's are notorious for leaking exhaust gasses (or fumes) into the interior. This article details a procecss to find and eliminate the sources. To make the article easier to read, key photos are hot linked, while additional views just have a hyperlink you can click on. When driving with a window open, the air rushing around the windshield and drip moulding creates low pressure in the front half of the open window. This vacuum is what draws the air in the back half of the open window, and ultimately draws in exhaust fumes through any leak near the back of the car. If the windows and doors do not seal well, exhaust is drawn in (to a lesser effect), even with the windows closed. Granted when driving there is a low pressure area over the whole hatch and rear panel of the car, but not nearly as strong as the low pressure formed from an open window. This should also improve heater performance, since you can also find and eliminate high pressure air leaks. Equipment needed: To recreate the leaks in a garage, you need: A shop vacuum. Some cardboard. About 3 feet of 1/4" to 3/16" automotive vacuum hose (to act as a stethoscope). A roll of masking tape. Optionally you can also use a DJ smoke or fog machine (rented from an equipment/party rental facility). It makes finding leak areas easier. To seal the leaks you need: Seam sealer or caulk for tiny leaks (like GE Silicone II in clear and/or black available at home centers). Dum Dum (like 3M strip caulk #08578 available at NAPA) or duct seal (like Blackburn duct seal available at home centers) for small to medium leaks. Depending on where you have leaks, you may also need: Spray adhesive (like 3M general trim adhesive #08088) to attach interior vinyl. Replacement body plugs, grommets, gaskets and interior trim plastic rivets (from Nissan or aftermarket Z specialists). The test setup: If using a smoke machine, Set it on a piece of cardboard inside the hatch compartment (facing rearward) and send the power and remote cords out the passenger window. <IMG SRC="http://www.classiczcars.com/photopost/data/500/medium/Z_Air_Leak_Tests_004.jpg"> Close up of the Smoke Machine: http://www.classiczcars.com/photopost/data/500/medium/Z_Air_Leak_Tests_003.jpg Test firing the smoke machine... http://www.classiczcars.com/photopost/data/500/medium/Z_Air_Leak_Tests_005.jpg Open the passenger window about 3" and seal the shop vac floor nozzle to the upper rear corner of the window frame with tape. Cover the rest of the window opening with cardboard, and seal the opening inside and out with masking tape. <IMG SRC="http://www.classiczcars.com/photopost/data/500/medium/Z_Air_Leak_Tests_001.jpg"> Another view: http://www.classiczcars.com/photopost/data/500/medium/Z_Air_Leak_Tests_002.jpg Turn the dashboard vent control to "Off," and close both fresh air vents under the corners of the dash. The shop vac can now be used to pressurize (hook the hose up to "blowing" port) or depressurize (hook the hose up to the vacuum port) the interior. The depressurize test: Close the hatch and driver window, seal the round vents behind the quarter panel windows (if equipped) with tape, hook the shop vac hose to "vacuum," turn it on, get in the car and close the driver door. Feel for air coming in the dash vents and fresh air vents. Either repair the leaks now or temporarily seal them up with tape - these leaks hurt heater performance in the winter. With vacuum on, feel around the interior with the back of your hand for leaks. Below are some possible leak areas and fixes (fix each leak as you find it (either permanently or temporarily) and it will make it easier to find each successive leak): Hatch seal - check alignment of hatch (adjust hinges & striker), replace hatch seal and/or add additional "universal" weatherstrip to close gap as needed. Even with a new gasket and properly adjusted hatch, I needed to add a strip of "universal" foam to the upper edge of the hatch to get a seal. This image is with the hatch slightly open, showing how the gasket touches the hatch on either side of the hinge, but leaves a gap in the hinge centers. <IMG SRC="http://www.classiczcars.com/photopost/data/500/medium/Z_Air_Leak_Tests_012.jpg"> Hatch filler panel - remove and add thin universal weatherstrip around underside if leaking from edges, on Series I 240Z's (cars with 2 horizontal chrome vents on the outside of the hatch) if leaking from slots, remove panel and clean / repair vent flaps, on non-Series 1 cars, check the large rubber body plugs on the outside of the hatch about a foot from either side of the latch. Bottom of strut towers - under the diagonals for the strut towers (under the vinyl) there is a 1.5" diameter body hole with no grommet (this is over where the rear diff crossmember mounts to the frame rail). Where the diagonal mounts to the floor is also not fully sealed. All of these holes suck air through the frame rails. Nissan did not plug or seal these holes - the vinyl trim is supposed to seal off area. Either seal the vinyl to the floor, or peel back the vinyl and seal these areas (or do both). <IMG SRC="http://www.classiczcars.com/photopost/data/500/medium/Z_Air_Leak_Tests_015.jpg"> Tail lamp panel, dome lamp panel & speaker openings - the many possible sources will be checked with the pressurize test. If you remove the interior panels, the fuel tank vent hoses, antenna drain hose & grommet, tail light gaskets, unsealed sheet metal seams, and rust holes are common causes. Door or window seals - replace. Shifter - replace inner shift boot. The pressurize test: On Series 1 cars, seal up the body vents by taping up the slots on the inner hatch trim panel. From outside of the vehicle, close the doors, attach the vac hose to the "blowing" port, and if you have the smoke machine, plug it in and fill the interior with smoke. Filling up (the smoke does not stain)... <IMG SRC="http://www.classiczcars.com/photopost/data/500/medium/Z_Air_Leak_Tests_006.jpg"> All full... http://www.classiczcars.com/photopost/data/500/medium/Z_Air_Leak_Tests_007.jpg Turn on the vacuum and look for large leak areas (every Z has lots!). <IMG SRC="http://www.classiczcars.com/photopost/data/500/medium/Z_Air_Leak_Tests_008.jpg"> Feel with the back of your hand, confirming location with the "stethoscope" hose held up to your ear (note that you are doing this at your own risk - I accept no liability if you injure your ear drum, a bug crawls in your ear, of if you forgot the hose was full of some toxic substance). Starting from the rear of the vehicle (again, fix each leak as you find it -- it makes it easier to find remaining leaks): Tail lamp vents - (2 on bottom of each tail lamp). Remove felt "filters" if present and seal with clear caulk. The lamp sockets are not sealed, providing adequate ventilation without the outer vents. This should also stop the internal lens discoloration due to exhaust gasses flowing through the lamp. Under hatch - The hatch has a thick inner and a thin outer gasket. Any leak between the gaskets draws in exhaust. With the hatch open you can seal the opening with cardboard, taping it to the inner gasket and run a pressurize test or just open the hatch and seal the following: Round body plugs on either side of hatch rail. Pinch weld above hatch hinges (just below the outer seal along the roof edge) - caulk gaps. Hatch hinges to the body - Seal any gaps (exopsed adjustment or shim slots, seal the hinge gasket to the body, and if a pressure check confirms a leak from inside the hinge pocket, remove the hatch & hinges and seal any splits and cracks inside the rubber hinge pocket seals. This was a hard to find leak. In this photo, the hatch and hinges are removed. The hinges fit into a pocket along the roof edge. Behind the metal plate is a rubber boot that fits inside and seals the pocket. One of the pockets on this car had a crack deep inside the pocket and an area worn through from rubbing on the hinge. The part is no longer available from Nissan, so some glue and liquid rubber was used to seal it up. The gaskets also sealed poorly to the roof support (caulk sealed it up). There were also numerous leaks between the inner (thick) and outer (thin upper) gasket in the photo. Anywhere two pieces of sheet metal were spot welded together needed caulk. <IMG SRC="http://www.classiczcars.com/photopost/data/500/medium/Z_Air_Leak_Tests_013.jpg"> Continue the pressure test under the car: <IMG SRC="http://www.classiczcars.com/photopost/data/500/medium/Z_Air_Leak_Tests_010.jpg"> In the below photo, many leaks are sealed at this point, allowing the smoke coming from under the driver rear fender to be visible. <IMG SRC="http://www.classiczcars.com/photopost/data/500/medium/Z_Air_Leak_Tests_011.jpg" Potential under the car leak sources: Evap emission hoses & grommets - just behind the rear valence panel - use the stethescope to pinpoint. Seam welds around floor behind rear valence (you may need to remove the fuel tank, or use the stethescope hose to thoroughly check). Antenna drain hose and grommet - on driver's side behind wheel well. If lots of air comes out of the hose, it could be disconnected from the antenna or the antenna may need to be sealed. Remove the inner hatch trim panel to check. Pinch welds just forward of the antenna drain, and seam welds going back to rear valence panel. Evap hoses and grommets on passenger side, behind wheel well. Pinch welds just forward of evap hoses and seam welds going back to rear valence panel (removing the splash shield behind the passenger tire may ease access without needing to drop the tank. Wheel housing inner pinch weld in front of rear tire. Pinch weld under rocker panel (toward rear) Round holes under outside rocker panels (these can be plugged with the same rubber plugs used on either side of the hatch rails, and some sealant). Don't seal the oval drain ports in the inside of the frame rails. Body plugs in spare tire well and driver and passenger floors. Rest of car: Pinch welds on forward side of gas door opening (upper and lower corners). Hatch compartment floor rubber body plugs (remove carpet and check - these lead into the frame rails and can draw exhaust). Body plugs behind seats (remove carpet and check - for Series 1 these are in the storage bins). These lead into the frame rails. Grommets & throttle rod boot on firewall. Below are links to additional Exhaust Fume Articles: "Solving the Fume Problem in a 280Z" by Zhorse: http://www.classiczcars.com/forums/showthread.php?t=15466 "Exhaust Fumes in 1st Generation Z Cars" by rzola: http://www.classiczcars.com/forums/showthread.php?t=17367 Happy hunting... Here's to summer driving without burning eyes and a passed out passenger... This post has been promoted to an article
-
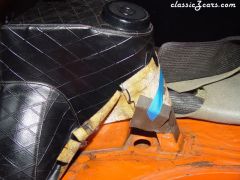 Lifting the vinyl around the rear strut towers revealed a few leak paths that may not matter if your vinyl is 100% sealed. The large round hole under the OE diagonal next to the strut tower and gaps around the sealer where the diagonal leg meets the floor allowed exhaust to come in from a unibody frame channel that runs all the way to the rear under the floor.
 -
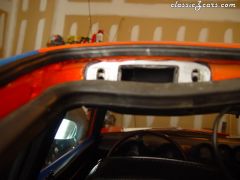 This was a hard to find leak. In this photo, the hatch and hinges are removed. The hinges fit into a pocket along the roof edge. Behind the metal plate is a rubber boot that fits inside and seals the pocket. One of the pockets on this car had a crack and an area worn through from rubbing on the hinge. The part is no longer available from Nissan, so some glue and liquid rubber was used to seal it up. The gaskets also sealed poorly to the roof support (caulk sealed it up). There were also numerous leaks between the inner (thick) and outer (thin upper) gasket in the photo. Anywhere two pieces of sheet metal were spot welded together needed caulk.
 -
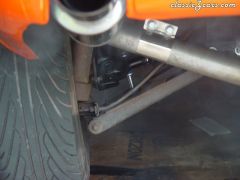
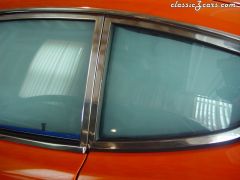
 One of the leak sources was the fit of the hatch gasket in the hinge area. This image is with the hatch slightly open, showing how the gasket touches the hatch on either side of the hinge, but leaves a gap in the hinge centers. Getting inside the car, closing the door and putting the vacuum on "vac" mode allows you to feel around and listen to seals with the stethoscope.
 -
 Many leaks are sealed at this point, allowing the smoke coming from under the driver rear fender to be visible.
 -
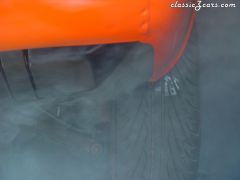 A zoomed in shot of smoke curling out from under the rear cowl. Smoke is handy to find areas that are leaking. A stethoscope (or small length of vacuum hose held up to your ear) helps narrow down the area to the exact source of the leaks.
 -
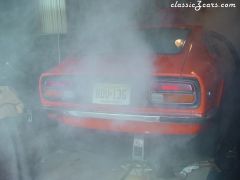 Later test after some of the leaks were sealed. Note the smoke coming from under the rear cowl is more visible now
 -
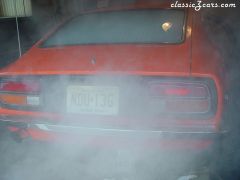 Turning the vacuum on "blow" creates pressure inside the cabin pushing the smoke out any leak path. This is after 2 seconds on blow. Smoke is leaking from the tail lamps, the hatch gasket, under the rear cowl, and every other unsealed orifice.
 -
 The interior is now full of smoke
 -
 The fog from the smoke machine is filling the interior (note how the rear window is more "white" than the front. It takes about 20 seconds of smoke to fill the interior.
 -
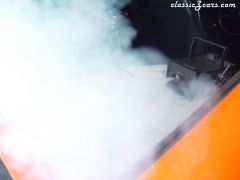 Finding leaks where exhaust enters the interior. Method uses a shop vac, a smoke machine, and a stethescope. The hatch is still open -- this is a test of the smoke machine. The remote switch has been pressed for about a second. You can see the machine on the right of the picture, and can just see the jet of spray shooting out that created the dense white fog.