Zhorse
Free Member
-
Joined
-
Last visited
Everything posted by Zhorse
-
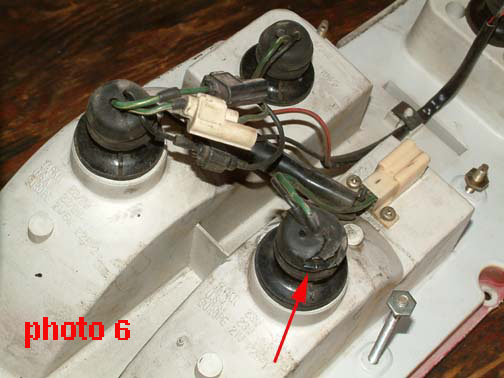
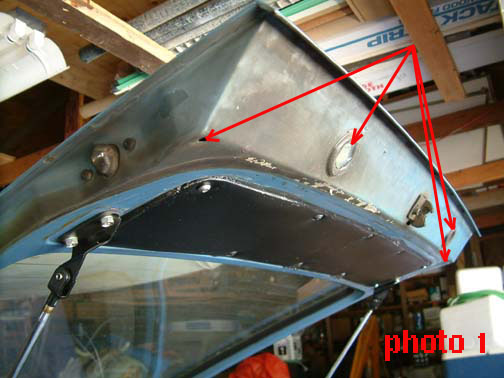
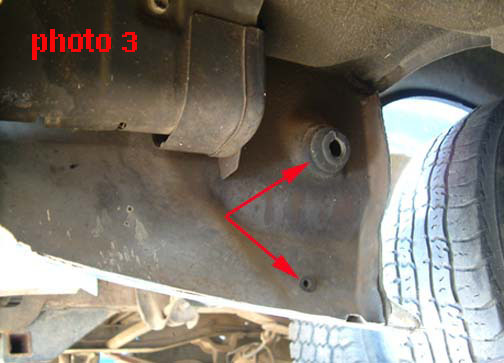
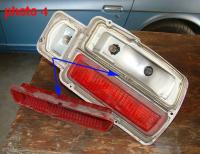
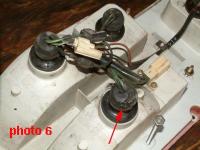
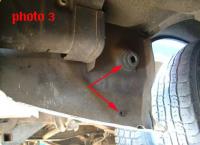
The fume problem, as most of you know, has to do with the Z car’s aerodynamics. The simplest explanation I’ve read is that a bubble of air gets trapped around the rear end of the car at speed. Since the exhaust exits back there, its fumes get trapped in this bubble. If there are ANY openings in the rear of the car, they will allow this fume-laden air into the cabin. My efforts on solving this problem were based on a lot of information gathered from the online forums. Since I couldn’t find any one, definitive explanation on this subject, I gathered these all tips into a folder and addressed them, one by one. I also discovered a few things that I did not find in the forums/archives. Two more things: 1) this article is based on what I found in my daily-driver ‘76 280Z coupe, and confirmed with a ‘75 parts car and ‘77 coupe I had at the time. I am reasonably sure most of the following information will apply to 240 and 260 coupes, as well, but no guarantees. I don’t know if any of it will apply to 2+2 cars since I have no experience with them. I don’t even know if the 2+2s suffer from this problem. 2) Everything you’re about to read here assumes a solid, rust-free car. All bets are off if you Z looks like rusty Swiss cheese. Okay, it’s easiest to break this up into seven separate areas you need to check: Firewall, exhaust system, shifter boots, rear quarters, rear deck, taillight panel and rear hatch. FIREWALL — I do not believe that I had any fumes coming through my firewall. I base this mostly on the fact that I don’t smell any exhaust or gas fumes when the hood is open and the motor is running. If you do, then take particular care to seal your firewall. The basic drill here is to replace or reseal any hoses, wire bundles or grommets where they go through the firewall. The most obvious of these is the accordion-like throttle rod boot beside your master vac. This item is rotted away on just about every old Z car I’ve ever seen in the junkyard. It’s only a few bucks for a new one and a good investment. You can also buy replacement original or aftermarket seals for everything else under the hood while you’re at it, but if you’re a low-bucks Z owner like me, silicone or another sealant of choice works just as good. I replaced the throttle boot with new and siliconed everything else going through the firewall. EXHAUST — Pretty obvious: If you have exhaust leaks, fix them. In particular, check exhaust pipe/manifold gasket and all pipe clamps or welds at resonator/catalytic converter and of course muffler. You can tell leaks either by black sooty residue or by putting your hands around (NOT on) the exhaust with the car running and feel air puffing out. SHIFTER BOOT — The main one of these you have to be concerned with is the big rubber one under the leather-like one you see inside the car. To access the rubber one, you have to take the center console off. Then you can’t miss it: it’s big, rubber, and it seals the shifter hole in the tranny tunnel from outside air. It’s not a particularly cheap item (about $40) but well worth the $$ and easy to install. While you’re at it, buy the small ‘inner’ shifter seal that seals the top of the tranny from road dirt, too. REAR QUARTER(S) — Now we’re getting somewhere. In my cars, this was a MAJOR source of fumes, especially on the driver’s side (because the exhaust system is on that side). Upon removal of the plastic interior rear trim on the driver’s side, I found one big and one small air leak. Both are under the car. To see them, get under the car and look up at the panel outboard of the muffler. (You don’t need to jack it up.) You will see two holes, one big one small. The smaller of the two at the bottom is, I think, the drain for the power antenna — which not very many Zs have anymore. On my car(s), the little plastic piece in this hole was all hardened and dangling. Replace or plug with silicon. The other hole is harder to see because it’s higher up. I have no idea what this 2-inch hole is/was supposed to be for. At any rate, Datsun stuck a rubber plug in this whole at the factory, and on all three of my 280s — it had rotted out in the middle. Since it was right beside the muffler, this is a literal black hole for fumes. Again, replace or silicon it closed. BTW, I found these holes by putting a halogen light under the car, shining straight up, in a darkened garage. Then stuck my head inside the rear quarter. Wherever you see light coming in, thats an air leak. So keep sealing until you see no light. On the passenger-side quarter, I did not find any leaks or rot in my gas tank vent hoses. If you do, then replace them. (I think a gasoline smell, rather than exhaust, would be more indicative of a leak here.) REAR DECK — This is the part of the car under the rear hatch, where the spare stows. I do not believe I had any serious fume leakage in this area, simply because there aren’t that many holes. However, on my car the grommets around where the hoses to the vent tank went through the rear deck were rotted, so I squooshed more silicone around them to make them airtight again. TAILLIGHTS AND REAR PANEL — Per suggestions on several forums, I bought new taillight gaskets and went through the laborious process of removing my taillights to put them in. However, once my light fixtures were out (there are lots of little nuts so be patient and careful), I found that original foam rubber gaskets, though old and funky looking, did not have any breaks and did not appear to be leaking. If yours are, of course replace them. HOWEVER, I did have a couple of rotted rubber thingies on the actual bulb fittings. These are the thin rubber seal things through which the wires pass into the bulb bases. When rotted, these seals DO leak air (blow through one without the bulb if you don’t believe me). If these are rotted, or the spongy gaskets on the bulb fittings where they quarter-turn into the taillight housings are gone or rotted, you can get fumes sucking in there. ALSO, the rear taillight lenses themselves leak air. They are not totally sealed all the way around, but have small rectangular openings — probably drains — at the bottom of each lens. I did not seal these on my car, but if I still had fumes after all I did do, I’d try that next. One more thing on the rear lights: the lenses are mounted in some kind of white plastic stuff that was apparently soft at the factory. On my car, this was still pretty soft — kind of like an Abba Zabba candybar — and seemed to be well sealed. But on my parts car, the white stuff was hard and the lenses were loose enough to just pop out by hand. If yours are this way, I would reseal them with silicone (except for the drain hole) and reinstall. REAR HATCH — This, in my opinion, was the main fume culprit on my car and, I suspect, most first-gen Z cars. One of the early band-aids I tried was a new rubber seal between the hatch and body. If anything, this seemed to make the fume prob worse. WTF?? So I got to looking at the hatch itself and discovered four holes in the lower edge of it (look under the rear lip when it’s open). Two are large rubber drain plugs, two are simply small half-inch holes. The driver’s side drain plug on my car was rotted almost away. I resealed it, and the other big one. I left the smaller drain holes open because, at this point, I had a sudden flash on the biggest culprit in this whole gory scenario, at least for me: the trim panel on the lower rear hatch. This is the vinyl-covered panel about 6 inches by two feet that is screwed and/or plastic-riveted to the underside of the hatch, right below the hatch release button. Please note that when the hatch is closed, this panel is INSIDE the car. I am convinced that my major fume ingress was through or past this panel — thanks to online forums for this tip. What I did, and what you should do, is remove this panel and put a piece of visine plastic between it and the hatch before reattaching. You know, clear plastic like is under your interior door panels. A vapor barrier, basically. You can do this with that 3-M sticky stuff like is on the doors, or silicon. I was so gonzo by his time that I siliconed the living crap out of the opening, the plastic, and the panel — then ran a final bead around the panel when it was reattached. In short, I made a big mess that needs to be cleaned up, but that frickin panel is SEALED. BTW, after you do this, leave the hatch open if you can for about 24 hours to allow the silicone fumes to dissipate. Anyway, that’s how I did it, and it worked. I don’t get any perceptible fumes in the car at any speed now, even with the window open. (Well, except at slow-speed decel for some reason.) My wife will even ride with me again, though I haven’t decided if that’s a good thing or bad one. Good luck! — ZHorse (John Riise, 1976 280Z) Photo captions: Photo 1 — There four drain holes — two large and two small — under the lower rear hatch. This hatch doubtless still gets fumes inside, but they are stopped from entering the car by the well-sealed interior panel and a good rear hatch seal. Photo 3 — Arrows show the two holes on the LH inner quarter panel of 280Zs. Note the larger of the two has a rotted-out center. Being right next to the muffler (removed in this picture), this hole would suck fumes big time. Photo 4 — This photo shows the drain hole arrangement in the taillight lens of a 280Z. If your bulb wire seals are funky, you can actually get fumes coming in here and sucking through the old wire seals. Photo 5 — Another shot of the drain hole on the rear lens. All three lenses have these. This photo also kind of shows the whitish, semi-soft lens mounting stuff. Photo 6 — Here’s what I’m talking about with the bulb wire seals. The arrow is pointing to, in this case, a damaged seal. This will leak air. Also check the foam gaskets where these fittings quarter-turn into the taillight housings.


-
I may be too late to make much difference (if you really went ahead last weekend), but you should use Google and eBay before deciding. There may also be past threads on this subject on this website, as well as zcar.com. There are many products out there specifically made to address the thermal and sound insulation problems of Zs and other cars. Personally, I went with Xtreme Dynamat. It comes in 1X2-foot 'sheets'. It's easily cuttable with scissors. it's kind of liek really thick tinfoil with sticky backing. You mold and cut it first, then peel off the coating and stick it in place. I paid $100 for a box of the stuff, which was enough to do the main cabin (firewall to behind seats) on my 280Z (seats and carpet must be removed) and it made a HUGE difference in how quiet the car rode. Not so much in insulating from road heat, but that was my secondary concern. BTW,this is about $190 retail, but I got it cheaper by going eBay. There are now scads of companies offering similar material. I would do a bit of research and do it right rather than sticking something from Home Depot in there.
-
Bill Reagan of the Z Club of Texas restored a 240 10 years ago. (It was supposedly the model for Franklin Mint miniature Z.) He did the major amount of work himself, including stripping, rustproofing and painting the body, and though did not replace everything, he put a lot of new stuff in the car. He wrote a book about it that is still available from Z Club of Texas (http://www.zcluboftexas.org/) and it is a really helpful guide to anyone contemplating a restoration. Anyway, he estimated $12K for the rebuild and ended up spending I think $14K, which is what he sold it for. That's 1994 remember, so I reckon you'd need $15K or slightly more for the exact same job today.
-
Just my 2 cents, but having been down this road, I would not recommend a body/paint novice take on a project of this magnitude. Probably too late now, but here's my advice anyway: if you want to learn body-working the RIGHT way, you have to work under someone who already knows it. Books help, but just as you can't learn to play the trombone from a book, you can't learn bodywork. You have to get out there and do it, and a teacher makes the process go exponentially faster. Said another way: why make all the stupid mistakes on the one car you DON'T want to make mistakes on? I wanted to learn bodywork bad enough that I enrolled in a tech school at a junior college and did it for a year and a half. That's one avenue, and has the advantage that everyone you're around is learning, too. You could also inquire at body shops to be a go-fer in return for instruction from someone, or 'hire' a guy to show you the ropes in his spare time/weekends. You can buy all the tools and trick stuff in the world, but if you don't know what you're doing, they'll only get you in trouble. Especially spray guns. I've seen some real paint disasters come out of spray guns in the hands of someone who didn't know what they were doing. Finally, it is a bit of a myth that the "best" paintjobs require you to strip down the entire car to bare metal. Actually, it is VERY difficult to get as good base down as they do at the factory. Yes, you have to get all rust areas down to fresh metal. But you don't have to take all the GOOD paint off. If it's not cracked or degraded, just leave it on. It's not going to hurt a thing, it's on there as good or better than any primer you're going to spray, and if you do the prep right, you'll never know it's there under the new paint.
-
I used Dynamat Xtreme. A box of nine pieces of foil-coated Xtreme (each about 12X15 inches) cost me $100 on eBay. This covered the entire front floor of my '76 coupe, including the vertical panel behind the seats. My floors were in fine shape, no rust, so I just put the Dynamat right over the old tar stuff. It's very easy to cut and shape. Once it's formed to the area you want, you peel off the backing and it's stuck there for good. One of these days I'll buy another box and do the back deck and maybe roof and doors. Just doing the floor made an amazing difference in how quiet the car rides. I know that some of the other makers are cheaper, but I'm happy with my choice of Dynamat. It's a nice product that does what it claims.