byunique
Free Member
-
Joined
-
Last visited
Everything posted by byunique
-
 Thanks guys, ended up buying the Felpro gasket, and used a sanding stone attached to a drill press to match the ports. Yes, from the sparks, there's definitely a metal layer inside. Hope this thing lasts, will be putting high temp rtv on the exhaust ports too.
 -
Yeah, sounds like a worthwhile trip to the local auto parts. Wow, dremel too, yeah that'd do it on a metal gasket I'm sure. Hopefully, will find the paper ones and just end up using a x-acto instead.!
-
Came across this, ring a bell for anyone? Still can't tell if there's a metal liner. Federal-Mogul eCatalog Resource Center
-
I'll need to replace the intake/exhaust gasket and my head is ported. I had bought the one from MSA, but returned it after seeing the metal liner in the gasket. I think it would be too difficult to cut it in order to match the ports. Anyone know the part number by chance or where I can order it online? I heard felpro makes one, but thats about it. I also have Right Stuff Gasket Maker but haven't really used it much. and don't want to try it unless someone else has already had success. Way too much work to do this twice! Gasket Makers : Permatex® the Right Stuff® Gasket Maker Also, I don't need the air injection stuff for smog. Its a N42 head with the usual square ports.
-
Here's another video which is cleaner, and it does compare what it sounds like with a center muffler if you are considering that. Sorry, didn't look over what was mentioned about exhaust.
-
I have the same 3.0 motor. 278HP/260TQ at the crank w/ Triple Mikunis and previous mild head work done. See my profile below to hear what it sounds like... Dave makes solid motors!
-
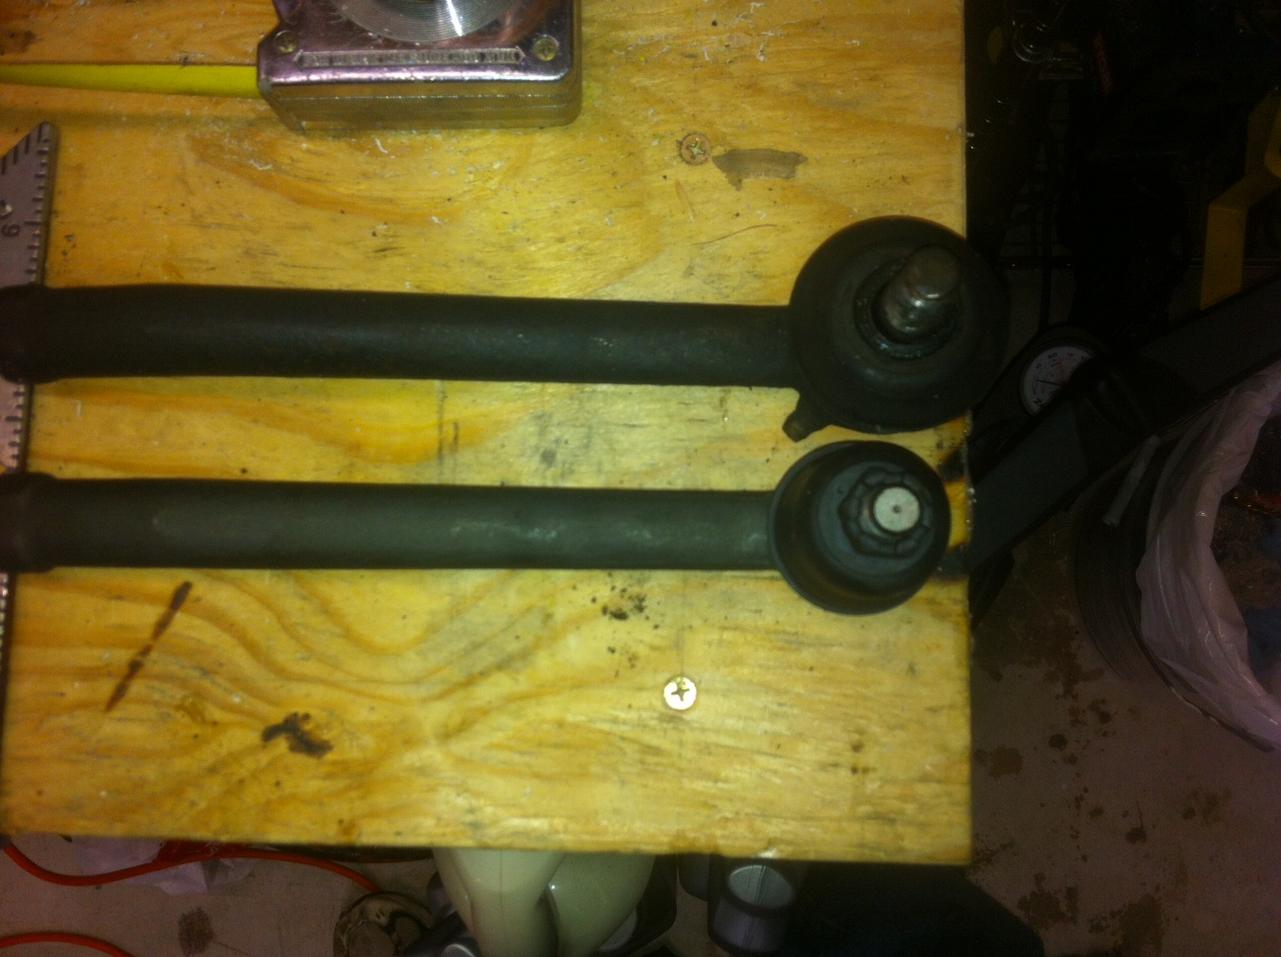
So, pulled out the old tie rods and compared to the new ones from Motorsport Auto. The old ones were definitely longer, about 3/8 of a inch and the threads weren't as deep on the driver side. I put it all back together and even achieved toe in of 1/2" and had plenty of adjustment. Not going to leave it toe in of course, but just goes to show there was plenty of adjustment left as compared to before. So somehow when I bought these rods way back from Motorsport, I must have been sold the wrong tie rod. Thanks everyone for the help!
-
never heard of that before...cool!
-
ah, the scoring of the tire is a interesting/easy method. Easier to measure across the score than the back of the wheel too. Nice, thanks
-
Thats good to know. Do you recall how many threads you are showing on your tie rods? Can you visibly see 1/8"? Is there a easy way to measure toe out besides using a measuring tape on the front and back side of the wheel? Thx!
-
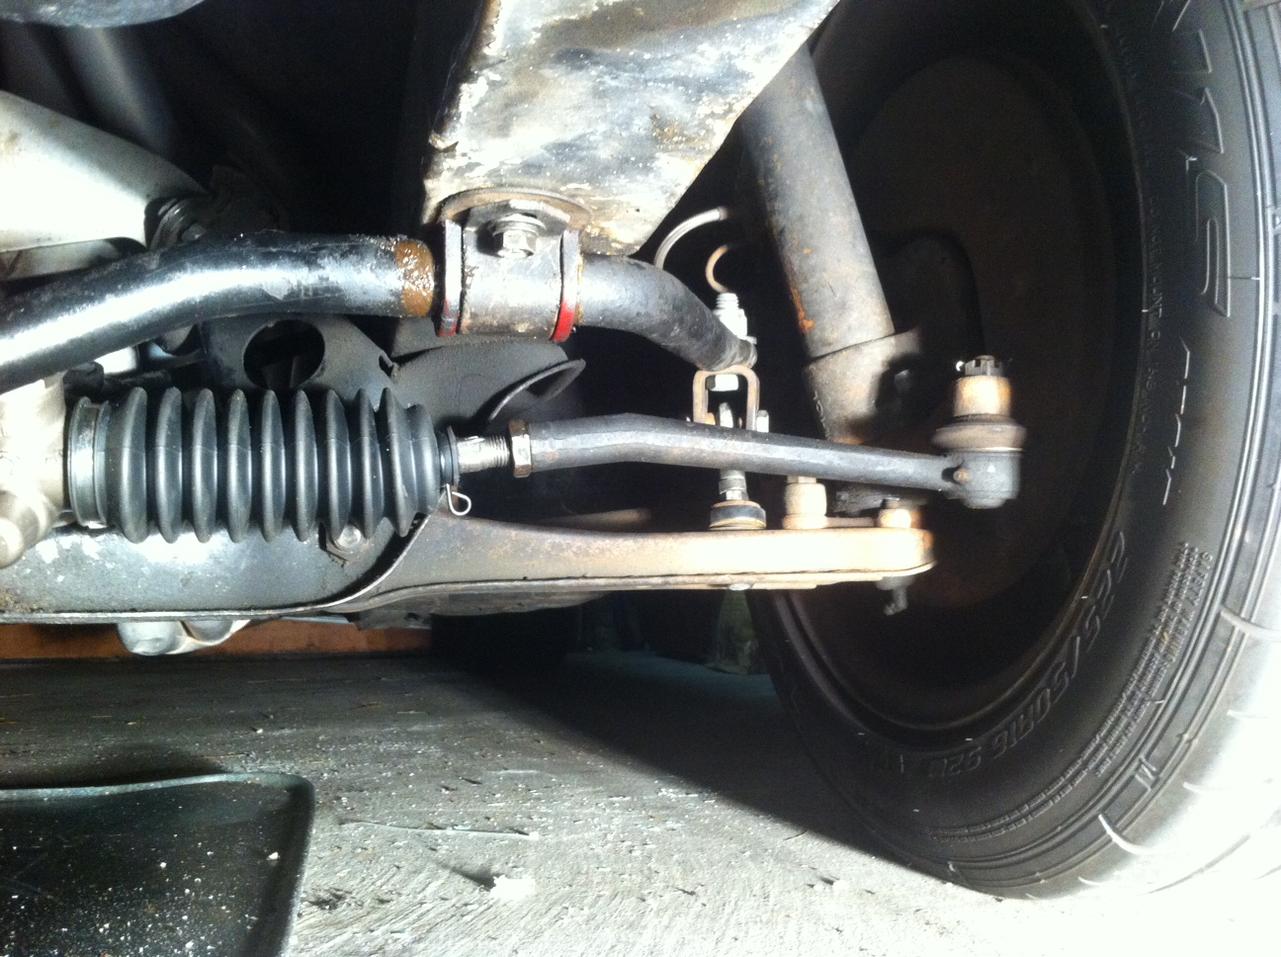
I replaced by rack and pinion last weekend. Its a rebuilt unit from carsteering.com. As far as I know it's a genuine OEM original part but just rebuilt. I assume dimensions of the rack are original at this point. When I assembled everything back together the tires are visibly toe out and the adjustments on the rack are bottomed out. There is a good 5 threads or so visibly exposed on the inner tie rod thread. (see pic) (both left and right side are consistent) Looking at the old rack, it looks like I had cut the threads down to make it all fit, but can't remember why I did exactly that. It's been too long.!!! Maybe for this exact problem...I just cant remember. I had replaced the outer tie rods before and they are from Motorsport a long time ago. Maybe the thread depth of the rods were insufficient? I ordered some new rods from them just a few minutes ago. Figured it wouldn't hurt having a second choice as I remove the old rods and check dimensions against the new ones and replace them if necessary. Just trying to get a feel if other people have had the same experience and what are some of the common pitfalls if any. Has anyone else cut the inner tie rods before? I may have to cut 1/2 from each side or 5/8. The suspension is Tokico 5 way adjustable with Eibach Progressive Springs and the Tension compression rod kit with urethane parts, and urethane bushings in the control arms, and sway bar. So mostly stock in terms of pickup points. Not sure if anyone has any measurements laying around, but it woudl be great to know 1) length of tie rod and thread depth 2) end to end distance of rack (from inner tie rod to inner tie rod) Maybe the rebuilt one has extra long threads? I just have nothing to compare it to since I hacked my old rack Thanks everyone!!!
-
answered my own question on how the play is actually removed, looks like a bushing replacement http://www.zhome.com/ZCMnL/tech/StrRack.htm Anyone tried to rebuild it yourself? Is it that hard, or worth the few hundred in getting a rebuilt one? Thanks!
-
Yeah, I have cinched that sucker down. When I first did that, it definitely helped, but being on the original rack I figure there is not much else for me to do.. Do you know offhand when they do rebuilds how is the play removed? new parts, gears, etc?..
-
Engine: Rebello 3.0 Exhaust system components: MSA 6 into 1, Ceramic Coated, 2.5 " MSA aluminized pipe from header to muffler muffler: Borla Stainless 2.5, Dynomax Center Mufller Bullet Youtube1: Youtube2: Center muffler addition
-
I know this is a old post, my rack in my 73 has about 1 inch of play when moving the steering wheel... Does the new rack take out that play? ,and what was the handling difference.. Thanks a lot!
-
I have had several of their headers over the years. I painted it black and wrapped it one time as well. Forget the paint, it ALWAYS burns off. Also, moisture gets into the wrap and then it eats a hole in the header eventually. Best is to get it ceramic coated one... 10+ years on mine.
-
Cool ride.. Enjoy the handling upgrade...!
-
thats interesting... London
-
Car looks in great shape...have fun with it! I've had mine for almost 20 years!
-
Ok, finally picked up a Sparco Speed 2 off of Ebay. From my research, I am looking for a base Sparco part number 500210, and slider... Anything else I need? for my 240? How does it fit together? Position? Thanks!
-
I could be your man. I live in SF, and SSF is not too far away...maybe 20 minutes. Email me, me at brandonyu.com. IM/Yahoo/byuniqueman
-
I have a 73, with the mounts built in. Just FYI, after having the Motorsport Sway bar in, I had a welder reinforce the weld, because the original weld (after all those years) couldn't take the stress and started cracking. I'd go for the Suspension Techniques setup because of the better adjustability in my opinion and don't have to worry about weak welds (if you have the mounts)
-
Welcome, lots of great Z gear heads here to help out.
-
mmm, thanks for the replies guys. That helps a lot with what to expect!
-