dhoneycutt
Free Member
-
Joined
-
Last visited
Everything posted by dhoneycutt
-
 EricB I have not checked lately so you may be correct. However I still say the guy is dreaming to get that much for it.
 -
Or....you back through the drive thru so that you are on the "normal side"
-
The KGC is from Japan, it wasn't a rare car was all I was saying. The KPGC is the designator for the GT-R model. That one was and is very rare even in Japan. To legally drive a "Grey Market Vehicle" in the US, you must prove that the vehicle in question meets all applicable safety and emissions standards for this country. The problem arises from the lack of crash test data and smog tests. In order to prove that a particular model is safe it must undergo crash safety tests. This ultimately destroys the vehicle so you must have many more to modify and test untill you get it right. I found a loophole 22 years ago when I brought back a rhd 1972 KGC10 model Skyline to the US. I had it licensed and was driving it on the streets with in 12 hours of picking it up at the port in Long Beach, CA. I still wish I had the car but...I was a stupid kid back then. That loophole is no longer available. I must also note that if I was still driving the Skyline and the government were to crack down on illegal vehicles they could still impound the car and destroy it. I am glad I had one and am glad I bought the Z car I am working on now. It is a US sold car so no worries.
-
While the car is rare in the US, it was not in Japan as the seller claims. If it had been a KPGC110 then yes. As far a legality for registration for US roads, it is still considered a "Grey Market Vehicle" and with out proof of meeting US standards, can still be impounded and destroyed at owners expense. He should thank his lucky stars if he even gets close to what he is asking for it. (let the flaming begin...)
-
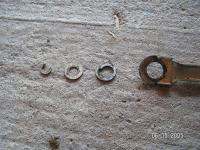
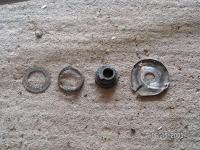
Yes it is original, mine didn't have a circlip either. You can with a pair of needle-nose pliers bend it back. If you can find a e-clip that fits, I would recoment using that instead.
-
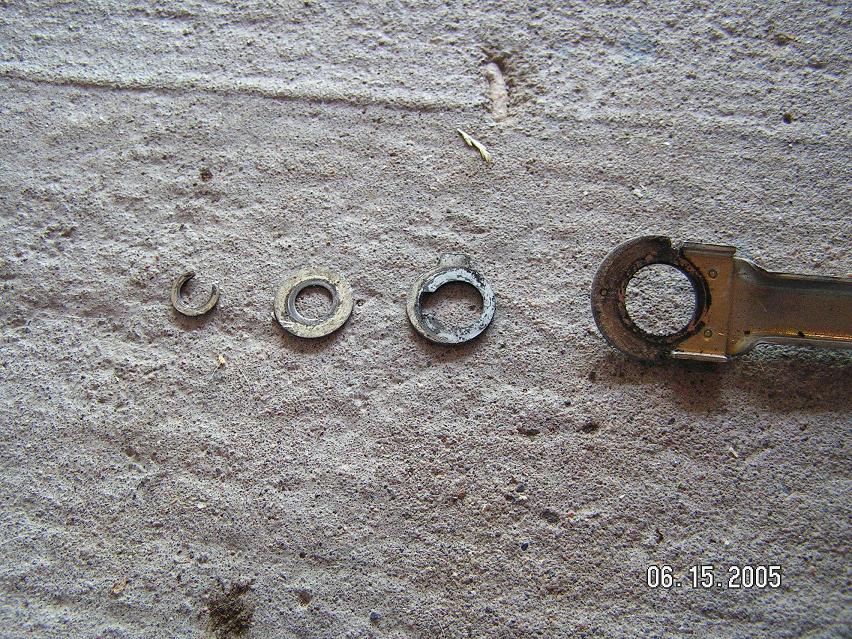
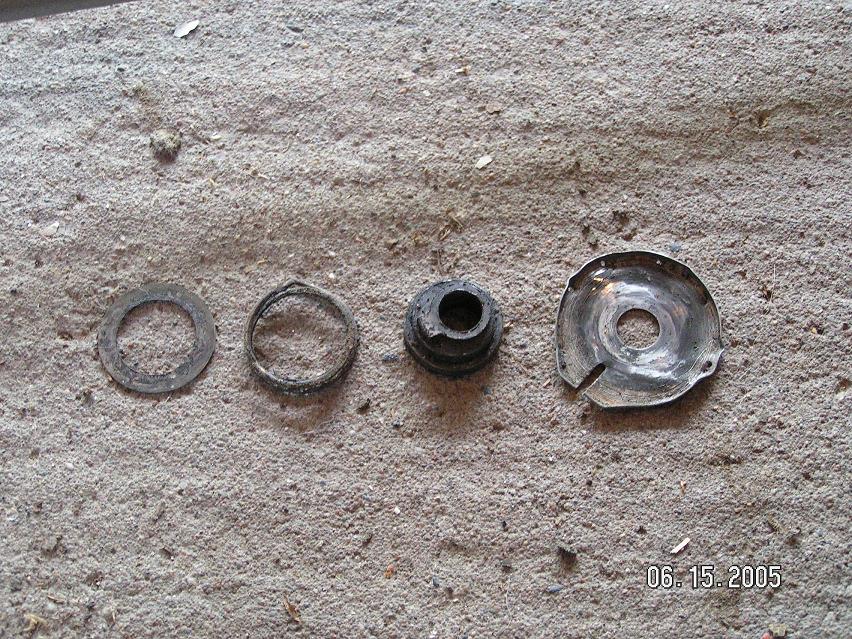
I'm not sure that this will help...I hope it does. In the second picture you want to put the items on the short arm that comes of the wiper motor in order from right to left. Then on the first picture the long arm goes on first and then follow right to left again putting the remaining items on.
-
Before you go out and buy a starter, I would take a close look at the battery cables and make sure that their is NO corrosion on either terminal and make sure that they are good and tight. Also make sure the battery is fully charged and that the alternator and voltage regulator are functioning properly. Just my .02 worth.
-
I just got my new billet shift knob from Z-Tek manufacturing with the Z logo on it. I must say...I LIKE IT LOL LOL
-
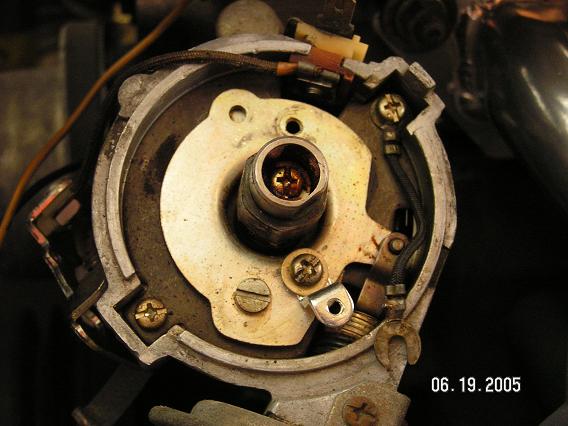
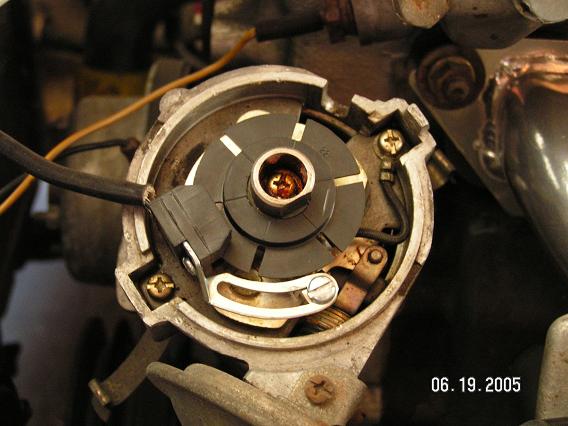
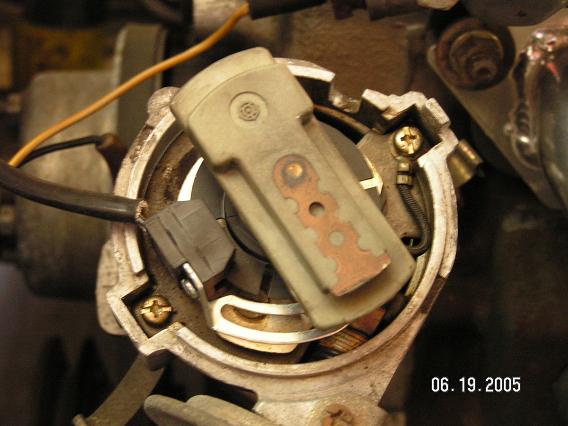
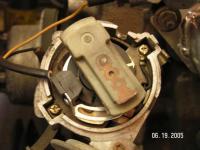
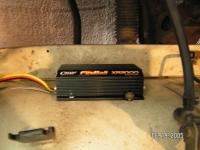
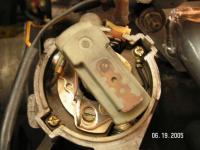
Step 12. Install the small optical sensor support bracket on the bottom screw hole and attach the ground wire you moved out of the way on step 8. The first photo does not show the ground wire attached. Do so before you go on to the next step. Step 13. Install the trigger wheel on the shaft paying close attention to the flat sides on the shaft and the matching flat sides inside the trigger wheel. Step 14. Install the optical sensor to the support bracket from step 10 and check for proper spacing and no rubbing/interference. Step 15, Route wires out of notch in distributor housing making sure there is no interference with the moving parts inside the distributor and seal the opening with silicone sealant. Be careful to not get any inside the distributor housing. Step 16. Install new rotor in same position as the one removed. You will notice in the photo, mine is a little worn. I have a new one in there now. It wasn’t available for the photo. (See step 2. :stupid: ) Step 17. Install distributor cap. NOTE: If you are replacing spark plug wires put on new set following the proper firing order. (1972 US model is 1-5-3-6-2-4) Step 18. Find a suitable mounting location for the control box. As you can see in the photo I mounted mine down by the frame rail directly under the coil. You will have to drill into the car to mount it there. If you don’t like to make any more holes then find some that will work for your application. Step 19. Follow the instructions that came with the product to make the electrical connections. THEY ARE EASY ENOUGH TO UNDERSTAND. NOTE: To clean up the look of my installation I shortened the red, yellow, and black wires when I installed my new coil. Step 20. I soldered all my connections and used heat shrink tubing to make sure that they were good. I recommend you do the same if possible. Is seems the crimp on connectors always fail at the worst possible moment (Murphy’s Law) and they are sometimes very difficult to diagnose when there is a problem. Step 21. Verify that all connections made were in accordance with the instructions and that they are tight and secure. Step 22. Reconnect the battery and start the car. Step 23. Bring it up to normal operating temp. Step 24. Attach a timing light and verify timing and adjust as necessary to get optimum performance. Step 25. Remove timing light. Step 26. Take car out for a test drive. If all checks out okay, then enjoy your self installed maintenance free ignition system. To give a cleaner more professional appearance, wrap the wires in a wire loom after everything is checked out and works. I hope that this helps those who are looking to install the Crane XR3000 ignition system on their 240 Z. I welcome all feedback since this is my first write-up so any constructive criticism is welcomed. Just PM me and let me know. Thanks for reading, David Honeycutt
-
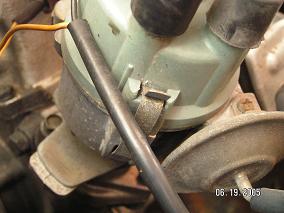
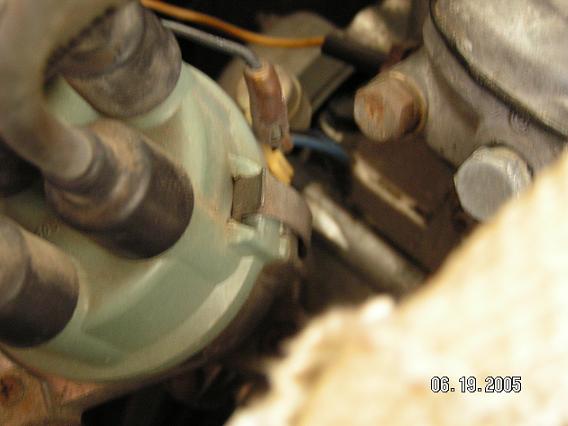
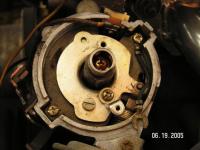
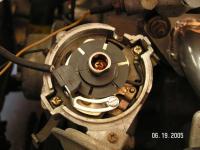
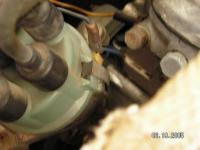
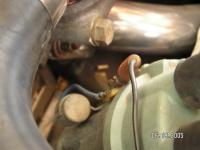
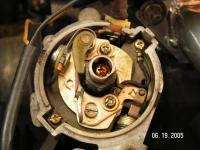
I must start this out by saying that I AM NOT a certified auto technician and as such cannot be held liable for any damage done to you or your vehicle while following this article. By using this article you assume all responsibility for your own safety and the well being of your vehicle. While I tried to the best of my knowledge to include the things that I thought were important this article is not all-inclusive. Proceed with caution and at your own risk but also please enjoy the fact that you will save money and have the sense of accomplishment a person gets from doing their own maintenance/repair work on their own vehicle. Step 1. Read the instructions very carefully, then READ THEM AGAIN to fully understand what it is that you will be doing. Step 2. Gather everything you need to get the job done. No one wants to have to stop in the middle of a task to go get something they forgot about. The tools I used were: Digital Camera (to take pictures of what I was taking apart so I could put it back together again) and to document the task. Phillips head screwdriver Flat head screwdriver Offset Screwdriver Wire cutters Wire strippers Wire crimpers Soldering iron Rosin core solder Heat shrink tubing Cordless drill Small drill bit Timing light 10 mm wrench 8 mm wrench Silicone sealant Step 3. Disconnect the negative battery terminal from the battery. Step 4. Take some pictures of how everything is BEFORE you start into the installation. This will help you if you run into trouble and need to put it back the way it was. NOTE: Now is a good time to replace those old and worn sparkplug wires. Have the FSM (Factory Service Manual or other repair manual such as Haynes, Clymer etc.) handy. Step 5. Take the distributor cap off by prying loose the two clips holding the cap onto the distributor body. (See photo 1 & 2). Inspect for wear or damage. If any, replace it with a new one. Step 6. Take note of the position of the rotor. (See photo 3). Step 7. Take the rotor off and inspect it. If it is worn replace it with a new one. Step 8. Remove condenser located on the outside of the distributor housing using the offset screwdriver. Step 9. Reinstall the screw from step 9 back into the hole you just took it out of. Step 10. Unscrew the ground wire on the point’s side only and move it out of the way. Step 11. Take the points out.

-
I don't know anyone who "likes" war...it is a neccessary evil that needs to be done to protect our way of life so that we, our children, their children, and those after them have the basic human rights that ALL deserve. I have not met anyone who joined the military to become rich. I served for 20 years proudly and am one of the luckiest guys around because I made it through my career without seeing combat. I think that name calling gets nowhere. As much as I disagree with the individual on the video, I feel sorry for him. It appears that he knows nothing of what he is talking about. He should be educated.
-
dogma420...I am using the stock 240 dizzy. You can use it with the 280zx dizzy according to their instructions. As soon as I get a chance to get out and drive it I will let you know how it works. I just want to verify timing etc. before I go too far from home :laugh: I've never written anything up as far as proceedures go so this is a first for me. Hopefully it will be easy to follow. I just need to figure out how to post it when I am done with it. jmanz6...I have heard that before and am just hoping that it won't happen to me...(yea I know wishful thinking on my part) I do have a spare tach and would probably just go for their tach adapter. We shall see. How much are the 280 tachs going for?
-
I thought of that as well but why didn't they just have you take it out? Maybe by leaving everything still connected to it and jumpering across it allows the tach to still function as normal.
-
I went out and bought a Crane XR3000 ignition and the PS91 Coil to go with it about a year ago and just now got to put it in :paranoid: I did a lot of research AFTER I bought it and was concerned about the performance of it and being able to use the stock tach. Well...after following the fairly easy to use instructions, it started right up and strange of all my tach works just like it did before install. I am working on a write up of how I did it with photo's to help anyone else. What I found that didn't make sense to me was they had me keep the black/white wire and green/white wire attached to the ballast resistor, but put a jumper wire across the ballast resistor :surprised I don't know??? All I have to do now is verify the timing and all should be good to go (I hope)
-
I went down to my local nissan dealer with the spring and shield after I spent about 30 minutes looking at the Z Car Microfiche CD and they came to the same conclusion that I did:disappoin Those two parts are not listed individually. They (Dealer) think that it comes with one of the linkage arms or the arm that connects directly to the motor. They are all available :surprised for what I thought was a reasonable cost. So...I went ahead and ordered all three arms for a total of about $72 USD. Should have them here next week! In the mean time I just bent a tab on the spring and cleaned and painted the arms and lubed it all up and put it back together and...it works better than it did beforeLOL LOL Albeit not as good as a new car but a whole lot better than it did. It looks like I will have a spare set of linkages but that is okay. Someone else correct me if I am wrong, but I think the purpose of the spring is just to take out slack in the mechanism. I am saying this because the short arm on the motor just rotates 360 degrees and the spring only has one tab (after looking at Carls pictures he posted here in this thread) on it. It wouldn't have a way to do anything else? (This is why I am not an engineer!!!)
-
I just got my wipers out of the car and discovered that the shield the spring sets on is in pretty bad shape and the spring doesn't have the little tang on it so it can rest in the notch of the arm that connedcts to the drive spindle on the motor :mad: Does anyone know where you can buy those parts?
-
I ran into this not that long ago when I ordered a new set of struts and springs for my 240. The 260 tubes are not only longer by about 2 inches, they are also about 1/2 inch larger in diameter. The 260 struts will give your Z the "Rally" look.
-
I won't even try to argue with you on that. When I was in the military, I was an explosives expert and got to "play" with lots of stuff . My spare tank has been void of fuel for quite some time (not even any vapours) so shipping it won't be a problem.
-
If Moyer's does every job like the photo's on their web site then it looks to me like you wouldn't notice the patches. It looks like they do a very nice/professional job. Again I am just saving up to send my extra tank to them first and then swap out tanks and get the second one done and maybe sell it when I am finished with that part of the car. If anyone missed the link to Moyer's it is: http://www.gas-tank.com/
-
...Or you could use a specialist who repairs and seals gas tanks and backs it with a lifetime warranty against rusting out on you again. I haven't gotten mine done yet but will when I get the money. Heres a link to their website: http://www.gas-tank.com/ Just a thought.
-
Larry...I am waiting patiently to hear from you. Thanks everyone for your replies. David
-
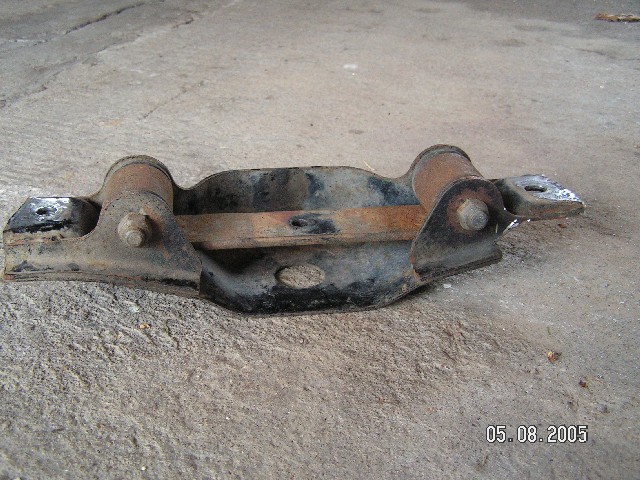
dspillman...I need the whole assembly. Mine as it shows in the picture I posted earlier bolts vertically to the trans tunnel but also has horizontal bolts on the crossmember itself as well. Carl...if you look at the right side of the crossmember in the picture, someone has ground/cut of part of it off. I just don't know if it is structurely sound or not, so I would rather be safe than sorry. dspillman...My vin # is HLS3079961
-
It does, thanks. Now all I have to do is find one.
-
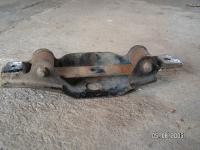
Carl, Thanks for the info, I didn't know that there were a couple of mounts out there :stupid: . I looked at the old transmission mount and it doesn't look like any of the pictures you showed. Here is a picture of the one I have and maybe you could tell me what one I have? After all this is the same 72 240Z that had 260/280 rear struts on it :mad: from the PO or before. It wouldn't surpise me if this mount was from a later Z also!
-
Happy Mother's Day all. I am in need of a transmission crossmember mount for my 240 Z. If anyone here knows of any please let me know. I have searched ebay...to no avail, and I also have a post in the classifieds with no luck as of yet. Thanks in advance for your help. David