akwikz
Free Member
-
Joined
-
Last visited
Everything posted by akwikz
-
 Kent, Glad you approve. Its been slow going for a while but I'm trying to get it rolling again. Its surprising how inspiring it is just to see her off jack stands again. Anyhow, I'm going to get the motor on the stand this weekend. Once I do that I can take some better pics of the rack and pinion linkage. My plan at the moment is to get it to the body shop soon. I have decided on a paint scheme that I think will be both unique and fit the persona of the car. I have also been working on my interior layout. As for the grille, just let me know where and when to send it. When you get it you should post a pic of it along side the GT-R grille. The two rarest of Nissan bits in one place. People will drool. As an aside, I was wondering if you would ever stumble accross the components to convert a 240z to RHD? I'm kicking around getting a Z again as they are becoming scarce even here. If so, I would need a dash, pedal box, steering rack, cowling, wiper assembly and gas pedal. Just curious if these can still be had over there. Brian
 -
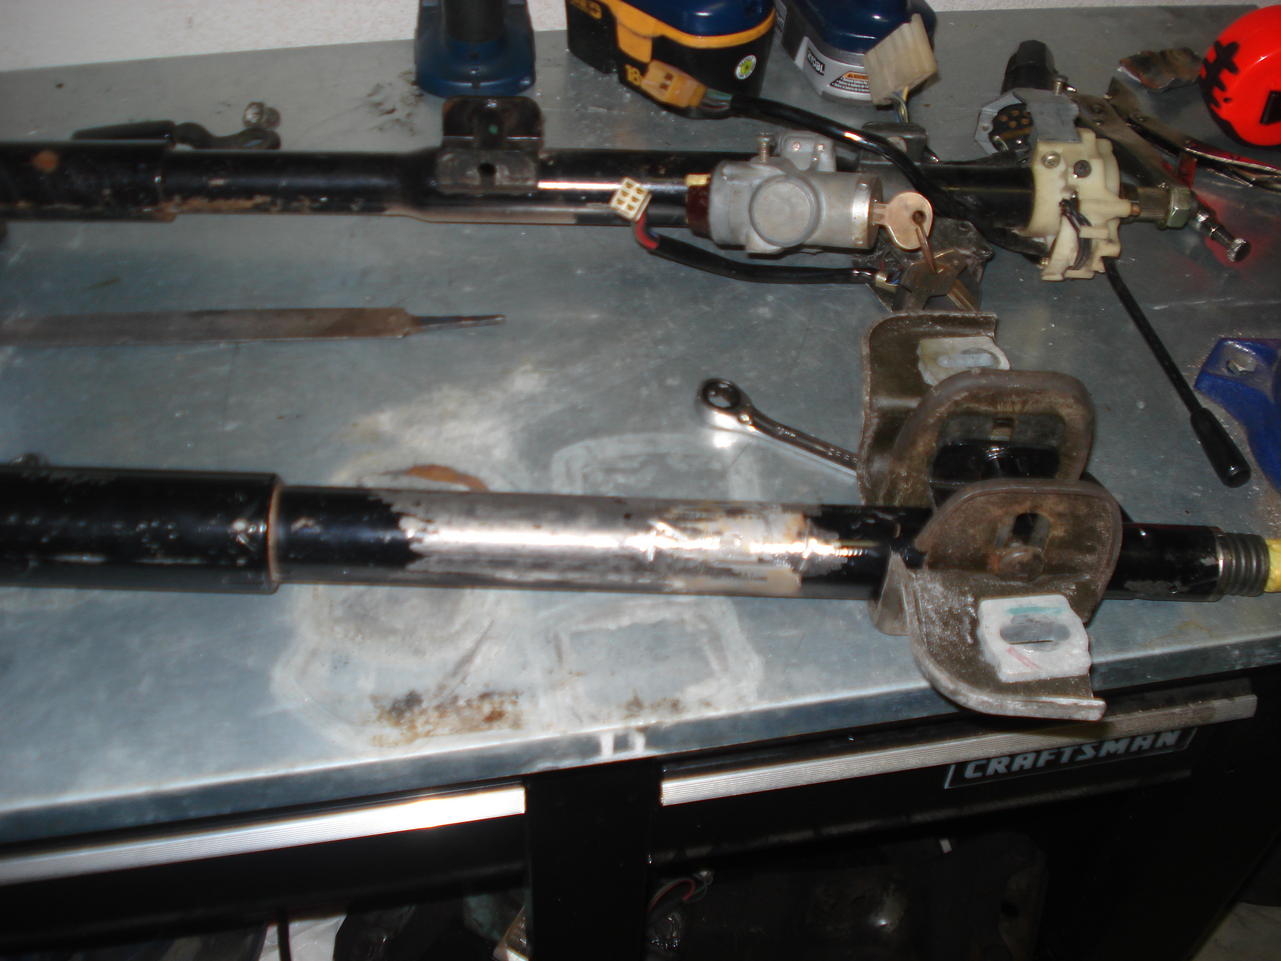
As you are aware, and as pictured, the GC110 uses a very basic "adjustable" column. It rides in a slotted mount under the dash. The S130 uses a simple bolt in style with ears. The GC110 mount is fully removable, unfortunately the bracket on the column is impossible to remove without severe damage to the original column itself. Even though I'm heavily modifying my car, I want to do as little damage to original parts as I can. This is where another trip to the junk yard comes in. Most Nissans of the era use a mounting style like the ZX, but after a bit of walking around I found an 810 two door. It uses the same mount as the GC110. I cut out the section with the mount and headed home. And here is the finished (nearly) product. I welded the small section with bracket onto my S130 column and viola, the column rides in nearly the exact same spot as the original. I tested it with the stock steering wheel and it feels factory. I need to drill a couple of small pilot holes to locate and mount the control stalks. I originally thought the lower pivot points for the control arms were off by .5 inch per side, well, it looks like they are in fact dead on. I was able to bolt the stock GC110 arms into the S130 crossmember and as you can see from the earlier pics the front wheels are just fine. I plan to run camber plates anyhow, so any minor variance will be easy to correct. So that's were I am at the moment. I pulled out the tranny and the motor will follow in the next few days. Once the motor is on the stand I can refine my motor mounts. And I hope to finally have the car taken to the body shop. I'm still in need of flares and a chin spoiler, but otherwise I have most of the parts stashed. On a completely separate note, do any of you know if there is a trim item that runs along the top inside line of the front windshield? Basically where the headliner ends. My car seems to be missing this, whatever its called.


-
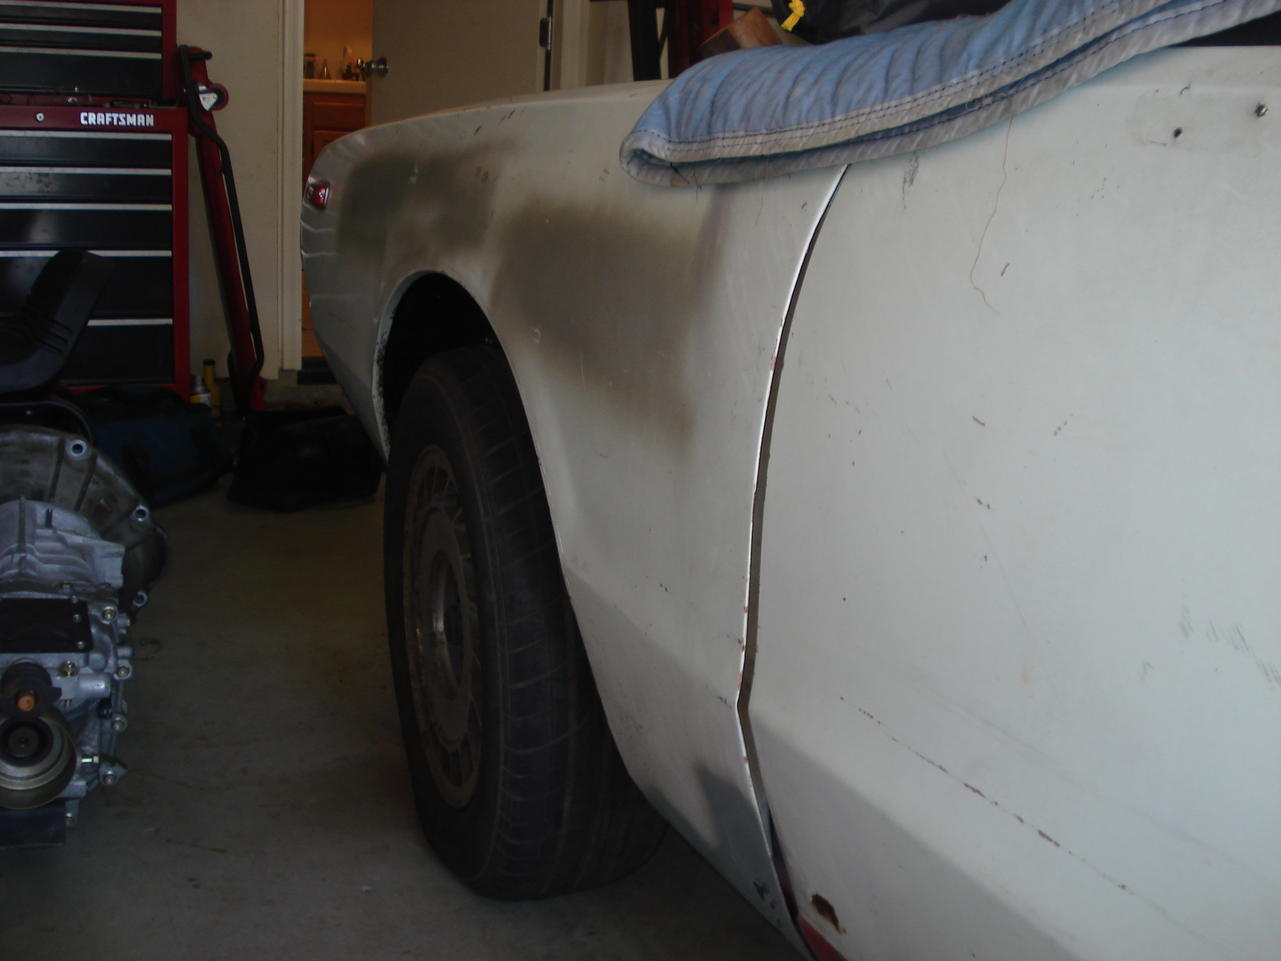
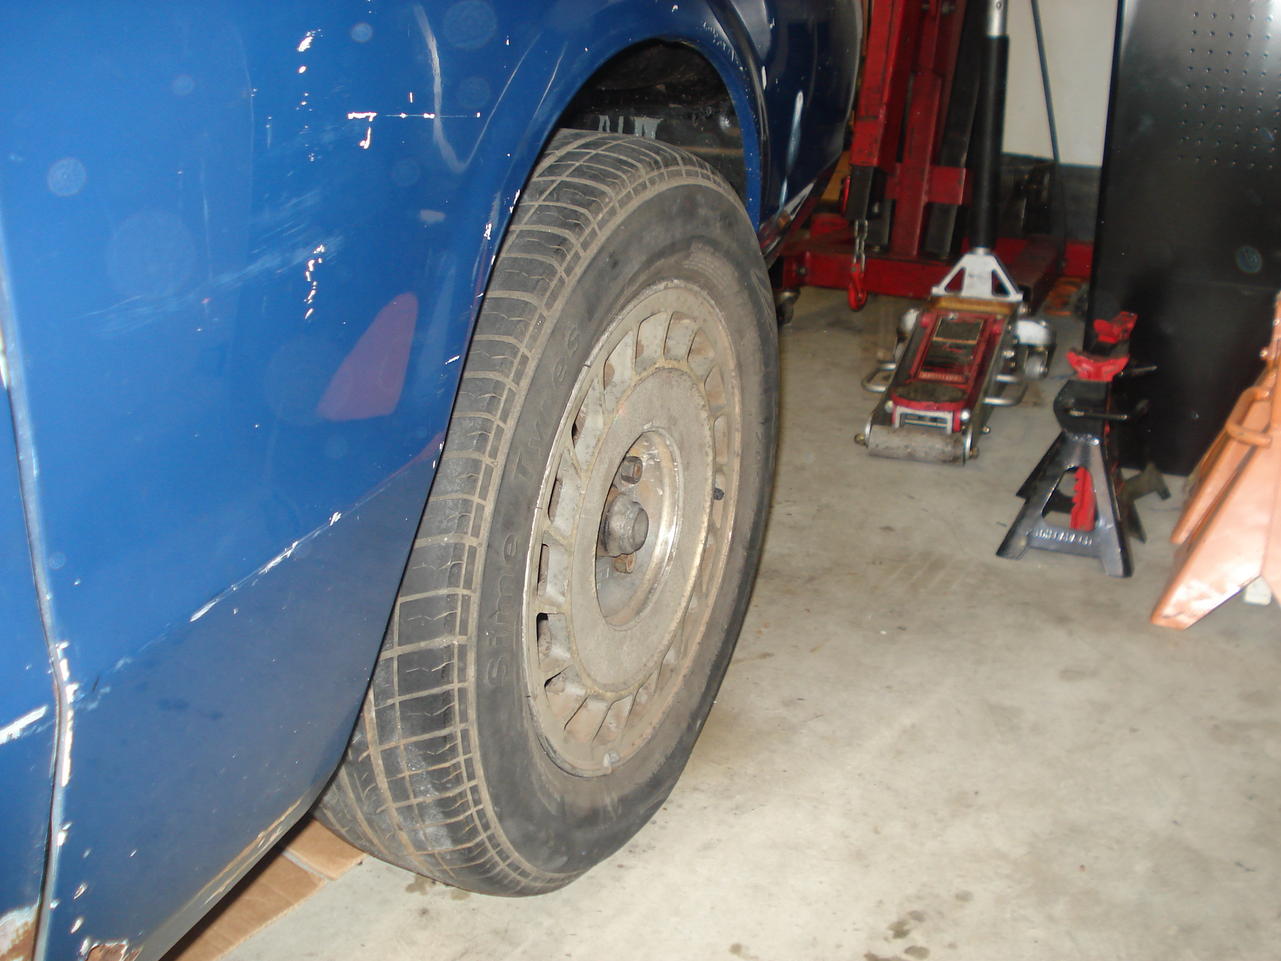
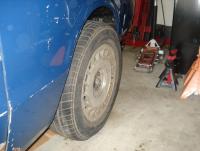
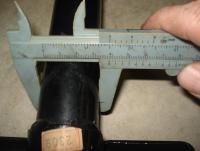
So it's been a while, but I have actually made progress. The car is officially on all four wheels again. I took the s130 steering column and shaved the stock mounting ears off. Then cleaned it and measured the C110 mounting in comparison. The columns are nearly identical in length, and all I had to do was measure from the top end where the wheel mounts.


-
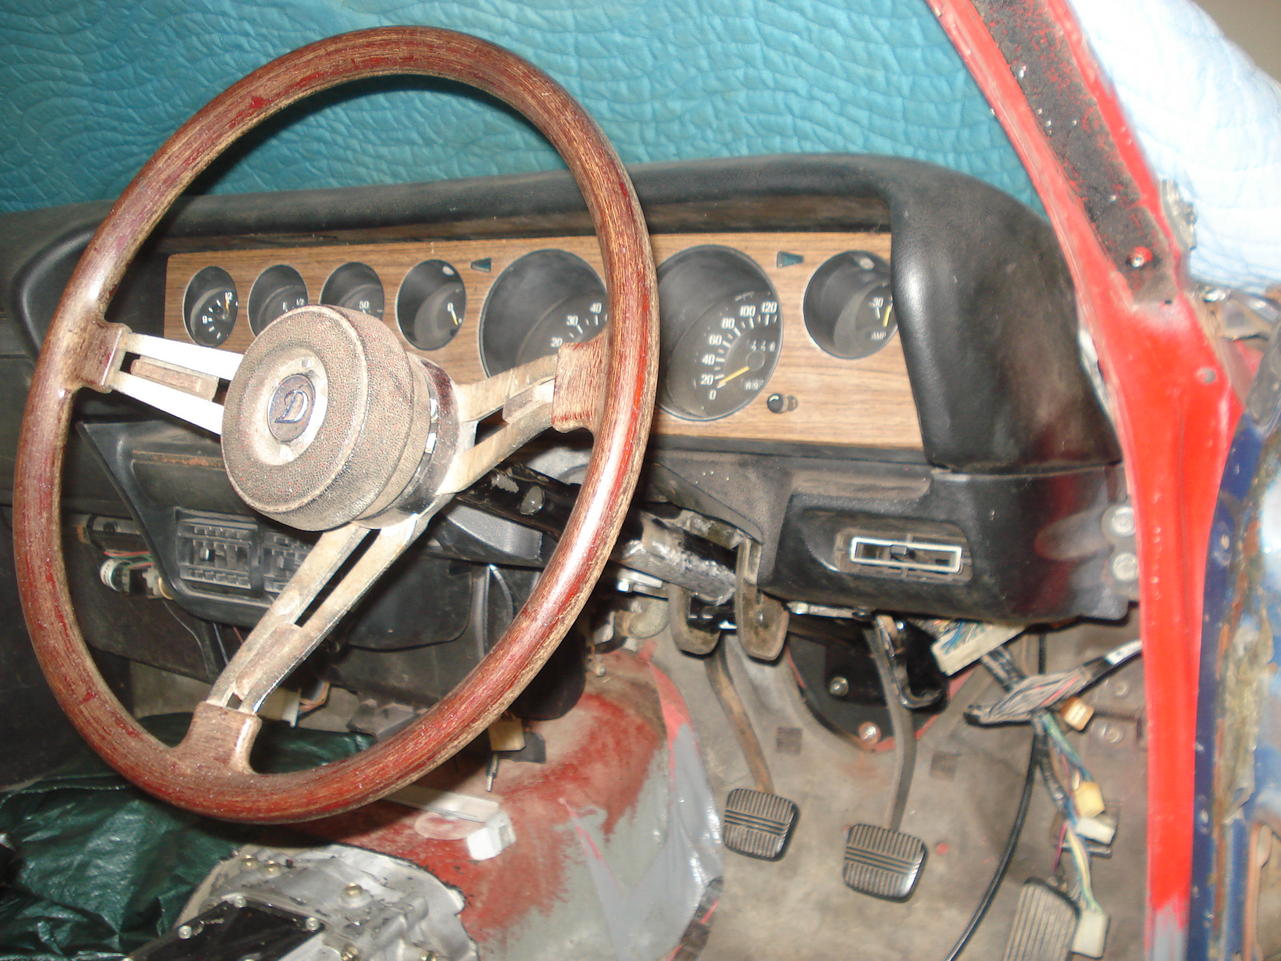
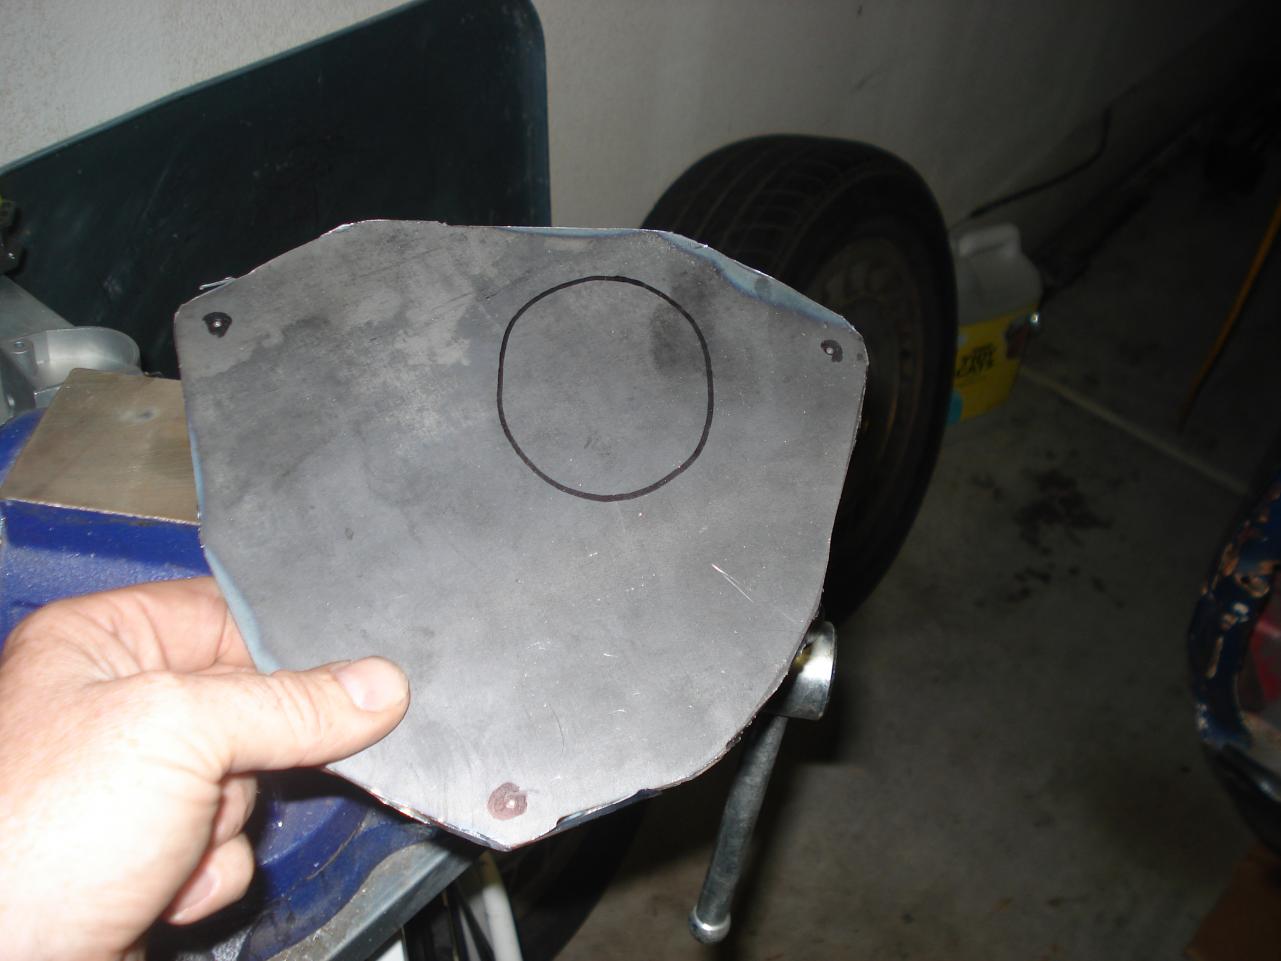
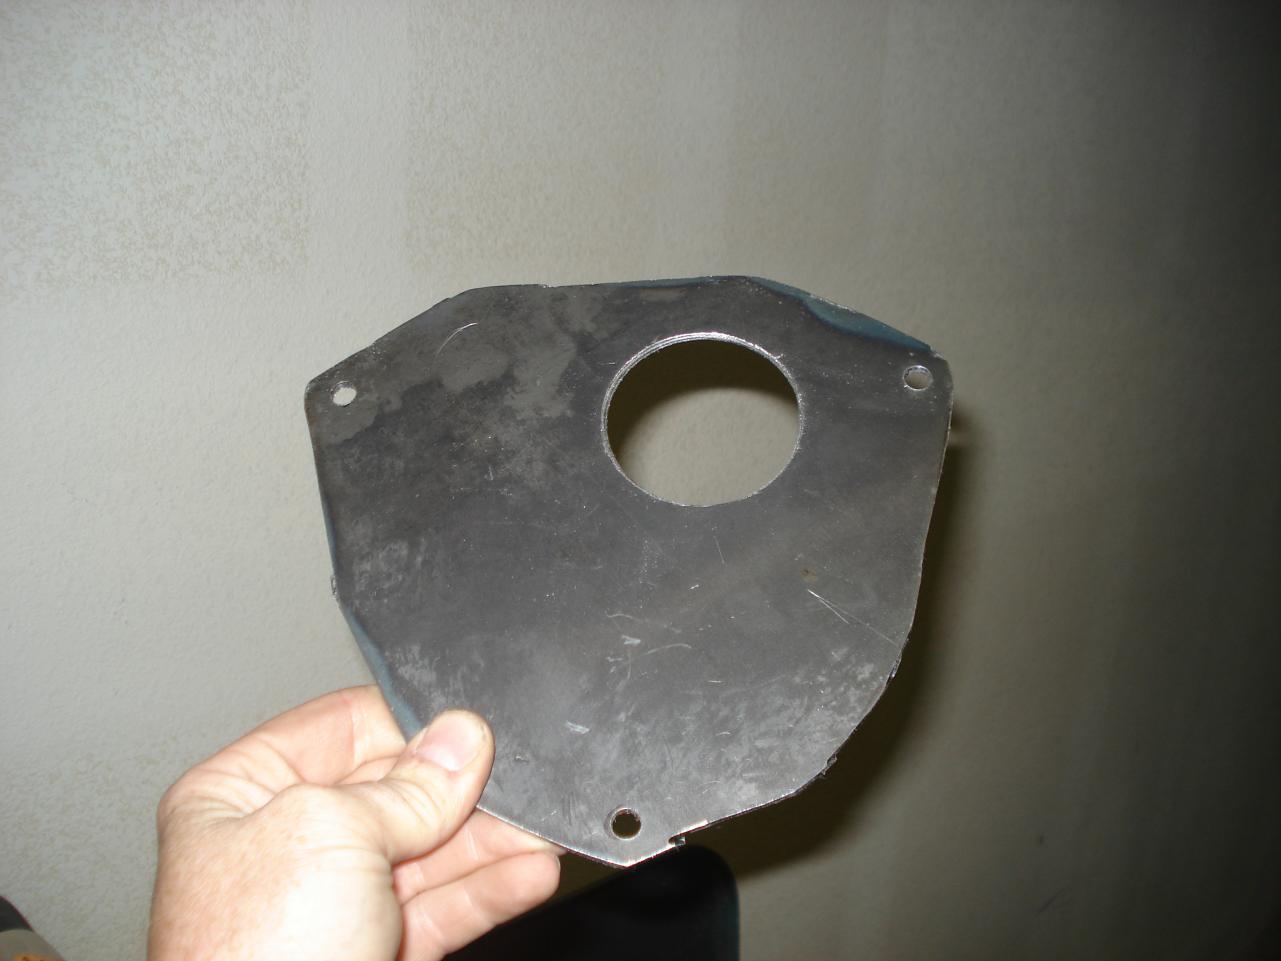
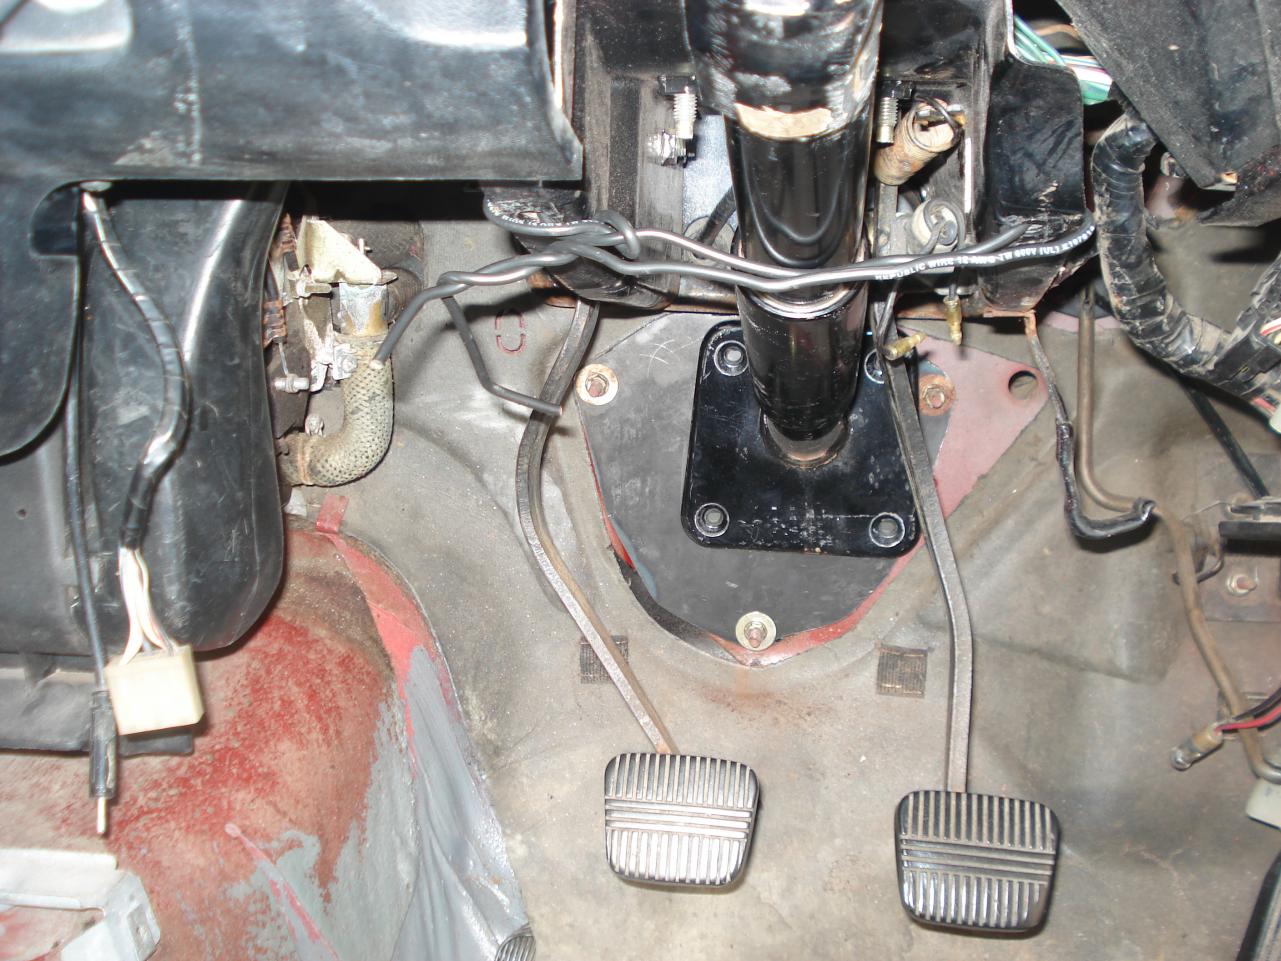
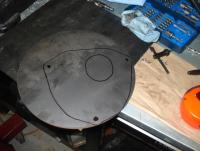
So this is the latest news. I went back to the machine shop a few weeks back to check on the progress as I hadn't heard from them in a long time. When I originally dropped off my mock up, I mentioned I was in no real rush. Well, apparently they took that a bit too far and never even started on my firewall plate. These guys have been good in the past but this time I was a bit pissed. Anyhow, I decided to make my own new one, and here it is. So this was made from 3/16 steel plate using a chop saw and a drill press. While it may not be machine shop perfect, I'm proud of it. I went ahead and did a rough fitting of it. These pictures are of the plate with the S130 ZX steering column. I trimmed off the original mounting ears just so it can be fitted in. I plan to remove the adjustable mount from the C110 column and transfer it over to this one. As you can see in the pics from the engine bay, I need to slightly alter the pass through hole so that the column can be moved down another 1/2 inch or so as its just barely contacting the right cylinder head. Other than that, I'm happy with how its coming together. I'll post up a few more pics after I have polished it up.


-
Also, Chris, I'm keeping an eye out on that steering rack for you. If you happen to find one before I do just let me know. It took me a few months to find mine, but the funny part is that when it did pop up, there were four others available at the same time. Two manual and two powered ones. It seems like a feast or famine situation.
-
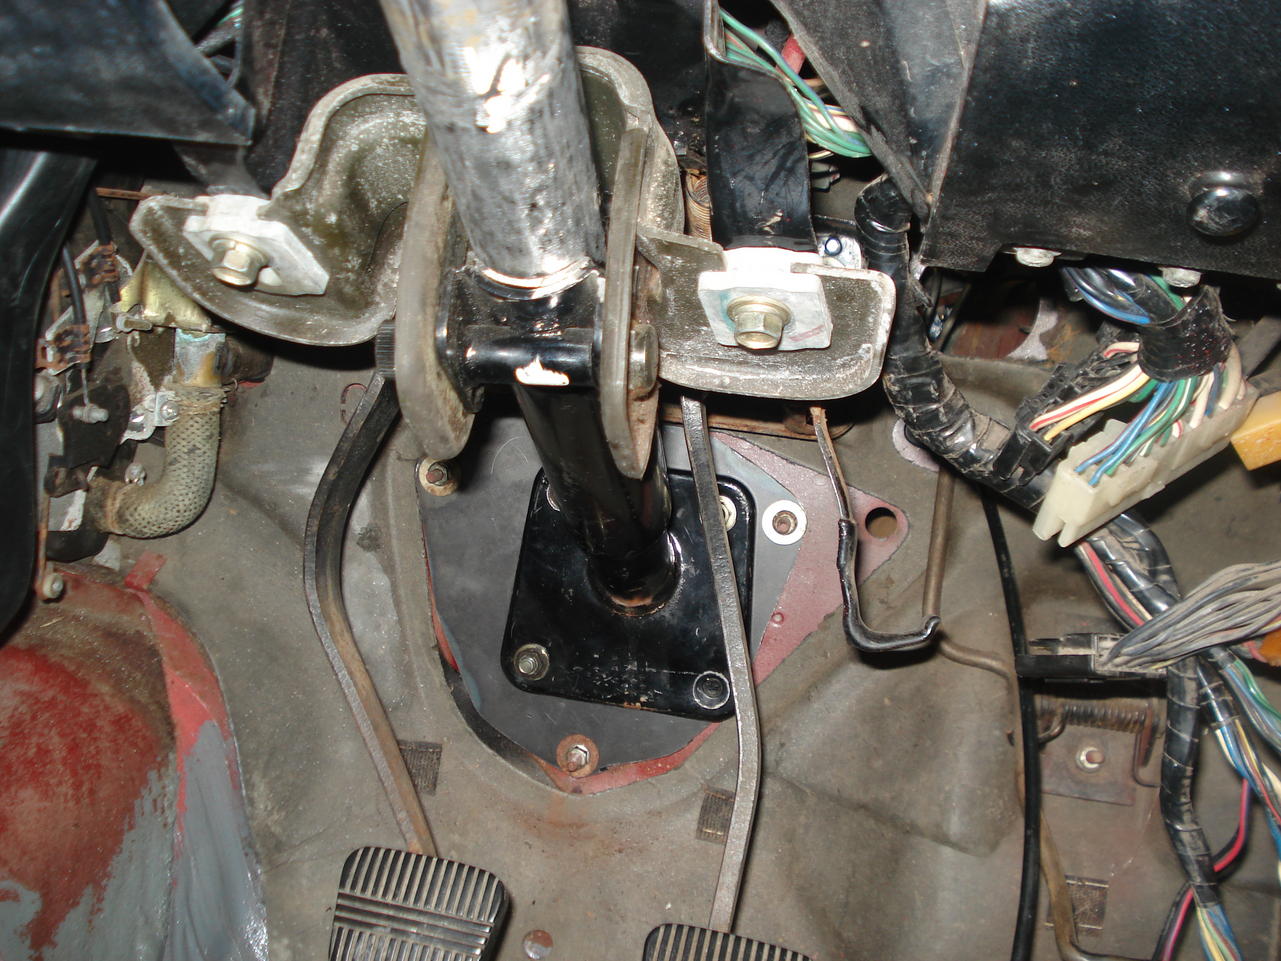
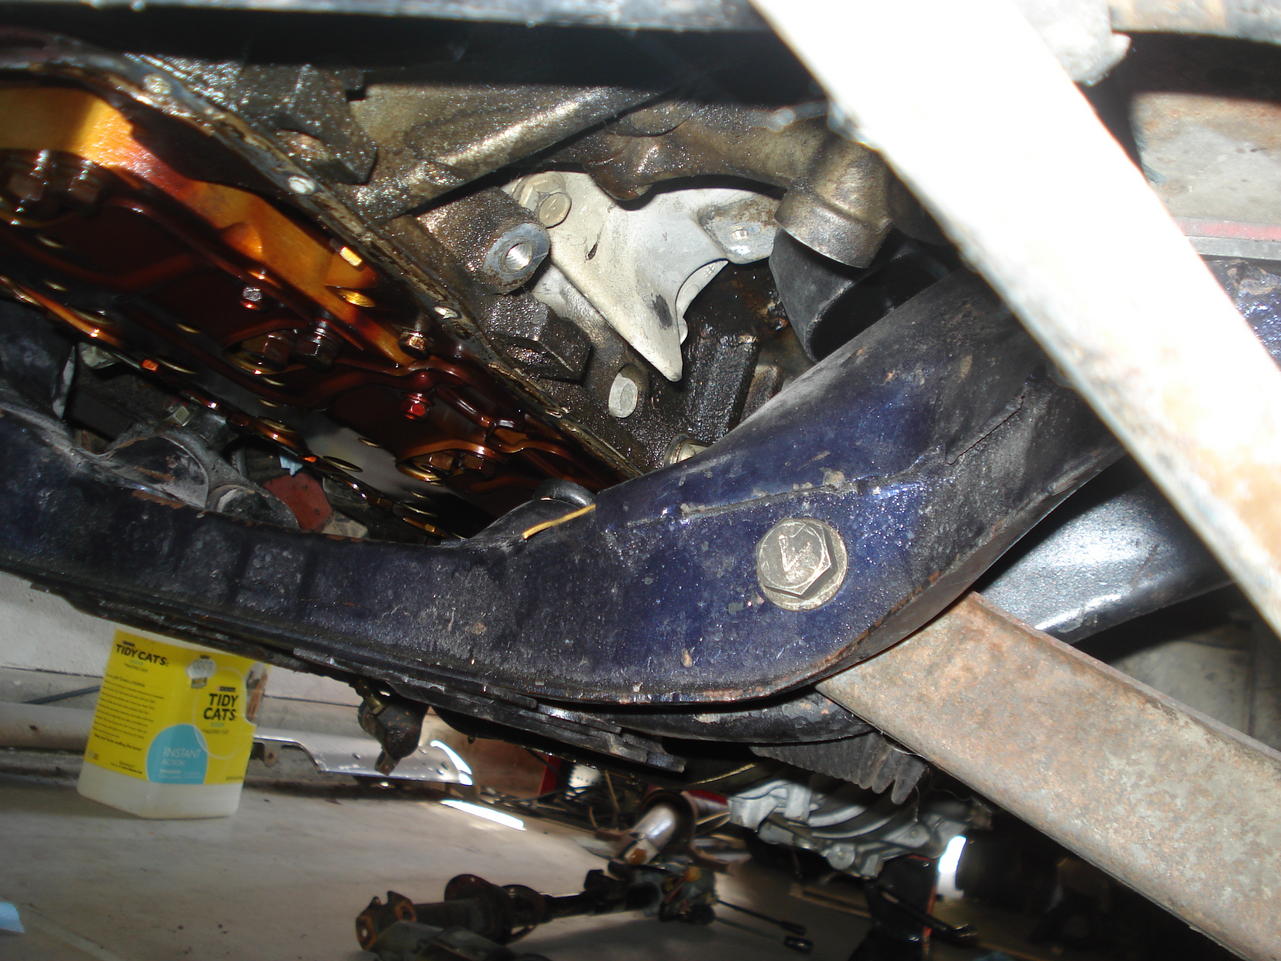
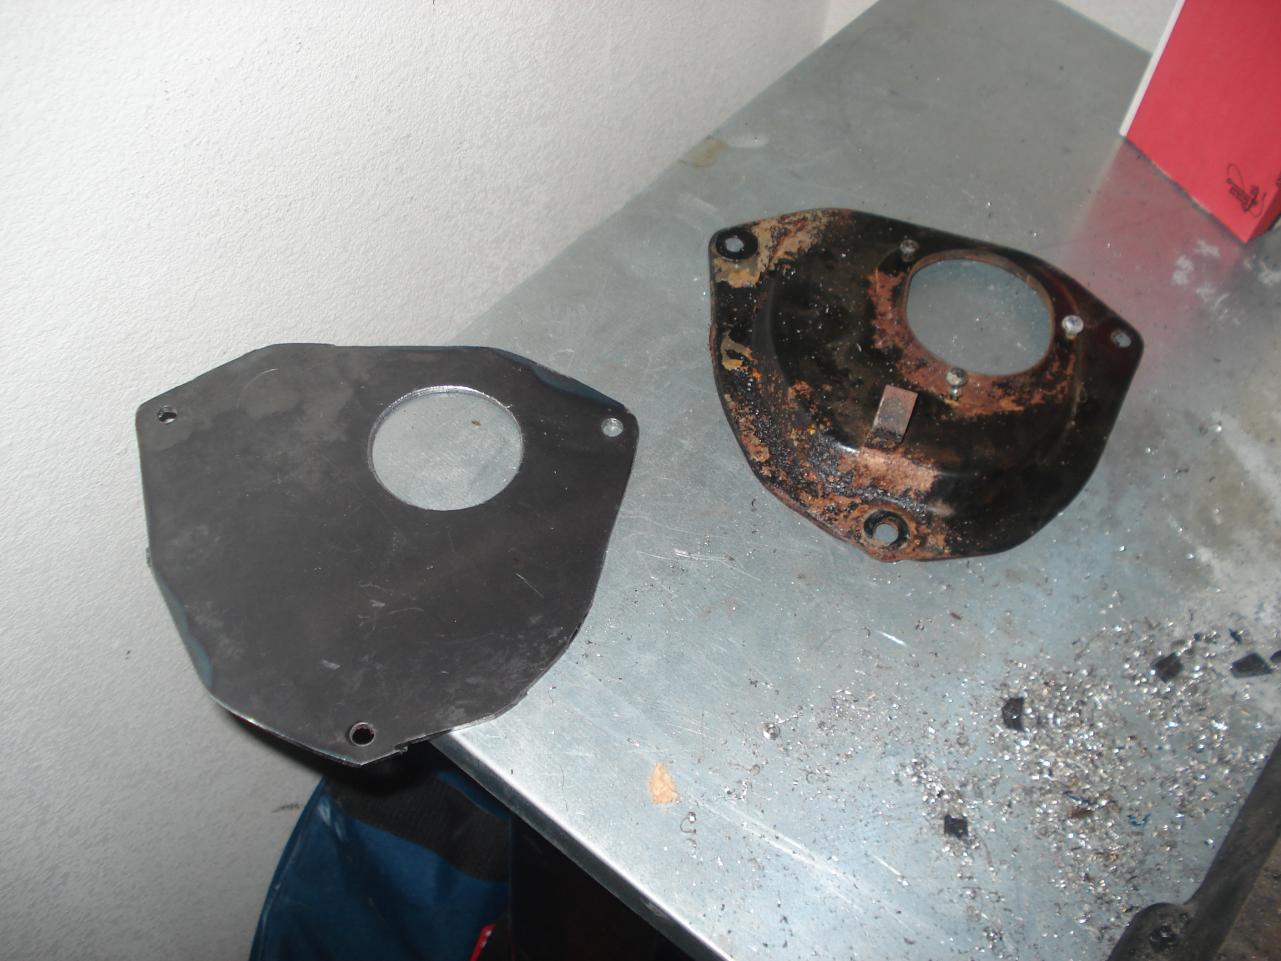
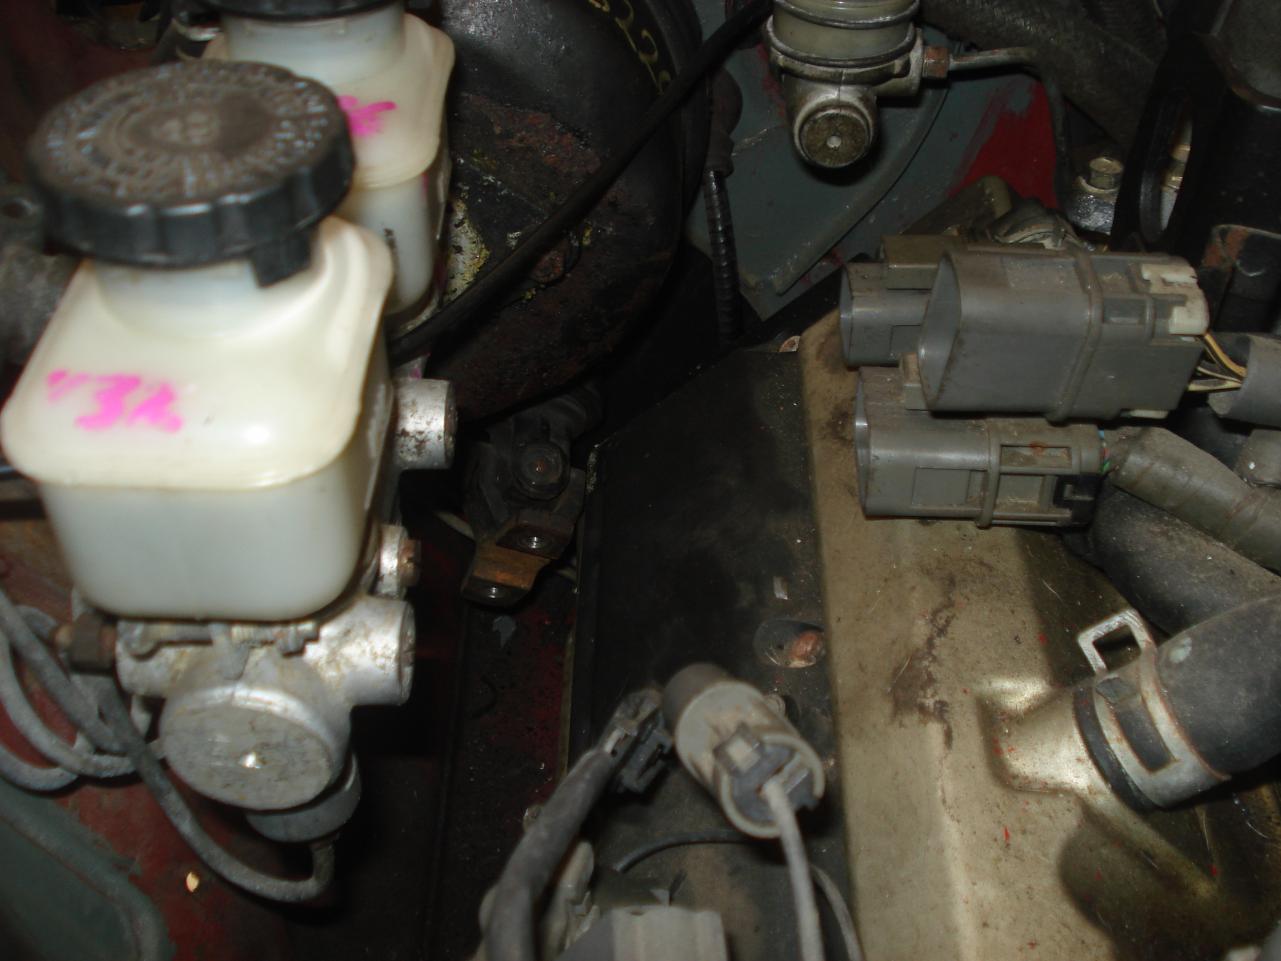
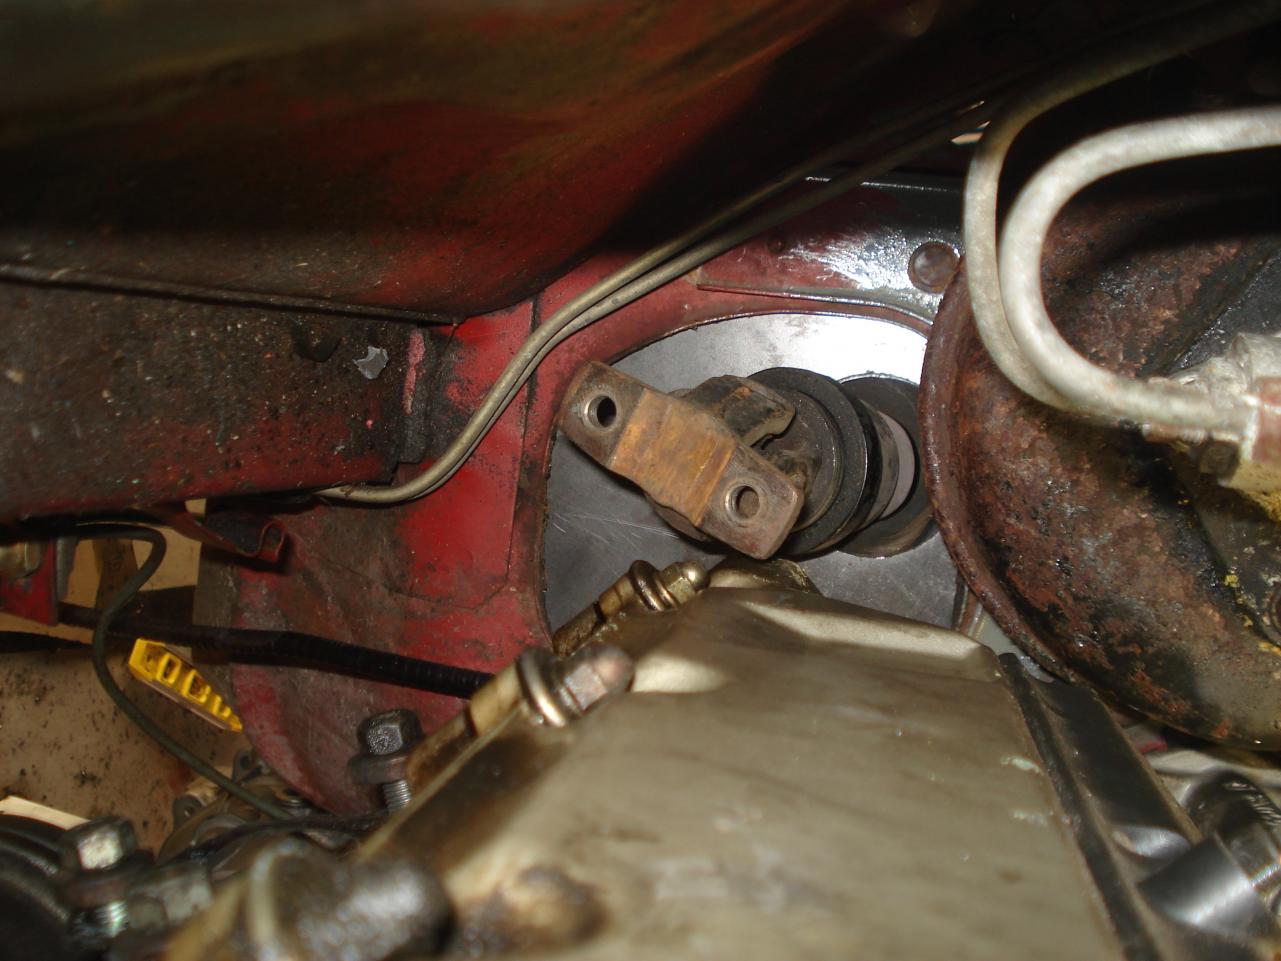
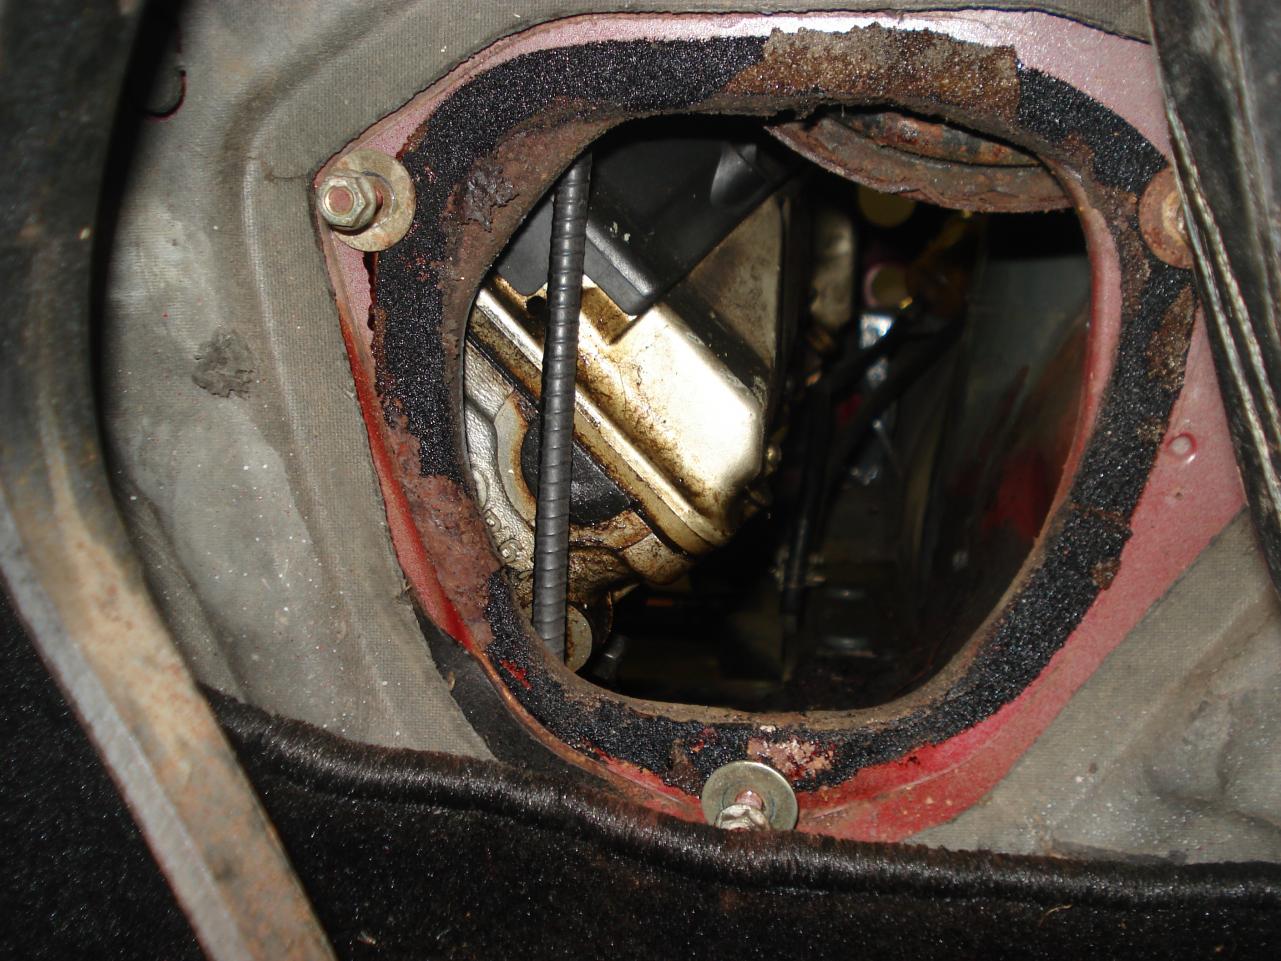
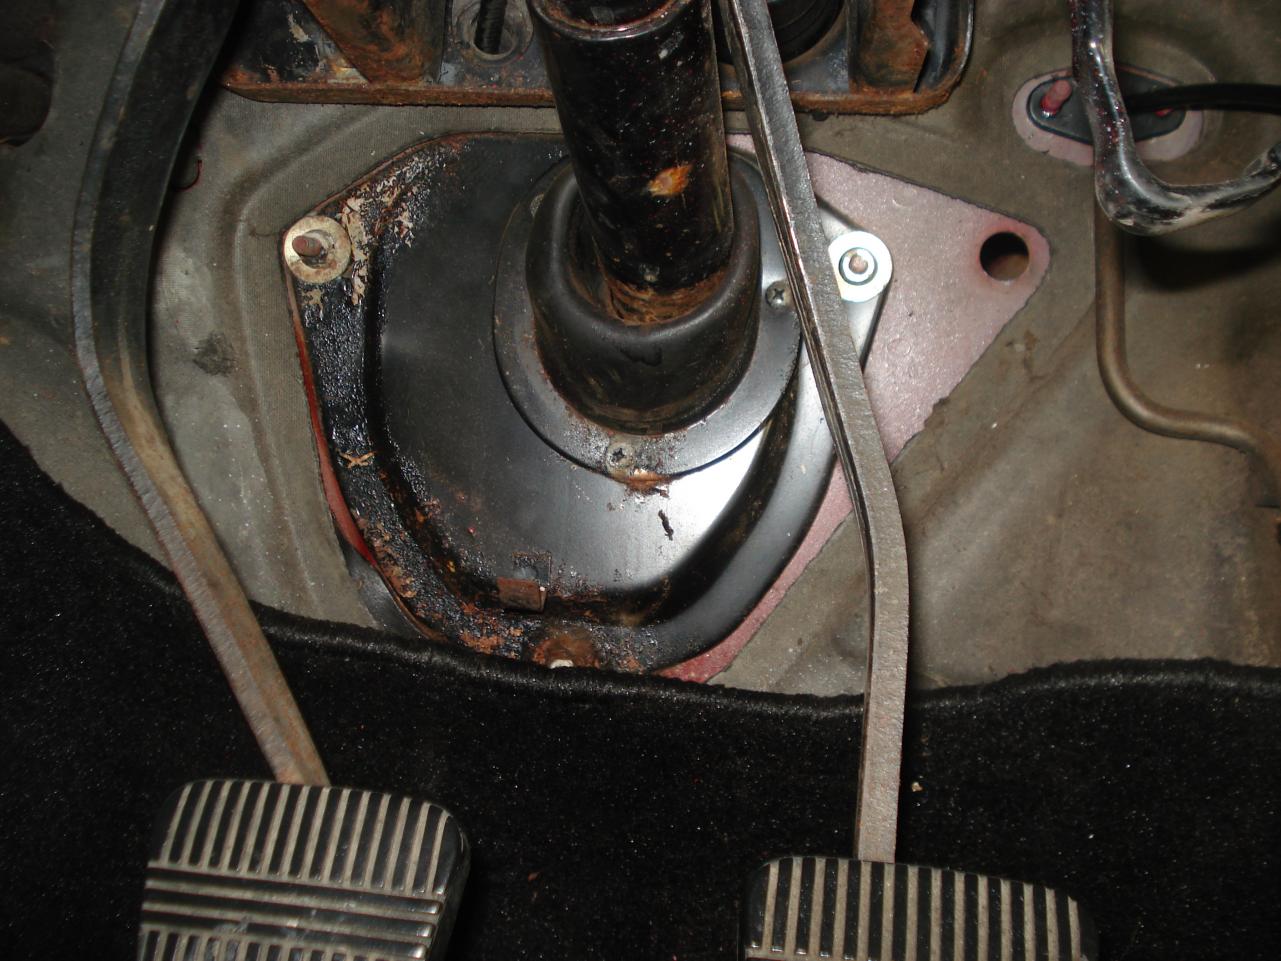
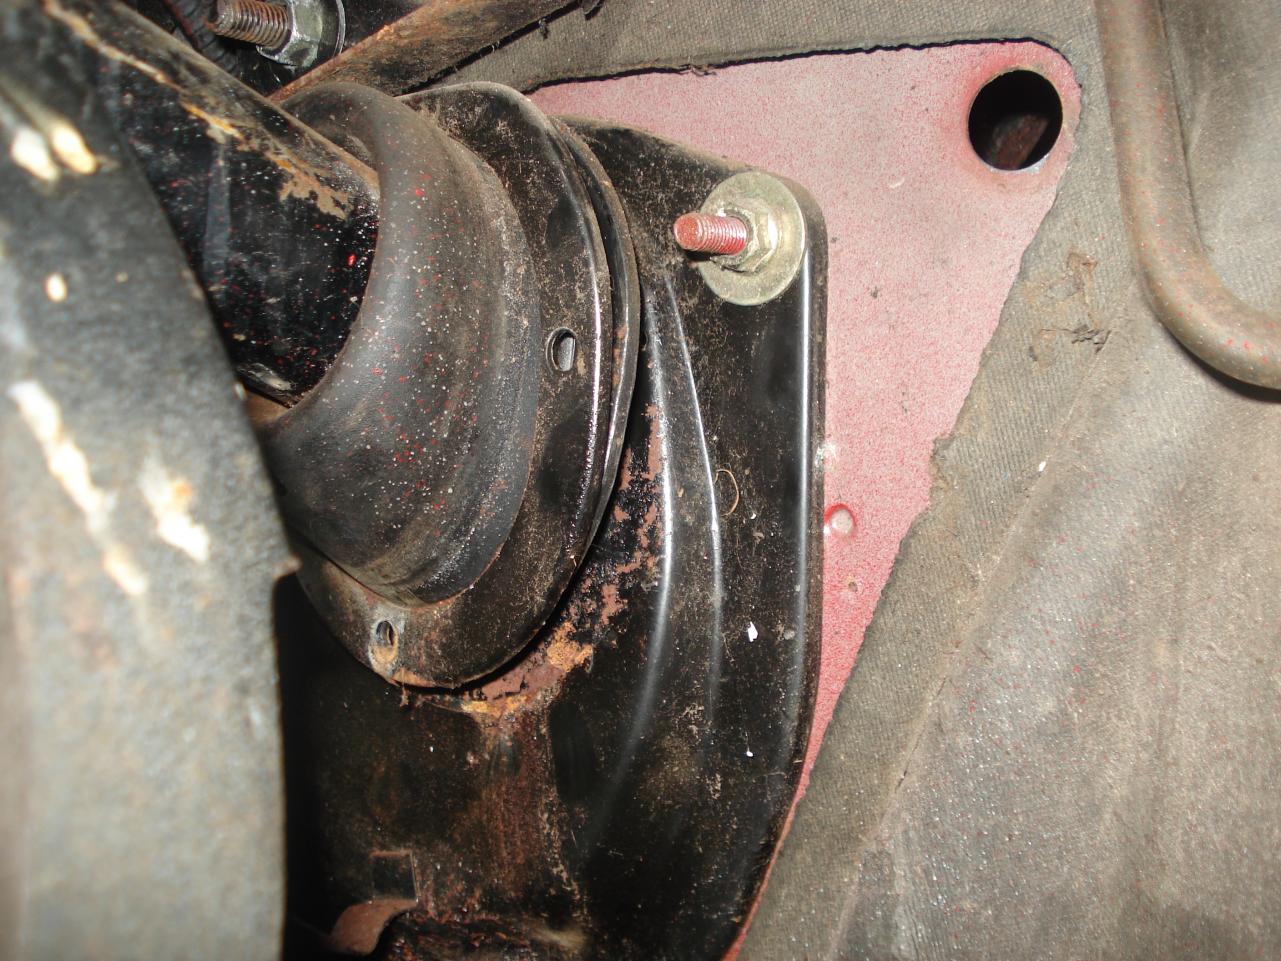
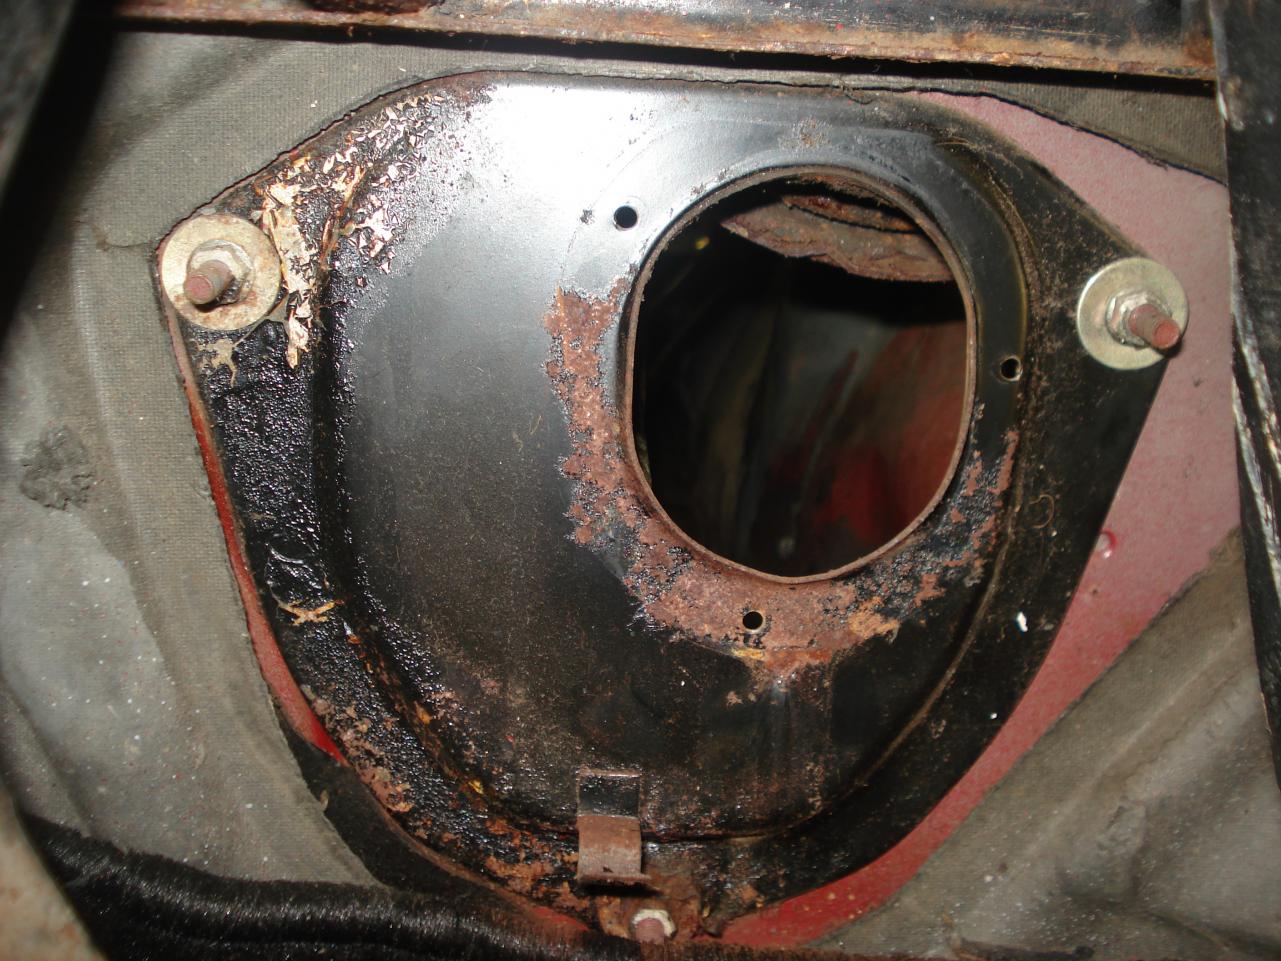
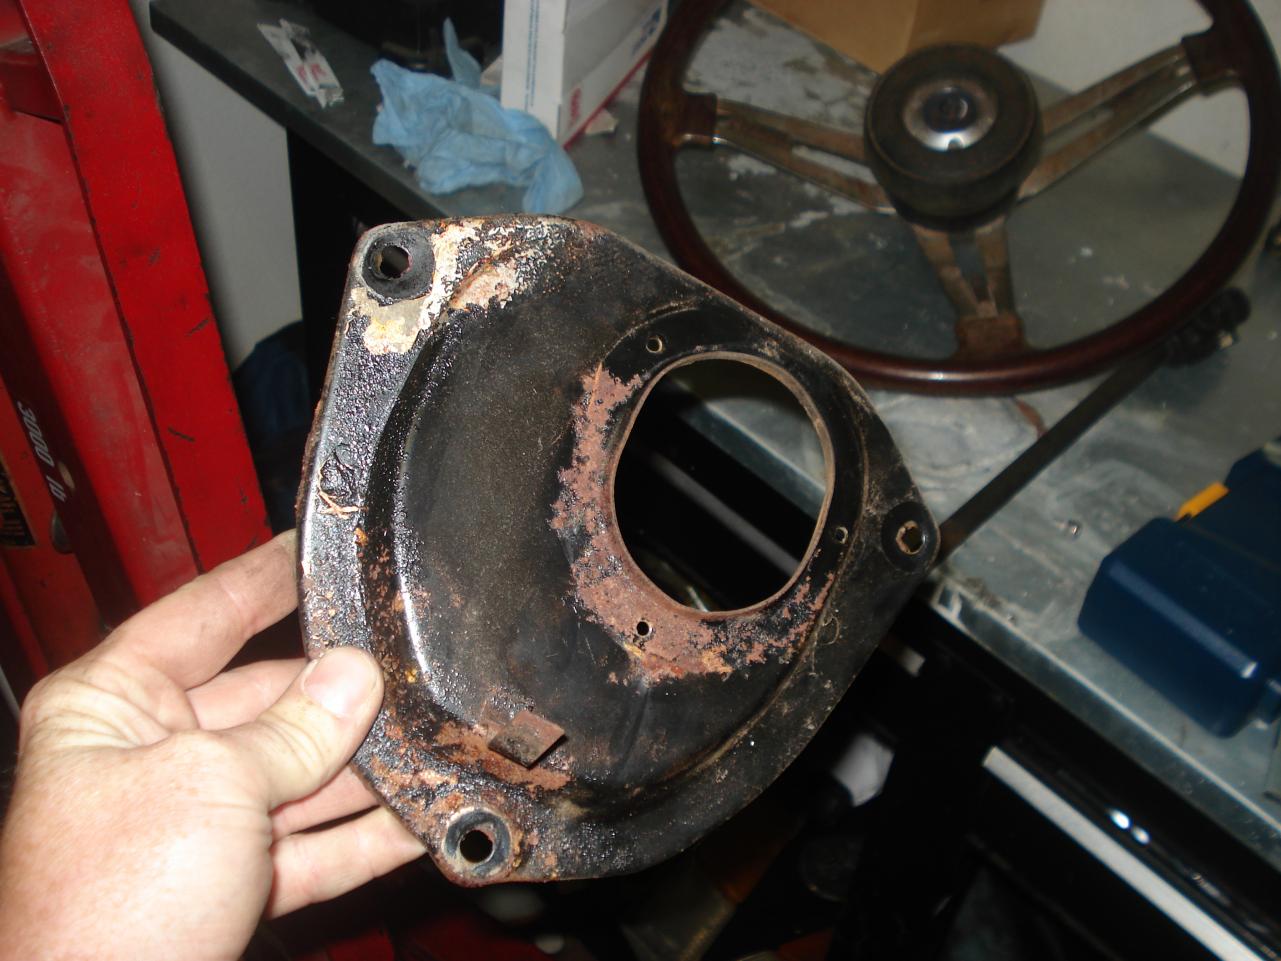
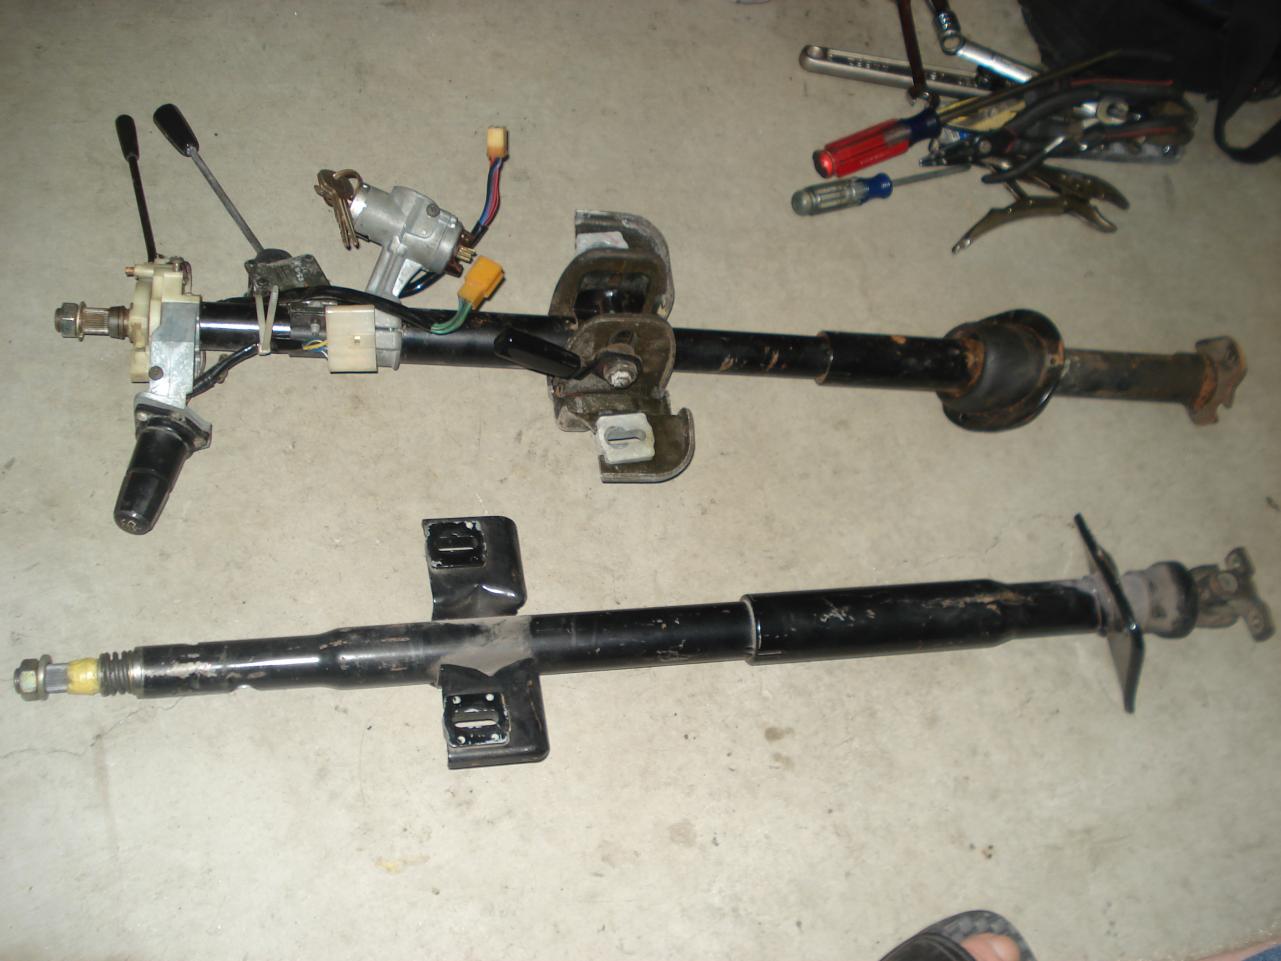
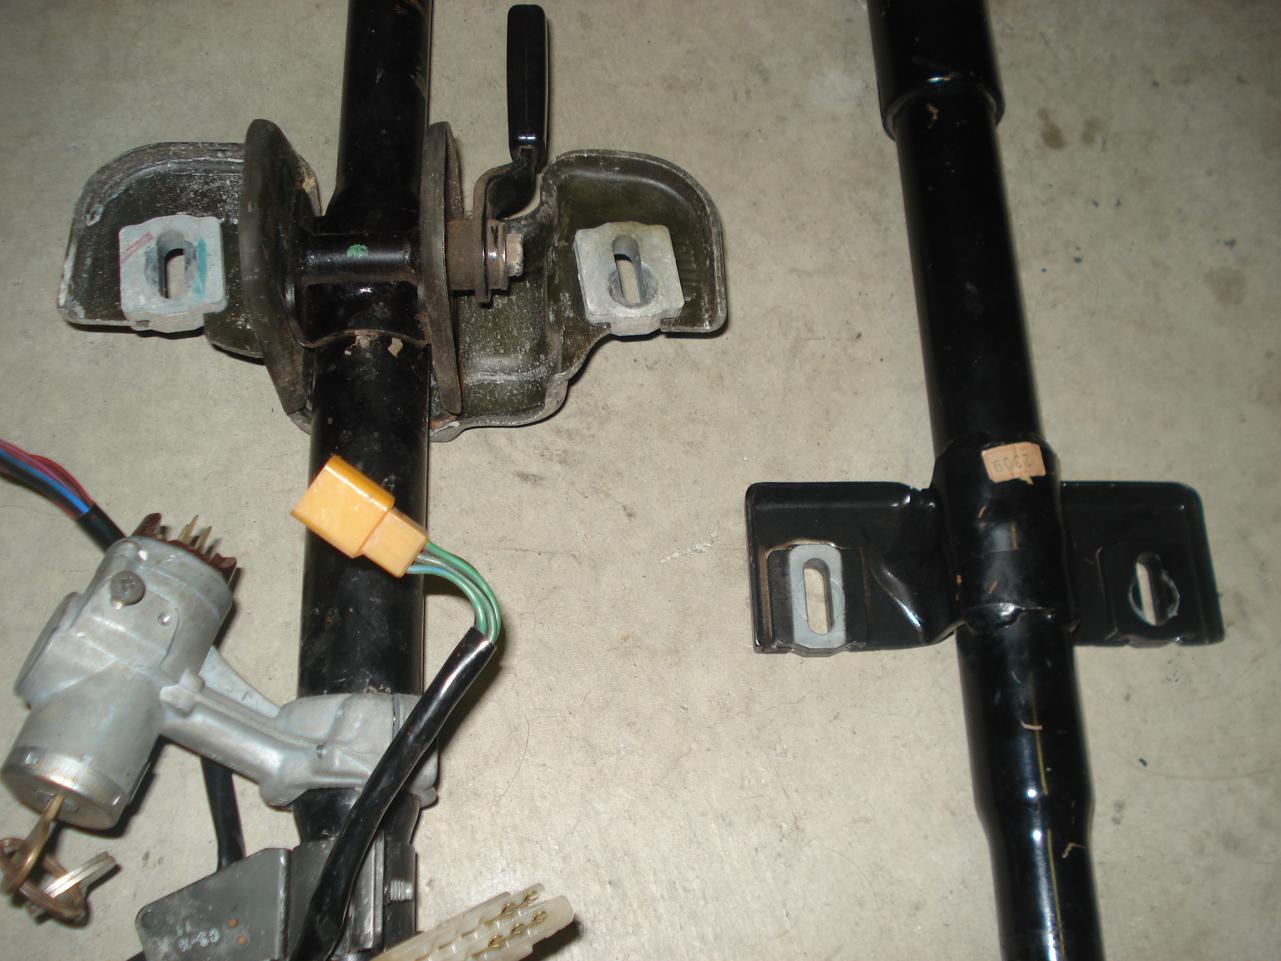
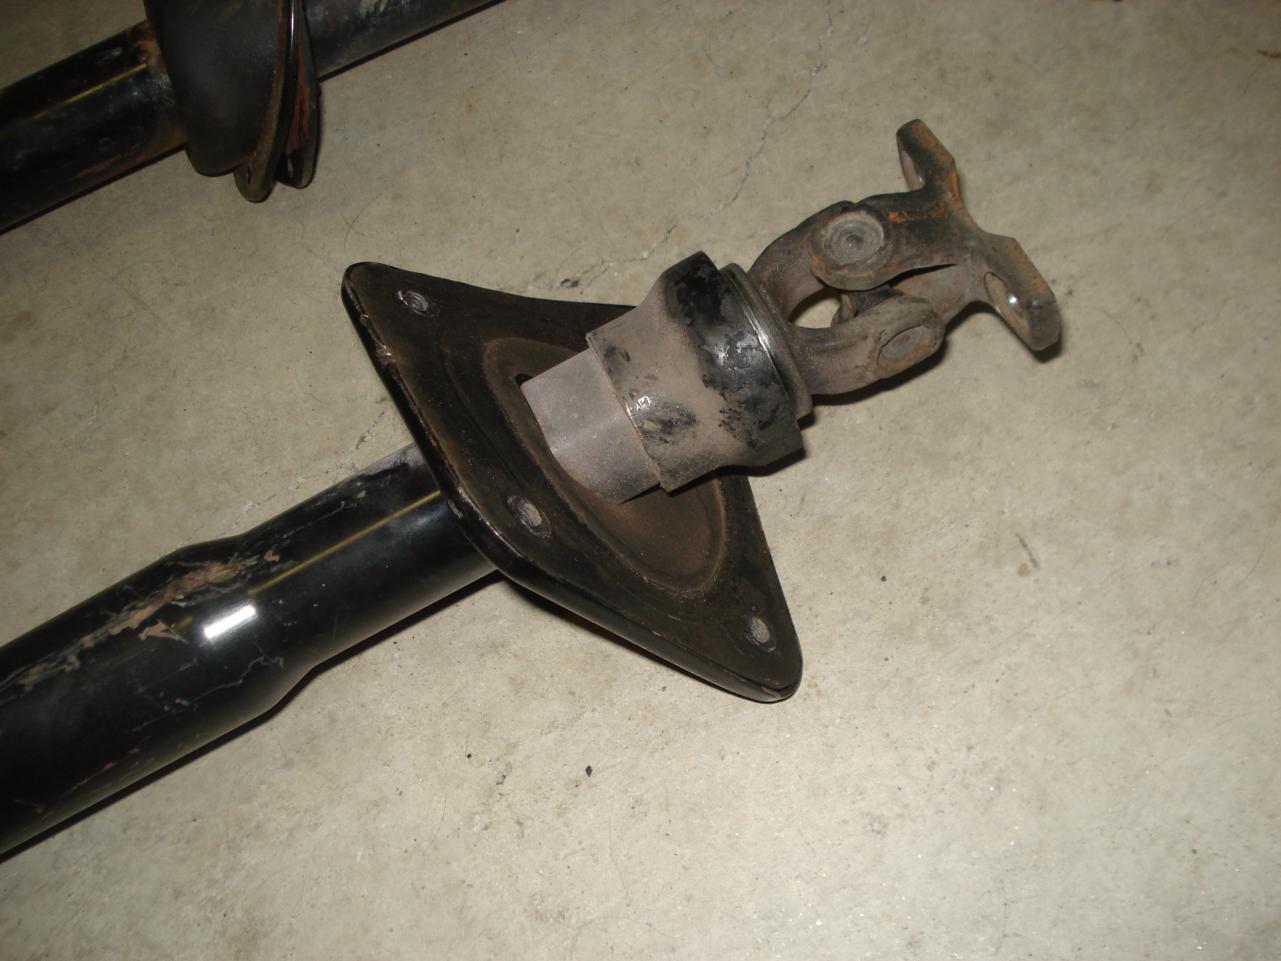
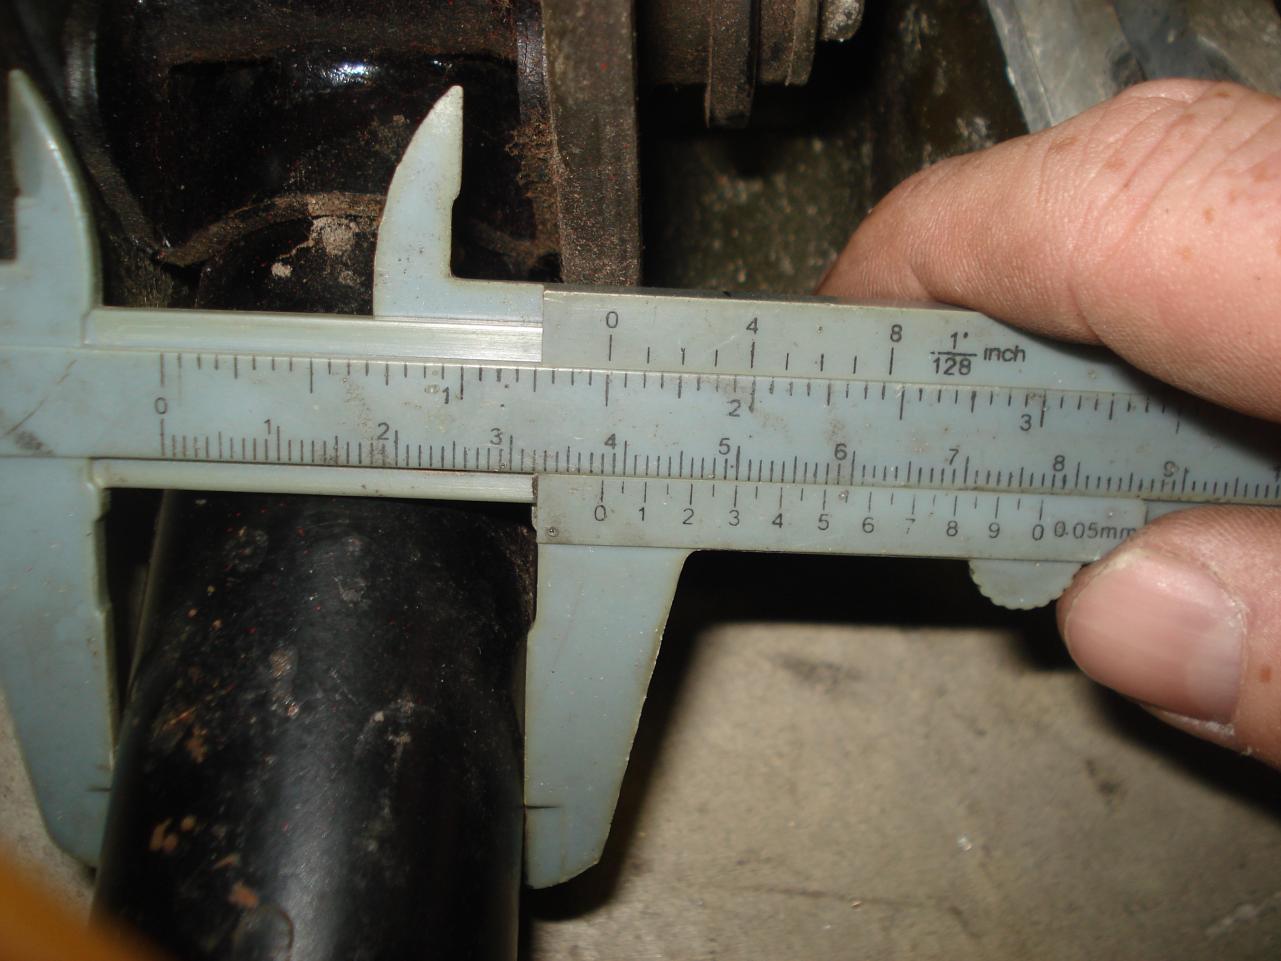
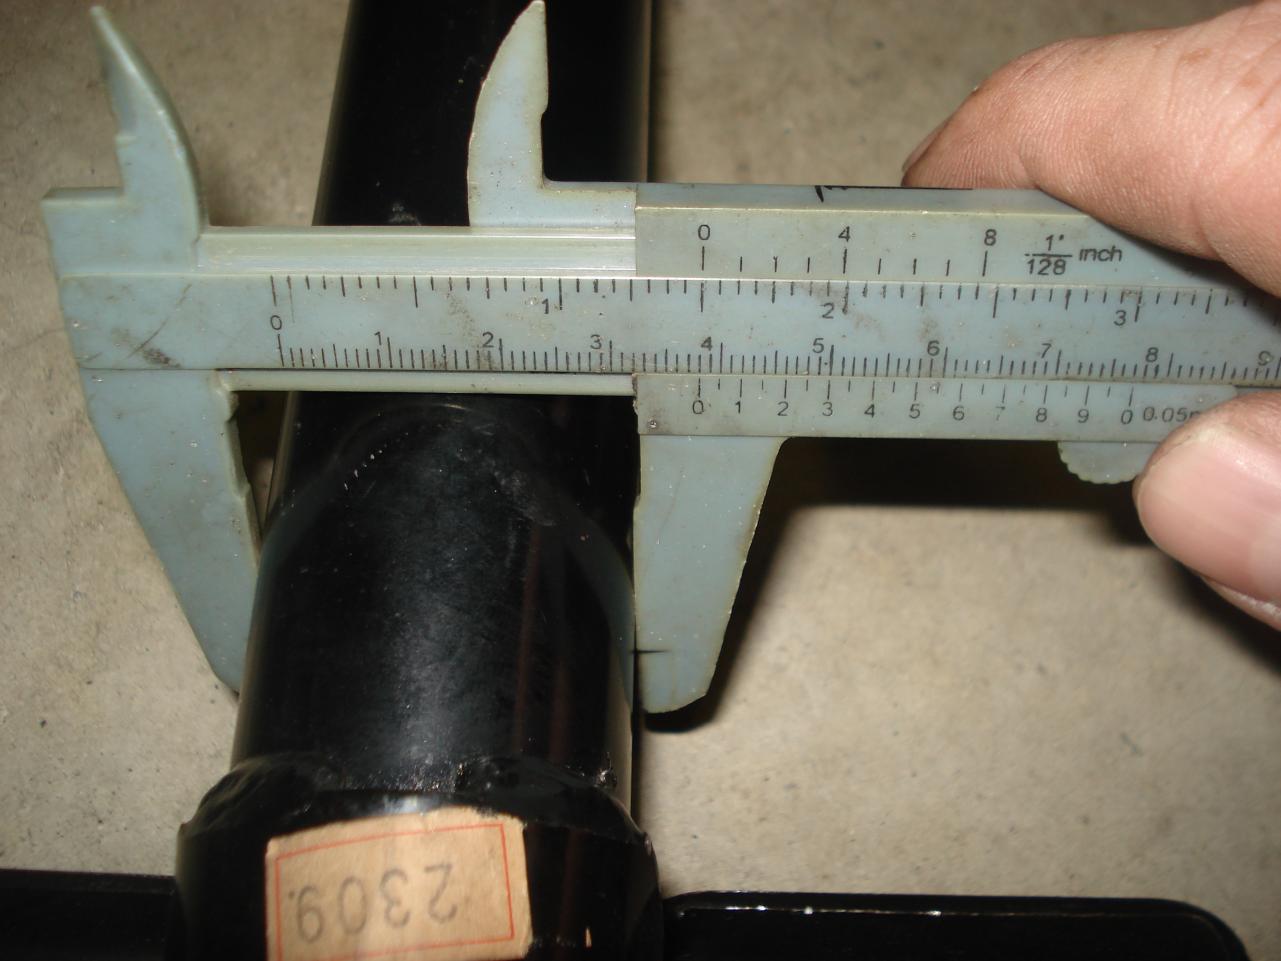
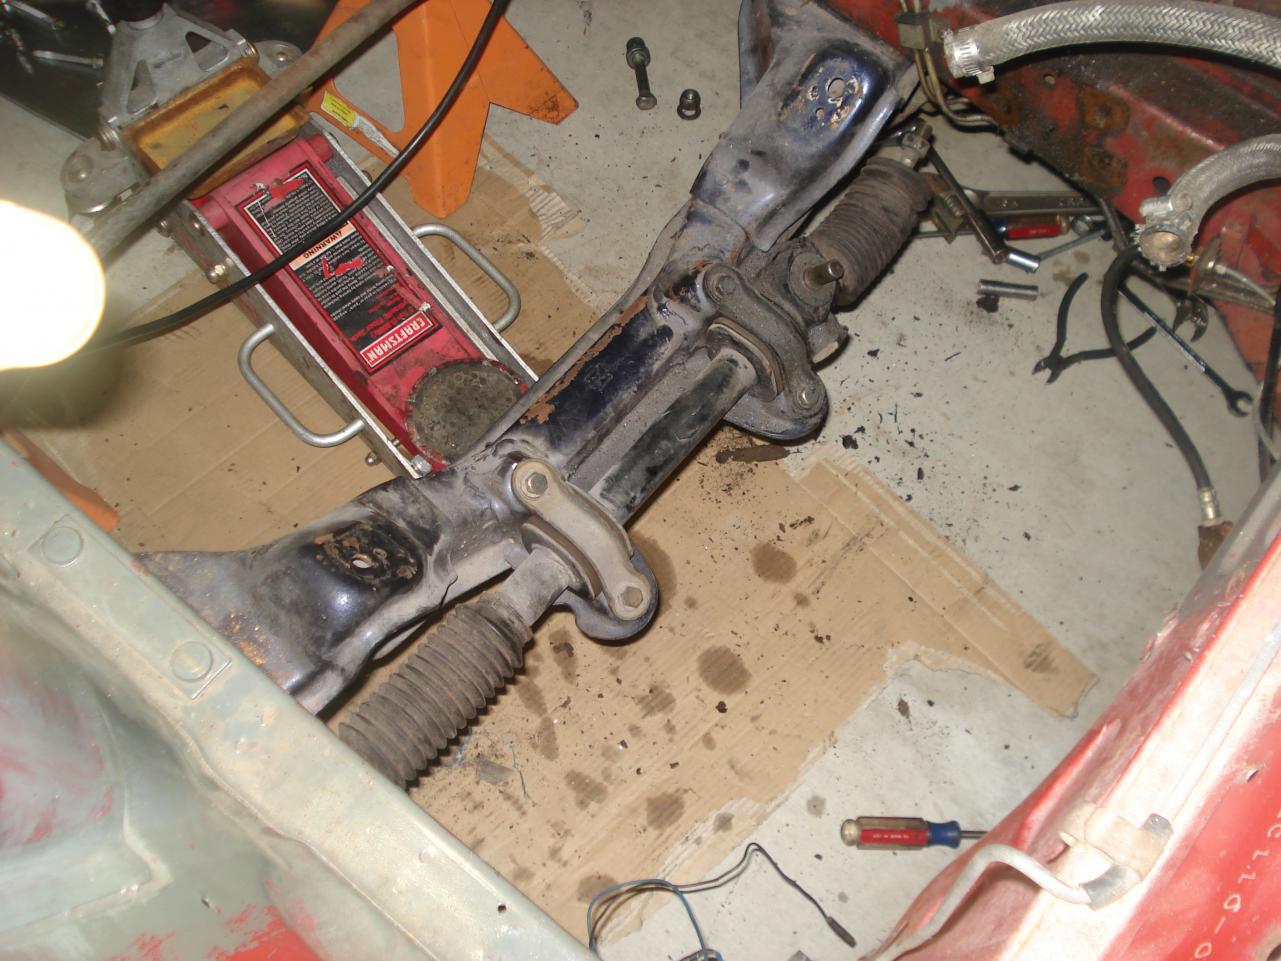
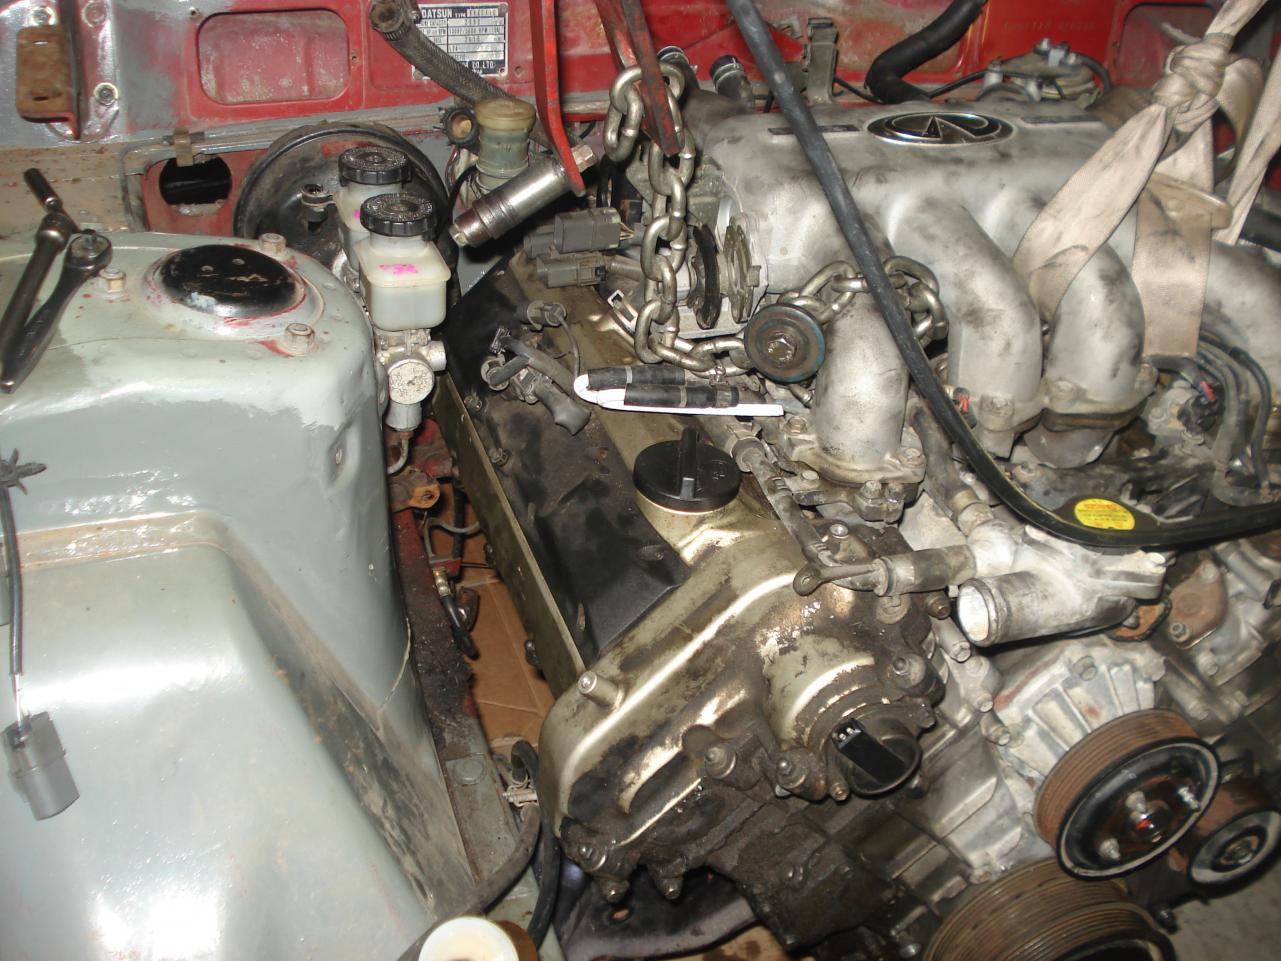
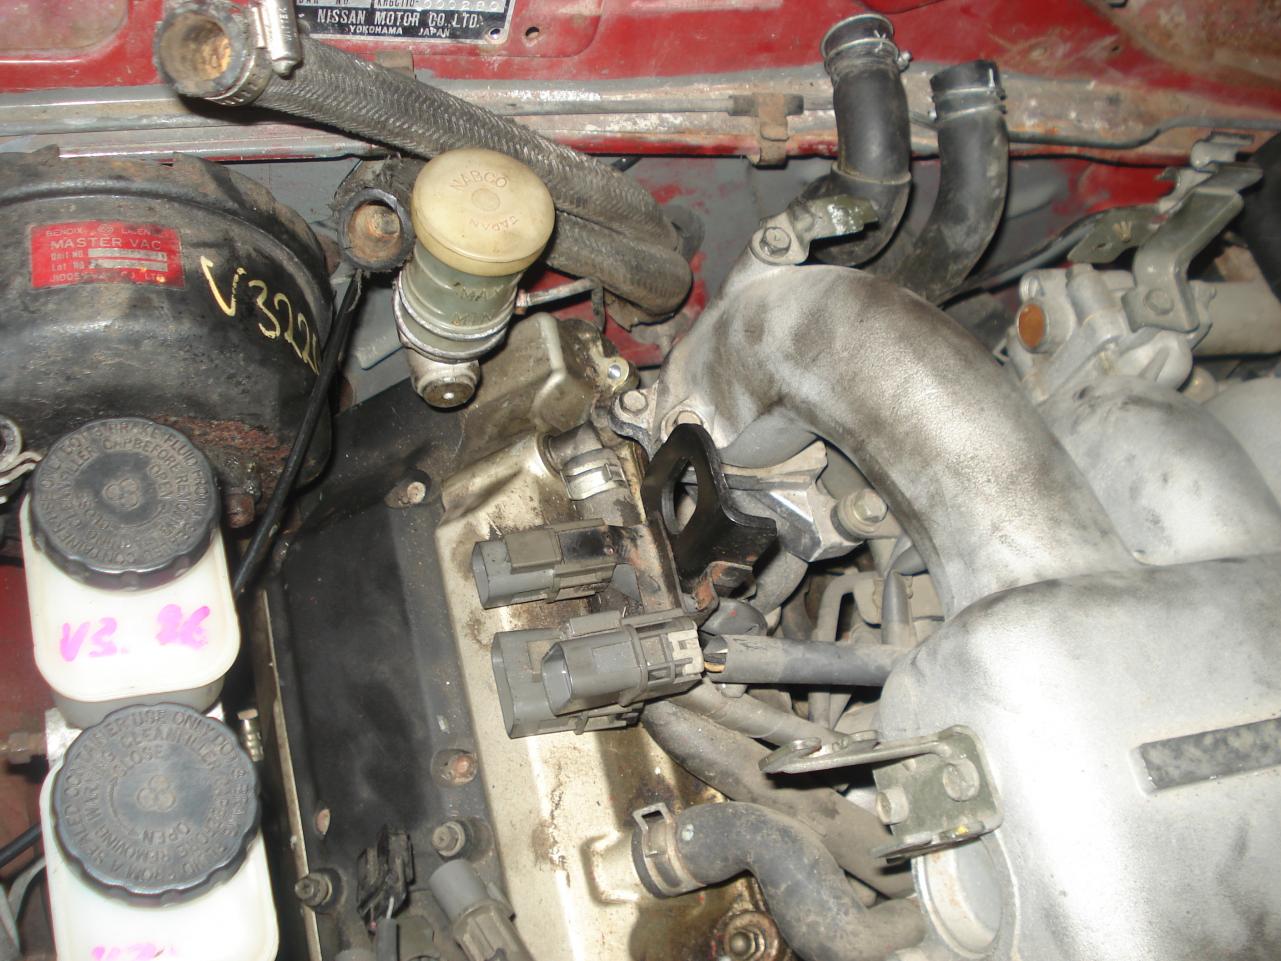
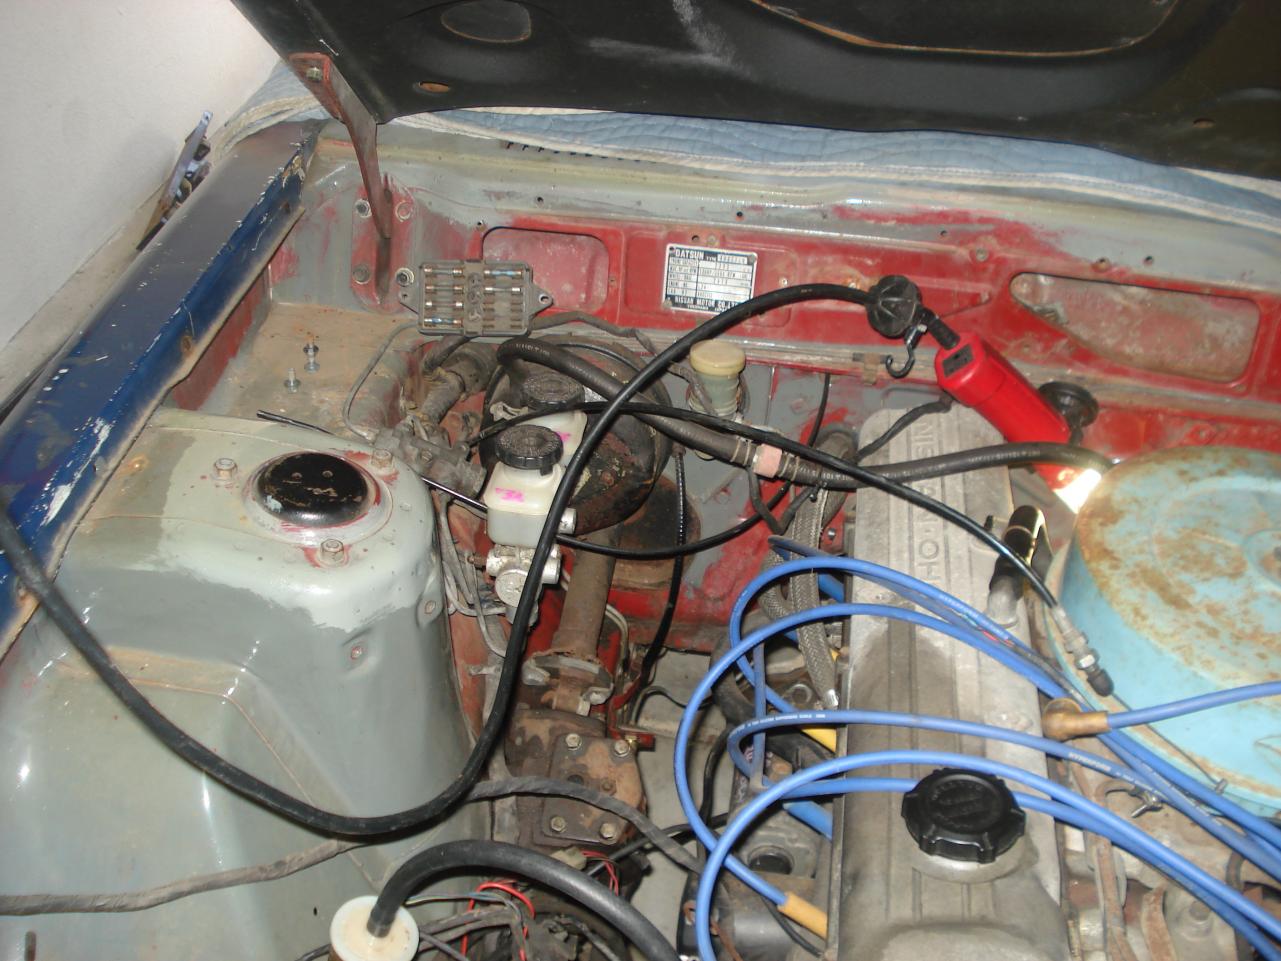
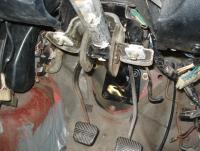
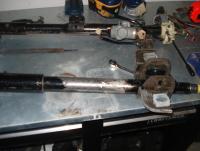
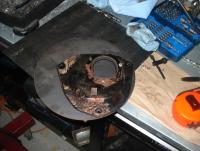
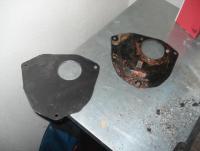
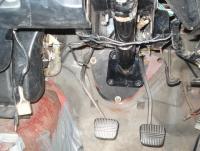
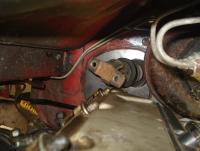
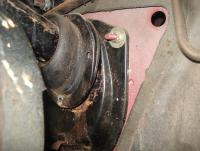
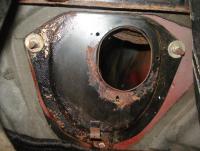
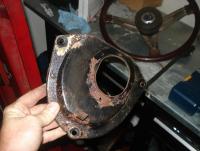
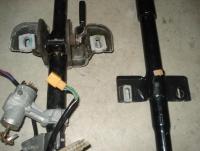
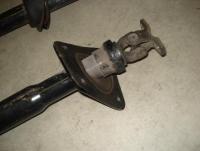
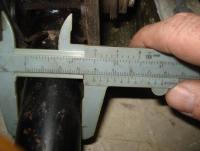
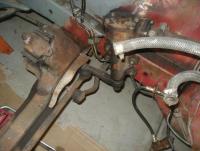
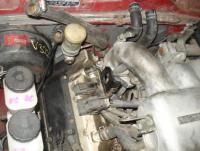
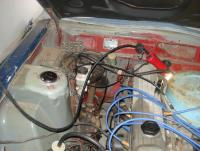
So here are the pics I mentioned. As you can see, the right side cylinder head is only 1/4 inch from the firewall where the column passes through. Its very tight. Now, while we are here, let me show you the plan with the rack and pinion conversion. Here is the stock C110 column as it connects to the firewall. As we discussed before, the stock column is supported by the steering box with merely a rubber boot at the firewall. With the rack and pinion, the column must be supported at the firewall. Here is what we have to work with. The plate you see is very thin. Before I actually had it pulled apart, I had considered simply redrilling this plate to accept the S130 steering column. After getting it out, I realized this was not an option. The plate is very thin. It will easily flex if you twist it. No way it could support the lateral forces a steering column would put on it. As I mentioned before, I'm working on an aluminum plate to replace it which will also have correct bolt holes for the Zx column. Here are a few pics of the C110 and S130 columns. They are almost exactly the same length when measured from the top end to where they pass through the firewall. The mounting points where it connects under the dash are different, as well as where the accessory stalks mount. Surprisingly they have the same diameter and taper points. It looks like the C110 stalks will easily transfer over, with only one issue. The column lock. The ignition switch is in an entirely different spot and therefore the keyway for the steering lock is not even close to being aligned. I'm not entirely sure what it would take to machine a new keyway in, but honestly I'm not convinced its even worth it. Anyhow, this is where I'm at right now. I hope to get another update to you guys soon.


-
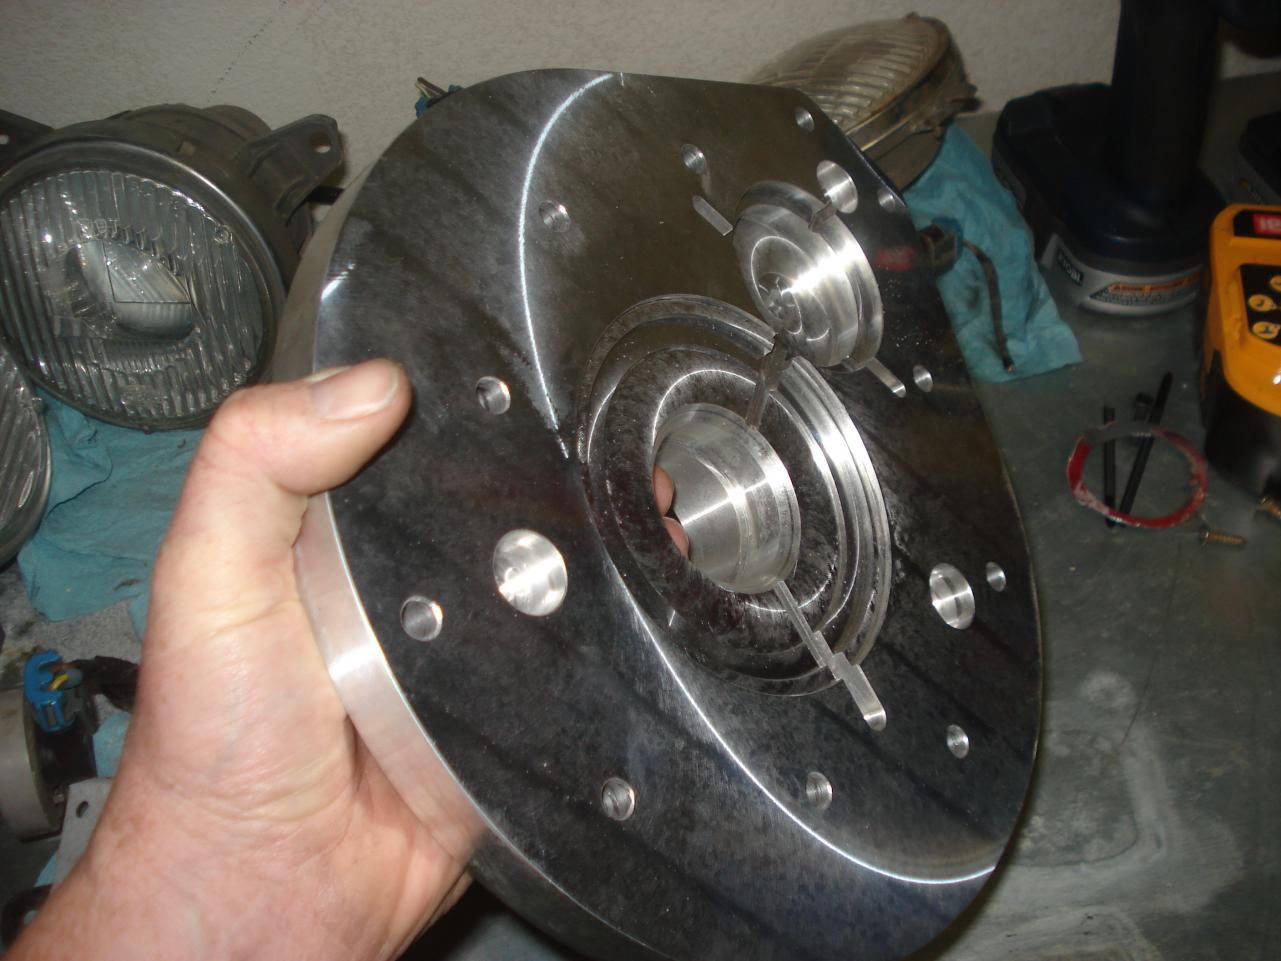
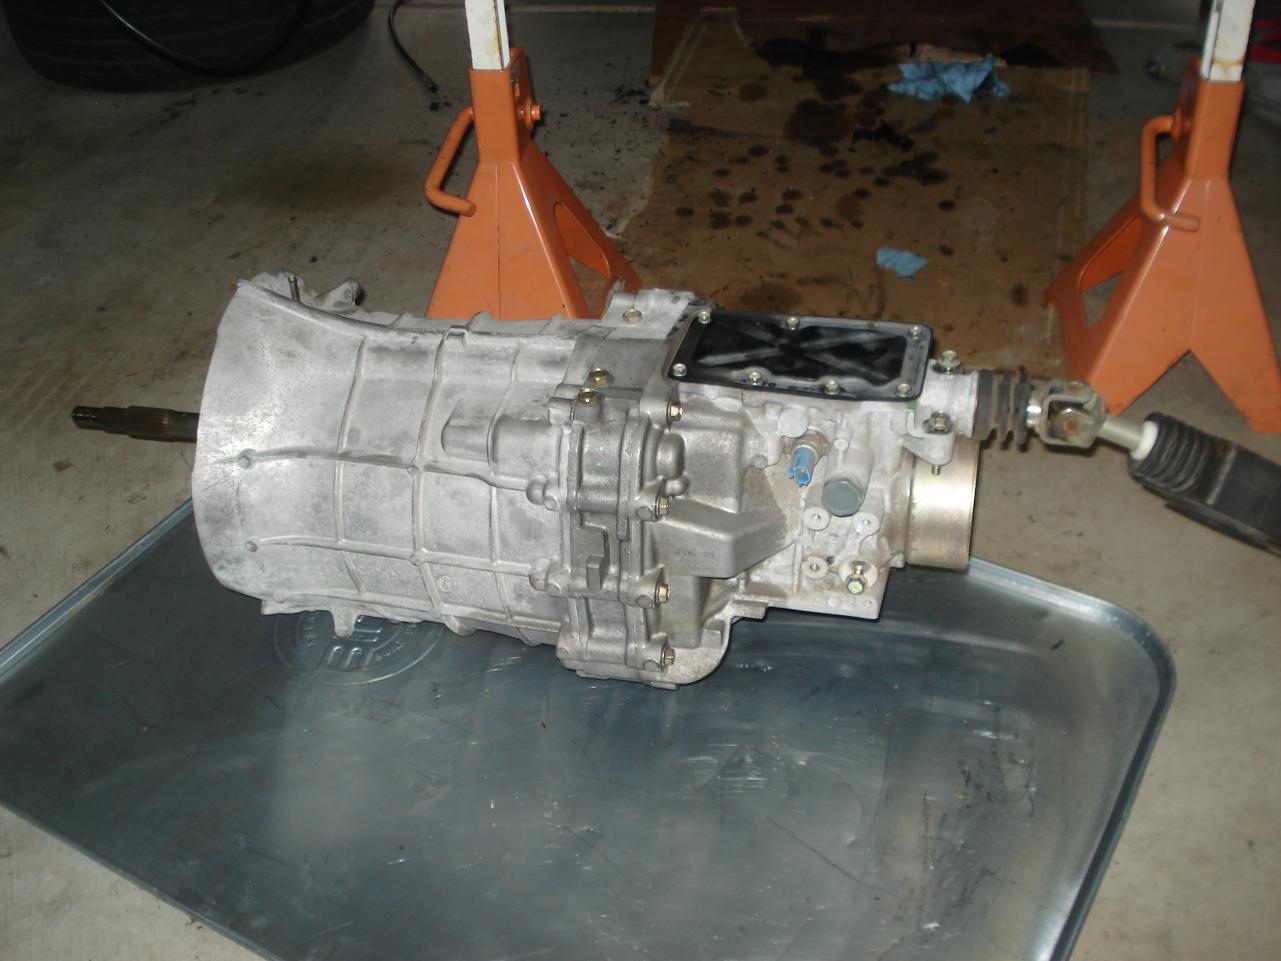
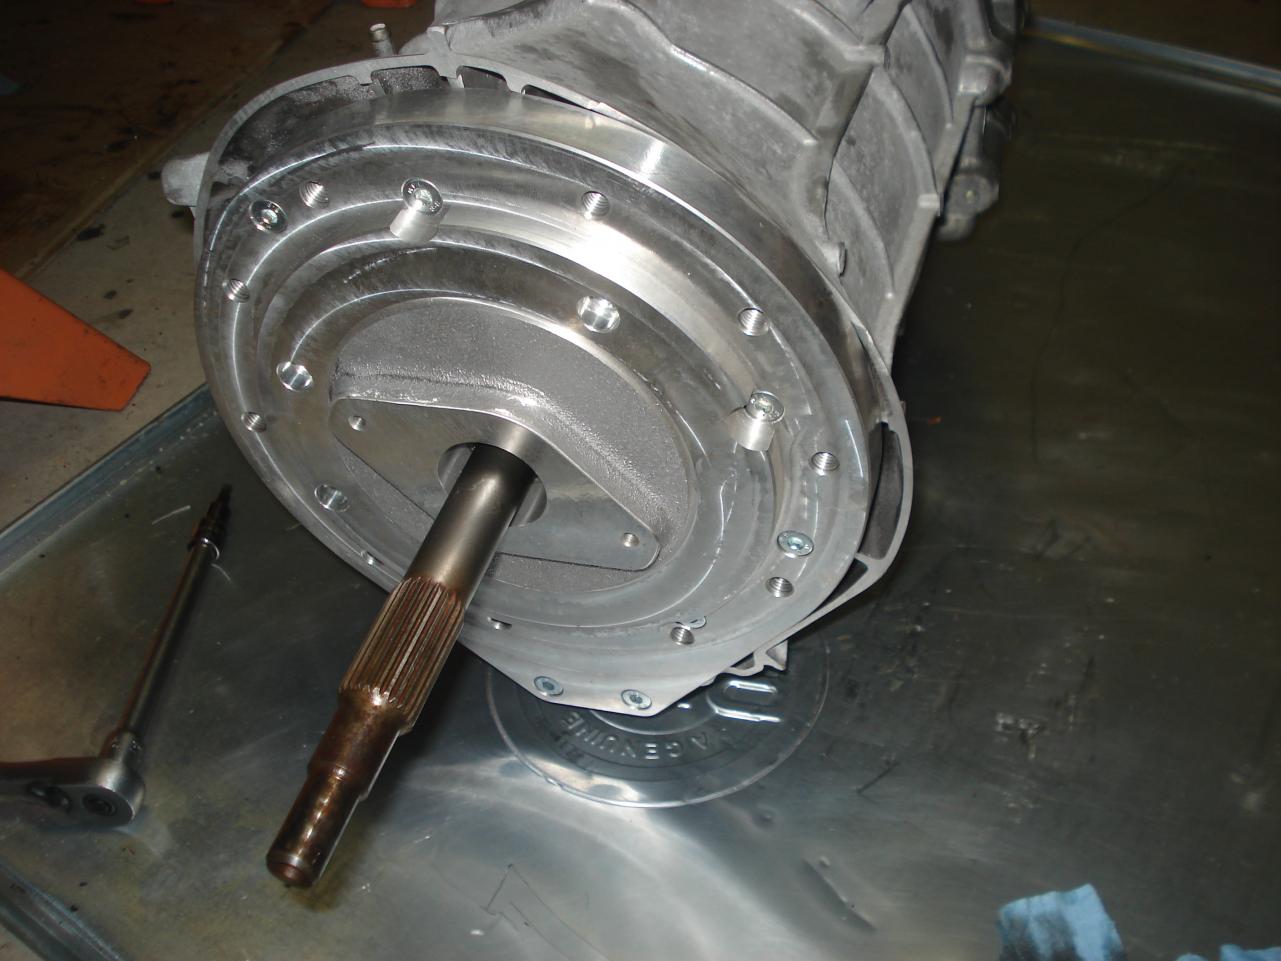
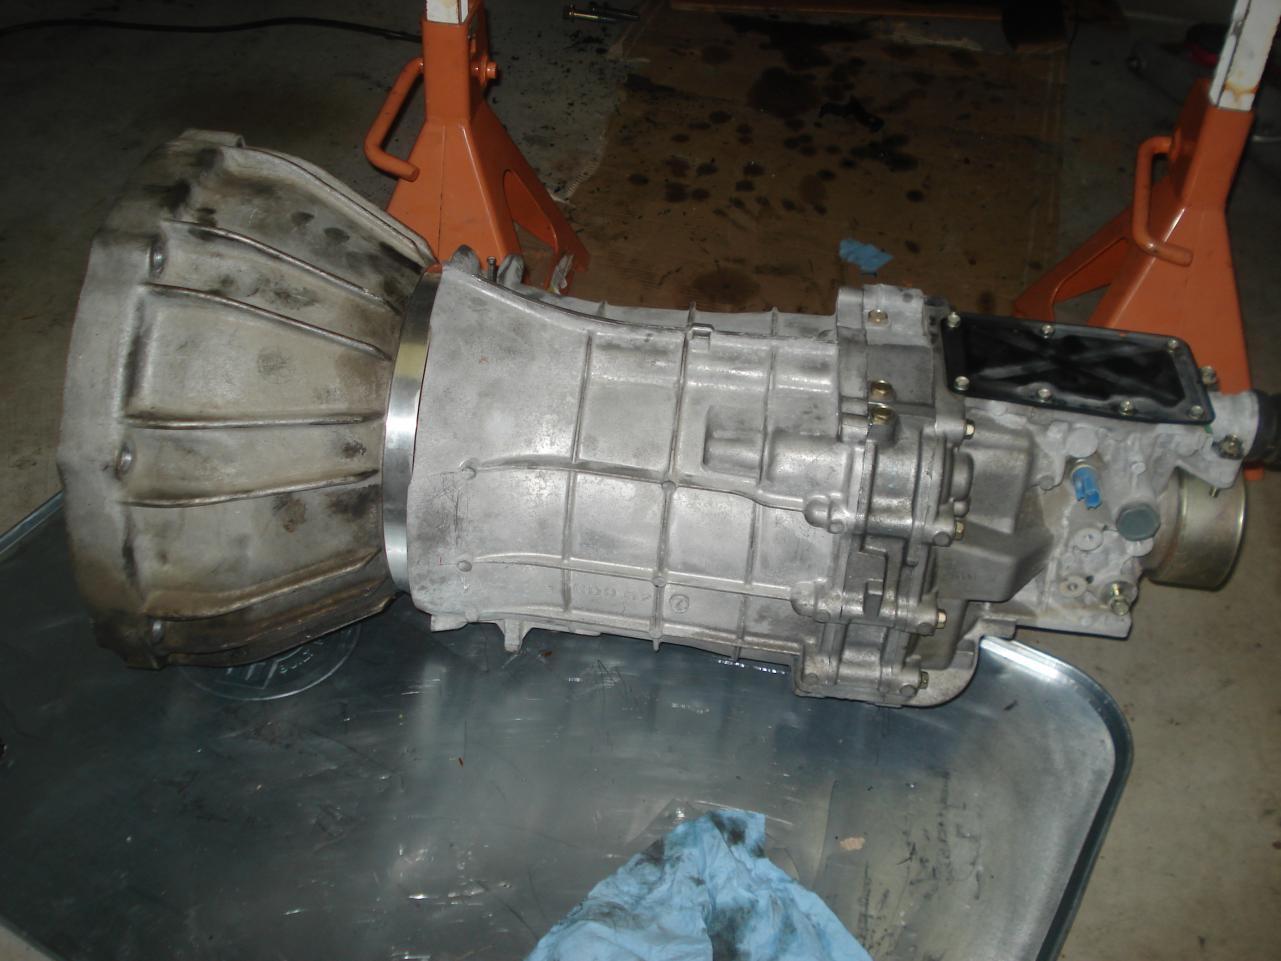
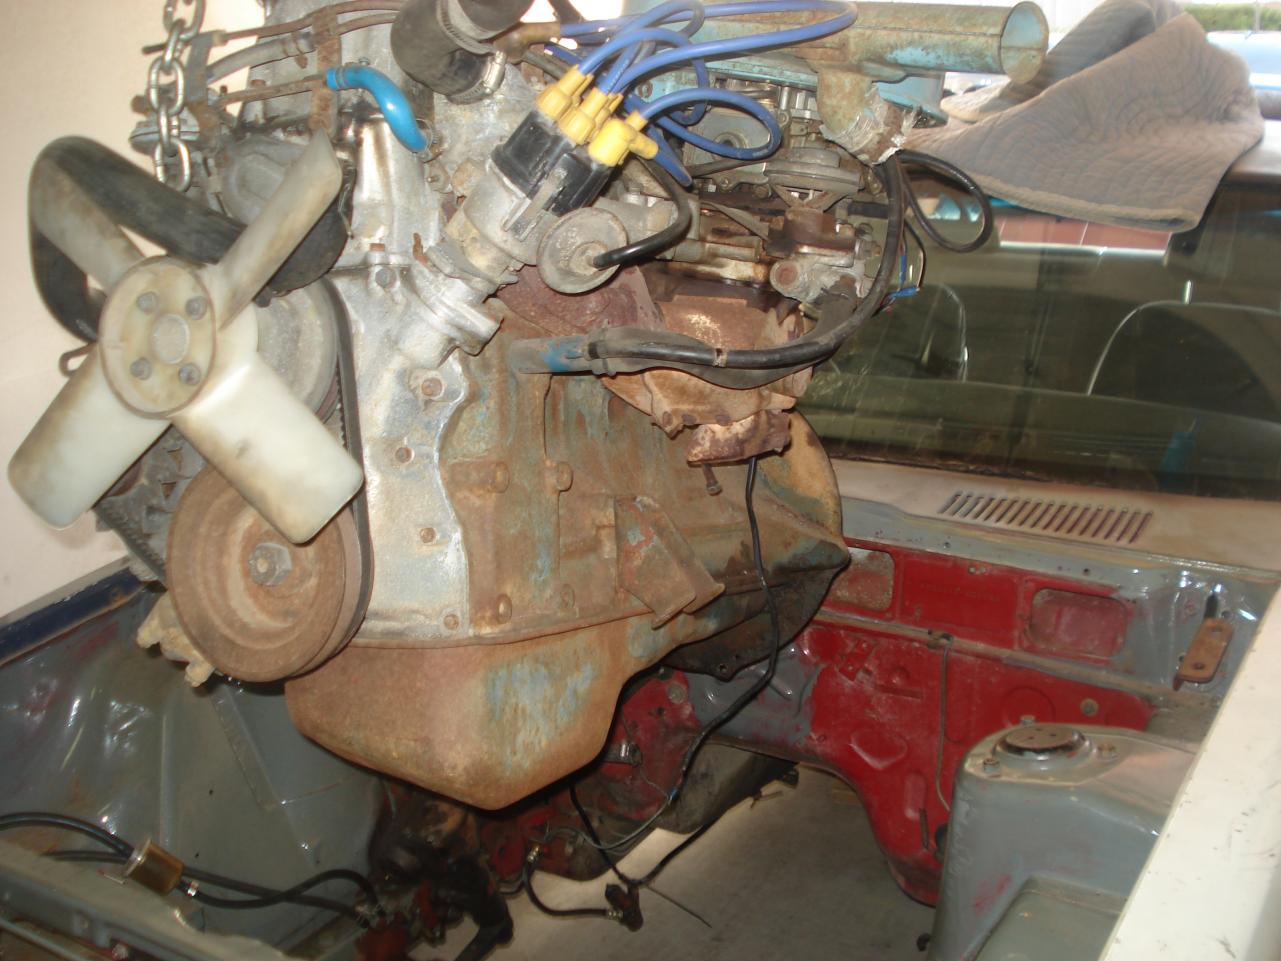
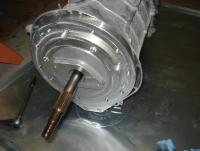
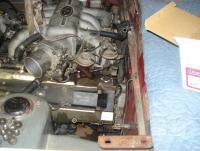
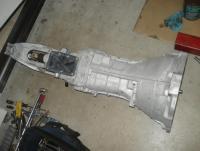
I thought I would post up a bit more of the progress. What we have here is my 350z six speed tranny. Obviously the VH45 never came with a manual tranny. And the common one to use on these type swaps is the Z32 five speed with the Mazworx adapter. I wanted something different. After kicking around a bunch of ideas, I happened to mention my plan to a buddy that works for a high end Nissan tuner here in San Diego. As luck would have it, they were in the process of designing an adapter to bolt this tranny to a multitude of Nissan engines. He was kind enough to loan me a prototype to keep the ball rolling. The tranny needs to be disassembled so that the bell housing of the front section can be machined off. Once that is done the adapter plate bolts on which then allows the automatic bell housing to bolt to the adapter. This then allows perfect alignment on the motor. So, at this point the motor and tranny are mated up sitting in the car. Originally I was fairly content with the placement of the motor in the car. It looked like I had a nearly perfect distance of about 1 inch off the firewall. Well, after pulling the steering column out I discovered that the firewall has a few places where it bends out a bit, especially as it nears the tranny tunnel. I decided I needed to move it forward another 3/4 inch or so. Its actually going to help out in more ways than that. With the move forward, the stock oil pan might even clear the crossmember. And the relocated shifter assembly will be almost dead on with the stock location in the center console. I will get a few pics of this up shortly.


-
Kent, I am already expecting to send one over to you. Are you having any luck in finding a steering rack? I tried getting one from Australia first and only found one that the guy wanted $300 for. You might find it easier to get one from Japan as I did. Believe it or not, the non power one only cost me $60. Something to kick around. Brian
-
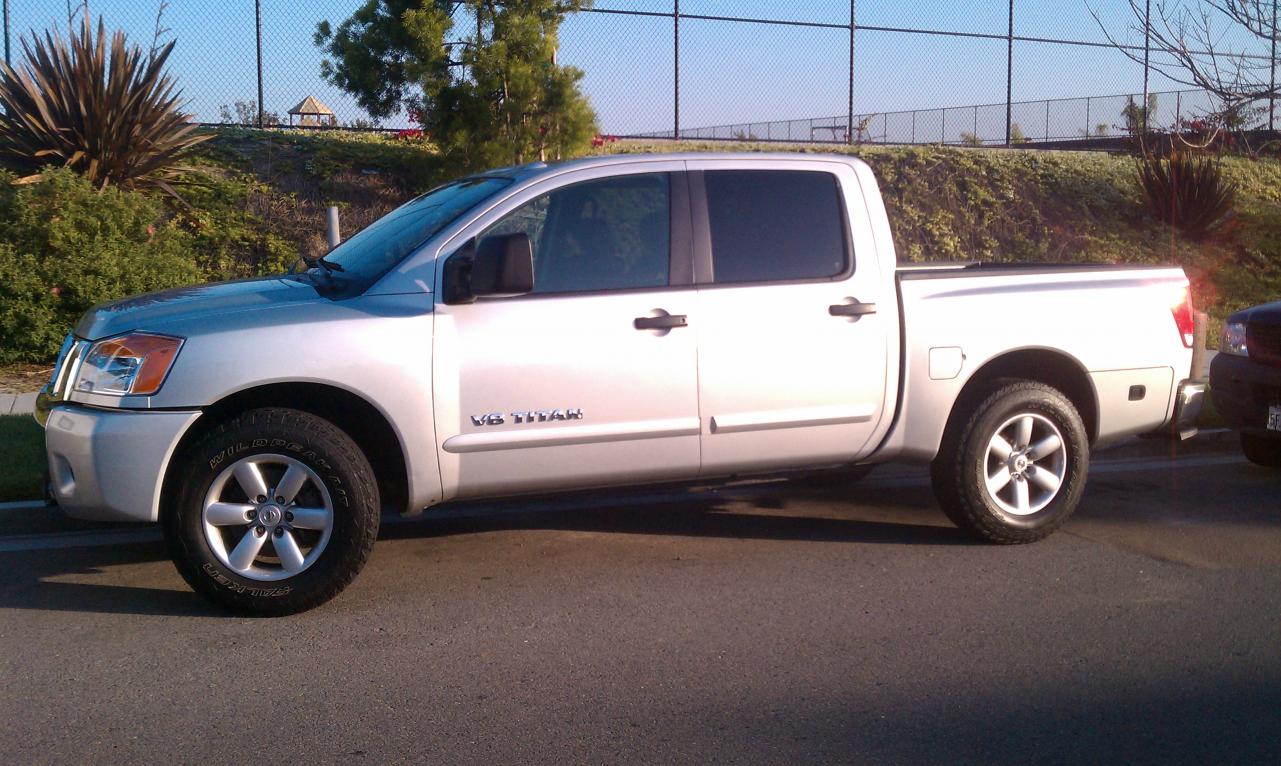
I must apologize for the delay. I had the rather unpleasant misfortune of finding my Pathfinder (Terrano for you in Aus.) stolen a couple days after my last posting. Surprising that a 20 year old truck with 341k miles on it was worth the trouble. It left me in a bind as my job requires me to have a truck. I filed a police report but knew it was very unlikely I would see my Pathfinder again. So, it gave me a good excuse to get this: It is a Titan SE crew cab. I've wanted one since they came out. Until now I just could not justify it. This one has the utility bed, factory tow package, power rear window, sunroof, and satellite radio. It sucks that some scumbag decided to take my Pathfinder, but I do love this new truck. Now, as to my Kenmeri. Because of buying the new truck, I have not been able to do much for a few weeks. But I can answer a couple of questions. The LCA I mentioned is the lower control ARM bolt hole. This is the hole that is .5 inches outboard of the stock c110 holes. I have a rough template of the firewall adapter plate that I need to have cut from steel. I'm going to try to get back at it next week. A few of you have expressed interest in doing the same thing. I'm happy to look into having others made if you guys want. Brian

-
The rack and pinion conversion requires replacement of the stock steering column. I have no pictures to offer right now, but I have already planned it out. Chris is correct in that the stock c110 steering column is supported on one end by the steering box. Where it passes through the firewall there is merely a rubber gasket. My plan is to make use of an s130 column. I have an adapter plate designed but have not had it made yet. All it will to is have outer bolt holes that will bolt onto the firewall, then a large teardrop hole in the center with bolt holes to attach the s130 column to that. Then the s130 jumper u-joint will connect them. Essentially a complete steering conversion from the ZX. There could be an issue though with those of you using stock motor mounts. I have not taken exact measurements but at a quick glance it looks like the zx crossmember moves the mounts rearward about an inch.
-
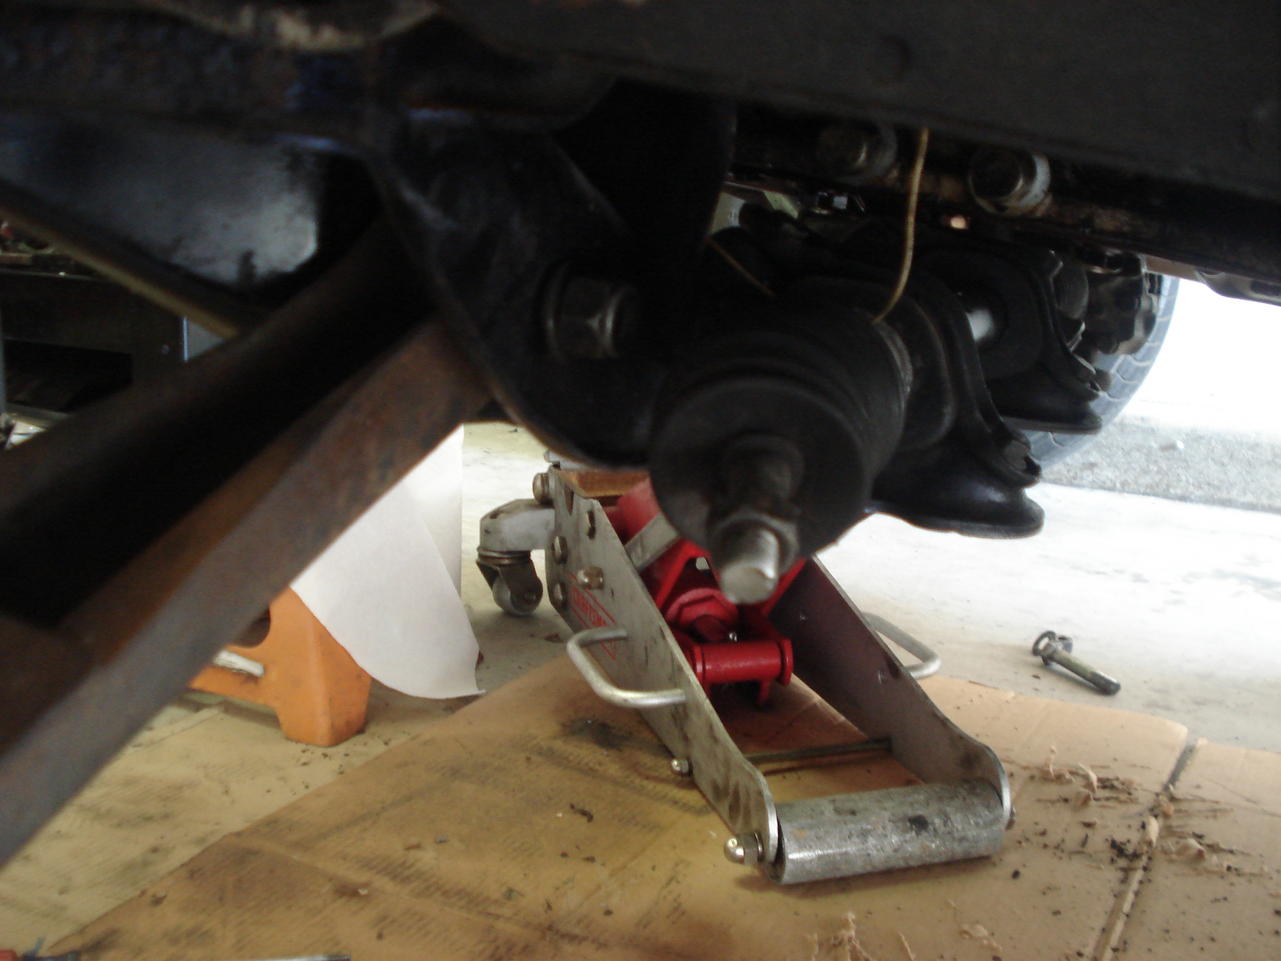
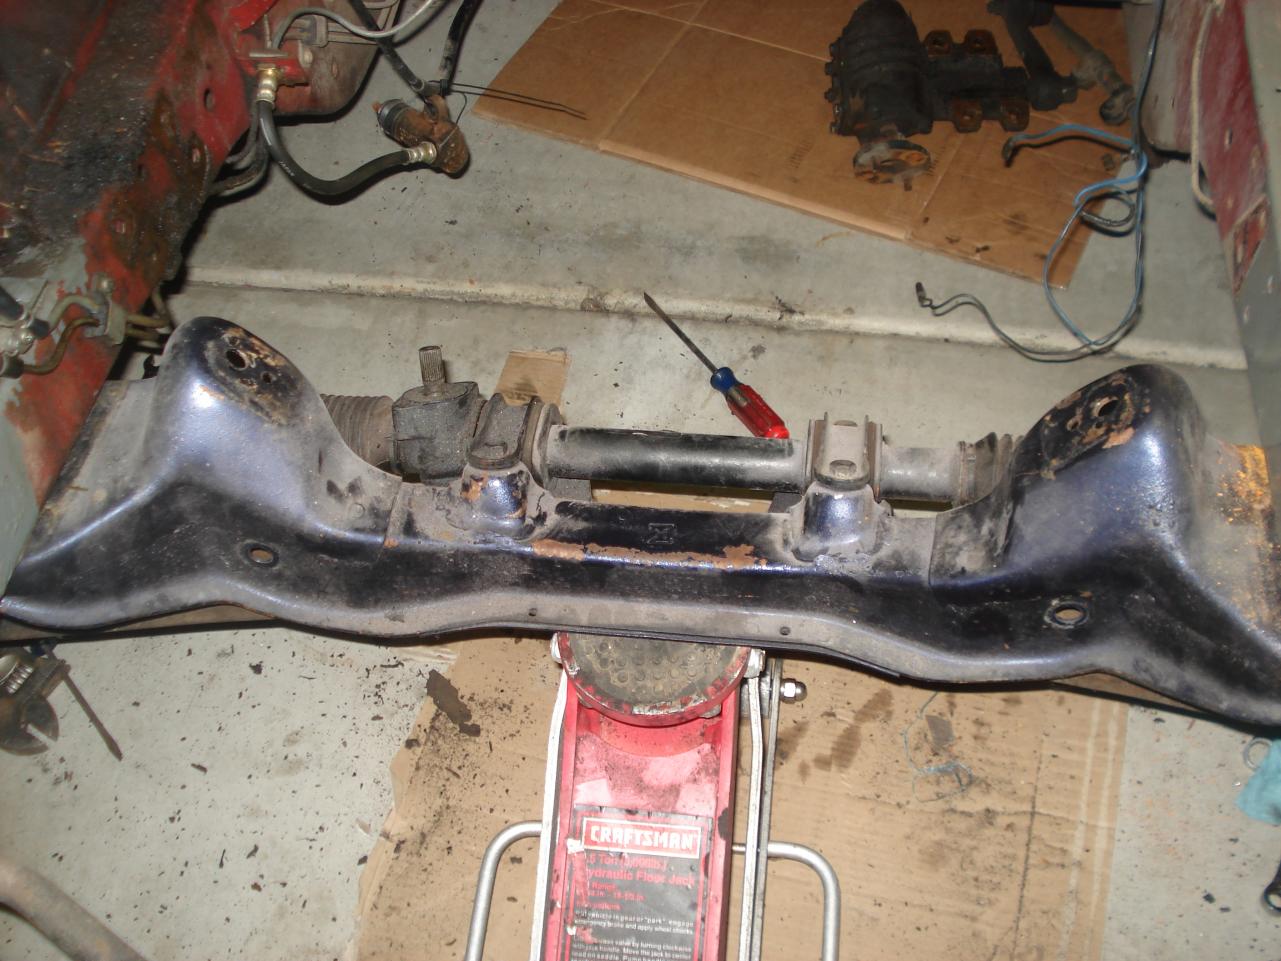
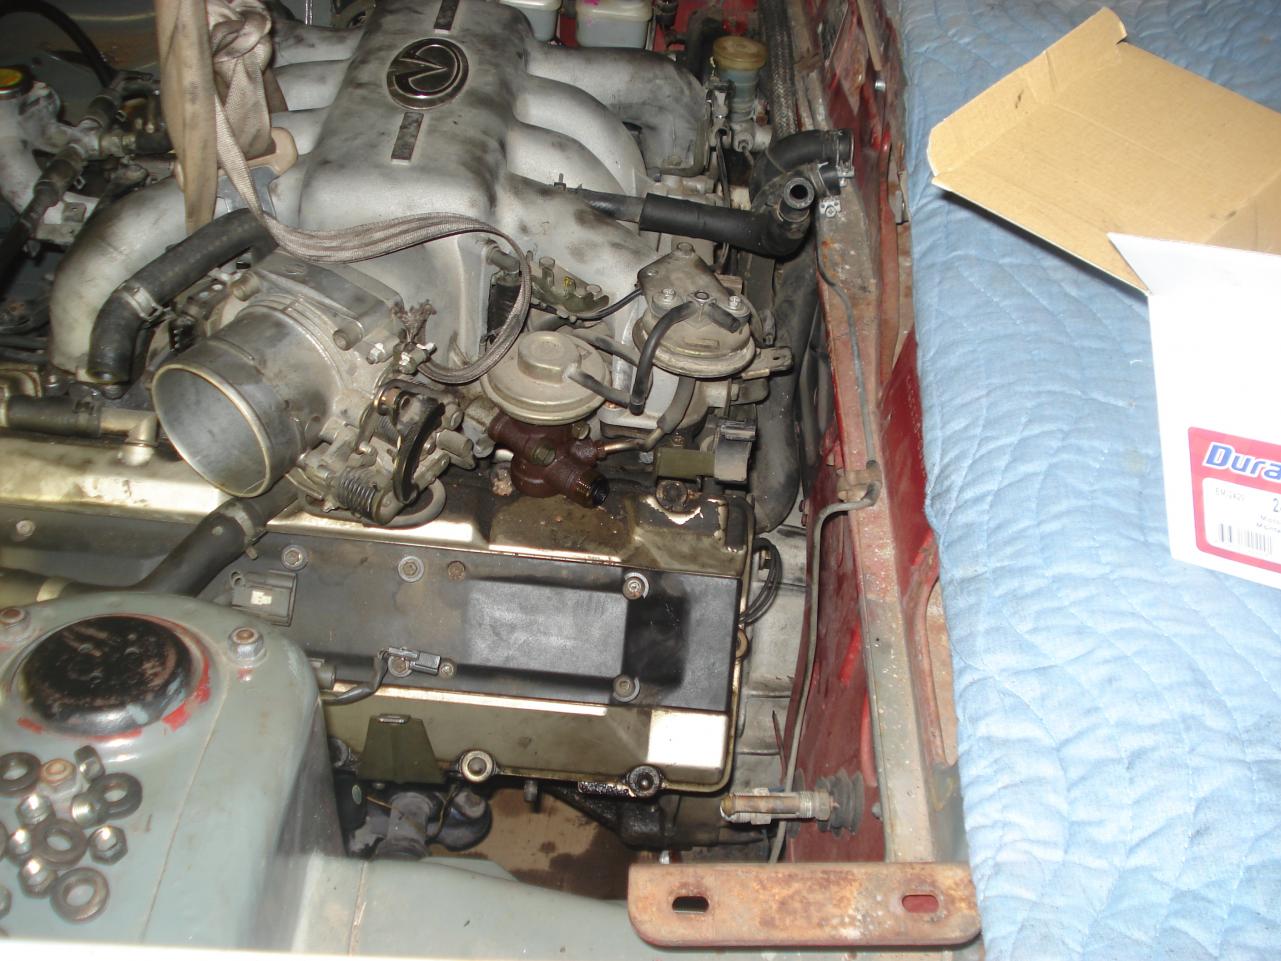
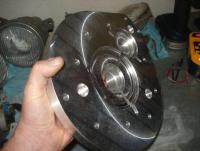
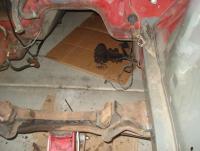
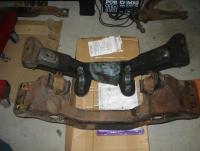
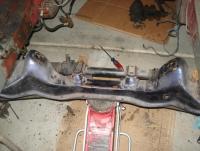
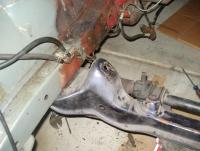
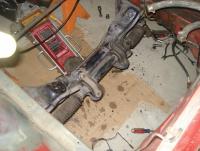
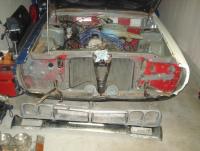
The VH45 width wise fits inbetween the strut towers with a good couple of inches to spare on each side. Length wise its about 4 inches shorter than the L24. What I did expect was a problem with the steering box. It is huge and for the most part would run right into the right side exhaust manifold. I saw no way for it to work with my motor choice. Living in Southern California, I'm lucky to have junk yards with plenty of cars ranging 30 years to look at. And this is what I think some of you guys are going to find interesting. Here is the stock crossmember and steering box coming out. And here is the stock crossmember with its replacement. That would be a 280ZX crossmember with rack and pinion steering rack. Amazingly, it bolts right in. The stocks bolts slide right in. The fore/aft placement for the suspension arms is identical. In fact, the GC110 and S130 front arms themselves are pretty much identical. Their lengths are the same, the sway bar mounting points are the same, and the TC rods are mounted to the arms in the same spot. The only real difference I have found is that the LCA bolt hole is about .5 inch wider per side than the GC110. Easily corrected. The crossmember was easy enough for me to get. There are 10 ZXs in the junk yard at any time. The problem was obviously none of them are right hand drive. It took a little while, but eventually I sourced a non power steering rack in Japan. And as you can see, it fits like its factory. From there I decided to test fit the motor. After getting so lucky with the crossmember swap, I was expecting the worst with the motor. Well, I guess my luck was holding. The motor cleared everything. As you can see it even missed the clutch


-
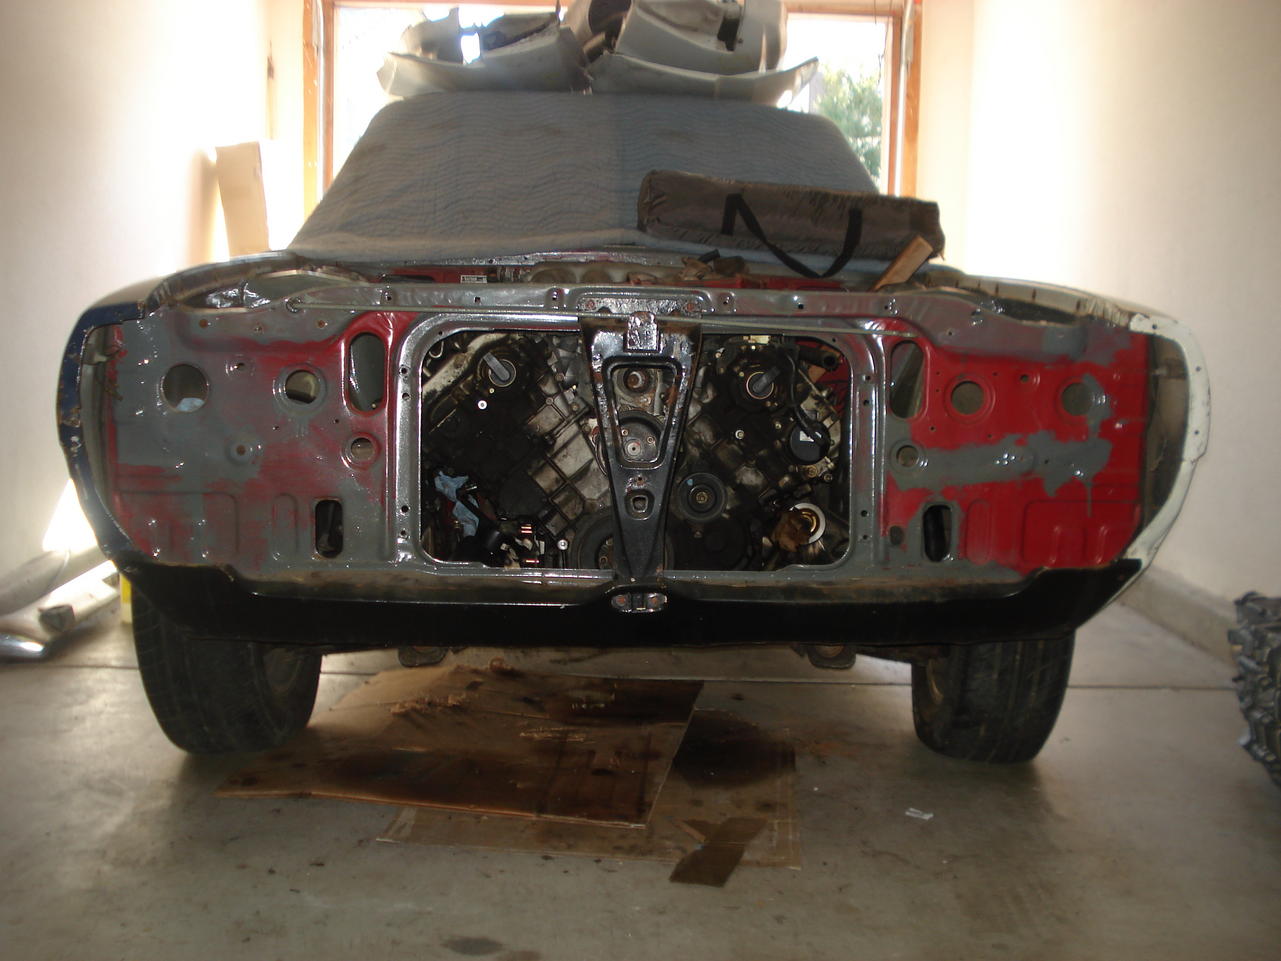
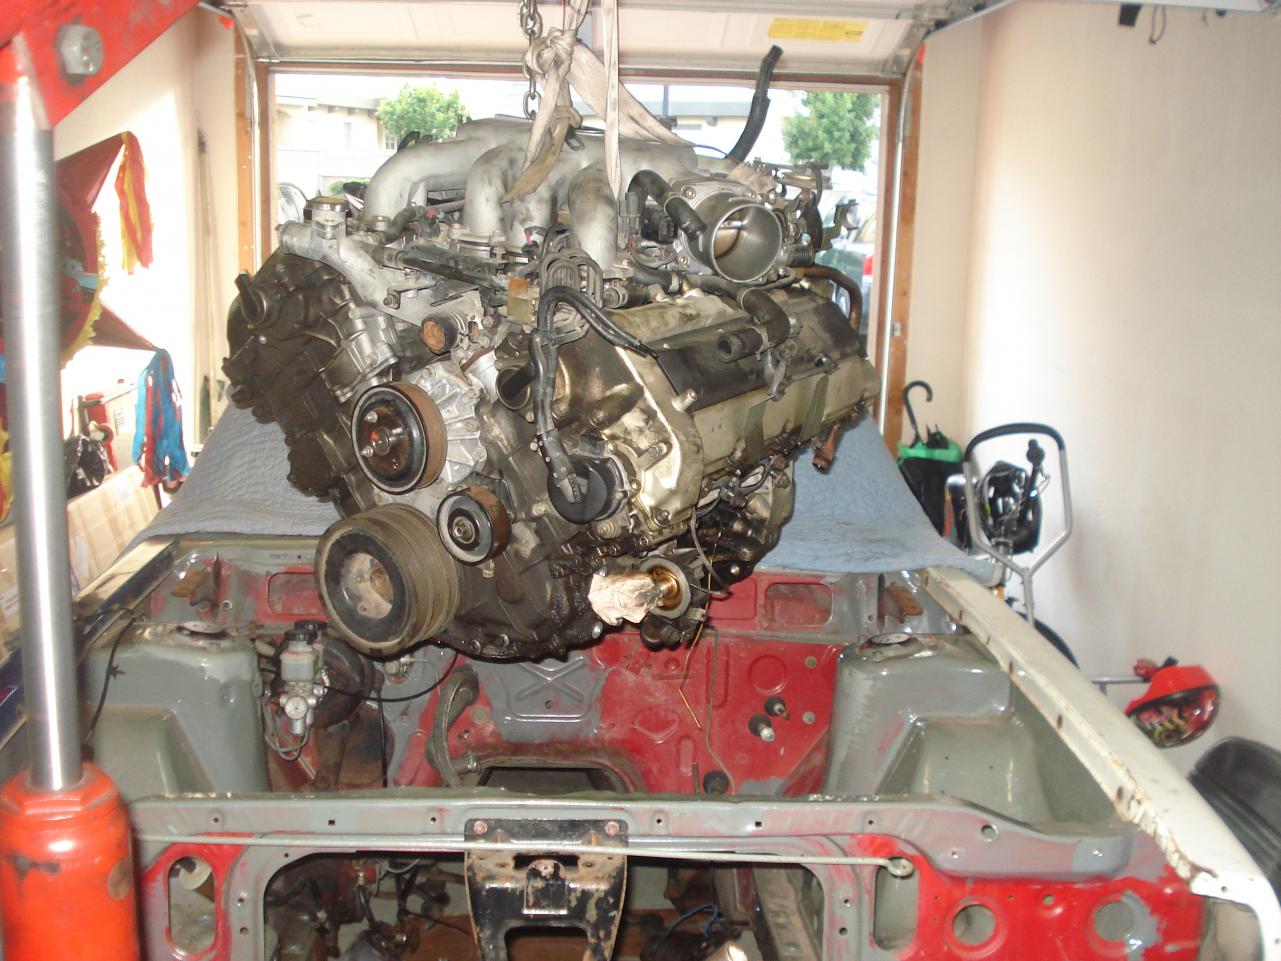
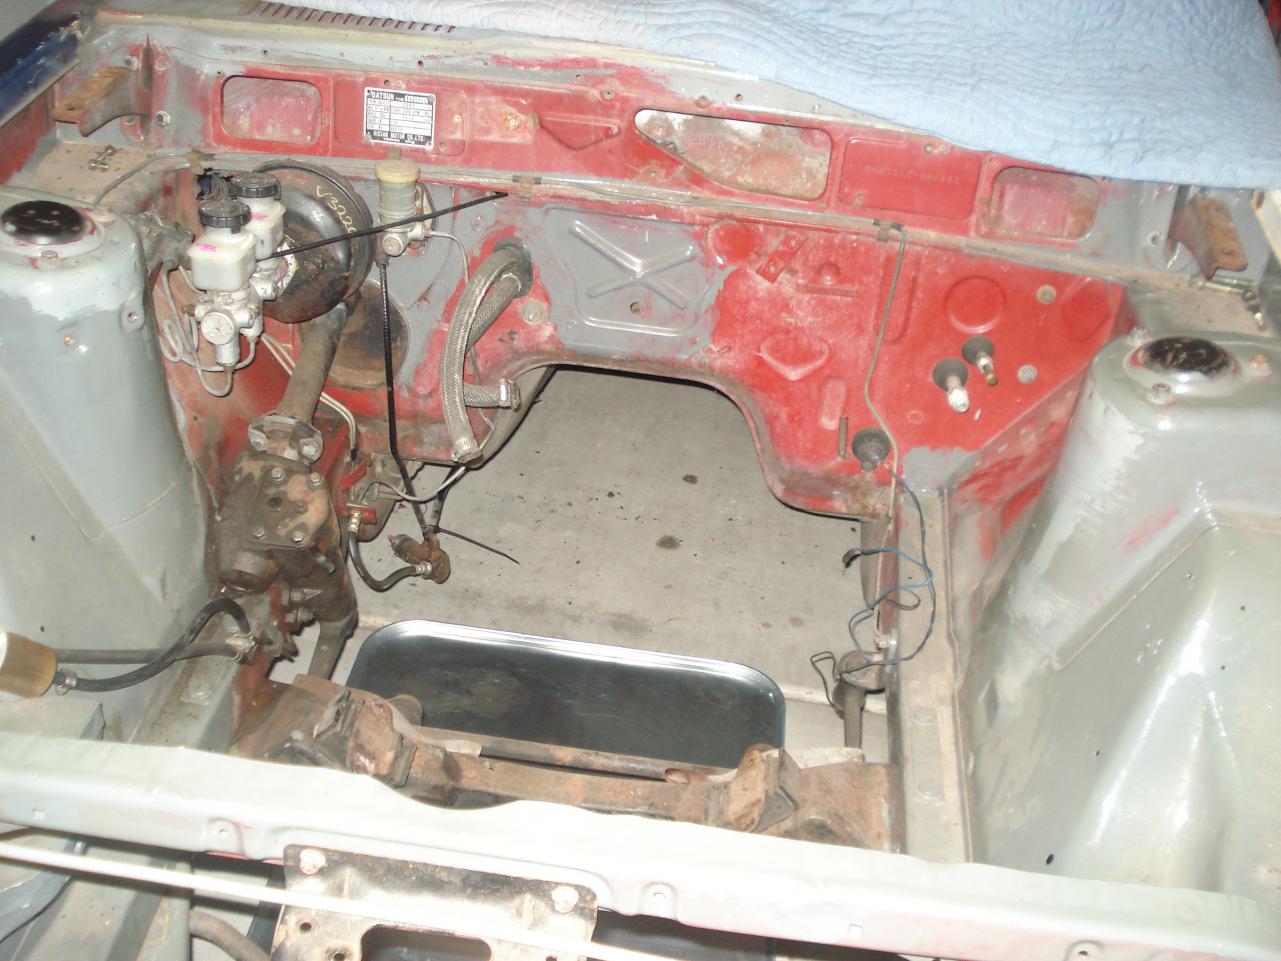
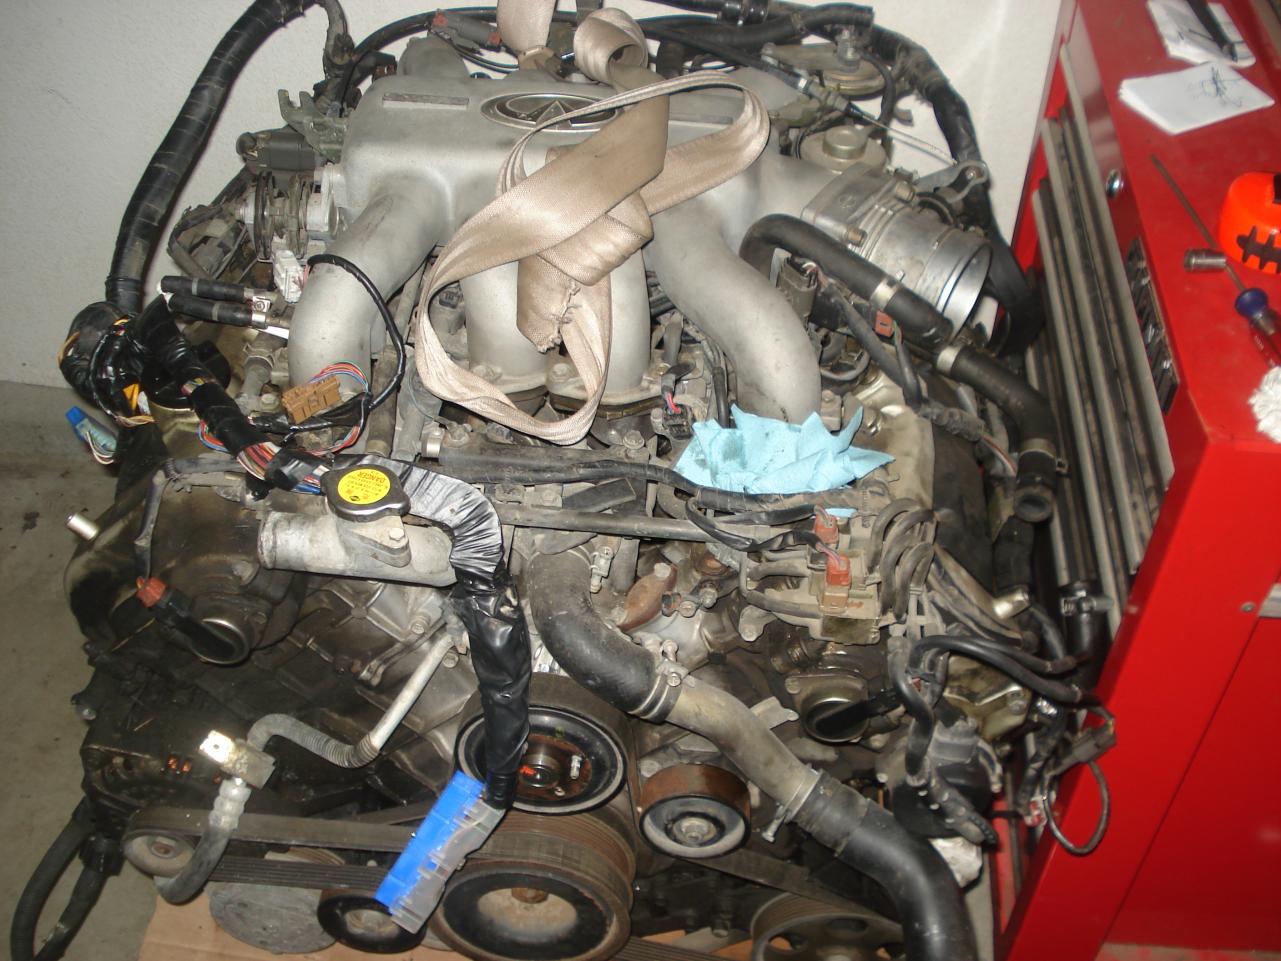
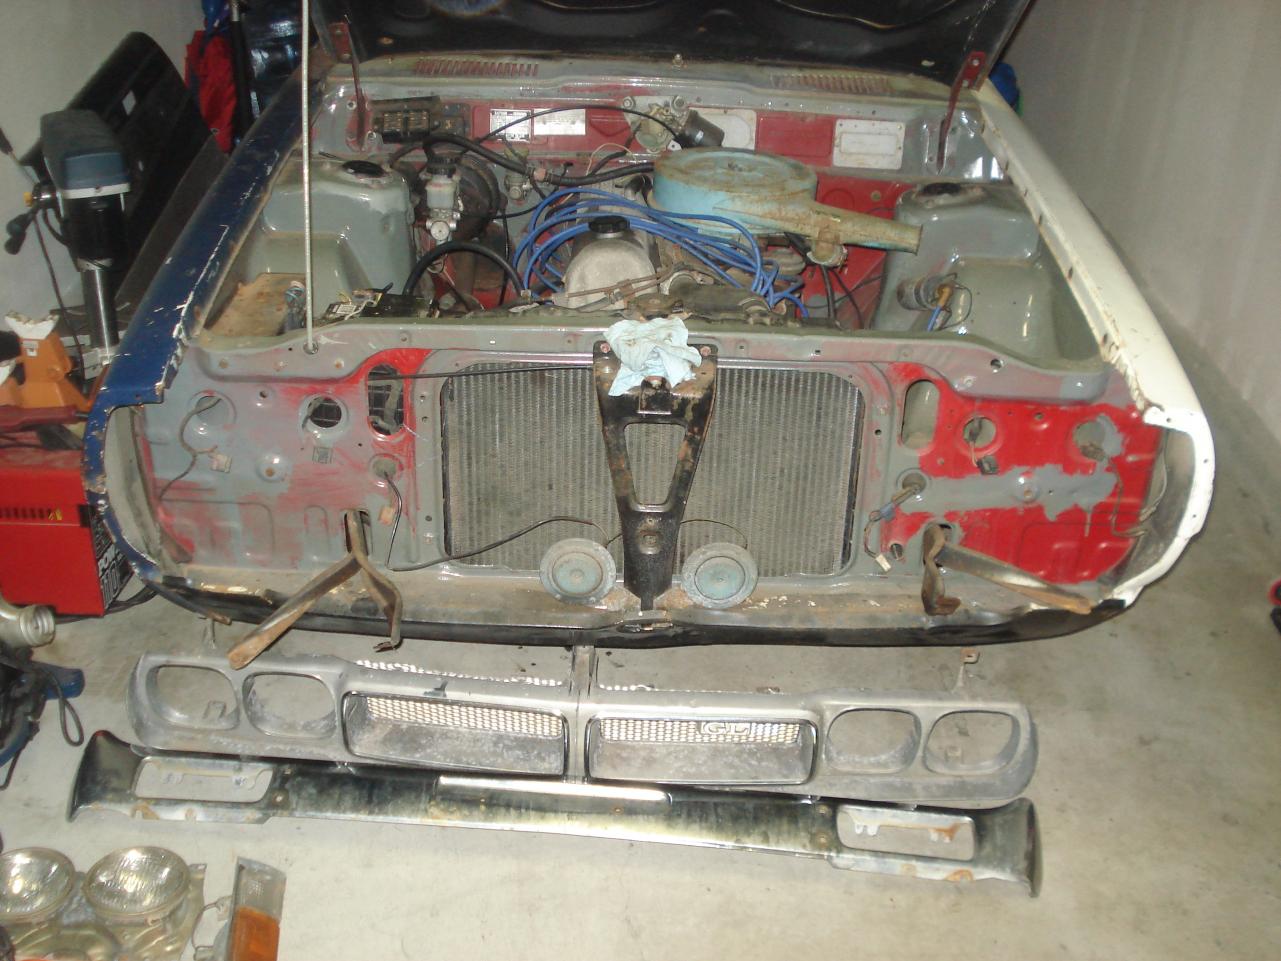
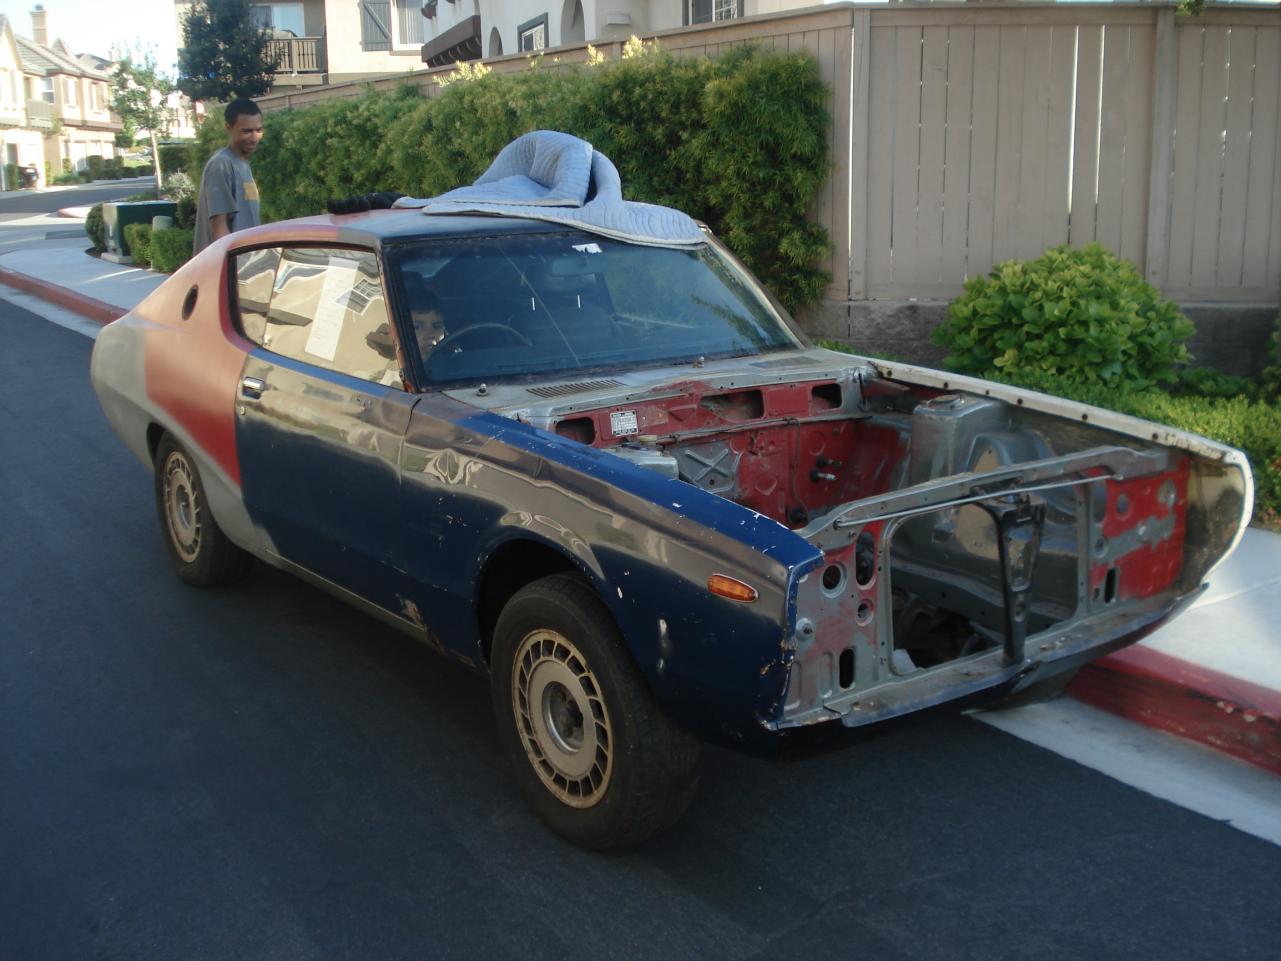
Here you see the empty engine bay, followed by what is to take the place of the original L24. Let me answer that question in your head, yes. That is a V8. And yes, that is a 350Z six speed. Now, the GC110 has a large engine bay for it's era, but this drivetrain combo is not small by any means. This is a VH45 from a '94 Q45. My original plan was to go with an RB, as I did with my last '73. I just happened to be walking around the local junk yard and it occured to me that there might just be another option. After some measurements I figured it was worth a try.


-
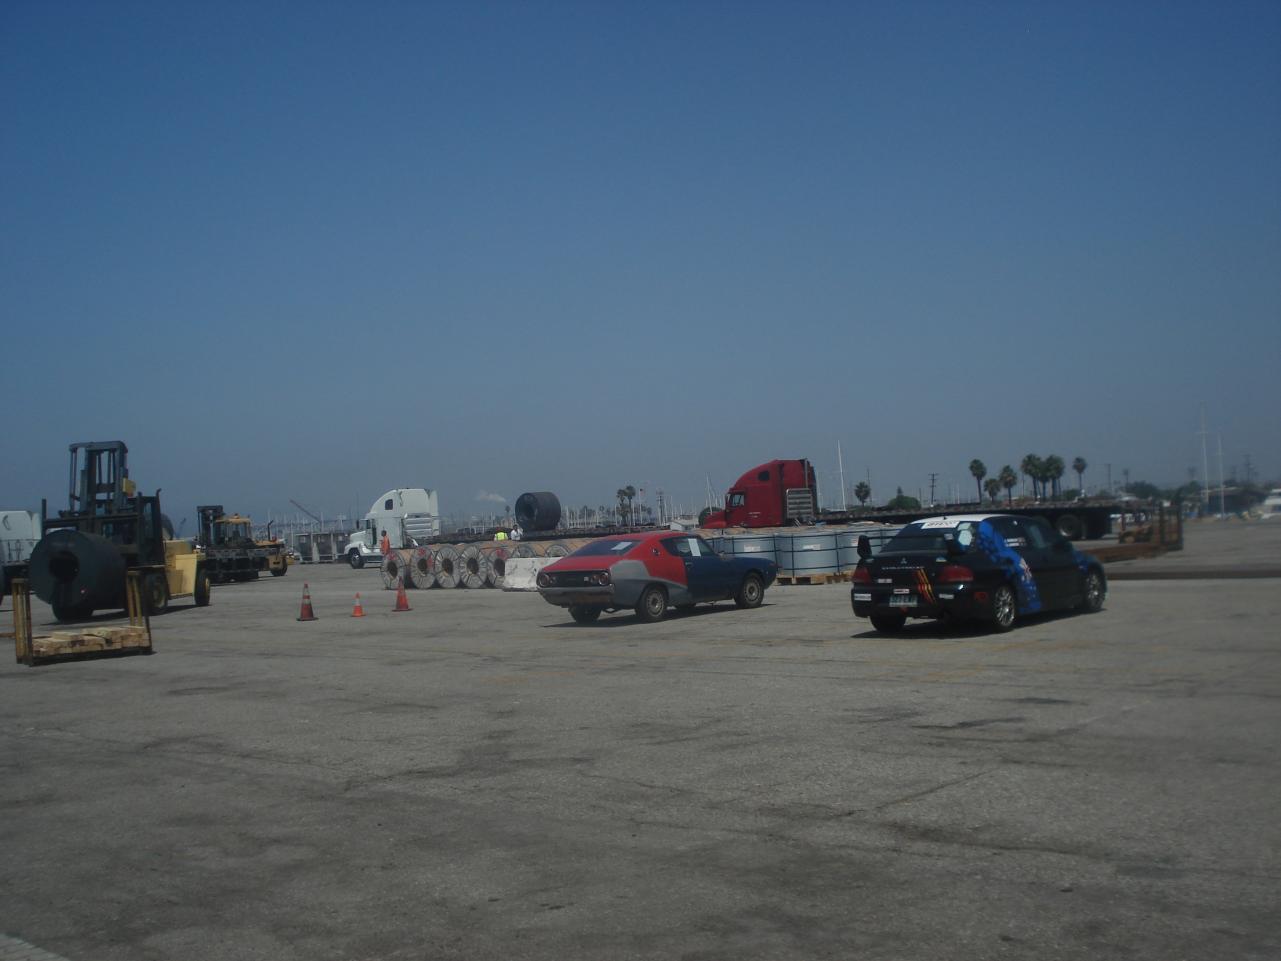
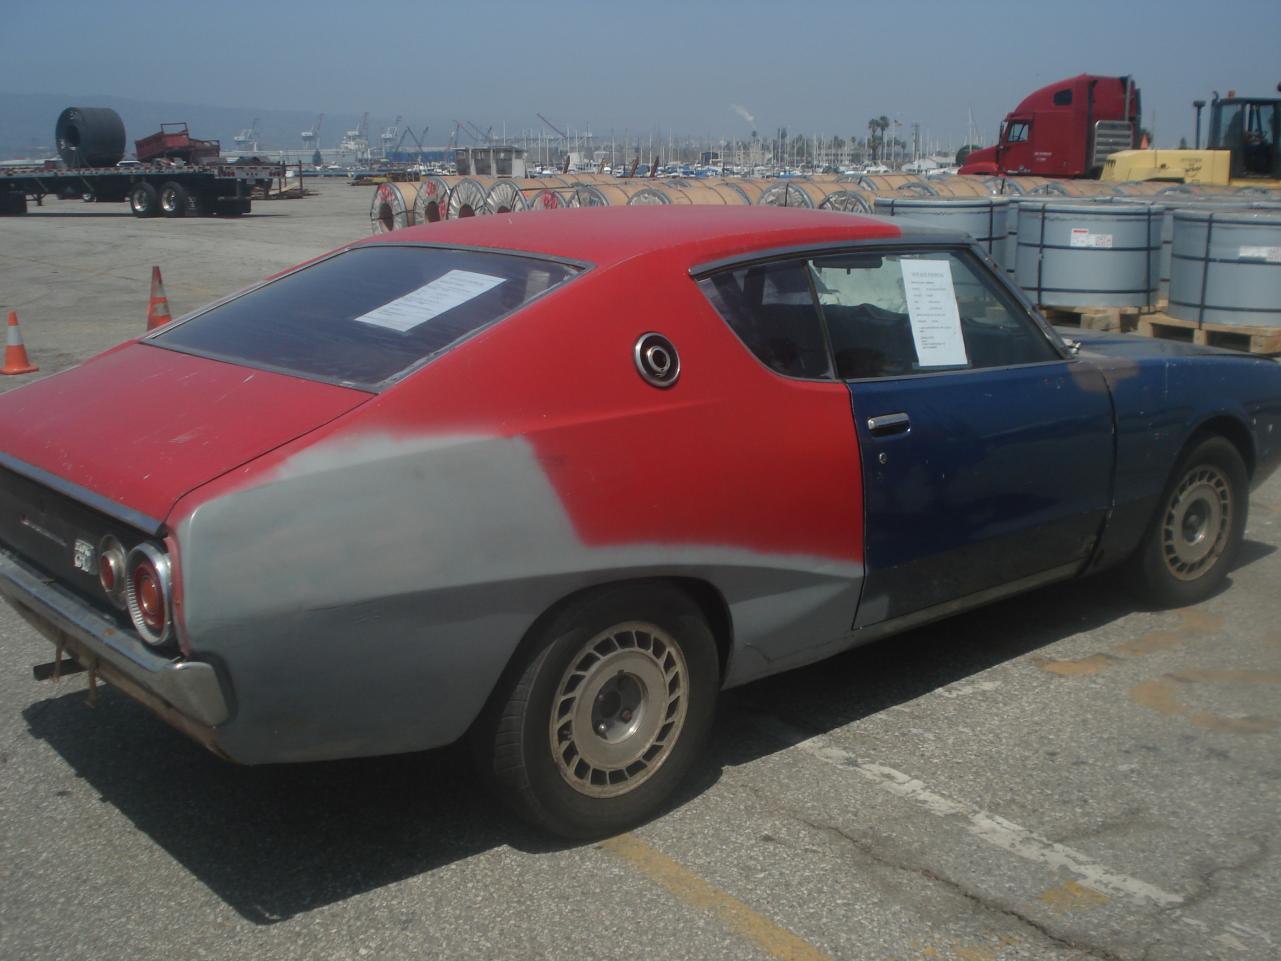
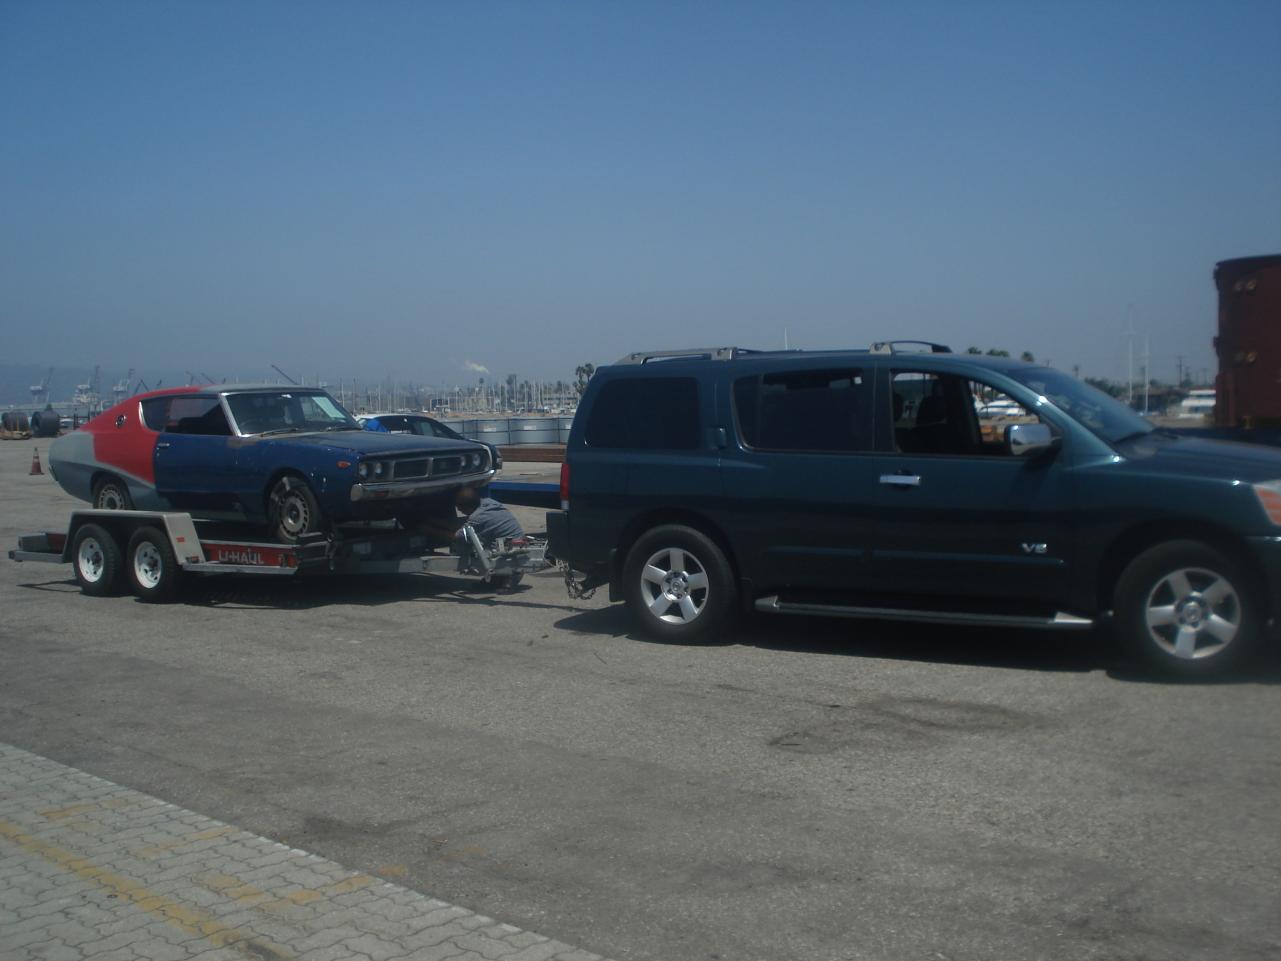
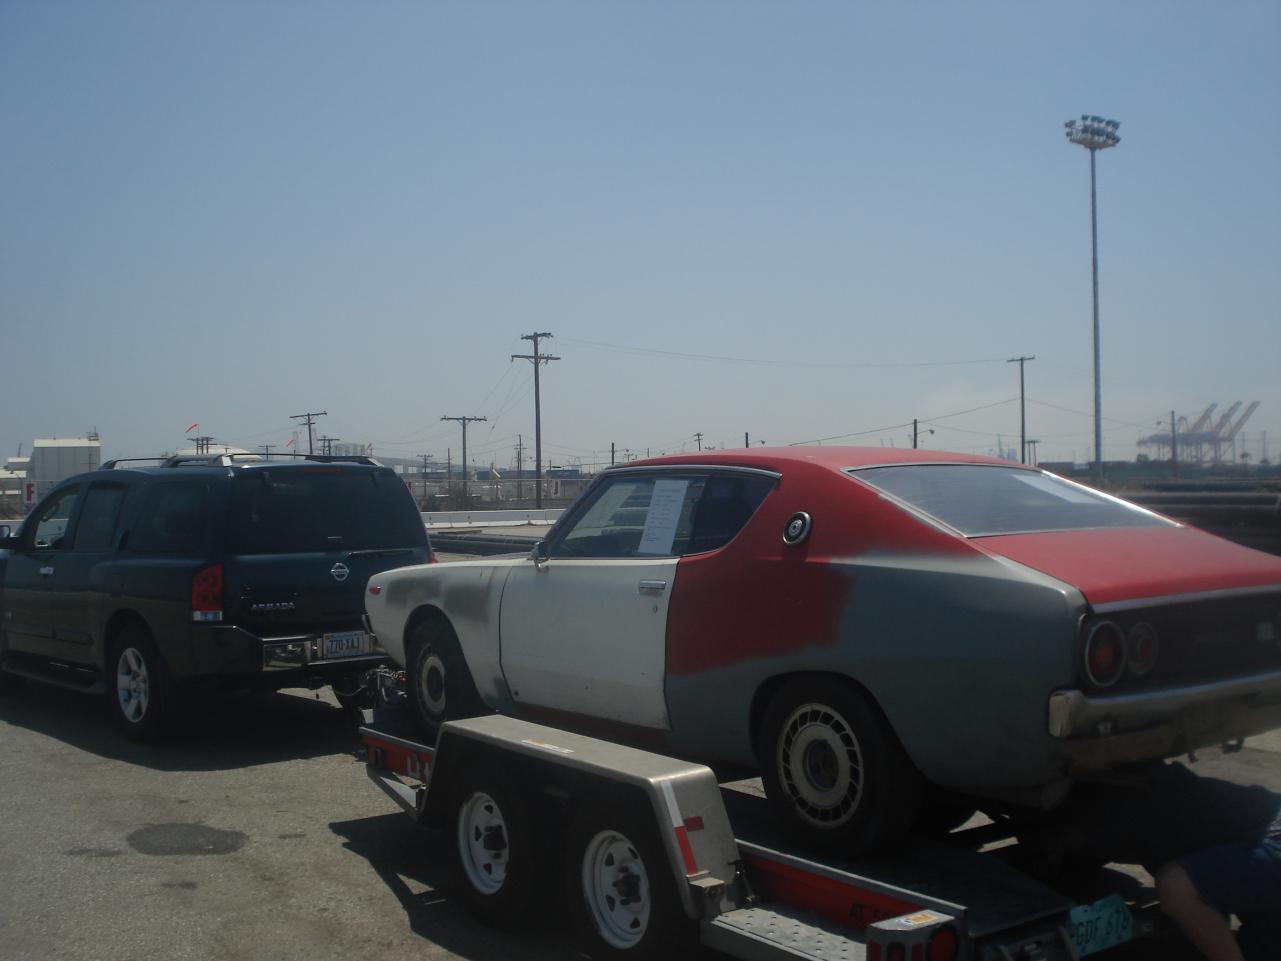
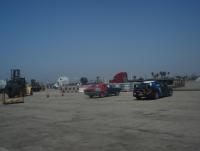
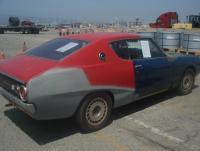
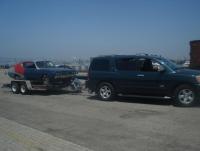
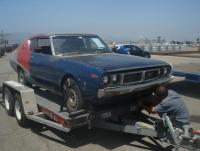
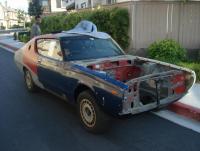
As most of you know, I bought Kents '73 GT a while back. She was shipped up back in 2010 and sat sleeping in my garage for most of the time since. The progress that has been made has mostly been done in the last few months. That being said, I'm going to start at the beginning. So here we go; Here you see the day we met in person. This is at the docks in Long Beach. When I went to pick her up we were escorted by security the entire time (new rules since 9/11). As you can see she was parked next to a race spec Evo 8. When the guard realized I was picking up the other car, he asks me "So, you payed to have that shipped from Australia?" My response "Yep" His reply "So.........................was this your first car or something?" "She has potential" I said. And loaded her up on the trailer for the trip home to San Diego(I love my Armada). Fast forward to January of this year. I started to pull her apart. Here we have the drivetrain coming out. The front end was pulled apart as well. You can see my wing man (my 8 year old son Alex) helping move the car around. Just so you know, I'm doing all of this in a single car garage, so usage of space is the key to making progress.


-
Thanks for all the kind words. Its much appreciated. And Kent, you are more than welcome to take her for a spin. So, there is actually a fair bit to report on her. I'm thinking I should start a new thread with the build instead of adding to this one. What do you guys think? Brian
-
It's been quite a while since I last posted. I'm not even sure where to start, so a quick synopsis: I'm back home in San Diego, Ca now. As with many I had to deal with the change in the economy and unfortunately it had an impact on my car projects. Most of you guys know that the '73 was sold back in '07. It went to a shop in Utah and eventually was bought by Gabe at Techno Toy Tuning. My '71 was sold just before that and belongs to a good friend of mine in Central Ca. As you guys may remember, I moved out to Arizona in '06. Well, it didn't go exactly as planned. The job I took out there ended up being not exactly as advertised coupled with what I can only describe as the worst State Government I have ever seen, and I was left in a bit of a bind. In a vain attempt to keep things afloat, all three of the Skylines were sold. All this did was buy me some time as the economy in Az never improved. I ended up finding a job back out here in San Diego and for a little over a year would commute between. I stayed here during the week and drove home for the weekends. Make no mistake, it sucked. But it allowed me to get health insurance for my family (not offered in Az, part of that jacked up Government I mentioned before) and eventually get moved back here for good. Anyhow, its been two years now since I came back. It took that long for me to get everything back in order. Obviously in hindsight I should have never gone out there. But if you never risk anything you might miss out. If nothing else I have a renewed appreciation for my hometown of San Diego. Now, if I haven't bored you too much, let's get to the good stuff. During all that mess, I stayed in touch with Kent on and off. And he was kind enough to work with me so that I could buy his '73. Needless to say, it was a long process, but she has been in my garage for over a year now. I was not in a position to do much with her until recently. Being able to go in the garage and envision the potential and occasionally start her up helped keep me motivated. Over the last few months I have pulled her apart in preparation for paint and body. I'm also working on the new suspension as well. When I have it sorted I think you guys are going to like it. With most of the cars I've built over the years, I haven't really documented much. Aside from the finished product. Due to the earlier circumstances I had the chance to heavily photograph this one. I'm taking a lot of time to do this with every aspect so that I can properly show every detail of this build. Anyhow, sorry to be so long winded. It's just that this is pretty much the only forum I still frequent. Mostly because of the fact that its more like hanging out with your mates in the garage than an online forum. While most of us may not have met in person, we have known each other for years. The mix of ideas without the negativity of most forums is a rarity. I will do my best to get some pics up for you guys. Brian
-
Hey guys. It has been ages since I've been here as other aspects of life have taken priority for a while. Anyhow, I thought I might chime in here as I completed this swap a few years ago with my last 240K. Here is what I did. The motor mounts are actually RB30 mounts shortened about 1". I then used generic Volvo 740 offseting mount insulators. There are also some for a mid '80's Supra that are basically the same. The best way to judge how much to cut the mounts is to set the motor/tranny into the car with wood blocks. The RB26 actually sits at a slight angular incline in the R32. The tranny will be just barely below the floor pan, about .5 inch if memory serves. Then, the lower timing cover is the best point for leveling the engine. The top of the lower timing cover is supposed to be level, actually plumb would be the proper term. Then I bolted the insulators in place and simply measured the distance from the top of the insulators to the mounting holes on the block for the motor mounts. I just cut the bottom off and welded on new plates. The driveshaft I used was actually the factory one modified with a yolk from a Z32 300zx. This kept the carrier bearing as well. I also used the factory RB26 harness and computer. I made a wiring diagram and it's actually pretty easy to wire up. I recently moved, but I will dig through the boxes to find my notes if you guys would like. Anyhow, it turned out pretty well for the most part. Kent even drove it when he was over here and I'm sure he could give his impressions. I never got the opportunity to refine it though. But the next owner managed to as some of you may have seen from pictures of it at the last Japanese Classic Car Show we had out here. As far as I know, it is still the only completed RB swapped GC110 in the U.S. Brian
-
That video is actually of my former car. I installed the RB26 in a relatively short time. As you can see it fits very well. The car still handled pretty well. The stock rear springs are not up to the job though as on full throttle runs the car would squat very hard. That car was sold last year. As it turns out, it was a decision I now regret. The combo of Kenmeri and RB is hard to beat. You will really enjoy the car if you go this route. And the look on peoples faces when you blow by them is pretty entertaining. They don't know what to make of the turbo howl coming from a nearly 40 year old car. Brian
-
Thanks for the comments guys. Alan, that car you pictured always gets me going. I don't know if you ever saw pictures from the Japanese car show here last year, but a gentleman from Japan had just brought over a copy of that car. It had a different paint scheme, but all of the body work looked to be an exact copy of the green factory race car. To answer your question, yes I sold both of them off. As you can see Chad bought the other one from me. Speaking of which, I'm very sorry to hear that you are selling off your cars Chad. I seriously considered buying it back from you after reading that. If not for the fact that I'm looking to buy another house right now I probably would. I did notice that you have it on e-bay right now and it looks to be getting a good response. Looks like you will end up getting it sold. Kent, I will definately be in the market for another by early next year. I don't know how often they come up for sale these days though. I've checked e-bay Aus from time to time and 2 doors don't appear that often. Hopefully you might have better luck finding one. Brian
-
I wanted to touch base with you guys. It's been quite a while since I last posted as I've been extremely busy. As most of you know, both of my Kenmerris have new homes. At the moment I am Skyline-less. I managed to get my old 510 back from the kid I sold it to 8 years ago and have managed to build up a stash of parts for it. Everything is still just sitting though as my personal and professional lives have taken center stage. I have a new job after 8 years with my last company. Surprisingly the job is back in San Diego, my hometown. I've been here in Phoenix for 2 years now and am ready to get back home. I started the new job 2 months ago and am really enjoying the change. I am in the process of looking for a new house in San Diego as we will be renting out the house here in Phoenix. I plan to be a bit occupied up until the new year most likely. After that I hope to be able to get back to working on cars again. That being said, I'm pretty sure I will need to get another Skyline or 240K again. As cool as the 510 is, I think it will become a primarily track only car as there have been few cars I enjoyed taking out on the open road as much as my Hakosuka or Kenmerri. As Kent could tell you, the RB26 was a very nice match for the '73 and just cruised so effortlessly. Anyhow, I just wanted to say "hi" and let you know I hope to be more active on the forum again. Brian
-
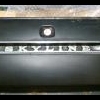
Thanks for the kind comments. To answer your questions; I doubt there is any recourse to take with the previous owner. All I can do is pass this along to anyone interested and suggest to them that they stay clear of any dealings with him. I would be interested to hear any rebuttal he may have though. As for the DMV, here is what I have found. The KPGC110 VIN will have to stay. All of the paperwork connected to the car coming into the U.S. dating all the way back to the prior Australian registration shows that VIN and the MVD would consider anything else a "typo" at best. It makes no real difference to me personally, but if I ever end up selling the car I will obviously need to disclose and explain the circumstances to any buyer. And here is the best pic I could get. It may be a bit difficult, but you can see how the "H" was modified. Pretty sad that someone would go through so much trouble to pull a hoax that was fairly easy to disprove. Brian
-
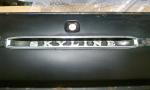
Guys, It's been a while since I last posted. I have been occupied with the day to day for a while now and have only recently had some free time. Anyhow, as most of you will recall, I bought the '73 K"P"GC110 last year. You all know the story behind it. For a while things never set quite right. I always knew that there was not just a possibility but a probability that the story was not legit. And that is exactly what I found. I decided to take a wire wheel and brake cleaner to the VIN stamp and guess what I found. Yep, K-H-GC110. So, in reality the car is an Aussie 240K. The "Nissan" I.D. plate under the hood? A photocopied fake glued to an aluminum plate. Granted it was more convincing under the plexiglass cover. The pics some of you saw of the VIN stamp were most likely right after the forgery was done and primered. I have taken pics but they are not too clear. I was made a tracing that is a bit more clear that I can post later if there is interest. Now, I'm not asking anyone to feel sorry for me here. I always suspected this and took this into consideration when I bought the car. For an American like myself getting a Kenmeri in this overall condition for what I paid I still made out. And the car has been turned into exactly what I had planned. Someone did a lot of work to carry this out. Not just the work on the car but the defrauding of the title and registration. I would assume that is no small task. Here in the U.S. it is nearly impossible to simply "fabricate" a VIN that was never officailly imported. You need to show evidence of the cars importation and passing of Customs before you can register it. Anyhow, I thought it only fair that I pass my findings on to all of you. A few here were quicker to figure it out than I was. I guess I was somewhat guilty of some wishful thinking, even with my suspicions. I am not going to openly admit what is really on my mind, but I will say that there is almost no way the previous owner could not be aware of at least some of this. Brian
-
The RB20 was pulled out shortly after the car arrived and was sold to a friend of mine. Believe it or not it was the same guy that bought my Hakosuka. He planned to drop it in as an interim motor while he builds an RB25. I never had planned to keep it as the RB26 had been waiting since before I got the car. I am slowly pushing the car more and more and today opened it up some. Here are a few videos of the car. They are rather bland, as only one of them has me getting on the throttle much. You can hear the tires squealing in one of them. Brian
-
-
-