kcpope
Free Member
-
Joined
-
Last visited
Everything posted by kcpope
-
 Ok good. Yes, tried all manor of finagling. Nothin. I have a supposedly higher quality switch from standard motor products arriving Weds, so we’ll see.
 -
Welp, I'm currently trying to tune my engine, as some of you know from my other recent thread, but now I've got another issue that came up. That "for sale" sign is looking awfully tempting!!! Was starting and tuning my car just two days ago, and the ignition switch was working fine (It's an aftermarket unit from Zcar depot BTW). Went to start the car today to do more tuning, no crank. I hear the typical sound of a relay turning on in the passenger footwell, but no starter solenoid action. No 12V power at the starter solenoid when the key is in the START position. Used a remote starter trigger directly on the starter solenoid and she turned over and started up fine with the key in the ON position. Now I'm checking my ignition switch. Please take a look at the video, and can I safely confirm the switch is bad?
-
Ok, as suggested, im going to set initial timing at 0. Then I’m going to hook up vacuum advance to manifold vacuum. Two questions… 1. Idle RPM of 800 will be low enough to NOT engage mechanical advance, correct? 2. See pic below. I assume this temporary port will be fine to use as my manifold vacuum port?

-
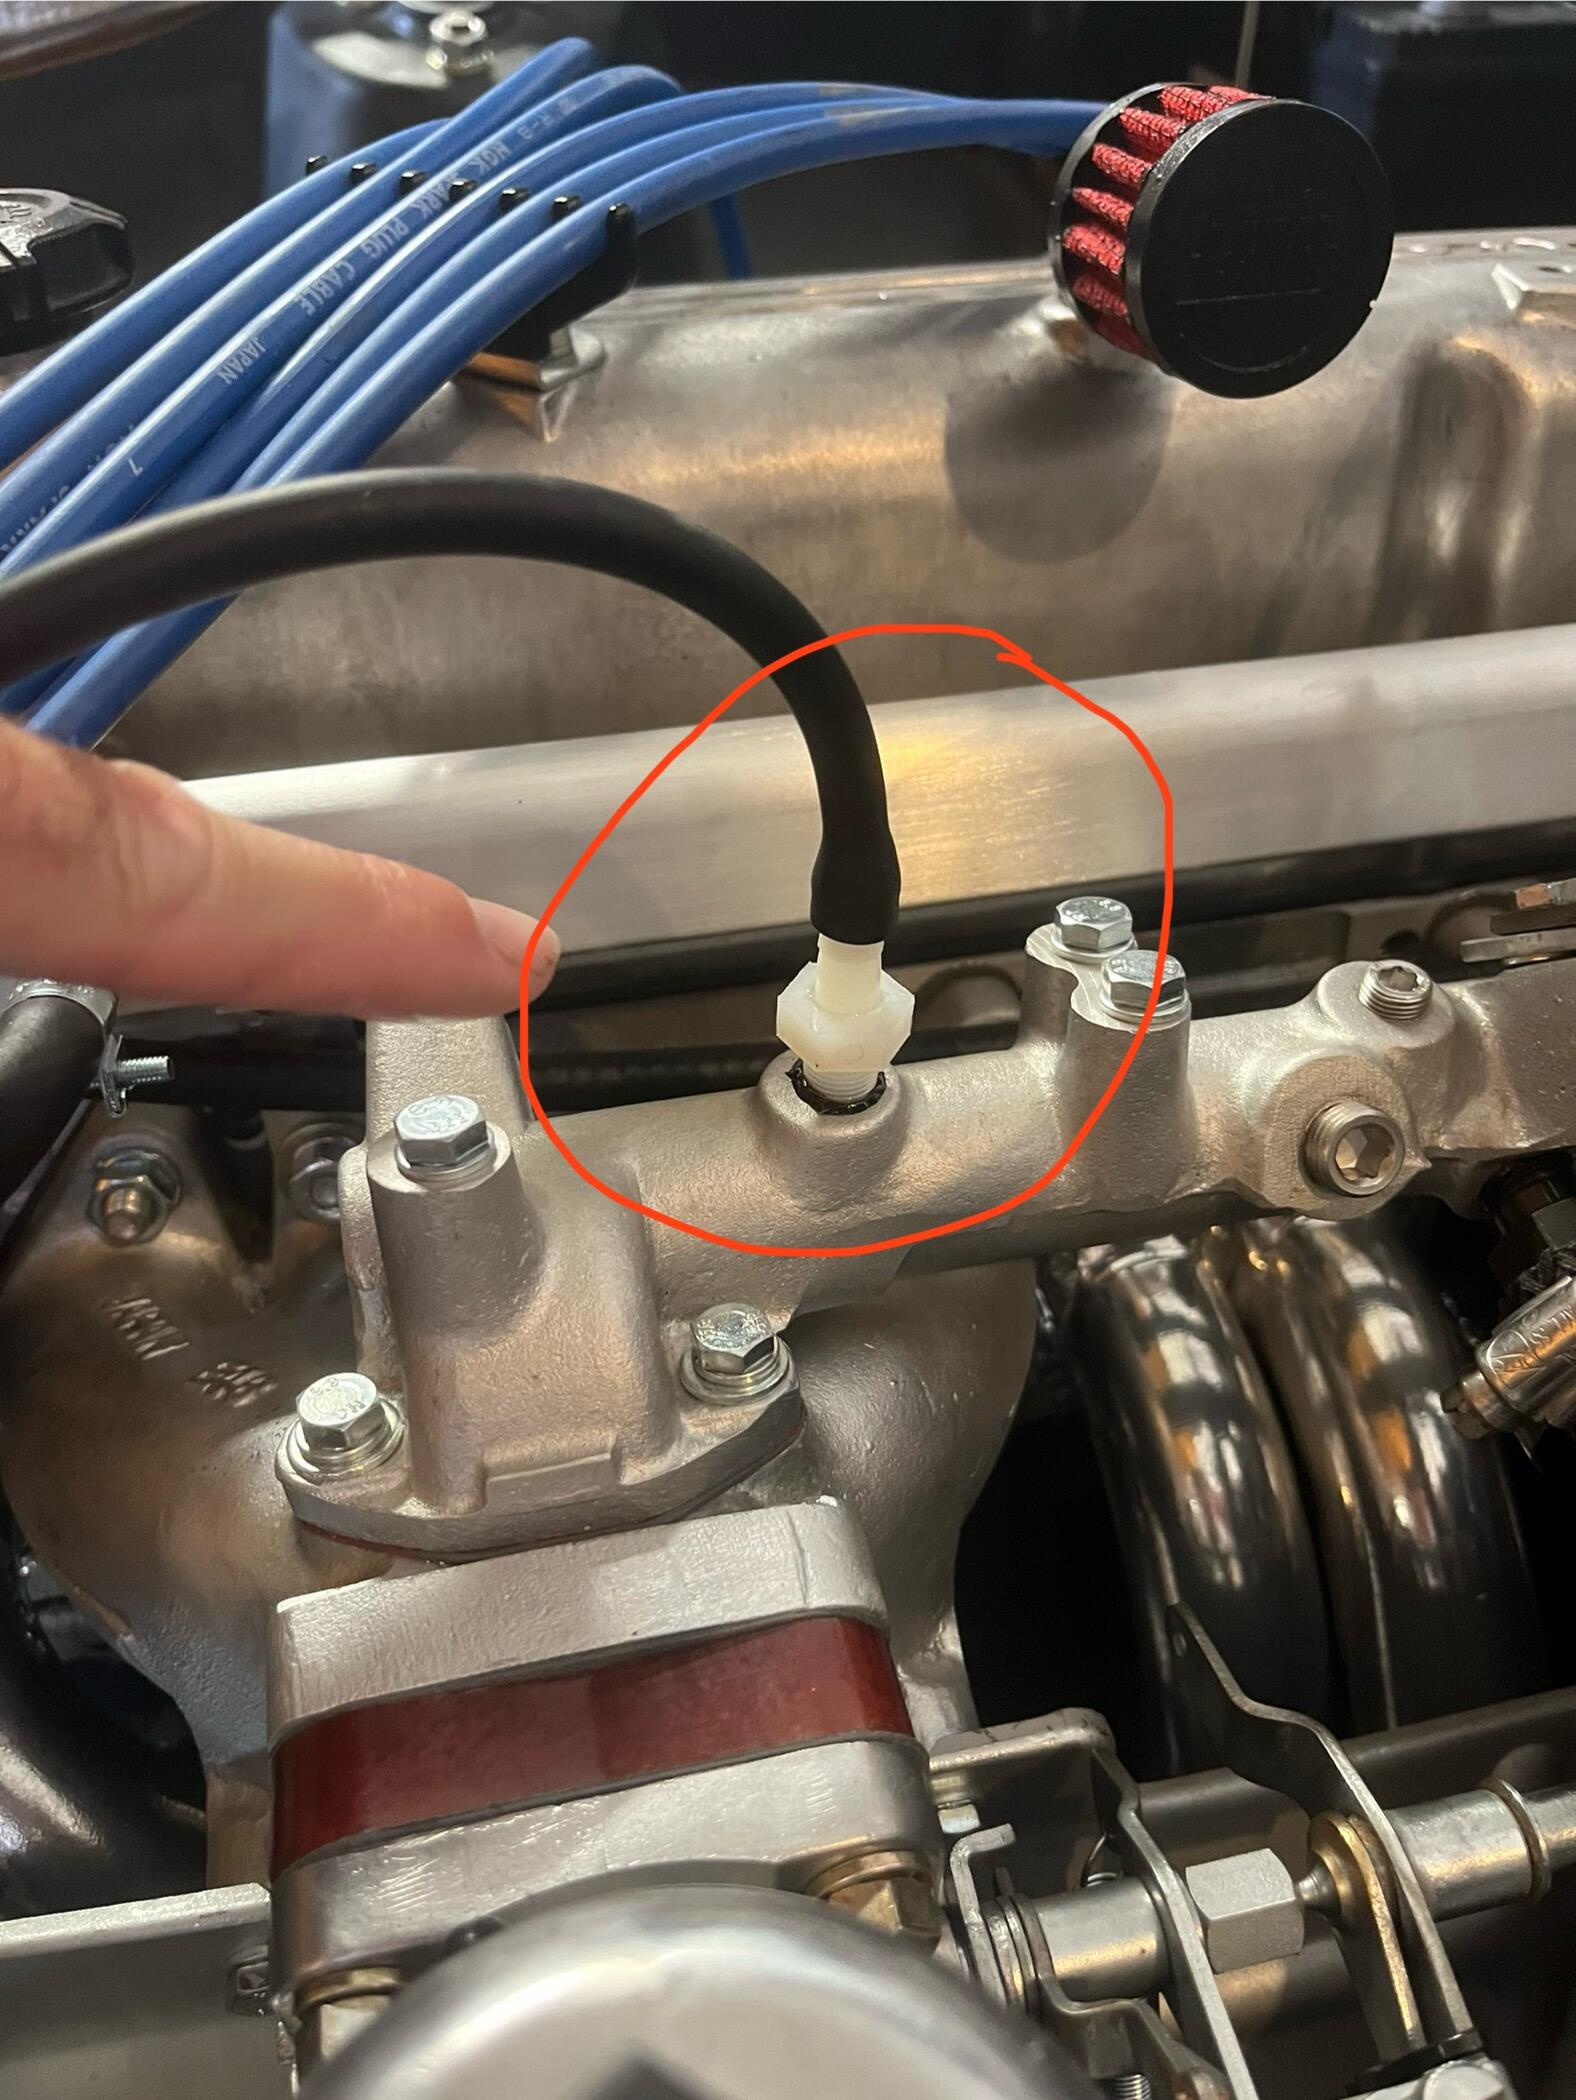
Good idea, I’ll do that. Guess I plugged all those intake manifold ports a little prematurely… Is there a port that is more ideal than others for this, or just any of them located on the balance tube? Lastly, approximately what RPM will yield max vacuum advance for testing purposes, maybe 1500 or so? Or will idle RPM of 800 be fine? I’ll report back with my findings.

-
Well, after doing more digging, I have a tentative plan. For the time being, I’ll disconnect the vacuum advance and run 18 static + 17 mechanical for a total of 35, which is a safe performance setting. Not ideal for mpg while cruising, but not the end of the world for now. Then as time permits, I’ll follow the instructions in this thread and attempt to modify my vacuum advance canister to limit its range of motion to 15 degrees (instead of 30). 18 static + 17 mechanical + 15 vacuum advance = 50 total, which is supposedly fine for these engines at cruising speeds. Feel free to chime in with anything else you might suggest. Thanks
-
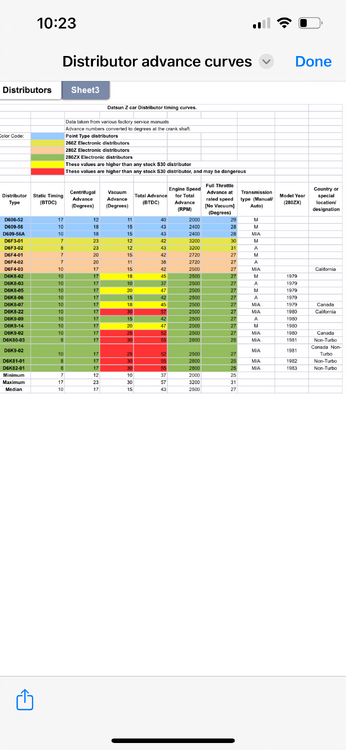
Fired up my Z build for the first time today. I’m trying to get my timing set right. I have a 280zx dizzy, D6K80-03. E12-80 module. I rebuilt it and it functions properly, including the vacuum advance. See attached chart. According to the attached chart, this dizzy will put my engine in the red “danger zone” with a total advance of 55. Didn’t know this when I bought it 🤦🏼♂️ Help me understand how I can make this dizzy safe for my engine. Option 1: Do I run it without vacuum advance? Set timing at idle to 8. Mechanical advance adds 17 for a total of 35. That said, I’ve heard not running vacuum advance yields poor performance for anything other than engines that run constantly at wide open throttle. Option 2: Do I set timing at idle to 0. Mechanical advance adds 17, vacuum advance adds 30, total advance of 37. I’m pretty sure performance would suffer here too, probably off the line performance because the timing is starting at 0. Option 3: is there a way to limit the vacuum advance to keep it in the safe zone? I did rebuild the dizzy, so I am familiar with the internals. I’d appreciate some ideas here. Or maybe this attached chart has me more alarmed than I need to be?? Really hoping I can salvage this dizzy, because the electronic ignition is a nice upgrade.
-
Post a link to the facebook group and I'll put my eyes on it and give you an opinion. Lots of scam groups out there, so beware.
-
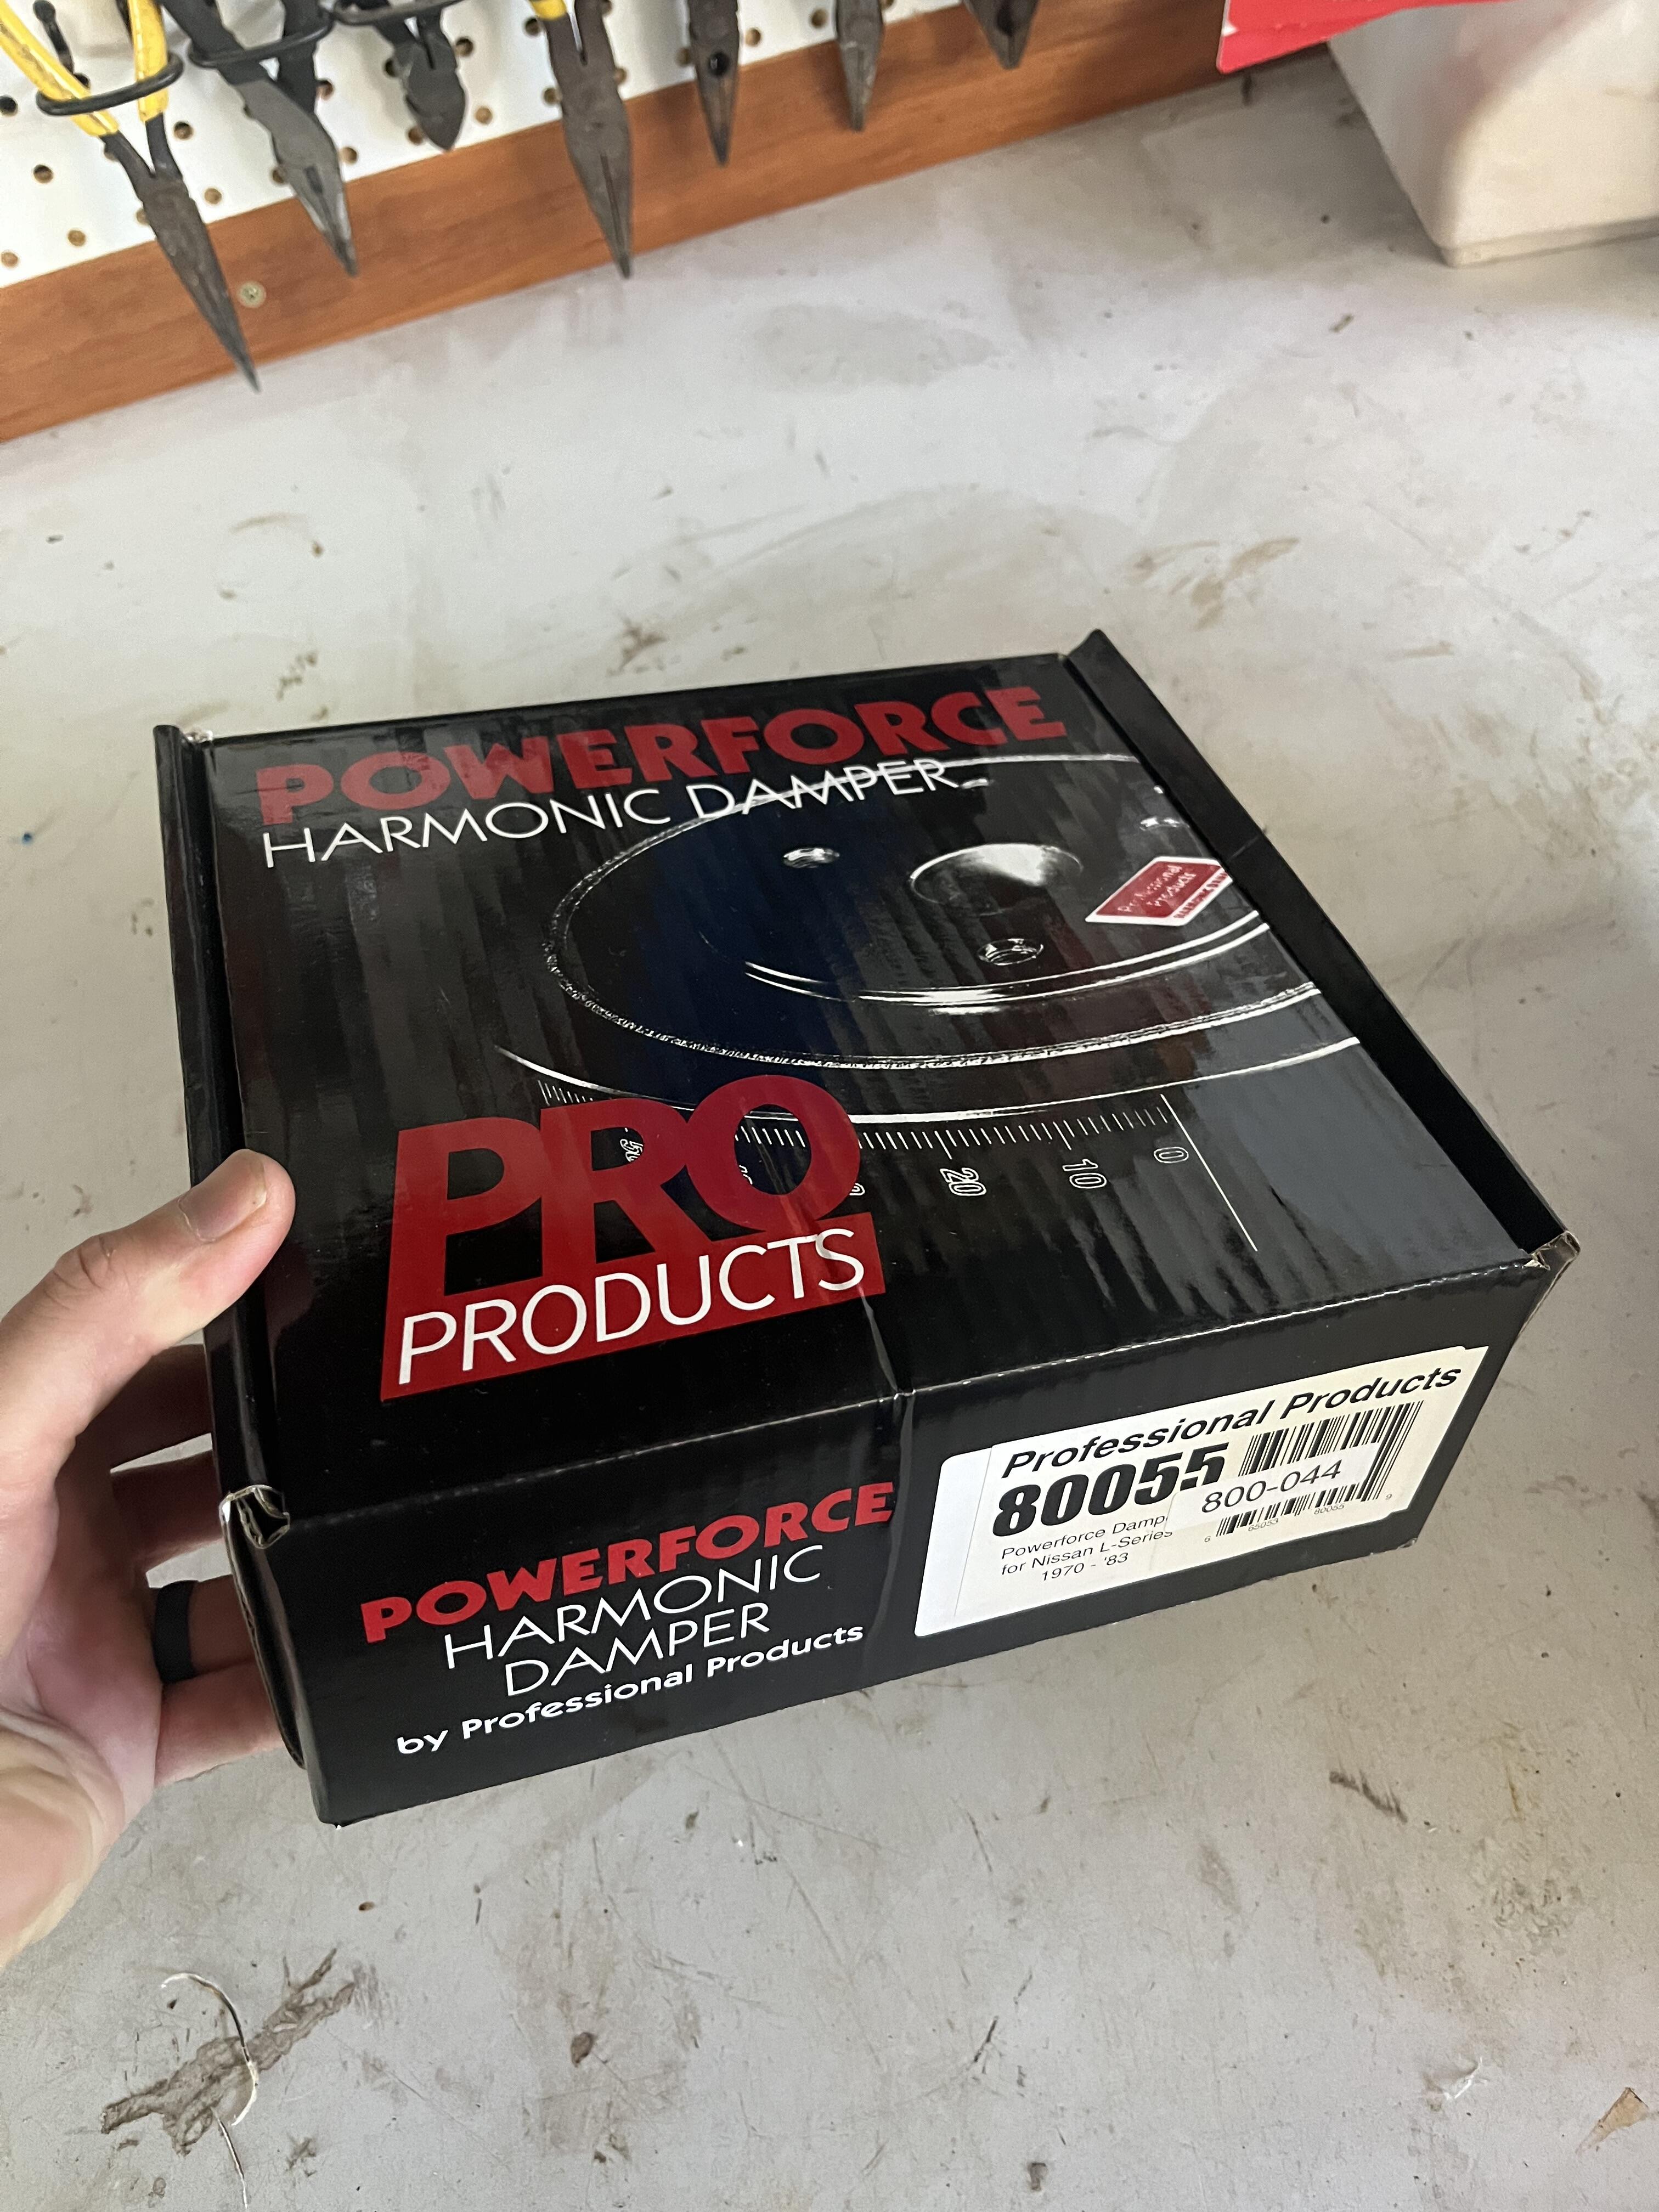
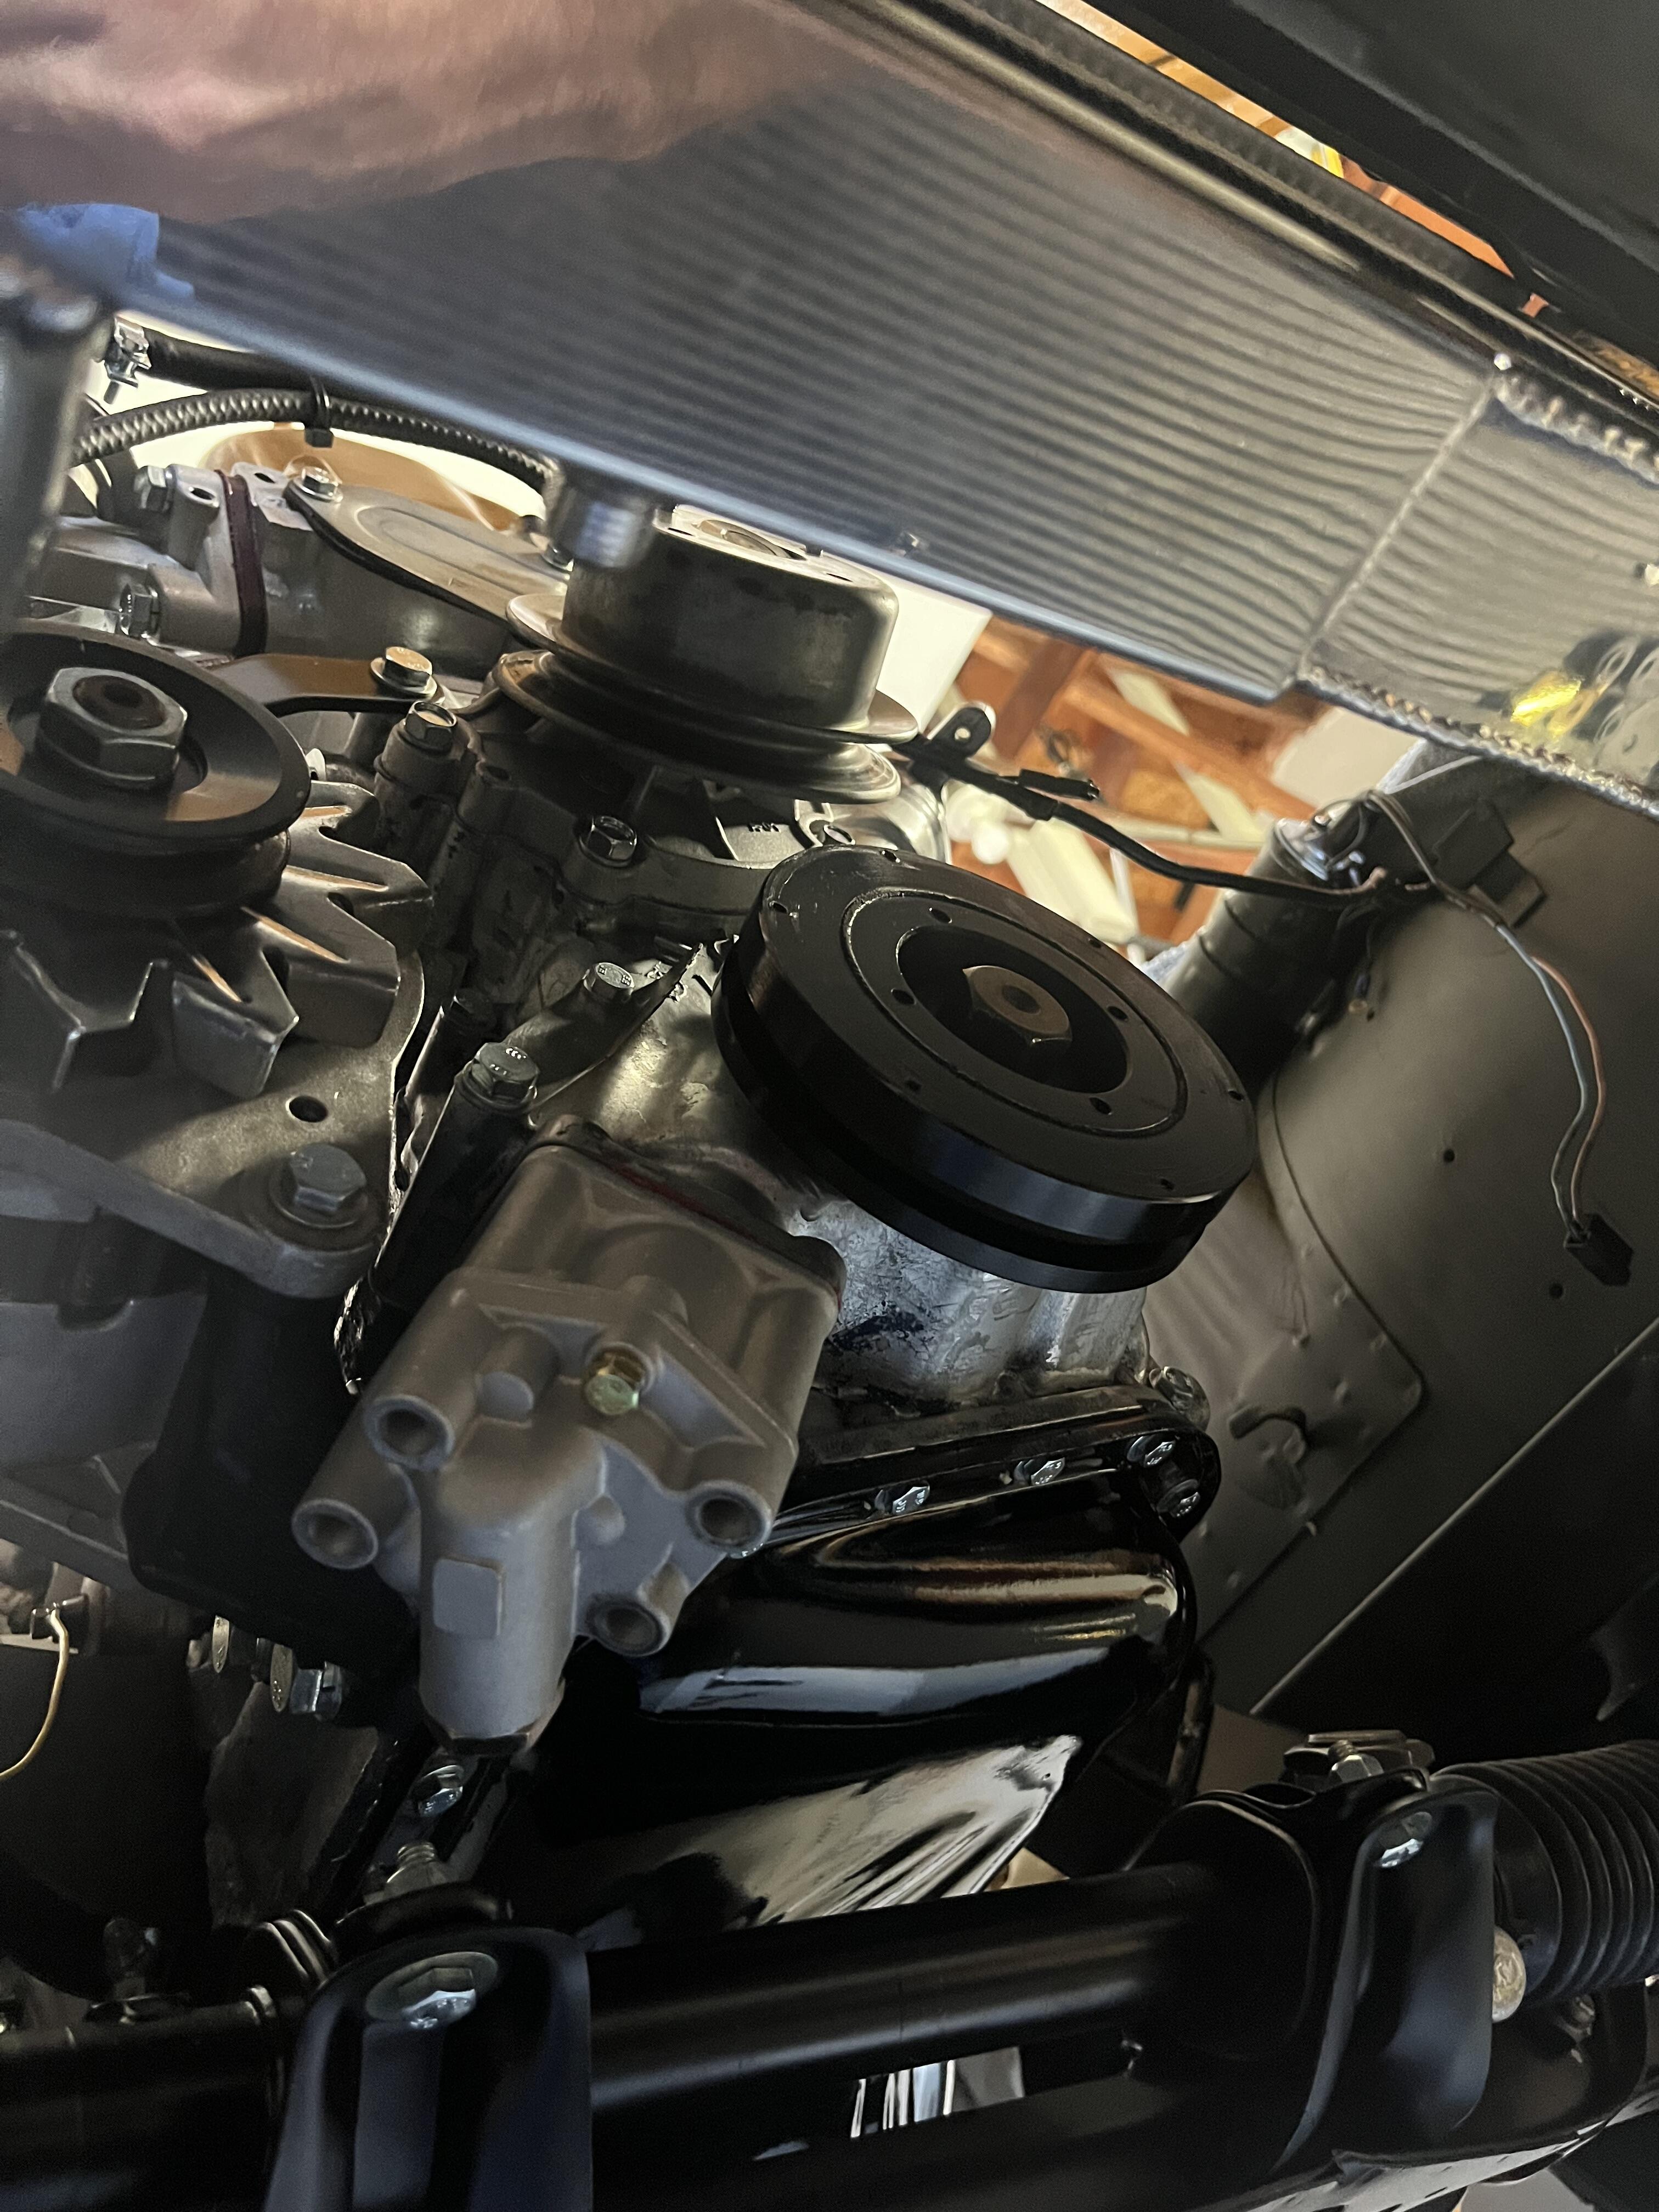
For anyone looking at this thread in the future… the ZcarDepot pulley I received is made by Pro Products. Pics below. Apparently some people have a hard to getting this on their crank because it’s a tight fit. Mine went on fine with a 2lb hammer and block of wood. The timing mark on the pulley wasn’t accurate for my car, so I’ll remark it. Just FYI. Nice to have a single groove pulley.


-
Hi TerrapinZ, let me know how much $ you’re looking for on your used double groove. I might consider it if you have one. Thx
-
Discovered my stock 2-groove harmonic balancer has a hairline crack. So I’m in the market for a replacement, and figured it might be nice to lose some weight. This one can be used as a single groove, or a double groove by bolting on the extra pulley. Is anyone running one of these? Any issues with installation? https://zcardepot.com/products/harmonic-balancer-damper-240z-260z-280z?_pos=7&_sid=c63d68427&_ss=r
-
Hmm, well I guess I’ll find out soon when it arrives. What year is your Z? I wanna say maybe the earlier Z’s had a different mount location because they didn’t have the rubber jacketed belt receivers. I think they were just floppy. But I might be wrong.
-
Thanks everyone, I think I’ll be fine without the hardware kit.
-
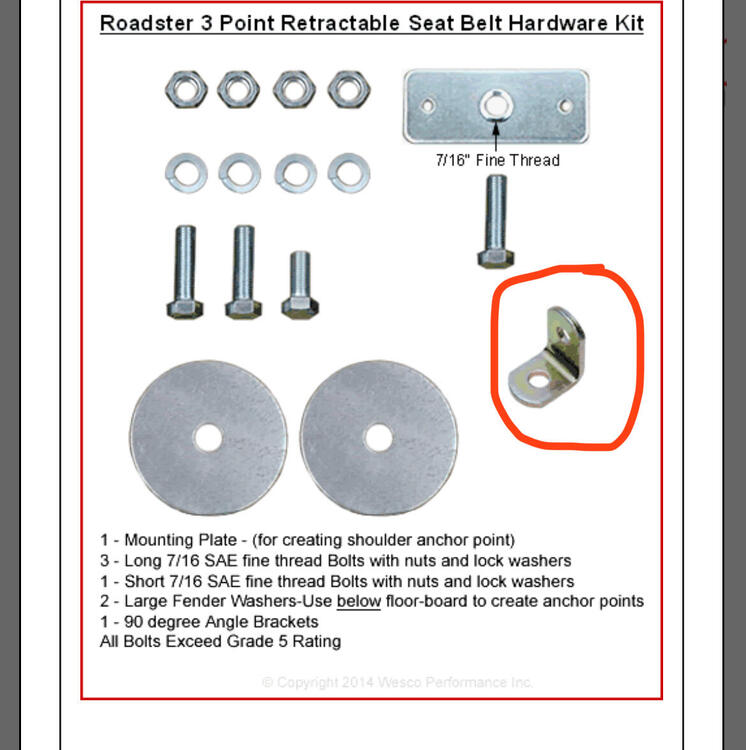
https://www.wescoperformance.com/noname.html As others have suggested on this forum, I’m getting ready to Pull the trigger on the Wesco 3 point roadster kit to replace my worn out OE belts. My question is, do I need to purchase their $9.95 hardware kit as well? I have all my OE hardware from my original belts. Is that enough? They show this little L-bracket in their hardware kit. Did anyone find that necessary to use? See pic…
-
I follow them on instagram. Beautiful builds. And my favorite part is their color choices. Especially that minty green. I know the whole car is a masterpiece, but one detail I enjoy is how they weld and smooth together the entire rear tail light panel for a seamless look. Very clean. I always wonder though, where do they get their donor cars from, and are they relatively clean to begin with? I would imagine so.
-
Like Zed said, you can remove that spring. Get a good grip on it with your hand, stretch it, and it’ll come out. Then jostle the pedal while trying to remove the pin and eventually you’ll get it. And your correct, your pin prolly has a round head. You could prolly get some vice grips around it to twist it.
-
Haven’t installed yet, but build quality seems just fine. Includes gasket as well. Its not that hard of an install, just takes a bit of time to remove parts to get to it. I haven’t heard any stories of failures, and the Amazon reviews appear good, so I’d take the win on any reasonably priced Datsun parts I can find. There aren’t many. One thing I would recommend. Get new water pump mounting bolts. If yours are original like mine were, they’re prolly rusted to death. MSA sells a hardware kit. https://www.thezstore.com/product/7020/water-pump-hardware-kit-70-83-z-zx
-
I just bought this one a couple weeks ago. Can’t beat the price and it’s Gates brand. It has the “improved” impeller design that supposedly pumps more water with less weight… Gates 41132 Premium Engine Water... https://www.amazon.com/dp/B000C2S6WU?ref=ppx_pop_mob_ap_share
-
I had the same issue. I think the rear hatch retainer clip is unique to the hatch lock and is a bit bigger. i ended up ordering this clip and taking a dremel tool and widening the gap to make it fit the lock. Its a bit on the small side, but it did work. Crown Automotive-2583377 Lock... https://www.amazon.com/dp/B077Z8NKQ6?ref=ppx_pop_mob_ap_share
-
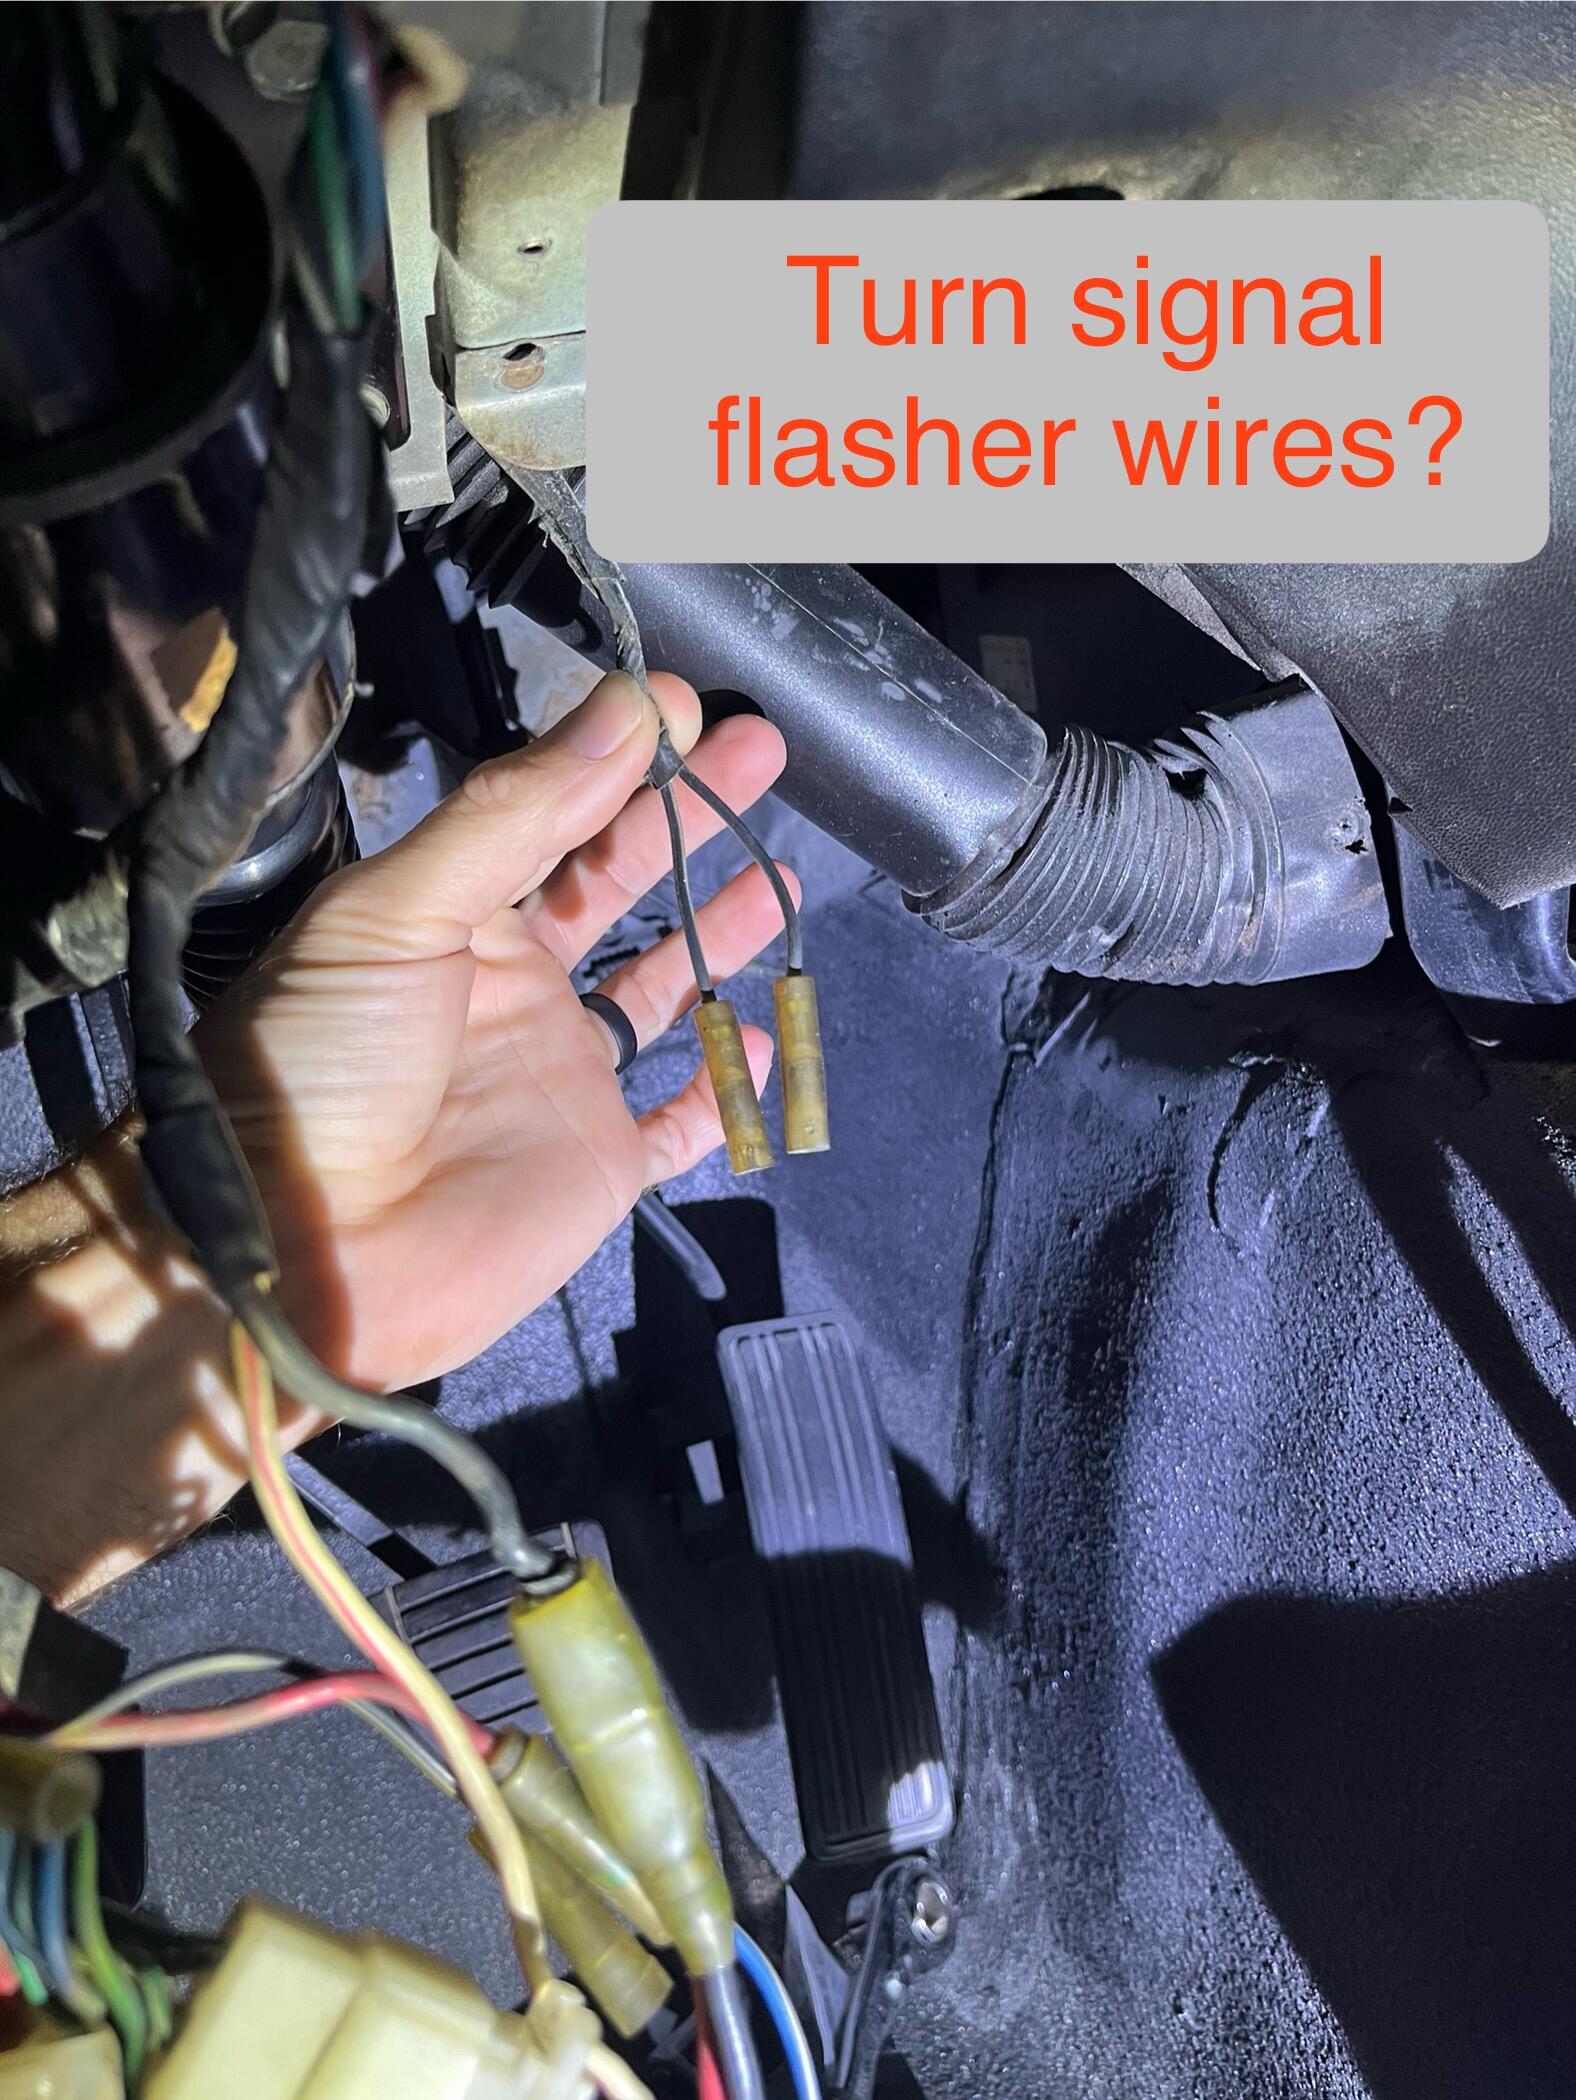
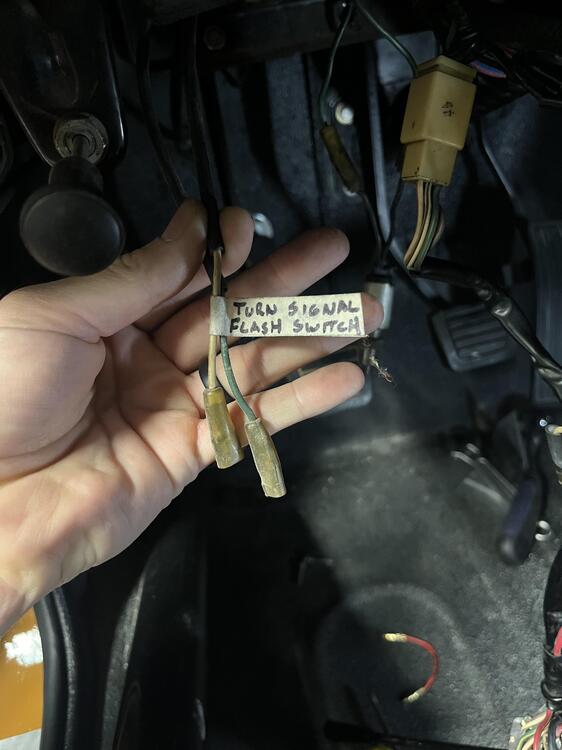
Well I’ll be dipped! Reach my hand up under the dash, feeling around for the turn signal flasher, and down dropped these wires, labeled and all! What a deal. I’ll buy a flasher unit and I think we’ll be in business. Thanks all, and hopefully my saga helps someone down the road.
-
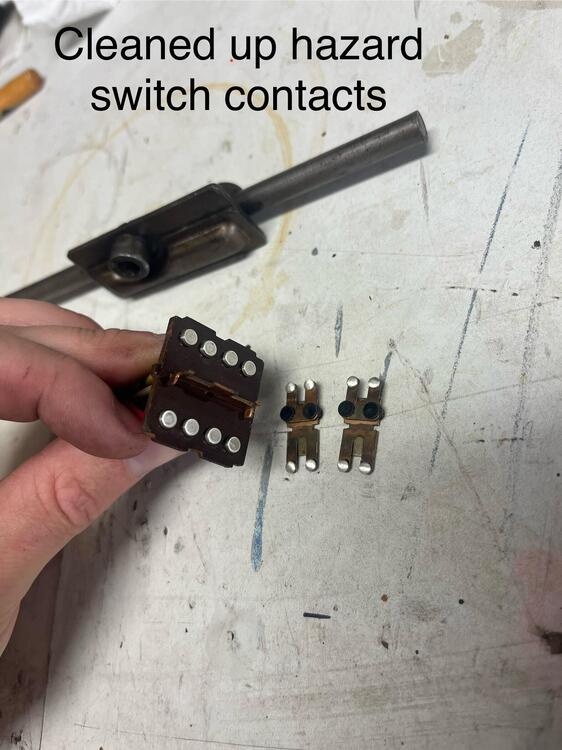
SteveJ and zKars, thanks for the input! Progress, good news! I went through the inspection points Steve mentioned. When I got to the hazard switch, I figured what the heck, I might as well open it up and clean it up. It honestly looked fine on the inside, but I cleaned it up anyways and lightly sanded the contacts inside. And good news, that brake lights are now working, woohoo! But still no turn signals, front or rear. While I was poking around, I came across two female bullet connectors that weren’t connected to anything. One black wire, the other is black with a white (I think) stripe. Any chance these are supposed to go to a turn signal flasher? Do I even have a turn signal flasher in the dash? Where is it typically located on a 72 Z?

-
Understood, thanks for the explanation. Oh man, a demo video or even just a list of what to test next work be great! Sent from my iPhone using Tapatalk
-
When I connect a jumper wire connecting only the two green/yellow wires together, I get 12 volts at the proper terminals on the turn signal stalk (but still no brake lights). See explaination video here… Sent from my iPhone using Tapatalk
-
Connections are all solid. No wires being pushed out. It’s like when I plug in the connector the GY wire just stops supplying 12V. Sent from my iPhone using Tapatalk
-
Alright, check out the video I made here explaining the results of my test, amongst other things. Easier to explain with video… Sent from my iPhone using Tapatalk
-
Steve, thank you. Tomorrow I will test like you said and report back. Sent from my iPhone using Tapatalk