Zs-ondabrain
Free Member
-
Joined
-
Last visited
Everything posted by Zs-ondabrain
-
 I've NEVER hit the speaker once. I quess apearances are decieving in the pic. The speaker sits higher than it apears and I can even use the Dead Pedal when needed. Brian... Not in a 240Z you don't. Gary, The one place I did'nt check was the JY or Pull a part. I would have settled for less or even a basic under dash light like Brian mentioned, but I'm totally happy with the route I went. Very clean white light that's not blinding in any way. can't even see the bulbs unless you get on your knees and pray. Jimmy, I found something on superbriteLEDs.com but they are pricey and I'm broke at the moment. the upgrade would include inserting the bulbs from the inside out. Not a plug and play thing, tell ya more when I find the info I'm looking for. MEZZZ, I wish you did too, the Cold cathode bulbs are a DYI thing. Just order them from the site above, cut the red and black wire at the large plugs (when you get it in the mail), mount them like I did, run the red wire to the cigarette lighter wire or any constant 12 volt source. Run the black wire to the P-side door pin wire and you're done. And thanks, I try. Dave.
 -
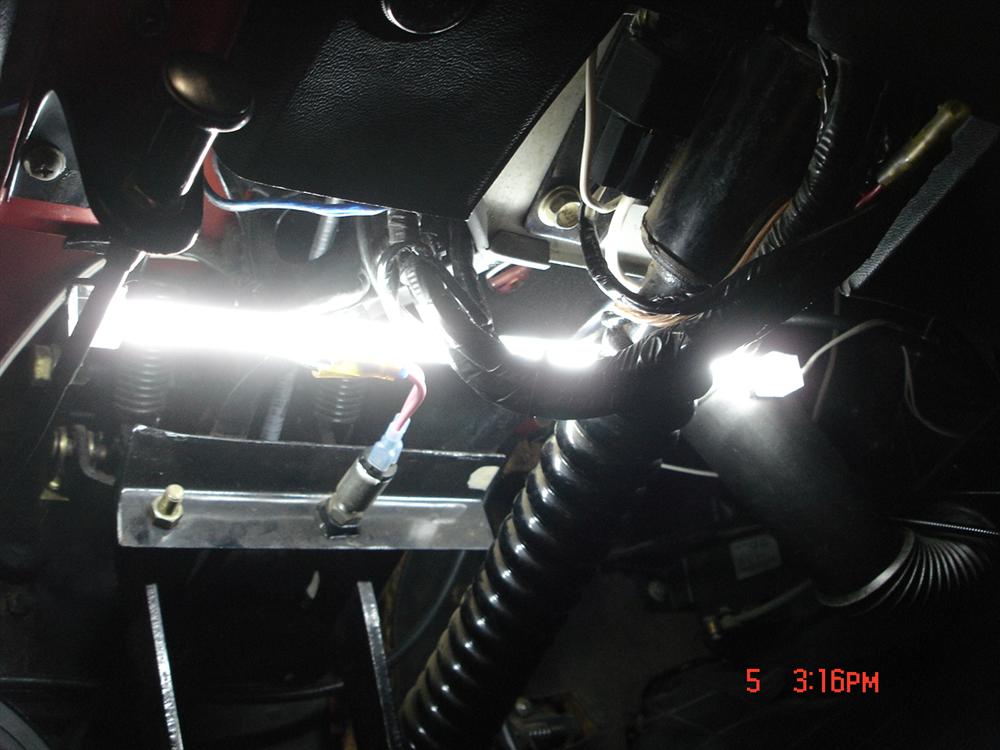
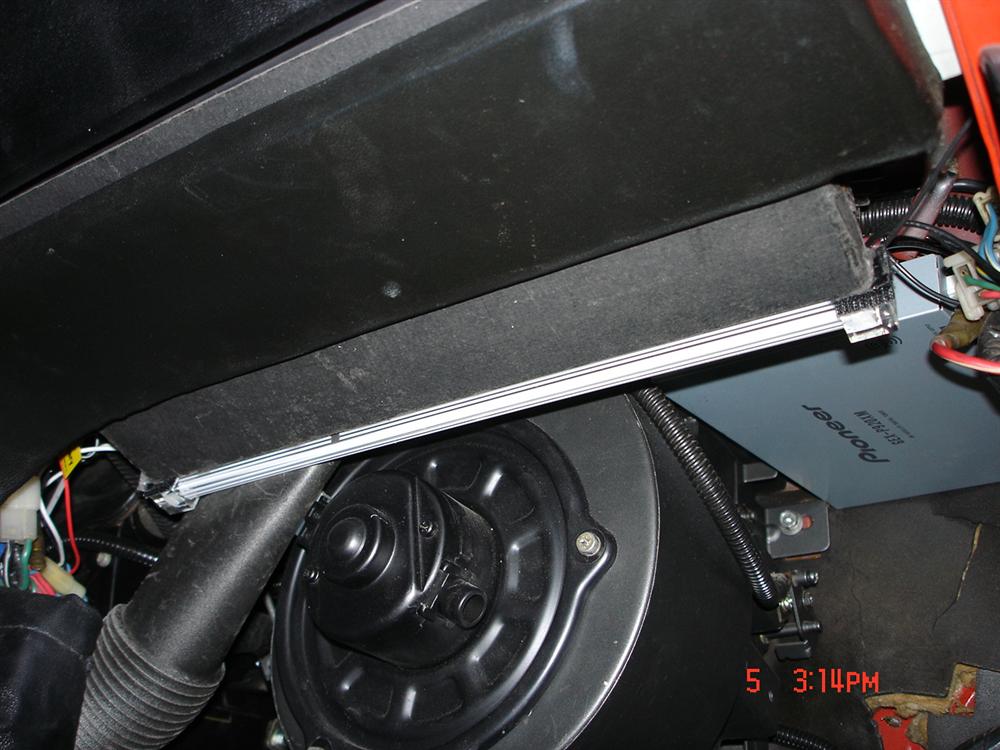
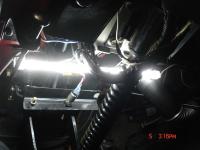
Unfortunately, They are similar to neon tubes and the protective tube will only withstand so much before it breaks. My initial thought was under the seats, facing outward but I store stuff there and your feet will interupt the lights. The doors would be great but doors slam, feet hit doors, and the tubes are 12" long. then there's the wiring as you mentioned above. The two tube can only be about 21" to 24" apart from each other unless you buy the single tube kit (about $4) I love them. I must have went to the dark garage about 4 times last night, just to open the doors and admire the scenery of a well lit interior. Dave. Heres the pics of the lights under the dash area on the drivers side. and another showing how you can't directly see the light tube unless your eyes are even with the door handle or seats.

-
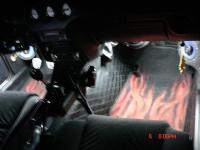
You guys have GOT to see these in person. The difference is Day and Night. They have a 30,000 hour lifespan and considering the fact that you only open the doors to get in and out, they'll last a lifetime. With a price tag of less than $8.00 for the pair, and basic shipping around $7. Then again, it's another reason to keep the car clean, cause it lights up the floor boards very nicely. Anyone have any other lighting upgrades to add? Dave.
-
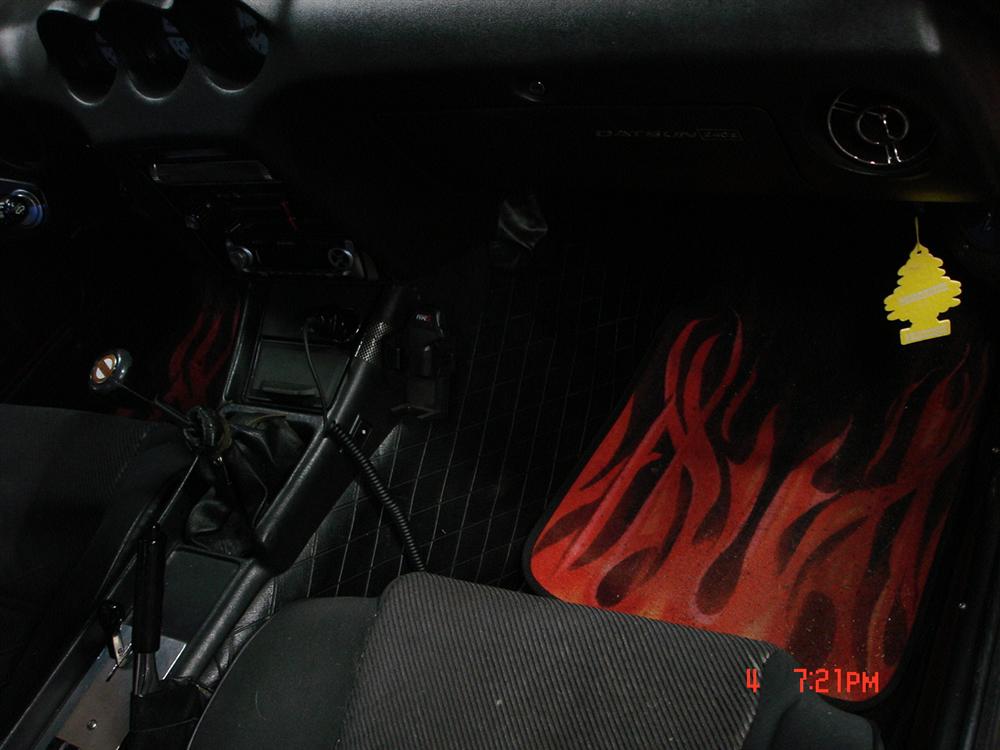
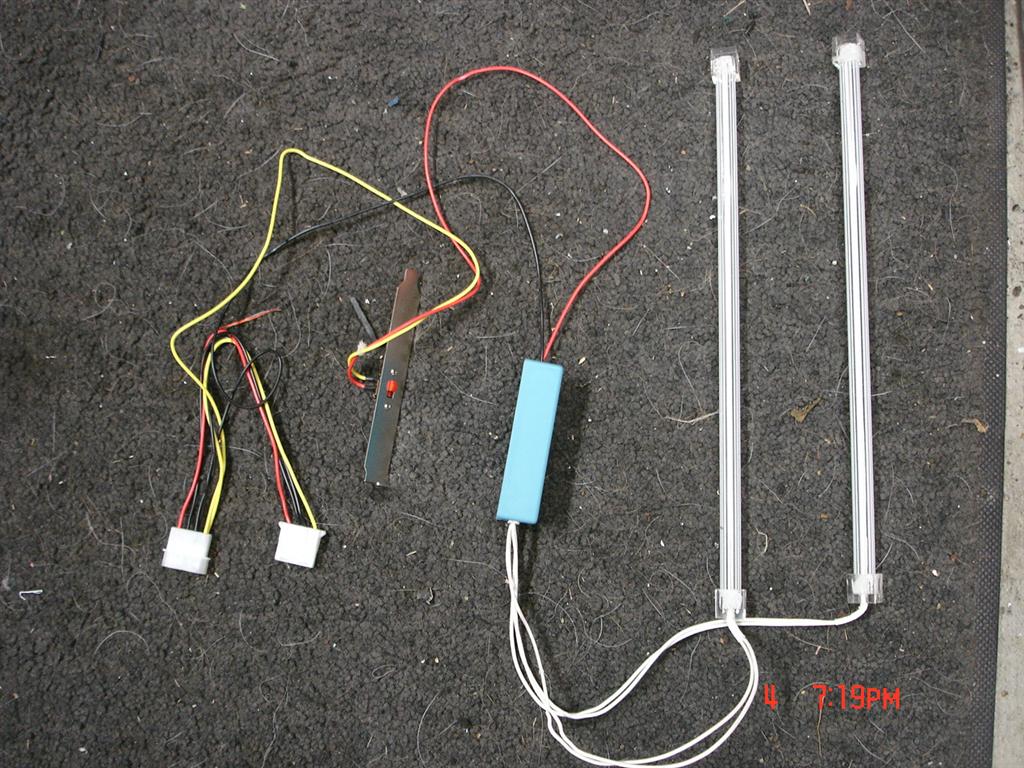
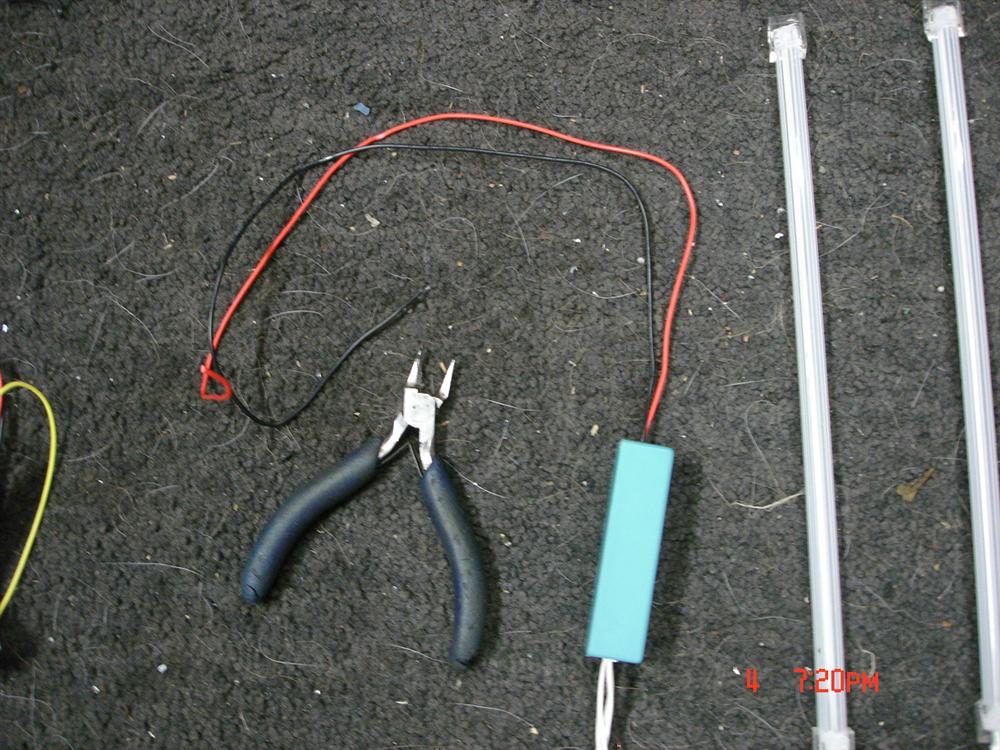
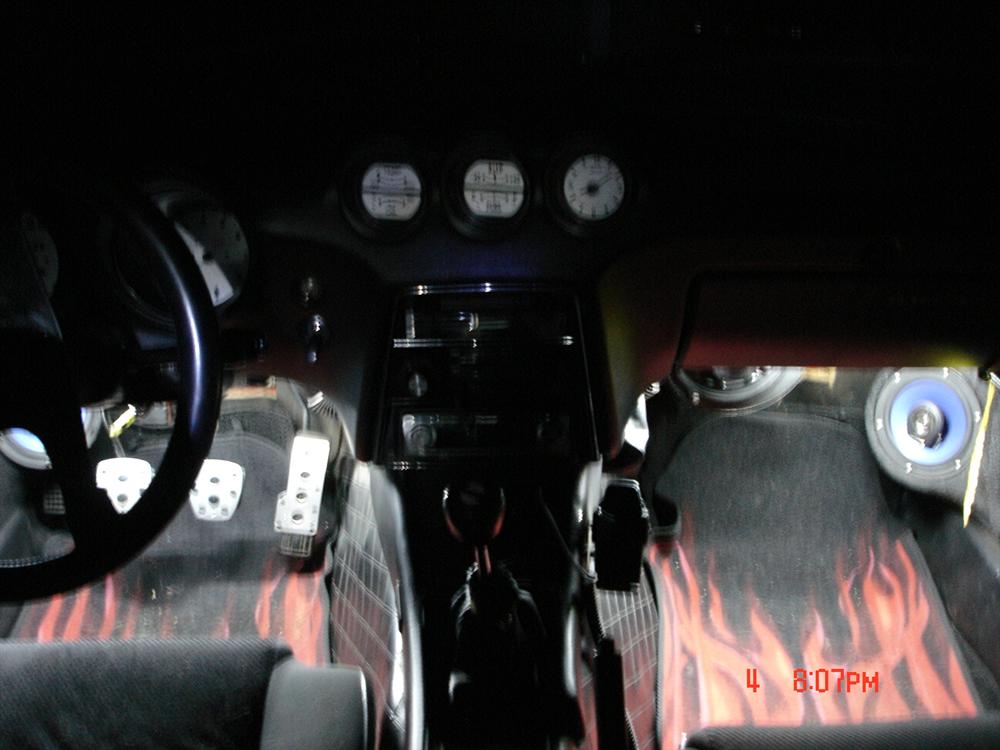
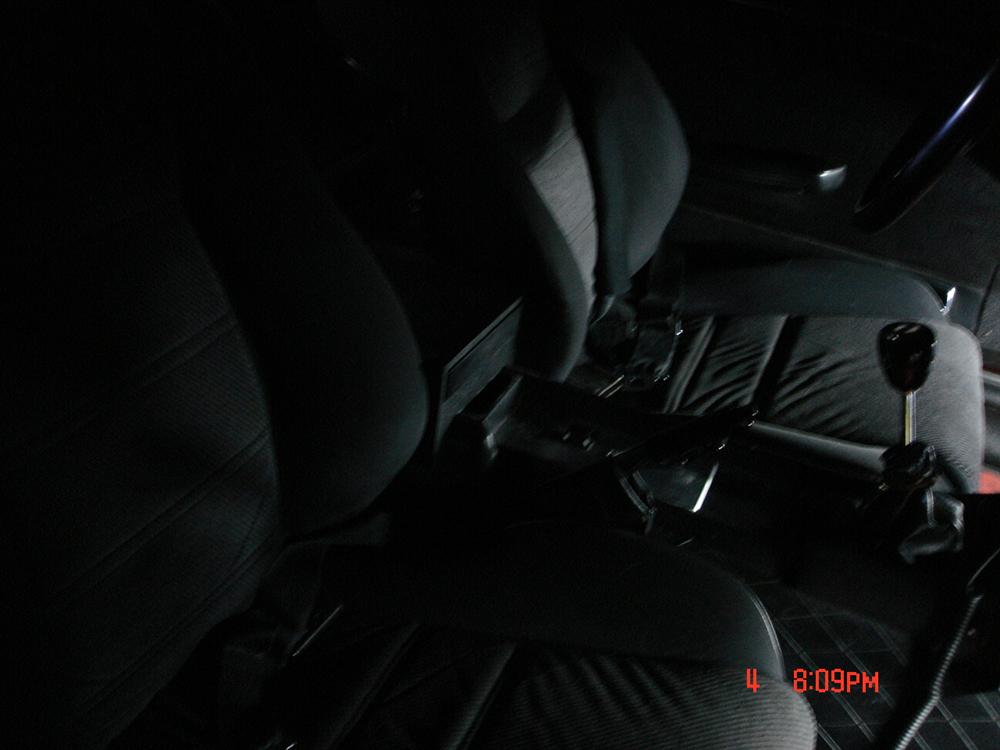
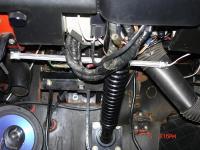
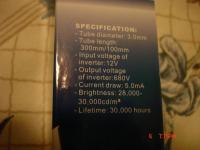
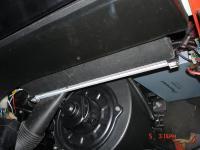
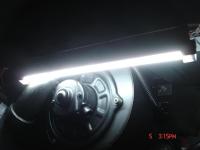
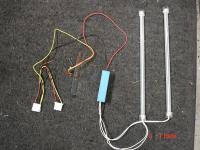
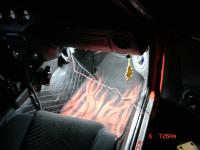
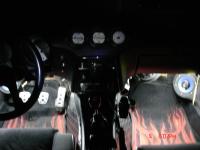
Being winter, it's dark sooner and longer than normal. So with that in mind, I really notice how dark the interior is when I drop my keys on the mat in front me. After digging for a minute and finally having to get out of the car and reach down to get the keys, I figure it's time for an upgrade. Some of you will like it and some of you won't. But the plain and simple truth is "The dome lights in these cars SUCK azz" So I got online and started looking for your basic 12 volt interior lights. this turned out to be Mission Impossible. So I used Goooogle to look deeper and found this site.... Directron.com and this link will take you directly to the lights in question. It's a Computer supply site and I found 12" (12 Volt DC) Cold Cathode Tube lights. Used to light up the inside of a computer case with a clear plastic side panel. The Cold Cathode tube only require 5.0ma which is practically nothing. The picture below will show before and after as well as cutting off the "T" plugs from the inverter that normally plug into the inside of the computer. They put off a Beautiful white light when placed under the dash. I mounted the first tube at the bootom back corner of the glove box, using the supplied Velcro that came with it. It sits just on the back corner but not on the down facing panel of the glove box. Out of site but able to light everything up. The blue inverter box sits in the dash area just above the radio. The wires from the inverter to the tubes are only about 12" each so the box has to be placed in the middle of the dash. **DO NOT CUT THE WHITE WIRES THAT GO TO THE TUBES** THEY ARE SPECIALTY HI VOLTAGE WIRES!! The drivers side was different. The tube sits on the upper side of the steering columnm, with the wired end touching the mid-section of the defrost tube and the other end just barely touching the curved dash support on the left of the steering column. So I Velcro'd the wired end to the plastic defrost tube and doubled up the Velcro on the other end to reach the dash support better. Best $15 I ever spent on lighting up a very dark interior. They sit low enough to even light the dark seats, just enough to make sure I don't end up with seat belt up my butt, AGAIN!! Here's the pics.. Dave. If you have any other lighting upgrades, please post them here, as the title of this forum should pop up when ever someone is looking for lighting options.


-
Speaking of Dome lights and not trying to Jack the thread BUT............ My dome light was giving crap as well. So I got into it and fixed it but started thinking "The dome lights in these cars SUCK azz" So I got on line and started looking for your basic 12 volt interior lights. this turned out to be Mission Impossible. So I used Goooogle to look deeper and found this site.... http://www.directron.com/clk12wt.html It's a Computer supply site and I found 12" 12VDC Cold Cathode Tube lights. Used to light up the inside of a computer case with a clear side panel. They only require 5.0Ma which is like Nothing, practically. The picture below will show before and after as well as cutting off the "T" plugs that normally plug into the inside of the computer. They put off a Beautiful white light when placed under the dash. I mounted the first tube at the bootom back corner of the glove box, using the supplied Velcro that came with it. It sits just on the back corner but not on the down facing panel of the glove box. Out of site but able to light everything up. The drivers side was different. The tube sits on the upper side of the steering columnm, with the wired end touching the defrost tube and the other end just barely touching the curved dash support on the left of the steering column. Best $15 I ever spent on lighting up a very dark interior. They sit low enough to even light the dark seats, just enough to make sure I don't end up with seat belt up my butt, AGAIN!!:tapemouth:eek: Here's the pics.. Dave.


-
It's on 3/30/08 at the Golden Gardens park in Seattle. Register at the park the day of the event. No real registration needed unless you want to enter to win a prize. It's more of a show-up-and-shine event. The usual rules apply like no showing off, burnouts etc. Just remember that the event is usually centered around SX and ZX as well as 350Z's and a lot of honda's and other imports. Lot of drifters, racers and plain old people wanting to check out others cars as well as show theirs off. Good event to just show up, park, meet new people and talk about your Z to the inexperienced import owner. Dave. Why don't all of the 240 and other S30 owners here on this site, who are going to go, write me and we'll all figure out where we can meet up and Convoy in together. Ithink that would be sweet and we'll definately get our fare share of looks. write me at wolfin32z@yahoo.com and we'll figure it out
-
Come on Bleach, you gotta help us increase the Z presence there this year. I'll be there unless something more important comes up. There were about 5 Z's there last year and I as well as many other would love to see a lot more there this year. IAN, All I was pretty much saying was "I gave you a HELL of a deal on the car" you could have at least kept me in mind or gave me first dibs on No Longer Needed parts. That's what I would have done, but then again, that's just me. Dave.
-
OK, so you tore the crap out of my old Z. Nice. But what did ya do with everything ya tore out? What are ya doing with the L28 and carbs that were in it? Seats? I spent some good money and time rebuilding those. Dash? Heater assembly? Dash Harness? Write me and let me know what's available if anything. If I knew you were gonna rip everything out, I would have done it for ya. I could always use spare stuff around here. By the way, that L28 I got from ya was trash. All the cooling ports and areas were rusted thru almost going thru th cylander walls and the block. Oh well. I could still use a decent L28 to rebuild though. Dave.
-
I'll actually have to agree with A7DZ on this one. It's all outlined in the statement ("You get what you pay for") I too have seen many a crappy job come out of Maaco and Earl Shibe BUT...... I have also seen some beautiful jobs come out of the same building. The nice ones were the ones who actually forked out real cash and weren't looking for that "Just paint the damn thing so I can sell it" Paint job. The statement holds true for about 80% of the shops in question. Some shops just plain old SUCK. but most will give ya what ya pay for. I was given a $4500 estimate on repairing all the dings and a top quality paint job on my 70'. And that was just a rough estimate on a walk around the Z. I got a $1500 estimate on repairing the damage and painting the new hood after that kid backed into me, from one shop. The other shop gave me a $3500 price and the same repairs but they included the high price for top quality work, baking the paint on, and rebuilding my cowl induction hood. I quess it all comes down to "How high do you want the quality to be, and how much are you willing to pay for that quality work?" Maaco can do a great job, but like any good shop, you gotta pay for it. Some shops won't do "quick, easy and cheap" But Maaco will cause there is money in it. You won't pay a "Big Shop" $300 to install an alternator but you'll fork out $50 for the mechanic next door to do it on his time. And he does quality work as well as quick, easy and cheap. See what I mean? Dave.
-
I met a lot of the guys a Canby last year (07') Maybe we'll have to get everone together again this year as well. Mine just rolled over 170,000 last night, After an 800 mile round trip to Roseburg, Oregon, yesterday. Does that count as low milage? It's low if you consider the average car is driven 15,000 a year. (those who work out of town, 5 days a week) Dave. Give me a call Jon.
-
This is what I found, Maybe there's a link in there to find out more. Dave. http://www.datrats.com.au/OS%20GIKEN%20ENGINES.htm
-
And a little more North Western would be nice for those who don't wanna travel 100's of miles away just for even a peek. I live 100 miles from Canada and LA and LV are too damn far. Something close would be great, Dave.
-
Hey Will, Me and Justin54321 are looking into making Clear Dome light covers to replace the cloudy white OEM covers, found on most S30's. Are you doing anything like this or did you even have plans? I ask because I'd rather see your clear lense then attemp it myself. Dave
-
Can't remember all that was mentioned on 9 other pages but here's what we got so far. I still do the LED taillight conversion for $250 LED sidemarkers on my car were the 1"x2.5" 12 LED markers found at the local KENWORTH (Big Rig) service center. about $8 per corner Dash lights are Ba9's and I personally used the "White Wide Angle Ba9's from www.superbriteleds.com I'm still working on (just haven't had time to complete the project) front LED marker/TS lights. I also now make the SCP Sidemarker Conversion Plugs for the 240Z's. It converts the sidemarkers to Turn Signal/Sidemarkers. PM me for more info MSA and Superbriteleds both sell an LED Dome light conversion kit for about $20 +/- That's all I got off the type of my head. Dave.
-
Just go to your local GoodWill or Value Village, or bargain (used stuff store) and grab a travel clock. I have one here if you can't find one at K-Mart or Fred Meyer. or whatever. Dave.
-
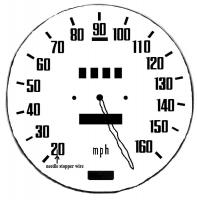
Thanks Arne, Itotally forgot about that too. I needed it posted because the early Z owners (69' to mid 71') don't have the option of a White face sticker because ours starts at 20MPH and MSA don't offer it. I obviously found out the hardway and had to make this one. I scanned it, and converted it to white without all the other writing on the gauge that can't normally be seen anyways. for those who want to, they can print this directly to card stock or a vinyl sticker for use on their early 240Z gauge. Dave.
-
Sure, just point your finger at the guy with the "BIG" picture. I hope ya washed it first. Yah, It was my fault. That was the smallest picture of the clock I had on hand. It was late and I did'nt have time to reduce the photo to a respectably smaller size. But on the other hand, I can totally tell how dirty the plastic is, now. Dave.
-
I attempted to buy one of the Michaels clocks and it was to big to fit in the 70 240Z clock shell. So I went to Value Village and grabbed 2) $2 travel clocks. I brought my 240Z clock shell into the store to make sure before purchasing them. They were totally different on the outside but upon getting them home and tearing each of them down, They were identical and from the same manufacturer. So I chose the one with black hands. I removered the seconds, minutes, hours and alarm set hand. I had to use the *Dremel* to remove the lip on the back of the 240Z clock face. After a test fit to make sure if fit nice and snug, I used some 2-sided tape to hold the clock to the back of the Datsun clocks face. After it was mounted using the tape, I found some very small, sharp screw to screw the face to the clocks black shell from the front. This makes sure that the clock will not fall off due to heat or the tape failing. The screws sit far enough to the outer portion of the face to not be seen when the clock is re-assembled. I then cleaned the face with rubbing alcohol, dried it with a blowdryer, then applied the MSA "White face gauge sticker to it. Rubbed out all the air bubbles and then re-installed the minute and hour hands. Then flipped it over and stripped some speaker wire to attach to the spring and tab for the battery. I then tied a knot in the wire about 3" away from the clock and slid the wire thru the time adjustment hole. *Please note that when I mounted the clock body to the face, I mounted it so that the time adjustment screw lined up with the hole on the case that was originally for the power wires of the OEM clock* I then went to Radio Shack and bought a single AA battery holder with 2" leads for about $1.50. Got it home and attached it to the speaker wires from the clock. *Make sure that the "Marked" or "Striped" speaker wire goes to the Positive tab on the clock* I set the clock and installed the battery. I was SO very sure of my swap that I wasted NO time to install the clock back in the car. I put the battery in the glovebox and walked away. I checked back 24 hours later and it was dead on the money, NOT a minute off. I figure it this way, I got a clock in the kitchen that has had the same AA battery in it for 2 years now. 1) At $4 for a 2 pack of AA's. That's $1.00 a year to replace the battery every 2 years. 2) the clock was only $2 3) it took a wopping 40 minutes to remove my 240Z clock, gut it, tear apart the travel clock, install it on the face, wire it, set it, install it and walk away. I also found that a dab of hot glue on the adjuster knob (on the inside of the clock) will allow you to adjust the clock like the Old stock unit. That was last month and it's still exactly set to my wrist watch, almost to the second. Not back for $6 and 40 minutes. For more info and to see the problems and solutions to the white face gauge kit from MSA, please look here.. http://www.classiczcars.com/forums/showthread.php?t=28936&highlight=Problem+MSA+white+face+gauge+kit Dave.
-
sounds like the back SU is running lean and the Previous owner cranked up the idle screw to compensate for it. reach under the rear carb and turn out the big knurled knob about 1/2 turn, to see how that feels. Also start checking all of your vaccum hoses for leaks and loose fittings. 10/30 is actually a little thick for the SU's but if you check the dipsticks on top, you'll barely see 2 small lines, keeping some 20 weight near the lower line will allow the SU's to react a little faster under acceleration. turn down the idle screws as you increase the fuel on the bottom half. Get yourself a flowmeter from the local auto parts store. Use the Search function here at the site. There has to be a couple hundred posts from the pros about ajustment. Good luck, Dave.
-
The usual thing about the ZX dizzy is it works, or it don't. You did'nt mention whether you changed the plugs or not. What kind of plugs are you running? It most likely (being a Datsun) should have NGK BP6es or similar plugs. Might be time for a new coil as well. Dave.
-
figure it this way Justin, $250 for the full kit, $12 for the tube of sealent, $20? for shipping totals out at about $285. Compare that with the man hours of repairing all the rust damage because the last owner did'nt replace the weatherstripping all the way around. It looks like next Saturday may be the day for all the cutting and welding of your battery tray, dog legs and lower door areas and the floor holes. My 9 year old turns 10 on the 11th but her party is on the 12th. I think I have aproval from the wife to work on yer Z that day. Dave.
-
Cesna Forum "Some old guy in a 240Z flew past me on the take-off strip today, and my wheels were already off the ground."
-
I thought about that too but 20 to 30 MPH off, not usually a condition on gearing or swaps. 5 to 10 MPH maybe. And I just reread the title "240Z speedo" Duh, sorry. anyways, this is what I meant about the resting needle placement.
-
The needle could have slipped. Is it a stock (unmollested) speedometer? I ask because I have white face gauges in my 70' and the speedo was off by 20 MPH after I did the face swap. This is where you need a friend to follow. Have your friend do EXACTLY 30 MPH. when he is doing that 30 MPH, have him put his hand out the window to let you know he's doing 30. Look at your guage and mark the speed your needle is at. roughly find out exactly how much it's off. now go home. If you can take out the gauge (2 wingnuts, the speedo cable, and the 4 bulbs) remove the 4 side screws, seperate the black housing from the metal gauge assembly. Use a flat head screw driver to push down on the small wire that stops the needle at 10 or 20 MPH, so that the needle can move past it's stopper wire. Note where the needle rests on it's own. Pull the needle straight up to remove it. Then put it back on about 20 MPH counter-clockwise. When I did mine, I had to put it back on so it would come to a rest half-way between the MPH font and the 160 font. When it's push on and resting where you think it should be, push the small wire back down again so you can slip the needle past it. let up on the wire and pull up on it a little so it's back where it should be. The speedo needle should now rest on the 10 or 20 MPH mark like usual. get back in the car, screw on the speedo cable without actually installing the gauge or reassembling the whole gauge. Take it for a test drive with the gauge sitting loose in the speedo hole. Have your friend do the 30 MPH again and see if you got it or if you need one final adjustment. The answer may be a whole lot easier than this but this is what I had to do to fix my own mistake. But like I said, the needle may have slipped and needs to be put back on correctly, by you. Good luck. Dave. By the way, what year Z is it. or is it even a Z?
-
just a quick insite on every 240Z, the key does NOT have to be on for the lights to operate. New cars-Yes. 240Z's-No. If the steering column cover is off, the white/red or the red/white 12 gauge wire should always have power, flip the headlights on and the other wire should get power. Anyways, the turn signal stalk is for switching the HI and LO beam (ground wires). The headlights each have a fuse in the fusebox in the upper right corner of the fusebox. Reddog929 was correct in the color of the wire for the headlights. The parking lights and sidemarkers, as well as the dash lights are all on the same circuit. and have almost nothing to do with the headlight circuit. Other than the fact that the combo switch controls them. Just make sure that the combo switch is getting power and the fuses are ok in the fusebox. Check the connections on the passenger side kick panel. The headlight wires are the only ones of the colors mentioned earlier in the upper passenger dash area. Start with the fusebox, then the combo swith, then the red and red/yellow wires at the headlight plugs in front of the radiator, also check to make sure that the hi/lo switch is getting a good ground and distributing that ground to the white/red and white/black wires on the white switch case on the T/S switch. by the way, the fusable links, if there are any left from the previous owner, are located on the starter to the large white wire going to the engine harness. The other should be on the alternators power output bolt to the other large white wire going to the engine harness. They should be about 5 inches each, and should both have a ring terminal and quick disconnect terminal (male or female) in a clear or blackened (by heat) rubber boot, to connect to the white power wire. hope some of this helps, It's late and I'm tired so I might have goofed, but I doubt it. Dave.