Zs-ondabrain
Free Member
-
Joined
-
Last visited
Everything posted by Zs-ondabrain
-

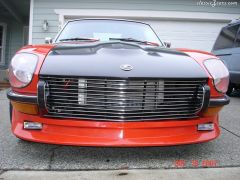 Thanks, I'm still not sure of what I'm gonna do though. Leave it black? just repaint it red? or go all out and make another cowl hood, like what was on there. Not sure yet....
 -
PLEASE DISREGARD THE DIAGRAMS ON POST #22!! The Diagrams on Post #22 are incorrect and have been modified to correct the Universal (J.C. Whitney) delay unit and the EQUUS 9030 delay unit. After installing these units into my 240Z and Justin54321's 72' 240Z. I discovered a flaw in the Diagrams. Because of my "PARK" relay, their instructions do not apply. So I have modified the diagrams to show the correct wiring of those 2 units. Not having installed the HELLA unit as of yet, I can not be sure if it is correct or not. So I changed the HELLA diagram to what I think will be correct. J C Whitney delay diagram for Honda upgrade 1mb.bmp EQUUS 9030 wiper delay full diagram under 1mb.bmp HELLA wiper delay unit into 240Z with Honda under 1mb.bmp
-
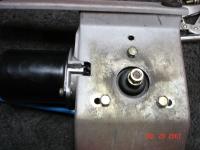
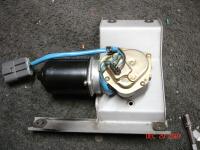
The 91' Honda Civic has the correct motor but here's a few shots to help get the correct motor. The motor on the right is the Honda motor. When you get the motor home, hold them side by side. the slots on the shaft should be aimed the same way. ( / ) ( / ) When you find the correct motor at the yard, save the 3 bolts and the washer and nut from the motors shaft. Dave.
-
I had to HUNT as well. Kept finding those "Spider legged" motors. Takes some time to find the right ones. I think I'll make an extra trip to the Pull a Part just to do research on the motors and what cars they are available in. *UPDATE* on the Delay unit instal. Good News!! It turns out that when you instal the honda wiper motor and MY relay set-up to allow the Motor to "Park", the delay unit only needs to put out a 1 second ground to the blue/white wire. Delay units already put out a timed 1 second pulse, The instructions call for you to "CUT the Low speed wire, put the COM wire towards the motor and the N/C wire to the switch side of the cut wire" BUT...... it turns out that the way I designed the relay set-up will allow a simple 1 second grounding of the Park wire to give an intermittent wipe. Vholaa, intermittent wipers. Most or Every delay unit that I've come across is huge or at the very least, a severely ugly hunk of plastic to try and find a place for in the Z, that allows access for the driver to operate the delay unit. And now the GOOD NEWS!.... Good news is that the delay unit can be turned on and set for a specific timing (2 to 20 wipes per minute) then tucked under the dash, out of site. THEN run the power wire of the delay unit thru a small 12 volt switch and back to the ACC. wire on the ignition, and install the small switch within reach of the driver. When you flip the switch on, there may be a slight delay of up to 5 seconds but it'll do 1 wipe and set back to park, then wipe according to your setting of the delay switch.. Pretty damn cool. HUH? Just remember to shut the switch off before normal operation of the wipers (Low or Hi) Dave.
-
Sweet, You ROCK Will!! I'll take 6 terminal boots for the fusable links on the starter and Alternator. I need to redo mine and 2 of "ZUP"s engine harness's that I'm rebuilding for him. And I'd also like to start making "TRUE" early 240Z Fusable links, with the male 10mm terminal (that seems to be like "Mission Impossible" to find) and the clear boot over it. Thanks again Will, Dave.
-
Here's one for ya Will, Do you have a lead on the clear rubber terminal boots for the alternator and starter fusable links? In rebuilding the harness's for a few people, I've notice that EVERY Boot is now blackened from electrical heat. I've even seen them totally black from almost catching on fire. I'd love at least a dozen to start with. And have you thought about the Chromed trim piece on the 240Z taillights. I ask because in doing the LED conversions, I've come across some trim that literally dissentigrates in your hands, from heat, exhaust gasses and UV brakdown. Dave.
-
Toss the Converter, Get a front diff mount from MSA or ANY of the other suppliers mentioned on this site. As for the oil pressure, As long as the oil is inbetween the "HI and LO" marks on the dipstick, you should be fine. Just rememeber that the car is 25 years old and the Oil Pressure gauge could be worn out (it happens) and may need to be replaced. Look for another or aftermarket oil pressure gauge, and try that before making a big deal out of the possible Bad oil pressure. Not a bad idea to do a pressure test on each cylinder, just for the hell of it. Dave.
-
Don't forget your after Christmas gifts..... Can't wait to meet ya and get that stuff in the Z with ya.. The wife still won't tell me what she got for me, supposedly it's in the mail and should be here by Friday. She keeps teasing me about it with the old "Neener Neener Neeeener, I know what ya go-oot" Drives me fricken nuts, but we'll see on friday. DEESZ, let us know how everything turns out when ya get all those upgrades on the car. Happy to help and Merry Christmas to all my past and current customers, You've all made the last few years of building the upgrades for the 240Z's, a pleasure. I can't remember another time in my life where I was this happy working my butt off for other people. The compliments, great reviews, word of mouth advertising and all the calls and E-mails have made it all worth it. Thanks again to EVERYONE on this site for the last 4+ years of Great info and friends. Dave.
-
So I had some time and found my wiper delay unit from years ago, that never got installed. Now that I figured out the whole relay for the park circuit thing, I attempted to install the Delay unit, with success. So here are three wiring diagrams for the HELLA delay unit (HL87200) , AQUUS 9030 delay unit (I think I got it from Schucks Auto Supply), and a universal drawing for other makes of delay units. On the instructions for your particular delay unit, it should show you which wires are (COM) (N/O) and (N/C). These wires are pointed out on the Universal drawing. (COM) to the motor, (N/C) to the switch, and (N/O) to the Park wire (Blue/white wire) If that not park it correctly, use an IN4001 diode from the Blue Datsun wire to the Blue/white "Park" wire, with the stripe on the diode facing the blue (low speed) wire. And cut the (N/O) wire and tape it off. If you have any questions regarding the delay unit into your 240Z with the 91' Honda Civic or 94 Accord wiper motor upgrade with my Park relay, please PM me here or at my email address below. Dave. EQUUS 9030 wiper delay full diagram under 1mb.bmp Universal delay diagram with switch and relay under 1mb.bmp HELLA wiper delay unit into 240Z with Honda under 1mb.bmp
-
First thing first, When you pull the door panel, DON"T mess withthe window. But rather grab a flashlight and inspect the inside bottom of the door for loose nuts, bolts or washers. Then start looking for where it came from. The window is jambing for some reason and it's probably a loose nut or bolt. Let us know what ya find. Dave.
-
Like I said, Higher Octane fuel and retard the timing a little. That should do it. Let us know what happens. Dave
-
On the 1st, As usual, you are correct in the fact that 27 years ago, my wipers slid across a dry window without fail. When I tore mine apart 4 years ago, I completely rebuilt the linkage by using degreasers and other grease and gunk removing chemicals to make sure there was a blank canvas to start rebuilding. I regrease with a white lithium cause it's light weight, sprays into all crevises and waterproof. Everything moved like a hot knife thru butter. I then completely rebuilt the motor and tranny by once again removing every bit of old grease and gunk that could possibly hinder performance or movement. Every contact was cleaned, every gear regreased, every contact rebent or fixed fixed for optimum performance. So after COMPLETELY rebuilding everything in the wiper system, it moved nicer, quieter, and stronger. BUT, not strong enough. I ran a NEW power and ground directly from the battery, and ran thru the speeds using good grounds and tested all movement compared to stock wiring. The change was little if any. So in final, The combination of 33 years (at the time) old gearing technology and old old wiring, the facts are as simple as this.... The 16 year old Honda motor has experience on it's side, a better wound motor, more torque and less ampearge use. on the 2nd, Yes, it is that much stronger/ more powerful. And yes, the Honda motor (in my experience and opinion) has better gearing and motor performance due to years of experience. I do not personally know the Amperage draw of each motor (Honda/Datsun) but I CAN tell you that the wiper related wires do NOT get as hot, as quick, with the Honda motor in , as compared to the datsun Motor. Fact. SO that tells me that the Honda draws less amperage than the Datsun motor. On the third, (3.1) The shaft of the Honda motor is similar but not Identical. It's a little smaller in diameter and width, but still slides into the Datsun arm with little play. Part 3.2....The motors and transmissions are NOT interchangable. The Honda motor is smaller and its main shaft is also a different diameter and won't interchange with the datsun drive gear. So in final, The Honda motor is just plain better, better use of gearing, better use of power and amperage, not as old and worn due to twice as many years on the job like the Datsun Motor. Just like any upgrade, it's done because of wanting something better, newer or up to date technology, etc. The upgrade is only for those who want to spend 1 hour upgrading their wipers to a more modern approach or solution. But if they wanna completely rebuild their OEM equipment and find a small improvement, that's totally up to them. It's all about personal choice.
-
Just a quick update, I just did a 94 Accord motor into a 72' 240Z. The problem with the 94 is not wiring or mounting but rather the shaft has to be ground down to fit the keyhole shape of the 240Z's wiper linkage. The problem with this is the way the linkage works, it has to be cut at an exact angle. I drew on a pic of the 94 so you can see what I mean. If you set the motor on it's end, with the gears pointing up, the motor needs to ran and use my harness to get the motor to PARK, then mark a line from the upper right mount to the center of the motors shaft. That is the angle that it needs to be cut at. Remove a little material at a time, test fit on the wiper linkage, remove a little more, etc, etc. remove material 9/16" down the shaft. This will give enough room for the linkage, lock washer, and the nut. Once again, the 91' civic is ALREADY cut at this angle and will slide into the Datsun wiper linkage with NO alteration And that's why I chose the 91 instead of the 94. The 94 Accord will work as well but need modification at an exact angle. Dave.

-
If you get it to work in the 280, post the results and findings and any changes compared to the 240Z upgrade. As for the second harness that is available. You'd need a honda motor with a long harness attached to the motor. I will be making these to each persons specs, (with or without Datsun plug, with or without Honda plug, length of wires per side) and they will start at $35.00 if you're interested, DO NOT request here on this forum, but rather via PM or my email below, in my signiture. I'm trying to keep my word with Mike and not get called a spammer again. Even though the full description and diagrams are here and can easily be done by Z car owners, I will make them for those not up to the challenge of "Do It Yourself" Dave.
-
Is it Deisel'ing or just running as if you did'nt even shut the Key off? If it's deiseling, go with a higher Octane fuel and retard your timing a little. If you did an alternator upgrade (280ZX alternator upgrade) and did'nt use a diode or My ZXP adaptor, it'll keep running cause the alternator is supplying the ignition with power from the lack of the diode. The other possibilities are sticky ignition switch or bad diode in your Voltage regulator. Wiggle the key after shutting the car off to see if it's the switch. If not, replace the Voltage regulator and see if that works. Good luck and let us know how it turns out. Dave.
-
See there, now I'm gonna have to argue with ya on this one. Just remove the wiper arms, run the motor, let it park or stop, re-attach the arms and you're done, Come on over, I'll show ya exactly what I mean. Dave.
-
That's what I'm trying to find out. Look at the motor and compare it to the mounting chassic and the wires. If they are the same wires, mounts and shaft then YES, it'll work. Just use some (Female quick disconnect) connectors to jump your Datsun plug into the honda wires and test it out. that's the easiest way to find out and also what I did the first time. I wasn't about to cut into my harness to find out if it worked or not. Try the 89' first. Dave.
-
You don't have to cut at the shaft on the 91' Honda Civic wiper motor. It's shaped the same as the Datsun motor shaft (slice from each side of the shaft with the nut grabbing 1/3 of the shaft) That's why I chose the 91' motor instead of the 94' Accord, you have to cut the 94' shaft and it's much bigger (10+mm i think) Dave. This is the adaptor I made for mine, I actually built 2 of them, one for mine and one for sale. But it has the Honda plug that mates to the Honda wiper motor so you MUST have the plug still on your Honda wiper motor. $35
-
I believe it will but I'd check wire colors and mounting plate for comparison. Check the above link to the forum on Hybrid for a little more clarity, lots of 280Z's over there and I'm sure someone has done one in a 280Z. You're quite welcome Ken, let us know when ya do and post your results. Thanks Mike, (Pop's Z) I'm already looking into it, I have access to the black box's, relays, and Datsun Plug and colored wires but I've yet to find a source for the Honda plug, other than the junk yard or Pull-A-Part. If I were to make a harness with the Datsun plug - black project box - wires and Butt connectors for the buyer to easily "Crimp" the adaptor harness to the connectorless Honda wiper motor harness, it would be a breeze to make and I'd have to charge at least $35 for the adaptor harness (without the Honda plug. I would also do my best to find a firewall boot to keep it looking stock or at least clean up the hole. ART.... If you need any other info, keep your eye on this forum and the one over at HybridZ (mentioned above) BARTH45657.... HO-HO-HO but seriously, I weigh about 130 on a good day so I'm too damn small to be Santa, But I appreciate the metaphor. Dave.
-
there should be a fusable link between the starter and the engine harness. Use an OHM's meter to make sure it's still good. Snug up the starter wire and make sure ALL of your grounds are tight and making good contact. The main ground wire should be to the right of the starter, above the engine harness, pull it grind the metal and re-attach it. That should give you a start on the road to recovery. Can't tell ya too much without the Year of Z you have. what year is it? Good luck, Dave.
-
All you had to do was remove the wipers, run the motor once and let it Park, then re-install the wipers. That way the motor is set at park and the wipers are too. Simple. See there, you keep complicating it, silly. No big deal though. Glad to hear it works though, Dave.
-
Did ya look at this one? http://www.classiczcars.com/forums/showthread.php?t=25857&highlight=fuel+tank+lines By the way, did ya wire up that harness for the wipers yet? If so, did it work? let me know what's up. Dave
-
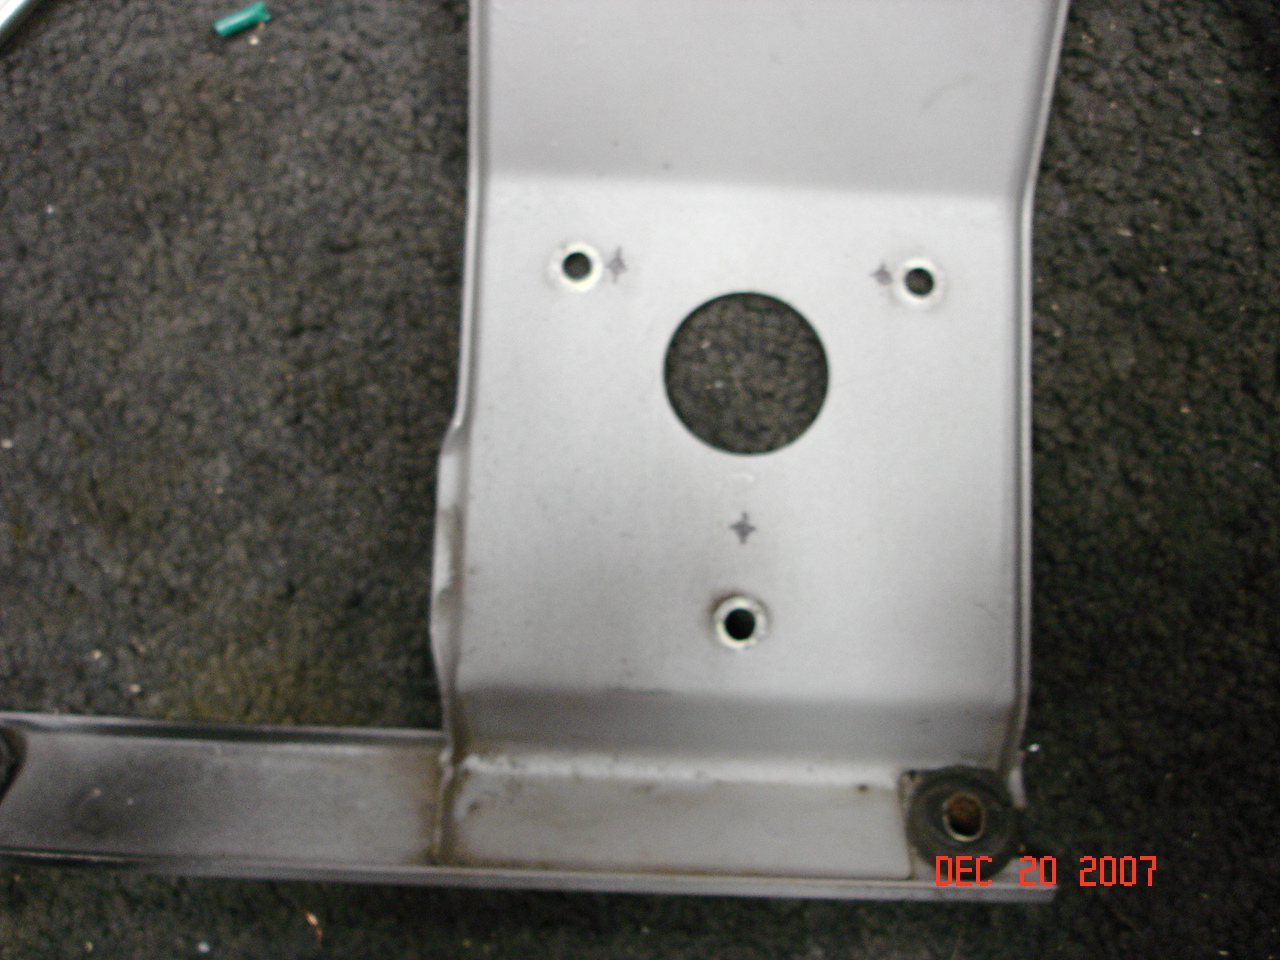
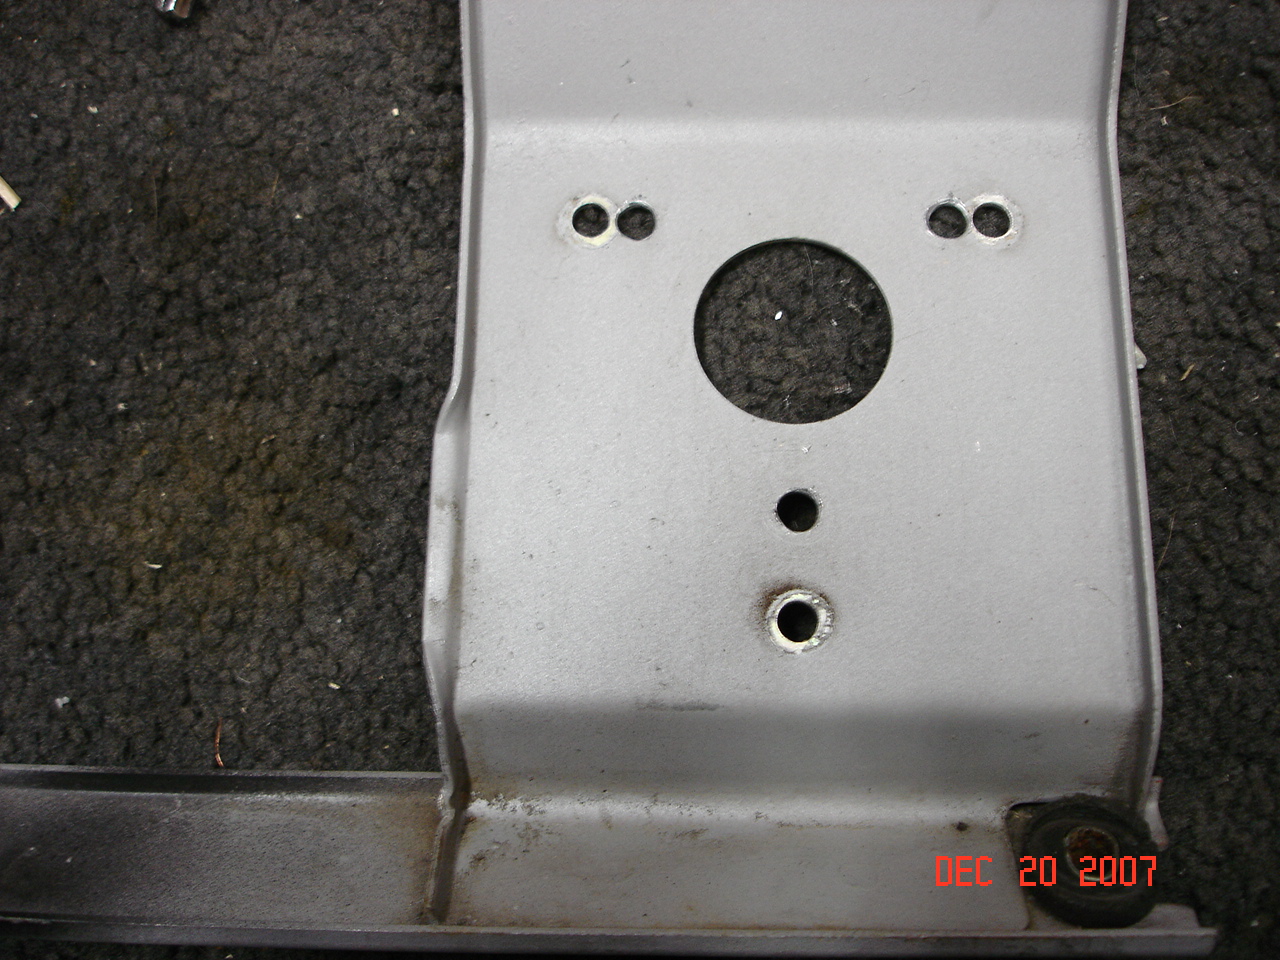
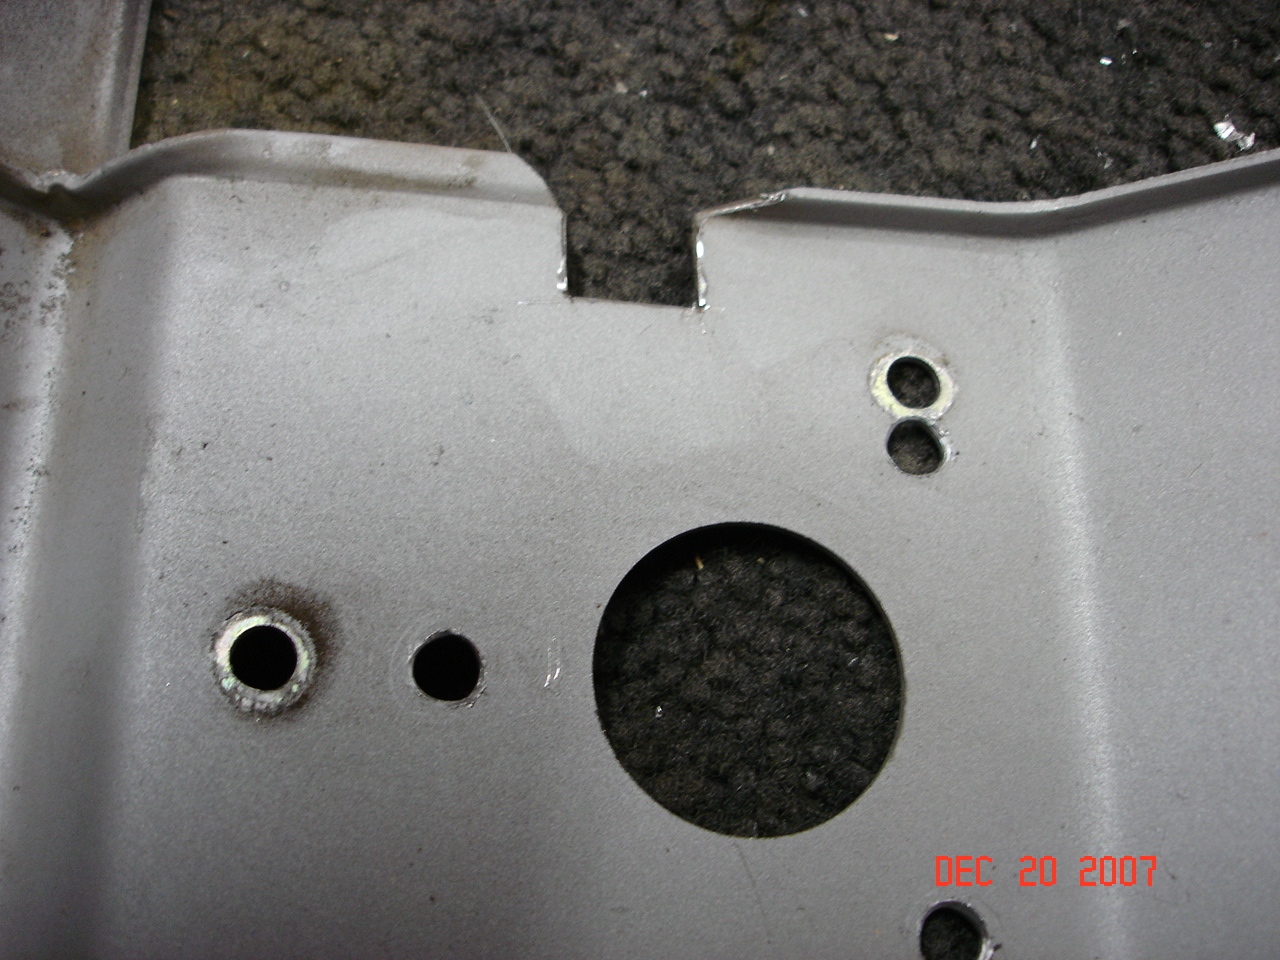
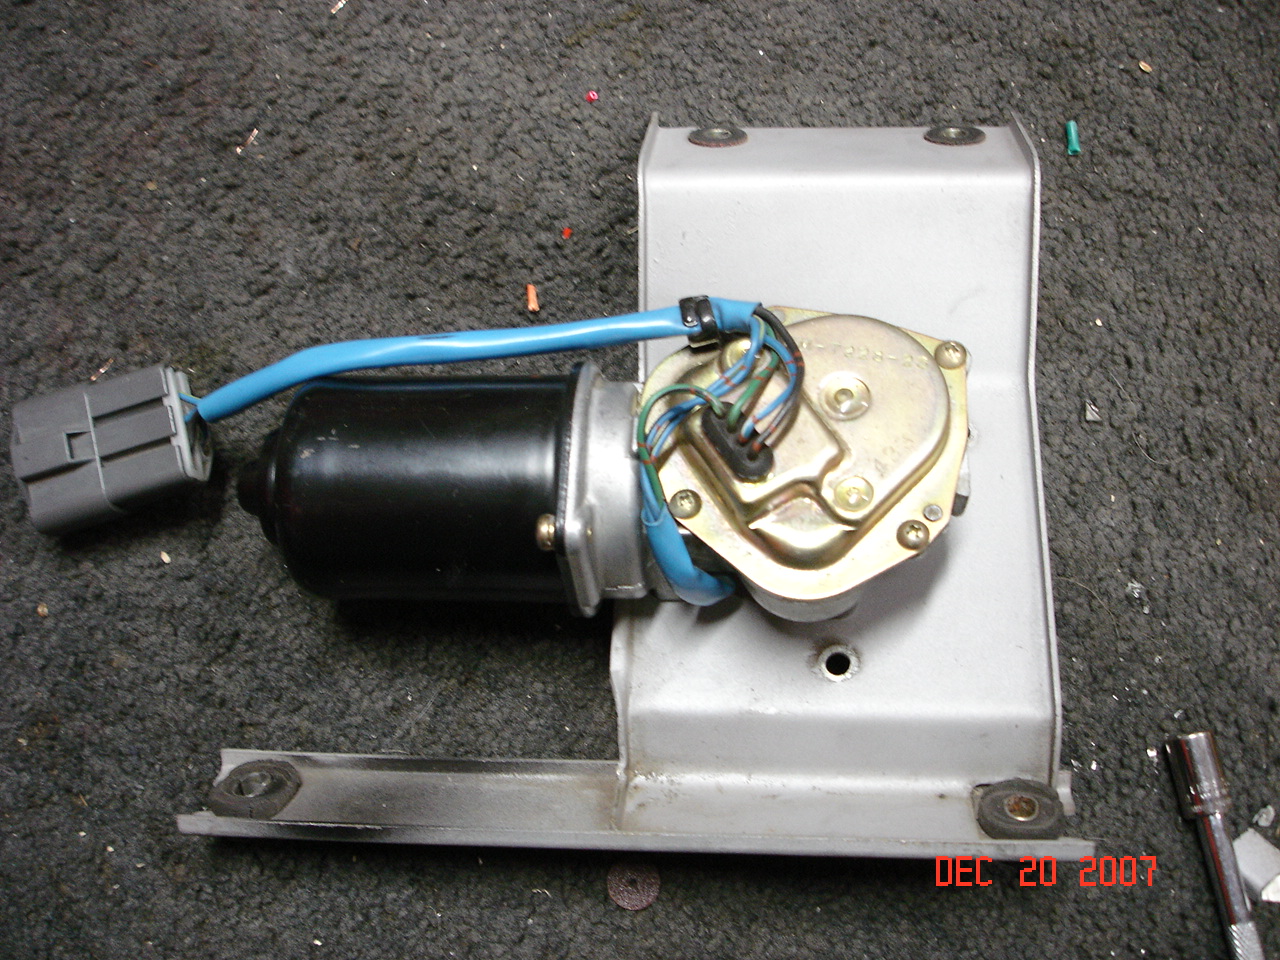
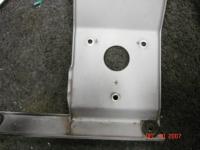
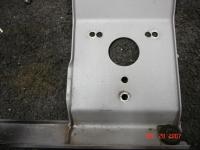
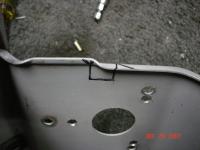
Tired of the old SLOW and Tired wipers on your 240Z? Ya, Me too. SO I did some research on the subject over at HybridZ and found that for a few years now, people have been trying to use the 94' Accord and 91' Civic wiper motors as a replacement to the Datsun wiper motor that ONLY like to move if the window is WET... So I read every thread and post on the subject to find out as much as possible. All I found was pictures and posts by people saying that "it works great BUT..... The wiper does'nt PARK when you turn the switch to OFF. You have to shut the wiper switch off at the EXACT moment to get the blades to sit in the usual DOWN position. So I went to the junk yard and pulled a 91' Honda Civic wiper motor, brought it home and tore the gear/contact cover off to find what made it click and Also to find why nobody, after 4 years, could get the wiper to "PARK" I wrote everything down that I saw, put it back together and studied the their wiring diagrams and my diagrams. So I wire up the wiper the way everyone else had been doing it for a few years and started tesing each and every wire. I discovered what they had missed and decided to wire up a relay, the way I thought it should be, to get the wipers to "PARK" and then gave it some power. Slow speed worked great, high speed worked even better. So I kicked it back down to slow then crossed my fingers and turn the switch off. It spun a little before the relay kicked in, then it finished it's rotation and stopped exactly where it should have. So I did it a bunch of times and it stopped in the exact same spot every time. So in other words, I seem to have fixed the problem that plagued people who have done the conversion before. Below is everything you'll need to know about putting in a 91' Honda Civic wiper motor into your 240Z. I've done the conversion and it's FRICKEN AWESOME!!! The first time I tried the wipers was in my garage on a DRY window with NEW wiper blades. I made a video of it for any unbelievers and also to show how the OFF position Parks the blades at the end of the rotation. So here's some more good news, the Datsun wiper motor mounting screws work on the Honda motor AND the Datsun wiper arm bracket will slide right onto the Honda motor shaft without modification. When you go to the Pull-A-Part, SAVE THE BOLTS and the NUT & WASHER. If you buy the motor at the Auto Parts Store, it will NOT normally come with bolts or the bracket mounting nut. Here is the Short list of needed items....... 1) 91' Honda wiper motor (make sure to unplug the motor and also remove the female end from the honda with at least 6 to 8 inches of wire past the female plug, you'll need the female end if you wanna make a custom adaptor type harness) I paid $6.50 at the local Pull-A-Part, Schucks Auto Supply wanted about $100. Go Used. 1) 20/30 amp 12 volt relay from the auto parts store (usually about $5.00) 1) 6-terminal Datsun Plug (exactly like the one on your Datsun wiper motor, or Voltage regulator or pre 3/73' Combo switch on the harness side. I sell these and the terminals if you would like to make a brand new adaptor for your conversion The other possibility is to Cut off your plug and wires from your Datsun Wiper motor, it's up to you. You can even Hard wire the Honda motor in if you'd like. 70' Datsun 240Z __________________ 91' Honda civic wiper motor blue/white-------pin 86 ________ Pin 87A-------blue/white blue-------------pin 87 ________ pin 30--------blue Blue/red-----------pin 85-------pin 85----------green/black Black----------------------to------------------black Blue/yellow----------------to-------------------blue/yellow ________________________________________________________ Here are the pics for drilling the Datsun wiper Plate, notching the plate to seat the Honda motor correctly, and that's it. 5 small cuts, 3 small holes. If you have any questions and don't mind reading alot more, check out this link for every single detail. http://forums.hybridz.org/showthread.php?t=82292 After the New Honda Motor is installed in your Z, turn the wipers on once or twice to 1) Make sure the motor is working correctly and running and 2) to Park the wiper studs in the right position before installing the wiper blades. Feel free to ask questions here, post results, share added info (other years and models of Honda wiper motors that are identical etc.) Dave. Datsun to Honda wiper diagram.bmp This post has been promoted to an article

-
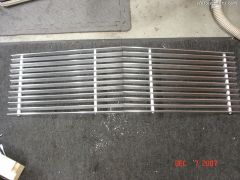 cost $45 in supplies and a butt load of time. It does look awesome when it's polished but it's too difficult to keep that way without sealer. 3/4" X 1/8" aluminum slats are $7 each for the 12 footers. The "C" channel is $7 for an 8 footer and I only used under 4 feet. All materials were available at the local Co-Op and also at the Local metal supply warehouse. I got mine at Everett Steel in Everett, WA. It was only 10 minutes away from me. Dave.
 -
White face gauge kit paint the back side of each gauge face metal plate Chrome (spray paint chrome-auto parts store) My parking light upgrade harness (does'nt make these LED's that much brighter but sure helps everything else) http://superbriteleds.com/ the BA9S white wide angle LED's(100 degree viewing angle)