


Zs-ondabrain
Free Member
-
Joined
-
Last visited
Everything posted by Zs-ondabrain
-
 O.K. lets try this one and EVERYBODY say thank you to Enigma for his hard work
 -
Attention! I have two or three people working on getting it all on here properly so every one can read it. Patience my good people, Patience! (my momma always said "Good things come to those who wait") so breath and relax, Damnit!:classic: :classic: Dave.
-
I'll try to get the rest on here as soon as possible, thanks again for your patience, Dave.
-
O.k. N.w.cubsman Converted It For Me So Hopefully All Of You Can Get Or Read This.
-
here a link to a new forum that has some of the updated instructions on it, we're working on getting a full detailed list of every thing you need to know for the harness onto this forum or thread. http://www.classiczcars.com/forums/showthread.php?t=19934&highlight=headlight+harness
-
Gogriz91 - Glad to hear it and good idea. If you or any one can figure a way to get a 7.73 mb page with 10 pics on to this or any other same subject forum, We'd all be greatly appreciative. I'll E-mail it to who-ever wants it or can get it onto this or any of the other same subject forums/threads. The page is just 10 pics of parts and techniques with the Fig # written above the picture, its in ''word'' format. Dave.
-
You'll have to forgive my lack of getting things done around here but if you had any idea of the crap that I've put up with this month, you'd understand. Here's what I got so far......and if anybody can tell me how to put a one page "word" document (7.73 MB)with pictures on here, I'll show you the "Figs." that the instructions refer to. The uploader only allows for 1 MB.
-
Oh thats just cheatingLOL But seriously, what about parts that have rubber perminately attached, like the upper front strut assembly that houses the strut bearing and bolts to the body? Or the lower lower control arm, if you plan on not converting to poli-urethane bushings? Thought i'd burst your bubbleLOL
-
All good suggestions so far, and here's my 2 cents worth. As for getting to bare metal to do it right, I started by scraping off years of gunk and grease, dust, and dirt with a standard 1 inch metal (flexible) scraper or some people call it a putty knife. Next I used a wire brush for all the corners and grooves and loose dirt and such. Then I used a degreaser (like GUNK ) which makes it easy considering all you do is spray it from the can, wait ten minutes, wire brush the part to make sure every thing got loose, then spray it off with the garden hose. As for stripping paint, the best stuff I ever found was a product called Mar-Hyde Tal-Strip II. It's an aircraft coating remover in a 15 oz. spray can. It's safe enough for aluminum but rips thru paint crazy. Takes a couple of minutes but you'll be happy with the results. Wipe the paint off with a wet cloth (wear the heavy dish washing gloves from the super market) wipe again to get it all off and most of the time it only takes one regular coat. If you have an air compressor, GET A MEDIA BLASTER!!! mine only cost my $80.00 at Harbour Freight Tools, Get the Aluminum Oxide media for about $20 for 30 pounds worth. That enough to last you quite a while. Months in a small blasting cabinet. Aluminum Oxide will remove paint, rust, por-15, tar or what ever is in the way, with out distorting the metal or hurting it. It take a little practice, but I guarentee you'll be happy with what you can do with it. When priming almost any metal, use a (Metal-Etching Primer) It chemically adheres itself thru use of an etching acid) to the metal which helps keep it on there much better than regular primer. thru use of the blasting cabinet, you'll most likely eliminate all the rust and won't have to use a rust converting primer. Every piece will most likely require a different process of prep to get the desired look that you're going for Brake calipers can get VERY HOT. There are many Paints that are specifically made for drums and calipers. They are usually HI-TEMP (800 to 1200 degree) and chemical resistant to keep your brake fluid from eating it back off when bleeding the brakes. The best one I found was from VHT. it cost a little more but remember that you get what you pay for. Visit my galley for all the update pics of the front and rear suspension work that I JUST got done with. Your main concern is to keep the rust from coming back. So if you like the shiny surface that the wire wheel makes on a freshly sandblasted bolt. Clear coat it with a hi-temp engine clearcoat from Duplicolor. it's an enamal with ceramic in the paint so it will hold up to the heat and stay clear without yellowing like most clear coats. Good luck, Dave.
-
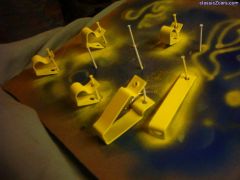 Mike, I just cleaned them with gasoline to remove all the overspray, tar, grease and oil. I use an eagle-1 product to make the rubber look new. I believe it was Tire dressing oil. the finished product looks brand new and shiny. Kenny, I use the Eastwood zinc electro-plating system before the yellow paint. it coats it with zinc to keep the rust at bay.
 -
Enrique, No offence given and none taken but DUH! I'm not talking fricken HOT, I'm talking at least room temperature or above. I obviously did'nt look to see where "Schevets" lives or take in to account that he may actually have a "real shop", as compared to mine. But I was thinking about the fact that it is winter around here. My garage when the heater isn't on gets to be about 40 degrees or less. And even NEW undercoating will get brittle as the temperature drops. If any one on this site would have an understanding of how finicky I am or my complex understanding of how things work, especially on a Z, I thought it be you. As for the POR-15, I still don't quite understand why a lot of you are putting it on, then undercoating. Undercoating, when applied to a clean, bare metal surface will protect the car from rusting. Thats why the factories do it that way. And they don't use POR first. call me silly but it seems to worked for them for the last umpteen decades. Obviously you guys have a way of doing things that I've yet to understand. I DO use POR-15 on metal that needs to be protected but will not have undercoating applied such as my control arms and strut assemblies, as you've most likely seen from the pictures I posted the other day. I think that POR-15 is a great product! Hell, I use it myself. But when you're on a budget as I usually am, You don't think about covering a great product like POR-15 with a cheaper product like undercoating. Like I said earlier, "no offence taken, none given". We were both obviously looking at different sides of the coin.
-
It's been my experience that if you undercoat or use a truck bed coating over paint, the paint can still chip off and take the undercoating with it. Strangely enough, thats actually how I removed all the old undercoating on the underside of my Z. The P.O. or some one else had sprayed undercoating ontop of the existing paint. When I tapped it with a sharp hammer, bits and chunks came flying off at me. It was cold in my garage when I did it so keep that in mind if you decide to remove undercoating. If you want to remove dents with out removing undercoating, make sure that the surface of the panel is warm or even hot before you bang on it. I have NO rust in or on my floorboards and plan to keep it that way. Good luck, Dave
-
I'm still deciding on whether to undercoat the rest of the floor pans until I get rid of a few inward dents. ( I think the P.O. used the car for stump jumping or something) the passenger side has one big lump on the inside floorboard, I think he might have tried to jack the car up from the end of the frame rail (just forward of the seat)
-
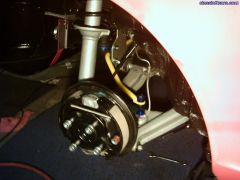
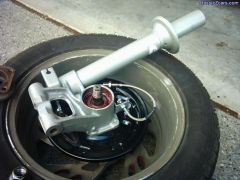 I used the tire with 2 people standing on it to get the 185+ LBS of torque on the nut (this is the best way to NOT harm the studs or the assembly)
 -
 all new bearings, grease, seals, stub axles (mine were bent) paint and por-15 with a 2-part epoxy clearcoat
 -
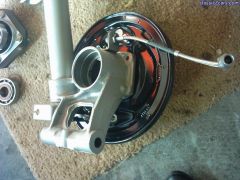
 I cant believe how long it took to get to this point yet how fast it's going back together
 -
 I still need my 280 mustache bar for the R-200 swap, the two stub axle flanges for the CV joint swap (out of an 83') Every bushing has been replaced with poli-urathane bushings and almost every thing has been sandblasted, stripped, repainted, recoated, or plated of some kind
 -
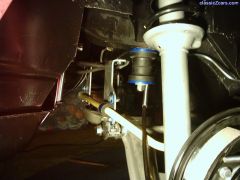
 unfortunately, I don't know if the red stock color will stay on too much longer, I'm thinking of a "Pearl Metallic Blue" with a candy coat of some kind for the outer shell
 -
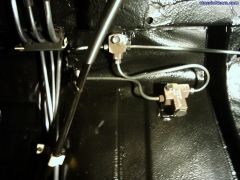 All brass was polished, lines were cleaned, and every thing was clearcoated to keep it looking that way.
 -
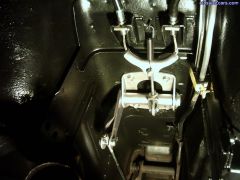 stripped, painted, and reinstalled after undercoating the underside
 -
 I used the tire with 2 people standing on it to get the 185+ LBS of torque on the nut (this is the best way to NOT harm the studs or the assembly)
 -
 all new bearings, grease, seals, stub axles (mine were bent) paint and por-15 with a 2-part epoxy clearcoat
 -
 I cant believe how long it took to get to this point yet how fast it's going back together
 -
 I still need my 280 mustache bar for the R-200 swap, the two stub axle flanges for the CV joint swap (out of an 83') Every bushing has been replaced with poli-urathane bushings and almost every thing has been sandblasted, stripped, repainted, recoated, or plated of some kind
 -
 unfortunately, I don't know if the red stock color will stay on too much longer, I'm thinking of a "Pearl Metallic Blue" with a candy coat of some kind for the outer shell