Zs-ondabrain
Free Member
-
Joined
-
Last visited
Everything posted by Zs-ondabrain
-
 And along comes Ben.... :stupid: Just make sure it's got a good head gasket on the new motor. Ask Ben what that's all about.... I'd say #400 has potential. Hell, I took a 15 year squater and turned it into a great Daily driver that needs minor body work to be a solid 8/10 How bad could #400 be. A little TLC here and there and it can be a Great car, with a faily low Vin. As compared to the Thousands of 240Z's still out there. JMHO Dave
 -
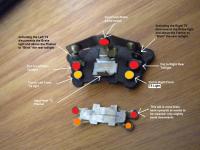
The right side wires are Green/black for the front right and white/red for the rear. The left side wires are green/red for the front left and white/black for the rear. Your diagram doesn't usually show the switch wires, but usually shows the wires up to that connection. The Green wire (center of the turn signal switch = Flasher) connects to a WHITE wire that goes directly to the flasher under the dash. You should be able to find the white wire on the diagram and the other wire on the flasher module is green. That green wire on the T/S flasher goes to the hazard switch and then to the fusebox. Hope that helps. Dave
-
"We re greased" all his ball joint throttle linkages. much smoother pedal responce. So we also threw the compression checker on my 240Z with the new 260Z motor and pulled a 190 average when we wet the cylinder with PB Blaster. Yeah me!! Back to Tylers thread...... Let us know how it starts up tomorrow when you fire it up in the morning. go to bed, 5am comes fast. Want me to save you a Krispy Kreme? Still got plenty. Hey James, the kids said "Thanks James" You'd think they never had a damn doughnut before. Dave
-
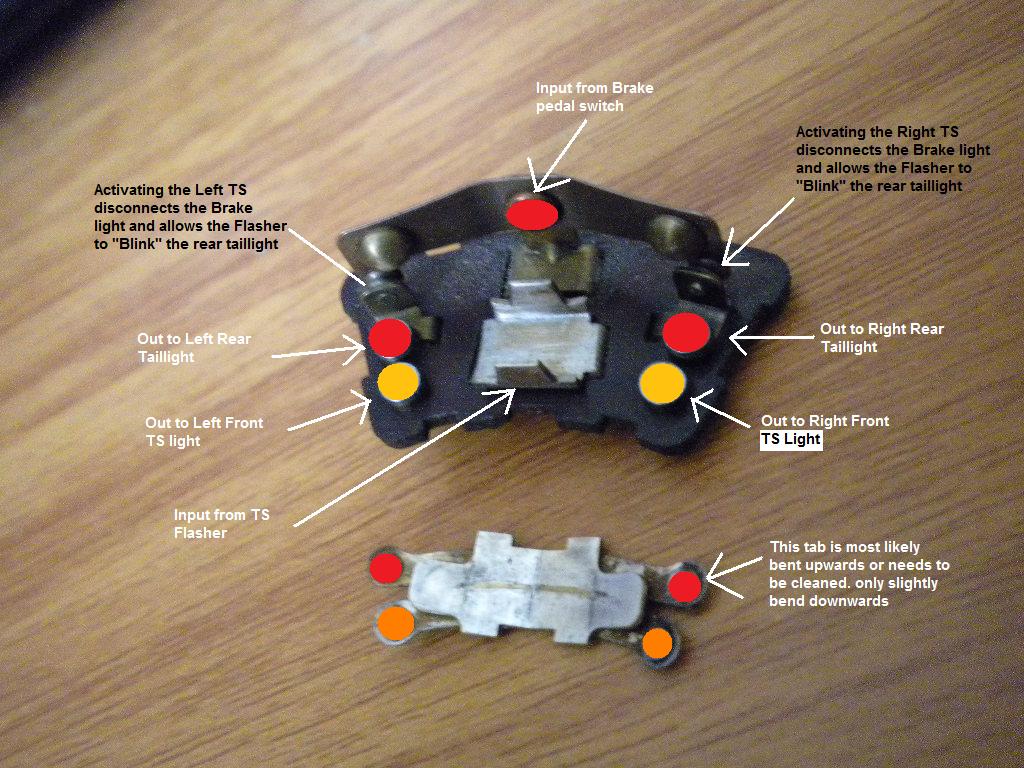
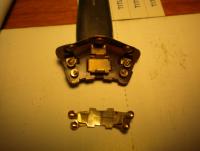
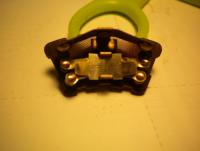
Sounds more like a bulb or connection issue in the front, rather than a switch issue. The RR and RF turn signal are connected together inside the TS switch when you activate the Right turn signal. So if you're activating a right turn via the switch, both RR and RF (green/black and white/Red) should show the same voltage and signal (+) I've attached a few pictures of the Inside of a Turn signal switch. As it sits in the pictures, you'll see what contact goe to what corner of the car. When you activate the turn signal, the brake light contact disconnects from the rear contact, so the t/s can go thru that same contact and blink with the front light of the same side. The first picture was written on for another customer, who had no rear turn signal but everything else worked fine. He rebent the tab correctly and all was good. let me know if this helps and if you need the switch needs to be rebuilt. It's what I do. Dave
-
Mostly You, and the others who are off track on the thread. I click on a thread to become hopefully educated on an early Z that is For Sale on Craigslist, Instead, I end up clicking thru the clutter of a bunch of bitching about who's right and who's wrong. So I ask myself, "What the Fucque does that have to do with the #400 Z on Craigslist?" And instead of just getting back on track or just walking away, You're right back looking for another fight? Who the hell cares about who it's about. Just get on with the thread. and grow up.
-
As soon as you're done bitching like a little girl, WE can get back on the Subject. Nuff said? Quitcherbitchen
-
where in Washington are you?
-
not the first time I've heard that about BD. Dave
-
Then why have I only had 1 email about it? Guess it's Craigslist time. Dave
-
Not that difficult if you already have one. Not exactly an off the shelf part. Support the motor, unbolt the motor mounts, the 2 bolts on each side of the crossmember that hold it to the frame, lower it down a little, unbolt the steering rack from the crossmember then pull the crossmember out. Put the new one in and reverse the process. Only takes about 1/2 hour if you're prepped and ready to go. Or at least that's how long it took me. Dave
-
Stock configuration is just a hole in the crossmember, the arm and it's bushing just sit up there and the bolt holds it in place. The rubber of the stock bushing allows the arm to move up and down. That's it. plain and simple. Nothing on the inside of the crossmember, no washers, spacers or anything like that. just the inner steel tube of the bushing, resting between the sidewalls, compressed into place when you tighten the bolt that runs through it. Dave
-
That's looks like an option. Weld the hole shut with some (1/8" or 3/32") steel, center drill it to the stock width hole. I can send you the correct bolts if you need. It'll cost about $25 to overnight them and you can have them by wednesday. If you wanna go that route, let me know asap and I'll get them to the post office in the morning. Let me know. Dave
-
I didn't realize the extent that the kit requires, that you cut the hell out of your crossmember. And I just threw one away. Sorry. If you have the large hole in your crossmember, then you're stuck with that kit, as mentioned by TerrapinZ. There's your options in a nutshell. Dave
-
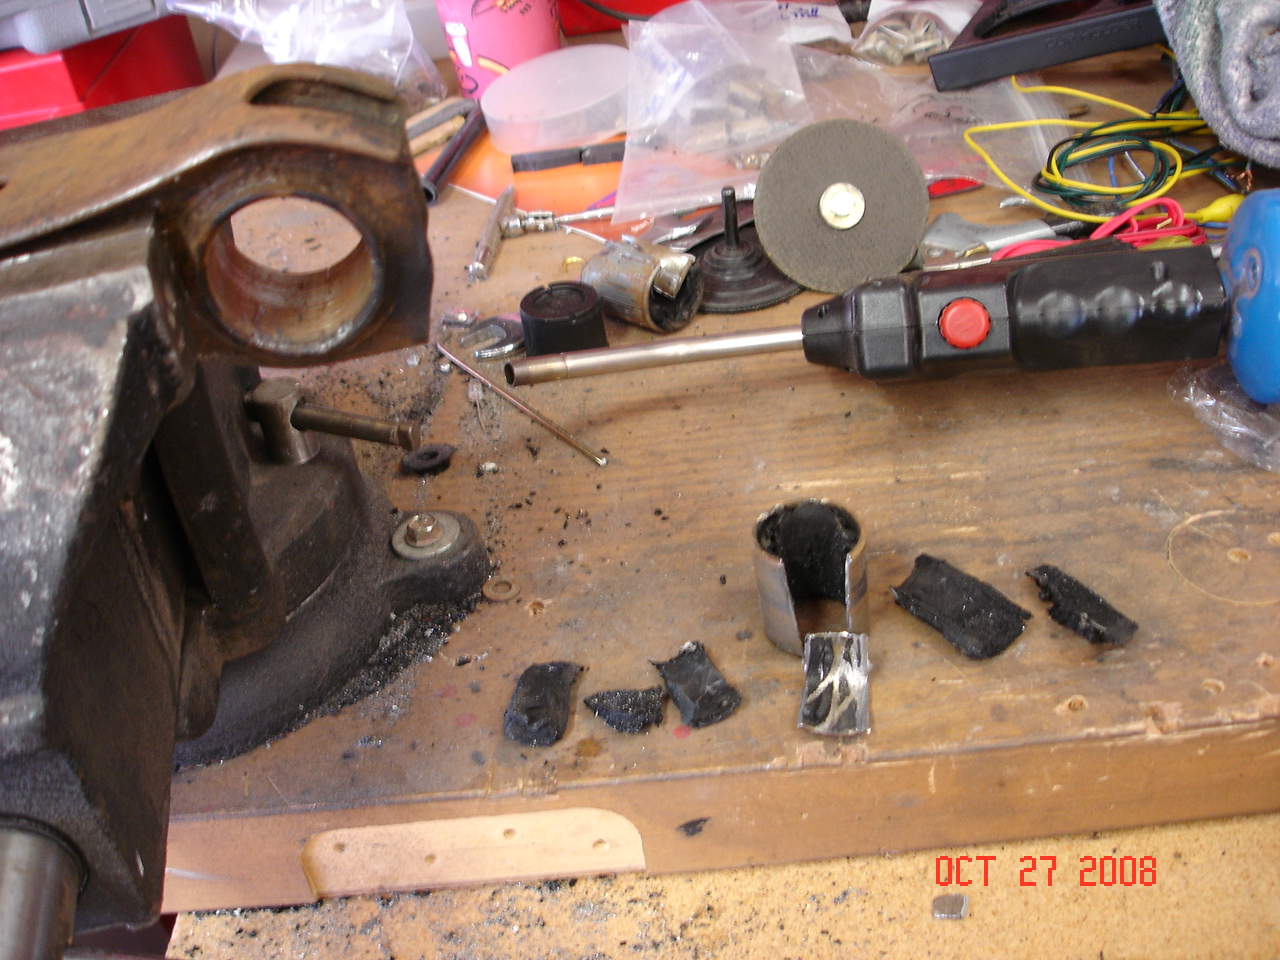
When you posted the picture of the transverse link bushing in the first post of the other thread, That is the correct STOCK bushing, that should be used with the bolt that I posted above in post #6. The picture below shows what the arm looks like if you tear out the stock bushing, cut the sleeve and pry the sleeve out to either #1 replace it with Poly Urethane Bushings (aftermarket Energy Suspension Part) or #2 Prepare it for a New Rubber bushing (Stock one just like in the #1 post of the other thread) The one you have is an "Adjustable Camber" style that the Previous Owner obviously put in. So you have 3 choices. #1 Put the one you have back in using the equipment you have, if that's possible. #2 Put a stock bushing back in with the proper bolts like in Post #6 #3 Buy an after market Urethane bushing kit and instal it using the stock bolts like in post #6 Does that clear things up or confuse you more? Trying to help here. Dave

-
So are ya talking Factory? Or Dealer Installed? Cause most 240Z's Didn't come with Factory A/C. Hell of a lot of Dealer installed units though. Actually, ALL 240Z's came with A/C.... Up here, we call it a window. and the awesome thing was that they all came with 2 windows. :stupid: I understand wanting the A/C, being in California and all. but let's keep on subject here. any other input, guys? Dave
-
THESE... Are The correct bolts you need, if you're using the stock bushings. Need them? Dave

-
Be sure to check our Datsun Classifieds at www.datsunclassifieds.com Lots of great cars there, as well as parts for projects, upgrades or what ever you need. Hell, I even have a car for sale there. it's the green 72' 240Z for $4200. Welcome to one of the best Z car related site on the web. Dave
-
Save me your left over paint. I just need enough to spray the fuel door and some other spots for touch up. IF I still have the green Z when you're done. Dave
-
It's almost everywhere. It'sprayed into...... The inner hatch and up into the tube frame of the hatch The rear quarter panels, over the wheel wells and in the Doglegs The rockers Inside the doors the undercarriage The inner wheel wells, front and rear The inner fender area (drilled from where the hood almost touches the fenders) The Tranny well and engine bay frame rail area's The inner floorboards were sprayed on top of the OEM sound deadener, but I had to remove the SD to treat the rust on the floorboards. Then I covered the floors from the firewall to the riser 12" behind the seats. Found their website... http://www.tuffi.com.sg/clad_kote.html
-
Thanks, we're VERY proud of him. Not a Vala victorian or anything but kept with it and finished on time. Now he needs to get a job. (that's the dad in me, doing MY job. Here's a few vids of the car and motor, etc that I made for the inquiring minds, interested in the car. http://video.cardomain.com/VideoPlayer.aspx?id=2027500 http://video.cardomain.com/VideoPlayer.aspx?id=2027501 Dave
-
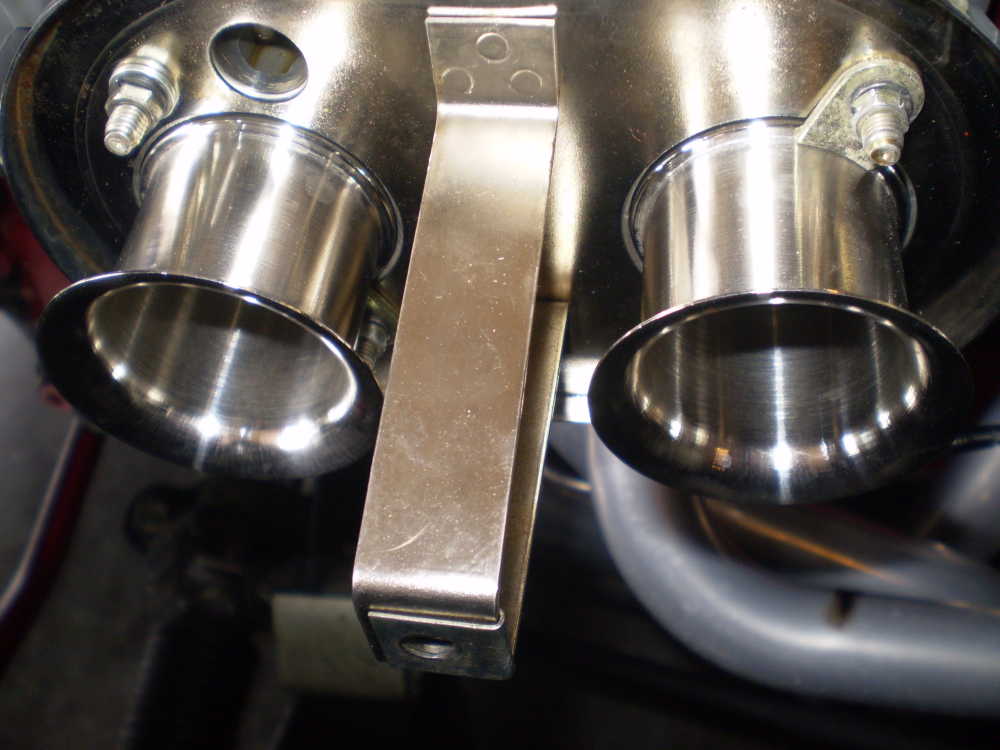
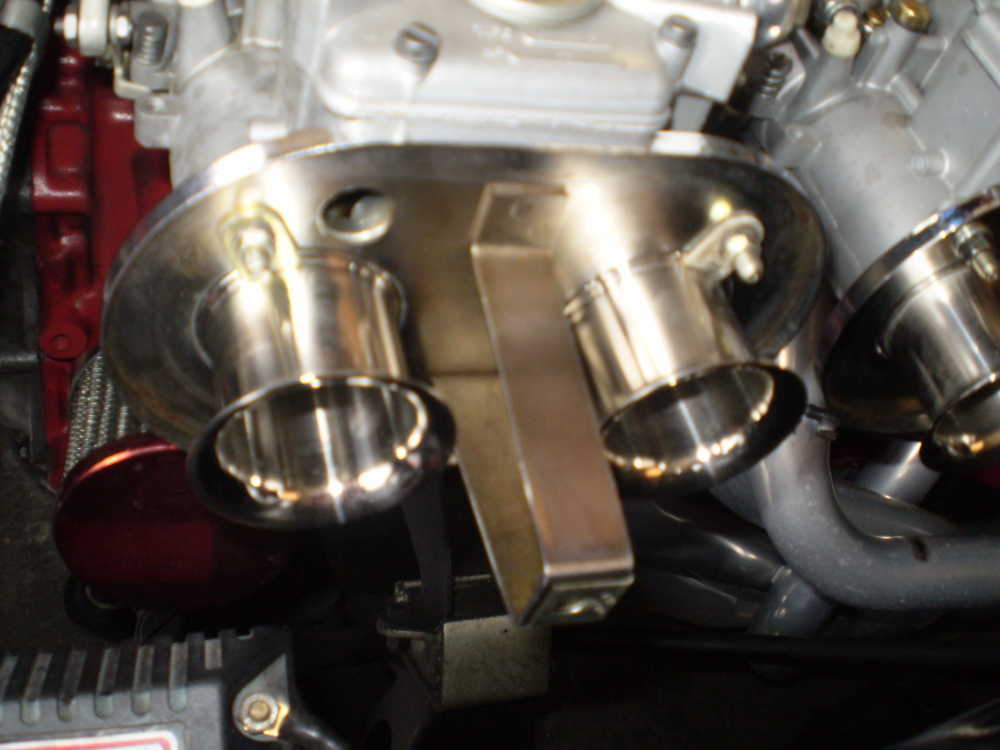
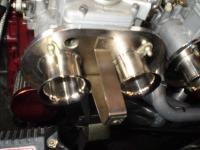
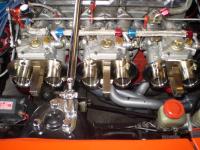
They were designed to run with the Insert style stacks. The insert secures the Aux Chokes and centers them. this hold the aux. in place and in return hold the stacks in place, then use the small tabs to hold them in the carb body.

-
my pleasure Kimi. glad to hear you're happy with the end result. Dave
-
I don't do eBay. Plain and simple. I'll buy parts from there but won't buy or sell cars on eBay. Just not my thing. I've chosen to sell the 72' on a Classic Datsun Related site to keep the idiots at bay. Meaning I'm keeping it in an area that is more likely to attract people of a higher Caliber and appreciation for Datsuns in General. I've already had a hit on it. found out when I got home from the BBQ for my sons Graduation. He'd like to see some under carriage pics and such. So we'll see how it goes. Not getting my hopes up as I hate to see her go and it's only the first "Hit" on the Ad. Dave
-
So here's the link to the new Datsun Classifieds ad I just placed. Asking $4200 and will not go below a set price, depending on my mood at the time. http://www.datsunclassifieds.com/showproduct.php/product/5049/title/1972-datsun-240z-w-2f-4-speed/cat/1 Let me now what you think. Dave
-
A dent free hood, some dolly work on the roof and a few other panels, then some paint, would likely raise the value, in my mind, no less than 2 to 3 grand more. I say this because The electrical system, the motor, the tranny, suspension and interior are now awesome. Paint and body work is all it needs to be a Z that I would not likely get rid of for a very long time. So an easy 6 to $7000 after the fact.