Zs-ondabrain
Free Member
-
Joined
-
Last visited
Everything posted by Zs-ondabrain
-
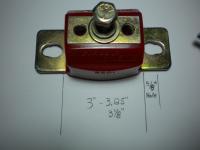
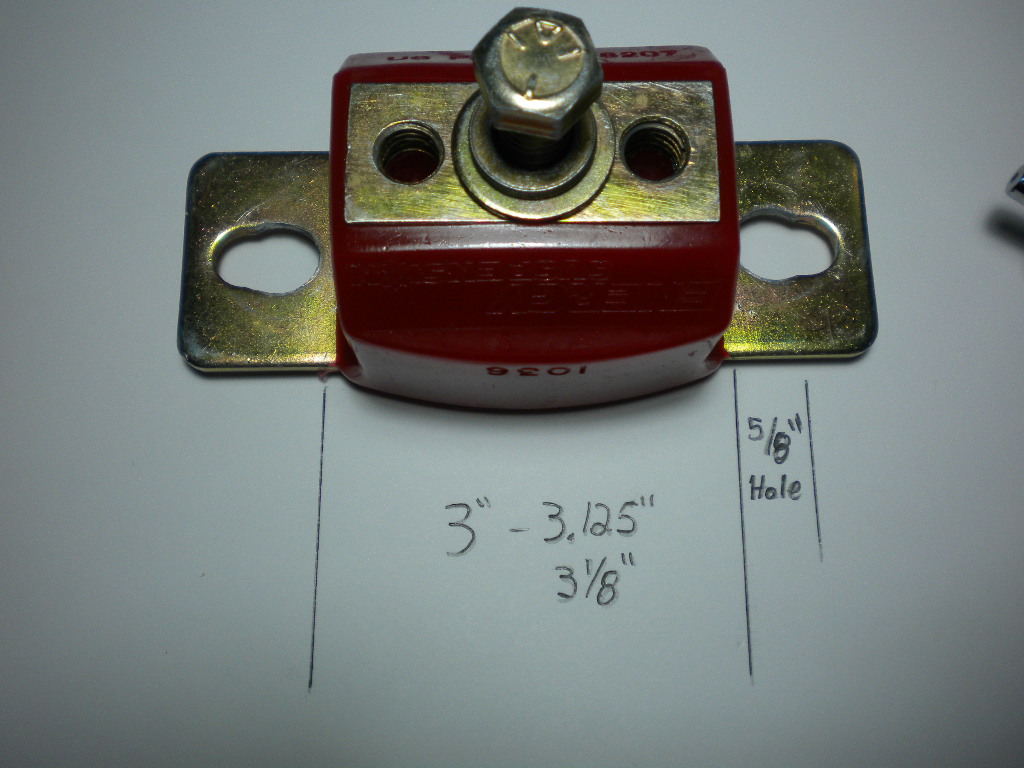
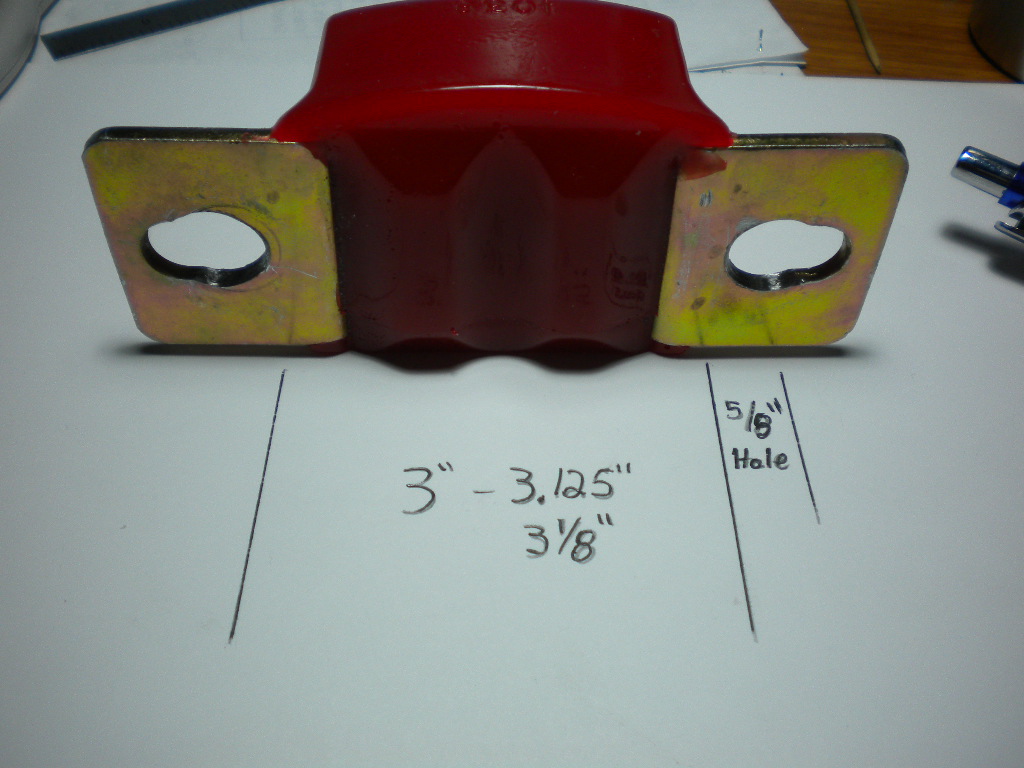
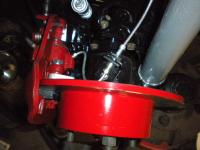
 Awesome, Thanks Darrel. Here's a picture of the 99101 in red. Part Number: 99101 •All purpose bump stop for control arms, traction bars & leaf springs. •Designed to be easily trimmed. •2 1/8" tall, 2" dia. •Includes 2 per set
 -
It's my Pleasure Mr Houghton. PM Darrel about the Bump stop specifics. Maybe we can get him to do a thread on using the bump stop with the R/T mount. Might bump sales and get the needed info out there for people looking for options. Dave
-
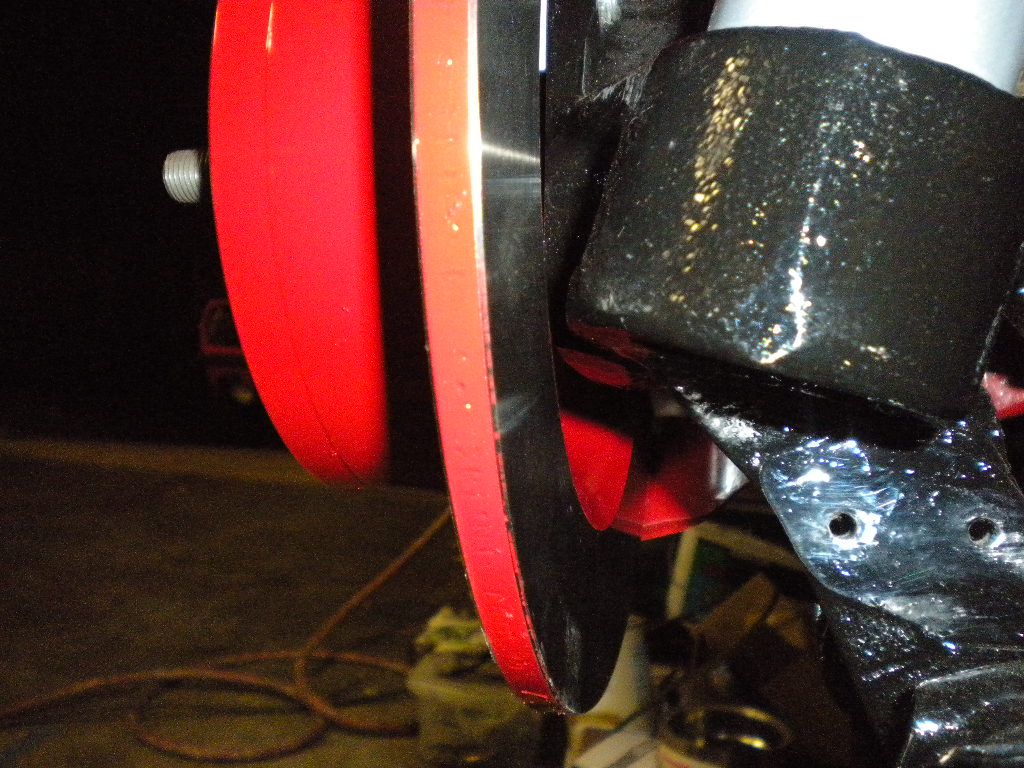
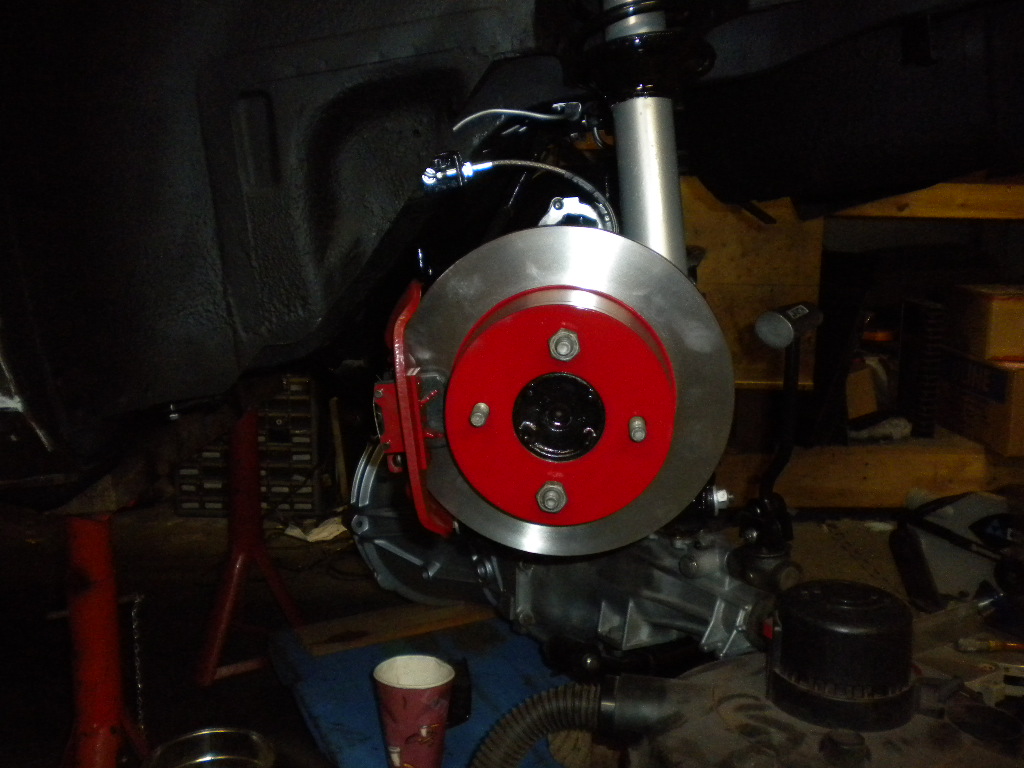
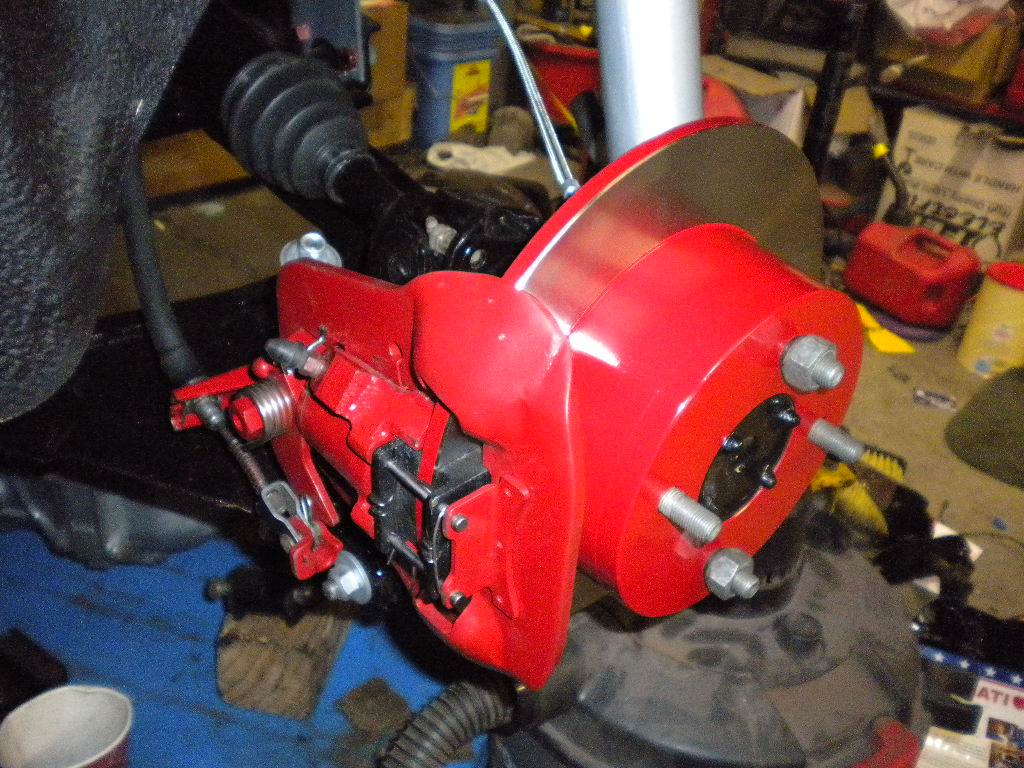
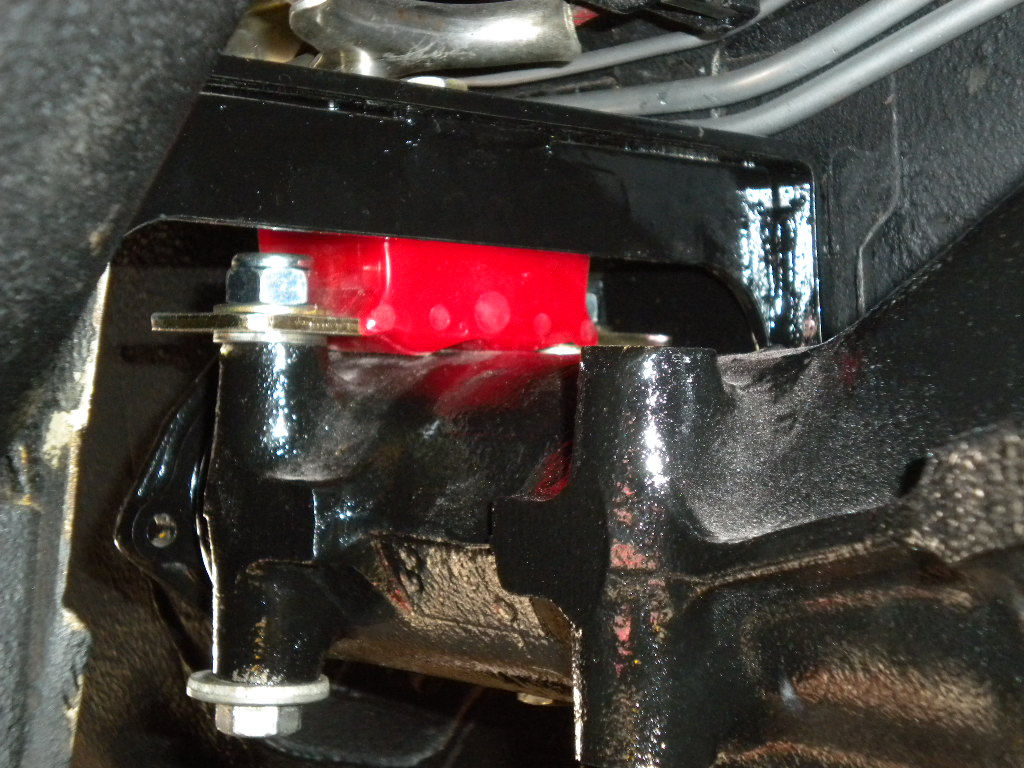
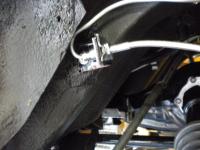
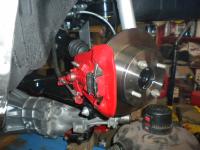
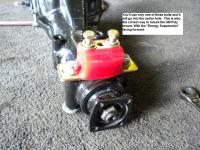
So I finally got my 79' 280ZX rear disk Brake Rotors from O'Rileys. Got them home and did the test fit before painting them with the Red Caliper Paint from Dupli-color. I also found out that when I welded the Ebrake brakets in the place that I did, They actually sit back far enough that I don't have to mess with or alter my Ebrake handle, brackets, pivots or rods. as a matter of fact, I think they will lock up withing 2 or 3 clicks of the handle. My 240Z never did that, no matter how much I adjusted them. I'm really liking these things and I haven't even driven the car yet. Also got the Stainless Steel Braided (Earls) Brake Lines from MSA and popped right in. BUT, they have a 17mm bolt that doesn't lock into the 19mm hole of the stock bracket. No big deal, just held it with a wrench and tightened them down. I also relocated the Hard-line bracket to the Frame, to completely avoid the Caliper bracket hitting it. 1st pic. Proportioning valve up front (on the firewall) is next. Dave


-
Thanks for getting the ordering started, I really appreciate it. MEZZZ, Sorry, you missed out, Conedodger beat ya. hahaha. Everyone else, Please follow the payment info on the first post. I don't have a paypal account and using my local check cashing place will cost me about $5 to cash your bank check (casheirs checks, personal checks) So please try and keep it to Cash, USPS Postal Money Orders and WalMart Money Orders. Thanks again guys, this is all for and because of you. I can't do it without you. Dave
-
Everyone who is still interested, Please Read the First Page (POST #1) It has all the info on ordering the R/T Mount
-
zKars, RoostMonkey wrote this "-------------------------------------------------------------------------------- No, I dont have a patent. Actually I used Ron Tyler's basic design ( hence the name " RT mount" ) with his permission and added my own little details to make what I feel is a slightly cleaner product. Theres nothing to stop someone from doing the same. If your thinking of making these, do us all a favor and make them better ( if possible ).Dont just copy this design. I only do this to help you guys out and to put a little cash in the Z fund. " Which basically says "Have at it" but at the same time "Make it better" I'm trying to keep it at the same price so as to not stray away from or show any real compitition, just expanding the availability. I called my Metal guy and he's making one up in Aluminum (easier, bendable, etc) so I can bring it home, do a test fit and mesurement and report back to him. If it checks out, I'll have him start producing them. I want to keep it Simple in it's design. It's been suggested to make it 1/2" shorter, but in doing that, it will also drop the diff another 1/2" and we don't want that. I was also thinking of weight reducing holes on the sides but I don't wanna mess with the integrity or strength of the mount. I'll know more when he delivers the prototype/mock up. As for a money making venture, not here. To be honest, I'll pay about $35 each, plus $10 for shipping each one in the US. Price of boxes, fuel to pick up, deliver, and return home. I might make $5 each, so it's not in my best interest to do this, but more of a back-up for when RoostMonkey is too busy. So it's basically all out of the love of the car and it's people, that I do this. On top of everything else I'm trying to do. So by my count, I want 1.......... (1) ConchZ........... (1) vercingetorix.... (1) Motorman7...... (1) Diseazd........... (3) SteveE............ (1) Zedyone_kenobi (1) Z_Tyler_Z.........(1) 260ZCaliCar......(1) MEZZZ.............(1) ARNE...............(1) Duffman...........(1) RT Hunter.........(1) Nigel1943.........(1) Marty Rogan.....(1) nahurry............(1) Pop's Z............(1) zKars...............(1) GreenZZZ.........(1) That's 21. I'll shoot a message to the metal guy and tell him we're on for the first 30 and tell him to kick A$$ on them. He said he's low on man power around the shop but he'll try and make it a priority. I think I can get this on a Net 30 which will allow me to start selling before all the money is in. We'll see. Thanks for the Retitle and swap over Arne. I appreciate it. Dave
-
Totally fair, and it's out of my fricken garage. bout time I found a sucker. hehehe snicker snicker. Still giggling about the dimmer.... Dave
-
That's exactly what the Headlight and parking light upgrades address. They introduce the needed relays that Nissan forgot to instal. Brighter everything and less damage to the switches and fusebox fuses. And that saved power will make the turn signals brighter and better responsive. Dave
-
Now that's funny. Did ya know you can also reset your odometer? just curious. and messing with ya. Good to hear things are getting better. Also, I'm gonna throw your box in the mail tomorrow, even thow your payment hasn't shown up yet. I put that relay in there but I won't promise you can use it on your 240Z. but hey, it's free, so do what ya want. Dave
-
Hey Stranger, long time no see. I'm sure shipping a hunk of metal to the other side of the pond is possible. How those upgrades working for ya? Keep your eye on this thread, I'll post when and if they become available for human consumption. haha. Dave
-
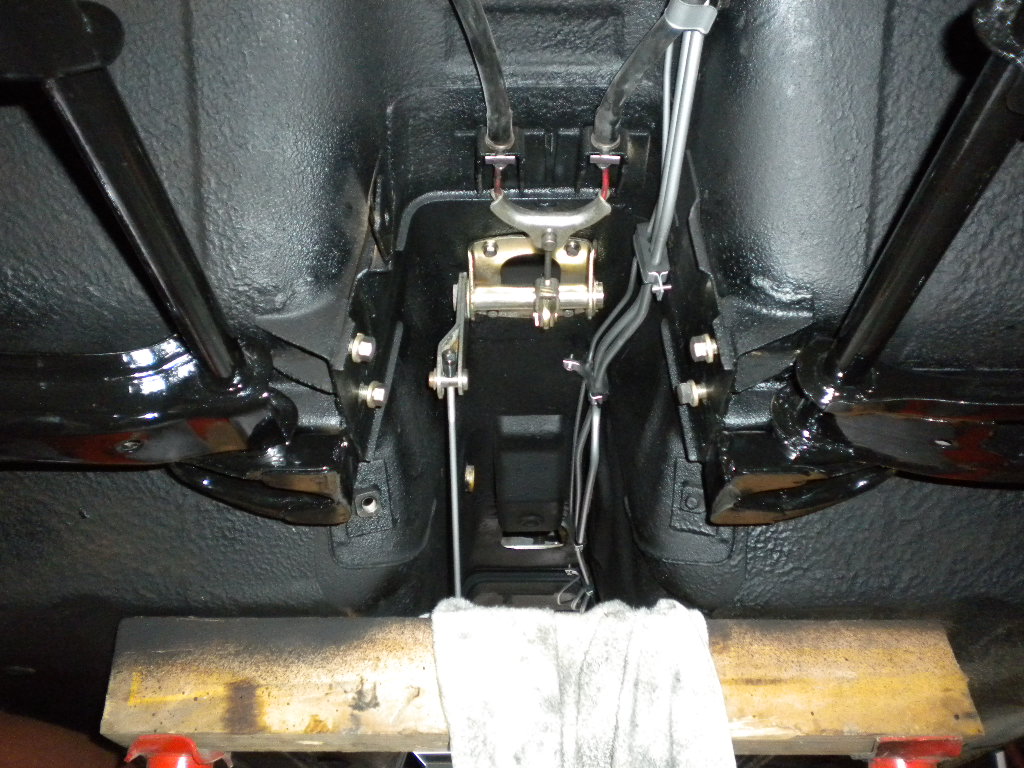
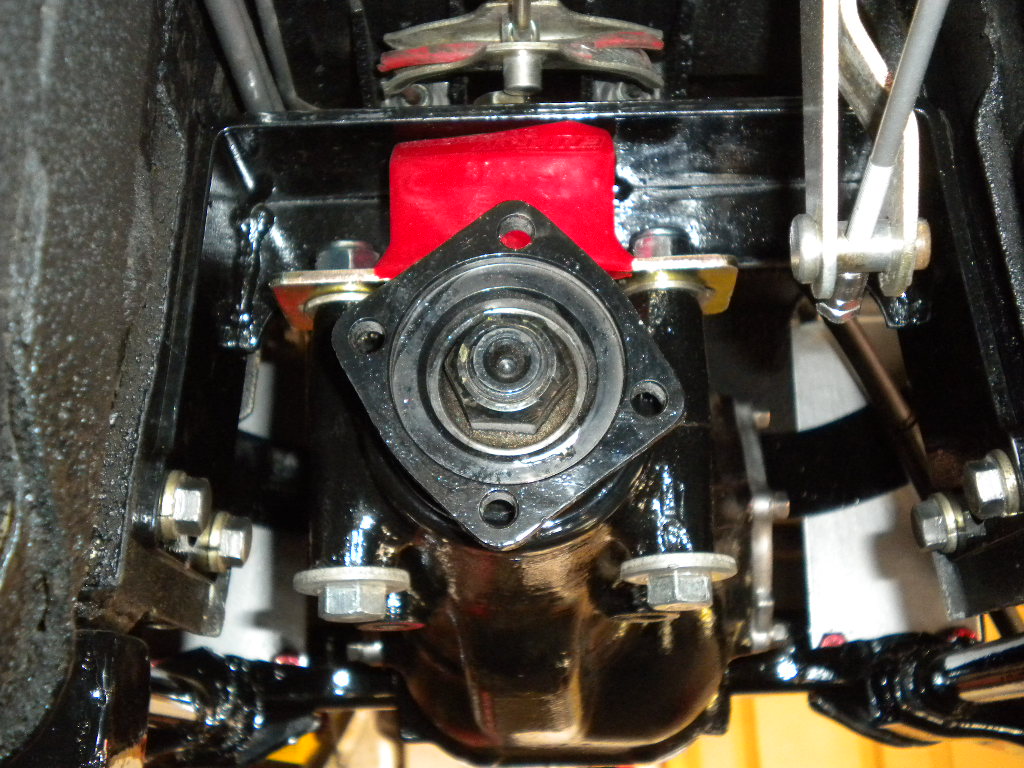
Easy enough. You'll be getting the metal ZS30 diff mount. You'll need to buy the Poly GM trans mount from www.jegs.com (P/N 3-1108 ) And also Paint the Mount yourself, to keep it from rusting as it is 3/16" mild steel. The ZS30 Mount can be mounted without removing the tranny or diff. 1) Remove the 4 bolts that hold the Diff Strap to the body of the Z 2) Remove the nut & washers that hold the OEM diff mount to the crossmember. 3) support the diff with a floor jack then remove the 4 bolts that hold the crossmember up. 4) The mustache bar and axles will easily support the diff in the hanging position after you lower the front of the diff. So lower the diff and use 2) 17mm ? wrenches and remove the 2 bolts that hold the OEM diff mount to the diff. 5) Being as how the new diff mount is in the shape of a square "U", you can slip it over the driveline or diff and slide it up into place. You may need to push the fuel lines up a little to clear the new mount. You may also have a rubber clamp on those brake and fuel lines that may need to be removed or moved forward to clear the new Mount. Slide it up and bolt it into place, making sure that the cross plate is facing the rear of the car and the poly mount hole is facing forward. **PICS** 6) When you go to instal the GM Poly Urethane Transmission Mount (P/N 3-1108 in Red or Black) You'll find that the mounting holes need to be widened enough to fit the larger bolts of the diff. And when you do this, keep thes as close to the poly as you can. The holes in the diff are closer together than the holes of the poly mount, so when you drill them larger, push your drill bit towards the poly to narrow the distance between the bolt holes. 7) Place the poly mount on top of the diff, slide the long bolts up thru the diff, place one washer on each bolt as a spacer to raise the poly mount off the diff a bit. Then slide the poly mount onto the bolts, then 1 more washer per bolt and put the nuts on loosely. 8) Place 1 of the 2 supplied poly mount bolts (with a washer and lock washer) thru the hole at the top of the ZS30 Mount, with the head of the bolt facing the top of the tunnel. 9) Raise the diff slowly, while aligning that top bolt with the center hole of the poly mounts 3 top holes. Raise it till you can thread the bolt in. Then continue to tighten the top bolt while raising the diff into place. You can also alternate and continue to tighten the 2 large bolts and nuts of the diff. When that's all done, go back and double check that all nuts and bolts are tightened. You're done. It's almost simpler than it sounds. Toss the strap, bolt up the new mount, drill the poly mount, mount it to the diff, raise the diff and bolt it all back up. Hope that's visual enough for most of you. It's pretty fresh in the memory so there ya go. Dave


-
The motor, trans, nice dash and seats are already over the $2000 price tag. So I say "Yes, good deal" if I had room and an extra $2000, you'd have to race to get to it before me, hehehe (as I twist my evil mustache to a sharp point) Dave
-
It's a great idea, kinda snug but definately would look stock to the untrained eye. Actually, you'll hear of a lot of guys doing it that way. Dave
-
Looks good so far. Are you gonna shoot another coat of Clear on there or does it just need to be buffed out? Been wondering what the Blue and white themed motor was gonna go it, for a while now. I also painted my own, first time ever, in my small garage. Very satisfying but now I know every drip, run and bad spot on the car. i'm my own worst enemy. Dave
-
Sounds good but How Much. What does he want for such a possibly clean car?
-
Ya, I lot of them are the same one that have already posted here, wanting one. That's one of the reasons I figured I'd see what the demand was here at ZCZZ. Truthfully, I'd like to see how far we get here before spreading too much word over there. If the orders pile up here, there should be a few straglers over there to take up the slack.
-
The Mount is typically used more by guys with the R200, LSD or quaife LSD. So I know it works well for them. I also know that I have a stock R180 in my 260Z and the mount works great there as well. I just read 15 or more pages at HybridZ and it looks like NO ONE has had issues with all the different diff combinations.. R180's R200's SX and Infinity diffs. I've also found that the flexibility (front and back movement) of the Mustache bar, allows for the fine adjustment of different types of diffs and mounts. Roostmonkey has it in his 70 ZXT and I've also read of it in all other years of S30's. Minor mods may be needed (like me having to remove the exhaust hanger bracket and moving the fuel lines up) but as said, they are minor mods and nothing seems to be permant or unreversable. I know from doing mine that I could easily remove it and bolt the strap back in, if need be. My suggestion, when installing the mount, is to loosely instal the poly mount to the diff (just turn the nuts on) and then the top bolt that goes thru the rt mount can be screwed to the mount at a slight angle because of the width of the hole in the top of the RT. Basically, loosely mount everything and it'll bolt right up, then tighten it all down from there. I did it and it worked well for me. and on the plus side, If someone orders it from me, and they find it won't work with their particular application, 1) it will still ne a "New" product and easily resold to the next guy or 2) return it to me for a full refund and I'll just resell it to the next person who want one. Pretty easy solution. OR 3) sell it to someone else and help them instal it for a small fee, see there, now ya made money and a new friend... Dave. So by my count, I want........... (1) ConchZ.......... (1) vercingetorix... (1) Motorman7..... (1) Diseazd.......... (3) SteveE.......... (1) Zedyone_kenobi (1) Z_Tyler_Z.......(1) 260ZCaliCar.....(1) MEZZZ...........(1) ARNE.............(1) Duffman.........(1) ??? Maybe RT Hunter.......(1) That's 15 as of 8pm on Monday. I'll keep updating and call the metal guy tomorrow (tuesday) and try and get an aproximate finish time on the first 30? or so. This is weird yet exciting all at the same time. Dave
-
OK, I'll call my metal guy tomorrow and see what the time frame would look like. Damn, all I was looking for was interest. Now I might have to actually go thru with it. why do I do this to myself? why :stupid: why :stupid: why? :stupid: ya'll know I love you guys Dave
-
I've thought about it. And the GM mount actually needs to have it's mounting holes widened a little to clear the girth of the large diff mount bolts. The GM mount is only $22 at Jegs. If I do a 40 order with the GM mounts, I'd be into it for about $2000. so I would need some definate orders before considering a large order like that. If I charge $30 for the GM Poly mount, I would also enlarge the holes before shipping everything out. I figure the easier it is, the better it sells, kinda like the upgrades for the 240Z's. Plus it takes an aproval committee for MSA to commit to buying anything other than a test run quantity. Plus, so as to not infringe on a name-sake. I'm thinking "ZS Mount" or Z/S30 Diff Mount" Dave
-
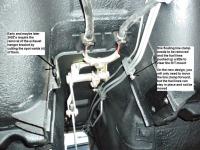
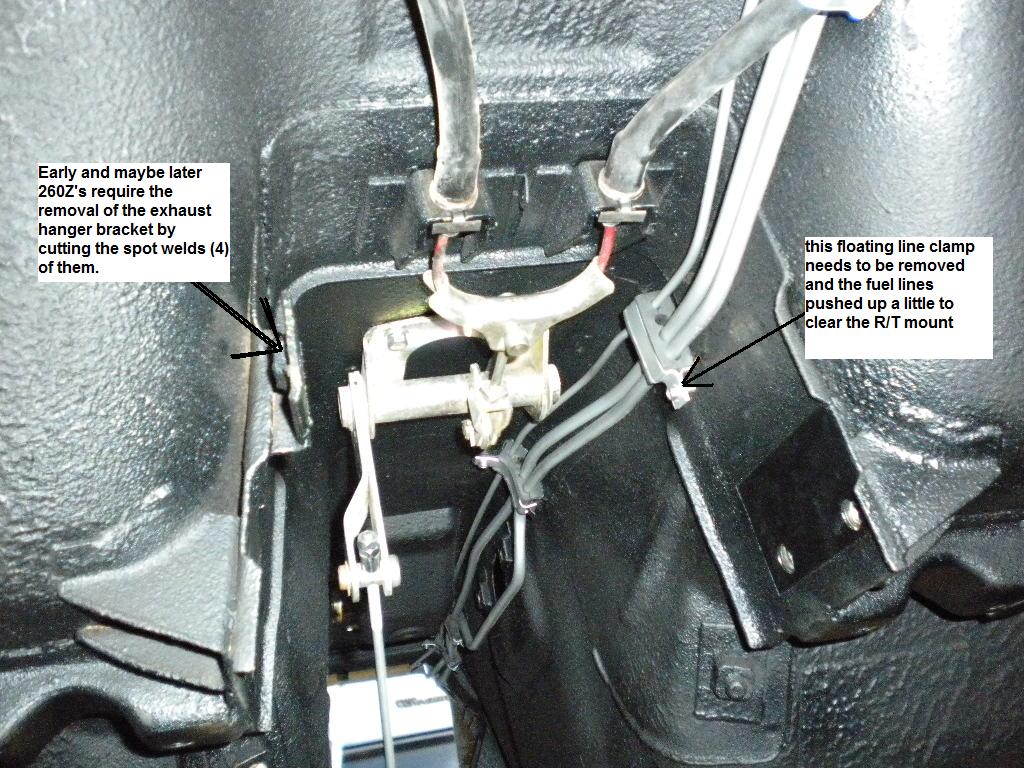
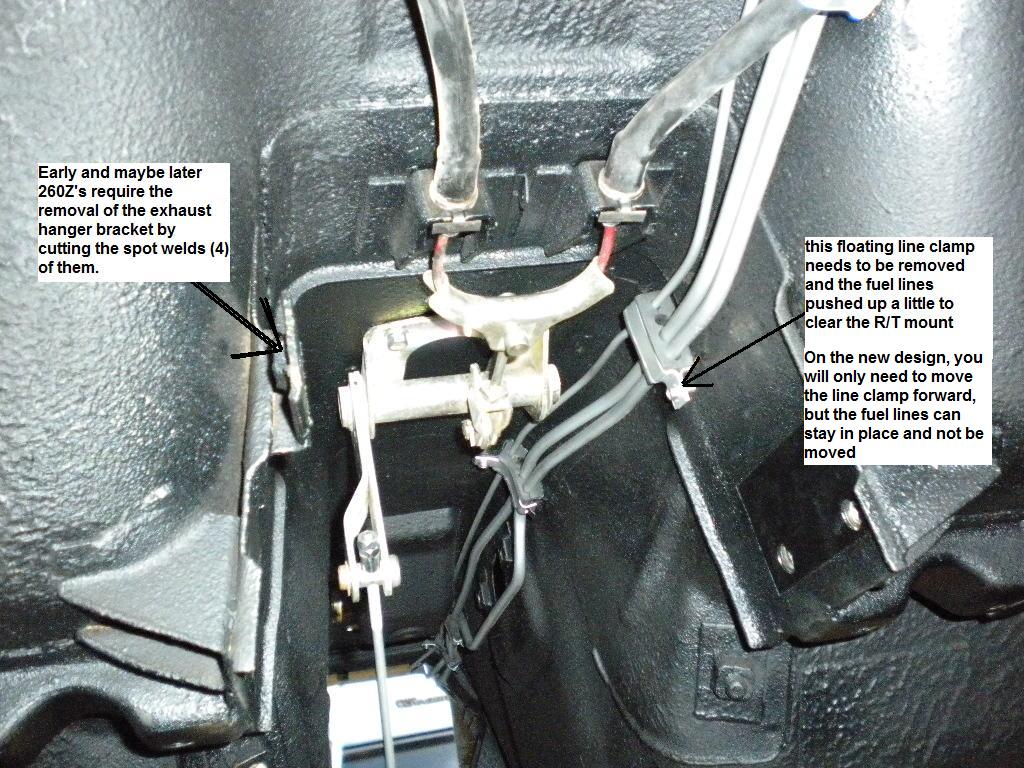
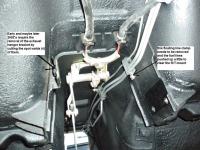
It will but you'll have to remove that exhaust hanger that is spot welded to the body, just above the drivers side, strap bolt holes. You'll also have to push your fuel lines upward, about an inch or so, after you remove the floating line clamp that sits above the passenger side, strap bolt holes. Dave

-
So by my count, I want........... (1) ConchZ.......... (1) vercingetorix... (1) Motorman7..... (1) Diseazd.......... (3) SteveE.......... (1) Zedyone_kenobi (1) Z_Tyler_Z.......(1) That's 10. 20 more and ya'll save $5. Or 10 more and we're good for an order of 20. Half way there in less than 6 hours. I figure another day or 2 and we'll have enough. ARNE, I don't wanna make it "Official" unless it's a sure thing. So if all of a sudden, orders start coming in via posts on this thread, then YES, move it to the group buy area. But lets see where this goes. Dave
-
Well, that's a start. The more orders I get, the cheaper I can sell them for. At 20, I can sell them for $60 w/ 2-3 day shipping in the US. At 30, I can sell them for $55 w/ 2-3 day shipping in the US. Not 5 to 7 days like Roostmonkey does. Anyone else? I know I need a second one for my own Z. (My 240Z) Should I start a thread? Dave
-
I agree with Will, replace the tub. Look around for a spare tub, they're out there, I've seen 'em. Dave EDIT** Found one down the road from me, a perfect spare tire well. his name is KEN and is a good friend. Tell him Dave in Marysville sent ya. http://seattle.craigslist.org/kit/pts/1456587675.html Hope that helps. Dave
-
So you need to check fluid levels and check the wire that goes to the junction under the master cylinder. That wire is connected to a pressure switch that is also connected to the "BRAKE" warning light in your speedo. So the Ebrake and pressure switch will both light the warning light in the speedo if there is an issue. Bleed the hell out of ALL 4 Corners, top off the fluids, check connections and also check the brake pads and shoes.
-
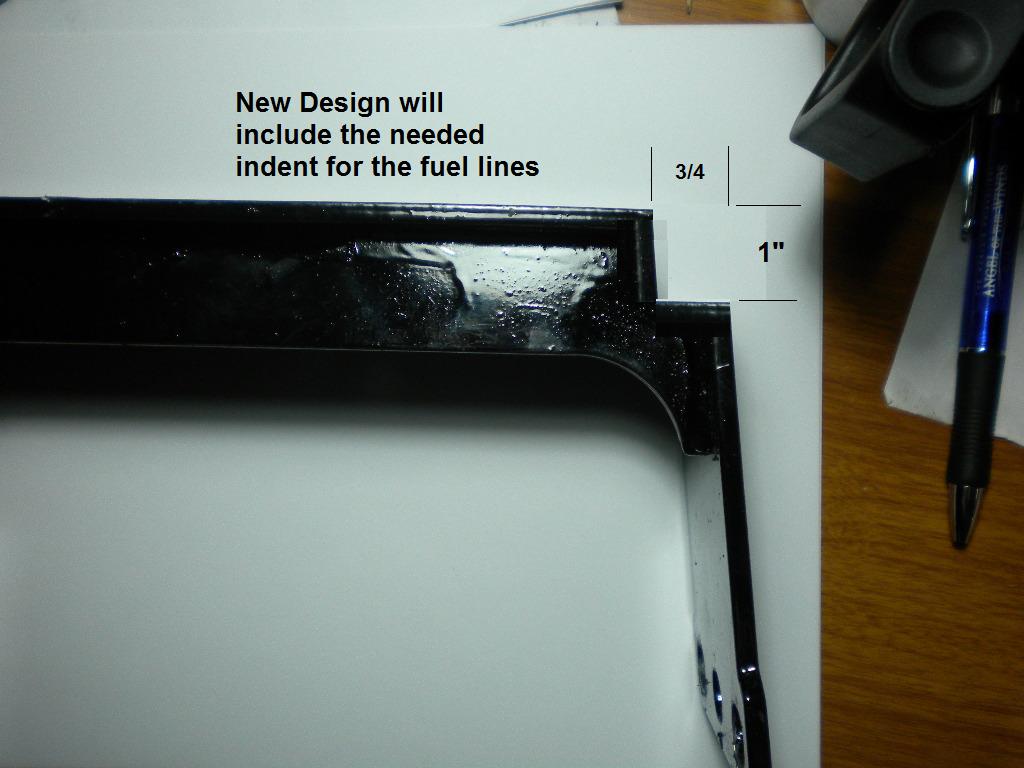
This Group Buy is for the Over the diff mount currently known as the "R/T Mount" That is typically sold on HybridZ.org by a great member named RoostMonkey. I've chosen to make and sell the Mount, not for a profit of any real amount, but as a secondary option to those who cannot find him, or wait for him to build them and ship them. I asked him about patents and such and got this for an answer.... "No, I dont have a patent. Actually I used Ron Tyler's basic design ( hence the name " RT mount" ) with his permission and added my own little details to make what I feel is a slightly cleaner product. Theres nothing to stop someone from doing the same. If your thinking of making these, do us all a favor and make them better ( if possible ).Dont just copy this design. I only do this to help you guys out and to put a little cash in the Z fund." So In Honor of Ron Tyler and his original design, I will keep the R/T Mount name on the product, to make sure the originator gets his due respect and recognition. So here we go......... ~~~~~~~~~~~~~~~~~~~~~~~~~~~~~~~~~~~~~~~~~~~~~~~ This Group Buy is for the R/T Mount for the S30 Zcars. Here's a link to some great info on the R/T Mount.. http://www.classiczcars.com/forums/showthread.php?t=35995 The mount is a 3/16" mild steel mount that bolts to the body of the S30, using the 4 bolt holes that the "Diff Strap" normally uses. Normally, the stock or upgraded diff of the S30 (R180, R200 & LSD) is mounted to the car using the stock crossmember and a rubber/steel mount. The Nissan mount has been well known for failing under heavy stress, age or Horsepower, by means of the rubber seperating from the steel of the OEM mount. When this happens, the Diff typically makes a Loud and very apparent "THUD" against the driveline tunnel, scaring or irritating the driver and leaving only the Mustache bar to hold the diff in place. Not very safe at all. The R/T mount will allow the use of a GM Transmission Poly Urethane Mount and also lower the front of the diff by about 1" which is typically better for those who use the Tranny's bolted to an LS1, SR20DET, RB25, 26 and 30 DET and DETT's as well the Borg/Warner T5 and T56 trannies. The R/T mount, sold by me, will be $60 and shipping inside the Continental US is included in the $60 price. The Mount sold at HybridZ is $55 or $62 w/ PayPal. I don't work for a Metal Fab business so I don't get the opportunity of an in-house price. I will make barely anything on this project as I will be paying much more for the same mount and covering the price of shipping, fuel and packaging/stuffing, using the $60 payment. So as per RoostMonkey's suggestion and my own personal experience, I will be IMPROVING the mount. The fuel lines have to be raised on almost all S30's by about 1/2". The NEW Design will include a modification to the mount to account for this small issue. 2 more bends will be added to the design, giving the mount a 3/4"w X 1"deep indent on the upper right hand side of the mount, to allow the fuel lines to remain in their stock location, without alteration or modification of their original position. YOU WILL NEED TO ORDER A GM TRANS MOUNT FROM JEGS FOR $21+S/H and drill out the mounting holes a little bit to allow the large diff bolts to pass thru it **Pics Below** It is a "Fail Safe Mount" so even if the Urethane rips or seperates, the mount will NOT fail. It has also been pointed out by a few members that a bump stop can used instead of the GM mount. This will allow the use of the stock mount and a bump stop mounted on the R/T mount, to essentially "Sandwich" the diff. This will eliminate both up and down movement of the diff. Now the down side...... I do NOT have a PayPal Account I can only accept Cash, USPS Postal Money Orders or WalMart Money Orders Made out to David W. Irwin. Send your Payment with your order stating......... Your Name Return Address (clearly printed or typed) Quantity Mail your order to me at........ David W. Irwin 6421 105th St. NE Marysville, WA. 98270 You can PM or Email me your request but money and an order in my hand, is what will get you your mount. Todays date is Nov 10, 2009. I'm told that I will possibly be able to start shipping orders by next Wednesday, the 18th. Or maybe even sooner if possible. I'm ordering a batch of 50 in hopes of taking care of everyone at the general moment. I'll be on a net 30 so if you said you WANT one, and change your mind, it'll come out of my pocket. So please be kind to this somewhat broke individual and don't tell me you want one, then say, maybe? or next month. At a measily price of $60, you'll get a quality product that will bolt into your S30, improve the mounting of your stock diff, allow you to "up" your HP without worry of a torn mount. I think I've covered everything. So feel free to start sending me your orders and payment and I will start shipping them out hopefully as soon as the 18th.