Zs-ondabrain
Community Member
-
Joined
-
Last visited
Everything posted by Zs-ondabrain
-
The 79' and 80' 15/16" MC 's are identical. same exact MC. I checked with 5 different auto parts stores, online and at HybridZ. But thanks. If you read the post again, you'll see that the resevoirs are from a 260Z but the MC is a ZX 15/16" MC. Saved over $100 by NOT ordering it with the 280ZX resevoirs and wired lids. Dave
-
Continued from above... I took the original E-brake bracket off the strut assembly, cut off the ZX ebrake bracket (not fun) and welded the S30 bracket onto the ZX caliper bracket at an angle that would allow for easy cable instal and no harsh angles as to bind the cable. I also crossed the Ebrake cable over itself above the diff. (Left ebrake to the right side and vice versa) to take up the slack of moving the cable forward. The rotors will be on after the 9th of Nov. (damn shipping) and the SS brake lines will be in by thursday (damn fed-ex) The brake shoes in the rear are $12 from Schucks The Master Cylinder is an 80' 280ZX 15/16" MC fitted to my 260Z Vacuum Booster. New gaskets and glue on the firewall as well. The nuts were swapped for Stainless Steel nuts and lock-washers. The brake lines that go to the MC were merely cleaned and bent a little to allow for the front and rear swap of the ZX MC (Rear brakes in the front chamber and front brakes in the rear chamber) from the 260Z's opposite set-up. Everything else was left alone for now. I've read everywhere about using a BIAS adjuster and NOT using one. I'll decide on it later. You'll also notice (to the trained eye) that I'm using the 260Z resevoirs. Reason for this is 1) they fit great 2) the MC was only $37 without the resevoirs and $132 With ZX resevoirs and wired caps. Easy choice. I cannot tell you the pros or cons as of yet but will report back when the car is on the road in the spring. I promise. Hope this helps clarify a few things and answer more questions than it generates. Dave
-
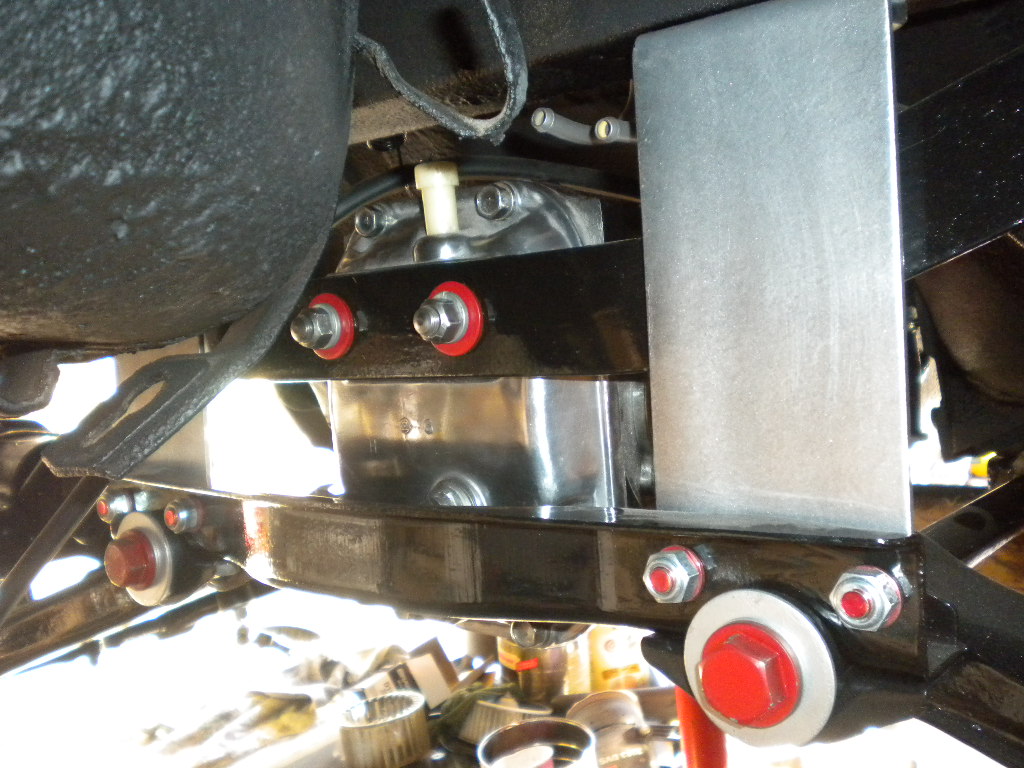
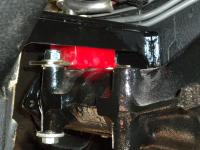
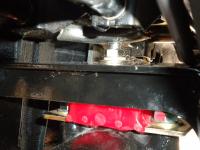
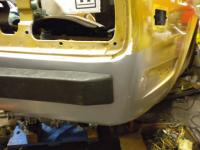
As you probably read on my exhaust thread, I'm going bullistic on this rebuild. The 260Z is a 2/74' or Early 260Z. I plan on doing a thread for each of the highly involved mods, upgrades, improvements or projects inside the build. So this one is on my brake upgrades. I always hate looking deep inside 20 threads with 20 plus pages to find info on a particular upgrade that I'm interested in. So this one will have nothing but my brake upgrades, parts, prices, pictures and info. So here we go..... On the FRONT Brakes. I chose to go with the 1985 Toyota 4X4 Non-Vented rotor, 4 Piston Calipers, The part number on the calipers is S12-8. They are a direct bolt on using the stock S30 Front rotors. They will require you to bend the hard line from your stock caliper, after you instal it onto the new caliper, to align it with the stock brake line flange. As the 2 calipers have different brake line hole arrangements. These are the brake calipers I ended up using... $75 each at Schucks auto parts. They were pre-loaded with bendix? brake pads. This is a stock replacement rotor for the 260Z, mounted on the cleaned and POR15'd (rust encapsilator) with new wheel bearings, races and hi-temp rotor bearing grease. The rotor was painted with Hot-Rod Red Caliper paint w/ ceramic in the mix ($7 per can). The rotors were about $25 each at Schucks Auto parts. And on the strut assembly...... with the hard-line bent to the hose bracket. The Rear drums were eliminated for the 79' to 81' 280ZX Rear disc brake conversion. I bought the adaptor brackets from Joe D on HybridZ.org for about $120 I think. The calipers were a used set taken from the local pull a part off a 79' 280ZX. They were $6.50 each and the red paint was $7 for the can of caliper paint. (I media blasted with Aluminum Oxide) The bracket...... The caliper...... 2nd picture shows how I moved the upper brake line and uses a top mount brake bracket on the upper and lower lines to relocate the angle in prep for the new Stainless Steel brake lines from MSA. Now the upper line and bracket is out of the line of fire of the caliper bracket when the strut compresses. The old brake line will be replaced with the SS brake line soon. Continued below............
-
I want my system to have as few cuts and welds as possible. A kit just won't do on this project. I want 2 solid pipes from the header to the muffler, the muffler, then 2 pipes bend properly to go from the muffler-under the diff-past the rear bar and to the left and right-then out the back of the car. So basically... Header, 2 pipes, muffler, 2 pipes and that's it. Except for the hangers and tips.
-
As long as the vehicle uses a 3-pin connector like our 7" bulbs, H4's, etc. Even the square bulbs of the late 70's and up use the standard 3-pin. BUT you can only use their harness for 2 bulb systems. 510's have 4 bulb systems which make the VB / DB harness useless. Unless you don't mind 2 of your 4 bulbs being inoperative.
-
I'll try and make it simple...... The VB or BD harness has an input plug (to control the relays) that plugs into the headlight bulbs 3 pin coonector, that normally plugs into the headlight itself. Then you plug their output connector DIRECTLY into the back of your bulb. Repeat for the other side of the vehicle. Mount the relay pack and connect the power wire to the battery and the ground wire to a good ground. BUT........ In order to do this on your S30 w/ sealed headlight buckets, you need to either cut their connectors off with enough wire to reattach the connector with butt connectors, AFTER you slide their wires thru the small hole in the back of the headlight bucket. OR cut a large hole in the back of your headlight bucket in order to slide their connector thru the hole, to connect it to the headlight bulb. Either way, you have to basically destroy your rare parts or cut the hell out of their harness to make it all work. Having a 240Z is an advantage on your part because my harness will plug into the 240Z's headlight connectors in front of the radiator on each side of the car. No dissasembly, cutting, drilling or hurting the vehicle in ANY way. But if you have a 280Z, or 260Z for that matter, you're S.O.L (crap out of luck) UNLESS you have access to a parts car that you can cut off the round 3-wire connectors that the 280Z uses on their headlights. I can then hardwire those to my upgrade harness and make the harness Plug-N-Play for your 280Z. Same thing for the 260Z's black round plugs.. I charge $125 for the 240Z HLH and $150 for the 260Z/280Z HLH and need the extra set of HL connectors. Nissan only used those for a few years (white round connectors) and nobody has them available anymore. The 240Z plugs are readily available and in use even now a days. Dave
-
I love the plumbing idea for mock up. I'll have to keep that in mind. I could make the pipes and take them down to the muffler shop and say "Play BORG and Assimilate This" Then bring them home and weld them up. cool idea. Dave
-
If it's got vaccum operated valves to move the doors in the heater system? I would start checking vaccum lines under the dash.
-
Steve, I like it. I think I saw yours here or on HybridZ, that's kinda where I got the idea. Mostly from the fact that it's such a rare thing on the S30's. I didn't want a fuel cell and figured that cutting the tank was my only real option to keep the exhaust from being too low or below the fuel tank, which I didn't want. Can we get a picture of the tank area on yours? Andy, Thanks, I hope it sounds as good as it'll look. But then again, when it's done, it's done. I don't think I'll want to change it or pay for something different after it's all done. I'm already in way over budget and the car is barely half way done. Still gotta do more body work, paint, interior and other mods before it'll hit the road. I'm hoping for some more sales of HLH and PLH or anything else I offer (LED taillights, sidemarkers, SCP, ZXP, etc, etc.) Doehring, I actually wanted to go with the center exhaust tip, in the shape of a "Z" or a, oval or rectangle but didn't see it in the budget and the side exhaust (to the far right and left of the rear) seamed to be the most practical or easliy accomplished project. Johnny, Me too!! but waiting seems to be the name of the game at the moment. Glad to hear the window worked for ya. Been there, done that. I'll update when I can. Also look for my other write-ups that I'll post when I get time away from the car, kids, upgrades. etc. Davge
-
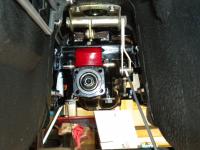
So in building the 260Z, I plan on a true dual exhaust system. I'm going with the 3-into-2 Ceramic coated header, A dual 2" inlet/dual 2" outlet SS welded muffler w/ internal X-over pipe, etc. I'll let the pictures do the talking.... I'll use the ceramic coated header and put 2" collectors on each pipe. So they can be unbolted easily. This should mount up high near the driveline. It'll look better when it's coated and in the car. This is why I cleaned up the back end. I might renotch the panel depending on where the pipes will sit on each side. The stock exhaust cut-out is now gone. With the R/T mount in and the crossmember cut and modified, There's a little more room for the dual 2" pipes to keep high in the underbody. But I think I need to move or modify the fuel pump and filter assembly so the right side exhaust will slide on by. There's no way I'm attempting this myself and will employ an exhaust shop down the road to do all the bending, welding and hanging. I'll try and update this with each move on the exhaust that gets done. The muffler is 4" tall X 9" wide X 22 long (add another 6" for the dual 2" pipes that stick out 3" from the muffler on both sides for a 28" length. I'll add pics of the fuel tank when it gets installed, after I seal the Drivers side vent line and run new hoses and figure out the vent line above the inlet and outlet cause I removed the vent line that normally goes to the charcoal tank up front. I'm thinking may bun a line to the fuel door/ filler area with a filter or something. I removed the expansion tank and did the whole tank mod. More to come later Dave
-
Rancho Cucomunga is where Al Allen lives (Datsun-Parts on Ebay) If it's him, don't do it.
-
I personally used Black POR15 Rust Encapsolator for almost everything under the car. Mustache bar, diff, control arms, strut housings, hangers, R/T mount, etc, etc. You can paint over it and it's actually a MFG suggestion to paint any POR15 that will be exposed to UV rays. Under the car is not typically a UV issue. Buh bye rust, hello Beautiful. Dave
-
And now, with the pics in the post above this one, I totally agree with the theory of "Make Diff swaps SUPER easy" Literally 2 bolts and 2 nuts on the mustache bar with the driveline and shorties and it's out. And the exhaust clearance is phenomenal. Should make for an easy instal on the dual 2" pipes. The fuel tank should be done by monday. Yeah!!
-
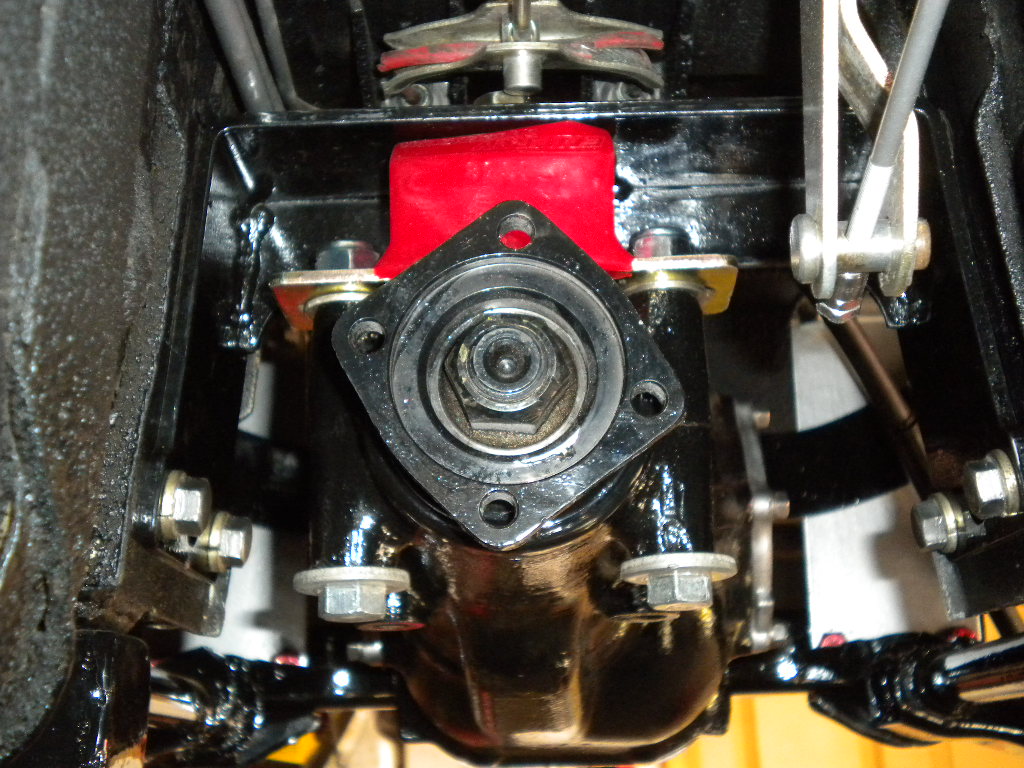
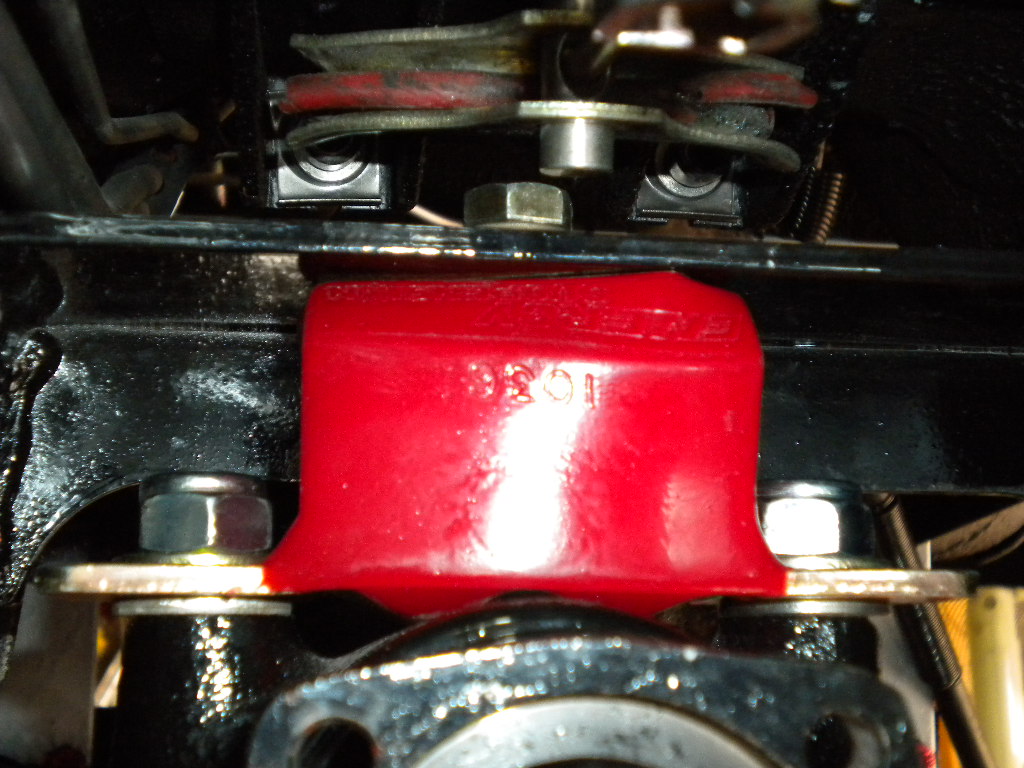
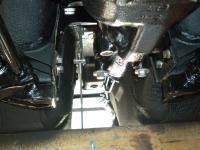
So I finally got the R/T mount, Coatd it with POR15, drilled out the exhaust hanger that the 260Z's have in the way of the R/T, pushed the 2 fuel lines and the brake line upwards to clear the R/T, and finally mounted it up there. All went well, slid right into place with a couple nudges of the plastic mallet, bolted right into place. Lifted the diff onto my shoulder and slid the studs into the mustache bar and got the nuts on there. Then I slid the bolt thru the top of the R/T and let it hand while I loosened the GM Poly Mount to give myself some leeway and it bolted right up. Slid a wrench onto the 19mm nylon lock nuts and tightened the poly back down to the diff and took a few pics for ya. Here ya go, Dave


-
I'm sure it's been said but "The voltage will not blow the fuses, the amperage will." Unfortunately, if the amperage did'nt climb, the fuses didn't blow and the voltage was allowed to flow. And even worse, if you have my upgrade harness's in place, the high voltage is still allowed thru the fuse and directly to teh circuit, where-as a stock weak system with bad connections and wiring would have slowed the damage a little bit more. So as ws said earlier, if it was on during the faulty mishap, it's a likely candidate for damage. (heater, lights, turnsignals, etc.) Before you rip the dash plate off (heater control) check for the heaters motor fuse on the right side of the dash in that bundle of wires. The fuse holder typically melts under normal usage but your VR issue may have totally killed it. If it's melted (the holder) just cut it out and replace it with an aftermarket inline fuse holder (12 gauge with ATC Blade type fuse works fine. Glad to hear the new alt and ZXP went in good. at least you're on the right path now. Think of it this way, you wanted to change those old bulbs out anyways. Right? Maybe? Hope your arms are skinny, that underdash area is a b i t c h.
-
If you have a business license, I can direct you to all the wiring you can handle. The outfit is called Micro Alarm out of California. They only deal with Licensed Business's so if you got one, let me know and I'll send you the info. Also keep Cycle-Recycle Part 2 in mind for your connectors and terminals. They are almost all I use for that end of my business. http://www.crc2onlinecatalog.com/Index_Main_Frame.htm Dave
-
I got real lucky yesterday. There was a 78' 280Z and a 79' 280ZX. So I also grabbed the 280Z Ebrake handle, some headlight plugs (made of unobtainium) and some clips and things. Then I went to the 280ZX and grabbed the rear calipers to finish up my rear disc brake conversion. I also grabbed the Honda wiper motor and blower for the heater. All that and the Porche bumpers only came to $55. The rear calipers were only $6.50 each, the ebrake handle was $3.50 and the fan and wiper motors were only $5 ? each. Lucky day at the P. A. P. Dave
-
That's what I planned for the 260Z before I ended up tearing out the shocks, filling the holes and smoothing out the whole back end. So I went to the local Pull A Part and found a Porche 924 with decent front bumper rubber on it. So I pulled the rubber and plan to shave the small 90* lip off each and mount them on the rear. And this... Should look like this...... needs a little work, gimmy time, I'll get it.
-
I love my Turbo Muffler. It's a Raptor Turbo Muffler, similar to the Cherry Bomb Turbo. 2.5" in and 2.5" out. The inlet is offset like stock. Here's a couple soundbites.... http://www.youtube.com/user/DatsunDave07 Second video down on the right. Titled "240Z New Exhaust" Can't post a link cause it contains the letters D I C K in the code. The exhaust has since mellowed out a bit due to build up in the pipe and muffler but everybody says they like it. Also, my exhaust sound was used in the Forzamotorsport 2 game on Xbox 360. My name is in the credits in the "Special Thanks To" area of the game. Dave (Irwin)
-
It IS a frequent problem for those of us who Daily Drive our Z's and have the lights on more than others. Never a bad time to update an old design. Electronic Flashers do require less amperage and are better for your turn signal circuit. I suggest them all the time and use them in all my cars. Cleaning the ground wire below the battery and the one between the taillights helps as well. but you probably already knew that. Dave
-
The Parking light circuit consists of the 7-Dash lights, 4-Side markers, 2-Front marker lights, 4-taillights, 2-license plate lights. for a total of 19 light bulbs. So you can see why the circuit overheats and melts solder joints and causes failure of the contacts in the switch. Old connections and wires create a lot of resistance, and that causes heat. My PLH harness plugs right into your 9-pin combo switch, between the switch and the dash harness, the relay mounts under the column, the fused power wire runs from the battery, thru the firewall and over to the relays socket. $50 upgrade harness or $150 switch. Not a tough decision. Dave
-
Maybe a stronger spring on the tensioner? Or try a different fuel pump just for experimental purposes? Kinda lost but at least you've narrowed it down to an area.
-
He has PARKING light issues and fixing the headlights won't fix the melting Parking light wires.
-
If it's a 260Z with a 9-pin connector on the combo switch? You need it rebuilt and you also need a "Parking light Upgrade Harness" that I sell. A full rebuild of both switches (Combo switch and Turn Signal Switch) is only $65 and the PLH Parking light harness is $50. Email me at wolfin32z@yahoo.com for more info and also use the search button for "Parking light upgrade harness" here at CZCC. Dave
-
sounds like the tensioner or valve wobble. When's the last time you readjusted the valves? I had a for V6 and could NEVER get the valves to quiet down. On deceleration, my chair and valve make noise. maybe it's common? maybe just a resinance at a certain RPM? Let us know if you figure it out. Dave