Zs-ondabrain
Free Member
-
Joined
-
Last visited
Everything posted by Zs-ondabrain
-
 or better yet. Unwrap it, mark your holes, drill then out to 1/4" then make a channel 1/4" away to a bigger 1/2" hole to allow the head thru then slide into place. Rewrap it and drill all your sheet metal holes to 1/4" or 5/16" to allow the new clips to lock into place in the sheet metal. You won't see the clips and it'll hold great. Dave Buy 'em here... http://www.autobodysupplies.com/Interior%20Door%20Panel%20Clips%20Page%201%20.htm
 -
I think I need the 79' to 81' 280ZX rear Calipers and rotors. The rotors will be bought NEW. These are the brackets I have (from HybridZ) and I think the above years are correct. These are my front Calipers (12-8)
-
I'll take the rear calipers if you don't want them. Seriously, I need them. I have the needed brackets but no calipers. Dave
-
HOLY CRAP JARED!!!! When you said 6 figures, I was thinking $6K. Now I don't feel so bad about me possibly hitting 10 to 12K when I'm done. I'm doing 95% of ALL the work on my Resto-Mod. If it's not destroyed, I'm rebuilding it. So you won't see all the labor costs mixed in with my final bill. The most expensive thing I'll pay for will obviously be the paint job. I'm doing all the body work so I'll only have to pay for the local shop to shoot it and wet-sand it and buff it out. This is as close to a One Man Show as I can get. once again, DAMN Jared. Wish I had 1/4 of your budget. or 1/8th to get me moving one mine. Dave
-
Same mounting holes. I don't see any issues. I own both a 240Z and a 260Z. they are interchangable. But the 240Z seats don't have the Safety switch that plugs into the 260Z, under the seat.
-
Also, when that is done, pull the drum outwards with your left hand, while tapping the drum on the center between the studs. Sometimes the paint or rust will hold the aluminum drum to the steel stub axle plate. Heat the drum in that area but NOT the stub axles center peice. Heat will expand the drum and hopefully come loose. Heating the center peice (steel) will only hold it on better = not good.
-
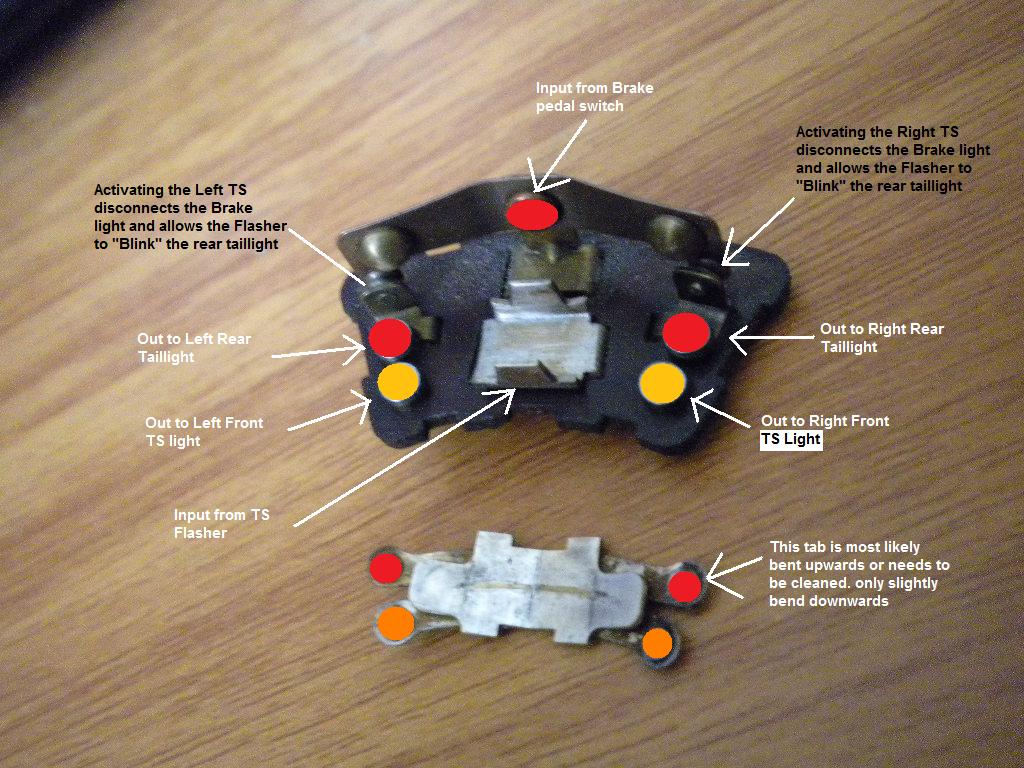
With the tire off, rotate the drum so the small 5/32" hole in the drum is at about 7 O'clock (as the clock sits) on the drivers side and and use a flash light to look into the hole. You're looking for a gear looking peice with horizontal teeth. When you find those teeth, use a long skinny flat head screwdriver in the hole and reach PAST the teeth to release the lock bar, that holds the gear from turning. To release it, get the screw up against the bottom of the gear and toward the center of the bottom of the drum. What you are trying to do is push the lock bar down and to do it you need to get above the bar. When you feel yuou've released it, put the screw driver onto the teeth and rotate the teeth of the gear downwards for as many turns as you can. You'll be releasing the tention on the pads from the drum. It's hard for me to explain but I hope you get the just of it. The picture shows the bar, the gear and should help you understand. The picture is of the drivers side. The passenger sides gear is on the right, opposite of the drivers side.
-
Damn, that's not bad at all, Car must have been in some pretty decent shape before you started. Now mind you, I don't have 10K in receipts yet, but I am at about $2500, but I don't have a paint job, tires & wheels, or an interior yet either. Awesome job man. You guys make me wish I could finish the car by next week. But Mr. Lotto hasn't paid any attension to me lately, or EVER. Dave
-
I don't know guys, I've had KYB struts with my Eibach PR springs for over 4 years of daily driving, racing around town and small tracks, and they still seem to be holding up great. Freeways are smooth, corners are tight and the wife never bitches about her "Precious Butt" after a long road trip. I know that KYB says "NO" but I've had NO problems. And as a matter of fact, I've already bought and installed the same combo into the 260Z. Can't tell you how they feel as the car won't be on the road till about April and they'll need some break in time as well. Opinions? Dave.
-
Do we dare ask how much you're into it for, so far? I'm not going ANYWHERE as ballistic as you, and I know that I'll be in for an easy 10 to 12K. Easily. And I'm keeping the original motor, trans, diff and other things. But the paint, new bolts (mostly stainless and newly plated) Polishing compounds and pads, metals and weldiong materials, Tires and wheels (Rota RB 17X9's with 265/45 ZR rated tires?) ZG fender flares, bright orange paint (solid 2 stage) etc, etc. I definately applaud your efforts and choice of products, The car should be what YOU as a driver wants, not what everybody else thinks Should be in or on it. Great Job so far, You can see my 260Z build here...... http://www.cardomain.com/ride/3195135 Thanks for sharing, I think you just reinspired me to get back out in the garage..... Tomorrow. Dave
-
I've had my wallet for so long that if I take it out of my pocket while driving, I fall over to the right. Not funny, especially when the cops think yourleaning over to hide something. And I keep my cash in my front pocket, always.
-
Just make sure to coat them with Anti-Seize paste so they don't rust into place and be careful when tightening the long skinny bolt(s) as they like to snap easily. Personal experience. I replaced mine 6 years ago with a Schucks/Cragen/Checker Auto Parts brand and have had NO problems yet. And by the way.... NEVER ask "what Else can go wrong?" Never!! Dave
-
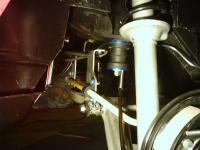
The idea of the R/T is to eliminate the stock mount and it's possible failings under acceleration. If you find that the crossmember sits too close to the diff after the R/T instal, and the bolt heads may touch the X-member, drill out and area for each bolt head so that you still have the Xmember and the bolt heads clear and don't touch it. You can kinda see the crossmember has been drilled out in the picture below. Just enough to clear the bolt heads.
-
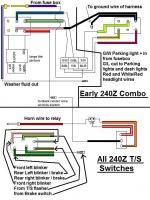
I'll see what I can do..... this should get ya started, I'll try and work on more variences later, when I have more time. Dave

-
The R/T mount is nothing like a solid mount. Period. A solid mount is just that, Solid. The R/T mount is a hanging support for the diff, as apposed to a resting mount crossmember. When the wheels get forward (1st gear thru 4th or 5th) power from the diff, the diff moves in an upward motion. If you have a regular crossmember and diff mount, the diff will try and pull away from the crossmember, and eventually, under heavy loads or Horse Power, will rip it apart. Under the same conditions but with an R/T mount, the diff will merely push upwards towards the new urethane mount, in a "squishing action. So think of it this way..... If you put a trucks bumper up against a brick wall with a peice of Urethane inbetween and slowly accelerate, the truck won't go very far but the urethane will absorb the push. But if you put a hole in the wall and tie the bumper to the brick wall and put it in reverse, somethings gonna give, whether it be the rope, the bumper or the wall. Click the link and you'll see what the Safety interlock is and how it's better than the stock mount. http://www.energysuspensionparts.com/Installation_Instructions/Energy_Suspension/17112.pdf The diff won't hit the cross member under deceleration because it's held Above the crossmember and the Urethane bushing required for the R/T mount is a "Fail-Safe style. So even if you remove ALL the Urethane from the mount, the mount will NOT fail because the 2 sides are interconnected.
-
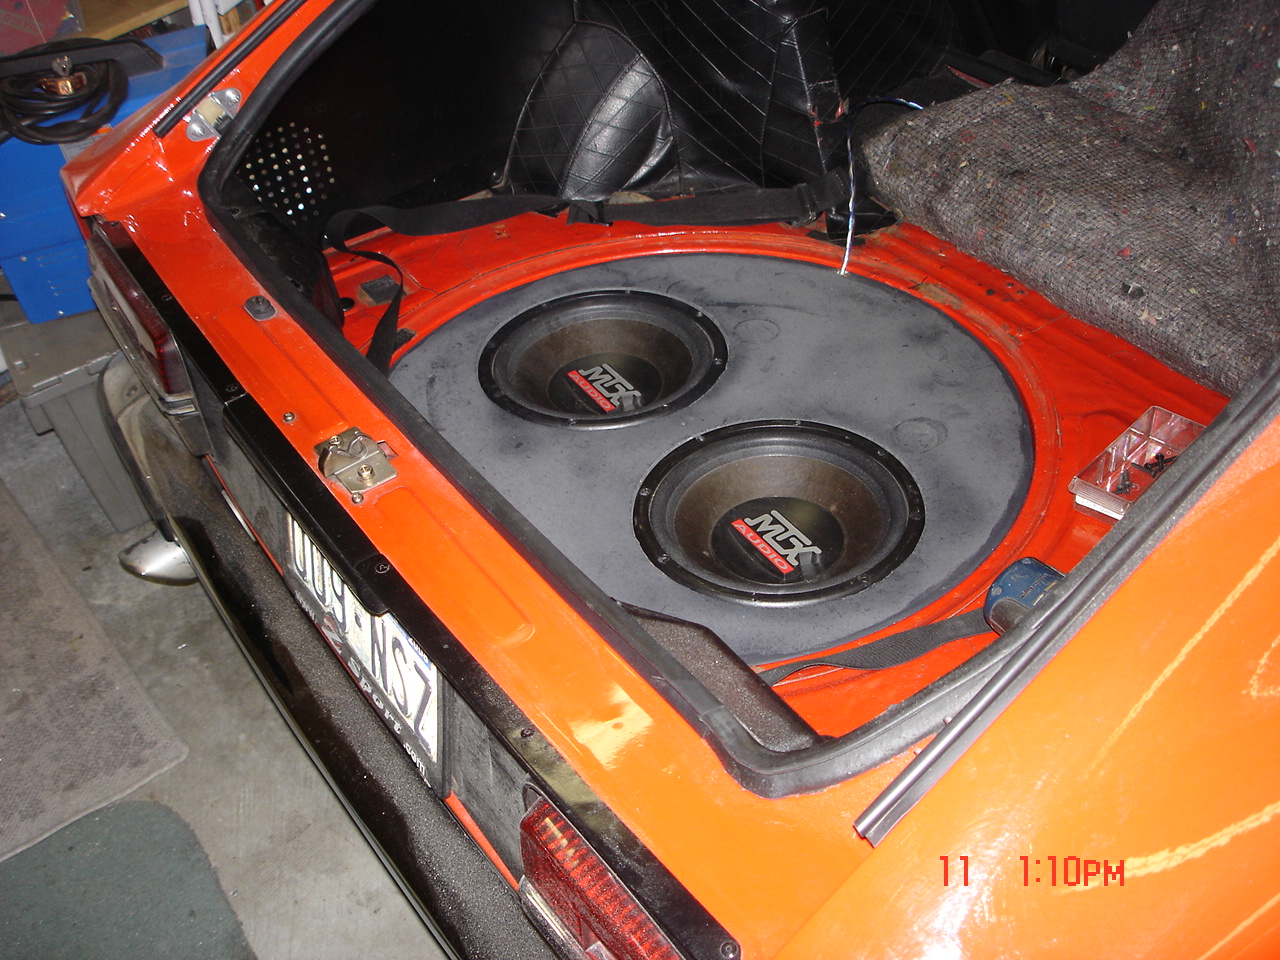
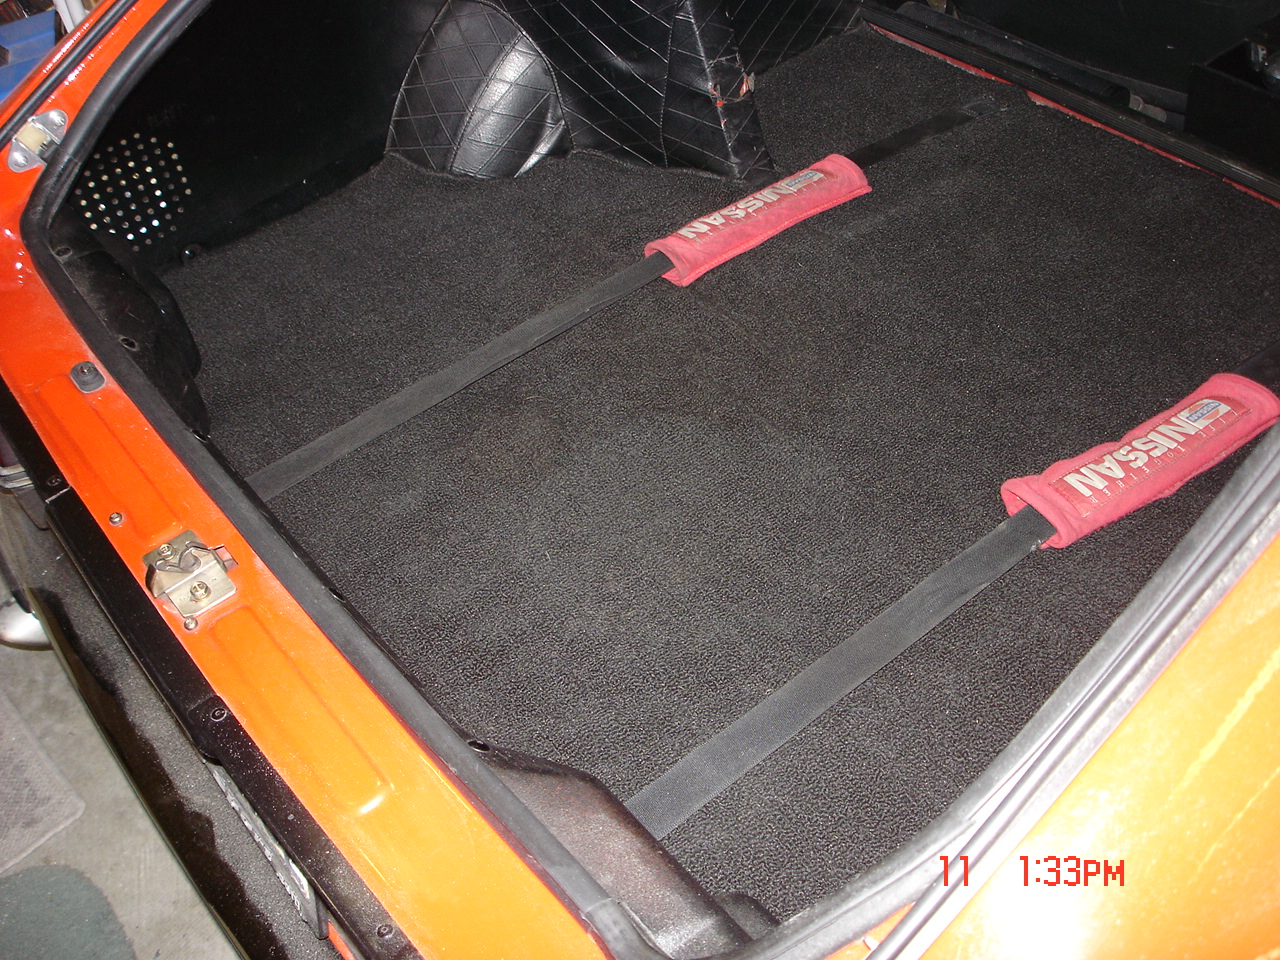
No Problem, but don't get us wrong, we're not here to criticize your work. Some of us are very critical of what goes into our Z's. We love form and function. Some things form but don't function, and vice-versa. If you were to build that into a box, that formed around the towers (sandwiched the front and rear) and clamped down using one of the strut nuts on top of each tower, then you might just have something. Just a thought. Some people don't like my sub-box in the spare well because it eliminates the spare tire. But I love it cause I get my subs and have the full back hatch area to use for what-ever, without losing any space. Keep messing around, ya never know what'll come of it. Dave


-
DUH!!! I just figured it out, now I know I'm tired. I just noticed that ZULAYTR's car is the one in the video. Nice looking Z man. Feels great to have your car on a video like that, doesn't it? Dave
-
Seems like it would be a bigger nuisanse than anything else. If you get into a head-on collision, that speaker blape will take whats left of your head, clean off. I'm sure you've heard of or seen the box for 6x9's that mounts across the back of the Z. Those are a little safer and take up much less room. Plus they sound pretty damn good. I personally have 2) 5-1/4" speakers in the rear stock locations, 2) 4" 2-ways in the doors and 2) 6-1/2" 2-ways in custom kick panel speaker pods. I also have 2) 10" MTX subs in the spare tire well, in a custom made fiberglass enclosure that is bolted in using the stock tire hold down. I also have 2) coustic amp creating about 800 watts. I've worked in 3 different car stereo instal shops and have been doing car stereo and multimedia for over 20 years. Click on my My Z Photos on the left, below my Avatar, you'll see what I'm talking about. It's quite a few pages back so scrol thru them and see if you like those. Your speaker plate is a good idea but not very practical for a lot of people around here though. Welcome to the best Z car club on the net. Dave
-
I'm loving the fact that the cars are getting more and more recognized as a collectable. (Don't start guys, not looking for any comments) but having Haggerty do the video was nice to see and kinda informative for those who don't know what to look for when it comes to rust. This should be required viewing for the newbies. maybe? <iframe src="http://video.hagerty.com/embed/player/?content=P26HCR1P385G84MY&widget_type_cid=svp" width="420" height="451" frameborder="0" marginheight="0" marginwidth="0" scrolling="no" allowtransparency="true"></iframe>
-
Didn't see them but then again, all the chemicals I'm around all day in the garage, have really messed with my X-Ray vision. Hell, the kids are taking advantage of it by doing stuff and getting away with it. Glad you like them, 5 years and a few thousand customers can't be all that wrong. Looks great. Dave
-
George, I absolutely Love the mat black finish in the engine bay. It that a crinkle finish or just flat black? Sorry to change the subject but I gotta know. By the way, when I had my triples, I didn't have any overheat issues with the 40DCOE's but I'm sure the weather up here in the Great NW doesn't compare to El Paso, TX. Dave
-
Luckily, the 260Z is a project car, so when I have time to work on it, I can take my time and do it right. If anything has a possibility of rust, it' gets POR15 when and where applicable. I bought the full ES Black (Graphite Impregnated) Poly Urethane kit and have or will instal every bit of it. The only think left in the kit is the End links and body mounts for the sway bars. 1" in front and stock 5/8"? in the rear. Everything in the engine bar was also POR15'd and a double coat on the fender area under the master cylinder and clutch master area, as the old ones leaked and caused the rust that I had to take care of this time. It'll never happen again and if it does, the POR15 should slow it down and the area will easily be repainted without worry of the Brake fluid causing issues again. Great write-up as I know the benefits of the Poly on My cars. Dave
-
Not if you have Poly bushings on the lower control arms. But you're correct for stock rubber. Looks good by the way. Now quit with the baby steps and rip that thing apart... hehehe. Click on one of the 2 "Latest Gallery Uploads" on the front page and you'll see what I just got done on the 260Z. And here's some Mustache bar pics to add to your Thread.... I know the bar is on upside down on the diff, I fixed it after the picture was taken. And here's the bushings on the 240Z without the bar.
-
I agree, but at the same time, the car won't be hot-rodded around. I've spent way to much money and time on the 260Z to go thrashing around in it like Tom Cruise in a rent-a-car in "Days of Thunder" I cut the center out in hopes of raising the dual exhaust up a few inches or so. Plus it looks different and kinda cool. If I find that it may be an issue, I'll make, or have one made, a bracket to act like a strut bar for the rear. But I won't be speeding, braking and cornering like a race car. I'm building it for Show, Cruising and Touring (long drives) It'll have all the luxuries of a sedan and the Sportiness of a coupe. Or at least that's what I'm shooting for. I'll have a better idea about the crossmember/diff/Rt mount and Camber when it's all in and drivable. But thatnks for your Concern Jon, I know you're just looking out for me (Us) Dave
-
Typically, it's not oil. It's gas seepage with dust and dirt to darken it and make it look and feel like oil. Also, the front carb is near the block breather tube, which can leak and be caught on the front carb area. When you choke it too much, the overflow will travel down the fuel valve and collect on the adjuster nut and tube. Don't worry about it. Dave