Zs-ondabrain
-
Posts
4,362 -
Joined
-
Last visited
-
Days Won
1
Content Type
Profiles
Knowledge Base
Zcar Wiki
Forums
Gallery
Events
Downloads
Store
Blogs
Collections
Classifieds
Everything posted by Zs-ondabrain
-
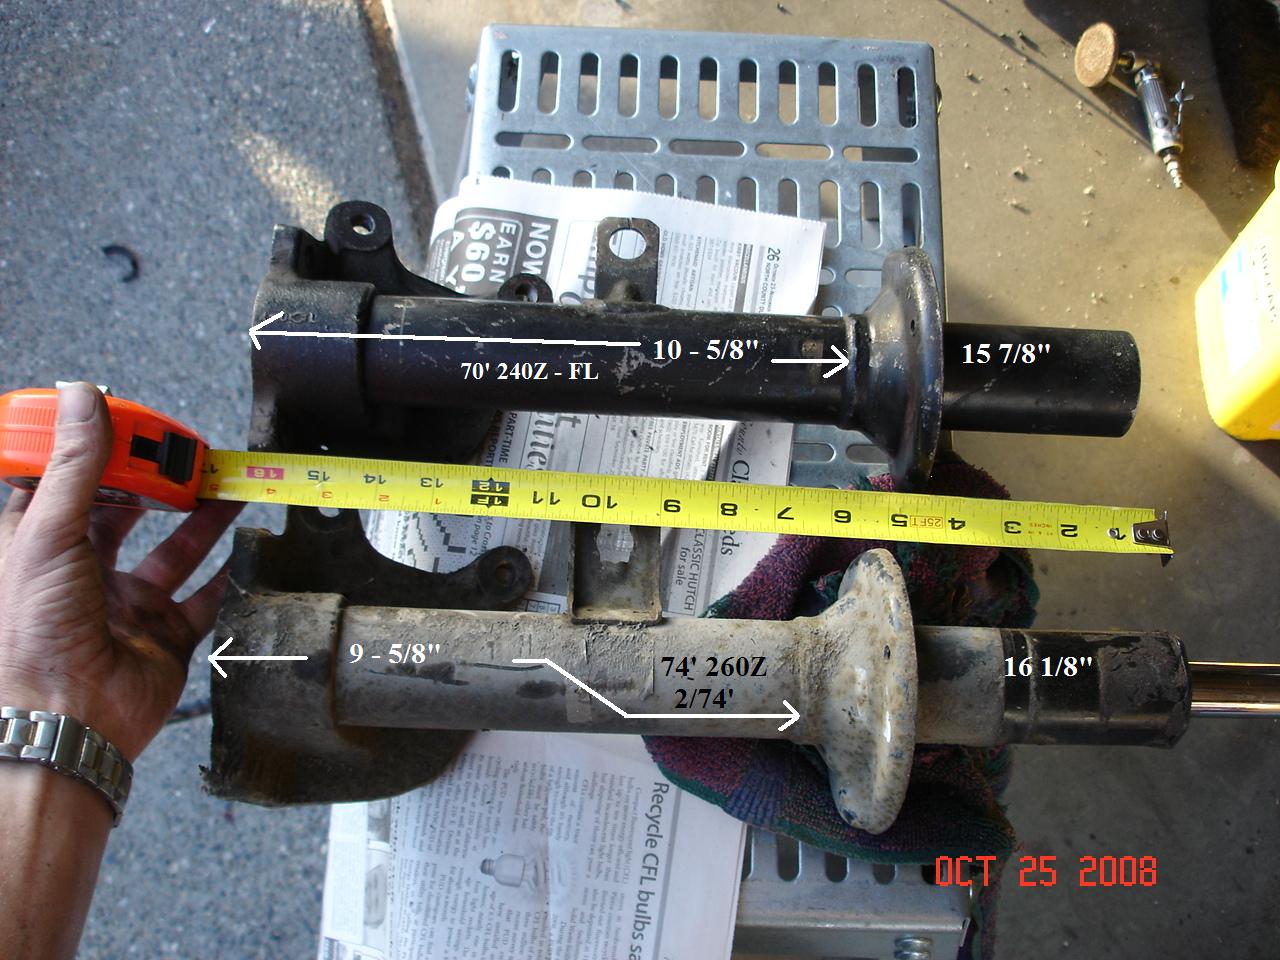
The struts are a different size. The diff should bolt in, as should the mustache bar and lower control arms. I believe the 2+2 has taller and stronger (more stout) struts and springs and the purches sit at a different height. I too have a 70' 240Z and an early 260Z. The struts assemblies were different. I even remembered to t6ake a picture and make measurements. The pictures are of the front left struts. Not sure if the pics will even help but there they are. Dave

-
Not really. A new set of Halogens or H4's are still going to be dull without improving the power situation. The HLH will introduce relays into the system and the headlight will get their power directly from the battery, turning your combo switch into a switch that only sends a signal to the relays, rather than powering the whole circuit. Being a plug and play harness, you won't have to cut, drill or alter anything to instal and use the HLH. Just unplug your headlight plugs in front of the radiator, mount the relay pack using one of the Voltage regulator screws, connect the harness to your headlight plugs, connect the power wire to the battery, bolt down the ground wires using your lower vallance bolts that are located on the inner frame of the front end and you're done. With the harness in place, you can use any new set of lights that fit, including H4 conversion lights up to 100 watts without ANY issues to the system. Email me if you're interested. Dave
-
Here what is?
-
Trying to work on the damn 260Z again. It's almost a lost cause with all the other stuff going on around my house. :stupid: Anyways...... The Parking light circuit includes..... Dash lights Front and rear side markers Rear taillights Front marker lights (in the turn signal housing License plate lights This is the major reason behind my Parking light upgrade harness. I'm willing to bet that your front sidemarkers and lower markers are also out. That being said, It sounds like your Combo switch is faulty. It happens more often than you'd think. The teeter totter contacts are not being pressed down hard enough in the second position (headlights on) I would start with removing the switch and attempting to repair the switch. Just don't lose any parts and DO NOT USE REGULAR GREASE. Use a very small amount of Di-electric grease on the bullet track (the area that the spring loaded bullet slides on) As you can tell from the list above, Th parking light circuit has about 19 bulbs, 30+ feet of wire, one Rheostat and a butt load of old connectors and one switch. The fusebox and the combo switch take the heaviest hit by switching and supplying the needed power for all that old wiring and bulbs. I'm not trying to push business my way, as I could always use a day off, but it also sounds like it's time to get my PLH (parking light upgrade harness) and my HLH (Headlight Relay Upgrade Harness) The will introduce Relays into a tired system and put power back into the systems and remove the heavy amperage loads that destroy the combo switch and fusebox. Email me at wolfin32Z@yahoo.com for more info, pricing and other details. Also, Use the search engine to find different threads on the same subject. Dave. Also, clean your fuses and fuse clips when you get a chance. Also make sure all your grounds are in tip top shape (Start with the one above the engine harness, below the battery tray)
-
All 240Z's came with 17mm ?? front sway bars. Increasing that to even a 19mm and adding a 17 or 19mm rear bar will change thing dramatically. When I added a 19mm to the rear of my 70', the difference was night and day. No more sloshing around. and increasing the front to a 23mm was even better. I personally wouldn't go any larger than the 25 / 19 combo. But that's just me. And don't forget to add just a thin film of the Urethane grease to each peice as you install it. Especially the sway bars. Dave
-
add a 25mm front sway bar and a 19mm in the rear and she'll rock right thru those corners. New KYB struts are about $50 a corner and well worth it. KYB's are great fro stock applications but if you lower it, go with the Tokiko's. I love my 70' beyond words, so I totally understand where you're coming from. enjoy, Dave
-
Nope, just 4 nuts and the fan assembly comes off, unless you have a shroud, then it's a little tougher. Just put the nuts back on with an addition washer to clear the stud more, and hold the pulley on properly.
-
None of them are correct so far. I have a 79' ZX 5-speed R200 3.90 diff 225/50ZR16's At 3000 RPM's my speed is exactly 80mph and I've done the mile on the frreway (using markers, in exactly 1 minute @ 60 MPH. My speedo is dead-on. So far, the second chart from E-ticket says my tires are 24.9" tall when they are new and 24.25" tall it also says that my 3.90 diff and 79' 5-speed are WAY off and I should only be doing 65 MPH (ish) Is there a scale that actually works out there. or is my Z retarded?
-
I'm thinking LOCK WASHER. anyone else?
-
And since Michael Jackson is 75% plastic, it's been said that they will melt him down and make childrens toys, so they can play with HIM for once. HAHAHAHAHAHA....................
-
I'd hit it with a hair dryer for a little while then give it another 24 hours before gluing your rubber back on. Just remember that some glues actually speed up rusting, so let it fully cure before gluing. Dave
-
Someone on the same forum said they were "BAMF" flares. Not sure what the difference is between BAMF, IMSA and ZG Flares. Try this link, it not only suggest Sales but has pictures for reference and instal. http://www.zcar.com/forums/read/1/1916069
-

Mouning MSA ZG flares on a 260Z (How-To)
Zs-ondabrain replied to Zs-ondabrain's topic in Technical Articles
Standard driven 260Z (not a racer or driven like one) Eibach PR lowering springs (MSA Bought) About 1.5" drop from stock height. KYB Struts 17 X 10 Rota RB w/ 35mm Offset (I think) 25mm front and 19mm rear sway bars So stiffer but comfy and lower but not extremely low. correct height tires but much wider (I'm thinking 275 or 265 / on 45 series 17's.) What is the correct height of the stock tire (in inches, tall?) and what combo is the correct one for a 17" wheel ___/__? (265/45? or 265/50?) Anyone know for sure.?? I'm doing the ZX rear disck brake conversion, but should I mount the wheels directly onto the stub axle or should I use a plate that is the same thickness as the previous brake drum??? Any help would be greatly appreciated. -
See there, I knew it had something to do with carbs and valves. I thought 3 sounded weird for valves. Thanks Mike, I figured it would be you or Ron who answered the question. Dave
-
Mouning MSA ZG flares on a 260Z (How-To)
Zs-ondabrain replied to Zs-ondabrain's topic in Technical Articles
Exactly!! and funny enough, I need to pull the springs on the rears to install the bump stops, that I found on the shelf, AFTER I assembled the rear struts..... LOL Oh well, at least they are clean and not on the car yet, before I found my mistake. -
Either way, it's great to see the Museum getting publicity. But unfortunately, he basically was repeating the "432" phrase with the interviewer and then finished by saying "BIG". So he basically agreed with him that it was a 432 ci block. In his defence, I'm sure age and nerviousnes had a play in his mistake. I'm sure I would also make a few mistakes when under the pressure of an unprepared interview. But like I said, at least the public has a few better ideas of what that car was that "Screamed by them" on the freeway.... Ya know? And to end the confusion for us who are NOT in the know, What exactly is a 432?? I was told that it was a 4 cyl, 3 valve (per cylinder), 2 carb, motor. How far off was I missinformed??? Anyone?
-
Mouning MSA ZG flares on a 260Z (How-To)
Zs-ondabrain replied to Zs-ondabrain's topic in Technical Articles
I got a lot of tips from "The Definitive Thread" That Blue Z is absolutely Gorgeous and also a big inspiration for wanting to do this and show the work involded in the process. The HybridZ thread left a few unanswered questions that were very apparent while doing the first mock-ups. Where to start? How high for each specific aplication and tire size? Lowered car or not? The variences are infinate.... I have an idea of what tire and wheel combo I will have but doing the ZG flares first will help when measuring to fill the arch and well, in a manner that will look and operate best. And I figure that with an additional 2.5+ inches of upper clearance, I won't have hitting or rubbing issues with wider tires. **ALSO** The design of the MSA flares was a major factor in determiniing where and how they would sit and be mounted. They were basically flat and need to be bent inwards to match up with the fender lips, which also makes the flare more rigid and tight. Who knows, I might not even like the look when all is said and done, but that's next year and by that time, I may not even give a crap and just want to drive the damn car, finally. -
Mouning MSA ZG flares on a 260Z (How-To)
Zs-ondabrain replied to Zs-ondabrain's topic in Technical Articles
OK, So I woke up late and got to work anyways. I bolted the flare to the remaining wheel well. And in the process of all this, I discovered just how bad my Dogleg was and went to work on that as well. I'm also filling the 260Z bumper shock holes and the fender indents on the quarter panels. Hope the pictures help any and all. Dave -
So I broke down and finally bought the MSA ZG fender flares for my 260Z project. I hope to have the car done and driving down the road by spring of 2010. But we all know how that "Hope" can be changed to "wanted to be done" So after looking at as many pictures as I could find, I think I figured out which flare goes where, as they are NOT marked with any kind of identifying marks to give you a clue. The fronts and rears are different so that makes that part easier. (Fronts are skinnier than the rears) The rears have a wider section on one part of the top than the other. The wider section, for some reason goes towards the doors. (I swapped flares for 1/2 hour till I came to the conclusion previously stated) So my first post is going to be ONLY of the rear left fender. You have to pull (bend) the flaretowards the center to get the flares to line up with the wheel well, as they are molded Wide. Narrowing them bows the top out for that flared look. I test fitted then and clamped them in place till I could drill and screw them in place, temporarily. I drew the outline first, then measured about 1-1/8th down (in) and drew my cut line. As per instructions found on Hybridz.org I only cut the outer metal first. REMEMBER!!! The Z's are a Unibody car and the folded fenders hold the outer skin to the inner body, SO it must be welded back together or you'll lose the integrity of the body. So at the widest point, I gain about 2.5" of clearance for the 17X9.5 ROTA wheels that are planned for the future. So the outer sheet metal is removed and the inner fender is cut with enough hangover to fold the metal upwards and be able to tack it to the outer metal as shown above and below. I'm going to bed but will keep adding to this as I go along. I promise. I'm also doing the doglegs at the same time so it may take a while longer than previously thought.
-
1 is a condensor and it is replacible, I could have sworn it was on a black wire but I could be wrong. It's typically mounted to the same bolt as the Voltage regulator. Doesn't matter how you connect it to the correct wire, as long as you connect it. 2 looks like an A/C relay. don't take my word for it though. Arne would know before me. 3 are you sure it's not a Yellow/white wire? like the insolated one near the motor mount? Your turn signal flasher might also be in the upper left hand kick panel area and has a white, 2 wire connector. So if it's not on the steering column support, look to the left.
-
If it's at all possible, give it a smack with a hammer. Not too hard but enough to break loose any rust that may be locking the bolt in place. Let the bolt soak for no less than 1 hour before attempting to remove it. Or overnight as stated above.
-
Consider us Verbal idiots. A picture and good description can mean the difference between the right and totally wrong "Fix advice" There are 4 bolts on the thermostat housing, 2 on top and 2 holding the main housing to the head. Which 2 are you refering too?
-
Finally bought my first 240Z (pic inside)
Zs-ondabrain replied to logan1's topic in Open Discussions
I'd say you're off to a damn good start there Logan. Congrats!! $1800 is a damn good price for a series 1 in decent shape. -
The front calipers are from an 85' Toyota 4x4 and the writing on the calipers is " S12W " and it will bolt right up to your solid rotor in the front. No modification needed. If you want bigger, go with the S12 calipers and Vented rotors, Not sure on the specifics. Also buy a set of Earls Stainless Steel braided brake lines. (about $80 ?? I think.) There are lots of choices for the rear. and I'll let the other guys tell you about those..... Guys?? I'm personally going with a set of 81' 280ZX rear calipers and rotors, to be bolted up to the rear using adaptor brackets that I got from a guy on http://www.hybridz.org There are full writeups both here at CZCC and hybridz, Use the search button and edumacate yourself on everything before making a final decision, as none of them are cheap conversions. QAlso look into the bigger ZX master cylinder and proportioning valve.
-
I gotta agree with Carl on this one. I realize that being on the east coast or close to it is a real pisser when it comes to a "minimal rust" Z, and getting as far as you have, only to go look for another one in better shape, can be as previously said, Dishearting. BUT...... 1. Take everything that is salvageable, off the car and set it aside. 2. Find another shell or better for a decent price. 3. Compare the parts of the 2 cars, as you dissasemble the #2 car. Set the best parts aside and sell the remaining parts to help make up the cost of the second shell. The experience will move along much faster, now that you know how to disseasemble the Z's. Toss the broken stuff, sell all unused parts, and find a local place that will pay for your salvage steel. It'll all be well worth it in the end. The fun and learning curve of building your own Z. Especially when people ask you "Damn!!, Where'd you get such a beautiful car" You can say to them "We Built it from the ground up" Keep your chin up, and your eyes open, Dave