Zs-ondabrain
Free Member
-
Joined
-
Last visited
Everything posted by Zs-ondabrain
-
 and to add to the 2/73' pics, here are a finished pair that I'm doing for "ZUP" And I really need pics and dates of what ever Z used the 3 wire Turn Signal switch with a 3 wire connector. Dave.


-
And when mounting the overflow tank, try and keep it as level with the top of the radiator as possible. This will allow the radiator to suck fluid back in without gravity pulling the fluid back into the overflow. Basically, the longer the straw, the harder you have to suck to get the drink in, shortening the straw or drinking straight from the glass will require less effort (in radiator terms). So higher is better. Also, Red-Line make a product called "Water-Wetter" it will reduce coolant temps up to 15 degrees in most cases. With my aluminum radiator and the water wetter and high mounted overflow bottle, my temp never goes over 180, even while stuck in 95 degree traffic jam in L.A. after leaving MSA this year. Dave.
-
Lets keep searching for an answer anyways, I get the puff of blue smoke and burn thru 2 quarts per tank. I need to do a rebuild and have the same question in mind. Just a simple upgrade with pistons and rings, bearings, seals, freeze plugs, etc. etc. Best rebuild kit? best affordable pistons and rings? I also plan on lightening the flywheel to 16 pounds and ballancing everything, installing my rebuilt N42, stage 2 cam and everything else will be transfered over. Thanks in advance to all who input. Dave.
-
Come on people. Take 5 minutes to go take a picture of your switches. I really need a picture of an 8/71 and a top view of the 1/71, MATT. But I still need some more input from every one who can add to this. Let's fill this thing up. If you don't see your switches on here, ADD them. Thanks, Dave
-
http://link.brightcove.com/services/link/bcpid1417302180/bclid909804097/bctid1557911172 It's a little off key but it gives you and idea of the history. The lights are definatley different but it looks more infinity than Nissan. You know what I mean Dave.
-
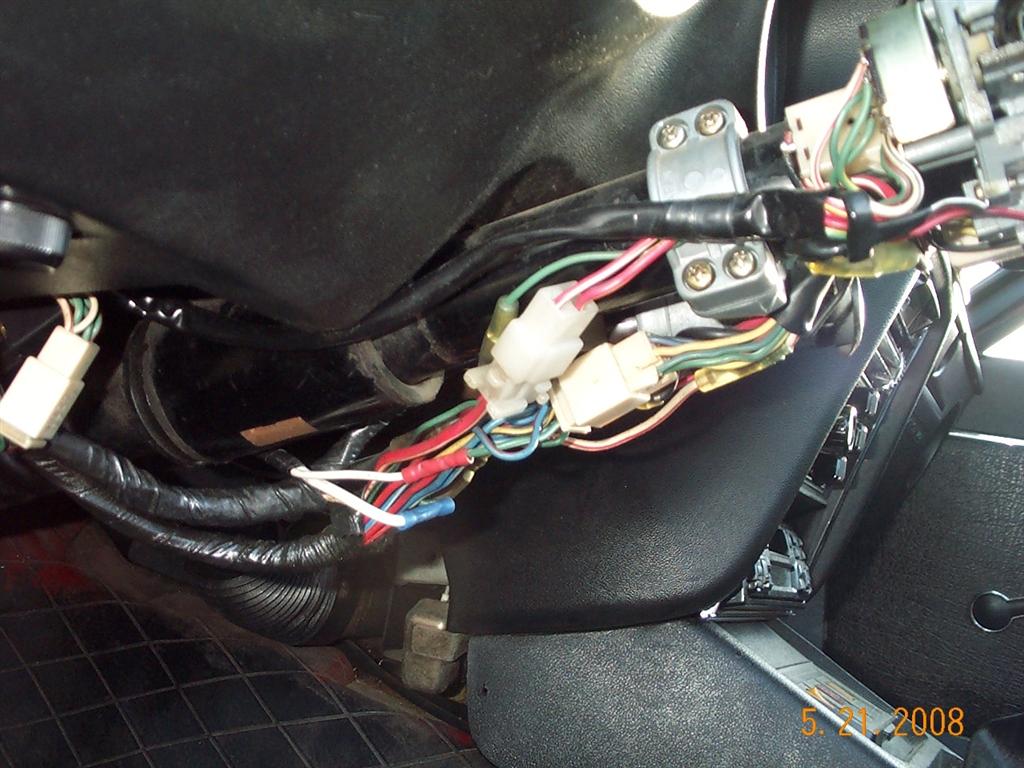
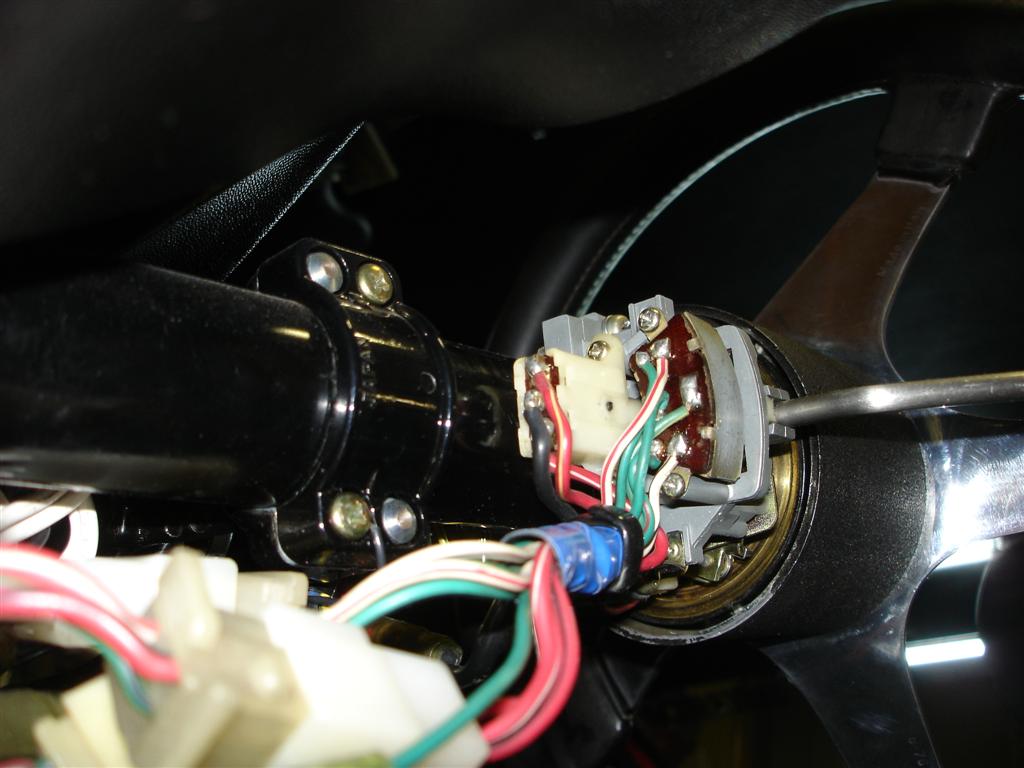
Here's another .... 2/73 240Z 3 position wiper and usual everything else, long pigtail on Turn signal switch. Also, I believe the combo switch sits on an upper angle (due to the 3 position wiper switch) as compared to the earlier 240Z switches that sit in the center of the metal chassis.
-
That's perfect Mat, is there a double black wire (1 small and 1 large) on the top of the headlight switch? And does the small black wire from the wiper switch go to the top of the headlight switch? Thanks and keep 'em coming guys, the more, the marrier. Dave.
-
Damn Stephen, Who pissed in your Cereal bowl this morning?? It's called "Funnybone" for a reason. If you drove your Z more often, rather than sit at your computer, you'd be a little less grumpy. Not trying to offend, but Damn dude, breathe.
-
This is for everyones benefit. You'll love this thread later, when you need it. Just takes 5 minutes and a camera. Anyone?
-
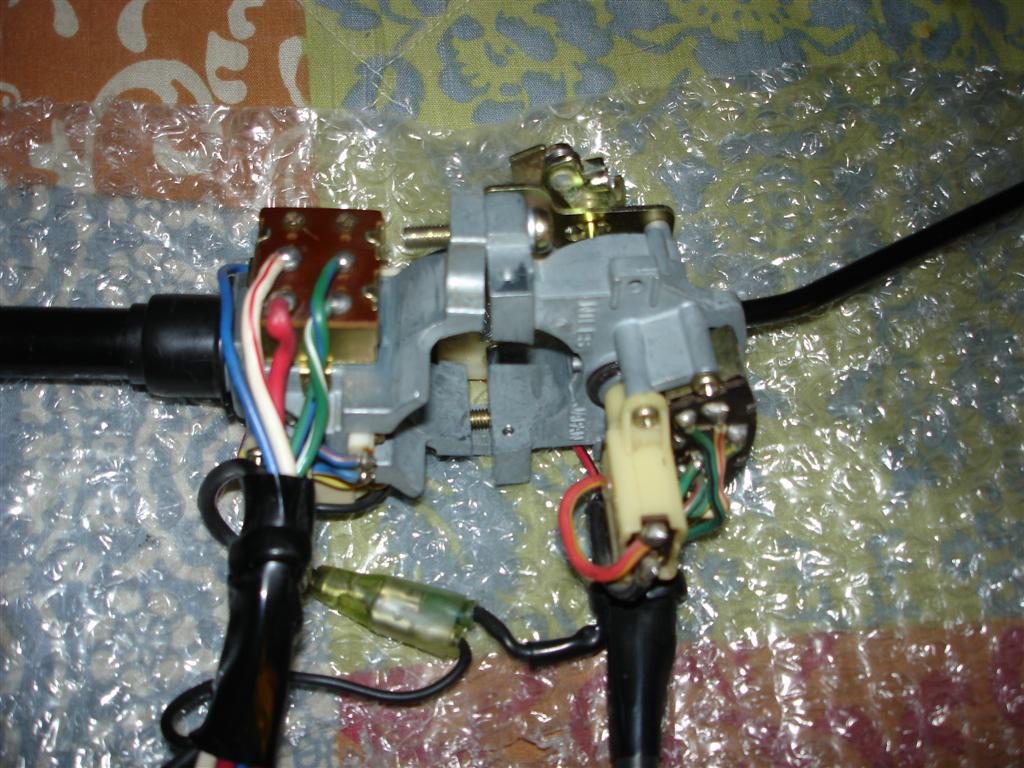
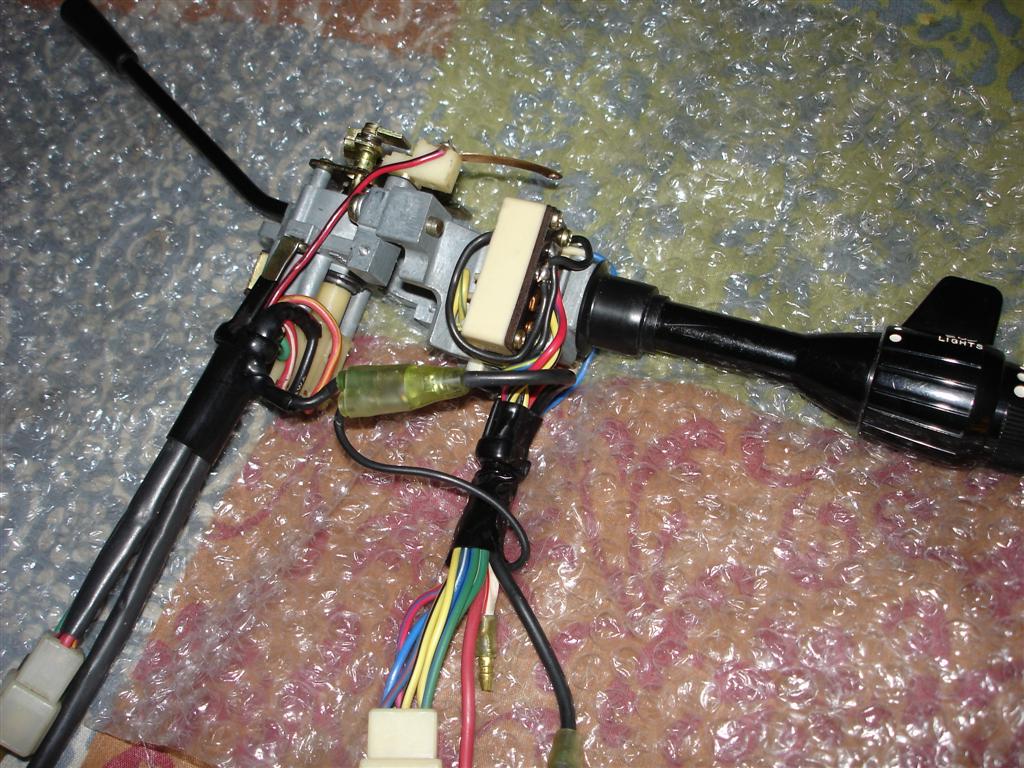
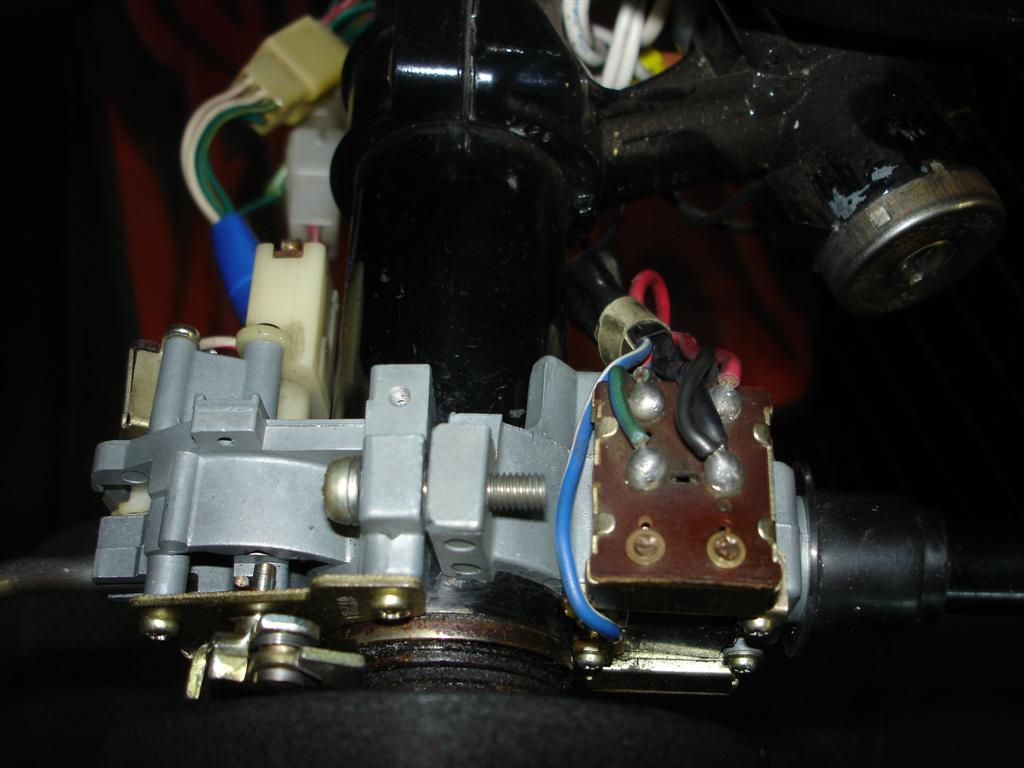
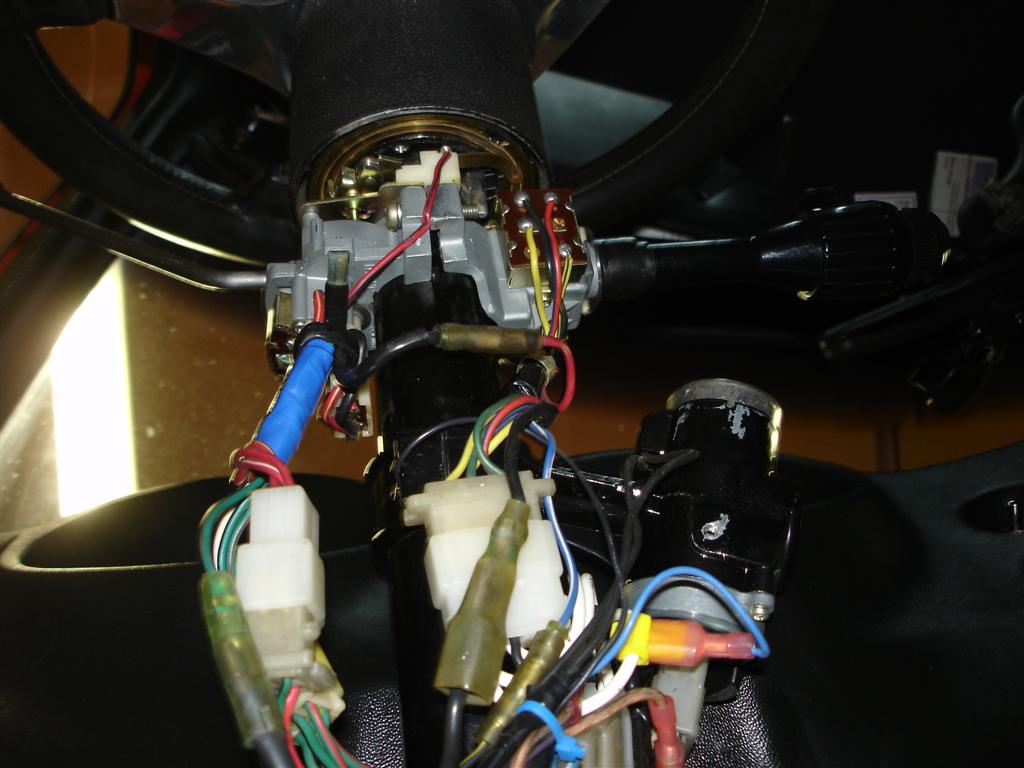
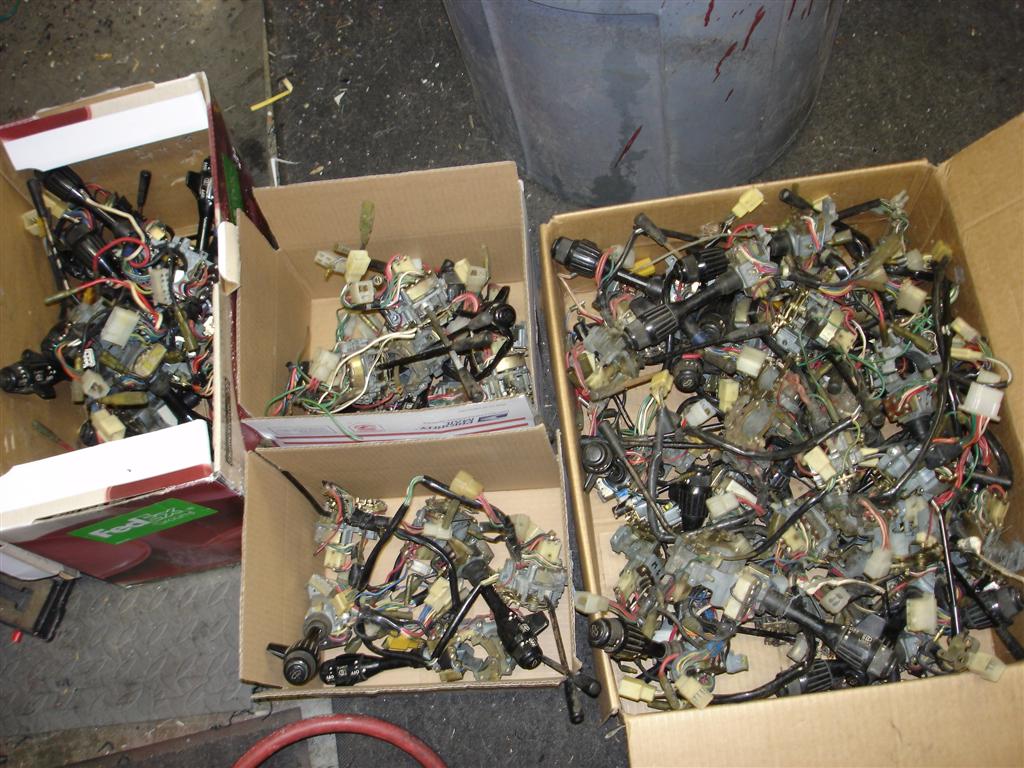
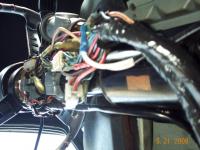
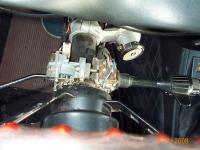
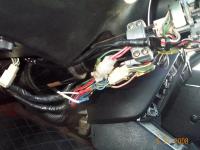
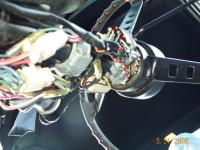
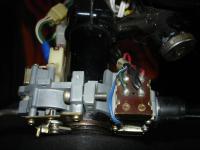
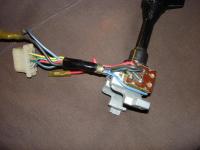
I hope to make this a Sticky (Mike!!) I want to Document every S30 style combo and Turn Signal Switch. I need every one to see what is already posted and add to this Thread if you don't see your style of switches. With any luck, anyone can pick up a switch out of a box of parts and be able to cross reference it here and know exactly what they have. I am now in possesion of over 80+ switches that I would like to start rebuilding for people and customers. Only problem is that there are so many styles that I am not totally sure of what is what. So PLEASE remove 4 screws from the steering column cover, take off the top and bottom covers and......... Take a picture of.... 1 of the top (looking from the roof down at the switches) 2 of the bottom (show the length of the T/S switch pigtail and the wires going into the T/S switch and the wiper switch. Try to show as much detail as possible that makes your switch different from the others listed. Make sure to STATE YOUR BUILD DATE!!! So everything can be properly documented. Thanks to all who participate. Dave. The pictures below are of my 8/70 and the combo switch and T/S switch wires are clearly visable as are the connectors. large 6-pin on the combo and small 6-pin connector on a short pigtail of the T/S. and a 6 wire T/S box.


-
Carl, The BD harness is a deal. UNTIL you try to instal it in a 240Z. You have to... 1, remove the headlight buckets 2, cut the BD headlight plug off just to get it into the bucket. 3, re-attach the headlight plug and do the same thing on the other side. 4, wire up a bright yellow harness that only has 14 gauge wires. 5, The BD relays are next to impossible to replace, as nobody carries the replacement relay. It's the biggest pain in the A$$ I've ever had to deal with. And I'm sure I speak for every 240Z owner who has ever tried to instal one in their 240Z. You basically get what ya pay for. Pay more, get one that is perfect for the 240Z, pay less and spend 3 hours installing a peice of crap. Did you read the second to last sentence, no cutting or splicing required. That's too damn funny. JMHO Dave.
-
OK, slow down guys, I'l Blushing over here. :love: I try to make each and every item as if were going into my own Z. I can't imagine how some Manufacturers make such infearior products considering their budgets and Mfg Plants. It's almost like they've never even seen a Z, but they're willing to make a "Universal" Part for our cars. eh hmm, VB, BD, etc, etc..... But anyways, I really appreciate the compliments, business and Praise for my efforts. The word of mouth advertising always seems to be the best. Especially when someone has tried an upgrade from somewhere else and unfortunately finds out that the Universal part is not even close without serious alteration to their Z or it's wiring. Then to write me and tell me how much more Superior My product is, compared to the Big name company. Makes me feel as if I'm doing right by you guys. And that's what makes it all worth it. My products are Warranteed for the life of my business. But only if you purchase them thru me. If you buy my HLH, ZXP or SCP's thru any other supplier, like "Datsun-Parts" No warranty will be implied or enforced. Because there is no telling what the product has been subjected to between my shipping it to him, his storage or handling of the product, and his shipping methods to his ebay customers. I basically release all interest in the product once it leaves my home. But once again, this only applies to "Resellers" Thanks again to ALL for their purchases, continued loyalty and great words about my products. And please don't forget to add ARNE to your praises, for the SCP and ZXP were his ideas to begin with. I plan on staying in business for you guys and gals as long as possible. Thank you all, so much. Sincerely, Dave.
-
My Xenon Urethane front air dam was Corvetter Yellow when I got it. I got lucky cause they forgot to add a "Flex agent" and most of it was easily removed by "Flexing" the urethane to break the paint free. I then used a thin putty knife under the lifted paint. Almost all of came off except for a few tight areas. I used a paint remover on those small spots and got the rest off. BUT BE CAREFUL. Paint stripper WILL melt Urethane if you're not careful. I used the kind that dilutes with water for a safer approach. Good luck, Dave.
-
It had a Titon V6 out of the Titon truck. I also think it was an All wheel drive or even 4WD rear engine. Turbocharged as well, I think. Also, they have 3 good shots of mine and I saw my Z in four other pics, for a 7 count. On the shot of the red "Vertical Doors" Z, you can see me in my Datsun shirt, talking to Goose52. http://japanesenostalgiccar.com/picture.cgi?section=events&article=zcarnatls2008&picnum=213
-
Sounds like an oblong to me. Try cleaning the center contact, in the lighter hole. I've found that some plugs work and some don't. You just have to compare the adaptors to see why one works and the other does'nt. So I take it the lighter itself works? If so, that'll suck more power (amperage) than the Radar detector will. The lighter, in essence, is a short circuit, and that's what heats up the lighter. So it's most likely a fitment issue. Dave.
-
Just remember that those wires heat up and occasionally, the wires melt together and don't apear that way, the solder flows, the contacts over heat and melt the plastic bullets, and I've even had the bullets slip out of place apon re-assembly and not know it till I tested it. Then had to tear it apart and do it again. When the switch is apart, pay close attention to the hole that the springs sit in. Each hole has 2 small lips that prevent the bullet from slipping out of that hole. Occasionally, one of those small lips will break off and it's so small that you don't even notice it. Then you put it back together and it'll fall apart agin and you can't figure out why. Being as how I do this all the time, I have replacement parts and have even figured out how to melt a new lip on the hole's sidewall, to prevent bullet slippage. DON'T stretch the spring too much!! it'll cause too much strain on the lip and bullet, causing premature failure. I found that out the hard way. If you still have problems, let me know and I'll try to help. Dave.
-
And even easier is the SEM Rust converter. Clean up the rust as well as possible (wire brush, grinder, what have you) apply with a brush or even a touch up gun (paint gun) Let it dry then do the bodywork. or Even apply it on any questionable areas. You don't wash it off when you're done and it only takes a light film. Little goes a long way and you can spray it up into cavities and call it done. Dave.
-
Hey Tom, He already fixed the lights, It's the wipers that won't shut off now. Weasel, I think the switch is still broken, Try it again. And look for any solder joints that may have flowed into another connection. I rebuild them all the time and have found this issue more than once. Dave.
-
See. I told you someone would correct me if I was wrong. But at least we got the correct facts out without knockin somebody down. I really like the "ALL chrome" look. But then again, the black rubber makes everything else stand out a bit more. That's why I'm torn between the 2. Dave.
-
And to add to that, I believe that most 240Z's had the black rubber trim on the front and rear bumpers but the EURO bumpers (from Europe) were available as a Full Chrome unit and had no holes for the rubber trim to be used. It's a nice look, just like the one you pictured. You can make the US models look like that by removing the rubber trim and either filling in the holes then rechroming or just use the bolts that have a rounded head to fill the holes that are left after removing the trim. Someone will correct me if I'm wrong, Dave.
-
It is the switch. The contacts are controlled by a plastic bullet shaped ball loaded with a spring. Occasionally, they fall out or the small pastic lip that retains the ball, breaks off and then they fall off, leaving the contacts connected in the On or Off position. Pull it apart and see what's up. You may need a new switch if it's what I think it is. If not, just place everything back where it's supposed to be. If you need a new switch, contact me about replacing it or possibly rebuilding it. I have the parts you need. If it needs replacing, or rebuilding, send it to me and I'll have it all back together and working like new for $50. Better than paying $150 for a hard to find NOS combo switch. Dave.
-
If you're gonna use the 3M stuff, use the 99. it's stronger and less effected by the heat. I personally use VS-1081 (12oz can is $8.00) made for hi strength and hi temp applications. And for everything else, I use VS-185 $3.25 per 12 oz can (hi strength, better webbing, not a film like the 3M products. Under a hot sun, the metal can reach temps exceeding 140+ degrees F. A hot aplied glue will work better but your talking a lot more money and someone that has the equipment. Dave
-
The dash lights are typically dim due to old bulbs, bad grounds, and lack of sufficiant power to the lighting circuits of the 240z's. That's was the 2nd reasoning for the PLH or Parking Light Upgrade Harness that I make. It's major function is to relieve the amperage that flows thru the fusebox and the combo switch. The resistance in the parking light circuit is the best explanation for your dim dash lights, as they are on the parking light circuit. After installing the PLH, the dash lights, as well as the side markers, front markers and rear taillights were brighter. I personally removed the inner, green plastic domes, especially after finding that the factory painted half of each green dome white. Just removing those improved the lighting. Then I went to www.superbriteleds.com and ordered 11 BA9 wide angle, white LED bulbs. Then I painted the lip of the front gauge plate, silver. (not the can or housing but the black front peice, so the light would reflect off of that and onto the face of the gauge. The result was an ever so slightly blue in the white light. It's much cleaner, brighter and I can tell you how fast I'm going at night now. Sorry the pics are so big, I was in a hurry.....
-
somewhere in this thread, I think I was asked what the carb set up was on my Webers. Weber 40DCOE 151's Aux. Venturi's are......... 45 Chokes are...................28 idle jets are...................45 (F4) Main jets are................120? F9 Air correction jets are ...170 Here ya go, Dave.
-
The only other Black/white wires I can find on my diagram is from the ignition and one that goes from the Voltage regulator and taps into the Kick-down switch for an automatic transmission. Is the wire "Cut" or does it have a connector on it?? If it ain't broke, don't try and fix it, Dave.