Zs-ondabrain
Free Member
-
Joined
-
Last visited
Everything posted by Zs-ondabrain
-

 I used rivets and fiberglass followed by "Half time" filler. Great stuff too.
 -
go with the RB. Heard nothing but good things and the V-6 VG is a little snugger, so I've heard. Plus there are more "Extras" for the RB.
-
try the fusable link that is connected to the starter. I personally haven't run across this particular problem before but give it time and "BUMP" the post now and then. Till then, start checking all your connections, fuses and don't forget the harness plugs on the upper right side of the dash. If you fix the problem, be sure to repost what you did to fix it. good luck, Dave.
-
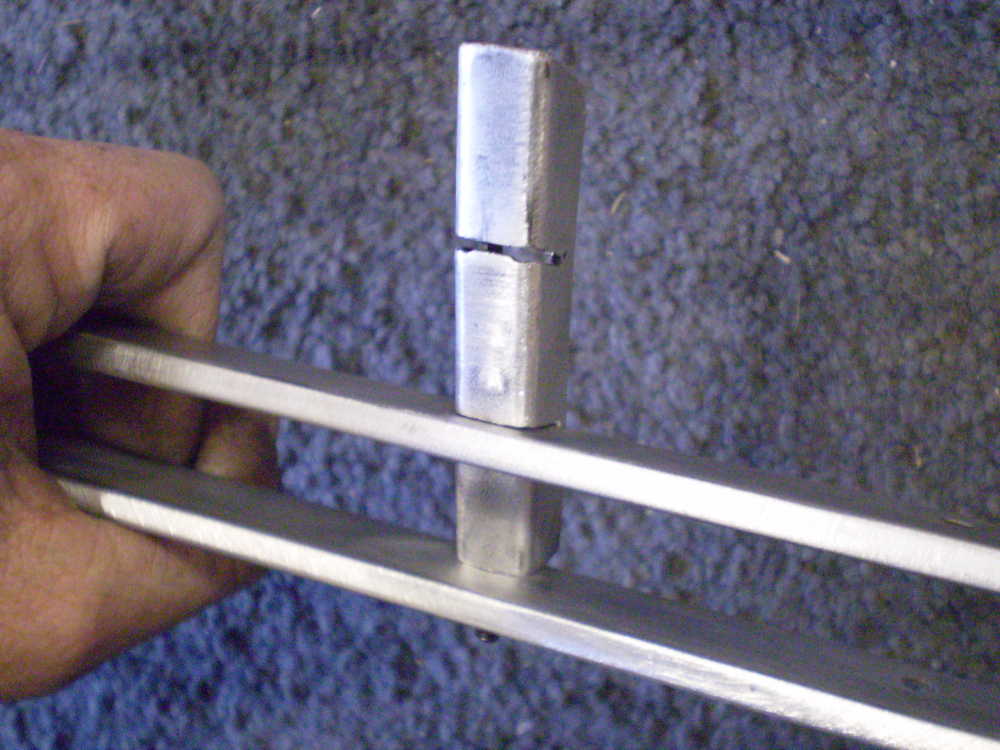
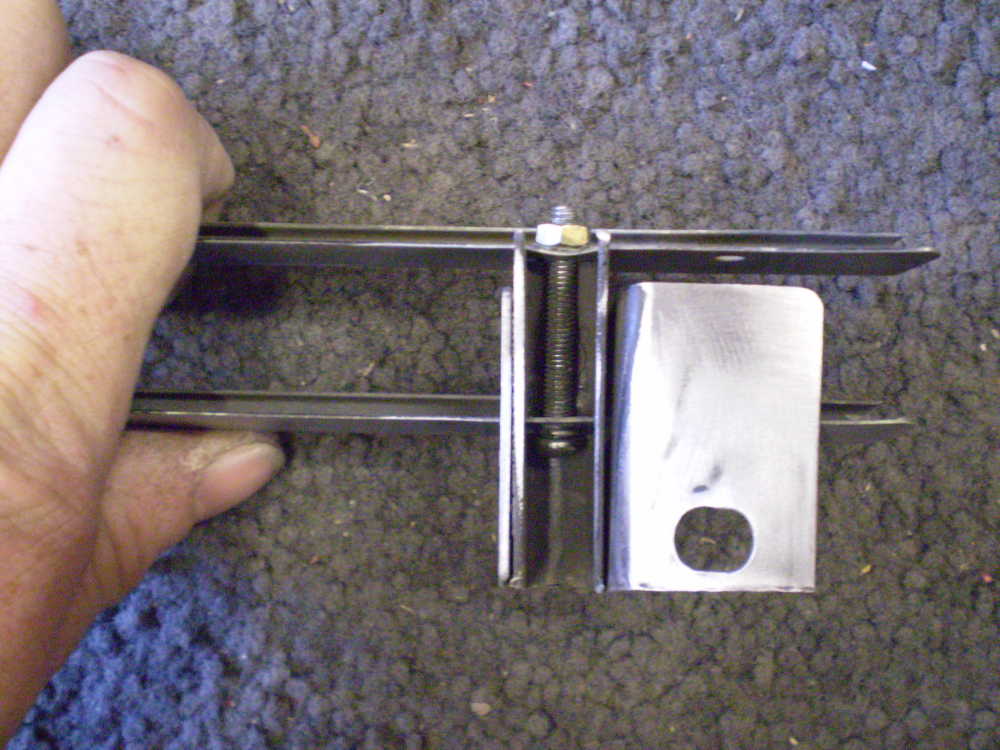
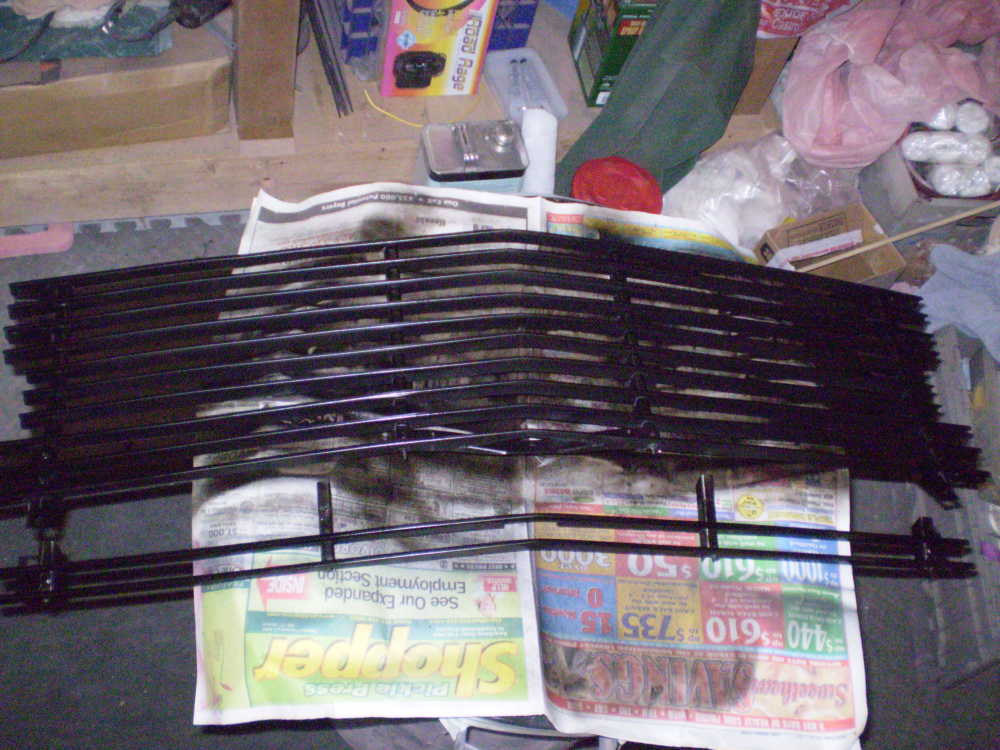
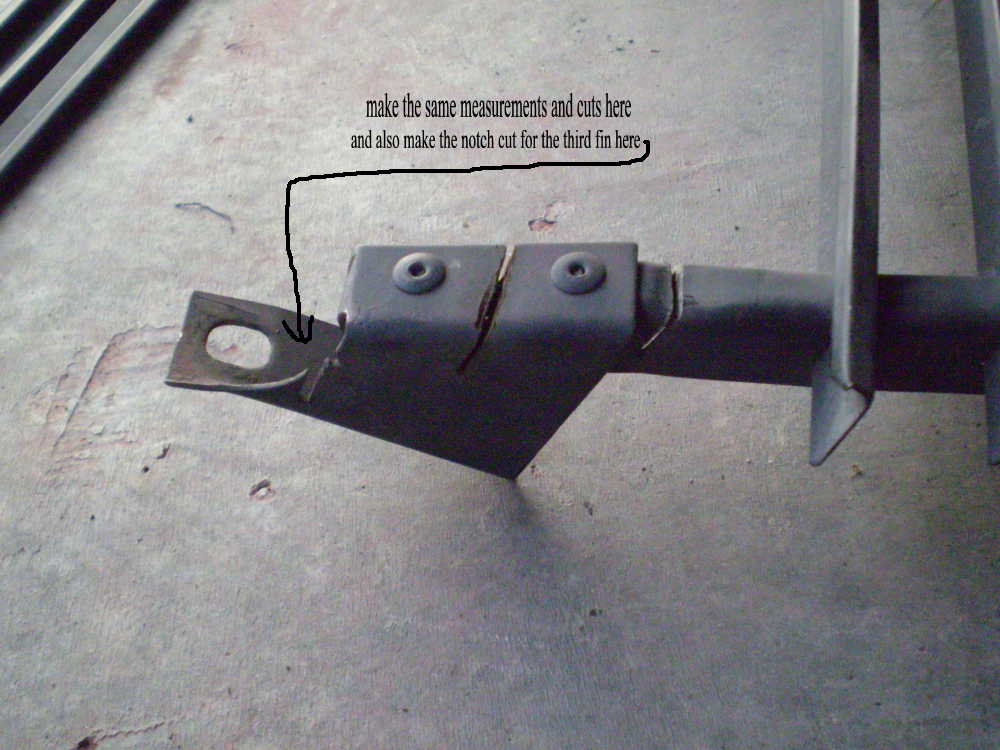
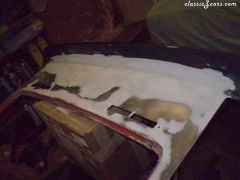
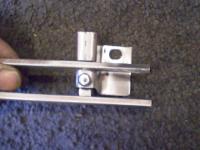
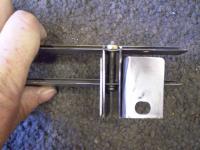
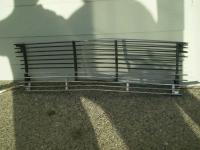
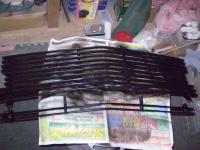
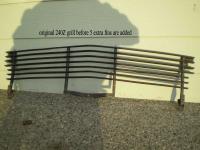
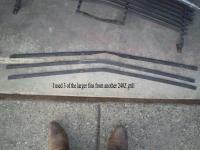
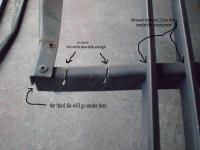
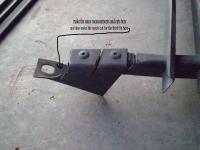
here are the rest of the pictures as promised. pic 1) right side lower support from a 280Z grill I think pic 2) one of the lower center supports. pic 3) inside of center support pic 4) backside of right support pic 5) all prepped and ready for paint pic 6) assembled for viewing pic 7) painted and ready for another coat pic 8) all dry and ready for install the extra slot cut in pic 2 allows it to fit onto the lowest fin on the upper assembly. then the side supports are held by the same screw as the upper halfs lower support. I used a Ford Semi-gloss Black. Same as my engine compartment paint.

-
I think they call it masonite or 1/8" MDF (Medium Density Fiberboard or you can look for HDF (High Density) Just remember to round off the edges so it won't cut into your new fabric. My 2 cents worth, Dave.
-
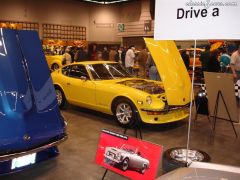 Ahhhh look at that, Datsuns along side the classic hot rods, RIGHT WHERE THEY SHOULD BE.!!! I wizz the old hot rodders off all the time when I show up and show my 240Z at their show and every body overlooks their cars to come look at mine. I LOVE IT!!
 -
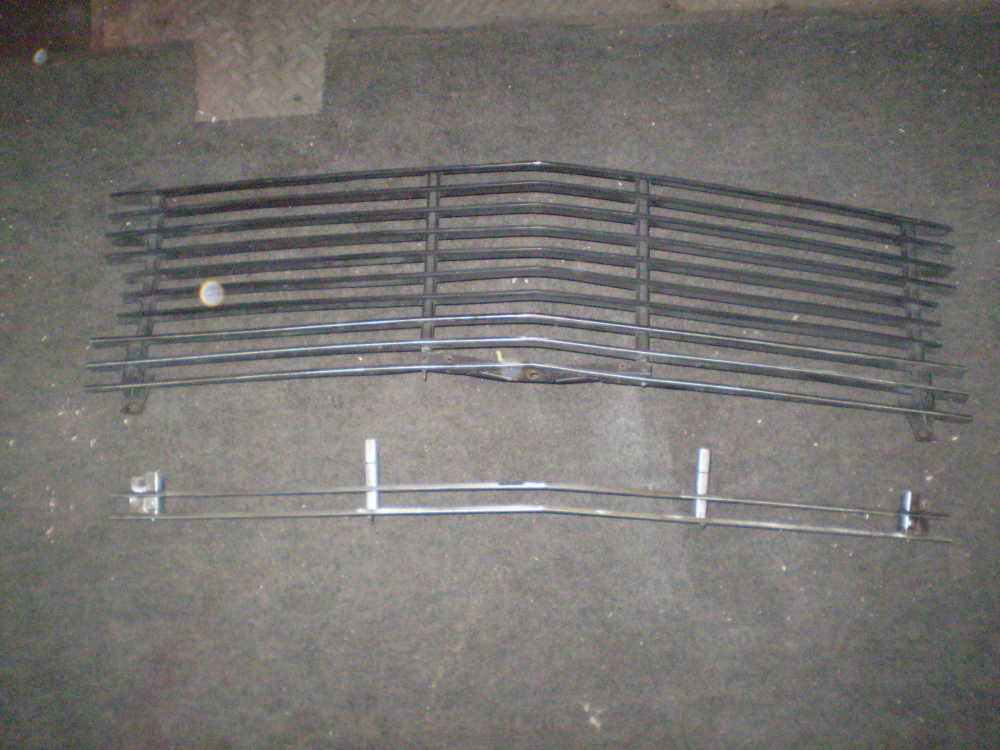
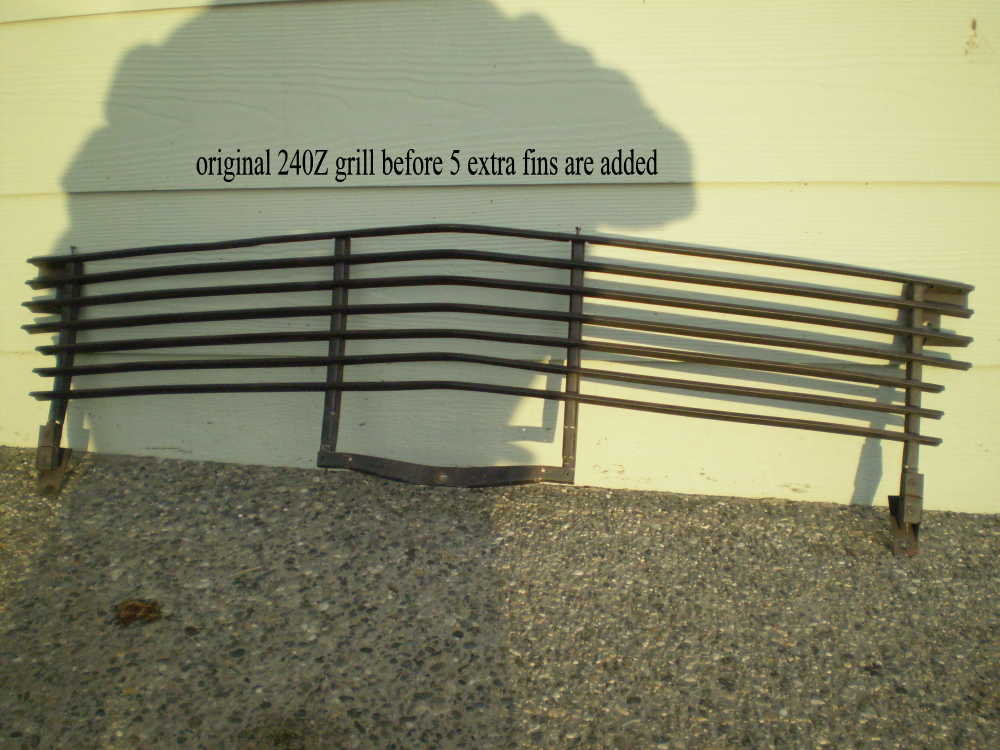
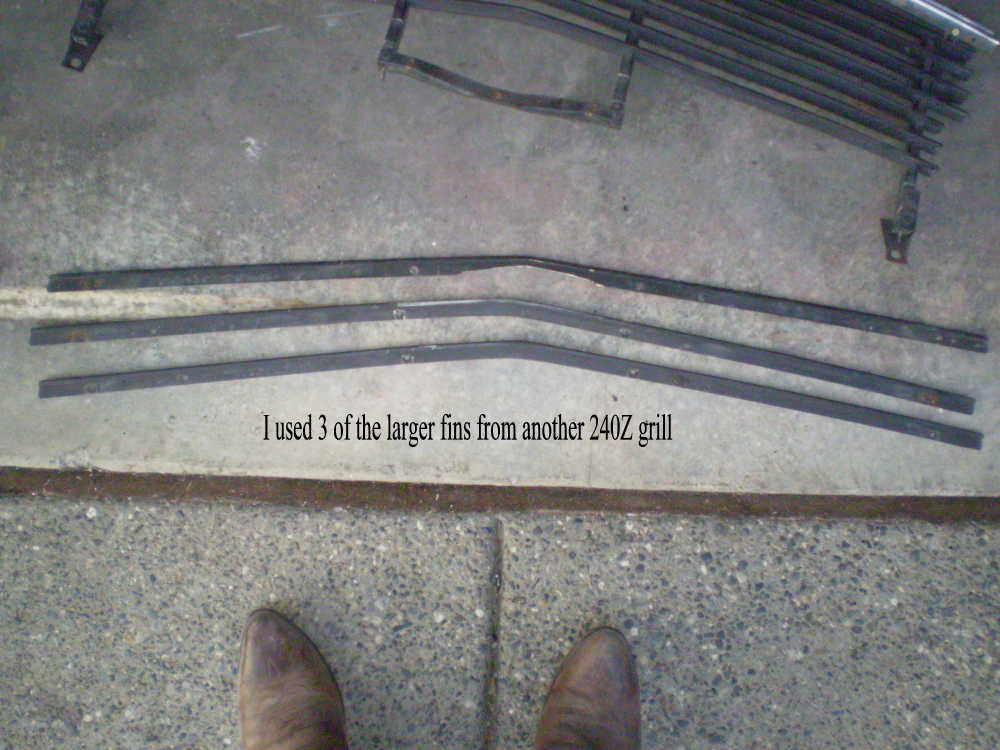
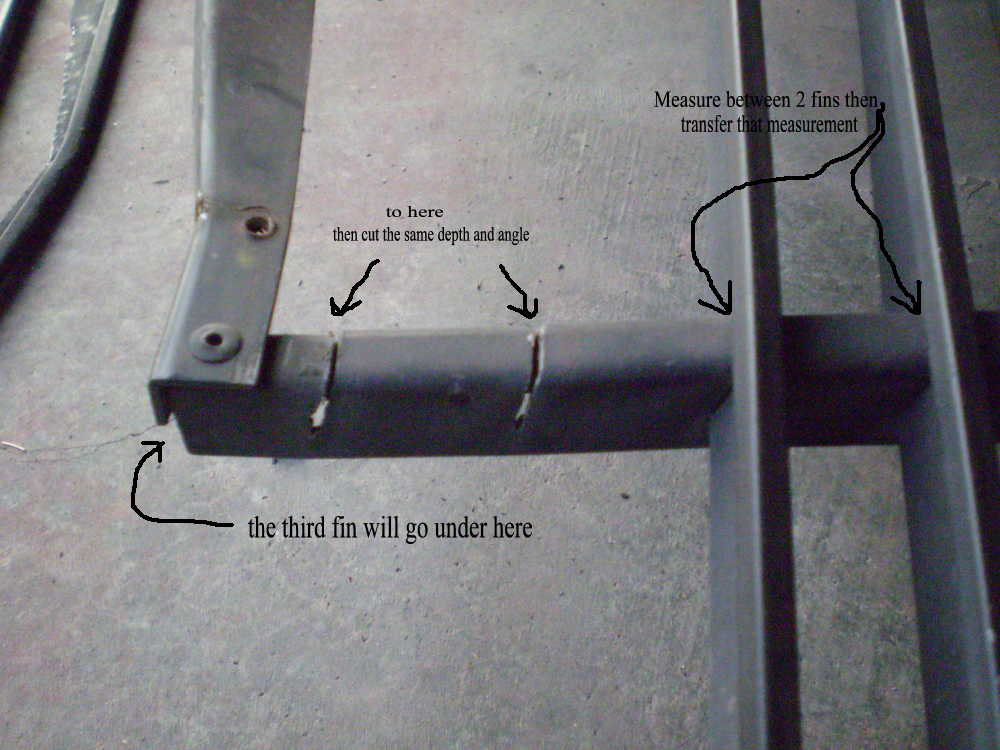
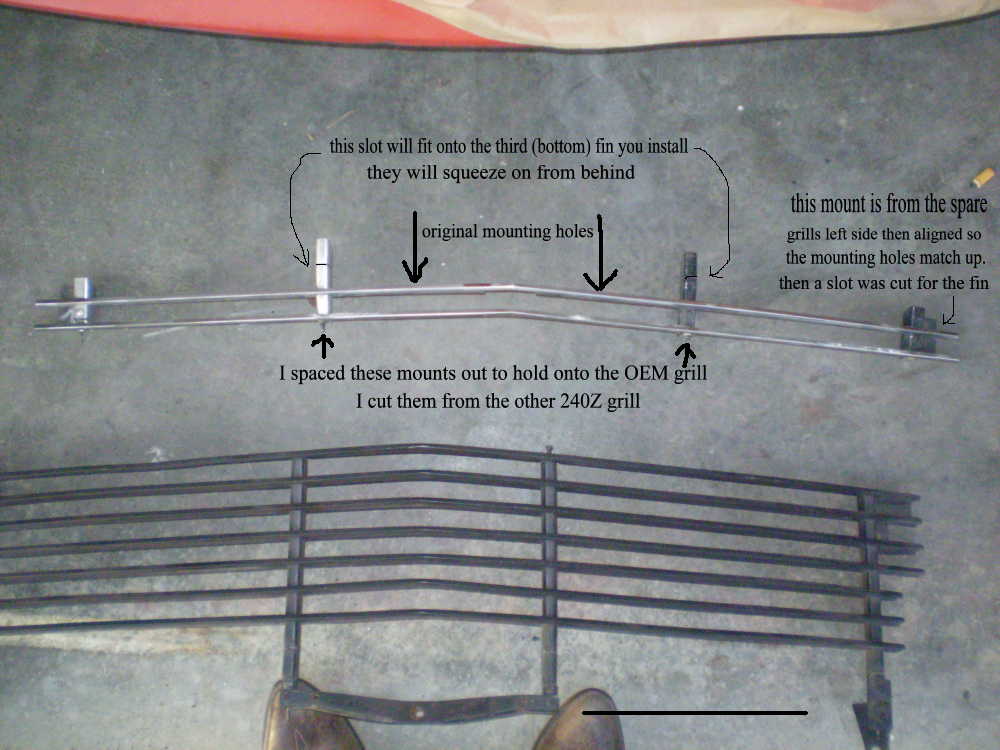
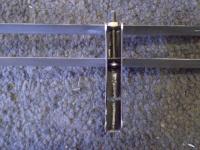
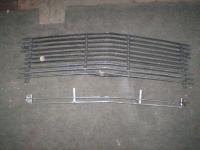
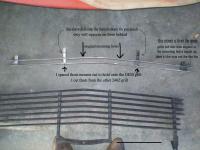
I was supposed to post a step by step instructional thread on how I did my grill. Well today I started to tear apart my grill to refinish it so I'll start taking step be step pictures with slight instructions added to each picture.here are the first 5 and not necessarily in order. Just measure the space betwwen each grill fin then transfer those measurements down to the open area. the 3rd fin will fit up under the bottom of the support frame. REMEMBER to remove the bottom nuts on each support and back the really long screws out just enough to make the cuts in each frame. I'm sure a replacement screw could be found but why go thru the hassle. take your time, measure 2 or 3 times and slowly make one cut at a time. I used an Air Saw with a thin blade to make sure the fins fit nice and snug. On the last 2 fins, you'll need the 2 end frames (left and right) from your spare 240Z grill. I will do a close up shot later to show how to cut it correctly. But heres the fun part, The right side lower mount will be used on the left side of the newly modified lower grill. And the same thing for the other side. You'll make you slot cut then cut off the top half so it fits betwwen the 2 fins. (last picture on this post) Then align the lower mounting holes, then drill the new holes for mounting the fins onto the new lower mount. Confused yet? Just follow the pictures......or send me 2 good grills and I'll build you one for $100
-
"are you on Crack? That radio is NOT out of a 72' or ANY year 240Z. 260 or 280Z maybe, but definately NOT a 240Z. Good luck selling under a fraudulant listing.... I've owned every year of 240Z from late 69' to late 73' and YES I am an Expert in this field." That is the letter I just sent him. I don't know about you guys, but I know I feel much better now. LOL Dave.
-
Me and Wayne have been tooling around something on the side. I plan on starting up a complete engine harness set-up for the 240Z's but not before I do a lot of research on the subject. From what I've heard. Brand new 240Z Engine Harness's are going from $550 and up to $750 - $800. I plan on borrowing a few harness's from 240Z owners can loan their engine harness out for a month or so, so I can measure copy, repair, rewrap etc. In exchange for me borrowing their harness. I will make them a headlight upgrade harness and return their harness rewrapped with an HLH in the same box. I figure that a $125 harness for letting borrow theirs isn't too back of a deal. Once I have made all my measurements, acquired the 3-5 different styles for the 240Z, And done all my research on suppliers and wires, I'll start making BRAND NEW 240Z ENGINE HARNESS'S and sell them for about $450 each. Let me know what you guys think and I will take ALL comments into consideration. Nothing is set in stone yet but this is the way I normally do things, as you all know. ANY VOLENTEERS? Dave.
-
Tokico makes great struts and Eibach makes great springs. They amke a very good combo. I don't think you'll be any happier with a different combo than what you already have. FWIW Dave.
-
one word Wayne, NOPE. or NODDA, NINE, NOT. OK, 4 words. But you get the point. Nice try though.
-
I'm actually thinking this one fits the bill a little better.

-
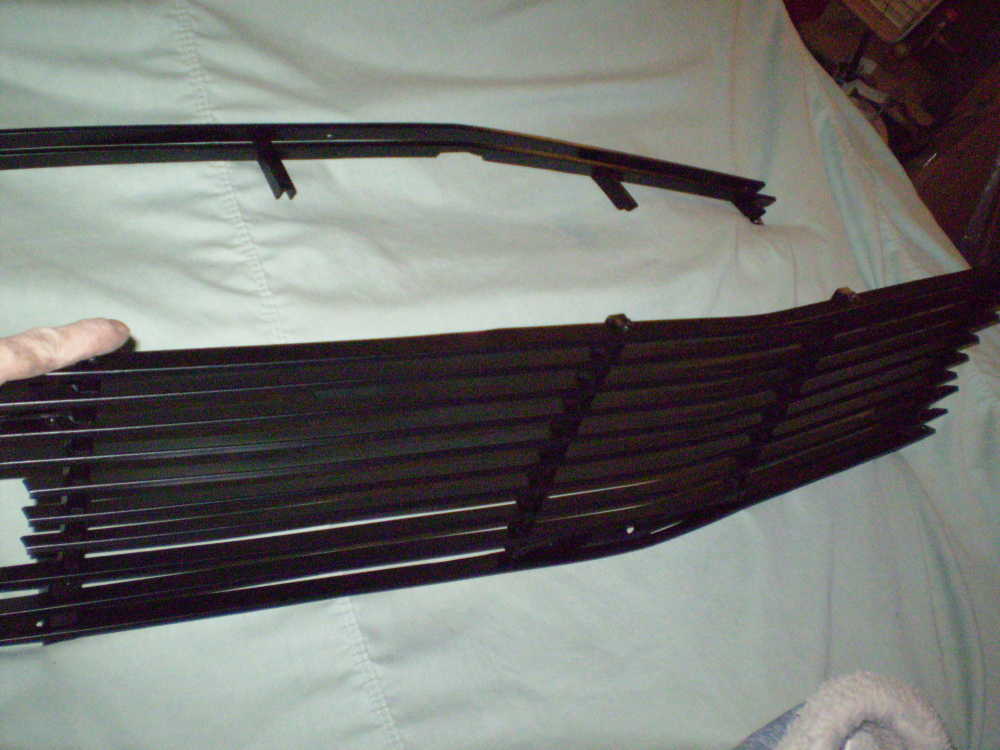
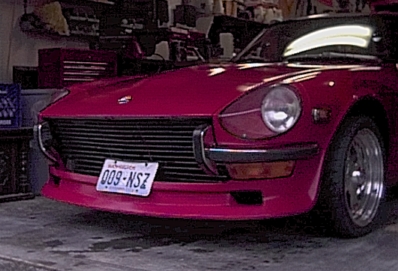
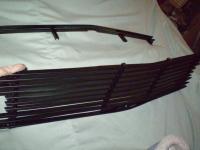
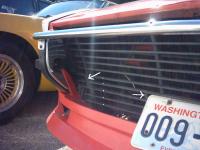
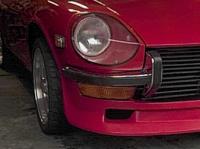
John, I had a similar problem when I modified my front bumpers. The first week that I owned my 240Z, I was backed into by a towball attached to a big 'ol van. He hit me dead center of my bumper and so I had to "FIX" the problem. In the pics you'll see the modification and you'll also see that my grill needed to be "extended" and so I found an extra grill and cut a few parts from it. I used an air saw with a thin blade and cut a few more slots into the existing frame work. As you can see, It filled the GAP just fine and I even get compliments on how "STOCK" it looks. But I've been considering upgrading it to a Tube style or multi-slat grill.

-
You are Quite welcome Wayne, Funny thing is that your 280Z switches are easier to service than the 240Z switches because 1) they are not as old as the 240Z models and 2) the 280Z switches are built with the idea of "future maintanence" in mind. Hey Will, Did ya ever find that box? Must be one hell of a storage unit or one big mess of a garage. I feel for ya, I can't find half of the stuff that I KNOW is in my garage......
-
do they have something similar but with the braiding spread out a little more? Like every 6 inches or so rather than every 2 1/2". I like the idea but it seems like it would look a little busy with the braiding so close to each other. JM2CW, Dave.
-
Actually I think they did that for the High/low beam switch. It sends the ground over to the turn signal switch. The combo switch turns on the (+) lead and the grounds (-) go thru the hi/lo switch. FWIW Dave
-
That makes two of us. The vin on that one is low to mid 5000's and under 3000 older that mine (HLS30-08077) and I bought mine for $2800 four years ago. My Z is now 37 years old and in GREAT shape, especially after I'm done with this damn paint job. If I had to total the rust in my car, it would be at less than 1%. Does any body, who is reading this, and knows all the work done to my car, have a clue what it's worth now a days?
-
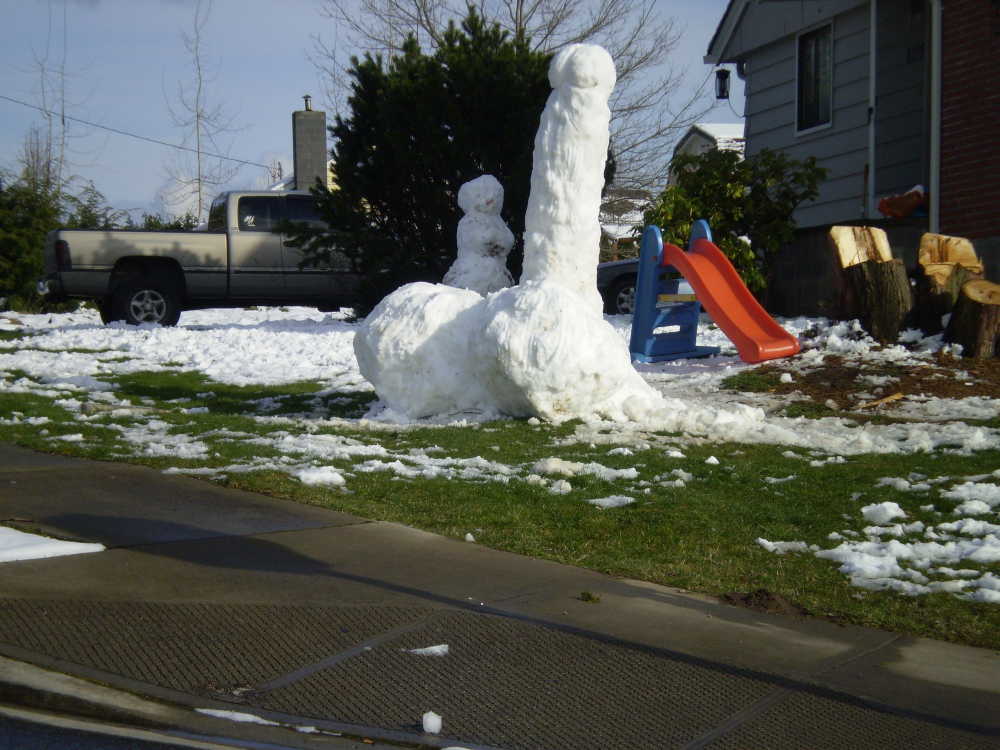
here's how cold it was in Marysville Washington today. This guy could'nt go limp if he wanted too........ And NO, I did'nt get out of the car to measure it. Tempting but NO. but if I had to guess, I'd say 7 or 8 ft tall...

-
I second and third that........ I have the 3:90 R-200 and the 79' ZX 5-speed in my 70'. I also have a Mallory Unilite with Promaster 60,000 volt Coil and that is backed up with an MSD 6A. I probably gained 15 to 20 HP with that ignition set-up alone. My take off is faster and my freeway milage is AWSOME. On the trip down to the Z Nationals last year, I averaged over 28 miles per gallon. And keep in mind that I still have the original 150,000 mile block and an E-88 head with dual S.U.'s. 225/50r16's probably helped out too. jm2cw, Dave.
-
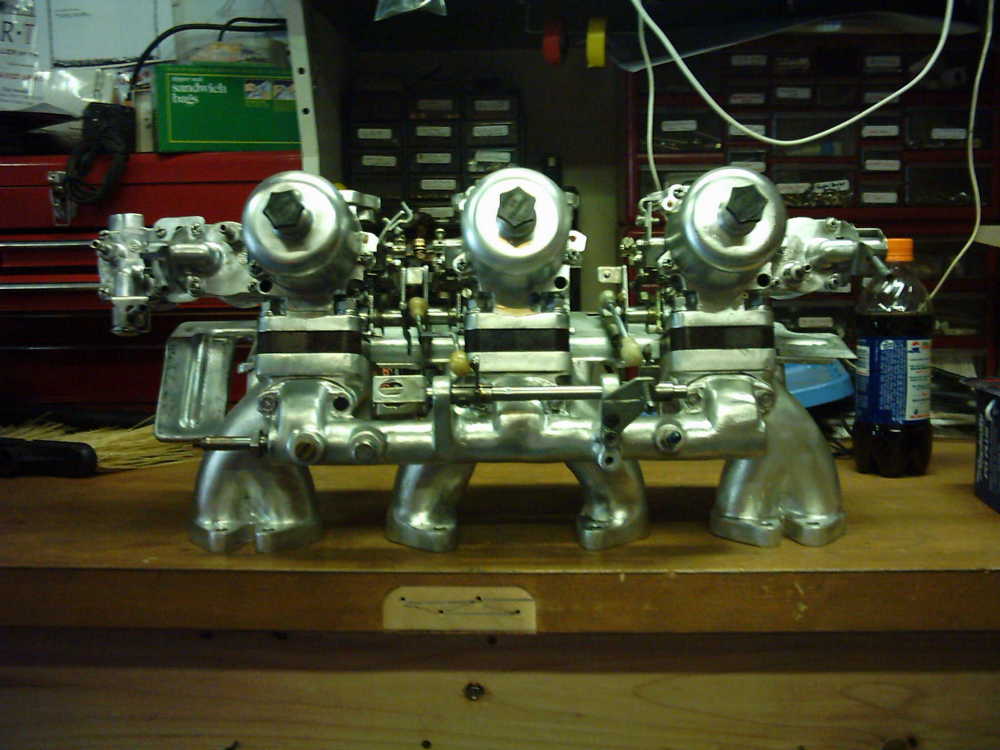
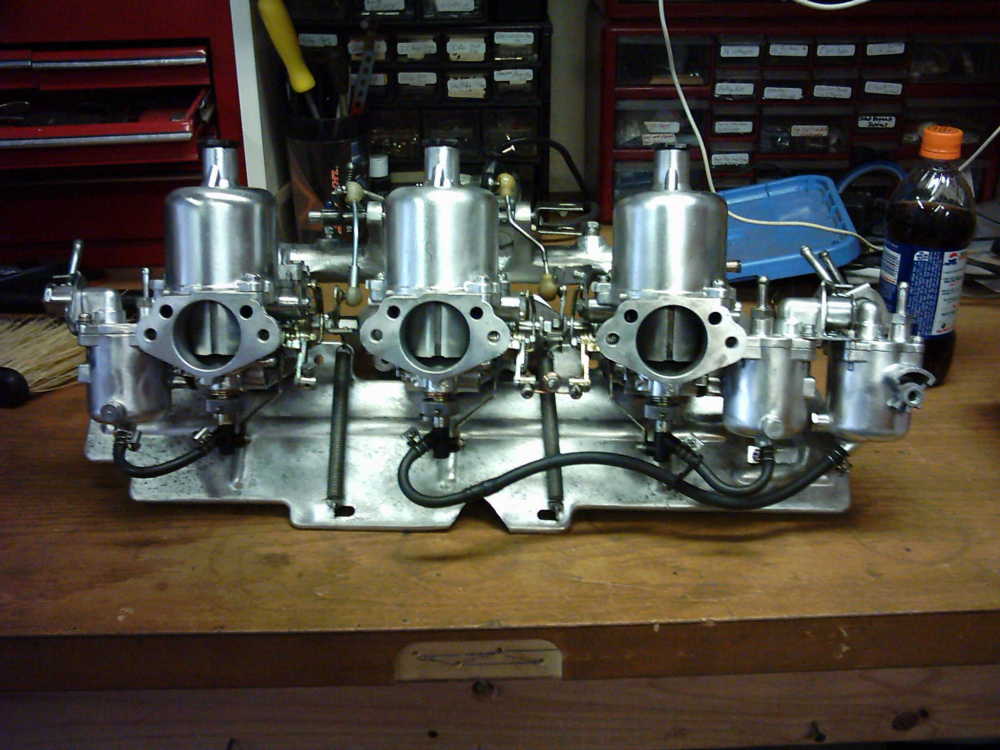
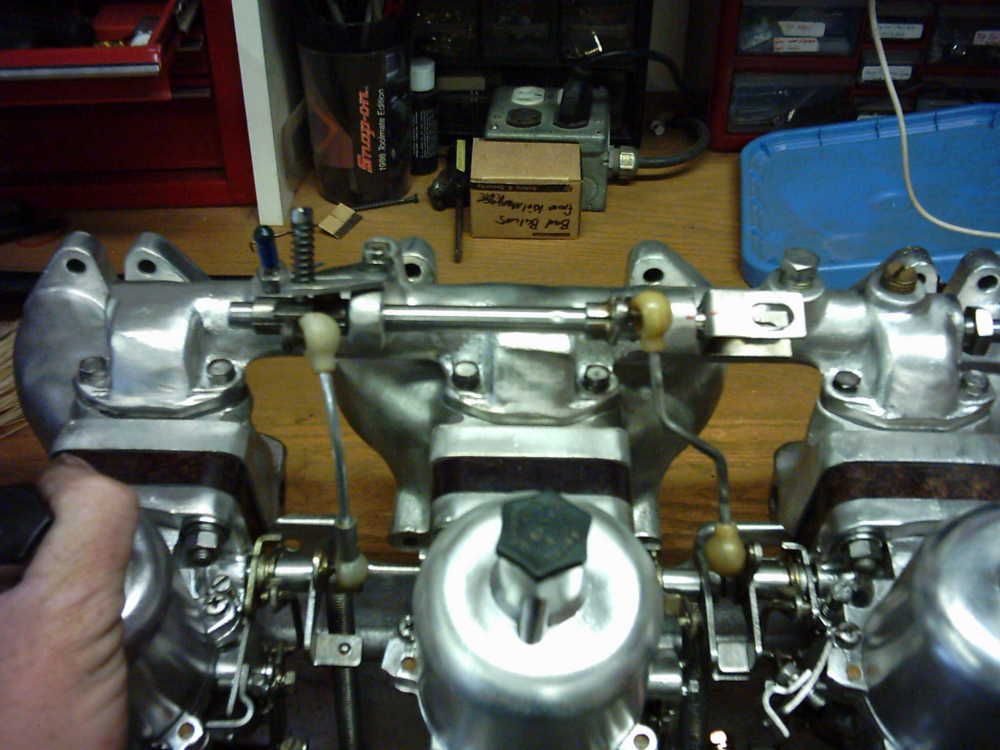
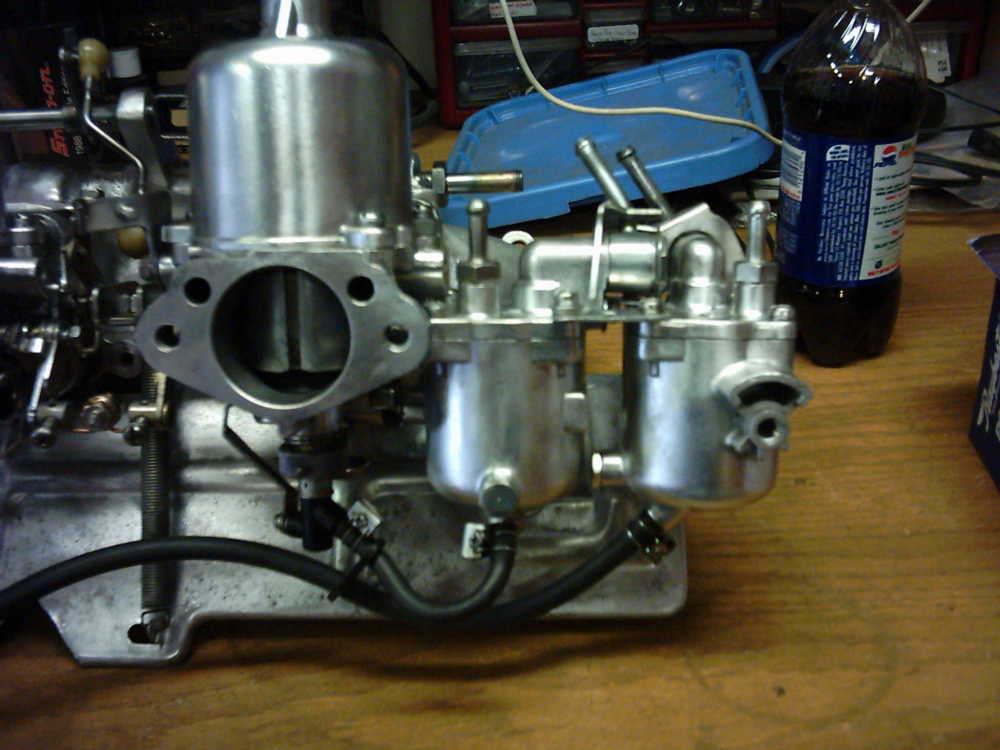
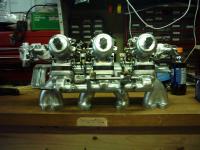
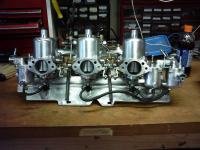
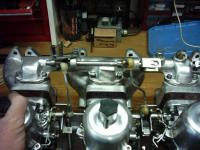
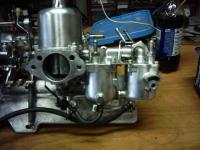
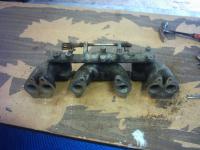
here's the ones that I used have on my Z. The intake was custom built by some one else but I modified it and cleaned it up. I had to make a custom throttle linkage and move one of the float bowls towards the firewall, but it ran great. The carbs were way out of sync and I did'nt know how to tune them at the time so I put my duels back on. Dave
-
1 quick way to find a squeek in the rear is to jack up the rear, put jack stands under the frame, remove one wheel and lift the whole assembly with a floor jack then let the jack down quickly while listening for the squeek, one side at a time. It may take a few tries to hunt it down. Just a thought, good luck Dave, Dave
-
When you replaced the bushings, did you use OEM rubber (original) or did you go with the Urethan bushings? The reason I ask is squeeking with urethane is not that common but thats why the put a very small tube of sticky urethane lube in with the bushings. Use very little but make sure that you coat every part that comes in contact with metal, especially if its in the rear where the suspension tends to travel a bit. If you installed Rubber, did you make sure that there was NO grease or residue on the metal parts that touch the rubber bushings? I have poli-urethane bushings in my 70'240 Z and I used the urethane lube so I've never had to deal with the "squeeking" problem. Congrats on the purchase of a GREAT car and Thank you from all of us for helping preserve the classics. It's nice to see the "Father and Son" theme is still going strong. Dave.
-
 Yah yer right, I totally forgot about that one. That is so fricken hot. If the 240 was originally built like that, It would have sold like crazy and been more pronounced as a "Super car" Thanks for the memories. I may have to just learn how to do that one of these days. Here's a clickable one... http://www.cardomain.com/ride/645045 Dave
 -
Even if it's not leaking, A dent is a dent. But here's an idea for ya. Drop the tank just enough to access all the holes and spouts. Seal off the filler neck and all but one of the breather tubes. Then get your air compressor up and running and fill the fuel tank up with air. once you've got enough air in there, you'll only have to tap on the tank around the dented area. If you have enough pressure built up in there, it should pop right out without any problems. No welding rods, no poking around your tank with a stick, no Explosions or splinters. And the other good thing is you can LEAVE THE GAS IN THERE, and if the dent leaks, you'll instantly know and also know exactly where the leak is. I did this to mine and it worked like a charm. JM2CW, Dave.
-
I have CV's from a 280ZX on my R-200 diff that is in my 70' 240Z. There are lots of combinations but you just have to do a little measuring before you rip into it. The R200 needs one side to be shorter than the other (if I remember correctly) so do your measuring and take the free parts either way. just don't tear yours out till ya know they'll fit. Good luck, Dave.