waynekarnes
Community Member
-
Joined
-
Last visited
Everything posted by waynekarnes
-
as was suggested earlier, pull the large shovel handle off the hatch, not a bad looking mod. don't know that i am enjoying those particular vents on the sides of the front fenders either. sort of looks like a troll's nose hanging out there waiting to blow a load of snot out. what ever blows your dress up. not as if he took the mona lisa and tried to improve it with a box of crayons and a pair of scissors. hundreds of z cars out there. some people personalize their z by adding a box of kleenex behind the passenger's seat. others change colors, add custom wheels. though not my taste, some add shovel handles to the rear, neon lights and those coffee can farting tail pipes. most of these extremely modified cars were probably on their way to the crusher, been sitting for years and were rescued by these kids, as cheap was all they could afford. they put a bunch of money into em. if not for hot rodders, modifiers, kids that did the best with what they had, at least 50% of all cars would be at the wreckers, lost forever. these people took these cars when they were casts offs. kept em running, sometimes by hook or by crook. after a while these cast off cars become collectables. people want em. thank those people that they bought these cars, hot rodded em, did what ever with em. if not for these people, remember that little old lady or man that bought that car new and held onto it are few and far between, if not for these people wanting the cast off cars, restorers would have very few cars to restore or buy as parts cars.
-
i bought a 79 zx gl in 81. drove it as my daily driver for 2 years. original owner had traded it in on an 82 zx turbo. in comparison, the 240z rides and drives like a datsun pick up of the same era. the zx is not a real z car. nor are others that came after the original z car. at least not in the idea and statement expressed by the 240z. a light weight stripped down gt sports coupe. built to excite the senses with good looks, reliability, and sheer sexy lines. the zx is a solid car, more jaguar feel. quality without all the breaking down and lucas " the prince of darkness " electrical issues that plagued the jags. when the zx was new, to people who owned and drove the 240z, the zx was considered a woman's or fat old man's car. not a true gt coupe. the car was fat, bloated and underpowered. nissan/datsun had wandered far off the path the 240z was designed to follow. that said, the 79 zx was a big hit, the best selling car of the z series at that time. having driven and owned both the zx and a real z car, i could tell why. one has to finesse a 240z and really drive it. the zx was a much friendlier car to drive. it felt solid and sure footed. all doors closed with an assuring thud. the door glass didn't rattle. heater and airconditioning worked as well as any pricey euro trash bmw or other gt. for it's day, it compared favorable in acceleration and cruise speed to cars costing much more. i had considered buying a new 79 vette. the '79 vette wallowed and was way under powered, felt as if it was going to fall apart around me as i test drove it. the 79 zx was, well it put a great big smile on my face. i used to drive mine over 17 to santa cruz from san jose at least once a week. could drive the whole way in 5th gear. engine would pull it and suspension would handle it. 4 wheel disc brakes would stop it fast. seats were comfortable, mirrors in the right place, stereo was excellent. ride was firm but not teeth rattling. a very enjoyable car to drive. worst gas mileage in stop and go driving was 11 mpg. usually around town mileage was 17 mpg. on the road at 65, i consitantly got over 28 mpg. best mpg was a trip to the swap meet in pomona from san jose, 32 mpg. cruise set at 60 mph. all that said. until i drove one, i was very biased against the zx. they took the beautiful shape of the 240z and turned it into a fat cow. later they pinched the front of the 280zx called it a 300zx and made it a funny looking fat cow. but, after driving the 79 zx, i wanted one. it is truly a nice car. more room inside than the 240z. luxury abounds. i was 25 when i bought my 79 zx. i was wrong about it being a fat old man's car. it certainly wasn't a 240z, it wasn't a light weight gt sports coupe. in most 240z owner's eyes, it wasn't as pretty as the 240z, but it does have some beautiful lines of its own. beauty in the eye of the beholder. even though i prefer, have owned and currently own the real and original z, truth is, if i had the money i'd own another 280zx. as far as collector status, outside of us z types, none of the z cars are really what one would call collectable. all z cars are still a niche car, with a smaller audience than say the rambler AMX. collector status ... as far as the most collectable ranking in order of most to least. the 240z, pretty much skip all the zx series until you get to the twin turbo 300zx. the 96 being the most collectable of the zx series. nothing after 96 is collectable ( yet ). as clean 240's are becoming harder to find and more of the 280z's were produced people are settling for the 280z in place of a 240z. so the 280z may soon be as valueable as the 240z among those that don't know the difference between the two. right now the 280z is just slightly more desireable than the zx. if you prefer the lines of the 280 zx series, the 83 turbo is the collectable one. but again, even it falls behind the 240z or the 300zx twin turbo in value and desireablity. if you are looking for something in the 280zx series to round out your personal collection, get the 83zx. if the 79 zx is clean and the price is right, buy it for yourself, not for the collector value. you will enjoy the ride. i'm off my soap box and expect the arrows to start flying over my statements.
-
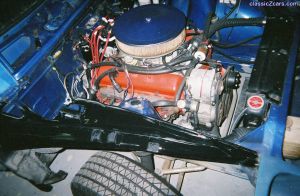
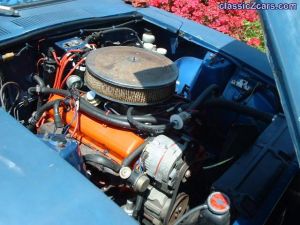 per the guy who sold me this z, it only has 40,000 miles on it. his best friend using a scarab kit, dropped the V8 in there when it had a little over 15,000 on it. sweet, huh ? we know the history of this z going back to at least 1977. they were like vegas, if it didn't have a V8 in it, what was the point ?
 -
thanks J ... that's my thinking too ...
-
i believe i bought that set up from jmortensen ... back in june or july of ought four ... it's still boxed up in my garage, i never opened it ... haven't gotten around to installing it after having the rug yanked out from under me when the body shop was sold right in the middle of body and paint ... i have been wasting my money and time engineering on the fly ... getting that taurus 2 spd fan installed ... i figure on installing the rear discs once i get the z running again ... mostly for the oh wow factor ... and i'm tired of messing with rear drums. as most know, there really is no reason to install rear discs on the 240z. the stock drums and the green shoes work fine. discs just cool off faster, thus less brake fade with multiple panic stops, or very spirited mountain driving ... no reason for cross drilled or slotted discs ... the high temps that occur under the extreme torture of the race track causes the pads to out gas when they get hot. 99% of street cars will not reach those temps. the slots or cross drilled holes are to release those gases, so the pads make contact with the rotors. vented rotors are the ones, if one stood a quarter on edge, all those ridges .... if it were a brake rotor ... those ridges would be the vents. yes, they do help to cool the rotors. if one uses the 280zx master, there should be no reason to remove any residual valves ... the zx's have rear discs. if using the stock 240z master, yes you need to remove that check valve at the master. either way, you will also have to remove the check valve at the rear of the 240z. it would be a good idea to install a proportioning valve, so the rears don't lock before the fronts ... too much rear bias, rear wheels lock up and want to swing around past the front of the car ... once you get the hang of it, probably be loads of fun. i would imagine the first 5 or 6 times, til you got used to it, you'd be on the side of the road, cleaning your thong out ... i wonder if after over a year of sitting if the calipers are still good ??? i'm thinking they should be fine. here's what info i still have from mike squared aka brokebolt happy hunting, wayne Big rear brake conversion 240sx 4 x 4 1/2 lugs 79-81 280zx master 15/16 89-98 240sx calipers and hangers 84-85 300zx rear rotors 4x4 1/2 lug pattern 86-80 FWD maxima rear dust shields and hub brackets both bored, cut and welded with correct offset. rear axles must be removed to install brackets make brake cable extenders Small rear brake conversion 79-81 280zx master 15/16 82-53 280zx rear calipers and hangers 82-83 280zx rear rotors 86-89 FWD maxima rear dust shields and hub brackets ... cut and welded with correct off set OR 80-84 nissan 810, maxima sedan rear brackets that have floating dust shield rear axle must be removed to install bracket Big rear brake conversion 280zx 79-81 280zx master 15/16 82-83 280zx calipers and hangers 84-85 300zx rear rotors 4 x 4 1/2 lugs 86-89 FWD maxima rear dust shields and hub brackets ... bored cut and welded with correct off set bone stock small rear brake conversion Maxima 4x4 1/2 lugs 79-81 280zx master 15/16 79-81 280zx rear calipers and hangers 79-81 280zx rotors 4x4 1/2 lugs 80-84 810, maxima sedan rear brackets that have screw on dust shields rear axles must be pulled on all to install brackets
-
found this on local craigslist contact seller directly for more info Datsun 240 Z Fender New in Box - $135 (concord / pleasant hill / martinez) Reply to: kvfarry@mac.com Date: 2005-07-01, 9:23AM PDT Brand new fender for drivers side. Will fit Nissan / Datsun 240 , 260 , and 280 Z. I have a used fender too and a couple of other Z body panels, shocks and some Racing suspension goodies Call Kurt @ (925) 686-4510 or my cell (510) 541-1428
-
i think the msa kit is closest to the scarab kit. why would you want to use the scarab style kit ? it was good in day ... and still works however, there are now better ways of doing things if i were to build one from scratch, i'd start with the JTR kit ... john in texas also makes a decent kit ... though the guys in the know, prefer the jtr kit. hooker header's kit is almost an exact duplicate of the scarab kit. http://www.johnscars.com/zcar.htm http://www.jagsthatrun.com/Pages/Datsun_Z_V-8.html you can get a V8 into a 240z, the avg price is around 3500. that's using a good junk yard engine and tranny, and modest modifications. i have heard of it being done for under 2 grand, but that was with very good luck gathering parts. the scarab kit puts the chevy engine distributor about 2 inches out from the fire wall ... the other kits put the engine closer to the firewall. the reason the engine is set back closer to the firewall, per Mike at JTR, is it allows the shifter for the camaro 5 speed transmission to come out close to where the stock shifter on the 240z came out of the console. some people claim it changes the front to rear weight bias, and it may. the engine also sets lower, changing the center of gravity, and it may. i know it places the headers and oil pan closer to the road, but no closer than in a stock camaro or corvette. one thing, it does is allow one to use a wider choice of aircleaners and intake manifolds. the hood can close without danger of smacking the rod holding the air cleaner to the carb. as cousin Carl suggested ... stop by hybridz.org ... they have a wealth of info on this subject. flamers are shoot down as soon as they start something. it's a solid site on topic. jerks are ejected asap.
-
until
http://www.my350z.com/forum/showthread.php?s=&threadid=111894 found this at z car garage website ... if you check the zonc.org website you will find the my z car garage info link ... check the calender shows events in northern calif. http://www.zcargarage.com/ check their calender i don't have any info on this other than what i saw, suggest you follow the links if interested. -
until
21 May Sat * General Membership Meeting * Location: Z Car Garage (San Jose, CA) * Time: 11:00AM -
that list of options for the scarab was just that ... options ... not every scarab built at the shop came with those items. an old friend of mine's younger brother worked at the shop, wrenching on the scarabs. the shop was in campbell, about 3 miles from my house at the time. another old friend, worked there for a while and had what looked like a bone stock z, and it had a pumped 350 and 4 speed. i'm wanting to say that Pat's scarab z was a 280. mine is a scarab kit z ... thus, originally, there were no modifications to the body. looked like any other '72 240z, running 280z hub caps ... as far as i know, you could get your scarab anyway you wanted, depending on how deep your wallet was. a basic V8 swap, with auto or 4 speed, 4 core radiator no other mods. deep wallet, your dreams just might become reality. i was working on the street where my buddys parents lived back in the early 70's, looks like they've moved. last i heard, my friend was living in livermore ... oddly enough, where JTR is ... my buddy's bro's name is Jonathan Sievert. his claim to fame, he was test driving a scarab, drove into the shop garage a little on the hot side, supposedly a bad master cylinder, and he racked up at least 3 customer's cars. minor body damage, fenders, bumpers, hoods, think he said he was going about 10 mph at impact. shoved one car into another.
-
i bribed Mike with 5 bucks ... that was back when he was young, foolish, and, easily lured into the big list chat room ... :devious:
-
http://www.johnscars.com/zcar.htm http://www.jagsthatrun.com/Pages/Datsun_Z_V-8.html http://www.jagsthatrun.com/ http://www.hybridz.org/ http://www.orlandospeedworld.com/members/scottiegnz/vette-irs-swap.htm the LS1 is the way to go at this time ... but, if you wait for someone to wreck a Z06 ... you can get your hands on a factory 427 cubic inch small block ... good luck with what ever you choose ...
-
i could send you another pic of your car, that was sent to me from Dave in Ga.
-
greetings, let me inject my 82 cents here ... safety 1st !!! get a package of acid resistant gloves at local hardware, napa or other auto parts house, a good pair of coveralls, leather boots ( or those rubber boots ), and GOGGLES eye protection is a must ... you may also want to get a decent 10 dollar disposable air filter ( mask ). you'll need a drop cloth of some sort to catch the residue ( stripped paint ) ... i have used one of those blue tarps, with a cheaper plastic tarp on top of that and a quality paper drop ( for absorption ) on top of that ... taped down with good duct tape if on the cement, or staked down if on the lawn or dirt. try to avoid asphalt, the chemicals may react with the asphalt and cause it harm. you can either jack the car and slide the tarps under the car or drive it on top ... prefer it be pushed ... watch out for heat from exhaust system coming in contact with your tarps. don't wash the chemicals down the curb, even though neutralized, still some nasty stuff. the problem with a chemical stripper is, it will/may get into any bondo/body filler that was used to correct any imperfections or repairs. in which case, you may have to seal or remove the filler. that said, there are gentle strippers made for fiberglass ( think corvette ) that are milder than those generally used for stripping metal ... i would recommend, that if you don't want to mechanically ( sand ) the paint off the car, use the gentle chemical stripper .. it will take longer, but i think you will be happier with the results. if the car was prepped properly for the second color, you should find primer between the original color and the new color. if not, will be new color on top of the original paint ... in the past, i have used a quality masking tape ... mark off sections like racing stripes ... on the hood, or other fairly flat surface ... i brush on an appropriate amount of stripper inbetween the taped areas ... so i have stripes of stripper separated by masking tape. wait about 15 minutes for stripper to react ( read the instructions for an idea of time )... then scrape a bit of the stripper back, see if this is how far you want to go ... if so, scrape all the other stripper off ... if not ... you have 3 or 4 more test strips of stripper setting on the paint ... wait another 5 minutes or so ... have another test scrape ... eventually you'll find the approximate time you want to wait to get through the amount of paint you want to remove. some strippers use water as the neutralizers, other use their own product ... have this on hand and at the ready. scrape/squeegie off as much of the residue ( paint and stripper ) as you can, deposit it in a container of some sort, before neutralizing the stripper ... will make for an easier clean up. again, safety at all times, you only have one set of eyes, and this stuff will remove skin. follow the instructions on the label of the product you decide to use ... i would buy a product at an auto paint supply house ... not something from the home depot ... most of the employees at the paint store have painted and are familar with the products they sell, can offer you sound solid advise. i none in your area, skim through a copy of most any corvette magazine, there are always ads for paint stripper in em. contact one of the distributors/advertisers in the magazine. they should be able to tell you where to buy it. i have assisted in hand sanding to bare metal and fiberglass of about 4 cars, have assisted chemically strip about 8 cars. both have their own pros and cons .. different hazards and messes .. both work ... chemical seems faster, it certainly is easier, though you will still end up with a little sanding. hand sanding is a long and tiring process. it will leave you dirty and your hands numb, skin tore up, but it is more precise, and no harsh chemicals to deal with. plus, chemical stripper gets into places you wouldn't think it would ... inside doors, the braces on the sides of the hood, in pinch welds, small nooks and crannies ... waiting to weep out into your new paint job ... remember, you MUST get all the stripper off and neutralized. any residual stripper hidden anywhere will ruin your new paint job ... good luck with which ever process you choose, both are work and both work, wayne some sites on the web .. check out the auto body forum below lots of info there if you don't mind scrolling ... http://www.halonmarketing.com/mall/Spra'%20Strip.htm http://www.diynet.com/diy/ab_detailing/article/0,2021,DIY_13684_2278594,00.html http://www.courier-journal.com/cjextra/csx/day4/ke051601s23862.htm http://www.goldcar.com/autobody/forum/archive.html
-
you can try it on your own gathering the parts below that info is from Mike ... you can but Ross' product ( people over at hybird.org use em and love em ) msa sells a partial kit ... i also included links for you ... i researched this ... as far as stopping power ... get the nismo green shoes, and a set of iron drums ... supposedly the iron absorbs and disappaited the heat better than the aluminum. remember, the majority of your stopping is done with the front brakes ... before adding rear discs ... upgrade the front ... get the kit that uses the vented 300zx rotors and the larger toyota calipers ... if too much or not in the budget, use the 84 to 87 ? four runner or 4x4 toyota truck calipers ... after trimming the dust backing plates, and bending the S brake lines just a bit ... they are a bolt on. replaces the stock datsun single piston, does a better job of clamping. of course, while better than the stock set up, the vented rotor set up is the way to go. returning to the rear discs ... you can get by with the stock master, but many like to upgrade to the 280zx master. also, depending on the year 240 you have, watch the brake lines at the master ... nissan changed the positions of front, rear. if you stay with the stock master ... remove the check valve in the master, going to the rear lines. you may or may not need a proportioning valve. i've been told by end users, some used the one already there ( rear on pre 73 ), or had no luck with that and used the zx valve. others used a wilwood. i have been told that the one on the 73 240 at the distribution block under the master, should not be used. on the pre 73 z cars, they are at the rear, near the axle under the car body. again, other than the coolness factor, ease of mechanics, unless going to a hugh rotor and caliper set up, as far as stopping, under normal driving and most racing situation, there is no reason for rear discs on a 240z. that said, i have a rear disc brake kit in my garage waiting to be installed ... i know i don't need em ... even with the 350 chevy V8 under the hood, the green shoes work fine ... but, they look cool and i want em. plus, no more messing with that parking brake issue i've been having ... Big rear brake conversion 240sx 4 x 4 1/2 lugs 79-81 280zx master 15/16 89-98 240sx calipers and hangers 84-85 300zx rear rotors 4x4 1/2 lug pattern 86-80 FWD maxima rear dust shields and hub brackets both bored, cut and welded with correct offset. rear axles must be removed to install brackets make brake cable extenders Small rear brake conversion 79-81 280zx master 15/16 82-53 280zx rear calipers and hangers 82-83 280zx rear rotors 86-89 FWD maxima rear dust shields and hub brackets ... cut and welded with correct off set OR 80-84 nissan 810, maxima sedan rear brackets that have floating dust shield rear axle must be removed to install bracket Big rear brake conversion 280zx 79-81 280zx master 15/16 82-83 280zx calipers and hangers 84-85 300zx rear rotors 4 x 4 1/2 lugs 86-89 FWD maxima rear dust shields and hub brackets ... bored cut and welded with correct off set bone stock small rear brake conversion Maxima 4x4 1/2 lugs 79-81 280zx master 15/16 79-81 280zx rear calipers and hangers 79-81 280zx rotors 4x4 1/2 lugs 80-84 810, maxima sedan rear brackets that have screw on dust shields rear axles must be pulled on all to install brackets http://www.cardomain.com/memberpage/496289 To remove the rear axles take the car to a qualified mechanic with the tools and equipment to do the job right. For the rest of you who want to do this in your garage on the weekend do this. Get your tools together: first get a 36" long 1" I.D. 1 5/16 O.D. sch 40 pipe and then get some flat stock steel 1"X1/2"X36" drill two 12.5mm holes or 1/2" (it doesn't have to be a precision bore) spaced 4 1/2" center to center or 3 1/4". Then buy thread lock, a 3/4" breaker bar and 1 1/16" socket, 1/2" center punch and 40 oz. hand driver. Next a tire bar 21mm or 13/16" and two 14mm combo wrenches. You should have needle nose pliers plus and minus screw sticks and other common tools. Most important, a service manual like Hayes or Chilton for general information. Set the e-brake and jack the car and support it safely then remove the tires. Disengage the e-brake and remove the four half shaft bolts from the hub, removal of the four bolts from the third member is not required but is recommended for ease of accessibility. They are a shoulder bolt 14mm on both ends. Then the axle nut will be visible looking from the third member towards the wheel hub. (It is best to remove the A arm with strut tower and take it to a qualified machinist and have him remove the nut.) Bolt the flat stock to the hub using the wheel huts and brace it against the car or the ground. Put the breaker bar with pipe and socket on the nut. Send the children to the neighbors house, their ears will be the better for it and now rotate the nut, or at least...try. The nut is crimped on so this can be tough sometimes and this is where most possible damage can occur. Once the nut is removed the half shaft flange should slide off, some don't, but don't worry it will. (It is! better to remove the A arm and strut tower, take it to a qualified machinist and press the axle out.) Chilton recommends using a slide hammer and center hub puller. I use the center punch and place it in the dimple of the shaft and with the hand driver strike the punch with firm square blows. *DO NOT DAMAGE THE THREADS!!!* Glancing blows may cause damage here and a lot of hassle. The axle will take a few good blows but it will start to move. There is a whole pile of goodies to loose like two seals, two bearings and a center spacer inside the hub so be careful and don't loose any of it. Now is a good time to replace bearings and seals with new ones, if you decide not to replace old parts now you may be doing this axle removal thing again in a few months. On reassemble it is best to use new nuts, but if you use the old ones run a die or rethread tool through it, and on the axle shaft can't hurt either. Use the red thread lock on the nut to ensure it doesn't back off and make sure you tighten the hell out of it! I torque on the high side of the recommended 181-239 ft. lb.. (actually I go to 250). First clean the shaft off the car with a good 4 inch hand grinder and a wire wheel or abrasive pad wheel to remove any bad areas on the shaft end. Next get a good rethread tool, M 20 X 1.50. I use one from my Snap-on set that I bought on-line RD-20. Next install the nut over the shaft and turn. I like to use tap-magic to help the tool glide over the threads. Unlike a die the rethread tool or thread restore tool will cram the remaining metal back into shape to help revitalize the old threads. If the metal will not conform back to shape the tool will remove it. A die will cut new threads in any metal that is there, their is a difference! . This is only a fix to the issue of removing a nut that had not been properly prepared before de-installation. I am the worst person for not preparing the nut before removal. Hope this helps. Mike http://mywebpages.comcast.net/pparaska/280zxreardiscs.htm http://www.zcarcreations.com/howto/rearbrake.htm one of the nicest Z car ever ... http://alteredz.com/ http://www.zcarparts.com/store/4.16/00000001/catalog/c484.html http://www.modern-motorsports.com/catalog/default.php good luck, remember ... it's your z ... there are plenty of museum pieces out there ... do what you want with yours ... keep it bone stock as the factory built it ... or safely improve performance, be it handling, acceleration, deceleration, comfort, or the way it looks, as long as enjoy it ... no sense in owning anything you don't enjoy !!! wayne
-
 all areas behind where parts were removed, dog legs, front fenders, were sprayed with rust proof paint, supposedly same as what mercedes uses at the factory.
 -
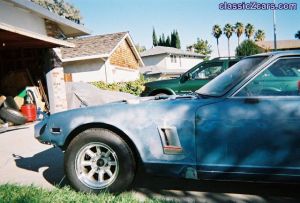
 Dan clamped msa airdam in place, trial fit.
 -
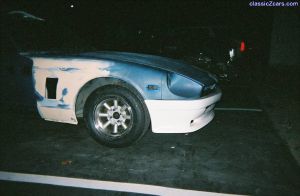
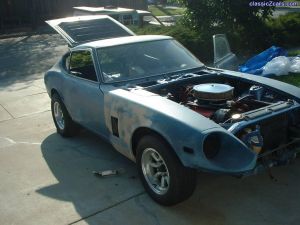 shop was unexpectantly sold. z was as delivered to my home by new owner of body shop. Dan says is 50% finished. no shop, no tools, no Dan. he did 100% more work than originally planned. was just gonna fix rusty doglegs and frnt fenders
 -
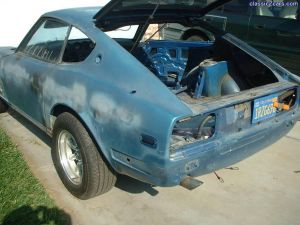 chrome emblems removed, used to have dealer installed rubber strip down length of body. Dan removed everything and welded all the holes
 -
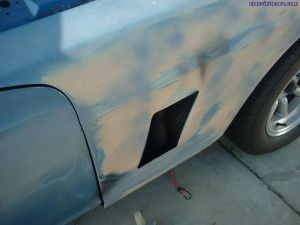 another view of hole for vent. Dan was going to fab metal ducting from engine compartment, vents were to be functional. extract heat from engine compartment.
 -
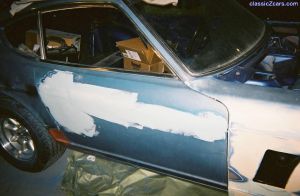 pass sd. body filler, can you tell there ever was a door handle ?
 -
 bought electric door kit from summit. my friend, Dan Robertson, removed and filled door handles, as well as all the other body work.
 -
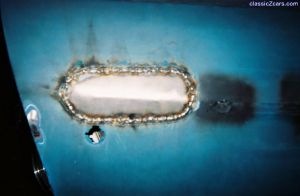
 with fender off, added drain tubes as per E Scallon's sound advise. now crap won't build up and rust out the fender again.
 -
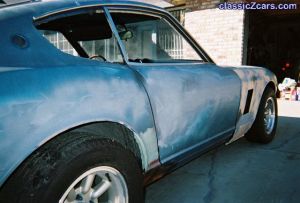 we were evicted from body shop by new owner. replacment panel fixing rusty dogleg welded, rough bodywork. door handle shaved, hole in fender for trans am vent ... all just roughed in.
 -
 1989 trans am vent