


waynekarnes
Member
-
Joined
-
Last visited
Everything posted by waynekarnes
-

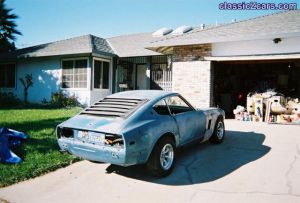 silent partner sold body shop, z is gutted. about 50% finished .. was towed back to san jose from santa cruz.
 -
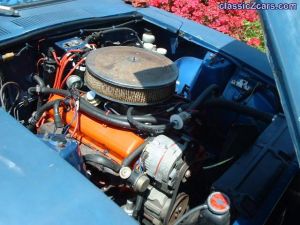 an original scarab kit car, calif smog legal, with carb door sticker, built in 1977. 350 chevy V8, vette 4 speed, 200r, 280z half shafts
 -
 looks a lot like me ... ..
 -
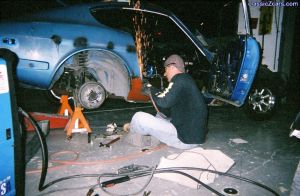 friend with friend that owns body shop. offered to do body work for cost of materials and a $150 book on welding. chrome removed, holes welded, rust repaired, door handles shaved, other custom touches
 -
 1972 240z scarab ... been parked after breaking down, for 10 years. i paid $450 and 40 for the tow.
 -
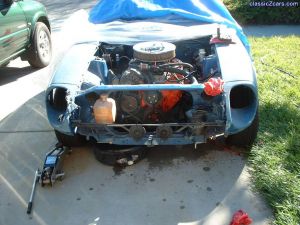 in attempt to install a taurus electric fan ... things have gone a-rye ... well, if i'm gonna change that, may as well ...
 -
there is a guy selling the jtr mounts on e bay ... he apparently owns a machine shop and says he can make most anything ... the JTR kit is the way to go ... engine sets back and low. JTR also sells the modified camaro free flowing 2 core radiator. use the ford taurus 2 spd electric fan with it. a 4 or 5 speed trans is more fun, but an automatic is an easier install and is less hard on the drive train. you can spend big bucks on a 3.1 over bored 6, with lots of speed equipment on it, get 300 horses of undriveable horsepower ... or spend less on the conversion kit and a 300 horse chevy ... be docile as the family mini van, yet put you back in the seat, when you stand on the loud pedal. you might also want to put a turbo zx engine in there ... that would keep the straight 6 .. add an intercooler and electronics ... that would be a fun reliable combination. for the excitement of doing it ... there are a few 300zx V6 engine swaps out there ... seems to me, the same amount of work as the chevy or the ford V8 ... again as suggested earlier ... hybridz.org great place for any modified z car ... mine is a 72 with a scarab z kit ... supposedly built in 1977 ... chevy 350 and vette 4 speed ... 200R rearend out of a 280z with 280z half shafts ... toyota fourrunner calipers on front ... rear disc kit waiting in the garage ... due to a bit of bad luck, z is stripped ( was evicted from the body shop, by the new owner of the body shop ... shop was sold before my car was finished ) and under a tarp in the driveway . what ever you decide .. try not to bite off more than you can chew ... be sure you have tools and friends willing to lend a hand, neighbors that don't mind you wrenching into the wee hours, and more money than you thought you needed. as far as getting the head bolt out ... you'll need to change the temp of the block, get it to expand, while keeping the bolt from expanding. liquid nitrogen comes to mind ... missed your post ... if some of the bolt is sticking out, thread two nuts onto it, with two wrenches, tighten one and loosen the other so they bind on one another ... take a small propane torch, heat the bolt, nut cherry red, but good and hot ... rap straight down on the bolt with a small hammer, as if knocking on a wooden door. while still warm, take a wrench, on the lower nut and see if you can't get the bolt to spin out of the block. if no threads sticking out ... and the bolt is broken well below the surface of the block ... set up a jig, to guide your drill or steady hand if you dare ... use a metal bit, drill out the center of the bolt, then use a tap, thread the bolt, put a nut on a bolt that fits the threads you tapped, run the nut up to the head of the new bolt. lightly paint some JB Weld onto the new bolt,and insert into the threaded hole .. bottom out the new bolt into the one stuck in the head ... put a few drops of JB Weld on the block ( clean it well ) careful, you don't want it getting on the stuck bolt ... run the nut on the new bolt down into the JB Weld, so it gets "welded" to the block. let it dry, when you are sure the nut is secure, use a wrench to turn the new bolt ... if all goes well, the nut should hold, the nut should hold and the head bolt should at least break free, allowing you to either back it out or use an EZ out. i have also done this bungering up the threads on the new bolt ... leave the 1st 3 threads alone, use a file or hammer ... mess the threads up a bit on the new bolt ... run it in with a wrench .. it'll bind a little, but the good threads should pull it in. bottom it out ... with any luck, the bungered threads will cause it to bind. now heat the new bolt, it'll transfer to the stuck bolt ... while still warm, turn the new bolt as if removing it .. the stuck bolt should break it's grip. one more trick is to use a bit that is a slightly smaller to the diameter of the original hole, and cutting oil, run a tap down, this will groove the sides of the bolt ... now ... using a slightly larger bit ... as close to the size of the bolt hole as you dare go ... drill into the bolt, this time only go down about an inch .. use a tap that is the same size and thread pitch as the hole in the block, run that into the hole ... with luck, and cutting oil, the previous tap left the bolt a hollow tube, and this tap, will cause that tube to break up as you thread this tap in. or ... call an automotive machine shop or drop by ... tell em you are planning on rebuilding your engine, explain about the head bolt, ask if they can suggest a way to remove it ... few years back, a guy towed his car to the machine shop to have a broken bolt removed. if you don't want to remove the engine, take it to the machine shop, taking the whole car may be your option.
-
hmmm, z is back in my driveway, having been evicted by the new owner of the body shop ... a friend was using his friend's shop ... doing the work on my car. silent partners sold the shop. he's running a custom motorcycle shop now. my 50 % finished z is now a driveway queen. regarding the door kits .. ... mine is from summit ... has remote control and alarm ... the mechanics of it are simple ... the solenoid comes mounted on a plate ... has 4 holes for mounting ... or using that automotive body glue stick it to the inside of the bottom of the door. connect the solenoid to the rod that opens the door. with the exception of covering the holes/indent where the handles were, the installation appears to be quite easy ... the one thing i did notice today, that i had not seen earlier ... i was wondering what that spring was for, on the rod coming over to the interior door handle ... found out today ... the door kept popping open ... as i see it ... the interior handle pulls that rod towards the front of the door, releasing the wheel/latch on the door, wheel rolls, door opens. when closing the door, there is a knob ( tab ) on the wheel that bumps into the striker on the body, causes the wheel to roll, another knob latches in place. inside the door ... where the rod is pulled, it releases that wheel, when the rod moves back, i'm guessing, there is a pin that blocks the wheel from turning ... if the rod doesn't move back towards the rear of the car ... pin will not block the wheel ... wheel rolls and the door will not stay closed ... that spring on the rod ... well, i'm guessing that it is insurance that the rod moves towards the rear of the car, when the interior door handle is released. so, now ... i have to figure out how to get that spring to spring, that way the door will stay shut ...
-
i used it on my z ... i have also used the por 15 ... the tests on rust bullet show it to be better than por 15. but ... i say to each their own ... the rust bullet is easier to use and you don't have to buy all the cleaning products as you will with por 15. the rust bullet supposedly chemically bonds a layer of aluminum into the rust, so it not only seals it, it chemically alters it. i used the rust bullet to protect the areas on my floor boards that had rust on em. i also used it to make repairs ... small rust through holes that appeared when cleaning for the rust bullet ... used a wire brush and worked the floor ... opened up some holes about the diameter of a pencil ... i used the rust bullet and fiberglass matt to make the repairs .. no special cloth, as the por 15 requires. to apply the rust bullet ... get the area free of tar, oil and paint .. remove the flakey rust, get it fairly clean ( not half as clean as it has to be for rust bullet ). paint it on ... with rust bullet, you do not need to thin it ... one can spray it on if so desired. it is easier than por 15 to apply, can be sprayed without thinning, needs less prep work. again, i've used both products ... i can't say for sure whether either really works, just going by the test results the chemists put out. but, as both products ( por 15 and rust bullet ) seem to do the same job equally well, i will use the one that's easier to use, and that's rust bullet.
-
hmmm, i think that there is a tool one can buy from east wood for radiusing the shoes. from what i understand, most of the mom and pop VW repair shops still radius brake shoes, as do most of those mobile brake shops. Marty, good to hear from you as well, old days, with the list, one could pick up a topic and then visit a bit off the list, stay in touch. now, no quick messages, no stopping by for a cold one and a little bench racing ... too bad. Dave Mc Kenzie races in georgia, he's using the stock brakes. i think he has 2.4 liter 6, with a turbo. from what he says, runs pretty good. he has suggested that i should get scca or otherwise certified and see if i can run at laguna seca ... like you, he has a blast !!! he just bought a factory 300zx twin turbo race car, he's been running that and chasing down vipers. he's trying to get me to buy a twin turbo. i drove a few ... one stage III twin turbo ... supposedly 500 horses ... i hit 145 on 280, 4th gear ... in the blink of an eye, 150 into 5th and backed off ... felt like 85 ... surprised the crap out of me ... at that point ... decided, for the moment, my insurance agent would have a heart attack and i wouldn't have a driver's license if i bought one of them. damn, and only 10 grand !!! what a car that would be to take to the track ... too bad it looks like a saturn from the front. but ... from the side and the rear, it gets better ... looks like an 88 fiero gt. only 10 grand for a car that cruises at 140 mph ... 150 with out breaking a sweat .. still has me thinking about it .. oh back to the brakes ... i think that Dave is also running the best of the raybestos rear shoes and semi metallics in the front. i'm running stock toyota pads in the front ... may be the reason for mine not stopping as well as i think it should. if i go shopping for pads ... i should get semi metallic or ceramic in the front ??? are these available at pep boys, auto zone, kragen ??? or a racing specialty shop for toyota ??? are they hard on the rotors ??? Marty, i'll check with Dave, see what he's running on the rear ... he used to offer a lot of advice, when the list was running ... guess like me, he visits the website about once a week or so.
-
Ben, that's about how much space i have between the konigs ( same wheels Carl has ) and the toyota calipers. if the wheel flexes, i will be s*itting bricks long before they rub the caliper, as most likely, right after flexing, the hub will probably be in the process of punching the center out of the wheel. unless you're running wide open, using extremely sticky racing tires on a perfect track, i doubt that you'd ever get those wheels to flex. if the bearings are bad, that might allow the wheel to wobble, but at that point, the shimmy would be a horrendous. if you have clearance, between the caliper and the wheel, it isn't going to change. if a mechanical problem causes the wheel to wobble, and it wobbles that bad, the wheel is gonna hit the caliper anyway. enjoy the ride, wayne
-
Marty, way back, before i got the V8 in my 72 running, did the brakes. that was back when we had the email list up and running ... MIKE< PLEASE BRING THAT BACK !!!! anyway, i quizzed the group, from my last 2 z cars, i already knew i wanted the toyota calipers in front. wanted discs on the rear. got several responses from the racers. John Coffey and others, highly recommended the green shoes. advised me, they used the green shoes and aluminum drums on their race cars. so, new master, toyota calipers, new rear wheel cylinders, green shoes. i bought the shoes from Kyle at strictly z. was about 40 bucks cheaper than MSA. remember, if you do go for the green shoes ... you need to order a front shoe and a rear shoe for the driver's side ... a front shoe and rear shoe for the passenger side. nismo, sells each shoe separately ... that way racers can buy the one they need and not have to buy a whole set. that screwed me up, as i ordered 2 rear shoes, driver's and passenger's rear. you guessed it ... i got two rear shoes, one pass and one driver's. as far as how i feel about the brakes on my z ??? i have nothing to compare them to, as far as before and after. z was dead in the water, when it was towed home. i did the brakes, before i ever drove it. thus, no way to know if it stops better with the "improvements". i will say that, my 86 PL 720 nissan pick up stops better than my z does. at least seat of the pants tells me that. however, racing, may be another story ... i am sure that the green shoes will do a better job than the organic shoes on the rear of my truck. i had velvet touch semi metallics on my 57 nomad, and they worked better when they were hot, after a ride on 17 to santa cruz, than just driving around town. with the velvet touch shoes, seemed like once warmed up, were two to three times as grippy than when they were cold. might be the same with the green shoes, i just haven't gotten em warm enough to appreciate em. anyway, i still like the idea of rear discs, bought a used set off Jon M. over at hybrid.org ( he's going larger ). they've been sitting in the box, unopened, for almost a year now. if i don't get in another financial bind, and end up having to sell this z too ( my son needs close to 2 grand of cavity repairs and termites are eating my house ), i just might get around to putting em on. drop me a note, let me know what you decide. oh ... you will need to radius the green shoes to the drums ... so that you get full contact with the drum. remember those days ??? wayne
-
wise guy ... of course i know what it is ... it's that black thing a ma jiggy right there ... it make em fire ... and, if i stick my finger in there, it makes me say nasty words and run around shaking my hand. ;-0
-
ahhh, yes, ... the tab on the door handle is broken ... a common z malady. if your friend has one for you, get the one from the driver's door. the handles are identical. they swapable from passenger door to driver's door, part numbers are the same. if you use the handle from the same side, you are getting a worn tab. if you take the one from the other door, that tab hasn't been used ( you'll see what i mean, when you hold it in your hand ), it'll be like getting a brand new one. if you think you need a brand new one, i think that they are 25 bucks at vics. but, i've been hearing the rattling of dissatisfied customers. try Les and see what he has ... http://classicdatsun.com/
-
the ignitor is the devise that, sends the voltage that causes the spark to jump through the distributor cap, to the rotor, out the plug wires to the spark plugs, ignites the fuel, causing a controlled explosion, that causes the piston to push downward, moving the crank, which spins the flywheel, which with the clutch engaged, turns the main shaft on the transmission, and if the trans is in gear, spins the driveshaft, engages the differential gears, twists the half shafts, turns the rear wheels, and moves your ZX down the road. an ignitor is a devise that lights a fire. the ZX ignitor runs about 125 dollars, new. when it starts to go bad, not enough juice to make a solid spark, the fuel doesn't fully ignite, engine doesn't produce the horsepower and torque that it should. engine feels sluggish, sputters, may run hotter than normal, black smoke out the exhaust pipe. when ignitor goes dead, engine won't start ... remember, ignitor makes spark, dead ignitor, means no spark ... engine won't run. test for bad ignitor would involve testing the voltage and amperage output, over various rpm ranges of the engine, and temperature ranges. sometimes, one might "educated guess " that the ignitor is bad, by looking at the spark on the end of the spark plug wire. the spark should be a hot white/blue lightening bolt ( in miniature ). mechanic may have seen a yellowish, weak trickle of a spark. the most common defective item that causes this, is the ignitor. i've forgotten exactly where it is, but ... i think the ZX ignitor is mounted on the side of the distributor. a small black box. been a while since i sold my 79 ZX. i have pertronix in my 72 z, it has an ignitor, same principle. hope this helps.
-
well, doors are shaved. smoothed over ... was gonna surprise everyone with pix of slightly customized z, with a beautiful paint job ... friend of friend with body shop ... pay for material ... work on my z when nothing else going on ... bought the door kits, body shop shaved door handles ... trial fit the kit ... all looks well. silent partner in body shop, sold interest to family friend of body shop owner. new owner says, unless i want to pay 70/hr ... i have no money ... my z has been evicted from body shop ... i get to figure out how to mount kits ... but, hard part is done ... doors are shaved and body work on doors complete ... more info to follow ... eventually ...
-
Carl, new avatar ??? i just now got it ... i thought it was people eating tasty animals and that was a weird looking ham ... or something ... peta ... i may need new bi-focals ... pain in the arse ... now i get it ...
-
Carl ... ha ha ... you know that i type two words a minute .... i started the message a week ago .... .... bumpers ??? job ??? meet me off line ..
-
opps missed the part about ... slamming the door ... the bushings or the hinges may be worn ... if previous owner had large friend that used the door as an assist to get out of the car ... leaned on the door in and out, when sitting or getting out ... may have bent the hinges, the door frame, or wore the hinge pins ... do a search ... door adjustment ... e scalon posted a really good write up on adjusting the door and replacing the hinge pins ... Usually, when you remove the door and / or hinges you want to scribe the location of the hinge plates on both the body and the door. This makes it easier to replace them. When the occasion arises where you have no prior markings to work with you need to check a few things. In the case of the Z, the mounting locations of the hinges on the pillar and the door are fortunately flat and on the same plane. This makes it MUCH easier to replace them without markings. Mount the hinges to either the door or the pillar and adjust them so that they are roughly in line. Then get a piece of flat stock, or a level and make sure that the unmounted sides are then also on the same plane as each other. Make adjustments to one hinge or the other until the flat stock is perfectly flat on the mounting faces of both hinges. Then either mount the doors to the hinges or the hinges to the pillar. You'll still need to adjust the door to the opening but you'll know that the hinges are not binding against each other. Usually the biggest cause of hinges not being aligned with each other is due to the use of shims, warped panels (whether due to repair or a bent body) or because someone FORCED the hinge into that location. Just for the record, when the hinges are NOT on the same plane, then you determine the "center" of the adjusting limits and place both hinges as close to that location as possible. From what you mention, the bottom being further out, I would suspect either a shim or two behind the bottom hinge on the pillar or a bad adjustment on the door itself. Remember shim hinges on the pillar affect the door's location with reference to the skin of the door and the fenders. Shims on te door side affect front to back (and when used unevenly diagonal) placement of the door within the door opening. Hope this helps. Enrique Scanlon Here's a primer on how to adjust the doors on your Z so that they fit properly and seal well. ADJUSTING THE Z DOORS: Unless the car has been in an accident and the door opening or door itself have been tweaked out of shape, most problems with the doors are due to misaligned latches, hinges, or worn components. Presuming that it is adjustment or bad parts and not bent items check the following. First perform a visual check of the door. Check to make sure that the door is aligned properly within the door opening. Check the spacing along the top part of the window frame, the spacing between the window frame and the quarter window, also the spacing between the door skin and the rear quarter panel. I also check the spacing on the front of the door, above the hinges and the front fender. All of these should be even, and consistent in width. The gap should not appear to be excessive one edge with it's opposite component, i.e. front of door to back of door; top edge by windshield cowl and lower edge, etc. If all these appear in order then you have an adjustment problem with the latch mechanism. If however, there is a problem with the alignment, before you go and loosen the hinge bolts behind the kick panels, first do the following: 1. Check if there is any vertical play to the door, that is, with the door open lift the door gently. If there is a noticeable movement up and down, then you may have a worn pin or pins that are causing the alignment problem. Check to make sure that the hinges are solidly affixed and if so, then you definitely have a worn hinge. Although it is difficult to find new hinges, you might need to replace one or both. On Chevy's it is a known problem and parts stores sell new hinge pin inserts to fix this. This is an often overlooked problem, so check this first before you dismount the door or start adjusting the latch etc. 2. If the hinges are in good condition and there is no vertical play, check your weatherstripping. I know of a case where a guy filled the cavity in his weatherstripping with silicone in order to get a "tight" seal. Unfortunately, it also increased the thickness of the gasket and made it almost impossible to close the door without a hydraulic ram. He finally replace the weatherstrip. Check to make sure that the weatherstripping is mounted properly on the lip of the door opening, also the rubber splash guard on the front part of the door just above the hinges. Check the lower weatherstrip on the under lip of the door. Any one of these could cause the door to shut hard. 3. If both the above are ok, check to see where the latch is striking the striker plate. The striker plate is on the door frame and the latch is on the door. Both must line up in order to catch. The latch on the door has countersunk screws and hence is fixed in position. The striker plate on the door is the major adjustment item. It can be positioned along the 4 axis on each of the screws. Close the door, if the door exterior is not flush with the rear quarter panel skin, then you need to move the striker plate in (towards the seat for a protruding door edge) and out (for a sunken door skin). If the door is difficult to close AND the handle is hard to operate, check the bottom of the striker plate to make sure that it isn't inclined too far inward in relation to the top of the plate. That is, the door latches, and the skin lines up, but it feels as you are forcing the door to close and forcing the handle to open, then the bottom part of the latch is stressing the latch, Loosen the screws, and WITHOUT moving the top part of the plate, adjust the lower portion of the plate outwards. Align and retry. If the door latches but springs back when slammed the bottom of the striker plate is probably out too far. This appears to be a half-way latch, and only the safety position has been achieved. If when closing the door, there is a noticeable thunk, and when opening the door the door seems to "DROP", then the striker plate is set too high. The reverse occurs when the plate is too low, although in this instance the door usually will not latch. If you find that you have to move the door within it's opening, then it gets a little more complicated. In a nutshell; you need to remove the electrical components attached to the kick panels, remove the kick panels, and preferably with a jack supporting the door, or a friend, loosen the hinge bolts located behind the kick panels and adjust the door to fit. It makes it easier to remove the striker plate mechanism in order to ensure a good fit. DO NOT remove the hinges from the door, or loosen these bolts unless there is a problem with the hinge. The hinge pins must be PARALLEL and IN LINE to work properly, and it is too easy to get these out of line and introduce serious stress to the door. Sorry for the length, but hope it covered your question and options. Enrique Scanlon i knew i had it saved some where ... that Enrique is one smart guy ... heck of a nice guy too !!! i take no credit for his sound advise ... just passing it along ... if you find any of this advise helpful ... thank Enrique, not me ... it's his hard work and advise not mine ... regards and good luck, wayne
-
greetings ... if the door opens fine from the inside ... most likely no adjustments of the door are required ( i can't spell necessary, but if is could ... wouldn't have said required ). from the outside ... when you pull on the door handle, does it kinda tip to one side, as if it has come loose on one end ? if so ... there is a pot metal dog ear on either end of the handle. the door handles for the passenger side and driver's side are the same part. if the handle is tilting, tipping, feels loose on one side, most likely, the dog ear has broken off. there is a rod that comes up and goes through that dog ear. when you pull up on handle ... the rod moves and and released the door locking mechanism. if the dog ear has broken off ... the door will not open, as the rod won't be moving. that is the most common problem. it is rare for the mechanism inside the door to fall off. there is a plastic "plug" that goes over the rod and holds the rod to the handle. if someone has been in there and replaced the door handle ... then you might have trouble inside the door. remove the arm rest. remove the screw holding the chrome dish under the inside door release handle. you will need a tool to pop the retaining clip off the window crank handle. be careful ... put a piece of heavy plastic ( cut from plastic bottle ), between crank handle and the door panel, and watch where the clip flies to. carefully, pull the pegs that hold the panel to the door, freeing the panel from the door ( once again ... the tool that you use to remove the clip from the window crank, comes in handy ... slip it behind the door panel, use it as lever to gently pry door panel from door ). watch you don't tear the pegs out of the panel and leave em in the door. remove the plastic sheet ... it keeps the rain out of the door. you need it ... if you tear it ... replace it with generic heavy duty plastic ... any color you want. seal it in all the same places. put crank on ( no clip ). roll the window up ... look up at the door handle ... use a flash light ... you really can see it ... now, you need to soak your hands in hot water ... so they shrink ... you need tiny hands ... take a look and see if any thing is loose. you'll see it right off ... the release mechanism is fairly simple ... convoluted, but simple ... look up at the door handle ... see if the dog ear is broken and the rod is hanging loose ... if rod is loose and ear is not broken ... then the plastic clip is broken or fell off. put rod back in place and find something to press on the end of the rod .. a plastic cap with a hole in it ... a metal press on washer ... one of those springy types ... if dog ear is broken ... two i think 8 mm nuts hold the handle on ... buy new ones ... used ones usually look like crap ... and dog ears are cracked. if you are on a shoe string budget ... remember the driver's and passenger side are the same ... as only one dog ear gets used ... the other dog ear is like brand new ... so, if more money than time ... and you feel ambitious ... swap the driver's side to the passenger side, put passenger side on driver's door. or go to wreckers ... get side opposite the broken side. if passenger side is broken ... get driver's side from wreckers ... or ebay ... but, if money is available ... they are around 25 bucks new per side ... grease the inside mechanisms, use water proof grease ... things should be okay ... good luck ...
-
... nope not yet ... Carl will vouch for me, quality requires time and attention ... can't rush it !!! soon, soon ...
-
thanks everybody !!! there is a 71 at the pick and pull monterey at san jose, in san jose ... got me a door glass for 29.99 ... ( too bad i got ripped off by the seller on ebay ... that brings this to 60 bucks ). had to take most everything that would unbolt off to get it out ... including the upper door frame ( the chrome piece above the glass ). is there an easier way to do this ... when removing at the wrecking yard, one need not be as gentle as when working on one's own piece of moveable art. i want to put this in my 72, doing as little damage as possible and removing hardly anything ...( and yes, as i am sure you all recall, after the air driven torque wrench and leaky can of wd-40 episode, i've given up working in the nude when visiting the wrecking yards. ... after that little adventure, i really don't care if my clothes do get dirty. however, at home ... where i have all the proper safety equipment, that's another story ).http://www.classiczcars.com/forums/newreply.php?do=newreply&noquote=1&p=100680#
-
thanks, Will ! i'm hitting the wreckers in san jose tomorrow ... hope to find one .. might give Rod a call ... gotta go pick my son up ... game night at school ... warhammer ... back in an hour .. wayne
-
maybe i will get lucky and find a 69 through 75 out there tomorrow. Carl, i saw the letter in sport z mag. no gold chains for me !! :-0 that was an email i sent to Bob. didn't know he saved em to use in the mag. i am published !!! ... you notice twin z above it ? his scarab has twin turbos ! bet it hauls arse !!! mine's fast ... his must flat fly !!! but i still need a window ... Carl, trade you front and rear bumpers with over riders for your driver's window ... i'll stop by your mom's, grab the window and leave the bumpers on her lawn. call me ...
-
searched glass, door glass, no help. 1972 240z ... driver's door glass damaged. need replacement glass. found a 78 280z at wreckers. anyone know, is the 78 door glass a direct replacement for the 72 240z ? the doors are different, 69 through mid 74 doors exchange. newer doors were modified, to meet us federal safety standards. latches in different places than the 240z. braces in the doors that the 240 doesn't have. so, i wonder if the glass has been modified to clear all those changes ... are all the brackets, bolt holes, screws, guides, ect. all in the same places. my z has a V8 in it, i am not concerned about restoration points, i need it to bolt in and function properly, like the original glass. thanks a bunch ... i'm hitting the wreckers saturday morning ... please respond asap if you see this post later ... please respond anyway ... that 280z may already be picked over or some a hole may have broken the glass to get a screw or something. thanks, wayne