a7dz
Free Member
-
Joined
-
Last visited
Everything posted by a7dz
-
 I agree Arne and can say the third party manuals are confusing at best. May be better to take pictures of one being set up correctly and Post it as a tech article here.
 -
I learned from a member here to use a solvent sprayer to spray POR 15. Works really well and is easy to clean up. Got mine at Harbor freight for about $ 5.00. Syphon some lacquer thinner through it when you are done and it is ready for the next use. Put the plastic tube in the can and go for it. Another member here put a fishing weight on the tube to keep it in the can. I used a clip I had for that very purpose. Used this to coat the inside of my doors and fresh air vents. Do use the Marine Clean and Metal Ready per instructions. With those steps followed I have painted POR 15 over painted surfaces and it will not come off. I know part of mine was a mistake.
-
Beware that the lower part of the fender is rusty normally from the inside as the cowl drain deposits silt in that area and it stays wet. So, make sure you remove the fenders and inspect the front edge of the rocker panels also. This is a great place to use POR 15. The whole bottom of my 70 240 is done in POR15 to include the fender wells. It flows out nicely. Two things to be ware of one is moisture. The chemical process is activated by moisture. The second is be careful not to let the POR 15 pool up. It will get rough on the top side if you do. Seals the same just is not as pretty. I did brush most of the surfaces how ever I did spray the inside of the Rocker panels, cowl bucket, rear fender wells. UNDER NO circumstance spray this with out a respirator with organic filters!!! I can not stress this enough. I even wear a respirator when I brush it.
-
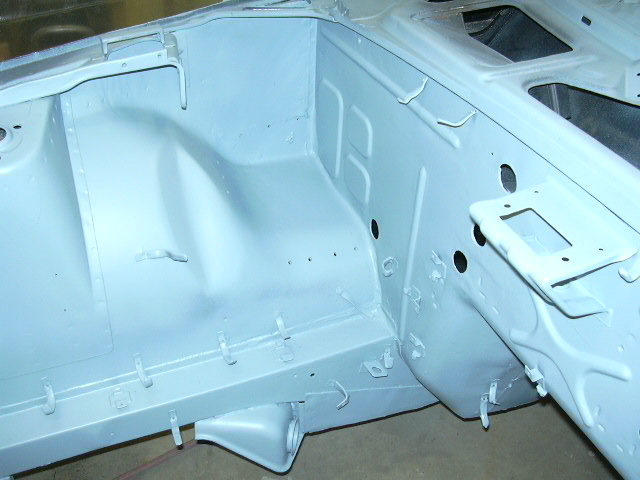
That is the primer that is being used on the car in the pictures I sent you. I too am sanding and sanding and sanding. I am getting real close to the color stage. This car is a long ways from a year ago. .
-
I was advised by our automotive paint store to try this product. It is sweet to work with. http://www.autobodybrands.com/primers/5425_x2k.html It is a direct to metal epoxy fill primer or sealer. Just my 2Cs
-
You named your problem. The rod should be 3-4 mm short of the aluminum mounting flange or 3 mm taller then just the brake booster. Had the same problem on another Z last week end readjusted the rod and all is well.
-
I know it is winter and a lot of you are storing your cars but, need a little info and help here. Please go out to your 240Z cars take the accessory relay out and see if the blower motor still comes on. Please post the results with the build date in this thread. This question comes after helping a member troubleshoot his car. After we get the data back we will let you know what is going on and why we are asking these questions. Thanks for your help.
-
Before I jump in I would like to see pictures of these same parts: the torsion fitting and frame rail from both the inside and the bottom as well as from the front. It is definitely repairable but, not drivable. Parked mine because of rust damage in the same area. By the way this is rust damage you uncovered by tagging the curb. The biggest factor being the doubler just behind the torsion fitting was never sealed coming out of the factory and collected water and rusted from the inside out. I know this does not look like a lucky thing to you but, you are lucky to have had this happen a this speed and not faster or in a worst condition. I want to see the other pictures because I just finished the repairs on my car this past winter and have several pictures of how that was completed. I will write a tech article on it later but, will say that there are a lot of these cars with the same problem and need attention.
-
I just completed the bottom of my car. I did strip the seam sealer sand blasted the complete wheel wells prepped the surfaces per manufactures spec's. (Degreased and etched) I used the POR patch as my seam sealer then painted POR 15 over it. Yes I did take a little disc grinder and smooth out some roughness in the POR patch and you can not tell it is there. I did both sides of the seams as best as I could reach them and completely satisfied with the end result.
-
Ian; Glad to see this car at this point. The lack of funds is not limited to teenagers those of us with families fit into that circle as well. Wasn't it this spring that you hit the wall and were having trouble with the motivation to go on. I am glad to see the words of encouragement from the members here to you were heeded. Ian Great job getting this car back together there are a lot of these cars been apart a lot longer then three years. Took a good person to say thanks for your comments and get back out there.
-
I do not think I would cut them off but, I would neatly tie them into the bundle. You may find a use for them later. If you were to look under your dash and around your car there are wires stowed all over. Fog light wires, fuel pump wiring with or without the electric pump, air conditioning wires. The list goes on and on. Besides how were you able to get the information that this was an automatic harness those extra wires. Just my thoughts and experience on this kind of wiring.
-
Arne; I think I have a good replacement mast here for your antena. The case on mine is rusty and I was given a complete set up out of an RX 7 that is brand new. I am sure with a little thought I can make it work just fine. Let me look for sure.
-
I am one whom will tell you I have found parts that I was told you could no longer get five or six years ago, All of them from Nissan dealers. Things like both front fenders the hood and several little clips and gas filler tube, Hoses All the rubber bushings for both the front and rear suspension. Just to begin with. So, laugh at us if you want to it just keeps these parts in stock longer. Oh yeah both door handles drivers mirror. These are all out there if you have the part numbers when you walk in the door. I will say that getting the Parts CD made this possible before I was just laughed at.
-
I always sift the media before I use it. The extra few minutes is so much easier then tearing down the complete set up chasing the plug. I use an old wire kitchen strainer I got at Good Will. I have also found that I have to vary the pressure on the top side of the sand tank to keep the flow of sand constant. Changes with the moisture content of the air and the media being used. I have found that by adjusting the valve in between the water separator and the sand mix valve I can keep a better flow of sand and keep the pressure down causing less stress to the metal being blasted. I start with the valve about half open and adjust from there. I ran a 5 hp 30 gallon tank on this set up with great results. It did take some time to get the set up refined. My 2 cents.
-
That is an easy repair to access. I would not even think of not replacing the metal. May need to fair it a bit with bog but, only after removing and replacing the cancer.
-
I only have three wires over there. Black and black/yellow going to the washer pump motor and a yellow green going to the brake switch.
-
I bought mine thirty four years ago now. I have spent the last eleven months putting sheet metal back around it. I am about to get some paint back on it. Arne keeps asking where the orange is? I keep looking and will soon be able to show him. But right now the orange paint is sitting on the bench waiting for the primer and last looks at the body lines. I too have a long ways to go but, no worry I will get there. I just wish I had all the parts redone and ready to go back on. There are some in that condition but probably more that are still waiting to get the twice over.
-
Heres the latest on the battery tray rework. Just about ready for paint.
-
The drug store on every corner has money orders.
-
I disagree with there being no cartridges. My FSM clearly shows the strut cartride in the picture on page FA 13 in figure FA-32. on my 70. The " O" ring is to keep the cooling oil in the strut tube. It is put there as a cooling agent. The instructions in steps 8 & 9. State to remove the cylinder from the outer sleeve clean the oil with gasoline.
-
Well said Arne. I too have just taken the struts out of my car even though they were changed a couple of times still had the fish oil in the strut as called out in the day on the parts list for the struts. With the new gas struts inserts the oil is no longer needed. When you buy new springs they too will be different lengths. At least the European or domestic replacements. Good luck with your project.
-
I have used mine countless hours. Never been sorry I bought it. Besides it helps the club.
-
My dash wiring is still in tact and the wires on the right side are as follows: The t connector with two wires Black w/ white and Green is stowed and not used. Red black wire with spade connector goes to the defog switch in the console. First blue wire with inline fuse with spade is the power wire going to the defog switch in the console. Second blue wire with inline fuse and bullet connector goes to power the fan switch and fan motor it connects to a red wire common to the wire harness between the fan motor and switch behind the radio. Look and see if the red wire on the left side goes to the fan switch harness if it does that wire connects to the second blue wire above. The blue wire on the left side is stowed and not used. The black wire is aground and connected to the dash common to the rear radio mount bolt on the left side.
-
You need to make sure the hot lead coming from the fusable link is isolated, sounds like it may be touching something inside the car it is a white wire needs to be isolated also the red white wire both will end up at the amphere meter.
-
The power to the coil and dizzy go through the tach. It either has to be in or jumpered if you are using the engine wire harness.