Kvamen
Free Member
-
Joined
-
Last visited
-
A bunch of folks found themselves at the mercyless mercy of a nameless, faceless tyrant. This tale relates to three of them, a preist, a pagan and an engineer. They've been lined up to be executed by guillotine. Their only choice is whether to lie face up or face down on said device. The preist ponders a moment and opts to face up, so that he may be looking up to heaven in his last moment. As the blade is released, nothing happens. The executioners deem that the preist may go free, since the guillotine did not take his life. Next in line is the pagan. He also opts to face up, reasoning that he should unflinchingly face the end of his life. Again the machine is tripped and again, nothing happens. As with the preist, the pagan is freed. Now, it's the engineer's turn. He reasons that since it was good enough for the previous two, it should be good enough for him. As he's looking up at the blade, he says, "I see the problem. It just needs a little grease"
-
Sorry, I can't tell you what the color ID number or name is. The paint dribbled across the sticker on the can. It was a BMW color, a dark, neutral grey metalic with a little pearl in it. Doug
-
Beautiful paint job. So much so that I almost wish I'd picked such a dazzling blue. I trust you enjoy yours as much as I do mine. It shows. Doug
-
Many variables to deal with. I presume that your paint job is not new and thus cured. In order for the new paint to bond you must have a clean surface. Best to clean the surface with polishing or rubbing compound. This will take off the wax. Wet sand the surface with 400 grit. Mask before sanding so you don't scratch what won't be painted. Even if you do, scratches can be worked out with 1000 to 1600 grit wet sanding and polishing compound. When the stripe area is clean and satiny, wash it all down with detergent. Now re-apply your stripe masking. Use the good masking tape from your local paint store. It costs a little more but it's well worth it. Consult with your paint store. They can keep you straight on compatibility issues (laquer, urethane, acrylic enamel, whatever). You may not even need a primer if your base paint isn't rubbed through, presuming your stripe is dark over a lighter paint. If you use a primer, use a color similar to your stripe. A good compressor and hvlp gun are nice to have but if you don't, and you don't forsee the need for one in the future, you can do a very decent job with spray cans of good quality automotive paint. Again, consult your local automotive paint store. They've seen it all and are usually quite helpful. After your paint is applied and safely set up, unmask the stripe and have a good grin. I find that the hardest part of a paint jop is waiting for the paint to be dry enough to remove the masking. It's like Christmas and I'm seven again. The final cleanup is the edges of the stripe. You may have a raised, sharp edge where the paint abutted the masking tape. You can shave this edge, carefully of course, with a sharp knife or use the super-fine sandpaper and polish it out with rubbing and polishing compound. One problem using primer is that you may have a fine primer line showing between the stripe and body paint. Do not despair. The cure makes an even classier stripe. While you were in the paint shop, snooping around, you probably noticed packages of striping tape of different colors, widths and multiple stripe tapes. You can match your stripe or contrast/compliment your color scheme. Consider a double stripe. It will give you body/tape/stripe/tape/stripe combination to really sharpen the impact of your work. Probably the trickiest part of any of this is making a straight line with tape. Start with reference marks (light pencil, don't engrave the surface). anchor the tape firmly at your starting point. Then roll off enough for all of this panel. Sighting down the tape, pull it firmly but don't stretch it. As you lower the tape to the surface, it will make contact and barely stick. If it's not quite where you want it, lift it up and try again. This way you can ease into body contours and put the line where you want it. When you have it where you want it, press the tape down and especially at the paint edge, rub it down with a cloth. You can now mask the rest of the body ( I use newspaper ), taping it to your stripe edge. One other note on striping tape. After you've got your tape in place. rub it in thoroughly with a cloth so that the adhesive bonds to your paint. When cured, it is bonded like paint. For the multiple stripe tape, it has a clear mylar tape on the top side which holds the stripes in correct relative position. Peel off the paper that protects the adhesive at the bottom of the tape. Apply the tape. Rub it in good. Now peel off the mylar top tape. Rub in the stripes thoroughly. Most important of all, have fun with it.
-
Yes, Alphadog, bumpers are good. When I first started working on this beast, I had to do some work on the leaky gas tank hoses. It was jacked up in my driveway which has a slight downhill slope. While my back was turned, gravity (the oposite of comedy) took over and she started rolling downhill. Before I could get the door open to get my foot on the brake, the front bumper made contact with a fir tree at about four mph. It hit square on the bumper guard. Flattened the bumper guard and pushed the bumper into left light bucket, just skinning the paint. At that point I decided that restoring the bumper was not worth the trouble. I'm currently building bumpers out of rectangular tubing. They'll look good and work better. I'll post some photos when I get it done. Obviously, I'm not a purist. But then I didn't get this car to restore to show or sell. It's to drive, which it does in exemplary fashion.
-
What kind of wheels? I dunno. They came on the car. FWIW, the hub covers say "MODERN". The rivets are decorative, not functional on a one-piece cast wheel. Doug:confused:
-
It sounds like you'er being robbed of fuel. Another possible problem might be your fuel filter. They can plug up enough to allow enough fuel to idle but RRRun. Incipient plugging can be intermittent. Good Luck and Merry Christmas. Doug Quammen '73 240
-
I've been looking for a replacement for a seat belt/rewind mechanism for a '73 240-Z, drivers side. I know that at this age, they dont have their original strength. Even a good working harness from a junker doesn't really thrill me since it's still a 30 rear old seat belt. I even saw a wrecked one in the junk yard whose seat belts were apparently torn off on impact. Ouch! I haven't seen anything but competition harnesses in catalogs. Are there any adaptations from other vehicles? Any suggestions? TIA Doug Quammen, 73 240-Z:confused:
-
-
-
-
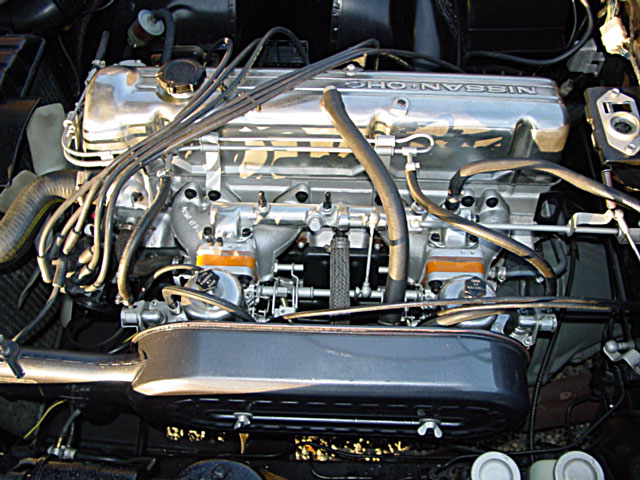
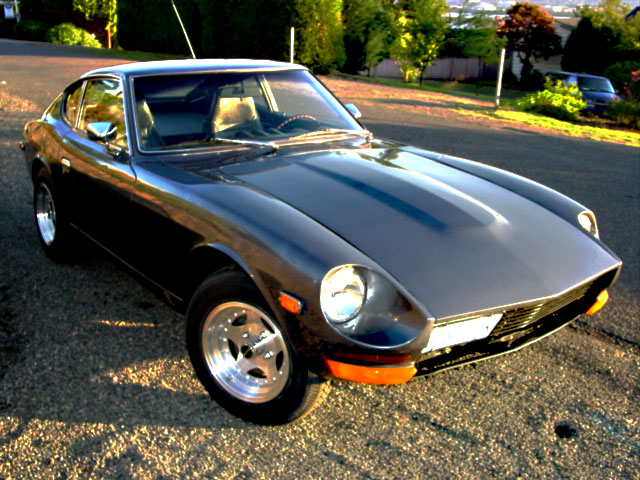
Well, it's time to show off my beast. I've had it for only a few years, most of that time spent dead or dismembered. It's back to life now and lives for the road. Engine has been overhauled with a moderate cam. '72 intake and exhaust manifolds to match '72 carbs that it came with. While the engine was out, I stripped off the fenders and rebuilt the battery box, the rot in the fenders and under the fenders. I ran out of things to take apart, so I had to paint it and put it back together. The bumpers weren't worth putting back on, so I'll be fabricating new ones. Doug Quammen