.JPG.cfcada9cf1c1b502df3f5f2f2ca3ff36.JPG)

SteveJ
Free Member
-
Joined
-
Last visited
Everything posted by SteveJ
-
 I did it on my 73, as well. It's pretty much as you described.
 -
Been there, done that. https://fiddlingwithzcars.wordpress.com/2014/01/20/installing-the-front-bumper/ Rear: https://fiddlingwithzcars.wordpress.com/2013/06/29/rear-bumper-install-73-240z/ Brackets: https://zcardepot.com/front-bumper-bracket-stainless-steel-240z-1970-73.html Bring the car and bumper over, and we can knock it out.
-
In doing further research, I'm glad I have decided to play with different ideas before implementing one. I was wondering about the minimum depth of material for using a helicoil, as @grannyknot has warned. I found this link: http://www.noblefix.com/helicoil/HeliCoil-Tapping-Chart.html. It expresses a depth of "H" that can be looked up in the chart on the page. It appears as though the minimum depth needed is 7mm. If that's the case, there could be an issue with using a helicoil since I know the material thickness is less than 7mm. Just in case, I did just order some 6mm deep M6 inserts. I'm going to end up knowing more about helicoils than I ever wanted to.
-
Well, I figured I would try @Diseazd's suggestion and reached out to a machine shop. So far, they haven't gotten back with me. Plan B (per @Zup) - I ordered a heli-coil kit and will test on some M6 nuts to see if I like my competence. (I have also been watching Youtube videos to get details I might otherwise miss.) Plan C - I will practice drilling out and re-tapping M6 nuts with an M7 tap.
-
Another reason for the oil is that it will keep the strut from rusting to the tube. Overfilling isn't too big of an issue, though the tire shop had thought I had blown a front strut when I got my last tire change since some of the oil was still on the outside of the strut tube. By the way, @zcardepot.com is now selling an octagonal wrench to remove the gland nuts. It's good to support companies that come out with new products to support our hobby.
-
Z Specialties - http://www.zspecialties.com/
-
I was thinking along the same lines about the hole. The 6mm bit may clean it up a little, though. I haven't broken a tap before, but I have broken an extractor...about 24 years ago. My friend and I managed to salvage that day, though.
-
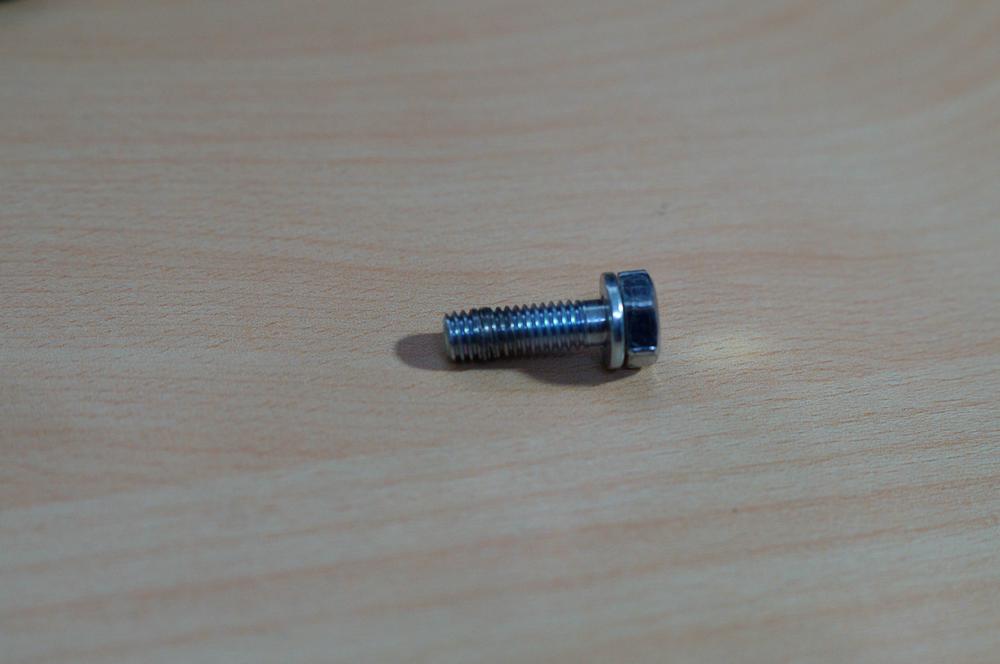
From my research the pitch for M7 is the same as M6: 1.0. It looks like I should use a 6mm bit (I have metric bits, though one very precise website suggested a C drill bit. Is 0.00577 inches difference that important?) before using the M7 tap. (I have to make sure I have an M7 tap. I think I do. Even if I don't, I can get one in a couple of days online.)
-
I did the research (aka, Google is my friend). The 1/4-20 cap screw may be a 3/8 or 7/16 head. The M7-1.0 has an 11mm head. Therefore the head on the 1/4-20 could be smaller than the M6-1.0 or bigger than the M7-1.0. If the M7 seems to clear the top of the striker plate, it seems like that would be the way to go. The fun part will be digging the door lock out of the door to lubricate it to make sure it rotates without too much effort. I want to eliminate as many variables as possible here.
-
It's not the height of the head that concerns me. It's clearing the top of the striker plate. I'll have to check when I get home. @grannyknot Is there a reason for going to M7 and not trying the 1/4" bolt first? I haven't needed to worry about this before, and I want to increase my knowledge.
-
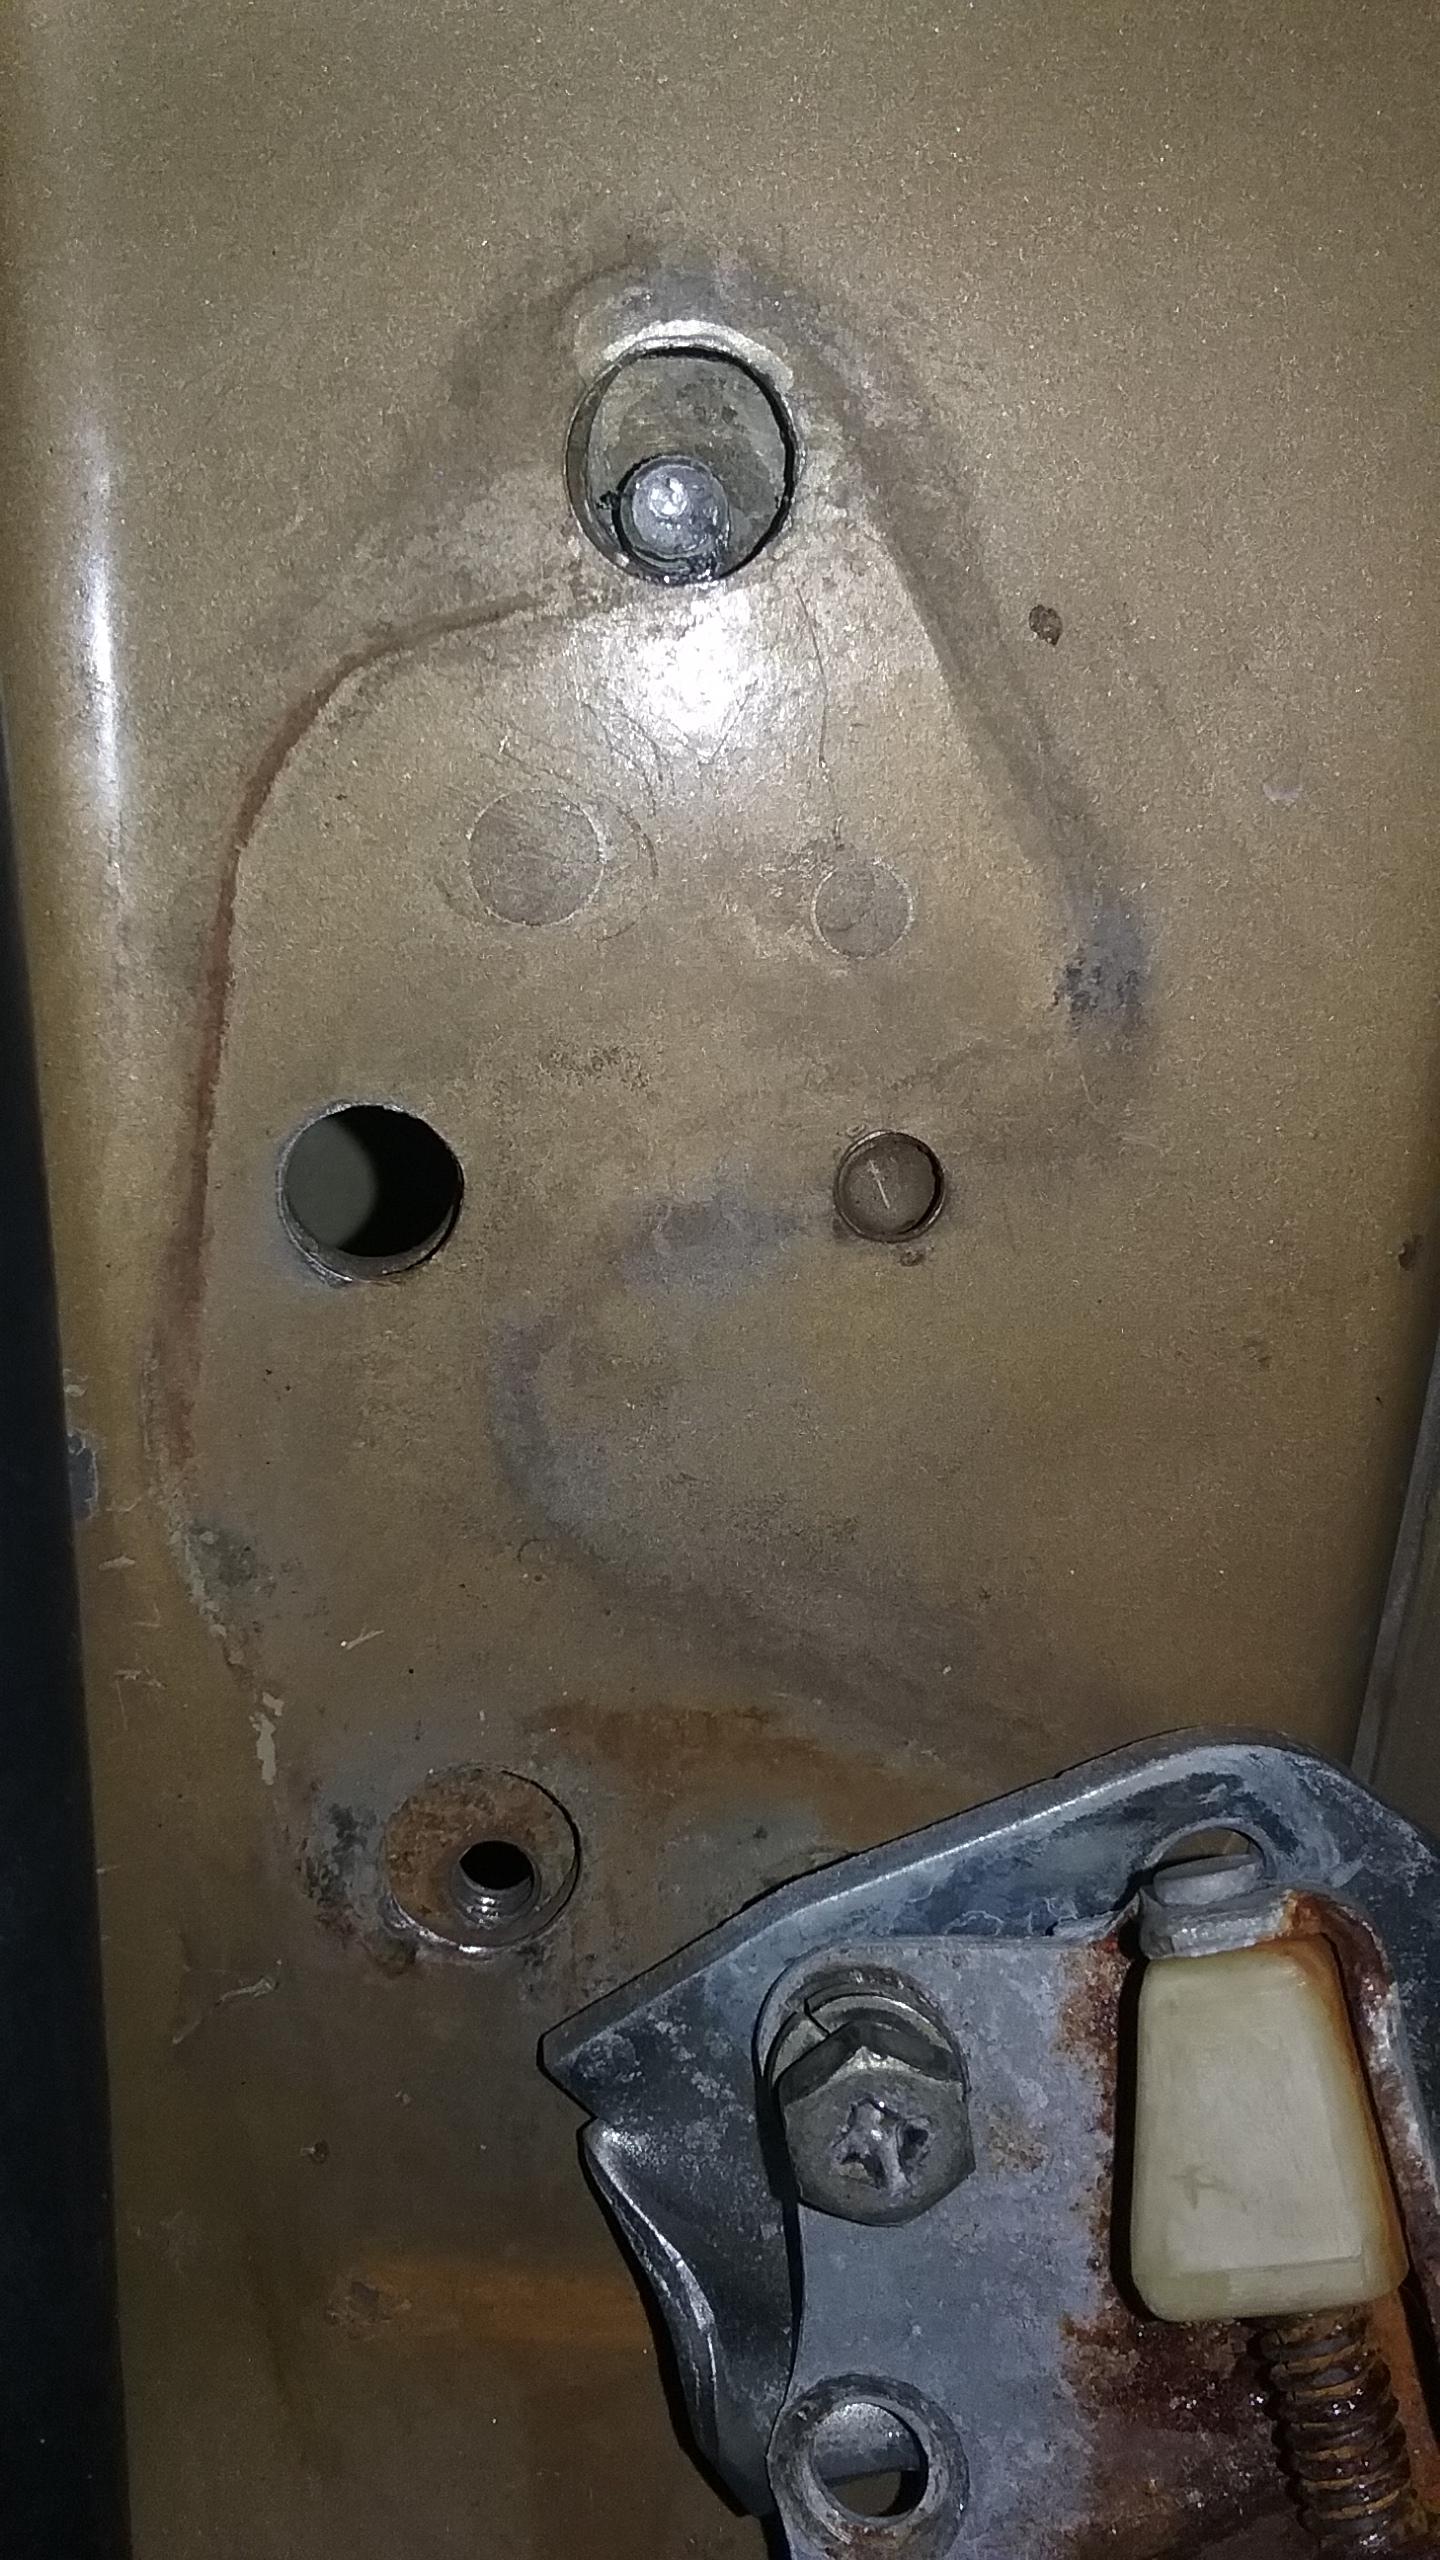
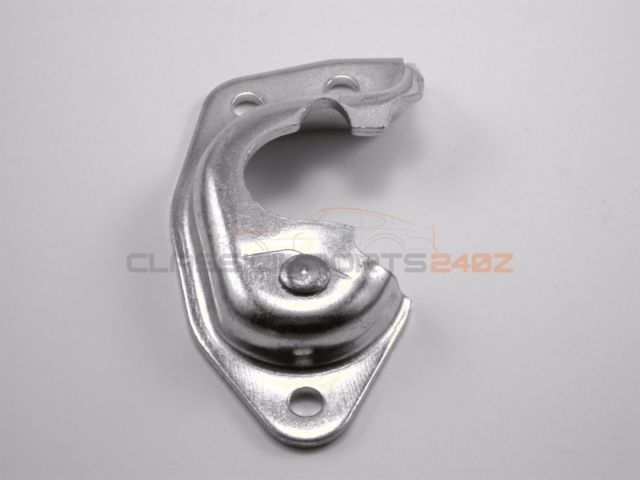
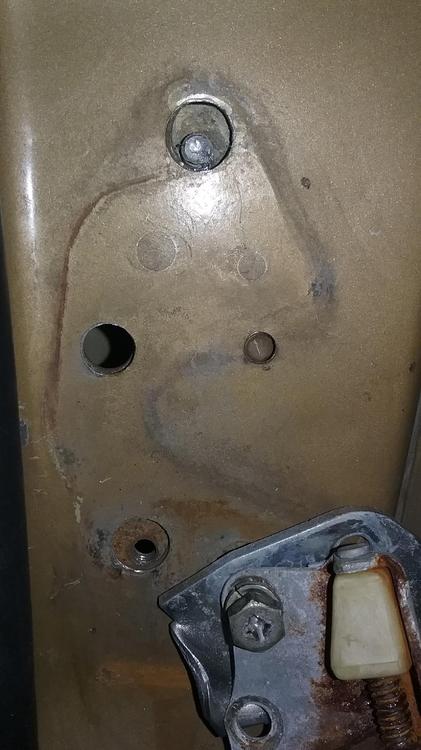
Okay, so after removing the broken bolt and re-tapping the threads, I'm still having big issues with the striker plate in my 260Z. The door closed fine a few times, but then it wouldn't latch completely. I tried adjusting the striker plate, and I noticed that the bolt would not tighten. I pulled the bolt out and noticed the threads were boogered up. A replacement bolt wasn't getting tight, either. At this point, I think that re-tapping the threads and using a new bolt probably won't hold well, and I would like to entertain suggestions. Should I drill out the M6 to 1/4" and tap at 20 TPI for that size? I am afraid that I might have clearance issues with the head of the bolt if I drill out to M7 and tap at that size. If these don't work, I imagine I'll need to cut a hole in the body to put in a backing bolt. That is the least preferred course of action.
-
On Saturday I was getting frustrated about the striker plate moving on the driver side door, so I attempted to cinch it down good. That didn't end well. I noticed that my attempts to drill it out were meeting with similar success. (Tip: Spring loaded punches don't seem to pack enough punch to mark the center of a bolt. Are you familiar with the First Rule of Holes? It goes along the lines of "When you find yourself stuck in a hole, the first thing to do is STOP DIGGING!" I called a friend from the Georgia Z Club who has restored several Z cars to ask for advice/help. Fortunately he was willing to come over (yesterday) and drill it out. First he started with a dremel tool and shaved down a little where I had attempted to drill into the bolt. Once that was smooth, he marked the center with a sharp punch, and then he started to drill. He wasn't happy with the first go, so he hit the bolt with the punch again. He proceeded to drill through the bolt. He changed out the bit and drilled through again. Using the extractor, he pulled out what remained. We chased the threads, and I dug though my Nissan bolt collection to find 3 new bolts of adequate length. He adjust the striker plate, and the door closed just fine. After he left, I pulled the remains of the bolt off of the extractor. It would take a micrometer to figure out if he could have gotten it closer to center. Now that I've seen his techniques, I want to practice punching and drilling out the center with some bolts in my collection.
-
It's worthwhile because it's for you guys.
-
Here's a video of some members of the planning committee hard at work, verifying that the go karts at Lanier Raceplex are suitable for ZCON attendees. We are doing our best to leave no detail to chance.
-
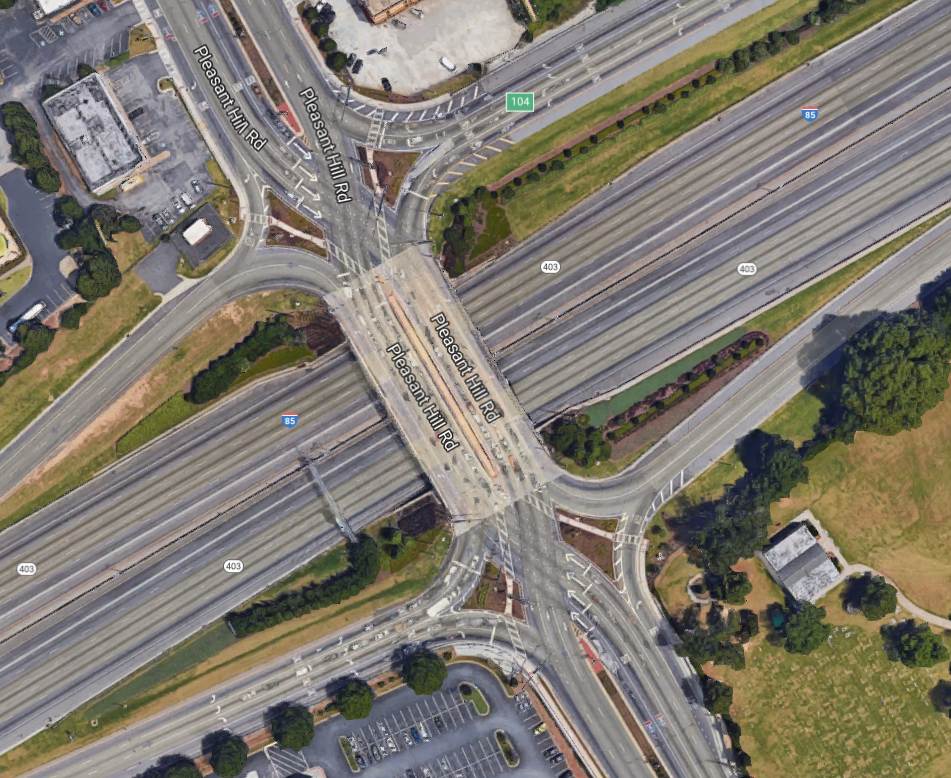
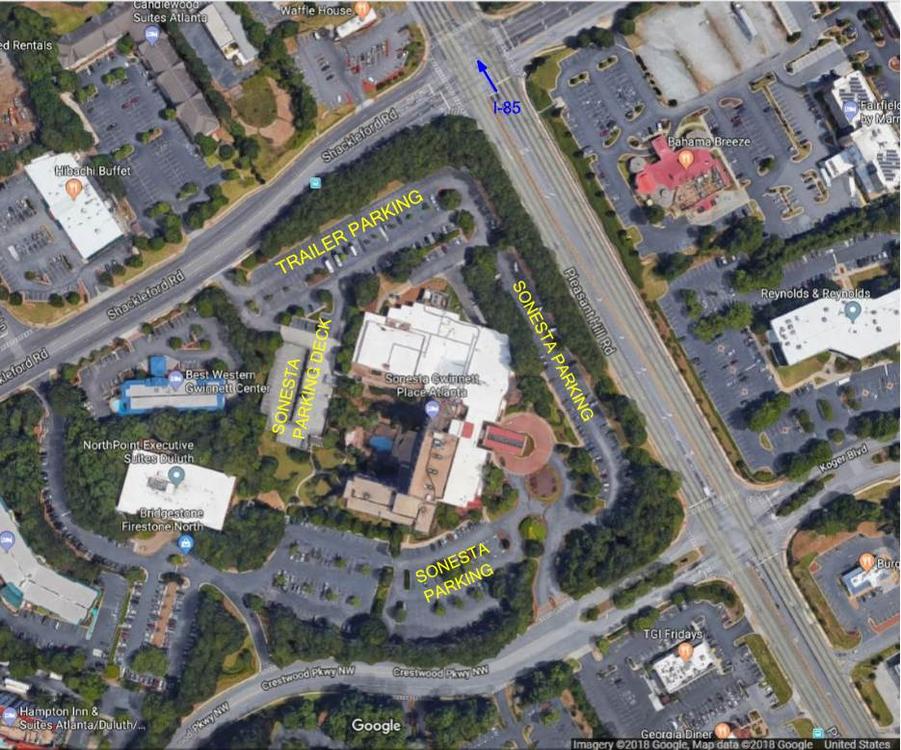
Chris Karl, ZCCA President, and several of us from the planning committee visited some of the convention sites, yesterday, including the Sonesta Hotel, Coolray Field (planned site for the People's Choice show), Road Atlanta (track day), Lanier Raceplex (planned site for Autocross & Karting) and Sweetwater Brewery. We met with the event planners at the hotel and toured it extensively. I did bring up trailer parking, and that was included in the tour. The hotel has open air parking and a parking garage. There will be regular security patrols and video surveillance. Here's a map of the hotel site showing the parking areas. It is very near I-85. Coming from the north, you make a left off of I-85 onto Pleasant Hill Rd. From the south, you make a right onto Pleasant Hill Rd. Note: this is a diverging diamond interchange, meaning the lanes on Pleasant Hill Rd cross over. It can be a little confusing the first time you encounter it. If you are bringing a trailer, make a right off of Pleasant Hill Rd onto Shackleford Rd and a left into the hotel parking lot. That's also the way to go if you want to use the parking garage.

-
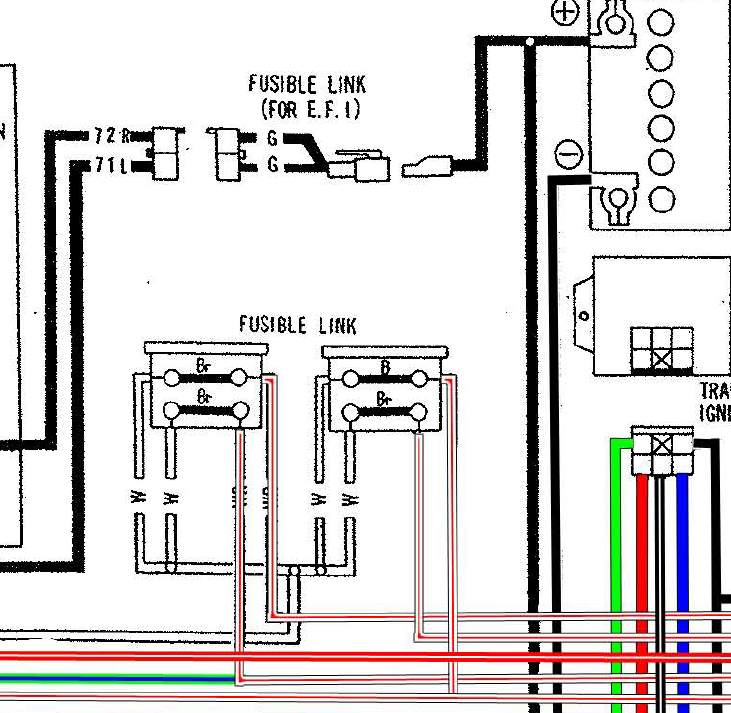
Are you measuring voltage to ground at each link? All of the white wires are connected together. Therefore if one has voltage, they ALL should have voltage. If you didn't have voltage on #2 at the white/red wire until after you turned on the car, that means that the fusible link is bad, and something is backfeeding the circuit. Edit: By the way #2 is the link to the fuel pump power.
-
Based upon the diagram I posted, can you indicate where you didn't have 12 VDC?
-
Okay, that's the same as the map light, too.
-
Can you get a clear photo of where your timing mark is and post it? You should easily be able to get more than 8 degrees timed in. As a matter of fact, post several photos of the engine bay with many around the distributor. Bandwidth is cheap. Otherwise, make plans to come out to the Mitty at Road Atlanta in April. I'm sure I could find more than one person I would trust who could tell you what's going on with your car.
-
We like to say that the distributor can only be installed one way, but I have seen on more than one occasion where someone managed to install the distributor 180 degrees out. Don't ask me how it was done. I only know that some people can do it.
-
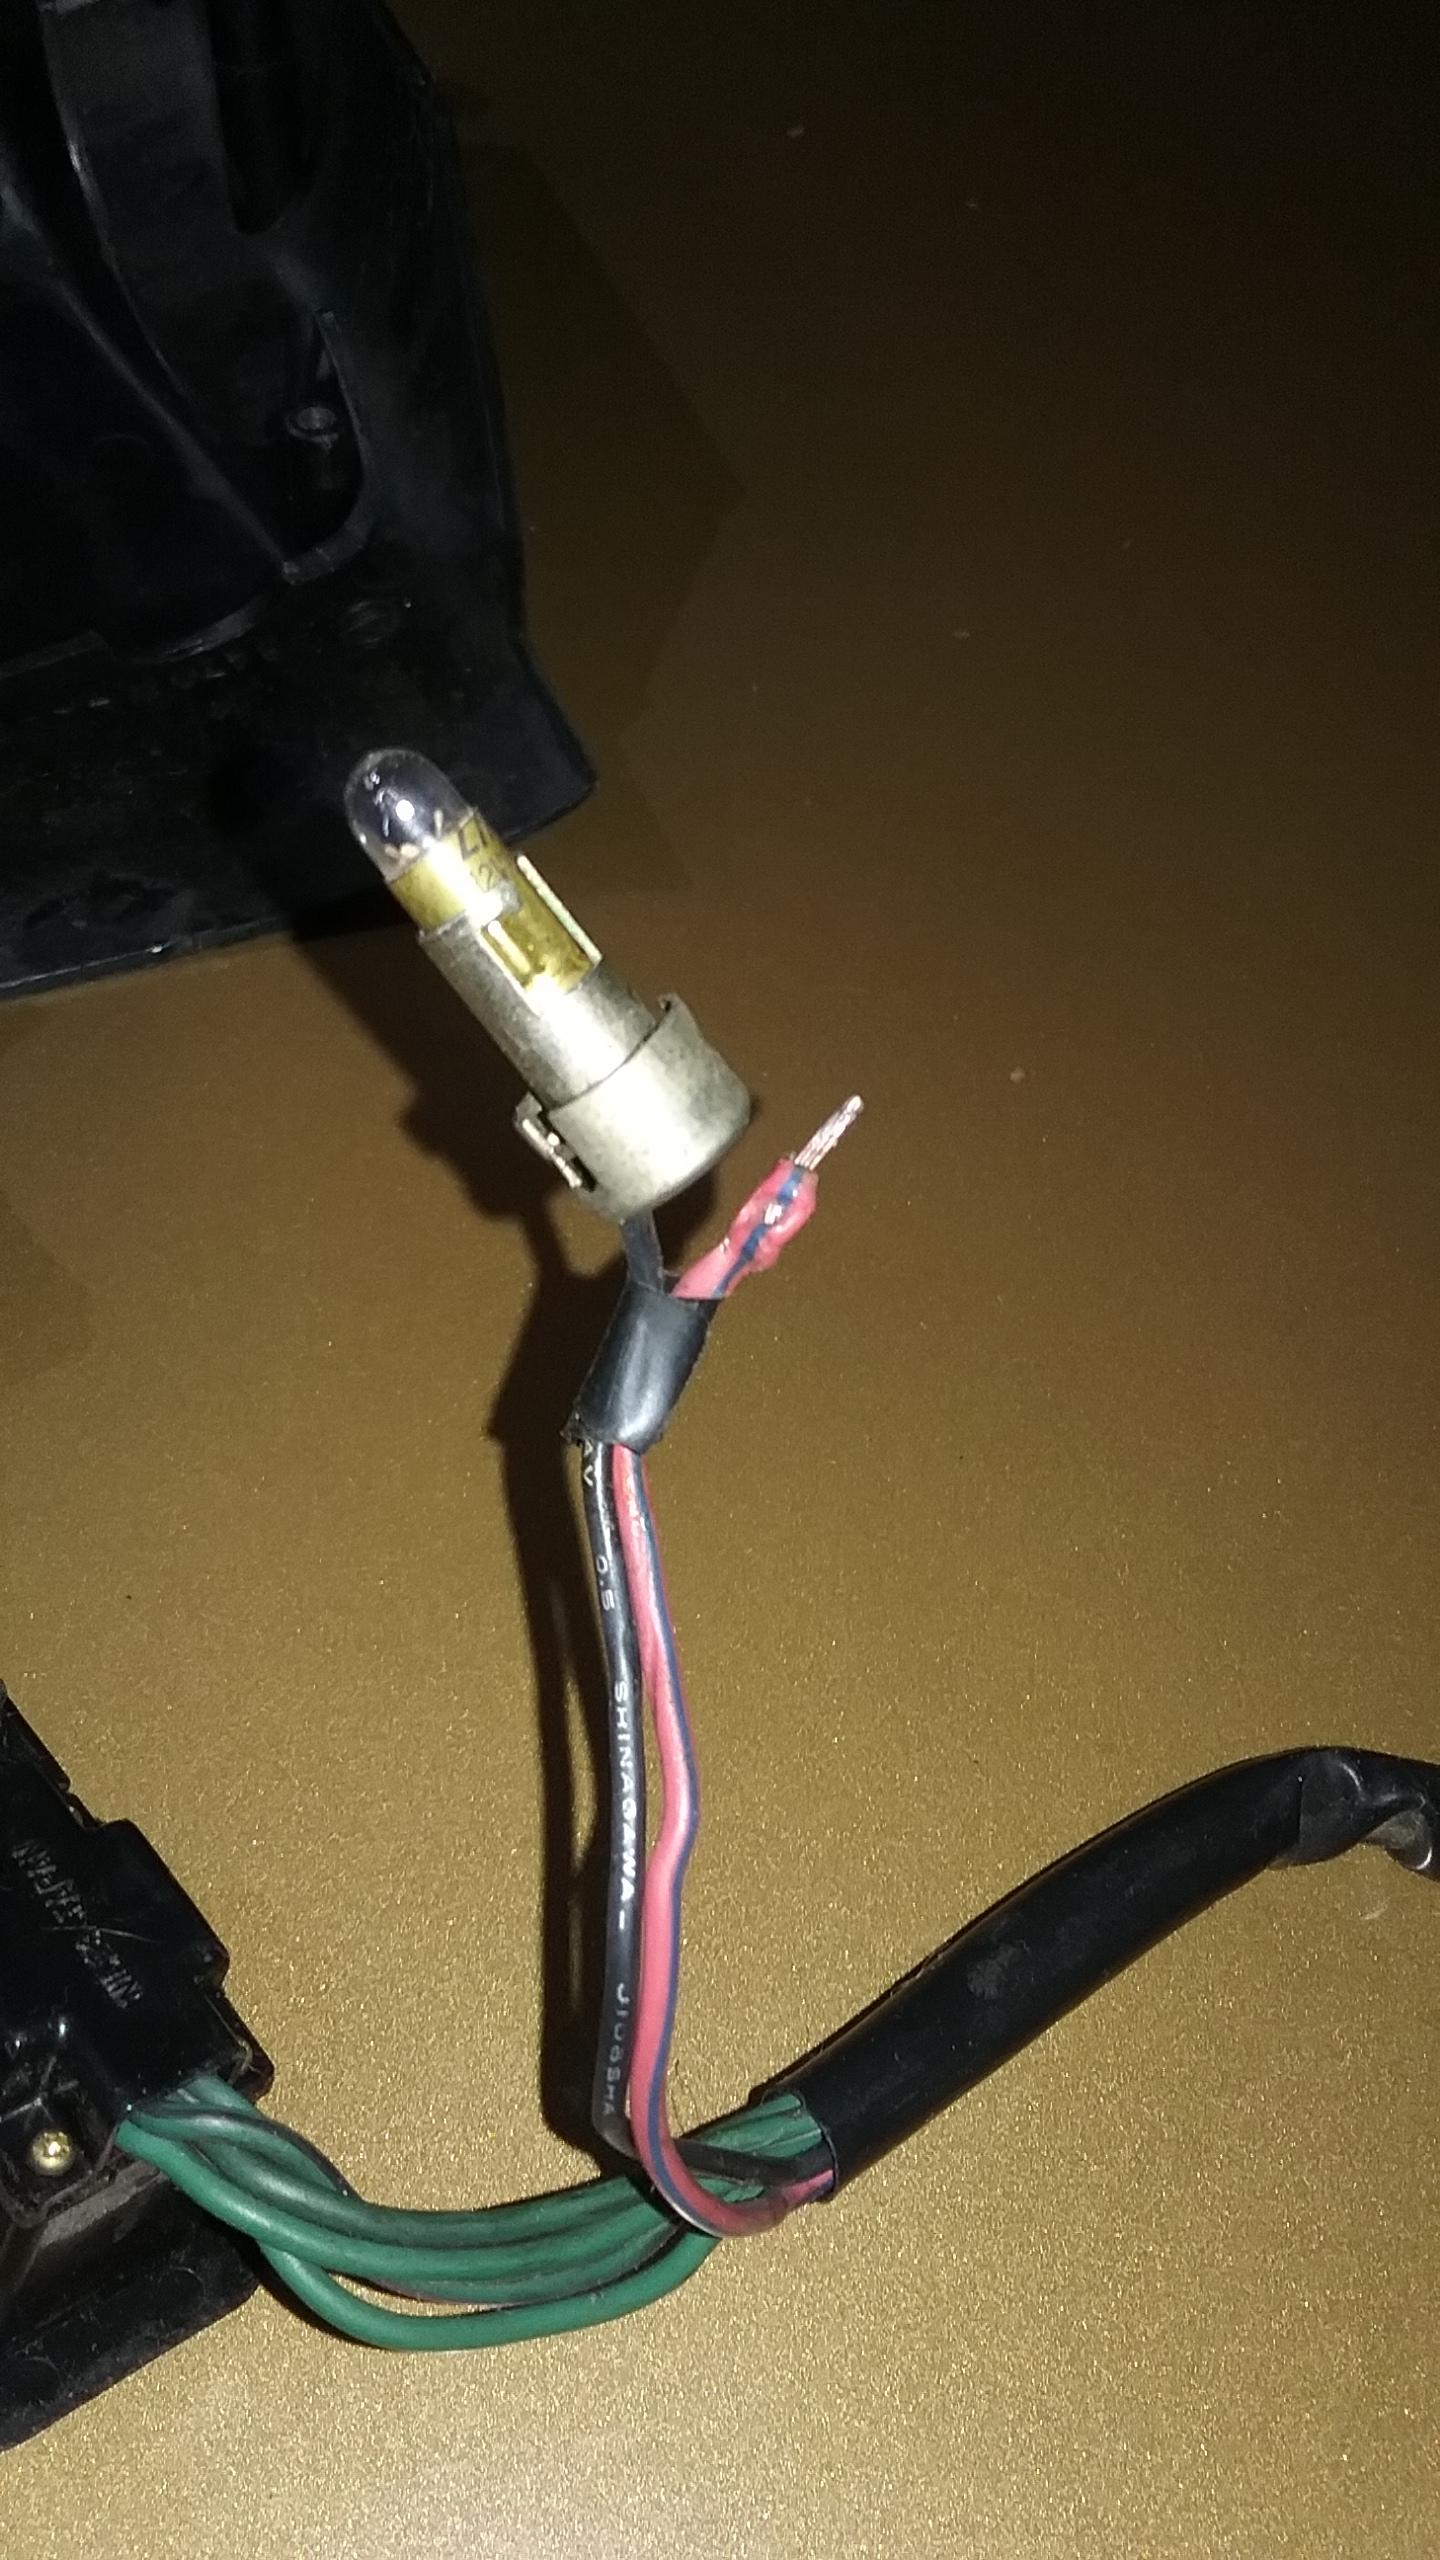
Please put the year of your car with your posts. That makes it easier to find the correct answer. Assuming you are referring to a 260Z, those are probably BA7 bulbs. BA7 bulbs are more common in motorcycle applications. These are low power bulbs and don't go out often. https://www.ebay.com/sch/i.html?_from=R40&_sacat=0&LH_ItemCondition=3&_nkw=BA7+bulbs&LH_PrefLoc=1&_sop=15 If your bulb is different, please post a photo for easier identification. Once I fixed the socket shown in the photo, I replaced the bulb with an LED BA7. The LED is very bright. You'll most likely want to stay with the incandescent bulb.

-
You may see improvement in the wipers by cleaning and lubricating the linkage. If you do that, test the wipers BEFORE putting the cowl back on since it's easy to install wrong. (Been there, done that, have the marks on my cowl to prove it.)
-
So THAT'S where it went. I've been looking for my socket.
-
The electric fuel pump is essentially a helper pump. It's only running after the car has started. Have you replaced all of the soft fuel lines under the hood and going back to the tank? Old hoses crack and let in air. The symptoms would be similar to what you described. It could also be a mechanical fuel pump with a damaged diaphragm. If you have replaced the soft lines, I suggest changing the mechanical fuel pump out. There are several choices for mechanical fuel pumps at Rockauto at $35 and less with similar parts & prices at Amazon, so it's not a big expense. I can probably come up to see you in a couple of weeks to give you some suggestions about sorting things out on your car, too.
-
You are close. All 5 (6?) should have constant power.