Everything posted by SteveJ
-
Wtf?
Yes, there used to be a kit for doing that. No, I wouldn't do that to my cars. Then again, if you saw my cars you'd ask what I'm doing with them period.
-
How Many 260Z's built in 1973?
Here's another theory, Carl. Quite a few parts changed from the 240Z to the 260Z. There could have been supplier issues with the interior parts, etc., that could have slowed production.
-
How Many 260Z's built in 1973?
12/73 vin 15896
-
only the Hazards and brake lights are working????
It can be fixed...with the guts of another. PM me for details.
-
passenger door
74-76 doors should work for you.
-
No blinkers (turn signals)
It's not an uncommon problem. I've seen many threads where people have suggested replacing the back of the switch. I'm glad you got it fixed.
-
Sub-diodes - 1978 alternator internal voltage regulator
I saw some more on Google Shopping & Amazon, too. There are some Standard Motor Product diodes that look similar. You may be able to get dimensions on their website.
-
Tach will not work with Petronix
Did you bypass the ballast resistor?
-
what?? electric fuel pump comes on when I turn the lights on??
I haven't run across a wiring diagram for the relay circuit. I pulled out the connection between the alternator and voltage regulator in my 73 a few years after I put in an internally regulated alternator. I didn't even realize what it was for at the time, but I did notice that the battery stopped running down. I would imagine that the logic would be the same as for the 260Z. However I don't know if they used the same kit.
-
Atlanta Caffeine & Octane - Nov 4, 2012
Sometimes "because it can be done" is enough of an answer. Maybe the owner just wanted to do something unique. Maybe he just wants to wrench on something other people wouldn't touch. It doesn't matter. I loved seeing something that I haven't seen in person before.
-
New 240z more hints
Carl, I guess that late 90s concept is coming back to life. I remember when Nissan surveyed Z owners about that concept. I guess a lot of us didn't like it because it disappeared quickly. I thought the back end looked rather awkward, too.
-
what?? electric fuel pump comes on when I turn the lights on??
It depends. Was the fuel pump added by some jackwagon who didn't know his head from a hole in the ground? Was the fuel pump installed in accordance with factory directions? What wiring modifications have been made to the car? The factory's implementation of the electrical fuel pump involved the addition of two relays. One relay coil energized with the starter, and the other tapped in between the alternator and voltage regulator to power the coil. If either coil was energized, the circuit was completed for the fuel pump to get power. I can't think of any way the factory method could cross-connect with the headlight circuit. It smells like an idiot with wire strippers to me.
-
Atlanta Caffeine & Octane - Nov 4, 2012
Here is their website: http://www.caffeineandoctane.com/ It's the first Sunday of the month. The next one is December 2. I usually get there around 7AM, and the main lot is full by about 7:30. The location is at the corner of Windward Parkway and Deerfield Parkway in Alpharetta/Milton. You take GA 400 to Exit 11 and go west for a couple of blocks.
-
Atlanta Caffeine & Octane - Nov 4, 2012
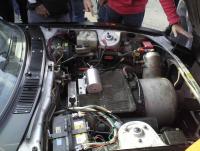
Essentially, yes. The guys in my usual crowd were talking with the owner when I came up. One of them told me it was an Auxiliary Power Unit (APU) from a B-52.
-
Atlanta Caffeine & Octane - Nov 4, 2012
Being the first Sunday of the month, I got myself out of bed early (thanks, in part, to the two four-legged alarm clocks asking for breakfast) to participate in the ritual Caffeine and Octane. Fortunately, with the time change, many other S30 owners were also able to wake up early, too. We had ten lined up (with one Z32 breaking it up right at the end). That's the most we've ever had gathered at one time for Caffeine & Octane. We were discussing turn signal switches, and I ended up testing a couple of switches for club members. It didn't hurt that I was taking apart a turn signal switch earlier this week to study its function and to clean it up. There were the usual exotics and beautifully restored cars from the 50s & 60s in attendance. However, a ratty-looking 280ZX seemed to garner the most attention. The video at the link will tell you why.
-
Sub-diodes - 1978 alternator internal voltage regulator
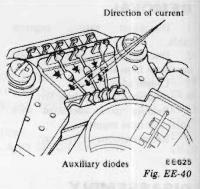
According to the drawing in the FSM, the lines go to the common point. However, you can easily verify this. Use a multimeter set to resistance/continuity. Place the lead in the common port on the common point, and place the other lead on the other side of the diode. You should need no resistance. Reverse the leads. You should see infinite resistance. If you see no resistance both ways, the diodes are bad anyway.
-
Sub-diodes - 1978 alternator internal voltage regulator
Amazon has some 10A diodes here: http://www.amazon.com/Volt-Schottky-Diodes-Solar-Panels/dp/B0056RHMCG/ref=sr_1_17?ie=UTF8&qid=1351959697&sr=8-17&keywords=diode I'm not sure of their physical size, though. You may also want to consider getting a soldering heatsink. Here's one: http://www.amazon.com/Elenco-ST-23-Heat-Sink/dp/B0002LLWIQ/ref=sr_1_1?s=industrial&ie=UTF8&qid=1351961829&sr=1-1&keywords=heatsink+soldering If you get it, you may want to use a small file to notch one side of the clamp to stay in place better. I'm not sure of any specs on the existing diodes, but you found the right page in the EE section. Just point the end of the diodes with the line toward the common point. Also make sure you have a hot soldering iron to melt the solder quickly and minimize the amount of time you're applying heat to the diode.
-
Sub-diodes - 1978 alternator internal voltage regulator
I would have to take a look at the EE section of the FSM to have a guess about the diode functions. I'll let you know if I have a chance to go through it.
-
Sub-diodes - 1978 alternator internal voltage regulator
It depends. If he picks up a Maxima alternator that has diodes on their last leg, he hasn't gained much. If his alternator has good windings and bad diodes, replacing the diodes would give him a serviceable alternator, and the process would give him a better understanding of the electronics technology used in the car that could help him repair other issues later.
-
Turn signal + relayl question
It's the brake warning lamp check relay. You'll find it on page BE-92. It's connector number 11. The circuit is drawn on BE-35 and described starting on BE-41. One thing to note is that the coil for the relay is powered from the L terminal of the alternator, so the coil is energized whenever you have voltage at the L terminal. The warning lamp is lit whenever you pull up on the parking brake or let the fluid level get low in the reservoir. Anyway, you might want to check the voltage from the blue wire to ground with the car running just to make sure the alternator isn't putting out so much voltage that it's frying the relay.
-
Turn signal + relayl question
Answer: something is causing too high of resistance in the circuit for the left blinkers. The high resistance is preventing the flasher from heating up enough to open the circuit to blink. Corrosion in the light sockets or in a connector could cause this. Too low of wattage bulbs, such as LEDs could do it, too. For your other question, have you looked at the FSM in the BE section for the relay under the seat? Can you tell us what color wires are on the wiring harness side of where the relay plugs into?
-
Anyone want new door cores made out of fiberglass for the vinyl kits?
Double check on Amazon. I noticed threads on here, zcar.com and Hybridz that referenced some of the products I found there. The prices were fairly low, too.
-
Anyone want new door cores made out of fiberglass for the vinyl kits?
I checked my spare 260Z/280Z (74-76) door panels against the 73 door panels. The window cranks are in the same position and the dimensions look about the same. Why do you think you need electric motors for your windows? Added: If you REALLY want an electric window kit, you can find them on Amazon and many other sites.
-
Anyone want new door cores made out of fiberglass for the vinyl kits?
Be careful. There are at least 3 types of 280Z door panels. One fits the 260Z and 75 & 76 280Z. The other is for the 77 & 78 280Z. I do not know if there was any differentiation in the 2+2 door panels for the various years, though a little research of the parts manual could clear that up. Anyway, if I can remember, I'll compare the door panels when I get home. Steve
-
Oil Pressure Guage malfunction
Do you have any other odd electrical symptoms such as other gauges dropping or lights dimming when you hit the gas pedal? Does your tachometer respond correctly? As for removing the gauge, you can do that by removing the glovebox and heater panel. You can then remove the screws and pull the gauges out through the opening left by the glovebox.


