.JPG.cfcada9cf1c1b502df3f5f2f2ca3ff36.JPG)

SteveJ
Free Member
-
Joined
-
Last visited
Everything posted by SteveJ
-
 At Zcar.com, the topic comes up from time to time... http://www.zcar.com/car_talk_forum/what_is_this_manifold-naps_831617.0.html http://www.zcar.com/70-83_tech_discussion_forum/l28_naps_896835.0.html Search over there for more info.
 -
Search through the electrical section. I know that I've described the headlight circuit in great detail.
-
Thanks, Jim. The old ring was a little corroded, but not too bad. Fortunately, I found a new retaining ring in my parts stash a few minutes ago. If I was organized, I might actually catalog all of the stuff I've been accumulating. I did not look at the sealing surface at the tank, though I imagine it's pretty nasty. I cleaned the gunk off of the O-ring with carb cleaner, and it passed my cursory inspection. That doesn't mean it was still up to snuff. Thanks for the info.
-
I replaced the fuel sending unit on my 74 today. I thought I had a new O-ring, but I couldn't find it. When I removed the old sending unit, the O-ring appeared fine, so I decided to re-use it. I tweaked on the retaining ring a little because I wasn't smart enough to leave well enough alone. It puts plenty of pressure against the fuel sending unit and O-ring. However, when I tried to put in some gas, it leaked at the sending unit. I got the gas level below the sending unit and worked on it some more. I think the first time I put the ring back on it may have slid over to the side some and not remained centered in the opening. I put the ring back in place again, carefully ensuring the ring was centered properly. A friend slowly added gas, but the leak remained. I went ahead and ordered a new O-ring and retaining ring from MSA. I hope to have it around Thursday or so. I'd like to hedge my bets, though, and ask for input on any other reason for the tank to leak at the sending unit besides not centering the retaining ring or replacing the O-ring. Thank you in advance for any suggestions.
-
You're welcome, Sarah. Sometimes it's not so bad to pay extra for the correct screw. My two cars have suffered from benign and not-so-benign neglect over the years, so if I can replace someone's kludged it-works-for-the-most-part fix with a proper fastener, it's worth it to me. The link really pays off for finding parts commonalities.
-
Look at the parts manual link in my signature. Find all of the part numbers. Go to Nissanparts.cc or Courtesy Nissan Parts, and put in all of the part numbers. They will let you buy anything that is still in the system and let you know what is NLA.
-
-
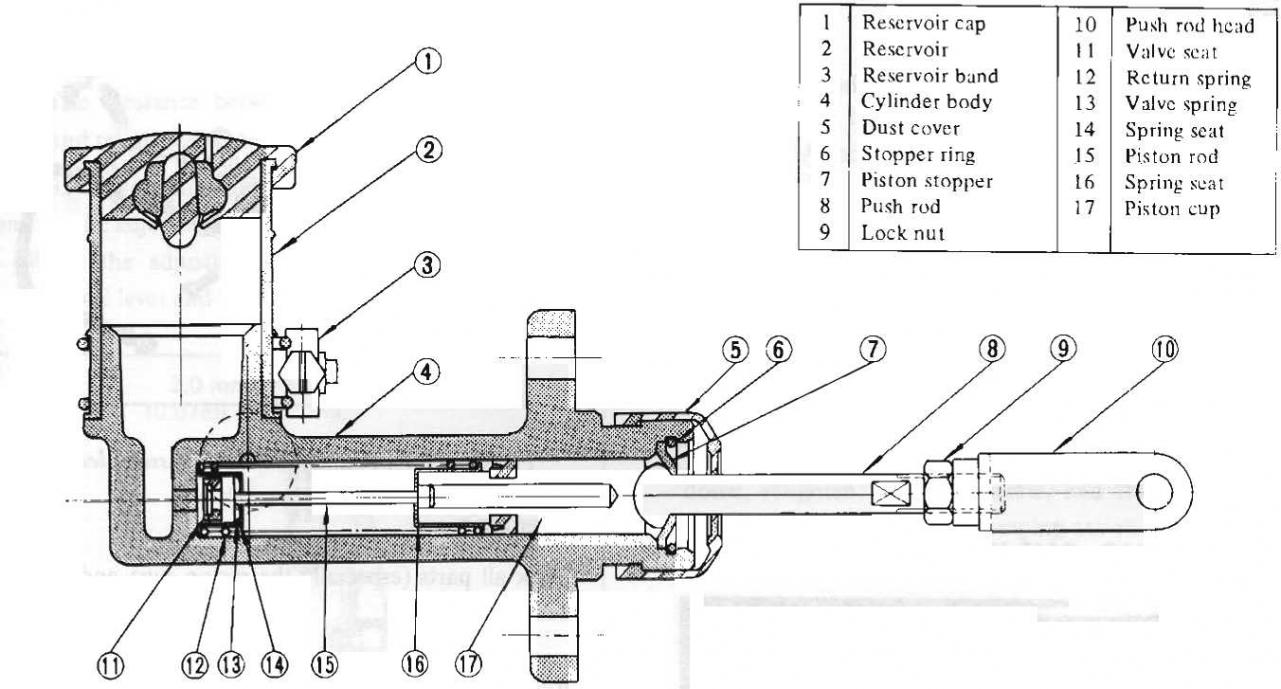
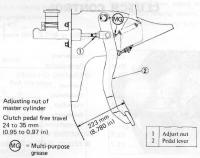
Step 1 - Chill cold beverage of preference. Step 2 - After Step 1 is complete (beverages must be cold), park the Z so that you can open the driver side door as much as possible. Step 3 - Contort yourself as much as possible to get your head and shoulders close to the clutch pedal. Step 4 - (I prefer using a pick with a hook end for this.) Remove the cotter key from the clevis pin that holds the clutch pedal to the push rod head on the clutch MC. Step 5 - Remove the clevis pin. (Note: Make sure you leave these parts some place where you can find them later.) Step 6 - Loosen or remove (I can't remember if you can get away with just loosening the bolts.) the bolts that hold the clutch MC to the firewall. Step 7 - Move the lock nut on the clutch MC push rod toward the reservoir. You shouldn't have to move it too far. Step 8 - Move the push rod head to butt up against the lock nut. Step 9 - Align the push rod head and the clutch pedal so you can put in the clevis pin. Step 10 - Get some of that cold beverage because you've probably worked up a sweat. Step 11 - Tighten the clutch MC to the firewall. Step 12 - Test travel of clutch pedal. DO NOT TAKE THE CAR FOR A DRIVE, YET. Step 13 - Readjust the pedal if necessary. Step 14 - After getting pedal to your liking, put the cotter key back in the clevis pin. Step 15 - Finish consuming cold beverages.

-
While gasket kits are available, I have heard needles for the L26 flattops are NLA. A user over at Zcar.com asked me to measure the needles in my spare set of carbs for purposes of fabricating some, but I don't have time for a while to tear my spares apart. Oops, I didn't notice you weren't in America. Hmm, maybe the Aussies or Kiwis could provide you a source for the needles, or did you get your hands on an American 260Z?
-
Be sure to use some dielectric grease in there to reduce corrosion.
-
Well, some of this wasn't today... I had replaced the plugs and tweaked the carbs. I had also replaced the speedometer cable and door seals (with the Kia Sportage seals). My wonderful wife helped me bleed the clutch today. (Apparently when a friend was helping me replace the clutch master, he didn't get the line quite tight enough. Oh well, the paint was bad already, and at least he didn't overtorque or round off anything.) I took it for a shakedown run in anticipation for the convention. It ran like a scalded dog. Monday, I am going to replace the sender for the fuel tank since it reads only when it wants to.
-
I have to admit that I turned in my badge quite a while back...

-
Is there any chance that there is an internally regulated alternator in the car? If you don't have a diode in the circuit with an internally regulated alternator, you can get feedback through the ignition circuit that will keep the car running. Also, it could be to your benefit to post pictures of what you have so we can see what it stock and what is not. Finally, have you looked at the FSM in the BE section to try to match up connectors?
-
If you have access to compressed air, blow air through the line from the engine bay back to the fuel tank. Be sure to have the gas cap open when you do it. There is always the chance that there was something in the tank to get sucked in if you were running out. The only other thing I can think of (This is just a SWAG since I've never messed with this.) is that could the pickup have fallen off so that it is not able to pick up gas?
-
-
Since you ran too low, you could have clogged the pick up or the line going to the filter. Also, if you have the electric fuel pump in the tank, the screen could have been clogged with junk in the tank. If that is the case, you might want to consider getting your tank boiled & recoated.
-
How much is it above the full mark?
-
That is similar to what I envisioned, only with a remote door lock system instead of a pushbutton. That way, the thief has to have the remote. Finding a push button won't suffice.
-
Leonard, all you have to do is search for 12v timer relay or 12 volt timer relay on Google Shipping. It wouldn't be too much effort to design such a circuit. Send me a PM about what you want it to do.
-
I always love reading the success stories. Now I have to get my butt out to the garage and work on the car some today.
-
While the pedal is firm, are the brakes actuated? If you have obstructions in the lines, you could just be pushing against an "immovable object". If there isn't much air in the lines between the master and the obstruction, you aren't compressing much air.
-
Rust, grease, grime, dirt...yeah, that could get into all of your lines, or the two that come off the master. Another thing could be that you're not opening your bleed screws enough. Something is keeping the fluid from getting through.
-
So, the key details come out. From your description, it sounds like there is an obstruction in the line. The air you see with the vacuum pump is coming in between the hose and the bleed screw.
-
IMHO, the best wire to interrupt for a kill switch is the White/Red wire going to the ignition switch. If that one is interrupted, nothing happens when you turn the key.
-
Is the fluid level going down in the master when you do this? If the system is dry, or relatively dry, I like to start with a vacuum pump. Go to the left rear cylinder and with the bleed screw open, start drawing a vacuum. Have an assistant adding fluid to the master as you do this. This way, you have someone to watch the master while you're watching the cylinder. For final bleeding, I perfer the method of having the end of the tube submerged in clean fluid and having the assistant pump the brakes. This way if the assistant lets off the pedal too soon before you can close the bleed screw, you pull fluid back into the system instead of air.