.JPG.cfcada9cf1c1b502df3f5f2f2ca3ff36.JPG)

SteveJ
Free Member
-
Joined
-
Last visited
Everything posted by SteveJ
-

-
My coated header sends up a lot of heat right onto the fuel rail. I used an infrared thermometer, and it was getting pretty warm at the rail. I was thinking about fabricating another shield to mount under the rail before trying to fabricate a new fuel rail that goes closer to the carburetors.
-
I used this to go over the existing insulating wrap. https://www.amazon.com/gp/product/B01MZZHXMQ/ I cut it in half and used both pieces to cover.
-
This is the part number that Courtesy Nissan lists: http://www.courtesyparts.com/oe-nissan/b6370e4100
-
Probably June 30th or July 1st or 2nd. I'm taking time off from work. I know you need me to look at your tachometer and AC. What else?
-
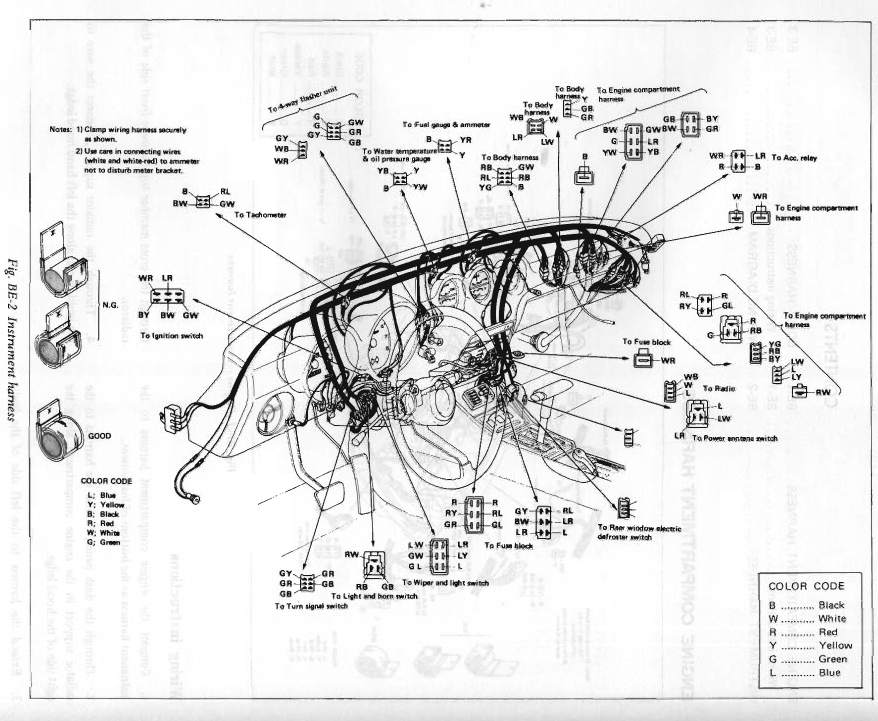
Also, check the 6 wire connector under the dash, specifically at the green/white and green/blue wires. Those are the ones that the parking light switch connects. The reason why I asked about the bulbs is that it is easy to replace the stock bulbs with 1156 and 1157 bulbs. While those bulbs will work in the sockets, they draw more current than the 67 and 1073 bulbs specified by Nissan. The extra current can cause heating at connectors with that one (and the fuse box) being the most vulnerable. The heating can cause damage without blowing the fuse.
-
How do you know you didn't blow the fuse? Did you check it with a meter? Do you have the correct bulbs in for the side markers, turn signals and tail lights? Inspect for corrosion at the side markers. That will come into play later.
-
The problem is that the setup in the photo does not move the fuel rail from the heat source. I fabricated a new heat shield for my car and reduced the temperatures at the carburetors by about 100 degrees. I also added more insulation on the fuel rail. It reduced the heat on the fuel rail, but it didn't eliminate it. I plan on moving it closer to the carburetors so it is better protected by the heat shield.
-
-
If all else fails, I will be the guinea pig.
-
Let me know, too. Do you know if they will fit on a 260Z slider?
-
I could swear that I ordered some of the caps that go over the nuts. I'll have to check my hardware supply if I can remember it.
-
Single castle nut from same seller: http://www.ebay.com/itm/70-74-DATSUN-240Z-260Z-FRONT-SPINDLE-CASTLE-NUT-WITH-WASHER-NICE-OEM-PARTS-/221864836376
-
http://www.ebay.com/itm/70-74-DATSUN-240Z-260Z-FRONT-SPINDLE-CASTLE-NUT-WITH-WASHER-NICE-OEM-PARTS/222114221446
-
Connect the vacuum pump to the hose where the mechanical pump would go. See if you can pull fuel through it. A hairline crack above the fuel level would may not show much/any fuel leaking out, but it might be enough to let air in. I have seen threads in the past where people found this was the problem with pumping fuel through the fuel lines.
-
Look for cracks in the soft fuel hoses. That can introduce air into the line when you're trying to pump fuel. If you have a hand-held vacuum pump, try seeing if you can pull fuel up to the hose for the mechanical pump with it. If you have difficulty doing that, so will the mechanical pump.
-
Yeah, but can you ship a valve cover to the Netherlands for $15.45?
-
-
-
-
-
Give me a heads up if you're coming back to track the car at Road Atlanta or Atlanta Motorsports Park. I'm only a half hour from either venue.
-
-
-
That's what I thought. It fits with your part photos and with what Mark posted. If you look at this site: http://www.5speeds.com/t5/index.html, it will show you other T5 applications. The GM version looks like you could use bullet connectors on it, and it runs about half as much as the others.